Read in the article
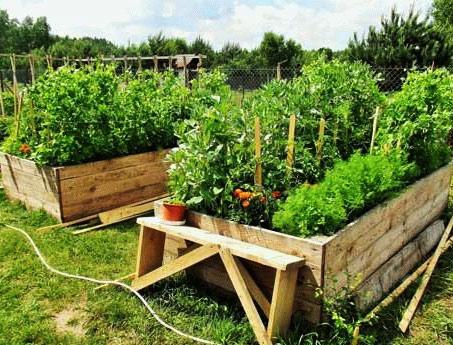
Why do they use high beds in the country with their own hands: photos of finished structures
High beds are not only a decoration of the territory, but also reduce soil moisture, therefore, in a site with a close flow ground water such structures are essential. Often they are erected in for the convenience of caring for plants.

It is easy to create high beds, it is enough to determine the size and height of the structure, as well as choose the material of manufacture:
- wooden models. The most common option, however, should not be forgotten about the need to treat wood from the formation of mold and fungi.

- plastic structures. Attracts cheapness and ease of care for the material. It is environmentally friendly and does not require special treatment.

- Galvanized metal. The strength and durability of the material attracts a lot of attention to it. When choosing galvanizing for the construction high beds do not forget that the material heats up quickly in the sun, so it is suitable for shady areas.

- or . Used in the garden by craftsmen who work great with stone. It is not easy to create such a ridge, since you need to know all the features of the masonry, and also do not apply to cheap solutions.

- Handy materials."Homemade" turns into almost any improvised means. Available in plastic or glass bottles, constructions with several floors from used tires and much more.

Choosing a fencing model and material for work is based on the characteristics of the climate, material capabilities and the requirements for the final appearance.
Pros and cons of high beds at their summer cottage
High beds for strawberries and other crops have a whole range of advantages:
- you can arrange a garden even on uncultivated areas;
- no need, just loosen the ground inside the structure;

- weeds grow less and are easier to weed;
- between the ridges they make neat ones, along which it is convenient to walk even in bad weather;
- the rate of ripening of the crop increases, as the soil warms up faster;
- at proper arrangement high beds with sides have a layer;
- easier to insulate structures for the winter.
It is not difficult to assemble such models. Decide in advance on the location, height and material of the fence for high beds. Here are some interesting photo examples of garden design using such structures:
1 of 4
Ways to make a high bed in the country with your own hands
When creating a raised one, you need to decide on several parameters:
- Dimensions. It is necessary to calculate the amount of material needed in advance, and this can only be done after creating drawings with exact dimensions.
- The form. Create square, rectangular, round or multilevel structures for planting useful crops.

- Manufacturing material. The most common and affordable are wood, galvanized and, of course, plastic. Stone ones will be more expensive, but they will also last until they get bored.
There are options for high and without fences, but they will not protect the ground from sprawl due to heavy rains or snowmelt. Therefore, it is better and more reliable to buy boards for high beds or another available material.

To choose a model of the ridge, decide on the type of plants for planting. For example, create a multi-tiered strawberry garden with your own hands. Here is a video example of its assembly:
Features of high beds: photo examples of designs from various materials
Creating fences for high beds on the site is easy. Having chosen the dimensions and location, carefully read the advantages and disadvantages of all options:
| Material with photo example | Advantages | disadvantages |
wooden structures  Purchasable Options Purchasable Options |
|
|
Metal variant  Greenhouse arrangement Greenhouse arrangement |
|
|
and panels  Application plastic panels in the garden Application plastic panels in the garden |
|
|
Concrete or brick fences  An interesting option for arranging a flower bed An interesting option for arranging a flower bed |
|
|
Homemade beds from improvised materials  Application of plastic bottles Application of plastic bottles |
|
|
Of these options, a high bed made of plastic panels is popular. It is easy to mount, and the variety model range allows you to find best option for any . Here are some photo examples of such structures:
1 of 4
It is easy to make a high bed of slate with your own hands. To do this, just follow a few simple steps:
- Purchase sheets or take pieces of material remaining from the roof.
- Dig a small trench along the perimeter of the future bed, half the height of the fence.
- Install the slate sheets vertically and dig them tightly with earth.

Additionally, you can use metal or plastic pegs for the strength of the structure. And also do not forget about safety precautions and work with the material with gloves.
Design of high beds from Igor Lyadov: photos of interesting options

Creating a "smart garden" using this technology implies the following dimensions: width from 60 to 100 cm, and the length is not of fundamental importance. The gardener advises to arrange the construction from north to south, leaving a passage between the ridges from 60 to 80 cm. Updating the box should be done every 5-7 years.
The creation technology itself comes down to several points:
| Illustration | The sequence of creating a structure |
 | It stands on a heavily overgrown area, but do not burn it, but fold it. Make sure that the surface is even for the future ridge. |
 | Put together a box of boards or other material, fastening it with self-tapping screws. Cover the bottom completely with open cardboard boxes. Then pour thin layer sand. |
 | The next layer will be from fallen leaves, mowed grass and other plant remains. Before backfilling all elements, it is better to use water-repellent paint. |
 | Add humus, manure and compost according to the gardener's recipe. And 10 cm of earth. |
Below is a video on creating a garden bed from Igor Lyadov:
Do-it-yourself high garden: how to make a wooden structure
Using wood to create unique design beds on suburban area, photos of several options are given below:
1 of 4
To make a bed of boards with your own hands according to a photo or a prepared drawing, you need to collect:
- the material itself to work the desired length;
- antiseptic to protect against rot and mold;
- on wood;
- and nails;
- pegs to strengthen the structure.

The site for planting is prepared in advance. It is better to make markings using pegs and ropes to get an even shape and the same height of the structure from all sides. Step-by-step instruction for assembling the box is shown in the video instructions below:
Features of do-it-yourself vertical beds: photos of interesting options
Popular among professional gardeners and just lovers of "digging in the ground" are not only warm high beds, but also vertical multi-level structures. This planting option has a number of advantages:

- it is more convenient to cultivate the soil around the plants, since there is no need to bend down low;
- less likely to spread fungal diseases: there is no contact with the rest of the soil;
- you can bring the structure into the house for a period of cold weather or other bad weather;
- you can decorate or decorate the wall of any structure;
- there is a lot of free space for planting other crops.

However, there are also disadvantages in choosing vertical bed models:
- a small amount of fertile soil leads to the need for top dressing;
- the soil dries out faster, so it is needed more often;
- not all crops are recommended to be planted in vertical structures.
They raise beds with strawberries or cucumbers from the ground, as these plants are considered unpretentious in care. And warmth and constant watering have a fruitful effect on the level of yield.
Here are some interesting and unusual vertical beds:
1 of 4
Where to buy a vertical bed for strawberries: several models with descriptions and photos
By design, vertical beds are different. On sale in online stores and specialized departments of shopping centers there are pyramids, suspended structures, multi-level and other unique ideas. Here are some photo examples:
1 of 4
The cost of the model varies depending on the material of manufacture, the amount of area for planting and the complexity of the design itself. Below are a few options that are available for purchase in stores:
| Title with photo | Short description | Cost, rub. |
 Openwork Openwork | The package includes 3 pots, 13 cm high, 37 cm in diameter and 3.5 liters in volume. | 1200 |
 Pockets for green walls Pockets for green walls | Dense waterproof material. Includes 36 pockets. | 1450 |
 Pyramid Pyramid | Construction height 150 cm, length - 127 cm, width 100 cm. Material - plastic. | 4700 |
Maria, Kaluga:“I bought the Azhur design at first for the balcony, but then I appreciated all its charm in the garden. I plant strawberries and herbs, they grow beautifully, without taking up much space.
Olga, Moscow:“I decided to decorate the wall of the house in the village with fresh flowers, but I was afraid to plant it. Found this great option. I put pots or bags with earth and a flower in pockets for green walls, it looks great.
Dmitry, Saratov:“I like to live in the country in the summer, so I spend a lot of time in the garden. I decided to make myself a bed for strawberries, and did not come up with anything better than making it vertical. I found the Pyramid model, assembled it quickly, and now I get a high yield every year.”
You can not only buy finished structure for vertical planting of plants and flowers, but also to do it yourself. Several productive and simple ways will be given below.
Optimal dimensions of a pyramid-bed for strawberries with your own hands: video assembly instructions
Pyramid garden beds are becoming more and more popular among gardeners. They reduce the occupied area and give high yield certain plant varieties. For example, such models are often used for planting juicy strawberries.

You can make pyramidal beds of any size and from improvised materials. Dimensions are determined only by your preferences. For example, if the area allows, you can build a multi-level flower bed with a large base. At small space for planting or growing strawberries on can be mounted high model with little base.
Here are a few interesting options do-it-yourself country pyramids:
1 of 4
Step-by-step video instruction for creating a wooden pyramid:
How to make vertical beds for strawberries from plastic pipes
To create a vertical bed from the site is within the power of any summer resident who knows how to handle the tool. There are quite a few advantages to this landing method:

- ease of use and ease of harvesting;
- no need to often dig and fertilize the soil;
- besides high yield, such designs look beautiful on any site;
- rodents do not harm the root system, and the soil quickly warms up in the sun, increasing productivity.
The disadvantages include only the need for frequent watering.

To make a garden bed of PVC pipes with your own hands, prepare:
- thick PVC pipes with a diameter of 15 cm;
- thin pipes and plugs;
- chisel, drill and;
- a large canvas of burlap;
- reinforced tape and a skein of synthetic twine;
- soil for plants.
To assemble a vertical bed, follow the instructions below:
| Illustration | Sequencing |
 | Select the appropriate bed height and cut the required piece of pipe. From a thin one, cut a piece 10 cm less than the height of the structure. It is necessary for uniform watering. |
 | On top of a small PVC pipe, 2/3 of the entire height, make several holes at the same distance. Through them, water will flow to the top layer of the soil. Install the cap at the bottom. |
 | Take a hole drill and make holes in big pipe for plants. The diameter of the nest should be 15 cm, and the distance between the “holes” should be 20-25 cm. Place a plug at the bottom of the pipe and fix the structure vertically. |
Raised beds are ideal for growing vegetables, fruits, berries, flowers and herbs. They have incomparably more advantages when compared with ordinary beds:
- you no longer depend on the shortcomings of the soil on the site, since perfectly balanced purchased soil can be used for bulk ridges;
- good drainage is guaranteed;
- the thickness of the fertile pound can be easily cut, depending on the root system of the planted plants;
- with purchased soil, you will save plants from weeds, fungal diseases and decay;
- a high garden is much more convenient to dig, weed, fertilize, not to mention more convenient harvesting from such beds;
- warm raised beds make it easier to grow plants in regions with cold and short summer;
- you can break high beds at any place convenient for you;
- decorative vegetable garden in beautifully decorated high beds can be planted directly next to the house;
- in hilly areas, high beds are ideally combined with retaining walls;
- in a small area you can grow more vegetables than with a conventional garden;
- the bulk bed can be given any shape, coordinating it with the style of the site and the layout of the summer cottage or courtyard area;
- the soil warms up better, and therefore seedlings can be planted earlier, accelerating the cultivation of vegetables in high beds;
- the soil remains more friable, not compacted when walking, and therefore the plants feel better in a loose pound;
- cucumbers and tomatoes can be planted along the edge of beds with a height of 50 cm, without worrying about their garter, so they can grow hanging down;
- high beds for strawberries and other low-growing berries will make harvesting much easier, since you don’t have to bend down low;
- creating raised beds will require only a few hours;
- a variety of materials for the device of bulk ridges allows you to create both budget designs, and prestigious options for elite cottages;
- high flower beds can additionally attract the original, for example, mosaic facing beds.
You can arrange bulk beds in any area, but we recommend that you get acquainted with some of the features of this method of gardening and horticulture in order to create optimal designs for specific purposes.
Important features of the device raised ridges
Optimum raised bed height
If in your area good soil, and you are building a bulk bed on the ground, then you can limit yourself to a height of 15 cm. If the bed is isolated from the ground, then raise it at least 30 cm. This height will suit most horticultural crops. For growing potatoes, it is desirable to make the beds even higher.
For warm compost beds, the height should be increased to at least 50 cm. It is convenient to create such high beds in the country when there is no way to cover in the middle of the week. garden beds during sudden frosts. A layer of compost under the soil will protect the plant roots from freezing, as a favorable temperature will be maintained inside the bed.
height restrictions bulk beds no, and some try to raise the beds to waist height so as not to bend over at all during garden work. This is convenient if the bed is narrow. For wide beds, you should still choose a height such that it is convenient to reach the middle of the bed.
Optimal length and width of high ridges
The length makes absolutely no difference and you may only be limited by the length of your section. However, care should be taken to ensure that the fencing of long ridges is stable, for example, long wooden planks can be additionally reinforced with vertical planks or posts.
Width of high beds - more important parameter. It is optimal to plant at least two rows of plants, otherwise the material costs for a high garden will be large, and no less space will be needed. It is more convenient to make beds 90-120 cm wide. Remember that it should be convenient for you to reach the middle of the ridge to work.
Only the beds attached to retaining walls. Do not plant more than two rows of plants on them, as it will be convenient to work only from the lower side of the slope.
Plants for raised beds
Although theoretically bulk soil any plant can be grown, but we recommend that you refrain from planting crops such as corn or sunflowers in high beds, as harvesting from high stems will be inconvenient.
The location of bulk beds on the site
Choose a place so that direct sunlight falls on the bed for at least 6 hours daily, especially if you plan to place a tall garden near a fence or buildings.
If the bulk bed is located on the ground, then additionally use the following methods:
- cover the soil with a metal mesh so that the roots of the plants do not undermine the rodents;
- to slow down the germination of weeds, cover the bottom of the bed with at least newspapers. If there is no need to use the original soil, then use geotextiles to completely prevent the germination of weeds.
Do not build high beds on wooden deck yard or terrace, as contact with water and soil will cause the wood to swell and rot.
Types of materials for bulk beds
High garden beds can be built from any materials suitable for building strong sides of the desired height, resistant to bad weather and soil pressure from the inside. However, it should be remembered that beds made of slate, wood treated with antiseptics, old tires, cinder concrete and other materials that can emit harmful substances, better to use for decorative flower beds, and grow food in safe beds, or at least use a thick film for garden work to prevent soil contact with non-environmentally friendly material.
Most often, for the construction of high beds for the garden, they use the following materials:


How to make high beds from boards with your own hands
If for raised wooden beds on a paved area it is enough to simply build a wooden border and lay drainage and soil in it, then it is better to impose a high garden on the lawn with a narrow blind area. Why is a blind area needed? First, the shade on the lawn from the plants in the garden will prevent the grass from forming a beautiful mat around the bed. Secondly, it will be inconvenient to mow overgrown grass.
Creating a narrow paved strip will keep the lawn looking neat. It is this version of the arrangement of high beds that we will describe today, citing recommendations and photographs of Australian experts. All work can be done in one day.

Since wood is a short-lived material, many recommend pretreating it with antiseptics. Others reasonably believe that such processing is incompatible with the concept of organic vegetables, and it is better to use wood that is less prone to rotting, for example, Oak planks. Ultradizz recommends using treated wood only when creating flower beds or, in extreme cases, use a dense plastic film from inside the bed to prevent soil contact with chemically treated wood.
Necessary materials and tools
Pre-sawn boards to the desired length;
Roulette;
Drill, screwdriver or screwdriver;
Self-tapping screws for wood;
Construction sand-concrete mix;
Master OK;
Hard brush;
Crushed stone for drainage;
Mulch from tree bark.
How to make high wooden beds on the lawn
Stage 1. The device of the first row
First, the sod is removed in strips, the width of which is sufficient for installation wooden board on the ground. Sod is removed along the perimeter of the beds.

Then you should install the boards on the ground, carefully checking that they are on the same level. To level the structure, you can put planks under the lower boards.

Then you should check that the diagonal dimensions match. If the bed is skewed, level it and recheck the diagonals and levels.

Tap the boards together with a rubber mallet so that there are no gaps, make sure once again that the horizontal and vertical levels are set correctly. You can remove some of the soil under the boards if necessary.

For easier fastening of boards with self-tapping screws, you can initially drill a hole with a diameter slightly smaller than the fastener, and then screw in the self-tapping screws that firmly connect adjacent boards.

Stage 2. Increasing the beds to the desired height
Subsequent one or more rows of boards are fixed so that they overlap the joints of the bottom row to ensure high strength designs. The photo clearly shows how it should be done correctly. After checking the levels, fix the boards with each other.

Stage 3. Filling the beds
It is possible to fill the bed with drainage phase, but it is even better to first put geotextiles on the bottom to prevent the germination of weeds, and also to protect the bulk bed from the risk of infection with fungal and other diseases from the underlying soil. For drainage, crushed stone and pebbles, fragments of stones and ceramics can be used.

Then fill the high bed with weed-free soil or purchased ready-made soil so that its height is about 3 cm below the top edge. Seedlings are planted in a garden bed, then the gaps are filled with hardwood mulch, especially if a high garden bed is made in the country. Mulching will help keep the soil moist longer and protect the seedling roots from frost.
Stage 4. The device of the blind area around the beds
The blind area is laid on the sides where you mow lawn grass. Sod and soil around the ridge are removed to a depth of brick or tile thickness plus 2.5 cm. The width should correspond to the length of the brick. Use bricks to mark out the area with pegs and string.

Cement-sand mortar lay on the bottom of the trench with a layer of 2.5 cm, and lay bricks on top with a small gap.

Using a level and a rubber mallet, set the bricks flush with the lawn's soil.

Pour dry cement-sand mixture between the bricks, compact it with a trowel, and sweep away the excess with a stiff brush.

As a result, you will get a neat high bed for garden and ornamental plants.

Arrange high beds with your own hands on a paved or concrete pad even easier, because you do not need to make a blind area. If you want to create warm beds, we recommend raising the sides to a height of 50 cm to place the compost between the drainage and the soil.
If it is really important for you to have a beautiful and high-yielding garden, then we recommend creating high beds. The many benefits of such gardening cannot be overestimated.
To get a quality crop, it is necessary to make a lot of efforts to equip the site, grow various crops. High beds are considered an alternative to painstaking garden care - not very large elevations intended for the cultivation of vegetables and herbs.
In order to build high beds with your own hands, do not need specific equipment and any special skills. Structures along the entire perimeter are protected by hand-made walls, because of this general level the soil becomes higher than on an ordinary garden plot. Such a device has its own characteristics, namely: the hill is made in several layers, which contributes to high-quality soil fertilization, protection of the root system, good growth cultivated crops.
The entire construction of the high bed consists of 6 layers:
- Lower protective layer from a metal mesh.
- Wood chocks.
- Mound of branches and bark.
- Part of the active layer from paper scraps.
- Nutrient layer of fallen leaves and grass mowing.
- Directly fertile part of the soil.
With metal mesh protect root system thus preventing the entry of pests. top the structures are filled with fertile soil, where various crops are planted, which later take their roots in another layer of foliage with grass, where vegetables and greens are fed. Bark, chocks, paper scraps are used as semi-protective components necessary for moisture filtration and metabolism.
All of the above layers of high beds are protected by a special frame made of brick, wood or plastic.
Gallery: high beds (25 photos)


Advantages and disadvantages
When compared with ordinary garden structures intended for growing vegetables and herbs, bulk beds have a number of significant advantages:

Working in the garden and caring for plants takes a lot of time and effort, and the results are not always equal to labor costs. High beds will help to increase productivity in the summer cottage and facilitate physical labor. Grow bountiful harvest, without tearing your back, it’s easy - it’s easy enough to make high beds yourself.
An example of a classic high garden in the country
This does not require complex tools and special skills.
Pros of high beds
High or smart beds practically perfect way for growing any plants: vegetables, berries, fruits, herbs or flowers. Compared to traditional beds, high fences have many advantages:
Arrangement of high beds with the help of unhewn boards

Materials for the construction of smart beds
Do-it-yourself high beds can be made from various building materials Here are the most popular ones:

Raised bed options
When installing high beds, some recommendations should be followed and the following features should be taken into account.
Optimal Height

Length and width of raised beds
The length of the beds is unimportant, you can make any length - as long as the territory of the site allows. The only condition is that long beds need to be strengthened with additional jumpers or retaining posts.
You need to pay more attention to the width of the beds:

Where to install a high bed
If the nature of the soil does not matter much for a smart garden, then sunlight is important for any crops. For landing, you should choose a site on which direct sunlight falls for at least 5 hours.
Before filling the beds, do the following:
- A construction mesh is nailed to the bottom of the box - it will protect the plants from rodents and moles;
- Then dense cardboard or geotextiles are laid - weeds will not break through such an obstacle, and water will not stagnate.
What to plant
You can plant almost any vegetables, berries, herbs or flowers on high beds. On the decorated beds, you can annually make a crop rotation, changing crops in places. Only such plants as sunflower or corn are not very convenient to grow in such boxes because of the high-growing stems.
Do-it-yourself high beds from boards
Wooden boards are the easiest and most environmentally friendly safe way make a garden bed. In addition, this material is always available.
However, many gardeners rightly believe that such processing reduces environmental safety material and this is reflected in the quality of fruits and vegetables grown. The most environmentally friendly way to extend the life of wood is. It is even better to use boards with good resistance to decay - larch or oak.

Making a high bed of bars
Also after antiseptic treatment with inside the bed can be sheathed with a film to limit the contact of the soil with wood treated with chemistry.
Inventory and materials
To assemble a wooden garden bed, you will need the following tools and materials:
- boards 5x20 cm;
- bars 5x5 cm;
- hacksaw;
- wood screws;
- screwdriver or screwdriver;
- shovel;
- building level and tape measure;
- building network.
High bed installation

Filling a high bed
The bed is ready, now you need to fill it. The efficiency of smart beds is achieved by their correct layer-by-layer filling:
- First, you can lay cardboard to protect the beds from the germination of weeds.
- A small layer of sand is poured onto the cardboard.
- Organic layer - long rotting organic material(branches, bark, coarse thick tops, chips).
- Plant residues - plant tops, vegetable and fruit peelings, leaves, non-perennial weeds.
- The bed is spilled with water, and preferably with manure infusion and fertile land is poured 15-20 cm.
Raised slate beds
Slate is simple and a budget option for raised beds. And if this roofing material lies dead weight after replacing the roof, then this is also a free way to make smart beds on personal plot.
Advantages and disadvantages of slate for arranging beds
The advantages of building slate are as follows:
- low cost;
- durability;
- rigidity and strength;
- chemical neutrality;
- neat appearance.
The minus of the slate border is strong heating in hot weather. Plants will need more frequent watering.
You will be surprised at your past doubts - whether to make high beds in the country ... Your back will be grateful to you - you just bend over a little to care for the garden. Your knees will thank you - you can just sit on the edge of the garden and work on your garden. Your plants will thank you - no more competition from weeds or nearby fruit trees. Your land will be grateful to you - you do not trample it down and ennoble it with humus. Your high-bed garden can look beautiful, comfortable, and reward you with a generous harvest.
How to make high beds with your own hands.
1. First we must mark out the place for the beds. The usual width of the beds is 1.2 m, the length can be any. Laying out rectangles right size sand on the ground.

2. We collect high beds. The high bed has no bottom and consists of posts with grooves on all four sides and boards with corresponding grooves. You can buy ready-made garden fences or make your own. For fences, it is better to take hardwood, because. conifers emit resin, which can have an unnecessary effect on soil composition. We check the horizontal installation of the garden box with a level.

3. We lengthen the high beds. Because Our beds are modular, we can extend our beds from any side with another module.

4. How to protect a high bed from rodents. Even if you have not encountered moles and other underground garden pests in your summer cottage, it is better to provide protection for your garden right now than to unsuccessfully fight these rodents later. At the bottom of each box we put metal mesh so that it goes a little on the edges of the fences.

5. How to protect the soil on a high bed from being washed out into the main soil. To do this, we use ordinary packing cardboard in two layers so that it covers the entire bottom of our garden box. If there are not enough whole pieces, we use scraps of cardboard - we fasten them with a stapler with the main piece so that the cardboard at the bottom of the box does not move when the soil is poured.

6. The soil for high beds should be light, crumbly and "fluffy". You can easily check its quality by poking your finger into the ground - if it sinks to the third joint, this is the norm. To improve the composition of the soil, you can add peat or compost. We pour the soil into the garden box, check its horizontal level, water it to compact it a little. During the season, we will need to add a little soil.

7. Irrigation system for high beds. It is planned to fix along the contour of the high beds garden hose with nozzles for watering: we need 90 and 180 degree splitters.

8. Trellis for high beds. Because the earth in the high bed is loose, then it will not be possible to install a trellis in it, so we fix the trellis from pvc pipes in the ground next to garden box. We stretch nets on the trellises for climbing plants- cucumbers and beans. For tomatoes, we install light supports made of steel rod.

What you need to know when arranging a high bed.
1. Try to protect high beds from strong wind and heat, creating partial shade for them with trellises of flowers or tall shrubs.
2. The long side of the bed should face south - so the plants will be evenly lit, otherwise, more tall plants others will obscure.

3. Planting density on a high bed is twice as high as on a regular bed. So plants fight weeds and create a humid microclimate with foliage.

4. High beds with sides will make it possible for older people or people with back problems to take care of the garden.

5. High bed - warm bed. Such a bed warms up faster in the spring, and if you make a mini greenhouse on its basis, it will surprise you with an early and generous harvest.

6. Divide a long, tall bed into square segments with cross braces to reduce soil pressure on the side walls of the bed.

Fences for high beds.
1. Most often, wooden fences are used for understandable beds. There are a few points here - do not use boo wood, especially sleepers, which may contain harmful chemical substances. Do not treat fresh wood with wood preservatives unless you are sure they are completely environmentally friendly.

2. Wattle as a fence for a high bed. For all its environmental friendliness, such a fence has three significant drawbacks - the soil in the bed dries quickly from the wind, proper thermal insulation of the bed is not provided, the soil can spill out through the cracks. Everything is fixable - use a layer of double cardboard around the inner perimeter of the fence. Eco-friendly air layer between the sheets serves as thermal insulation, the earth no longer spills out.

3. As a fence for a high bed, you can use a metal profile, including from old roof or a fence.

5. You can make fences for a high bed with your own hands from brick or concrete. This is a very good option, but keep in mind that concrete will affect the acidity of the soil in the garden for 2-3 years.

6. The best fences for high beds - plastic. They do not emit anything of their own into the soil, excellent thermal insulation, long service life and the ability to set any shape of the beds, unlike standard rectangles of beds with wooden fences.

7. Fences for high beds from improvised materials. You can make the sides of the beds from bottles laid like bricks on a concrete mortar.

Why do we need high beds.
High beds allow you to increase the area under the garden. you can use inconvenient slopes or poor or weedy soil. Raised beds allow in an environmentally friendly way control weeds and soil erosion.

Such beds warm up faster and give more early harvest. They allow more economical use of moisture for irrigation.

Various types of high beds.
In addition to the traditional raised bed with high sides, there are several other types of raised beds.
1. Circular high bed. It consists of a round frame, in which there is a path to the center of the garden. This form of high beds is also called the "keyhole".

Branches, roots, paper, compost are placed at the bottom of the beds. In the middle of the bed there is a tunnel for fresh organic waste and water.

This design of the beds provides the necessary moisture and constant enrichment of the soil.

2. High bed without fences. When arranging such a bed, the trunks of trees (not conifers), branches, roots, snags are laid in the ground at a shallow depth; the second layer is this sod removed from the place where you make the bed, laid with grass down; the third layer is 20-30 cm of the main soil mixed with humus.

For irrigation of bulk high beds, an irrigation irrigation system is used, when water comes from a ditch between the beds - a good option for gardens flooded in the spring, or you can use the drip irrigation option when water enters the garden from mini terraces.

The paths between the beds are covered with straw or large sawdust. Never step on the ground in a high bed - this will compact it, and it will be more difficult for plants to receive moisture and nutrients.

High beds of this type can be used not only for a vegetable garden, but also for growing shrubs and fruit trees, if you have problematic soil for them in your summer cottage. The service life of such a bed (until the first tree layer with trunks completely rots) is 20-25 years - this period is enough for any fruit tree.

Spare no space for paths between high beds - so you can always drive there with a garden wheelbarrow both for harvesting and with a new portion of humus. Have pity on your back - use a wheelbarrow.
If your raised beds are located next to fruit trees, you may need to install a root barrier before laying out the beds - dig a trench, cut the root on the way to the beds, install a metal sheet into the trench, which will prevent the root from growing in that direction and cover the trench with soil.

Learn more about raised beds through your own experience. There are many interesting finds, experiments and new discoveries in this topic for every gardener.
And we have prepared for you a video with 100 inspiring examples of the use of high beds in the country.