- familiar stranger
- Preparation of the base ceiling
- Lathing device
- Installation of plastic panels
Until recently, there were not so many ways to finish the ceiling. Whitewash, paint with water-based emulsion. The daredevils still dared to glue the ceiling with wallpaper - that's all. And today there are suspended, stretch, mirror, stained glass ceilings, etc.
Ceiling sheathing with plastic panels is the easiest, most economical and fastest way to finish.
To date, one of the most popular, especially among those who like to do everything around the house with their own hands, has become a plastic ceiling. Such popularity is due to the fact that making a plastic ceiling is quite simple, especially for those who have had to deal with suspended ceilings, and it will cost only a little more than a plasterboard ceiling.
familiar stranger
Strictly speaking, a plastic ceiling is a suspended ceiling.
It is attached to the main ceiling with the help of special suspensions on a frame made of metal profiles or wooden slats. Only the material for the panels instead of drywall is polyvinyl chloride, one of the safest and healthiest types of plastic. Suffice it to say that, in addition to wall and ceiling panels, food containers are made from PVC.
Such a ceiling is easy to do with your own hands, giving it an attractive appearance. Panel seams will not be visible on it, besides, it will last you much longer than the plasterboard counterpart, and it requires the most minimal care - from time to time to remove dust from the plastic. This is easy to do with a damp cloth, as plastic is absolutely not afraid of water.
When choosing panels, it is important not to confuse and not buy wall panels instead of ceiling panels. Although they are made of the same material, they differ significantly. Wall panels are much heavier than ceiling panels, which makes a huge difference.
Related article: Choosing a sofa in the living room: some recommendations
If you mount such panels on the ceiling, you will get a significant load on its frame. And this is fraught: one fine day, the frame may simply not withstand, and the ceiling will collapse. And if you install ceiling panels on a wall, they deform over time, since their mechanical strength is much lower.
Back to index
Preparation of the base ceiling

Types of plastic panels.
Making such a plastic ceiling with your own hands is no more difficult than a regular plasterboard suspended ceiling. Installation of any false ceiling, incl. and plastic, you should start with the preparation of the base ceiling. Its surface must be thoroughly cleaned of exfoliated lime or plaster and treated with an antifungal solution.
Then you need to take care of the electrical wiring passing through the ceiling. Indeed, in most cases, lamps and chandeliers will be mounted on the ceiling. Before mounting the ceiling, you need to fix the wires and at least bring them to the switch. Wires must be securely insulated. Jokes with electricity are dangerous, so if you do not have enough experience in this matter, then it is better to seek help from a specialist.
To mount the plastic ceiling yourself, you will need the following tools:

Scheme of fixing PVC panels.
- puncher or electric drill with a drill bit;
- hacksaw for metal;
- construction knife;
- roulette;
- square;
- rebound paint cord;
- water level;
- screwdriver
From the materials do not forget to purchase:
- antifungal solution;
- suspensions;
- dowels (be sure to take the same diameter with a drill with which you will drill holes);
- plastic panels;
- ceiling profiles;
- self-tapping screws.
Back to index
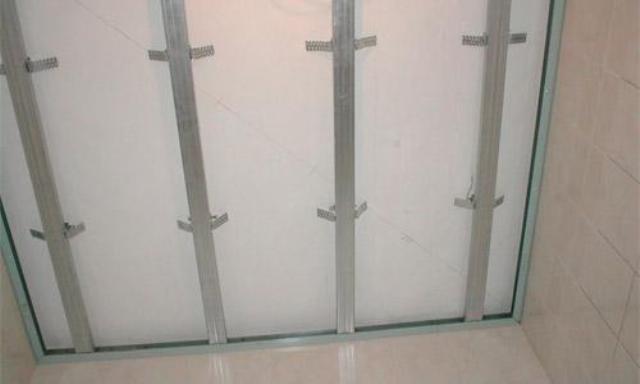
Lathing device

Installation of plastic ceilings.
The frame for a plastic ceiling can be made from both wooden slats and a metal guide profile. Still, the second option is preferable, since the metal is less susceptible to changing its dimensions under the influence of temperature and humidity.
You need to decide in advance how far you will lower the panels. At the same time, you need to take into account the depth of your lamps - mainly from 5 to 10 cm. Having decided on the height, you need to install and fix the profile guides strictly horizontally. Here it is better not to rush and double-check everything several times. Otherwise, rushing and setting the wrong profile, you will not leave yourself any other choice but to make the ceiling oblique, which will immediately catch your eye.
Related article: How to defrost plastic plumbing
From the base ceiling at the corners of one of the walls, the required distance is measured down. It is important that the marked marks are at the same level, so be sure to check their location using a water level. Then these two marks are connected with a cord into one horizontal line.
Taking the measured horizontal as a guideline, you need to draw the same lines around the entire perimeter of the room, checking them with a level. This will be the horizontal plane to make the ceiling even.
The next step in the installation will be the installation of metal guide profiles along the marked border. The profiles are attached directly to the wall by drilling holes in it with a puncher or drill, using plastic dowels and galvanized self-tapping screws for fastening.
In order not to break the horizontal line when fastening the profiles, the end of the unattached profile is laid at the end of the attached one, then its other end is laid strictly according to the markup, and the profile is attached to the wall along its entire length.
Having finished installing the profile on the walls, you need to install the profile on the ceiling itself. To do this, on the ceiling along the direction of installation of the ceiling profile, you need to fix straight suspensions in increments of 50-60 cm. The suspensions must be fixed strictly along a straight line, breaking it off with a paint cord. Ceiling profiles are attached to these suspensions, and guide profiles fixed on the walls are laid at the ends. With this false ceiling design, there is no danger that one day it will fall on your head.
Among all the options for inexpensive finishes, there is probably no more versatile material than. They are suitable for decorating ceiling surfaces, walls, and at the same time, they have a fairly impressive list of positive qualities. But not everyone knows how to sheathe walls or ceilings with plastic. This article will discuss in detail the installation of plastic on walls and ceilings, as well as a video demonstrating the installation process.
What is required for work
It is easy to assemble a plastic wall or ceiling cladding with your own hands, and at the end of the material there is a video demonstrating this. To facilitate the preparation and the work itself, there is also a detailed instruction, after reading which, there should not be any incomprehensible moments.
Before attaching plastic to the ceiling or walls, it is necessary to calculate the required amount of material. This is easy to do - you need to divide the surface area by the area of \u200b\u200bone plank. They are different and specific data on the selected varieties are on the packaging or on the product price tag.

In addition to the coating material, it is necessary to prepare the material for assembling the frame. It can be made from wood or metal profiles. The number of components depends on the type of structure, its complexity and is calculated in each case individually. After the components necessary for installation are purchased and ready for installation, you need to check the availability of the necessary tools. You don't need too many tools:
- Hacksaw for metal
- screwdriver
- Building or laser level
- Roulette
- A hammer
- In some cases, a construction stapler and a plumb line
After the materials and tools are ready, you can proceed to the next stage of work - surface preparation. In videos that show how to knock out a ceiling with plastic, this stage of work is often omitted, but it is necessary.
Training
This is a simple operation and consists in the fact that the entire area that will be hidden under the plane of the new coating must be treated or impregnated with a bactericidal effect. Such processing is carried out so that mold does not appear under the future coating or fungus does not develop. Before that, all traces of the old finish and peeling fragments of plaster or putty are removed using improvised tools, such as a spatula.
frame
To fix the skin is necessary. Regardless of where the plastic will be mounted - on the ceiling or on the wall, such a frame is required. Without it, there will be nowhere to attach fragments of the coating, and in the video below, which demonstrates how to hem the ceiling with plastic, attention is also paid to the frame.
The distance between the elements of the crate is from 30 to 40 centimeters. At the same time, if installation is carried out on the ceiling, the distance should not exceed 30 centimeters - otherwise, the coating may sag under its own weight.
Mounting panels on the wall
After assembling the base or batten, you can begin to fix the details of the outer covering of plastic panels. This process is slightly different from how plastic is mounted on the ceiling.
It all starts with the corner or the final part. As a rule, this is a plastic corner or a special element that covers the end of the part. The first plank of the cover is inserted into it. If the length of the plank reaches the overlap and a solid surface is assembled, a decorative plinth of a special shape is installed at the top, into which the end of the plank is inserted.

When the first part is installed, it must be fixed. You can do this with a self-tapping screw, clamps or staples from a stapler. Next, the next cover element is inserted, with a protrusion into the groove of the previous panel. You need to insert tightly, until it stops. This is how the entire coverage area is assembled with the obligatory fixation of each detail.

It is inserted with force, one side into the final corner or end piece, and the other into the previous panel. If necessary, the fragment is adjusted in size to the desired dimensions by sawing off or cutting off the excess part. Below is a video that shows how to mount the plastic on the wall and ceiling - after assembling the crate, these processes differ slightly.
Floor mount
Asking the question - how to make a plastic ceiling, you need to take into account some points of this work. Firstly, it is better to do this work with an assistant - it will be much easier, since everything will have to be done on weight, but otherwise, you can assemble a plastic ceiling with your own hands and there is nothing complicated about it.
Secondly, you need to take into account the distance that will be required to install the fixtures. Their ceiling part should not touch the ceiling. This is an important point, since everything should be taken into account when marking, even before you hem the ceiling with plastic and assemble the crate.

Usually, this distance is about 10 or 15 centimeters. It can be a little more or less, in accordance with the dimensions of the room and the design of the lighting devices, but, in any case, no less than the lighting required for installation.
Next comes the assembly of the frame. It is assembled in much the same way as on the wall, differing only in the shape of the parts used - the end part of the panels is inserted into a plinth fixed to the wall, in which there is a special groove for this. It is installed first, strictly horizontally, according to the pre-applied markings. Here you will need a building level, and even better - a laser one.
After the crate is installed, it is possible to sheathe the ceiling with plastic and in order to make it easier to understand the intricacies of this process, below are several videos that detail all the stages of work.
Plastic has many supporters and no less opponents. But if you need an inexpensive, quickly mounted and attractive finish, then one of the most popular options is plastic panels. Every year their range is increasing. There are plain, striped, checkered, with flowers and floral elements, imitating brickwork, natural stones, etc. Of all this variety, the ceiling of plastic panels is usually made plain. And most often - white or very close to it - with a slight shade, such as "baked milk", ecru, ivory, etc.
According to the type of surface, they can be glossy or matte. There are collections with a rough surface - for those who prefer original solutions. Also available with glitter inserts. But since the ceiling of plastic panels is almost always made in technical rooms - kitchen, bathroom, toilet, on the balcony - small, as a rule, sizes make you choose a glossy surface: it visually raises the ceiling, and due to reflection, the room seems more spacious. Also, the reflections on the ceiling increase the illumination - with a matte ceiling, you need to take more lamps or increase their power.
Harmful or not
You can often hear that there is no place for plastic in the house. Maybe, but plastic is almost everywhere. They even pack goods into it, we have many products in the kitchen and in the bathroom also made of plastic. PVC panels are made from the same group of plastics as syringes and food containers. What is nice is that this material does not have pores in which bacteria and other microorganisms can settle. If there is a nutrient medium on the surface and conditions are favorable, they will multiply, but they can be removed with one movement of a rag dipped in soapy water or a disinfectant solution. Plastic panels are really hygienic. Evidence can be considered the fact that the sanitary station allows them to decorate medical institutions.

There are plastic mirror panels or with mirror parts - stripes
The second point that stops many is the flammability of plastics. They really are on fire. They begin to maintain a flame at a temperature of + 360 ° C. For comparison: and fiberboard, start to burn at +250°C. If we compare these materials in terms of the amount of smoke emitted, then plastics emit 40-50% less smoke.
Another argument: the ceiling of plastic panels does not breathe. If you live in a private house, and you have a ventilated attic above, air exchange is important. If you live in a high-rise building, you still need to equip a ventilation system, which is a must in both the kitchen and the bathroom with a toilet. And to prevent condensation from accumulating behind the ceiling, build a pair of ventilation grilles into the ceiling in opposite corners. Although, the ceiling is still leaky and with sufficient air exchange, no problems arise.
Types of plastic ceiling panels
All PVC panels are divided into two categories: wall and ceiling. They differ in rigidity and weight: mechanical strength is unimportant on the ceiling, therefore the material is made lightweight, with thin walls. You need to handle them carefully: you can even crush them with two fingers. Is it possible to mount wall panels on the ceiling. It is possible, but they are more expensive, and their higher strength is unclaimed. In addition, they are heavier, because the load on the frame will be slightly increased (if any) and this must be taken into account when installing it.
Now about the dimensions of the panels and the types of their surfaces. There is a material whose appearance resembles a lining: the same strips, only made of plastic. The ceiling of such panels is also called slatted because the surface is very similar in appearance.

An almost flat, crack-free surface, with hardly distinguishable joints, is obtained from seamless plastic panels. The joints of such panels are almost imperceptible: the front surface is even and smooth, and on the sides there is a spike and a groove, as on a conventional lining, with which the skin is assembled.

There is also sheet plastic. It is more difficult to work with it and it is used little: it is necessary if columns or other non-linear surfaces are trimmed, and it is more convenient to assemble the ceiling from rails.

The advantages of ceilings made of plastic panels include the ease of care for them: almost any contamination is washed off with warm soapy water. The appearance remains unchanged for about 5-10 years - it depends on the quality of the plastic.
How to make a ceiling from plastic panels
When buying PVC rails, you will also need finishing profiles - moldings - with the help of which the ends and joints are formed. Their choice depends on the configuration of your room and on how exactly you are going to make the ceiling. There are two options: make a false ceiling or attach plastic directly to the main one.

Suspended ceiling made of plastic panels
On the one hand, a suspended ceiling allows you to covertly lay communications without chasing the walls. On the other hand, it "eats" some height. It will take a minimum of 3 cm. But this is if the lamps are installed ordinary, and not built-in. To install a built-in lamp, the false ceiling must be lowered from the main one by 8-12 cm. You will not find smaller lamps, except for furniture or LED ones. If you put them in sufficient quantities and separately illuminate the mirror, then the illumination should be enough.

Assembling the frame
When installing a false ceiling, a frame is assembled from guides. Most often, profiles are used to work with drywall. If you are doing the ceiling in the bathroom or in the kitchen, take galvanized profiles and fasteners. In drier rooms, this is not critical. They also assemble a frame from wooden bars of 30 * 30 mm or a larger section.
They nail the strips or profiles first around the perimeter, putting them all in level. Then, on standard suspensions (there are two types) or wooden bars, intermediate guides are fixed in increments of 50-60 cm. They are also aligned so that they are in the same plane as those installed earlier (it’s easier to do if you pull the threads between those already installed and align them).

If you decide to make a minimum indent, just to lay a corrugated hose - 3 mi, then the slats are nailed directly to the ceiling. If necessary, the level is leveled with linings - pieces of plywood, wedges made of wood, etc. In this case, the framework looks something like this.

Installation of starting strips
After the frame is assembled, you can begin the installation of plastic panels. It begins with the installation of the start profile. In the case of a ceiling, a ceiling molding is also used.

It is attached close to the profile or bar fixed around the perimeter of the room. The edges are cut at an angle of exactly 45 °. The length must be measured very accurately: the slightest discrepancy leads to gaps. Against the background of a white ceiling and white profiles (or colored ones, it doesn't matter), the cracks turn black very clearly. If they are small, it will be possible to cover them with putty, but it is better to cut them off clearly: exactly exactly along the length of the wall or with a light spread of 1 mm.
The cut off bar can be glued or screwed with self-tapping screws. Ceiling molding is better - to glue (on liquid nails). So the joint turns out to be perfect: when gluing, you press the bar tightly, screwing onto the “bugs” you cannot achieve this effect, since it twists forward a little.
On the side that goes to the wall, a thin strip of glue is applied in a zigzag pattern. The surface of the wall is degreased (you can take 646 solvent). After drying, the piece is set in place, pressed tightly along the entire length and torn off. There should be glue on the wall. Leave it to dry for a few minutes (4-8 depending on the viscosity, the bar should not float, and the glue should stick well) and then apply it in place. To be sure that the bar is level, take a rule, a ruler, an even bar and check the level of the glued starting profile. If necessary, until the glue has finally set, the bar is adjusted.

Having glued the starting profiles on three sides (letter P), they are left to dry, otherwise, when installing the planks, they can be moved. After 8-12 hours, the adhesive will harden and it will be possible to continue the installation.
If, during gluing, “liquid nails” squeezed out somewhere, do not clean it. Wait until completely dry, then pry with a sharp knife. The glue will simply break off and there will be no traces left. If you try to remove it with liquid, it will only smear and stain everything around.
Installation of plastic panels on the ceiling
After the glue has dried, you can begin the installation of the plastic panels themselves. Measure the size from one joint of the already mounted skirting boards to another, add 1.5-1.8 cm to this value. Cut panels of this length. You do not need to make them across the entire width or length of the room - they will not become in profile. If the geometry of the room is ideal, you can cut a lot at once. If there are deviations in size, make several pieces, adjusting the length as you go. You can cut plastic with a jigsaw or grinder.
The first panel enters the previously installed molding from three sides. She is placed with a spike forward - in the bar. Sometimes, if the trim profile is made of soft plastic, the top part (mounting shelf) will flex, making installation difficult. To make the deflection smaller, this edge can be grabbed with self-tapping screws. So it will be easier to insert the bar, otherwise you have to correct it with a spatula, setting the panel in place. It should go into the baseboard or starting profile exactly along the entire length. The inserted strip is fixed to each guide with a self-tapping screw. For fastening to a wooden frame, you can use a stapler with staples (if you mount it in a bathroom or kitchen, then take the staples from stainless steel or galvanized).

The setting of subsequent bands is the same. They are installed first with one edge - into the molding (it enters the plinth by 6-7 mm), then insert the other edge. After that, the bar is leveled, lifting the middle with the hand and eliminating the deflection, tap on the edge with the palm, driving the lock into the groove. It doesn't take much effort, just to make it sit tight. Below you will see that there is no gap at the junction, which means the strip has become normal.
If there is an assistant, he supports the installed panel so that it does not fall out while you fix it on the screws (brackets). If you work alone, you can eliminate the sagging by sticking small pieces of double-sided tape on the profile. They will hold the bar until you secure it. So collect all the panels.
During installation, do not forget to cut holes for installing fixtures. You can do this with a ballerina or a ring nozzle, you can try with a jigsaw, but if you have a good command of the tool and you can make a round hole. As it turned out, you can make a hole with an ordinary drill with a thin drill ... how? Watch in the video. There are a couple more good tips in there.
Having installed a strip or strips in which there is a hole for the lamp, you immediately mount it, connect it and check it. If this is not done immediately, then problems may arise: how can you connect the wires if the entire ceiling is already assembled? Just disassemble part of it. And if you put the last strip on glue? Have to break. Therefore, we install and check the performance immediately.
Installing the last panel
Most of the difficulties arise when installing the last strip. It usually has to be cut. Measure the actual distance from one side of the ceiling and from the other. The difference can be several centimeters. There is nothing unusual or difficult about this. And then there are two options:
- The cut strip is simply inserted into the pre-glued starter profile or plastic plinth. With sufficient panel width, this is possible. But then you need to subtract about 5-7 mm from the measured distance and cut off the strip in this way. Otherwise, you won't put it in. And so it has to be carefully corrected with something thin (steel spatula) so that it falls into place. After a few attempts, it still works out ... But besides the difficulties with installation, there is another drawback here: after a while, since the strip is a little shorter, it moves away (it sinks more into the molding) and a small gap appears in the ceiling.
- The second option is to glue the strip. Then, cutting off the last panel, set aside the distance measured earlier on the ceiling as it is. And not from the beginning of the panel itself, but from the thrust bar. Then it is glued in its pure form on “liquid nails”. Only glue is applied not to the strip, but to all guides. And the one along the wall, and on the perpendicular laying (to which they were attached with self-tapping screws). Further, the technology is the same: they applied it, pressed it down, set it aside for a few minutes, and then finally installed it. The disadvantage of this method is that this strip is not removable. It will need to be broken if necessary. Therefore, leave one more in stock - just in case.
Installation of a plastic ceiling made of PVC panels is almost completed. It remains to install the last plastic plinth. On it, the mounting plate is first cut off: leave only the plinth. After it, you also cut it at the corners at 45 °, try it on, cut it off exactly. After trying it “dry” again and making sure that the size is correct, the plinth is smeared with glue, only both shelves are already: the one that will be glued to the ceiling, and the one that will be glued to the wall.

Sealing cracks with acrylic
Actually, the installation is completed. But sometimes one more operation is necessary: covering all the gaps with white acrylic. This operation is not needed if you bought high-quality panels that have perfect geometry - French and Belgian. After their assembly, there is no need for correction: there are no sags that form due to the fact that the panels are uneven. Otherwise, we take acrylic sealant, insert the tube into the mounting gun, and fill all the cracks and gaps. Usually these are joints and corners, and also the junction of the plastic plinth with the ceiling. Often there are so many gaps that you have to go through the entire perimeter.
Fill the gaps in small sections of 30-40 cm, removing all unnecessary and leveling the seam. Acrylic levels well until it sets, which is a matter of seconds. Therefore, they smeared a piece, corrected it. If everything is ok, move on. You can remove excess acrylic with a soft cloth, but sometimes it’s more convenient with your finger - for some reason it turns out smoother. Having smeared a piece, take an object with a sharp and even edge (a small spatula) and a damp sponge. Excess putty evenly cut off with a sharp corner of the spatula, then wipe everything with a damp sponge until it is clean, otherwise you will not wipe it off later. So go through the entire perimeter and leave to dry for 8-12 hours.

After the acrylic dries, it can be drawn into the seam. You have to take the tube again and fill the gaps that have appeared, rub it, remove the excess and wash off the smeared. This, the second time, is usually the final one. After drying and this layer, stains remain on the plastic ceiling. Wipe them with a damp clean sponge and then gently rub with a soft cloth to a shine. Now the ceiling of plastic panels is ready, and after installing the fixtures, the repair can be considered completed.
How to mount to the ceiling
If the ceiling is already flat and does not need to be leveled, plastic panels can be mounted directly on it. The order of work is the same: first, the starting profile, then cut-to-size strips are inserted into it, fixing at least every 50 cm.
Choose fasteners depending on the material from which the ceiling is made. Carnations or staples from a stapler can be beaten into a tree. It is more difficult with concrete: self-tapping screws will not work, and you will be tormented by drilling a hole for the dowel for each fastening. Then it’s better to assemble the frame with a minimum indent from the ceiling and then assemble everything as described above.

Another option is to glue on liquid nails. The technology is well-known, but its minus is that such a ceiling made of plastic panels turns out to be non-separable and it will have to be completely dismantled if something happens.
Lamps in the ceiling made of plastic panels
It's not about design or quantity - here everyone is determined by himself, but about the type of lamps and power supply. There are two options: install conventional lamps at 220 V or with a step-down transformer at 12 V. In the first option, ordinary incandescent or housekeeper lamps are installed, in the second - halogen or LED. In any case, a separate machine with an RCD should be allocated for lighting the bathroom or kitchen, which will turn off the electricity supply in the event of a short circuit.
Features of installation and selection of luminaires for 220 V
If you install lamps for 220 V, and put even low-power (40-60 W) incandescent lamps in them, you will have to somehow take care of the thermal insulation of the case. Due to the fact that the lamp is heated, its body also becomes very hot. From the heated case, the plastic darkens and warps over time. Therefore, glue a layer of some kind of flexible heat-insulating material onto the body.

The second point concerns electrical safety when working in 220 V lighting. It is necessary to install lamps with a high degree of protection in the bathroom: not lower than IP44. This means that the lamp housing is protected from water jets. Such lamps cost a lot: the technology is complex. The second point: for the most part, they are rather bulky, since the case is usually ceramic. Just hanging it on plastic will not work: mortgages will be needed. They are installed when assembling the frame: these are additional jumpers in those places where the lamps will be attached.
Halogen and LED
Since this type of lamp requires only 12 V, the electrical safety requirements are lower here. In principle, any design is suitable. Power from the shield after the machine is supplied to the transformer, and from it to the lamps. Up to 4 lamps can be powered from one transformer, but there is a limitation in the instructions for them: the maximum length of the wire to the lamp should not exceed 2 meters. Lamps work normally even at a distance of 2.5-2.7 meters. At a higher voltage drop is already significant and the glow is weaker.

If you decide to put a transformer outside the bathroom for added safety, this is a serious limitation, especially if the bathroom is rather big. Then it will have to be transferred to the bathroom and hidden behind a false ceiling made of plastic panels (the thickness of the device is about 3-4 cm).
Sometimes a transformer is put on each lamp. This is normal, it just costs more, but with a large distance between the lamps it is justified.
More and more people prefer to improve the interior with a false ceiling. GKL overlapping is best done in rooms with a low percentage of humidity. Moisture-resistant material is used for sheathing the false ceiling in the bathroom and kitchen. For such purposes, plastic is best suited, since a suspended ceiling made of PVC panels is characterized by a number of positive properties compared to other finishes.
Advantages of PVC panels
Plastic is a common material used directly in the arrangement. This trend is not surprising, since plastic has such positive properties:
- PVC panel is inexpensive compared to other building materials.
- Relatively simple installation.
- High moisture resistance. Plastic does not absorb moisture.
- The material retains its properties when using cleaning agents.
- Plastic is resistant to chemicals and does not lose its properties.
- Sheathing a false ceiling with PVC panels allows you to hide the details of the ceiling, improving the appearance of the room.
- Good soundproofing.
- Easy installation, which allows you to do the work yourself.
- An extensive color palette makes it possible to choose the best option for a suspended ceiling.

disadvantages
Like any building material, along with the advantages of plastic, there are also negative qualities. The main disadvantages are:
- Specific smell. After installing the false ceiling, the smell of plastic remains for some time.
- There is a possibility of deformation with a sharp temperature difference.
- The impact can damage the plastic.
- Plastic does not belong to the category of natural materials, so this kind of material is not recommended to be mounted on the ceiling in residential premises.
Important! Plastic is no longer as prestigious as it was when it was introduced to the market, as there are many better materials out there.
Varieties of material
According to the characteristics of plastic, there are three types.
- White. This type includes unpainted material.
- Color.
- textured. A feature of this type is that a special texture is applied to the surface, giving the material a natural effect. Such plastic is much more expensive. The ceiling covering, trimmed with textured plastic, looks presentable and expensive.
Assembly tools
To install the ceiling, you need to prepare materials and tools.
You will need:
- Profile or bars for the future frame.
- Plinth. Its direct purpose is to fasten the panels.
- Dowels, self-tapping screws.
- Screwdriver.
- Hacksaw.
- corners.
Preparatory work
Before installation, you need to perform preparatory work. Without them, the following situations are possible:
- If a beginner in the construction business does not check the surface, extra materials may be purchased.
- If the ceiling covering is uneven and there has been no preparation, it is unlikely that the ceiling will be installed correctly.
Important! It is necessary to follow the rules of preparatory work in order to avoid additional expenses and in order to save time and effort.
Frame installation

Stages of installation work:
- Install the frame (wooden or metal).
- Attach the PVC skirting board to the crate.
- Install the panels in the plinth and fix them.
Important! If a collapsible plinth is chosen, then the decorative part of the baguette must be fixed last, after attaching the panel.
"skeleton" device
Sheathing of the floor is impossible without fixing the frame. The best option is a metal frame. For the design, it is best to take the ud and cd profile. Such profiles help to quickly create a frame and align it.
To mount the "skeleton", metal is used, since wood is not as durable as metal. The tree is deformed by temperature changes. When choosing a material for the frame, the selection rules are followed, since the durability of the structure depends on the material chosen.
Before installing the suspended frame on the ceiling, markings are made. For these purposes, a level is used. Marks are placed on the wall under the ceiling, along which the guide profile is installed.
You need to fix it with dowels or self-tapping screws, depending on the material of the walls. (Mounting pitch - 400 mm).
The next step is the installation of stiffeners. To carry out such manipulations, the following steps are followed:
- The stiffeners are laid in the guide profile. Subsequently, panels will be attached to them. Create a frame perpendicular to the direction of installation of the panels.
Important! In advance, you need to determine the direction of laying the panels. To make the seams less visible, follow the installation rules (begin laying the panel along the wall with the window).
- The carrier profile is cut, focusing on the dimensions of the room. The installation step of such a profile is 500-700 mm.
- It is impossible to perfectly sheathe the ceiling with PVC panels if the frame is not stiffened.
- After the frame is assembled, it is fixed. If a metal profile is used, then the first element is installed at a distance of 350 mm from the wall. You must strictly follow this rule, since such an important nuance allows you to give the frame stability.
Panel mounting

The correct design device depends on the direct installation of the first sheet of plastic panel. Before directly installing the panel on the frame of the suspended structure, all parameters are carefully checked to avoid errors. Fasten the panel with staples or self-tapping screws. All subsequent panels must be fixed parallel to the first.
 Fixing the PVC panel with screws
 Installation of plastic plinth, pros and cons
Scrupulous work is the installation of a plastic plinth around the entire circumference of the room. Sometimes there is a detachable plinth. Its peculiarity is that the decorative edging and the part into which the panel is inserted are supplied separately. At the end of the installation of the plinth, these parts are connected by a latch. If you follow the installation rules, then installing the skirting board will not take much time and effort.
Important! If there is no experience in installing the plinth, in this case it is worth choosing detachable models.
 Plastic ceiling plinth
 Until recently, we could not even imagine what could be done with the ceiling, except to whitewash or cover with a water-based emulsion. If you wanted something "cheerful", they covered it with wallpaper. With the advent of new building materials in our lives, completely new ceiling finishing technologies began to appear. The arsenal of such design solutions includes the installation of stretch, suspended, mineral, glass, mirror, stained glass, plasterboard ceilings, as well as sheathed with wooden or plastic panels. Let's talk today how to make a plastic ceiling.
Features of plastic ceilings
Plastic panels for such ceilings are made of polyvinyl chloride - a safe and harmless material. In our country, PVC panels are used everywhere for finishing ceilings and walls, as well as for the manufacture of containers for food and products. So do not doubt the environmental friendliness of the material.
It is important to remember that plastic panels for walls and ceilings are different, and it is not recommended to buy one to replace the other. Ceiling panels are much lighter, and this is an important detail, although their mechanical strength is much lower. If you use wall panels when installing the ceiling, there will be a large load on the frame, and this is not very safe. And using plastic panels for the ceiling when decorating walls, you can observe their deformation over time.

The plastic ceiling is a type of false ceilings. A plastic sheathing is mounted on the frame, which is attached with special suspensions. For the frame you need wooden slats (you can use a metal profile). For the manufacture of the ceiling itself, you can use simple inexpensive materials, but it is better to invest in better plastic. Fixing plastic panels on the ceiling is provided by skirting boards for plastic ceilings and a shaped profile.
When installing plastic ceilings, there is one caveat. The appearance of the surface depends on the selected panels. When buying glossy panels, the joining seams on such a ceiling will be hardly noticeable, they are practically invisible. The glossy ceiling is a reflective surface that looks quite original. If you plan to make a ceiling of matte, colored and patterned panels, then be prepared that the seams will be visible quite clearly.
Advantages of a plastic ceiling
If you, when making repairs in your apartment, are planning to make a plastic ceiling, your choice is quite far-sighted, because such a ceiling has many advantages. Firstly, if the neighbors flood you, the plastic ceiling will not have to be redone, and if the flooding is not serious, you will not notice anything at all. And this is a big plus, because the ceiling, pasted with wallpaper or whitewashed, would have to be whitewashed or glued a second time.
At the end of the work, you will receive a perfectly flat ceiling, which, if desired, can be washed with water or detergents. But even if you do not bother to take care of the plastic ceiling, it still will not lose its beauty and originality. Even in the event of a temperature difference, the ceiling will retain its flat surface. Wallpapered ceilings fade over time, and plastic ones will retain their appearance for many years.

With the help of such a ceiling, you can not only hide large irregularities or pipes, but also turn them into a particle of the interior by arranging beautiful modern lamps in that place. The ceiling can be made not only smooth, but also embossed, using wide panels with contours. Another advantage of a plastic false ceiling is its price. Of course, this is not the cheapest type of ceiling, but, nevertheless, it will cost you much less than, for example, a stretch ceiling. In addition, the air gap that forms between the ceiling and the plastic creates good sound insulation.
Since PVC panels are surprisingly moisture resistant, it is logical to install them in the bathroom. When flooded, plastic panels are able to withstand the weight of water and not be afraid of the main enemy of moisture called mold. Especially if PVC panels are also installed on the walls and in the kitchen. For the same reason, such material is great for lining a home kitchen. Plastic panels in the kitchen are especially good, because such a ceiling is easy to clean with ordinary detergents, and, as you know, with the constant operation of the gas stove, all surfaces are polluted with soot.
The choice of plastic for mounting
First you need to calculate how much material you need. It's easy enough if you know the area of the ceiling. If not, then it can be measured. A complex configuration room will need to be divided into parts - rectangular sections on the ceiling, then the results should be rounded up. If the room is rectangular, it will be easier to measure everything.
When buying, you just need to look at the packaging - the area of \u200b\u200bone plastic panel must be indicated there. Also take into account the number of panels in the package, consider how many panels you need to cover the entire area and add a little (taking into account trimming and the like).

You can determine the type and color of plastic directly during the purchase. The design of the whole room depends on which panels you choose for mounting the plastic ceiling. White panels are the cheapest, while patterned and textured panels will cost more. All panels must be in the same color (color scheme) and the pattern, if any, must be accurate and correct. If a panel that catches your eye is lighter than the rest, or, on the contrary, very dark, it is best to change it to one that fits perfectly into the overall tone of all panels.
When you buy a material such as plastic, you need to be very careful and inspect each panel, because defective models are not desirable to use. When you bought plastic, when transporting it to the house, remember that it cannot be damaged, because then during installation it will not fulfill its function and will not create perfectly even joints.
Choice of materials and tools
So, first you should get acquainted with the most common profiles for attaching plastic panels:
- The starting profile that is most frequently encountered. Such structures serve to close the ends of the panels and are attached to the ceiling around the perimeter of the entire room.
- H-profile is also called connecting. Based on the name, it is used to increase the length of the panels.
- F-profile is designed to close the ends of the plastic panels at the outer corners when moving to another plane. That is, one wall is sheathed with PVC panels, but the one around the corner is not.
- The plastic ceiling plinth is essentially the same starting profile, but a little ennobled.
- The outer and inner plastic corner are used to close the end panels at the inner and outer corners.
- A universal plastic corner can be glued to any corners, but it does not look promising.

To determine the number of profiles, you need a pre-drawn scheme. Draw on paper a proportionally reduced ceiling. It should be borne in mind that the profiles should be 60 centimeters apart from each other. Thus, it will be easier to deal with the number of bars, the footage of the plinth and profile. You will also need to buy suspensions for the frame, lamps (if necessary) and fasteners.

Profiles are also required that are attached around the perimeter. The number of self-tapping screws for fastening panels and dowels, which are necessary for fixing the profiles, is calculated taking into account the number of required profiles, plus a margin. If desired, replace the profiles with wooden beams and use staples instead of self-tapping screws. So you can reduce the cost of the process and simplify the assembly of plastic panels.
To calculate the amount of ceiling plinth required, divide the ceiling perimeter by 3 (if the segment is 3 meters long). From the tools you will need: a ruler, a wallpaper knife, a tape measure, a building level, a hacksaw, drills, a stepladder. As well as a drill, puncher, dowels, self-tapping screws, paint cord, hangers and ceiling profiles. When all the tools are prepared and the materials are purchased, you can start installing the ceiling.
Preparatory work
Basically, preparatory work when installing a plastic ceiling with your own hands is not needed, but if you wish, you can sand it with medium grit sandpaper. Of course, if you are making such a ceiling in a room with increased humidity, for example, in a bathroom, it is better to treat the concrete floor with an antifungal compound.

The first step is to determine the level of the future ceiling (how many centimeters it will be lowered down). If you still decide to mount the lamps, do not forget to leave room for them. Basically, the fixtures have a depth of five to ten centimeters.
If you mount the fixtures yourself, pay attention to the resistance of the wire you buy, but without certain knowledge in this matter, it is better to turn to a professional. It is better to fix the wires above the plastic in advance and bring them to the switch. The wiring must be isolated and hidden behind the profiles. Next, we make markings on the wall around the perimeter.
Mounting the box on the ceiling
When determining the horizontal, it is important to remember that the sloping ceiling will be striking, so you need to measure everything more than once, first measuring the height of all corners and choosing the lowest one. Then you should retreat 5 centimeters to the floor and mark the horizontal, using the water level. In the corners and on the ledges, you should leave marks, as in the photo of plastic ceilings. Further, using a masking cord, beat off the lines that were previously determined.
On the marked strip, which shows how much lower the ceiling will be, you need to drill holes for the dowels. This should be done with a drill or puncher. Through the profile you need to make holes directly. Insert the dowels into these holes, and attach the ceiling profile to the wall. The usual length of such profiles is three meters, but they can also be connected to each other if you suddenly have a very large room by inserting one into one. At the same time, do not forget to fasten the profiles to each other with bugs.

Along the entire perimeter of the room, a profile should be attached to the wall, and on the ceiling - suspensions to which the ceiling profile will be attached. Hangers should be mounted along a straight line. The desired lines can be created using a masking cord, not forgetting the distance (about 60 centimeters from one another).
After that, you need to pull the thread-fishing line. This must be done as shown in the video about plastic ceilings, across the entire room, from wall to wall. Further, this thread should be attached to the dowels that already hold the profile. It is important to remember that if you pull the fishing line incorrectly or not tight enough, sagging cannot be avoided, but you need to get a perfectly even horizontal line.
At the level of the thread, the profile should be fixed. This requires an assistant who will hold the profile so that it is as close as possible to the thread, but does not touch it. Having attached the profile to the suspensions, you need to bend them. When the frame is built, you can proceed to the ceiling sheathing with plastic. The plastic itself is recommended to be fixed with self-tapping bugs, not forgetting the points of contact with the profile. It is better to seal even the smallest seams with silicone, and remove excess material with a spatula so that the ceiling looks neat.
plastic ceiling lining
When you start working directly with plastic, pay attention to the room. If it is slightly skewed and uneven around the perimeter, then the first strip of plastic must be cut off very carefully in order to properly hide this flaw. It is necessary that the following strips are attached to the profile perfectly, at a right angle.
It is important to know before making a plastic ceiling that the installation of panels can be carried out not only across the room. You can install the panels along and diagonally, and the colors can thus be easily combined if you want to get an original ceiling with an unusual pattern as a result. If you have chosen thin plastic, then it can be bent, trimming the corners, this will help create an unusual design. There is also a special corner plastic that hides the panel joints. With the help of plastic, you can also make a multi-level ceiling.

Installation of PVC panels on the ceiling starts from one wall. They need to be cut exactly along the length of the surface with a hacksaw, jigsaw or grinder. When cutting the first panel, it needs to be made a little shorter than the width of the room, by about 3-5 millimeters. Clean the edges with a sandpaper or abrasive mesh. Try not to wrinkle the panels. And most importantly - before installation, do not forget to remove the film from them!
It is necessary to work carefully, because this material is quite fragile. Plastic should be treated with care before plating. If you have already caused damage to the purchased plastic, you can try to hide them with silicone, preferably white. This option will not work if you opted for colored plastic, because silicone is white and transparent.

Fasten the first panel tightly with self-tapping screws on the profiles, fasten all subsequent panels to the rails of the mounting profiles according to the type of constructor. The most difficult stage of the whole procedure is the installation of the last panel. You need to cut along the length by a millimeter less than the distance from one wall to the starting profile at the opposite one. Insert the panel with one side as far as it will go into the profiles, directly into the corner.
The second end will hang freely, slide the panel out of the first corner and insert it. Between the penultimate and last panel you will have a small gap, but they need to be joined somehow. Sometimes you can do it on your own, but most of the time it doesn't work. Then you can use masking tape. Glue a couple of strips across the last panel and pull it up to the previous one.
To mount the luminaire, mark the location on the panel with a pencil. Then you need to cut a hole using a clerical knife. Insert a lamp into the hole and connect the wire to it. Wires need to be run under the ceiling. If you need to install several fixtures, it is recommended to connect them in parallel to each other.
At the end of the installation, the room will change a lot. But it will still need to be glued with a frieze around the perimeter. This is done in order to hide the plastic attachment points. And given the moisture resistance and practicality of such a ceiling, we can say that this is a fairly profitable choice for repairs in your home.