Decorating a house made of natural wood is an excellent choice for those who value environmentally friendly building materials. Natural stone, solid wood, lumber derivatives on a natural basis will always be preferred by people who care about the health of their families. Do-it-yourself aesthetic interior decoration of a wooden house made of wood is not only prestigious, but also practical, reliable and durable.
Choosing the interior decoration of the house in favor of wood
Wooden buildings have been valued for a long time, and today they are back in fashion, which is experiencing a new round of popularity. Log buildings, buildings with natural interior decoration, wooden houses from a bar are distinguished by a special atmosphere. They feel that unique aura of closeness to nature, which is not found in the "stone jungle" of the metropolis.
Modern construction of individual housing based on environmentally friendly materials is relevant both for families with an average income and for wealthy people who value everything that is natural. For example, a wooden staircase is organically combined with a similar wall decoration. Sheathing with natural wood or interior decoration of a wooden house with clapboard is an excellent solution when renovating the interior in eco-style or for decorating "like a Russian tower".
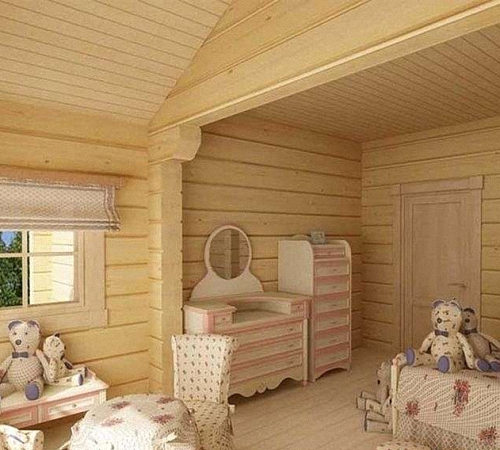
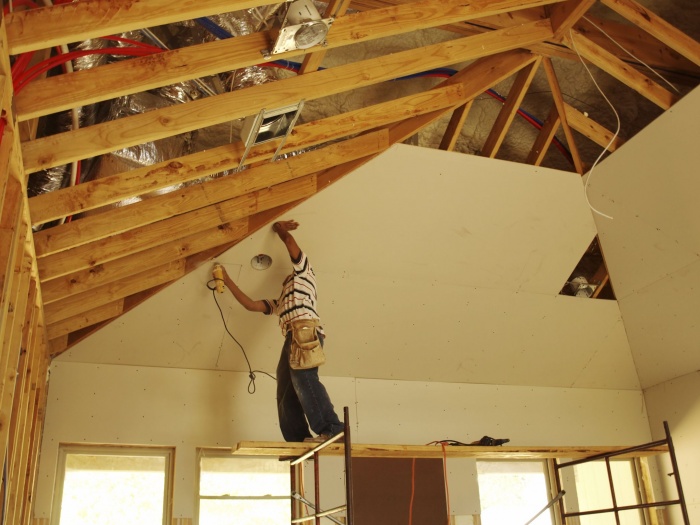
A house with simple furnishings and wood finishes, as it were, brings residents closer to the origins, teaches them to appreciate the texture and color of materials taken from the surrounding nature. With proper processing, the wood becomes fire-resistant and moisture-resistant, and a house with such a finish is warm and comfortable. For example, interior decoration of a wooden house photo:

The choice of finishing materials takes place at the final stage of the construction installation. Even if initially it was decided to leave the frame without additional internal processing, there is an opportunity to refine the walls at the end of the work, making them smoother and smoother. For reasons of practicality and aesthetics, interiors can be decorated in different ways:
- level with plasterboard under the wallpaper;
- plaster for whitewashing or painting;
- sheathe clapboard or other type of building materials for interior decoration of a wooden house.
Attention: Wall decoration with wooden sheathing is also chosen during the next renovation. This is especially true on the first floor of houses, where there is weak waterproofing and ventilation. Damp corners cannot be dried or hidden, and lining with clapboard and composite boards based on wood and polymers, impregnated with an antifungal composition, gives an excellent result!
If the old building has numerous defects in the walls, then natural materials based on wood will help to update the look. The choice of the variety directly depends on the general condition of the house, since a sagging foundation cannot be weighed down with heavy wood panels. Imitation "wood" based on synthetic materials looks presentable, although such walls do not have the ability to "breathe".
The choice of interior decoration is often dictated by the basic material from which the house is being built. Buildings made of laminated veneer lumber are built with a more strict geometry, their smooth walls are suitable for facing under plaster. Such a wooden house with interior plasterboard finish is pre-sheathed with panels, and non-woven wallpaper can be glued on top of the plaster for painting.
Varieties of materials for interior decoration of a wooden house
Building materials for interior decoration of a wooden house are produced on a natural basis with the addition of polymers, natural and synthetic resins, dyes and chemical impregnation. However, natural high-quality wood after high-tech processing will always be among the favorites of finishing materials. Wood is the most affordable eco-friendly material and the purest natural material available. For all its apparent simplicity, this eco-material has many options for texture and shades.
There are different types of wood:
- very light and dark, almost chocolate (wenge tree);
- practically without a pattern and with a pronounced pattern;
- saturated reddish and pale shades, etc.
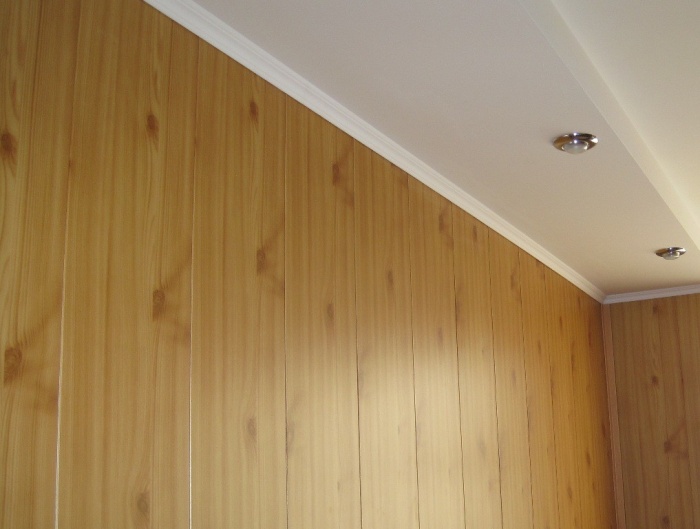
Wood of valuable species is very expensive, it practically does not occur in the form of an array in the construction market. But the unique patterns and delightful texture of natural wood is available in the form of veneer and wood wallpaper. In the form of a thin cut, sheets of expensive wood are glued or soldered to more accessible wood panels. In this form, they are used for interior wall decoration in a wooden house - photo:

Wall cladding is carried out:
- laminated chipboard;
- laminated plastic with a wood-like pattern;
- veneered MDF;
- clapboard;
- siding;
- panels made of composite materials.
All of these materials are referred to as “dry finishes”, while “wet” finishes involve plastering or plastering, which must dry before final decoration. For example, gluing walls with glass fiber for painting on a prepared surface.
Attention: If prices for materials seem high for self-repair of a wooden house and interior decoration, it is better to divide the costs into several stages than to give preference to low-quality materials or low-tech installation.
"Dry" wall renovation is an excellent solution for a clean and quick renovation, in which there is no need for the family to move out for a while. It is enough to vacate the room in which the repair or interior decoration of a wooden house from a bar is being carried out.
Tip: To protect the wall cladding from rodents, no gaps should be left behind the wood panels. All free space is filled with mineral wool. At the same time, it will serve as sound insulation and hygroscopic material to reduce the moisture content of wood.
Wet cladding or plastering of walls
Facing and leveling the timber from the inside with drywall is not chosen so often, especially when the frame is new, and significant shrinkage is expected during the first year. After 2-3 years, the main shrinkage of the walls will practically be completed, and you can proceed to the final stage. It is fashionable to complete the construction of a wooden house with plasterboard interior decoration in several ways.
The plaster is applied over the gypsum boards when they are already securely fixed. Dry mixes are available as starting and finishing (decorative). Classification of solutions:
- plaster;
- cement;
- lime;
- combined.
The cement-sand mixture is suitable for laying tiles, small lightweight panels or facing stone in rooms with high humidity. This is an entrance hall, bathroom, toilet and kitchen.
For living rooms (bedroom, nursery, living room, office), plaster and putty based on gypsum or lime-sand mixture are used. This starting finish "breathes", it minimizes moisture in a wooden house and prevents condensation. In very dry air, it gives off excess moisture from the walls.
Upon completion of the rough work, they proceed to decorative wall cladding, including wall painting or wallpapering for painting - photo:

Step-by-step method of preparation for finishing the walls of a wooden house:
- roughing of walls (removal of dirt and organic residues, mold and insects);
- the cracks are caulked with tow (moss, dry algae) to improve heat and vapor insulation;
- additional impregnation of wood with chemicals against mold, fungi, rodents and insect pests;
- sand with emery and treat with a primer for wood;
- it is advisable to make a test finish with the selected material in a secluded place, if it is painting or plastering, in order to evaluate the result.

Interior decoration with wood
The interior wall decoration of a wooden building is associated with natural wood-based materials:
- gusvarblok;
- lining and euro lining;
- planken;
- decking;
- block house;
- cylindering;
- glued laminated timber;
- decorative wood wallpaper and veneer;
- wood panels or boards;
- rail and frame board.
Sometimes the bottom third of the walls are finished in panels with flooring materials such as parquet or laminate with striking wood décor. The quick-fix and easy-to-wall lock system speeds up the process of completing your home renovation.

Tip: When buying, specify the shade and batch number so that there are no discrepancies that may be revealed during repairs, it is not always possible to buy exactly the same material!
The same materials that were used in the cladding of the walls of a wooden house can be used for cladding:
- multilevel ceiling;
- built-in wardrobes, niches and shelves;
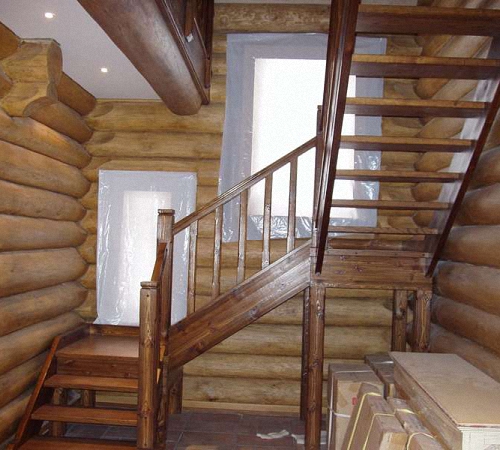
- staircase space;
- decorative beams;
- curly partitions;
- arches and niches;
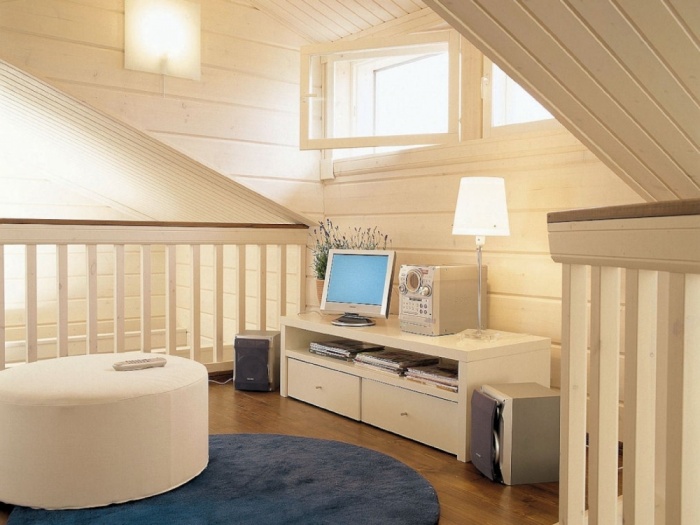
- design and architectural details for original decor, photo:

The lining was originally used for covering freight wagons, hence the strange name. Modern decorative larch or pine lining, used for interior decoration of houses, is very different from its "working progenitor". It is equipped with a snap joint, well ground and cut to standard. If desired, it can be ordered from more expensive wood. It is convenient to hide the defects of old walls under the clapboard, to lay communications behind it.
Planken differs little from the lining, it has a different type of fastening with rounded ends, which provides high ventilation. Decking is also called "decking", as it is successfully used in open outdoor areas. This material is excellent for verandas, loggias, balconies.
Glued laminated timber is a durable building material that does not undergo cracking and delamination. They are excellent not only as a building and finishing material, but also quite acceptable for interior decoration - as ceilings and ceiling beams. It is also used for finishing staircase structures and covered passages between buildings.
Such material as furniture board is widely used not only in the production of cabinet and built-in furniture, and as interior decoration. Looks very aesthetically pleasing in the cladding of walls, stairs, joinery, window sills, countertops. Shields can be painted and varnished.
Attention: When purchasing wood-containing materials, you cannot install immediately after purchase. They must be acclimatized in the same room where they will be used. It will take about a week for the wood to "stand".

Finishing with paint and stain
When choosing a type of finish such as painting walls made of laminated veneer lumber, it is important to choose an odorless paint for interior decoration. The building materials market offers a large selection of high quality paints, including eco-friendly paints based on natural resins. You can choose the color of the walls from the catalog, but in any white or light paint it is enough to add the selected pigment until the desired shade is obtained.
If there is a desire to leave the natural texture of wood, but to make a more saturated shade, then when interior decoration of a wooden house with clapboard, stain is often used. In this case, roughing and sanding must be completed. In this case, no primer is applied so that the primer penetrates deeply into the wood fibers. A reddish or cherry hue imitates expensive wood. Applying different shades of stain on the same wood will create a mosaic pattern or graphic contrast.
Tip: use a ready-made sketch of the proposed samples to evaluate the upcoming results. It is advisable to fix the finished drawing or cover it with a protective varnish.

The smooth surface of walls finished with natural wood with a beautiful texture can also be coated with clear varnish:
- matte;
- semi-matte;
- glossy.
No less interesting is the artistic painting of the walls, which is available to both professional artists and creative people who want to prove themselves as a designer. Of course, there is no dispute about tastes, but the blurry outline of the master looks better on the tree than the lurid motives of the clumsy hand of a beginner. The main thing is not to overdo it when choosing a topic.
A lot of materials are used for construction, but residential buildings erected from wood do not cease to be popular. The atmosphere in a wooden house is characterized by positive energy and comfort. However, the interior decoration of a wooden house is accompanied by many nuances.
The easiest way to get a beautiful front lawn
You, of course, have seen the perfect lawn in the movies, in the alley, and possibly on the neighbor's lawn. Those who have ever tried to grow a green area on their site will no doubt say that this is a huge work. The lawn requires careful planting, care, fertilization, watering. However, only inexperienced gardeners think so, professionals have long known about an innovative tool - liquid lawn AquaGrazz.
Start of finishing works
It should be noted right away that it is not worth starting finishing work from the inside of the house, immediately after its construction. A structure made of wood should stand for some time and shrink. For houses built of laminated veneer lumber, this period is about a month. Other wooden houses must stand at least ten months before the start of the trimming work. The exact dates are determined based on the moisture content of the material, the climatic conditions of the region and the season. During this time, the wood used as construction material dries up. Accordingly, the timber or logs decrease in size, and at the same time the insulation laid between the rows of the log house is compressed. A premature start of finishing work in a wooden house will lead to the fact that the cladding will be skewed or not adhered to the wall at all. In other words, haste to decorate a wooden house will lead to additional costs of time and money.
The crowns of the log house and their tightness
To ensure the tightness of the wooden walls of the house, you can use tow; moss is sometimes used as a jute material. The process of sealing the gaps between the crowns of a log house is called caulking. As a rule, caulk the log house in two steps. The first time this happens 1-1.5 months after the completion of construction, and the second after 6-8 months. The cracks between the rows of timber or logs are caulked immediately from the outside and from the inside. Otherwise, the structure may skew. Therefore, in the process, caulkers move along the walls of the house and seal them alternately on both sides. Caulking starts from the lowest rims.

It is worth noting that the log house after caulking becomes 5-7 centimeters higher. Then, the severity of the walls of the log house makes itself felt and it sinks. As a result, the insulation laid between the rows of timber or logs reliably seals the walls. The temperature in the house depends on the quality of these works. In addition to preserving heat, the second caulk allows you to eliminate small distortions that have arisen during the upsetting of the log house.
The interior decoration of the walls begins only after they are finally caulked, and the house itself has settled. The shrinkage process of the structure is checked using control measurements of the height of the walls. A wooden house is considered ready for interior decoration if, after the second caulking, the height of its walls has not changed in 90 days.
Sanding walls inside a wooden house
In some cases, finishing work inside a wooden house is not required. This is true for houses built from high-quality materials and, as a result, have a pleasant appearance, both outside and inside. In this case, you can significantly save money. It is enough to polish and paint the walls of such a house. A varnish is best used to protect the floor from abrasion. Walls and ceilings can be treated with special water-based paints and antiseptics. The surfaces treated by them will not lose their natural appearance, but on the contrary, the texture of the wooden walls will become more expressive. The use of antiseptics is necessary in any case, if, of course, you want to maintain a pleasant external design of wooden walls.

The seam from the caulking, between the rows of beams or logs, can spoil the impression of any wooden walls. Therefore, to refine such a seam, a twisted cord is used. It not only acts as a decorative decoration, but also additionally protects the premises from drafts.
Lathing and its meaning in the interior decoration of a wooden house
The walls of some houses will no longer benefit from sanding, this applies to excessively old or crooked buildings. For the interior decoration of such houses, options such as plasterboard products, wall paneling, decorative panels, etc. are used.

Installation of any such finishing material involves the use of a frame or lathing, which will level the curvature of the walls. In addition, the presence of the crate will allow the air to circulate freely. For a wooden structure, this is an important factor. As a result of the natural movement of air, the material of the walls will not change color and will not rot. only dry wood is not subject to these processes. The circulating air between the walls and the finishing materials will keep the wood of the walls in good condition.
The distance between the wall and the finish is also used for laying cables and wires of various communications: electricity or household appliances. By the way, electrical wiring in wooden houses should be installed only in pipes made of non-combustible material (corrugated stainless steel pipes are the most common). If necessary, a material providing thermal insulation is laid in the gap provided with the crate. However, if the house is kept at a comfortable temperature, you should not use any additional materials. The tree itself does a wonderful job of maintaining the right humidity in the room and unnecessary materials can do harm, not benefit.
However, fixing the finishing materials to the crate has its drawbacks. For example, if insects or rodents appear between the wall and the cladding, it will be quite difficult to eliminate them. However, before attaching the finishing materials to the wall, it will need to be leveled. A completely flat surface of wooden walls can be difficult to achieve, but with the right approach, it is quite possible. In order to close the gaps and gaps remaining between the wall and the cladding, special mastics are used. Once, instead of them, clay was used, but in some places it is still used. 
Regardless of the finishing materials, it is necessary that a gap of at least 20-40 millimeters remains between the cladding and the ceiling. This will play the role of insurance in case of additional shrinkage of the new house. For an older building, the gap will compensate for changes in the wooden walls. A material such as wood "breathes" its entire service life. Accordingly, it changes: it swells, having collected water, or dries up. The gap left under the ceiling in time will allow leaving the metamorphosis of wood walls without consequences for the facing materials. The lack of such a precaution is fraught with deformation or cracks for finishing materials. In order for the gap not to stand out against the general background, a ceiling plinth is used, it is rigidly fixed only to the ceiling.
Lining for interior decoration of a wooden house
Manufacturers offer a wide variety of cladding materials for interior decoration. However, to decorate a wooden house, they often resort to clapboard. It allows you to preserve the overall style and atmosphere of a wooden building. Such material can be used both for external decoration and for internal decoration (only the methods of their processing differ). The lining is of various types. Moreover, we are not talking about the wood from which it is made and not about its size. The profile of the lining, depending on the wishes of the customer, can be modified. Distinguish between wavy or even design of the material, as well as imitation of a bar or log (block house).

To decorate the walls inside a wooden house, 15-20 millimeters thick lining is used. Its cost is less than that of thicker counterparts, but such a material fulfills its tasks. You can arrange the lining boards in any order: horizontally, vertically, at an angle. Owners of remarkable patience and hard work are able to create whole pictures from the lining.
When fixing the lining on the crate or on the walls, do not forget about the possible shrinkage of the house. To compensate for possible changes in the wooden walls, leave a gap of 20-40 millimeters near the floor and ceiling.
Decorative wall panels

Often, decorative panels are used for interior decoration of houses and apartments. There are claddings made of different materials and imitating a variety of surfaces:
- MDF panels (veneered or laminated).
- Glass panels: smooth, corrugated, colored, matte, transparent.
- Polymer panels.
- Wood or bamboo panels.
- Leather panels.
The panels also differ in size, they are produced in the form of strips, assembled together or immediately in the form of a shield (sizes vary). The lining, by the way, is the same panel, but it stands apart because this material was used for finishing works long before the appearance of other similar products.
Decorative panels are fixed to the wall, usually with a lathing. The thickness and location of the bars, which depends on the type and size of the selected decorative panels. This finishing material is popular with designers and homeowners because the abundance of colors, sizes and materials allows for unusual, memorable interiors. Decorative panels also differ in price. For example, panels made of polymers and MDF are significantly cheaper than leather goods.
Some types of panels are mounted only with glue (gypsum products), therefore, to fix them on the crate, they resort to additional gypsum fiber board or plywood. These are called backing panels and are attached to the battens in the first place. The main cladding panels are already glued to them.

Drywall in a wooden house
The interior decoration of the walls with plasterboard is no different from the decoration of premises from another material. Drywall is attached to a pre-assembled frame. True, as in other cases, it is necessary to leave a safety gap.
The main condition under which plasterboard wall decoration is allowed is the operation of the house for several years, i.e. the house must be warmed up and give final shrinkage. This is due to the fact that drywall is fragile, and with significant changes in the geometry of the walls, it will become unusable. It is possible to ignore such metamorphoses of wall surfaces if the frame is mobile. For this, its profiles are not fixed too rigidly to the walls.

When decorating the walls with plasterboard, there is one more nuance: all docking joints and seams, as well as in the corners, it is necessary to use a reinforcing mesh. The use of such a mesh will prevent or slow down the occurrence of cracks in problem areas.
Interior decoration of an old house made of wood
If the age of the wooden house in which the finishing work is planned is several decades, then the first step is to assess the safety of the wood. To do this, you will need to dismantle the entire old cladding. After that, carefully consider all the places that differ from the general background of the wall surface in color or texture of the picture. If necessary, suspicious areas should be checked by trying to damage them with a knife, screwdriver or chisel. If the tree everywhere has a dense structure and has no signs of mold or mildew, then you can start finishing work. In some cases, it is recommended to treat the wood with special impregnations. When using them, remember that such impregnations are based on chemical elements.

However, if the material of the walls crumbles from mechanical stress, then it is necessary to identify the causes of the destruction. The most likely options are the appearance of insects, mold and other microorganisms. Sometimes, a third-party specialist is invited to determine the methods of treatment for the infected section of the wall. Damaged sections of wooden walls must be dismantled and replaced; the areas adjacent to these elements will need to be intensively treated with special compounds.
After assessing the condition of the walls of the old house, and repairs carried out if necessary, you can proceed to the interior decoration. The work on the decoration of the premises of the old wooden house is carried out in the same order as described above. The only difference is that the safety gap should not be left.
The interior decoration of a wooden house is the most creative construction process, during which you can recreate the design that your imagination requires. Now the construction market offers a lot of finishing materials, among which you can always choose the one that suits the price and style. The interior decoration of the dwelling will indicate the taste of the owner, because as the house is decorated, the owners are judged.
Preparation before interior finishing of a log house
Before starting to repair interior walls, you need to learn about some of the features that should be taken into account when carrying out interior decoration:

Types of interior wall decoration
Wall decoration in a wooden house can be done in various ways. It all depends only on the desire and capabilities of the owner himself. First, you should determine the goal that should be achieved as a result of finishing. The options range from the natural beauty of wood to contemporary styling with alternative materials. In practice, there is a tendency to decorate wooden houses inside with progressive materials that completely hide the wood structure. Below we will consider both traditional methods of decoration, and those that are becoming more and more popular with the owners of houses from a bar.

Wagon board decoration
Lining is a simple and affordable material with which you can finish not only walls, but also the floor and ceiling. To create an even coating, you need to worry about the crate in advance. The creation of the lathing will help to hide unnecessary pipes and wires, as well as additionally insulate the walls, if necessary.
The construction market offers buyers three types of lining, which can be purchased:
- An ordinary wagon board is a simple polished board that does not have any indentations or recesses. This is the cheapest finishing material among those presented. Such a board is fastened with galvanized nails to the crate. The disadvantage of this material is the lack of adhesion of the boards to each other when laying, which can lead to an incorrect and crooked fit to the surface. Also, during installation, boards are often chipped due to their small thickness.
- Universal type wagon board. Such material is more convenient and practical. Due to the fact that the boards have spikes and grooves, they are easy to fit together and such a structure will no longer be bent. This lining is reliable and practical in decoration.
- Block House wagon board. This is a type of lining, very similar to the second option, but on the one hand it imitates a rounded log. It was created in order to create an even more pleasant look for the whole design. The mounting method is the same as for the universal board.
Important! The lining must be treated with an antiseptic and other compounds that increase its service life.
Like any material, a wagon board has its advantages:
- The decoration becomes more decorative, the tree gives coziness and comfort to the house.
- The lining helps to hide unpleasant communications (pipes or defects of the frame itself)
- This finish helps to retain heat in the room. Even the thinnest lining is able to make the house warmer without the use of special material.
- Ease of installation, due to which, even with your own hands, you can completely decorate the house.

But, despite all the advantages that distinguish the lining, it also has several negative sides:
- The material does not resist fire like any wood, so it must be treated with special compounds. Such processing will increase finishing costs.
- Additional components for such a design greatly increase the cost of finishing with an economical clapboard.

Natural finish
Paints and varnishes will help preserve the pristine beauty of the interior design made of wood. This option is only suitable if the log house itself is sufficiently insulated and treated with special solutions to protect it from moisture.
Before finishing, it is imperative to clean the surfaces from dirt and dust and grind them thoroughly. Treatment with putty and primer will not be superfluous.

It is believed that there is no need to wait for shrinkage at home before painting. This assumption is correct, but immediately after construction, painting is also not performed due to the fact that the moisture present in the wood will go out, forming smudges and bubbles on the surface.
If the house was built using the “in the paw” method, then the surface is best covered with paint, and if it was built “in a bowl”, then ordinary transparent varnish will look great, which will not hide the natural pattern of the wood.

Using paint, you can create accents on certain surfaces or zone a room. Materials for interior wall decoration should be as environmentally friendly as possible, because inside the house, the safety of the coating is especially important.
Recently, art painting on walls and ceilings has become very popular. This design will bring a modern touch to the interior, while not affecting the virgin beauty of the wood pattern.
Important! With such a finish, communications cannot be hidden, therefore, the wiring is placed in the corners of the room, and the pipes are placed in a pre-created frame.
The floors and ceiling with such wall decoration are made with a wagon board or parquet.
This type of interior decoration also has its advantages and disadvantages that you should be aware of:
- The original style of the log house is preserved.
- Material costs are much lower than alternative finishes.
- The coating must be renewed every 4 years so that it does not lose its decorative qualities.
- After shrinkage, log cabins tend to bend slightly, and finishing with paint or varnish will no longer provide an opportunity to visually adjust this situation.

Usually, a wooden house outside already presupposes the same decoration inside, so there will be no limit to the amazement of guests if, entering a wooden blockhouse, they find there a modern interior that has nothing to do with the village. At the moment, it is possible and so to design your house. For the floor, parquet, laminate or carpet are best suited in this case; in some rooms, tiles may be present. For the ceiling, hinged structures or drywall are often used.
Plasterboard decoration
Drywall is a very convenient material in finishing, which allows you to create any desired structure without any problems. In order to attach drywall to the wall, you need to create a frame from a galvanized profile, on which the material is attached with self-tapping screws.
Important! It is necessary to finish with plasterboard after the house has shrunk, since cracks may appear in its process, which will spoil the appearance.
The advantages of plasterboard design include ease of installation, low cost, and the ability to hide all unnecessary communications.
Since this material is very fragile, its main disadvantage will be that it is completely unstable to mechanical damage. Also, a small negative point will be that the finished drywall structure needs to be refined, for example, with wallpaper or putty. The interior decoration of the wooden house in the photo was done with plasterboard.

Decoration with plastic panels and plaster
Installation of plastic panels is as easy as installing drywall. The main and most significant difference from the previous material is the variety of colors and patterns, thanks to which you can decorate the room in various styles by combining materials.
The advantage of this finishing material is that, thanks to the laying on the crate, you can hide unnecessary communications. This coating can be washed as the plastic is resistant to moisture.
Plaster is also an interesting option for wall decoration in a wooden house. Due to the fact that now there are decorative types of plaster, it is not necessary to completely level the surface. With the help of such material, you can easily create the necessary relief or even drawings using the sgraffito technique, as shown in the photo below. The coating is very reliable and durable, so it will serve for more than one decade.

Interior finishing of the ceiling and floor
The cladding of the floor and ceiling must be in harmony with the decoration of the walls of the house. The most successful options for the floor will be parquet or laminate. This is due to the fact that such a coating retains heat better and is environmentally friendly, which is very important inside the house, because the safety of all its inhabitants depends on it.
Important! After assembly, the parquet is covered with paraffin and parquet varnish.

The correct laying of parquet will enable you to enjoy the ideal floor for many years. The lacquer coating is refreshed every 2 years, due to the fact that it wears out.
It is worth taking very seriously the facing of ceilings in a house made of timber. Finishing can be done only after the house has completely shrunk, and this is a period of 2 - 3 years. Otherwise, the ceiling structure will simply deform, which will ruin all subsequent repairs.

For an interior in a modern style, it is enough to mount a stretch ceiling, which will save you from problems with plastering and other related work. If the interior is designed in a Scandinavian or rustic style, the ceiling beams do not hide, but, on the contrary, focus on them. They can be painted in any color that suits the style or covered with wood stain for the best decorative effect from natural wood.
Important! If an attic is located on the second floor of the house, then the space between the rough and final ceiling is laid with insulation and vapor barrier materials.

Having built a house from wood, most likely, you wanted to do something natural and natural in its interior decoration. At the same time, do not forget about the beauty of the interior, which can be created from the most common materials, with certain knowledge.
Decorating the walls of a wooden house from the inside can be a truly exciting experience. In this article we will talk about how you can transform the appearance of your "fortress".
As in all works, this one should also adhere to a certain sequence.
A violation can significantly affect the appearance of the structure:
- Before starting the installation of any material, it is necessary to pre-process the walls. Remember that wood is a material that resists moisture, mold and insects.
Plus, assembling a house from wood will not create perfect protection from cold and drafts. - All cracks are clogged with tow or moss, which will create an insulating barrier and reduce heat loss by up to 40%. If you plan to sheathe the walls and ceiling using frame structures, then this will allow you to mount additional layers of hydro, heat and vapor barrier.
- If there is no frame, then you can perform the insulation treatment using mixtures, mastics and impregnations. Resistance to fungi and insects is achieved in a similar way, using special antiseptic solutions.
- Such wood processing initially relieves you of the problem of the appearance of rodents, which is very important for a country house.
- Many materials combine the listed properties at the same time. This saves you the trouble of doing the same jobs over and over.
- All of the above measures will increase the service life of your repair, and the house as a whole, and create a favorable climate for its inhabitants.
Finishing materials
There is a great variety of materials on the market today. It will be very difficult for an inexperienced person to understand them, if not impossible.
Therefore, we will try to make the most detailed analysis of all common options:
- One of the most affordable ways is to decorate the walls of a wooden house with plasterboard. This material enjoys unprecedented popularity today.
It is unpretentious and easy to handle, strong and flexible at the same time. There are even moisture resistant and fireproof sheets (GKLVO).

- Another advantage of using this material is that you get perfectly flat walls and ceilings. And all this for a very reasonable price.
The average price of one square meter of drywall will cost you about 100 rubles (excluding the cost of the frame). - You may not have to spend money on a frame, since a wooden house has many wooden beams, or it may even be of a frame type, which will simplify the process of installing drywall as much as possible. In this case, the set of tools required for installation is also reduced.
All you need is a screwdriver, a hacksaw for wood and an ordinary stationery knife.

- It is also very important that when creating frames, you have the opportunity to hide all technical units, such as: elements of the heating system; ventilation, electrical wiring; water and sewer pipes; unnecessary floors that do not carry any aesthetic value.
- Also, the free space under the main skin is well ventilated, which saves you from excess moisture. In addition, you can create niches, build in lighting fixtures, consumer electronics, and even an air conditioner.
Lining and plywood
Decorating the walls of a wooden house with plasterboard is a profitable and simple business, but there will always be people who will ask: “Where is the natural appearance? Where is the unity with nature?
We built an ordinary city house! "
In this case, natural materials will come to your aid:
- One of the most common and beautiful options is clapboard wall decoration. Lining is a planed wooden panel with a comb-groove fastening system.
The standard panel width is 96 mm, the length ranges from 2 to 6 meters.

- The lining is of several types, differing from each other in the profile of the board, in the thickness and width of the working surface. Let's note the most common ones.
- Standard is a regular board with straight bevels (see photo above). Block house is a wider board made in the form of a rounded bar. Timber imitation - the name speaks for itself.
This view is also wider than the standard one. - All lining is divided into four quality classes: "Extra", "A", "B" and "C". Best to Worst. Also pay attention to the type of wood.
You can find additional information on the properties of each variety separately on our website. - Mounting the lining to a wooden base is also quite simple. From the tools you will need a screwdriver and an electric jigsaw.
The board is fastened using a secret metal clasp, which is fixed with ordinary wood screws. - Decorating walls with plywood in a wooden house is another way to achieve great looks and functionality using materials made from wood.
- Plywood may not be as environmentally friendly as lining, but its basic properties are not inferior to natural wood. Large areas can be sheathed with this material with ease.
- The main thing to remember when choosing plywood is the same ubiquitous moisture. If you have not insulated the room from leaks and condensation, then be prepared for the appearance of dark spots and streaks, and over time, the plywood in these places will rot.
Therefore, approach the issue of decoration wisely. Not only the appearance is important, but also the functionality of the room.

- Take a look at the image above, and you will understand that even a rough plywood finish with seams can complement the overall style and create an original appearance of the room.
- In this room, all the advantages of timber frame construction are realized. We see many niches (see How to finish a niche in a wall and in a partition), shelves and shelves.
Built-in lighting visually divides the space into zones, and favorably emphasizes each of them. - The far wall is finished with clapboard, and in its center there is a screen canvas for a projector. He himself nestled on a supporting beam, which is also decorated with plywood.
The floor is sewn up with the same material, but the installation was done more carefully, without obvious seams.
A private house built of wood cannot always be considered a complete structure, since in many cases it requires external and internal wall decoration. There are many different options, but not all of them are suitable for cladding this kind of building. In this article we will look at how you can sheathe a wooden house inside and out and how best to do it yourself.
When you need to sheathe a wooden house
To begin with, it is worth highlighting those buildings that initially do not make sense to somehow sheathe the outside, and even more so to do insulation. Whichever finishing option you choose, it will not be cheap, and therefore impractical for wooden houses of summer or periodical residence. As for finishing the home from the inside, it is more a matter of design and the wishes of the homeowner than a necessity. After all, wooden walls made of timber or rounded logs always look attractive.
Now we will give cases when wooden houses are cladding from the outside:
- there is a solid and strong log house, but old enough, which is why the appearance of the building leaves much to be desired;
- frame buildings made of wood must be veneered in any case on both sides, this is their design;
- if a wooden house built from a bar or log needs additional protection and wall insulation.
Often there are log houses that have stood for more than 50 years and are ready to serve the same amount. Additional cladding from the street will not only allow you to change the appearance of the home for the better, but also protect the wood from precipitation and in this way extend its service life. The same protection will not interfere with walls in need of insulation. Since it is customary to carry out thermal insulation outside, and not inside a wooden house, the insulation must be hidden behind a hydro-barrier and revetted, which will be discussed below.
Advice. The exterior decoration of a newly built wooden house is carried out after 1 year. The shrinkage of buildings of this type is quite significant, as a result of which the external design of the finished walls may suffer and everything will have to be redone.

Materials for exterior and interior decoration
Despite the wide selection of facing materials, their list for wooden houses is somewhat limited for various reasons. For example, it is relatively inexpensive to decorate a house with plaster, but this method is only suitable for frame buildings sheathed from the outside with OSB sheets, as shown in the diagram below. Plastering a log cabin or a dwelling from a bar will be problematic.

As you can see in the diagram, the basic mineral wool insulation located inside the wall is supplemented with a layer of polystyrene or expanded polystyrene attached to the OSB plywood sheathing sheets. And after that, tinted decorative plaster is applied. But such a facade finish is a rarity for a wooden house, the following materials for external cladding are more common:
- vinyl siding;
- wood siding, the so-called block house;
- lining;
- complex system "ventilated facade".
For reference. It is cheaper and faster to sheathe the walls of the house with painted corrugated board, this practice also takes place. But at the same time, the design of the building looks completely cheap and resembles a production building. In addition, the corrugated board quickly fade in the sun and loses color. Unless you get an expensive material coated with a pattern, as in the photo:

Vinyl siding is a very popular material, it is relatively inexpensive and retains its appearance for a long time, moreover, with its help it is quite possible to sheathe a wooden house on your own. It will be more expensive to decorate the walls with another siding - an imitation of a bar and a rounded log called "block house".

This is a very attractive and pretty material, but it requires maintenance, like a regular lining made of wood.

If we talk about what is the best way to sheathe a wooden house without reference to the cost of materials, then the “ventilated facade” system is beyond competition. It is a frame made of galvanized profiles, inside of which insulation is attached, and outside - finishing elements. Moreover, the latter can look like siding, brick or natural stone - to choose from. True, the system can hardly be called cheap, and not every homeowner can handle the installation.

It is easier to solve the problem than to decorate the walls of a wooden house from the inside. For this purpose, the following are most often used:
- ordinary and moisture resistant drywall;
- OSB particle sheets;
- ordinary sheathing boards - lining.
Drywall and OSB are an excellent basis for any finishing layer - various wallpapers, tiles and other materials. Moisture-resistant gypsum boards are perfect for the inner lining of the bathroom, and the lining is for the bath built into the house. OSB boards are not used very often inside buildings, since drywall is much more environmentally friendly.
A few words about the insulation used. It is common knowledge that houses built of wood must "breathe". This means that the material of the walls is transparent to vapors, due to which moisture from the inside of the premises is removed to the outside, passing through the wood. If a vapor-tight barrier is placed in their way, then moisture will condense in front of it, which will lead to the gradual destruction of the fence. Therefore, it is not recommended to use moisture-repellent polymers such as penoplex or penofol.
The best solution for insulation when decorating a wooden house is mineral or basalt wool. It is vapor-permeable and absolutely not subject to combustion.

An exception to the rule is a frame building, where the mineral wool layer is part of the enclosing structure, and there is no main wall. Here, the insulation is protected from vapor penetration by a film on the one hand and waterproofing on the other, as shown in the diagram:

Sheathing a wooden house with siding
This exterior decoration of the house can be carried out with or without insulation, if necessary. But in any case, it is necessary to provide an air gap for ventilation between the vinyl siding and the wall. Its task is to remove moisture that enters from the outside on a diffusion membrane, which plays the role of a hydro and wind barrier. This is why vinyl siding sheets do not attach directly to walls, no matter how flat. First, it is necessary to assemble the lathing from wooden beams, less often from galvanized profiles.

Advice. Before sheathing an old chopped house, you should thoroughly dig in the cracks between the logs, using natural materials for this - felt, tow or moss.
The width of the lathing bars for external finishing without insulation should be from 3 to 5 cm in order to provide an air gap. The interval between the slats is 40-50 cm. But first of all, a diffusion membrane is laid, it is capable of letting in vapors, but reflecting water. Membrane sheets are laid horizontally, starting from the bottom, with an overlap of 10 cm and gluing at the joints with tape. After that, it is pressed with bars or lathing profiles, installed vertically.

Note. If you plan to install vertical siding, then the beams should be fixed horizontally. They should be pretreated with an antiseptic composition.
Also, lathing strips frame all openings - windows and entrance doors. At the same time, it is better to nail wooden elements to the wall, and not screw them on with self-tapping screws. The latter do not allow structures to move during shrinkage or thermal expansion. An important point: the surfaces of all the bars must be strictly vertical and aligned in one plane. Now you can start installing the siding using the starter and other types of planks shown in the figure:

When adjusting the siding, it is important to take into account its thermal elongation, so the ends of the vinyl strips should not rest against the slots of the corner strips on the sides (meaning horizontal installation). The strips must be cut off and inserted between the strips with a gap of 3-5 mm, and the nails must not be driven in until they stop. For this, oval holes are made in the siding so that the strip can move a little. By the way, the installation is carried out from the starting bar - from the bottom up.

When the length of 1 strip is not enough for sheathing the entire wall of a wooden house, then you need to put one or more connecting strips, placing them as aesthetically as possible. Although siding is allowed to be laid with an overlap (without a plank), such a connection looks unpleasant, and therefore it is worth using it as a last resort. Well, there are special vinyl strips for framing windows and doors.
If it is decided to combine the finishing process with insulation, then the installation of heat-insulating material is also part of the work procedure. Given its thickness (not less than 100 mm, and in the northern regions and all 150 mm), it is necessary to take bars for the lathing of the corresponding width. Moreover, the membrane is not applied immediately to the wall, but already on top of the insulation. It is fastened by hammering on top of the strips of a counter lattice with a thickness of 30 mm. Further work is carried out in the same way as described above.
Decorating a wooden house with a block house
In essence, a block house for cladding a house is the same siding, only made of wood, and the algorithm for carrying out the work is the same.

True, there are a number of differences that we will focus your attention on:
- there are no starter, corner or connector bars here. All joints will have to be faced from the outside with shaped elements made of wood;
- block house strips are cut strictly to size, and when forming inner and outer corners, the material is cut at an angle of 45 ° for joining;
- the canvases are fastened from bottom to top on nails or special clamps. True, the latter tend to unbend and the stripes may fall out over time;
- when the board is oriented horizontally, it is better to install with the spike up and with the groove down.

One of the most difficult knots is the adjoining of the cladding in the form of an inner corner. Of course, you can ignore the resulting gap and sheathe the corner with a shaped element. But in order for the cladding of a wooden house block house, made by hand, to be of high quality, it is worth cutting out an arched cutout in the adjoining part, as shown in the photo:

At the end, an antiseptic primer is applied to the finished surface, after which it is finished with several layers of varnish or paint.
Interior decoration with clapboard
This is one of the most popular methods of cladding private wooden houses from the inside, used in almost all rooms, and especially in the steam room. At the moment, there are several types of lining on sale:
- classic;
- block house;
- softline;
- landhouse;
- American.

The technology of wall cladding inside the house is the same for all types, and work begins with the installation of a vapor barrier made of film and installation of the lathing. The film is laid out with an overlap of 10 to 15 cm, after which the joints should be carefully glued with double-sided or ordinary tape. From above, it is pressed against the wall with battens, the thickness of which is 20 mm. The slats are nailed to the wall vertically (with horizontal installation of the cladding) at intervals of 40-50 cm.
Important. All battens of the lathing should be brought out in one vertical plane by means of various shims or mounting wedges.

The first board is fixed with self-tapping screws at a distance of 40-50 mm from the floor, taking into account the subsequent installation of the plinth. All subsequent strips are most correctly fixed with the help of metal elements - clamps, put on the previous board and nailed to the lathing bars with carnations. It is not recommended to fasten the cladding by driving nails into the grooves of the lining.

As with the exterior cladding of a block house, all joints and corners should be revetted with shaped parts or a wooden skirting board. After that, it remains to treat the wood with an antiseptic and cover with several layers of varnish. A more detailed finishing technology is shown in the video:
Internal finishing with plasterboard
Drywall is an excellent material for rough finishing of any interior surfaces of a wooden house, including the ceiling. Also, moisture-resistant gypsum plasterboard is indispensable in rooms with high humidity - in bathrooms and dressing rooms. Subsequently, you can put tiles on it or apply liquid wallpaper. The technology here is simple: first, galvanized profiles are attached to the wall or ceiling so that their shelves are in the same plane. To strengthen the structure, jumpers from the same profiles are placed between the vertical profiles.

Sheets of drywall are screwed to the shelves of the profiles with self-tapping screws so that their caps are flush with the surface of the gypsum board. The step between adjacent self-tapping screws is 10-15 cm. Where it is impossible to fasten a whole sheet, it is necessary to accurately measure and cut off a part of it. This is done with a sharpened knife or specialized tool. When the wall is completely sewn up, then the joints and the caps of the self-tapping screws must be leveled with a putty, which, after drying, should be wiped with sandpaper. At this point, the surface is ready for further cladding.

Conclusion
Thanks to the existing cladding materials, it is possible to give any wooden house a presentable appearance, and even "turn" it into stone with the help of external cladding. In addition, finishing will save wood longer and increase the life of the building as a whole. It will not be superfluous to insulate the house from the outside, as a result of which the cost of heating it will decrease.