Most often, a dacha is not only flowers and rest, it is also a harvest. These are seedlings in the spring, seedlings, transplanting into the ground and other concerns. If you belong to summer residents who are important not only for the harvest, but also for a neat, well-groomed plot with fences, then you probably wondered more than once how to arrange beautiful beds in the country with your own hands?
Do-it-yourself beautiful garden in the country


If you started a summer cottage not only for the sake of flowers and fruit and berry trees, then you definitely have beds. And usually the hardest work is their improvement. Because you need to provide for so many important nuances in order to fully enjoy the harvest. That is why we want to figure out together with you, what are they - beautiful and correct beds?


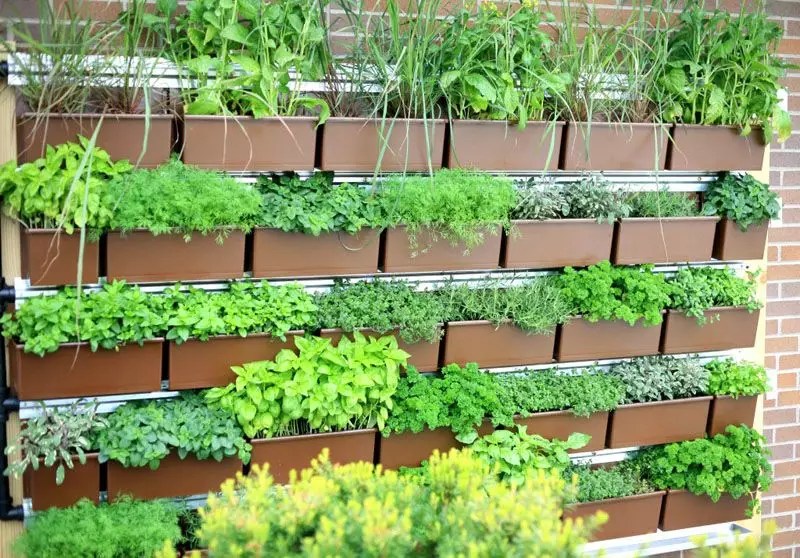
Vertical beds - how to create, what are the features, pros and cons
If you have a small plot and want to use it with maximum benefit, then you should think about creating vertical beds. Thanks to them, with small areas, you can get an excellent harvest, only once having made enough effort for this.

These beds are great if you want to:
- save space,
- grow more in a limited area,
- grow outdoors,
- simplify your care and reduce the number of probable weeds,
- facilitate watering and harvesting.
Thanks to their simple design and mobility, these beds are easy to assemble and move. And at the same time, you yourself can choose how many bushes or seeds you need for seedlings.
Varieties of vertical beds
There are several types of vertical beds:
ladder type- are created from boxes of different sizes, stacked on top of each other according to the principle of a ladder,

tubular- are plastic pipes of the selected diameter, filled with soil, with holes for seedlings,

suspended- where the beds are located on top of each other, being suspended or installed on a structure similar to a ladder,

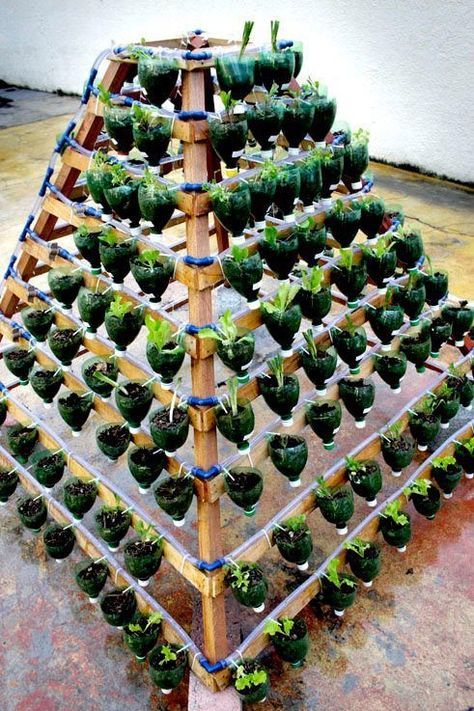
pyramids- they are created on the principle of staircases, but each new tier is smaller than the previous one on all sides and is located in the center, eventually creating the appearance of a pyramid.
Clear instructions for creating different types of vertical beds
It is not difficult to create a vertical bed, but it all depends on your skills, the tools in your arsenal and the materials you have at your disposal.
Most often they are made from planks to extend the life of their structure and get the most out of it. After all, wooden beds last longer, are more stable and harmless to future seedlings. But their arrangement requires more knowledge and experience in using tools such as a drill, screwdriver and jigsaw (if you need to cut the boards to the intended size).

In general, the basic set of materials for creating a wooden vertical bed is the same:
- boards,
- timber,
- nails,
- self-tapping screws,
- priming,
- seedlings or seeds.
First, decide on the size of the largest and smallest beds. Saw the boards into the cuts you need, and then collect boxes from them, which you stack on top of each other and fill with soil.
Do not forget that even experienced craftsmen use a pencil and tape measure so as not to be mistaken with the size. And to protect your hands, they take thick gloves.
Take advantage of a very clear, step-by-step master class by Ekaterina Komkova, telling how to build a very neat pyramid for your seedlings.

And if you liked the place near the fence or the wall of the country house, then it will suit you more, as in the relena75 master class:

They take up little space and, which fit perfectly into small areas, and due to their design are also very mobile. After all, they are so easy to move from place to place or put away for storage at the end of the season. And they are made no more difficult than their more massive friends. See for yourself by following the instructions from the Dacha Expert video tutorial:
However, a pallet can also become a stack.

Tubular the beds do not require much manufacturing effort at all. And they take up much less space in comparison with the previous ones. And the harvest will be worthy of a full-fledged garden.

To create it, it is enough to cut pipes of a suitable diameter, make holes on them using a special drill nozzle, dig in a chosen place, fill with soil and your garden is ready!
They are great for growing strawberries or cucumbers.
If you want to understand the intricacies of creating such compact beds, then you should pay attention to the master class of a dacha craftsman with the nickname Adek.
Disadvantages of vertical beds
But, like everything else related to the dacha, vertical beds are not a panacea. Indeed, due to all the same design features, they also have disadvantages.
- the soil in them is quickly depleted,
- the soil often has to be watered due to drying out with a small volume of the garden itself,
- if your region has severe winters, then the earth will freeze through, which is bad for perennial crops,
- it will take some effort and patience and the tools to create them.
In addition, due to the limited space, not every culture will take root in a vertical bed - plants with a powerful root system will not be able to fully develop.
Therefore, it is best to grow in such beds:
- salad,
- basil,
- cucumbers,
- strawberries,
- Dill.
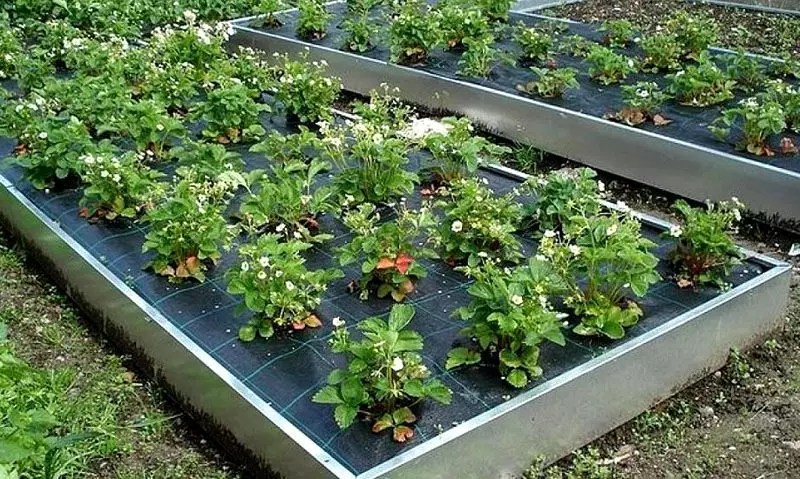
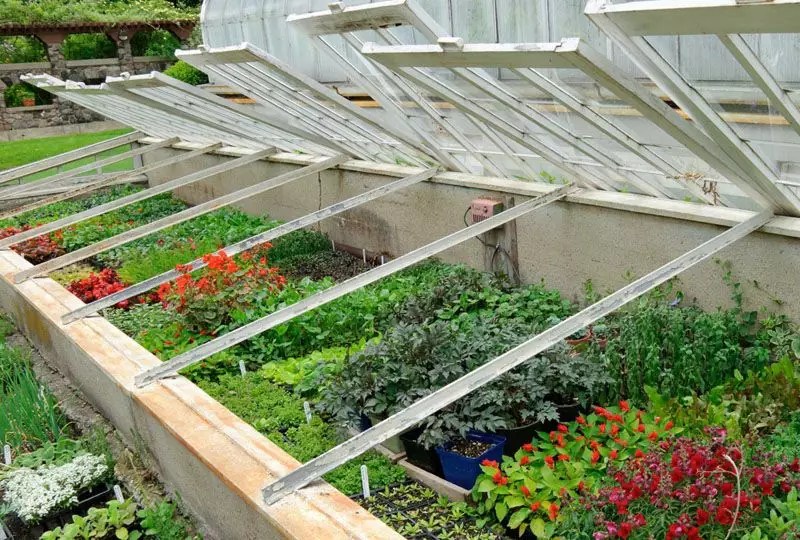
Warm and tall beds - basic requirements, pros and cons
As you can see, vertical beds are not suitable for pumpkin, corn and potatoes. Therefore, it is worth considering other options for growing garden crops. For example, if you have enough room, but the ground is cold, then you will like the option of tall, warm beds, great for delicate, thermophilic crops.


In fact, a high bed is an embankment of fertile soil, bounded on four sides by a fence. She:
- easy to assemble and disassemble,
- does not require much care and attention,
- well suited even for stony terrain,
- gives an excellent harvest.


In addition, due to the closed nature of the ecosystem, there are several times less weeds in such a bed, which means that weeding will require less effort.

They are divided into permanent and temporary. And, as the name implies, some can be used for several years in a row, while others are more often harvested for growing seedlings. But both those, and others, in essence, remain ordinary garden beds.
And most importantly, if you were visited by the idea of creating a warm garden for a summer residence with your own hands, then you do not need to put a lot of effort.

Very effective and comfortable ...

... and can be made from scrap materials!
General rules for the construction and assembly of tall beds
The optimal height is considered to be 15-50 cm from the ground (depending on the root system of the crop you want to grow.
The width varies from 90 to 120 cm.
The obligatory composition of each bed includes soil, drainage and biofuel (which will become humus, which provides the main fertilizer for the root system).

But the materials for the fence can be completely varied:
- boards,
- plastic boxes,
- pallets,
- metal profile,
- wooden boxes.
Everything will depend only on your idea and what is at hand now.
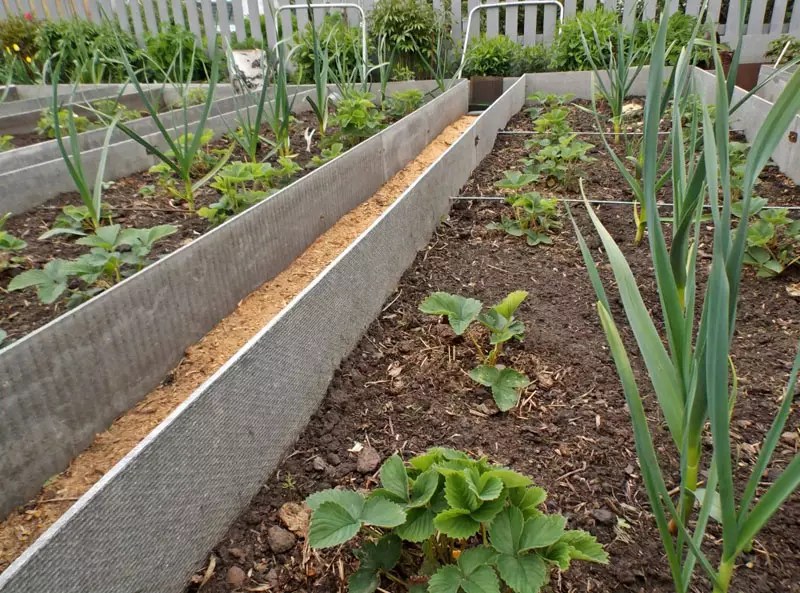
The most common and stable are the beds of boards. If, before falling asleep with earth, they are laid with roofing material, then they will last a very long time, since they will be isolated from moisture and decay.

Fencing with boards ...

... metal ...

... and again with boards
And it is quite simple to create them if you follow the detailed instructions of Evgeny Afanasyev given in the master class.

If you are not friends with the tools or do not have enough time to organize a permanent bed, then you can solve the issue differently. After all, such beds are so good that they only require a high fence. Plastic vegetable crates or pallets placed vertically and hastily knocked together to form a square, or even concrete blocks, may be the best solution.

Pallet fencing ...

... and concrete blocks.

Yes, you do not need to have a carpentry education to organize your garden. It can be made even in a spent barrel.
Or even weave it!
If you want to plant a couple of seedlings as an experiment, then you can do with pocket beds.

Here you do not need to be able to saw and plan, but the skill of sewing and sewing will come in handy. After all, such a homemade product for a summer residence and a garden, created with your own hands, will appeal to every needlewoman.
Take an old organizer for small things, combs or other household utensils, put film, soil and fertilizer in the pockets, sew on strong loops so that you can hang it on any wall or fence, and that's it - your miniature garden is ready!

As you can see, do-it-yourself beds for a summer residence and a vegetable garden are created from a variety of materials and of varying complexity. For some, you will need an impressive set of tools, but the result will also give a good harvest, or, for others, only a few boxes and a couple of barrels will be enough, although the result will also be joyful and very pleasant. The main thing that you should know at the beginning of the season is that any idea for a summer residence can be realized with your own hands - from a garden bed to a personal garden with the most exotic flowers.

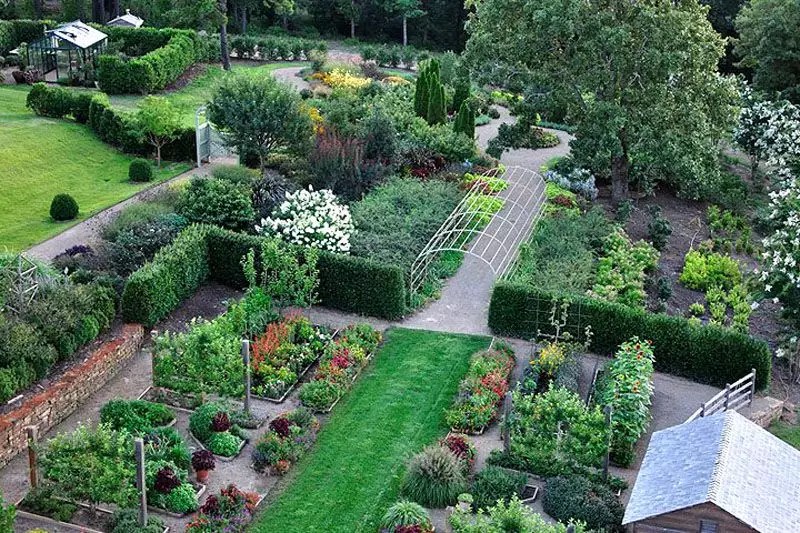
For many, their own garden or summer cottage is not only an opportunity to grow their own vegetables, but also a kind of option for recreation. Therefore, it is so important that the territory with your landings has. At the same time, you can beautifully arrange the plantings and give them a neat look using different materials. Let's find out how to make original beds with your own hands, not like everyone else. Interesting ideas in our review will help you create a variety of designs.
Do-it-yourself beds are not like everyone else: interesting ideas and tips for their arrangement
The design of the beds in the garden depends on the selected materials. Photos of popular designs are presented in the article. The beds differ in the type of material used. To choose a quality material, first decide on the purpose and shape of the structures. The location of the landings is also an important factor.

Using the sides for framing is practical and beautiful. Such barriers prevent the soil from crumbling, and also give the territory a well-groomed appearance. It is a good rainy day.
In the video below you can see how you can make reliable enclosing elements:
When creating beds, use the following nuances:
- the width of the bed can be 50-70 cm, the height is -30-60, and the distance between the paths is 40-50 cm;
- the length of the bed depends on the area of the personal plot, as well as on the volume of the crop;
- before the construction of the beds, the marking of the planting territory is carried out. This takes into account the agrotechnical characteristics of plants;
- crop yield per 1 sq. m .;
- plant compatibility;
- with a slope of the site;
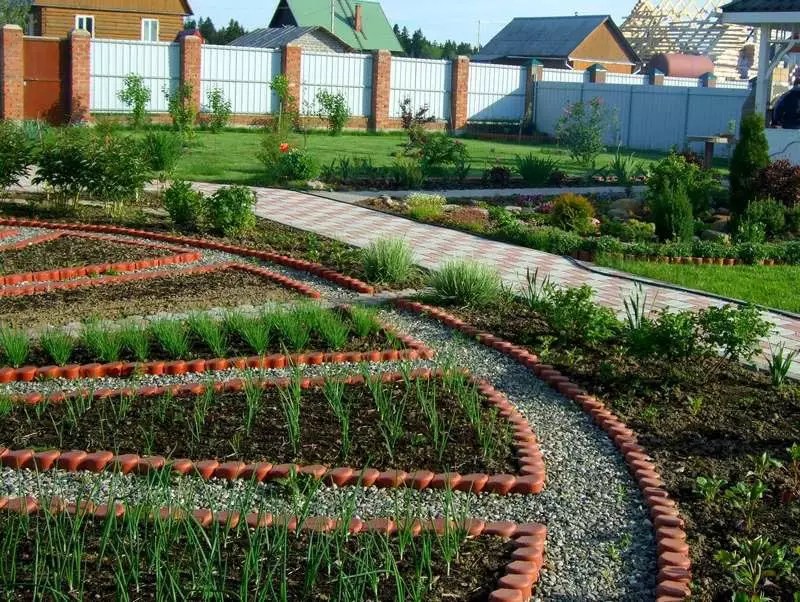
The nuances of designing a garden design with beds
Do-it-yourself photos of beautiful beds will help you decorate your garden. This process must be accompanied by a rational distribution of space, as well as the correct combination of vegetable crops.

If your site has a small area, then choose the corner version of the beds. You can try radial and radial layouts. The radial pattern is often used along. It can be used for the local area.
You can install rectangular or round beds and plantings along the yard and garden paths.

Pay attention to the compatibility of the crops that you intend to plant in the same area. There are special tables that will help determine the favorable neighborhood of individual crops.
The creation of the layout of the garden and the location of the beds should be done taking into account some recommendations:
- ... The site must be divided into an economic zone, a recreation area and a front one;
- it is important to think it over. The site should be lit from all sides, as many vegetable crops love the sun;
- limit planting areas to create additional protection and quality care for crops;
- placement of landings and original configurations;

- what matters is the width of the stands and the aisles between them. Experienced gardeners advise against making a width of more than 70 cm;
- site improvement is the most important component.
Decorative bumpers must be used for do-it-yourself beds. Not like everyone else's interesting ideas can be found on our website. With the help of the sides, you can raise the embankments. If the design of the entire territory involves the use of smooth lines, then you can make curly frames from ready-made modules.

Planting plants in containers has many benefits. They are especially appreciated for their mobility. You can move them anywhere in the territory. With such boxes with greens, you can not only arrange beds in the garden, but also a barbecue area or.
In compact containers, you can plant cherry tomatoes, eggplants or decorative peppers. In large containers, you can plant several crops at once.

Flower and vegetable beds look good. In this case, the flowers can be placed in groups, like bright islands.
For your information! Do not forget to use fine rubble, granite elements or wood cuts to decorate the paths.
DIY gardening in the country: how to make the right size
When planning your garden space, consider the size of your plantings. The placement of narrow ones for vegetables is popular, since such a design makes it easier to care for the plantings.

The functional design of the beds is carried out taking into account their length, height and width, which are determined in advance. The size parameters can affect the yield, the level of complexity of the design, as well as the appearance of the beds.
You can choose any width, but the best option is 70-90 cm. On such beds, plants can be planted in several rows. Even at a size of 90 cm, you can easily reach the center of the planting from both sides. If you plan to plant vegetables near the wall or, then do not make the width more than 50 cm.
Particular attention should be paid to the height. If you plant plants on a hill, then they can freeze in winter, so not the best solution for perennials. In this case, the height can be no more than 15-20 cm.
Do-it-yourself design of garden beds in the country: photos of paths and materials
When decorating the garden with your own hands, not like everyone else's interesting ideas, you can bring to life with the help of unusual paths. For their arrangement, stone, sawdust or crushed stone is used.

You can concrete paths, such a coating is particularly convenient. And if you are going to change the planting patterns every year, then lay out the paths with wooden platforms, rubber or.

If no other materials are available, tree bark or wood shavings can be used. This material does not rot, unlike sawdust.
Green manures can be planted on the paths, which will enrich the soil and also help to obtain high-quality mulch. But such a coating is not dense enough and it will be inconvenient to walk on it.
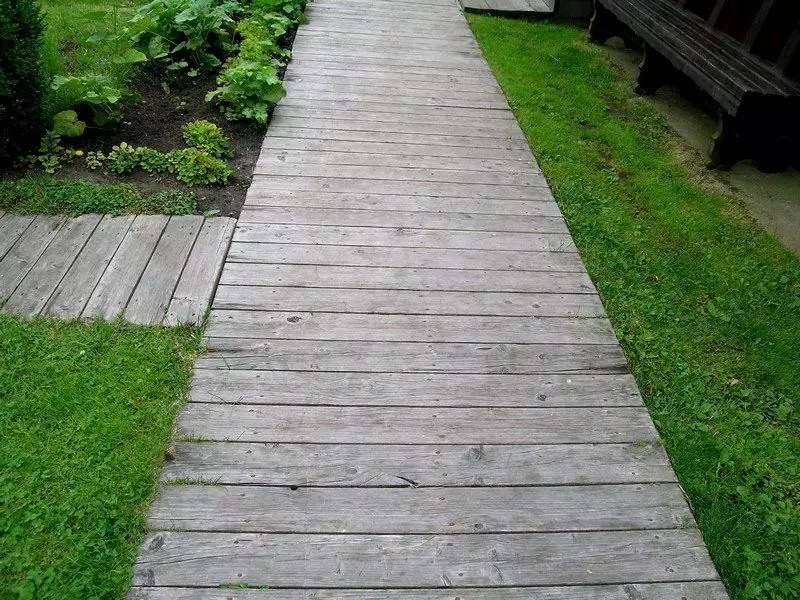 g Tracks from boards
 The budget options include crushed stone sprinkling. In some cases, pieces of roofing material, laths of laths and flat slate are used.
From pieces of ceramic tiles, you can lay out a variety of ornaments and mosaics. A reliable coating is obtained from multi-colored.
For your information! The materials of the paths and fences must be compatible with each other. For stone fences, rubble, paving stones, or tiles are a good option. If the structures are wooden, then the paths can be made from wood cuts or sawdust.
How to make a fence for the beds with your own hands
To create high-quality and beautiful designs, pay attention to the choice of materials for the manufacture of beds.
The design instructions begin with universal steps. First you need to prepare and level the soil. Apply markings around the perimeter of the landings.
Let's consider some options for materials:
- for borders it is used steel material with added polyurethane... This solution will keep the structures from fading for a long time. The material is easy to install and can be dismantled when cold weather sets in. In addition, such fences are resistant to corrosion and are distinguished by their mechanical strength;

- through plastic panels you can create multi-tiered structures. In this case, the elements can have a curved or smooth shape. This material is in demand due to its resistance to temperature extremes, as well as its high strength. You can make an original bed from plastic pipes;

- common material is wood... Before use, such a material will have to be treated with additional impregnations, as it quickly deteriorates. More expensive solutions include decking;

- polycarbonate curbs produced in a variety of colors. This material is fire resistant and resistant to mechanical stress;

- slate durable material that perfectly withstands the effects of precipitation.

When creating any border for a garden with your own hands, adhere to the following rules:
- fences should not be high. The optimal value is from 10 to 30 cm;
- the framing should be in harmony with the configuration of the beds;
- Set the material firmly enough so that the soil does not fall out onto the paths.

For your information! Plastic fences are easy to clean. To do this, it is enough to douse them with water from a hose.
Related article:
If you do not know which plastic constructions can be used, then our review will help you. You will not only get acquainted with the specifics of such products, but also learn the most unusual ideas for their use.
Do-it-yourself options for unusual beds in the country: photos and tips
Consider the options for decorating unusual beds with your own hands from scrap materials. The photo shows the most original ideas.
With the right design, beautiful beds are in no way inferior. Some ideas you can bring to life on your own:
- high beds allow to raise plants, and also contribute to their rapid heating and development of seedlings;
- round structures look unusual. They can be used to grow beets, cabbage, tomatoes and radishes;

- multi-level structures recommended for small areas;

- for creating ladder apply;

- vertical made in the form of boxes for seedlings or in the form of plastic pipes. They are fixed vertically, which significantly saves space. Vertical beds are used for strawberries, onions, lettuce, herbs and even cucumbers;

- comfortable suspended structures... You can plant greens or strawberries in them.

To create beds, you can use any materials at hand. These can be plastic boxes, barrels or wooden containers.
Related article:
In this article, we will look at how to properly use the curb tape, prices and reviews for these products, and also find out what types of such decor can be used for the landscape design of your site.
How to make a strawberry bed with your own hands: photo and manufacturing method
Let's find out what you can make beds for strawberries and other materials. For growing, wall and vertical structures are suitable, which provide optimal conditions for this plant. You can use spunbond. The price per meter of this material is less than the cost of film coatings.
So, here are the advantages of such designs:
- used for installation on a terrace or veranda;
- fill the space along the fences;
- can be placed on walls.

How to create a strawberry garden with your own hands from car tires
You can make a strawberry pyramid. In this case, you need tires from the car. This material is ideal for creating multi-tiered structures.
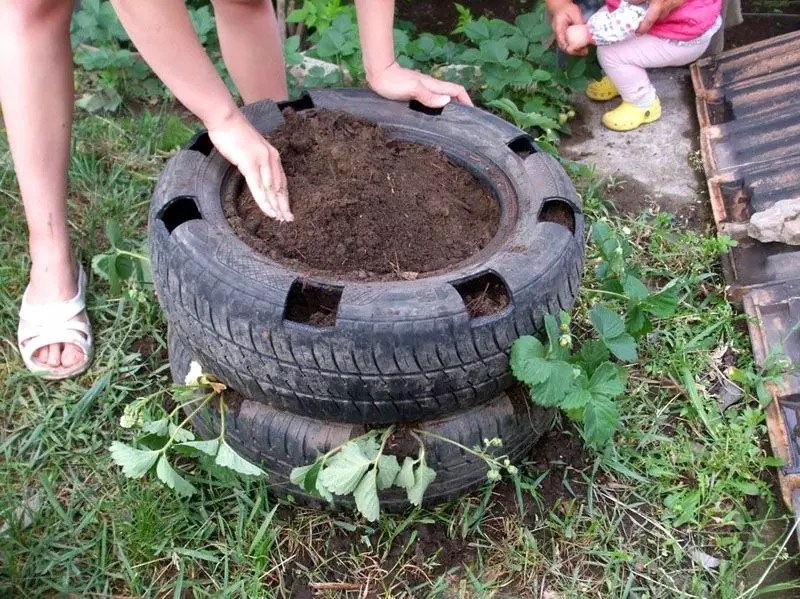
The tires are first cleaned, then washed, and then dried. Then the material should be painted over in the chosen color. Make holes on the sides. Then the tire is mounted in place. A pipe is installed in the center, and soil is poured inside the tire. Be sure to wrap the pipe with synthetic fabric and punch holes in it. The rest of the tires are laid on top and also filled with soil.

When the bed is done, fill the pipe with water. In this case, the liquid will flow into each tier of the structure.
How to make a strawberry bed from a pipe
The option of arranging vertical beds for strawberries from.
To make an interesting design, you will need two types of pipes with different diameters. In a pipe with a large diameter, make holes for planting seedlings. And in the smaller part, make holes for. The length of the structure can be any. Planting strawberries in a pipe horizontally, can be done from separate elements.
Then the smaller product is inserted into the larger one, and the space between them is filled with soil. Such a material is resistant to environmental influences, which is why it is so often used.
You can also make original strawberry beds from a sewer pipe.
In the table you can see the installation step by step.
| Image | Installation steps |
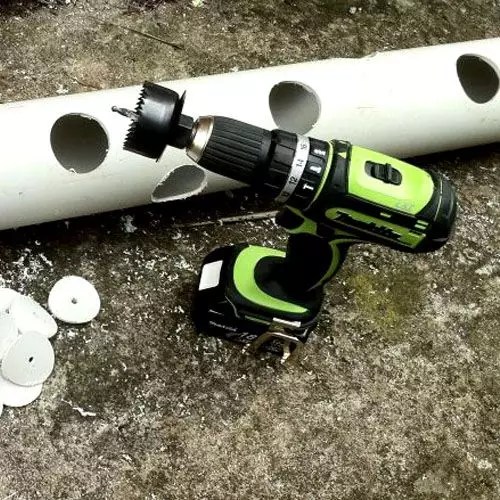 | Holes are cut in the surface of the pipe, the diameter of which should not exceed 25 -45 mm. The distance between the holes should be about 100-150 mm. |
 | Preparing the irrigation pipe. Punch holes with an awl. The rate of watering the soil depends on their value. Then wrap the part with spunbond or burlap, and then secure the material. Cover the bottom hole with a plug. Place a watering can at the top. |
 | Place the large pipe in a recess up to 0.5 meters. Sprinkle gravel around and then tamp. In the fall, such designs can be moved to a warmer place. |
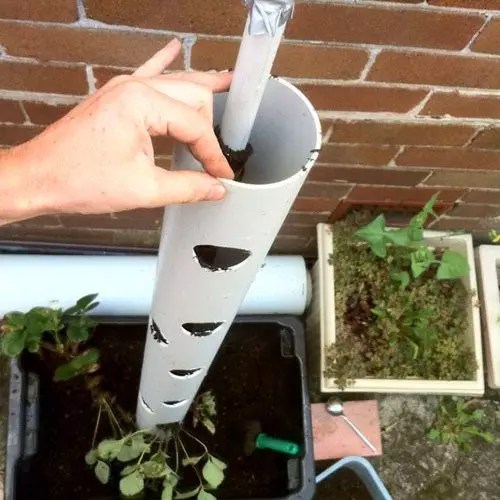 | Place a smaller pipe inside, and then pour the substrate around. After watering, the soil can get stuck, so it may need to be added occasionally. |
 | Plant outlets from strawberry bushes into the finished structure |
Making multi-tiered strawberry beds with your own hands
Let's figure out how to make a multi-tiered strawberry bed. In this case, constructions in the form are used. They can also be used as shelves for containers or pots.
A simple solution is to make a pyramidal structure from boxes. In this case, you will need boards that need to be connected in the form of rectangular and square products. Then the boxes are assembled according to the principle of nesting dolls: the largest element will be at the bottom, and the smallest at the top. Earth is poured into the container, and then the seedlings are placed there.

For your information! Multi-tiered structures can be made from various materials at hand, for example, from plastic bottles.
The technology of creating beds for strawberries from bags
You can try the method of growing strawberries in bags. For this, high-density polyethylene products or burlap are suitable.
Constructions made from natural materials offer superior flow capacity, environmental friendliness and durability. In case of self-production, it is recommended to additionally strengthen the material with strong threads. Then the bags need to be filled with earth and slits in them. Strawberry bushes will be placed in them. It is important to firmly secure such a product. Sew a loop on top to secure the bag to the support. This is a good option for creating tall beds in the country with your own hands. Photos allow you to see interesting ideas, for example, checkerboard design.

How to make a bed of slate with your own hands: photo ideas
Gardeners and gardeners are popular with the fencing of the beds with slate. It is a simple material that is durable. With the help of such elements, you can protect the soil embankment from creeping along the paths.
Let's note their advantages:
- used for long fences;
- the material heats up quickly, while the process of getting nutrients to the plants is accelerated;
- ease of use;
- low cost;
- long service life;
- attractive appearance.
But the slate border also has negative sides. In rainy weather and erosion of the soil, the leaves may deviate to the side.
In the video below you can see how to make a slate fence:
Useful information tion! The slate surface can be painted in any color.
Features of do-it-yourself corrugated slate beds
Let's look at how to make a bed of corrugated slate with your own hands. A similar material is used for roofing, but often small pieces remain that can be used for useful purposes.
Here's what you can do:
- cut the material into suitable pieces;
- highlight the boundaries of future plantings. Dig trenches in which you install pieces of slate and sprinkle them with earth;
- use metal pegs to fix the sheets.

Slate sheets are covered with vertical or horizontal waves. Horizontal material is more difficult to cut.
How to make a flat slate bed with your own hands
You can use flat slate for the beds. This option is not as convenient as the previous one. For beds, sheets are suitable, the length of which is about 1.75 meters.
Here is the manufacturing procedure:
- workpieces are cut into two parts;
- a trench is being dug;
- prepared parts are placed there, and then sprinkled with soil;
- holes must be made in metal corners through which bolted connections will be made;
- metal elements are connected to slate sheets. They must be additionally treated with special compounds that protect against corrosion;
- after the material has dried, it is necessary to fill the bed with organic fertilizers. It can be compost or brushwood.
Important information ! The slate must not be driven into the soil, as it can easily break.
The nuances of buying slate for beds: the price of products
You can specially buy flat slate for the garden. A grinder is suitable for cutting this material. When working with this tool, turn it so that the dust is flying away from you. Such dust can be harmful to human health, so wear glasses especially for such work.
You can also buy strips for slate beds. This material is sold for the design of various landings.
You can see the prices in the table.
| Image | Material | Dimensions (edit) | Price, rub / piece |
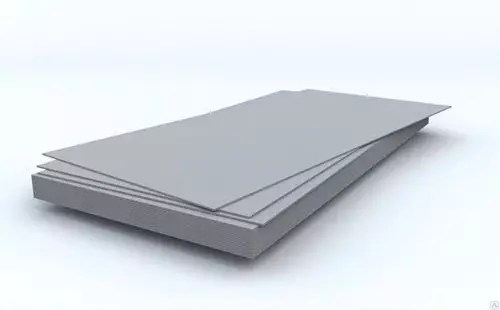 | Flat slate | 3000 * 1500 * 10mm | 1450 |
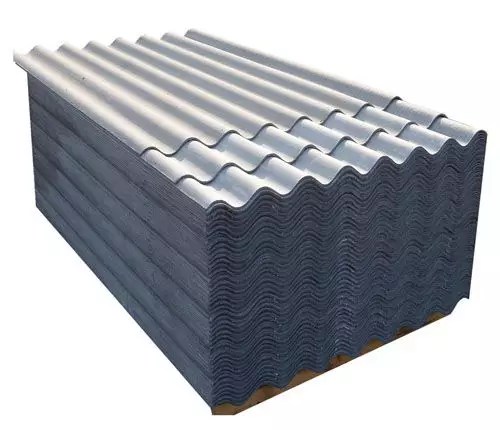 | 8 waves | 1750 * 1130 * 5.2mm | 210 to 245 |
 | 7 waves | 1750 * 980 * 5.2mm | 200 |
 | Flat not pressed | 1500 * 100 * 10mm | 389 |
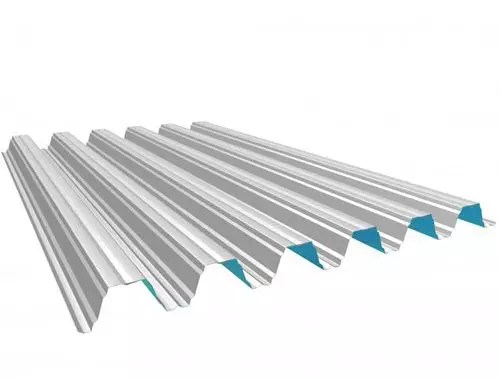 | Metal slate 0.55 | Different sizes | 150 to 208 |
 | Schiffer PVC (matte, colored) | 0.9 * 2m | 320 |
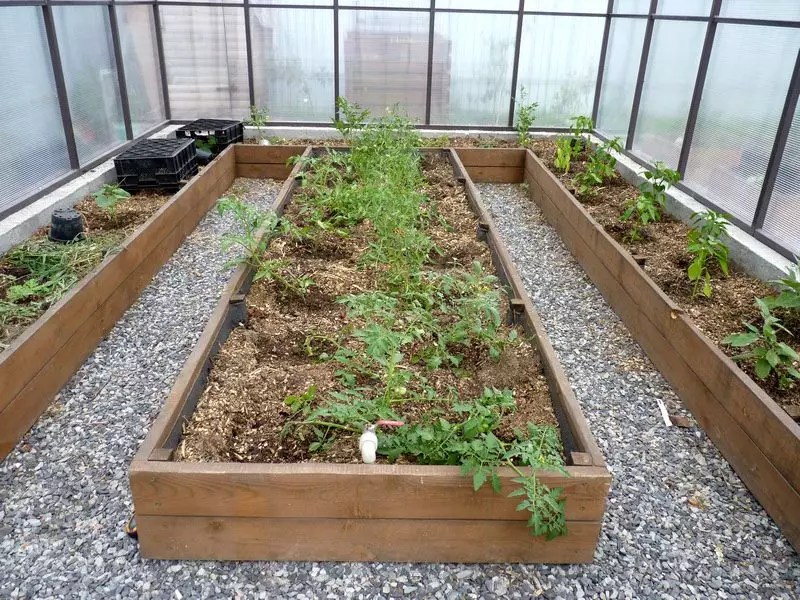
How to make beds in a greenhouse: photo options and manufacturing nuances
Beautiful photos of the beds in the greenhouse demonstrate how you can properly equip. If you organize the planting correctly, you can get a rich harvest. Greenhouses with a size of 3 * 6 m are in demand, since they can be used even in small areas. Similar designs are made from sheets. This material is highly durable and has good solar transmission. Such products are easy to assemble and disassemble, as well as easy to transport.
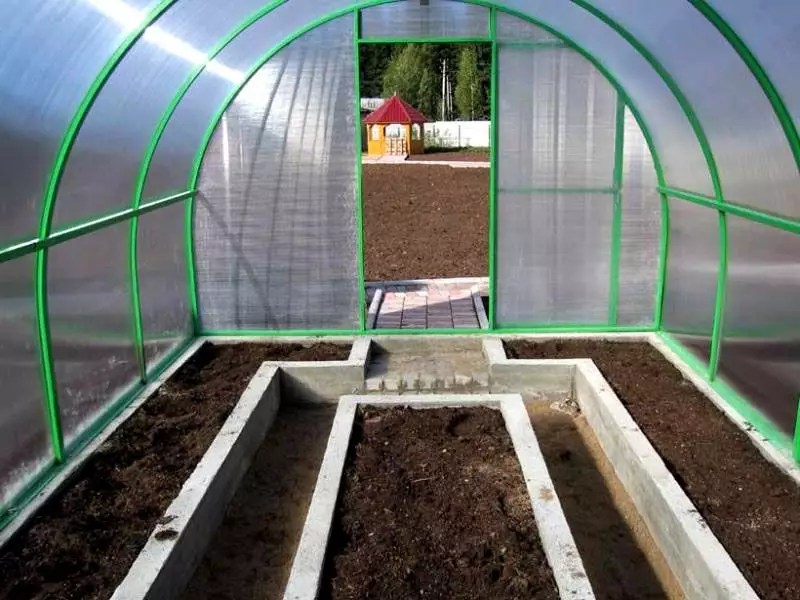
For greenhouse beds, you can use the following elements and materials:
- great as sides boards... Long parts are securely fixed with wood pegs;

- aluminum sides easy to install;

- slate sides durable and comfortable;

- as tire bumpers it is better to use cut tires;
- glass suitable for low structures;
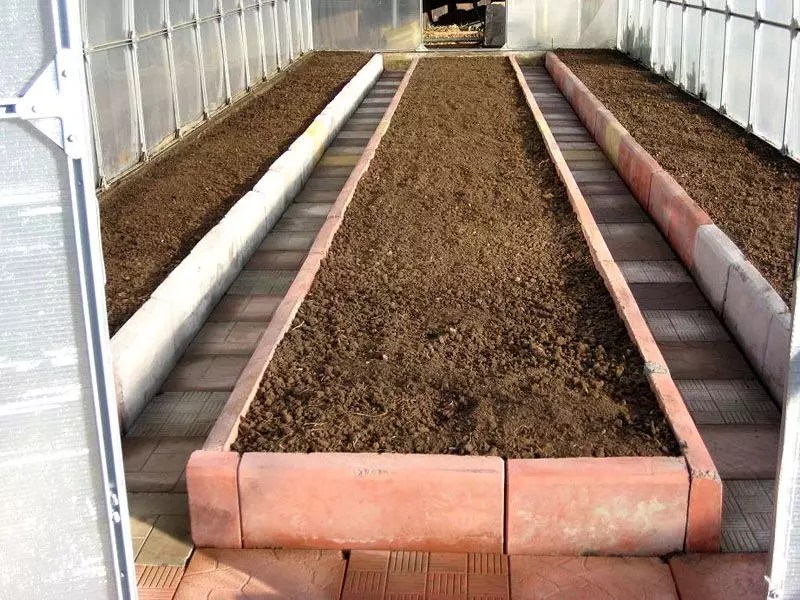
- brick fences can be operated for more than one year.
In terms of dimensions, the beds can be narrow, medium, wide. All sorts of original configurations are also popular: pyramidal, vertical, French or spiral.

For your information! The greenhouse can be built from foil, glass or wood. Functional items can be purchased in the store or made yourself from scrap materials.
Features of the location of the beds in the greenhouse 6 × 3: photo and arrangement of structures
Greenhouses 3 by 6 are especially popular, many gardeners are interested in how to arrange the beds in such structures. Incorrect planting placement can lead to a decrease in yield.

Some rules will help you make the layout correctly:
- low plants require a lot of light. To provide the required level of illumination, position the greenhouse from north to south;
- when growing tall plants, it can be installed in the direction from west to east. This approach will provide sufficient lighting for the lower parts of the seedlings;
- if the surface is not even, then step patterns can be built. In this case, the plants will be evenly illuminated.
How to make beds in a greenhouse 3 × 6: photos and layouts
A competent approach to planning the interior of the greenhouse will allow you to achieve high quality yields. Use a small bed width in a 3 meter wide greenhouse. Since the overall dimensions make it difficult to care for the plants.
Try these layouts:
- wide beds of 120 cm, and a path between them. In this case, the width of the passage will be about 0.5 m. But difficulties may arise when trying to get to the extreme plants;

- vertical placement of beds in the greenhouse;

- placement of three beds with two paths that separate them. Such a scheme has a smaller area, which makes it easier to care for;

- one wide bed in the center and two narrow paths along its edges. This allows you to properly organize even a small space and ensure maximum illumination;
- several rows of small width, located along the walls of the greenhouse and one large bed in the center.
The layout depends on the do-it-yourself installation in the greenhouse, as well as on the vegetable crops that are planned to be grown.
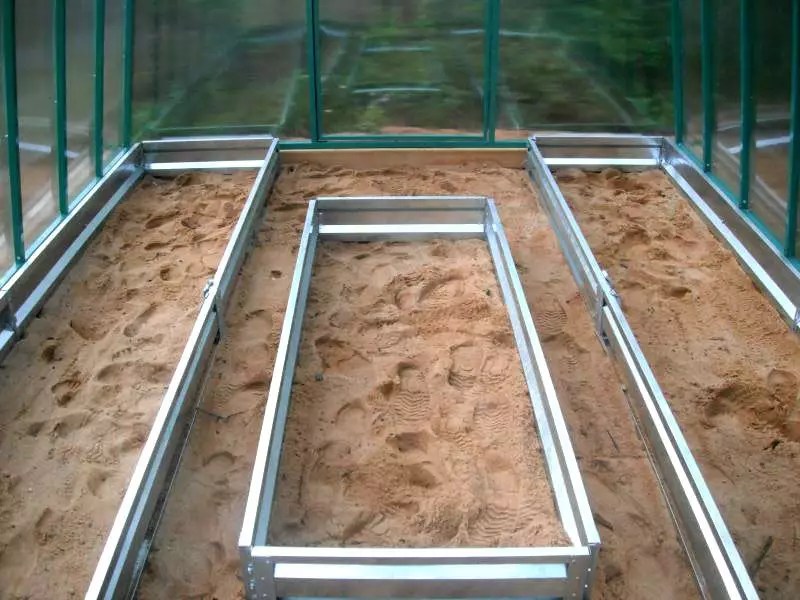
Warm beds require the use of special organic insulation. For this, a manure layer can be used, which heats the soil layer well. To increase the decay process, you can add some sawdust or straw to the manure. In this case, sawdust is first laid, and a manure layer on top. After that, the insulation is poured with boiling water. Then, after a couple of days, the manure cover is covered with soil.

Different wood chips can be used. Bark, sawdust and tree branches are laid at the bottom, then potato tops. After that, the leaves are paper and rags. Then the insulation is watered with chicken droppings. After that, the layers are covered with a film. After a week, the insulation is covered with a layer of earth, and the plants are planted.
How to make a warm bed can be seen in the video below:
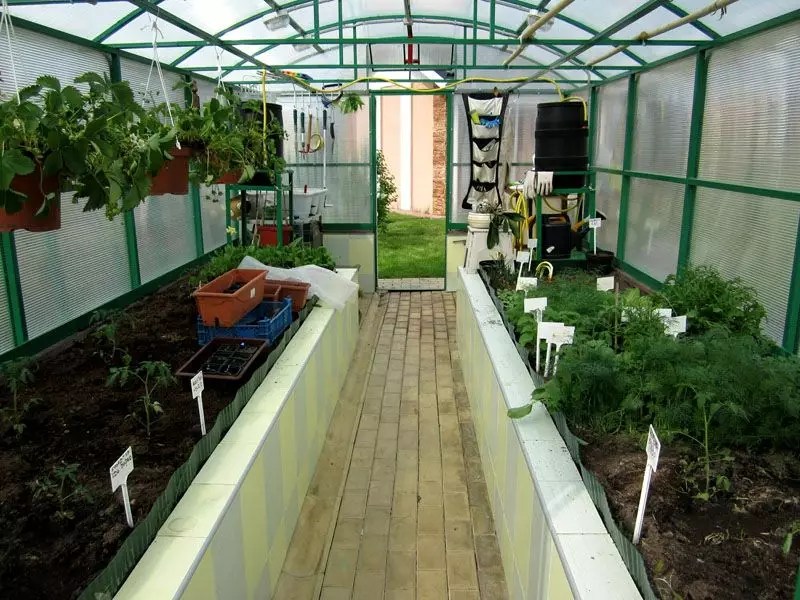
Do-it-yourself garden beds in a greenhouse: non-standard placement options
When choosing the location of the beds in height, take into account the climatic features of your region. This value can vary from 20 to 50 cm, which provides access to plants. Also, there is no accelerated drying of the soil. For unusual designs, materials such as board, slate, brick or polycarbonate are used. It is recommended to cover the bottom of the structures with straw fillers, rotten or rotten bark.
If such waste is poured with boiling water, then the fermentation process will begin, the formation of heat and rotting will increase, which has a positive effect on plant growth. The vertical arrangement helps to save valuable space. Thus, the strawberries are planted vertically in the pipes.
So, let's look at the main options:
- garters to supports often needed for plants that are too tall. To build vertical structures, you can use nets, partitions or shields. In so doing, stretching cultures will rely on such a foundation;

- shelves look like boxes and are placed one above the other. The height is determined by the needs of the plants. You can apply this method to low crops;

- plastic pipes are covered with holes where the soil is placed, and then the plants are planted. It is necessary to fix such structures in an upright position.

Article
Do you know what innovation is, how high beds came to our country from Canada. There, the land has been cultivated in this way for many years. Such planting options can be used not only for growing vegetables, but also for creating original ones. Let's find out how to make beautiful and practical high beds in the country with our own hands. Photos, descriptions of technological processes and diagrams will help you with this.
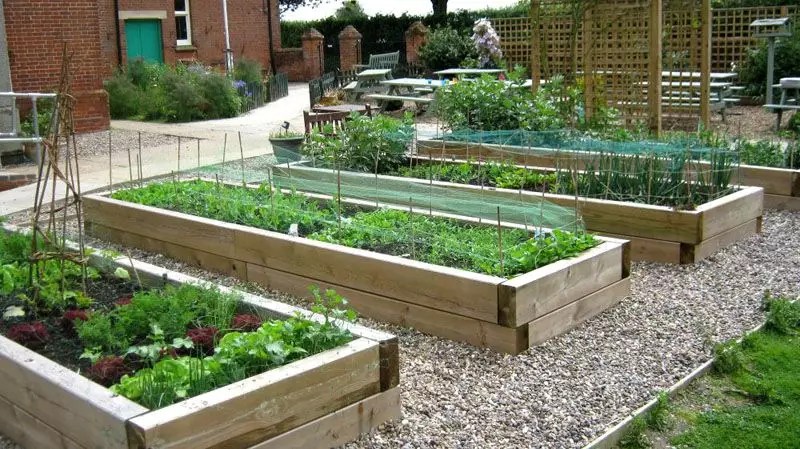
High beds in the country with their own hands: photos of structures and main characteristics
The rate of gas exchange, soil moisture and the presence of beneficial microorganisms depend on the size and shape of the beds. All these parameters have an impact on the quality of the soil.
With the help of raised beds, you can grow a large crop of berries, vegetables and fruits. At the same time, you can get good indicators even from a plot of land that is not fertile. A feature of high beds is that they warm up faster than low structures.

There are several types of vertical beds. They differ not only in material, but also in functionality. Some options are made from building materials, while others are made from simple materials.
Here are the types of beds:
- trapezoidal structures;

- multi-tiered beds;

- structures with a triangular cross section.

When creating isolated beds, factors such as illumination, soil composition, and its structure can be taken into account. At what height such beds will be placed depends on the volume of the root system, soil characteristics and personal preferences. The minimum height is 15 cm, but in order to produce better insulation, they can be raised by 30-40 cm. Warm raised plantings can be higher than 50 cm, since a layer is still laid on the bottom. Narrow beds can even be up to half your height.

The length can be very diverse. Most often, it depends on the length of the garden. If the bed is too long, then it needs to additionally strengthen the sides. When arranging any garden bed, remember your own comfort and conveniences. The best width is when you can reach the middle of the structure. The optimal value is 90-120 cm.

Different crops can be grown in high beds. It is not recommended to use plants with tall stems, as it will be inconvenient to harvest from them. Roots, strawberries, peppers, herbs and cucumbers are often planted on bulk structures.
For your information! The filler for raised beds is especially useful. It is made from organic ingredients. In this case, the root system is located in the fertile layer, which contributes to the development and growth of plants.
Related article:
Let's find out how to make original beds and what materials they can be built from. Interesting ideas in our review will help you create a variety of designs.
Features of tall beds: pros and cons
The main advantage of raised beds is that many vegetables and plants can be placed in a small area. Tall beds for strawberries, herbs and cucumbers are especially popular. Also, such designs have other advantages:
- fill beds can be filled with specially prepared soil. In this case, the quality of the soil on the site does not matter much;
- it is possible to adjust the thickness of the soil layer for any plant;
- raised vegetable gardens are easier to weed and dig;
- raised beds can be set anywhere, even in difficult terrain;
- on high embankments, seedlings can be planted earlier, since the soil in them warms up faster;
- on raised gardens, the soil is looser, which contributes to better gas exchange;
- can be used for that will hang from the edge of the fences for a high bed;
- depending on the material, you can create not only practical, but also beautiful designs. Some options can become a design masterpiece for your garden;
- high beds with sides are practically not susceptible to weed attack, and are also well protected from mold and mildew;
- installing the beds is not a complicated procedure; they can also be easily dismantled. The location of the landings can be easily changed;
- inside such structures, you can create a comfortable one;
- the soil on the raised beds is maximally protected from freezing. During early frosts, you can cover such a planting with polyethylene;
- erection of high plantings is protected from erosion during heavy rains.

Such designs have certain drawbacks, but there are not so many of them. First of all, fertilizing with mineral fertilizers will also be required. It is also important to watch out for the invasion of the bear.
For your information! Before starting work, treat wood parts with an antiseptic and special impregnations. This will prevent decay processes and protect against destruction of materials.
Creating vertical beds with your own hands: photo options
You can also create warm tall beds or vertical structures. They are popular for their appearance and space savings. In addition, it is an excellent solution for protecting plantings from various pests. Vertical structures are great for growing flowers, strawberries and herbs. You can not only make such constructions from improvised raw materials, but even purchase ready-made options. You can see how to make warm designs in the video:

Why buy a vertical strawberry bed: prices
You can see different design options for vertical beds, but their most important advantage is their miniature size. Such structures can be built from any materials, even from plastic bottles.
Vertical products require little maintenance. They are at the optimum height for easy handling.

You can see how to make a raised structure for strawberries in the video: To increase the rigidity of the pyramidal bed, you need to install an additional pole as a support element. In this case, the boards are mounted on a horizontal surface and attached to each other. A rail is installed in the base. The resulting side is fixed vertically, and then the second and third sides are attached to it. After installing the frame system, the length of the rails is measured. They are placed at intervals of 25-30 cm. To make the shelf raised, its ends should be cut off at an angle of 30 degrees. After assembly, the structure is filled with soil, which is rammed.
Technology for arranging vertical beds for strawberries from plastic pipes
For growing strawberries, you can build a vertical bed of. In this case, you need to prepare plastic pipes, a steel cable and a special knife for cutting. The volumetric section allows you to place the required amount of soil inside. The cut should be made along the structure. To fix the bed in a horizontal position, you need to make a hole in each of the halves. Then a fishing line or cable is pulled through them. Then the parts are placed one above the other. In this case, you can make different levels of pvc pipe beds with your own hands.

For your information! If you plan to place structures in a suspended state, then you need to take into account that they can swing. Therefore, it is better to install them in places that are well protected from the wind.
Erecting vertical beds with your own hands using a construction mesh
The compact design can be built for crops such as strawberries, herbs, flowers or potatoes. A vertical bed is a good solution. To do this, you need to prepare a metal mesh, straw, special soil and the necessary tools for processing the material.

To create a garden bed, you need to bend the mesh in the form of a pipe. In this case, the section should be 0.9 meters. The edges are secured with wire. Straw is laid on the sides, and the free space is filled.
To plant potatoes, these beds must be placed 50 cm above the surface. Gaps of 10 cm are left between the plants. Then the first layer should be shed, then the soil should be laid and the seedlings should be planted.
Features of arranging a vertical bed for strawberries with your own hands: using pots
For growing strawberries, you can also use ordinary ones. Such designs allow for an attractive exterior design. You can use both plastic and clay pots. Thus, you can create a layered composition.
Pots must be selected so that their diameters become smaller towards the top of the structure. In this case, the difference between the pairs of pots should differ little.

The largest pot is placed in the selected location and filled with soil. After that, a smaller pot is placed in it, etc. When the structure is ready, plants are planted in the soil and watered. The largest pot is installed at the base of the structure. A rod of a smaller size than the diameter of the container is placed inside. The pot is filled with soil, and the rest of the products are alternately strung on rods. After filling with soil, plants are planted. The pots are mounted on a post or high tree stump.
The nuances of creating vertical beds for strawberries with your own hands from tires: photo of products
There are different ways to grow cucumbers outdoors. In this case, you can build vertical beds. Also, this option is suitable for planting strawberries.
The tire structure is mounted according to the same principle as the pot structures. For this, tires of different sizes are suitable. But keep in mind that old products are not particularly environmentally friendly material.

Before mounting, the tires should be cleaned, dried and, if necessary, painted. The largest tire is laid down, and a part is cut off from the side. The hole is filled with soil and planted with plants. Thus, other elements also fit. Tires can be beautifully decorated with patterns or even unusual cuts.
Article
Gardening in Russia is famous for the fact that people are constantly adopting various low-cost ways to increase yields. The so-called warm beds have earned high popularity. Their device is designed in such a way that early heating of the soil occurs with natural (from decay of organic matter) or artificial (with the help of an energy carrier) heat.
To put it simply, a warm bed is a kind of compost pit, which has drainage at the bottom and planting soil at the top. There are three options for placing compost beds relative to ground level:
- raised above the surface;
- buried;
- mixed construction (the base is at a depth, the top is located above the ground level.
In any case, the filling of the bed will look like a puff cake, in which each layer is some kind of organic material.

Such beds are formed either in early spring or late autumn. Going into the winter with prepared beds is very rational, since before freezing in the bowels of the structure, the process of organic decomposition will already begin, and in the spring it will continue with renewed vigor.
Contents of organic warm beds
Approximate contents of raised beds from bottom to top:
- protection against rodents - mice and moles (use a metal or plastic mesh);

- drainage layer (plant branches, large branches, logs, remnants of old stumps and other bulky material);
- insulating fabric (geotextile) or a layer of old newspapers and on top of it - cardboard;
IMPORTANT. The insulating layer prevents the drainage layer from being flooded with water and also prevents weeds from germinating.
- sawdust, bark, shredded branches;
- unripe organic matter - old foliage and various plant remains;
- rotted compost;
- garden land or specially brought fertile soil.
IMPORTANT. The thickness of the top layer must be made so that the roots have enough space and they do not grow into a layer of unripe organic matter. Study in advance the specifics of those plants that you plan to plant in this garden.
Depending on the design, some layers can be removed. For example:
- if the bed lies on the ground without deepening, then a drainage layer of bulk material is not needed. There is no need for cardboard either - just cover the bottom of the bed with a protective covering from rodents, and then with a waterproof technical cloth so that irrigation water does not quickly go into the soil;

- if the bed is of a mixed type (buried with an elevation), make sure that the ground level is somewhere between a layer of cardboard and unrepaired organic matter.
There are no hard and fast rules. The main task of a novice designer of warm beds is to understand the whole principle of work:
- sequence of layers;
- organization of the decay process;
- rodent protection;
- thickness of each layer of filler.
Most of the questions are related to how thick each layer should be. Experienced gardeners recommend paying attention to key points:
- top fertile soil with compost 15-25 cm (depending on the length of the roots going deeper);
- unripe organic matter (old leaves, etc.) in a layer about 12-15 cm thick;
- a layer of old branches, sawdust - about 10-13 cm;
- lower drainage layer - from 5 to 10 cm.

Varieties
There are different versions of the beds that provide natural warmth from the inside. The choice of design depends on how much you are willing to spend time and effort on the result. Remember that any garden design is considered at the same time as:
- the ability to increase yields;
- a means of facilitating further gardening work, increasing convenience;
- aesthetic organization of plantations and plantings on the site.
Technologically the simplest option. What are the advantages of a warm bed of this type:
- it is much easier to take care of them;
- there is no need for strenuous work on digging the earth to the depth;
IMPORTANT. Ideal for conditions where the soil is excessively waterlogged (inside the warm bed contour, an optimal environment is created due to the selection of fillers, and the bottom is covered with insulating material).
- it is easy to create clear geometric shapes (relevant for lovers of landscape design delights);

- it is much easier to protect plant roots from mice and moles.
Recessed beds
The most difficult option in terms of labor costs. However, the result is more solid:
- under ground level, organic matter does not freeze as much as in raised beds, so the process of heat release begins much earlier in spring;
- once digging out a trench and filling it with organic materials, you do not have to worry about repeated work for several years (the shelf life is about 3-4 years without the need to change the internal contents);
- saving time and effort on the side framing of the beds, because you can do without it (if the surface of the garden is flush with the level of the surrounding ground).

Mixed type
This option is considered optimal:
- the buried part plays a long-term role (it is not necessary to dig it up every spring);
- the elevation of the upper fertile part allows you to process the garden with less effort;
IMPORTANT. Seated work is relevant for older people. Often they suffer from atherosclerosis and other vascular diseases, in which a head-down position is contraindicated.
- the recommended height of the part protruding above the surface is about 55-70 cm;

- the towering part will have to be decorated with side walls, that is, an aesthetically attractive look will be obtained - the garden or vegetable garden will look more stylish, please the eye with landscape design.
Materials (edit)
A very important aspect is what to make the contour of the garden from. Although there are a wide variety of materials on the market, they have different properties:
- aesthetic appearance;
- financial high cost / low cost;
- fragility / durability;
- temperature response;
- safety from the point of view of ecology.
IMPORTANT. Never use glass. There is a great risk of battle, and it is simply unrealistic to remove small fragments from the soil.
The final decision is always yours, and let it be weighed. A brief overview of the materials claiming to be used:

Do-it-yourself garden
In this article, we will look at the mixed type construct:
- recessed by the base;
- having an aboveground part;
- the side frame is wooden.
Such instructions will help you better understand the general scheme and details of working with various materials.
Preparation for work

Tools and material:
- carpentry (saw, drill, level, screwdriver, measuring tape, corner);
- garden (shovel, rake, pitchfork, garden cart for transporting compost and other filler materials, earth drill);
- edged board 2-2.5 cm thick, 17-20 cm wide;
- bar 4x4 cm for stakes;
- metal or plastic rodent net.
Garden bed dimensions:
- in width, it is important that it is convenient to work with the garden bed when growing plants. It is optimal if the bed is not wider than 1.0-1.3 m. In narrow places of the site (for example, near the fence), beds with a width of 70 cm can be made. Even with one-sided access, the plantings will receive the necessary care and attention of the gardener.
- arbitrary length - as far as the configuration of your garden allows.

- as mentioned above, the ground part of the bed is recommended with a height of 50-75 cm;
- however, this recommendation is optional. Moreover, taking into account the fact that the thickness of the inner layers varies. Therefore, the bed can be placed inside a lower contour (20-35 cm).
IMPORTANT. Plan ahead, so it will be easier for you to implement your plans without wasting time for rework and revisions.
Frame fabrication
Please note that the sides of the bed will have to be made of a double board, that is, place one board vertically on top of the other so that the height of the walls is sufficient. Thus, you have the following actions:
- measure the required length, saw the boards (4 pcs. side, 4 pcs. end);

- prepare stakes from a 4x4 cm bar, 75-80 cm long;

IMPORTANT. How many stakes are required? With a bed length of 2-2.5 meters, 6 pieces are enough. With a bed length of 3.5-4 meters, 8 pieces are enough.
- make two-level boards by joining two boards together (use board trimmings, dismissed with a hatchet into planks);

- keep in mind that self-tapping screws should not go beyond the drilled wood (when buying self-tapping screws, remember that the thickness of the board is 2.5 cm, and it must be multiplied by two, since the connecting strips will be the same thickness).
This completes the preparation. It will be necessary to install the frame directly into the trench - in the same place, fasten it at the corners of the structure. The measuring angle and level will help you to maintain accuracy.
Trench and its filling
Step-by-step actions:
- make a marking of the beds or beds (basting with pegs and a stretched cord will allow you to dig a trench of an even geometric shape);

- it is desirable to dig a trench so that its depth is about 40-45 cm;

- lay down a rodent net (it is sold in hardware stores, ask for a reinforcing mesh or netting);
- create a drainage layer (see above for details) - coarse organic matter that overheats for a long time;
- cover with old newspapers, cardboard;

- install side walls;
- drill holes for support stakes;

- at the corners of the structure, connect the boards and stakes with self-tapping screws;
- use a corner and a level so that the structure "sits" in the ground exactly both horizontally and perpendicular to the mating corners;
- continue to fill the raised part of the bed;
- add dry grass, foliage and other unripe organic matter;

- further - humus, manure or compost;
- the final layer is high-quality garden soil.
IMPORTANT. In fertile areas, before starting trenching, carefully remove the top layer of the earth, set it aside. This is the sod you use for planting.
After all the steps, do not forget to water the garden with water to create a moist environment. In such conditions, the process of rotting inside will begin. Do not try to moisten each layer with water as the trench is filled. There is no hurry, let everything go at a moderate speed. There is still time before planting, and the contents of the garden should exactly rot and be loose, and not rot in a viscous slurry.
Video - Do-it-yourself warm beds
Warm beds with artificial heating
The concept is that:
- water pipes made of cross-linked polyethylene are laid on the drainage layer;
- the pipe structure is connected to the electrical cable;
- heating is controlled by the user (turning on and off the heat supply - as needed, depending on the ground temperature).
IMPORTANT. Artificial heating is optimal for covered (tilt) beds and greenhouses - the heat generated by pipes is stored inside the system, and is not sprayed out in the open air.

The order and list of fillers may vary. In any case, the most important layers should remain:
- lower drainage (it is laid directly on natural soil);
- additional insulation (prevents the cooling of the "puff cake" from below, from the ground);
- sand (takes the place of the heating pipes) - plays the role of fine-grained drainage, helps to retain heat, facilitates the passage of irrigation water to go down below).
Only after all these components is a fertile layer of earth placed at the top.

- at dachas it is advisable to use an electric cable (after all, country heating is, as a rule, temporary and low-power);
- in capital private houses, you can connect directly to the heating (do not forget to make a shut-off valve in case the house is heated, and the bed does not need to be heated at this time).

What type of heating is allowed? It can be of any type:
- gas;
- electric;
- steam;
- water;
- oven.
Operating procedure
It's actually pretty simple:
- prepare layers (large drainage, synthetic insulation, sand);
- lay water pipes. Scheme - a closed loop (to ensure the circulation of warm water in a circle);

- add a little more sand on top;

- the final layer is directly fertile soil. Use good quality garden soil as well as extra black soil. Keep in mind that when heated, the soil should feed the plants well;

- connect the greenhouse piping to a heating source.
For lack of experience with electricity, invite a more knowledgeable person to help. If you understand the electrical work, the whole process will be elementary for you, and the design will turn out to be durable, efficient and reliable.
At first glance, the garden beds do not require decorative elements, but in fact they play a big role not only in yield, but also in the appearance of the entire garden plot. While working in the garden, almost each of us would like to see our site as well-groomed and pleasing to the eye as possible.
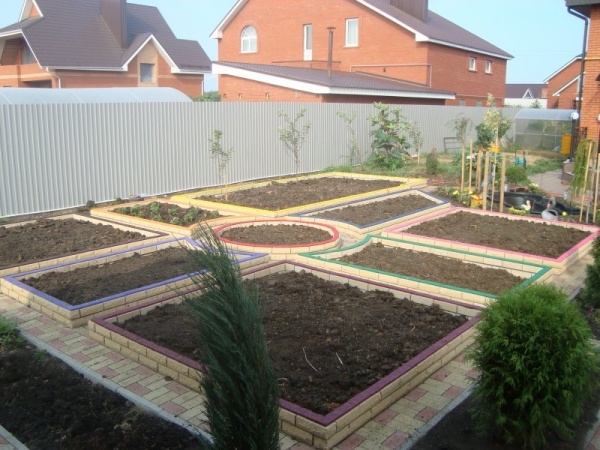
Form
The shape of the beds on the site primarily depends on your fantasies and what you want them to look like in the long run. There are a great variety of decor options: square beds, rounded, in the form of animals, various objects and other things. If you wish, you can even not adhere to the standard rules when building a garden, but come up with something new and unusual. It is recommended to arrange the beds in the garden, taking into account the features of the relief.
As a rule, there are no strict size recommendations, but there is one nuance that must be taken into account when calculating. The size of the bed should be such that you can reach the middle from either side without any inconvenience. If you need to build a bed near the fence or wall of the house, then first think about whether you can easily reach the opposite side.

Attention ! The width of the wall bed should be between 70 and 80 centimeters. The width of the bed, located directly on the site and adjacent to the wall or fence, varies from 1 meter in width, from 2.5 meters in length, and the depth ranges from 20 to 50 centimeters. It is recommended to make the distance between the beds themselves from 50 to 70 centimeters. Paths and paths between them should be about 20-50 centimeters below the surface layer of the bed.
Organization
If the summer cottage is located in lowlands and places where dampness prevails, then the beds are best built in the autumn period. It is recommended to choose a small size (1 by 1 meter), and the height should be no more than 30 centimeters. Thus, the soil will warm up much better, and the snow cover in the spring will melt much faster.
- take four wooden planks to get started;
- then collect from them a square 1 by 1 meter;
- after the base is ready, place the structure on a horizontal surface and cover it with soil mixed with fertilizer. If you need an early and bountiful harvest, then it is best to equip raised beds.

The construction process is as follows:
- in a suitable area, you need to dig a hole 40-50 centimeters deep. Choose the length of the pit according to your preferences. As for its width, here the recommended width is from 1 to 1.2 meters;
- further along the perimeter of the dug hole, it is necessary to install a semblance of a frame. The material for the frame can be selected based on your own preferences, for example, stones, bricks, small logs and others. The frame, the height of which should be from 40 to 50 centimeters, must be closed from the inside with plastic wrap;
- further on the bottom of the pit, it is necessary to install an iron mesh, which will protect the crop from rodents;
- then you should carefully fill the hole. To begin with, a layer of sawdust, shavings, cardboard and other similar long-decomposing material (1/3 of the hole high) is poured onto its bottom. Sprinkle the layer a little with earth and pour water;
- in the end, we fill in the soil, which should be mixed with manure and mineral fertilizers.

Location
If the plot is small, there may be some problems with the location of the beds. To place the beds in a small area as efficiently as possible, you should adhere to the following rules:
- it is necessary first of all to use any horizontal surfaces and suspended structures;
- the second option can be the combination of a beautifully designed garden bed with a recreation area;
- you should also pay attention to various items on your site (unnecessary barrels, old carts, etc.) that can be used to plant vegetables.
Attention ! Remember that it is necessary to place the beds on a flat horizontal surface, so that possible accumulation of excess moisture can be avoided.

Tillage
As a rule, the beds are dug twice a year, in the spring and autumn, while adding all the necessary mineral and organic fertilizers. If the digging takes place in the fall, it is best to leave the soil blocky to help retain moisture. In addition, if the ground remains blocky, then the larvae of pests in it will freeze and die. Also, instead of digging in autumn, mulching can be done. To do this, you will need to cover the soil with a sufficiently large layer consisting of peat, sawdust and rotted compost. In the spring, the unrepaired layer must be removed with a rake, and then dug up the soil.

Bumpers
Many people often do not pay enough attention to the design of the sides of the garden. As a rule, simple paths are made between them or they are upholstered around the perimeter with boards. But some want to create a beautiful view on the entire plot, including the garden. You can decorate the bumpers in different ways, from scrap or purchased materials, for example, ready-made bumpers bought in a store, bumpers made of bricks or slate. It all depends on your imagination.

Views
Vertical
A vertical bed will be a good solution for a small area. You can build it from scrap materials, for example, from boxes. But it is worth remembering that not all types of garden crops are suitable for growing in such a garden. The following types are suitable: strawberries, onions, lettuce, tomatoes, cucumbers.

From car tires
To do this, you need several rubber tires from the wheels of the car. First, they need to be prepared: cleaned from dirt and painted. Then soil with organic and mineral fertilizers is poured into the tire. The following types of crops are suitable for growing: parsley, dill, radishes.

Green wall
If your site has a fence or other building, then to give them an attractive appearance, you can try to build a so-called green wall. There is nothing complicated in this, you just need to attach the boxes to the fence or to the wall of the building, fill them with soil and plant the plants.
You can also go in a more original way and use simple plastic bottles instead of boxes. To do this, we screw the plastic bottles to the required surface, then cut a hole in the upper part of the bottle and fill it with earth. After that, you can plant the necessary crops.

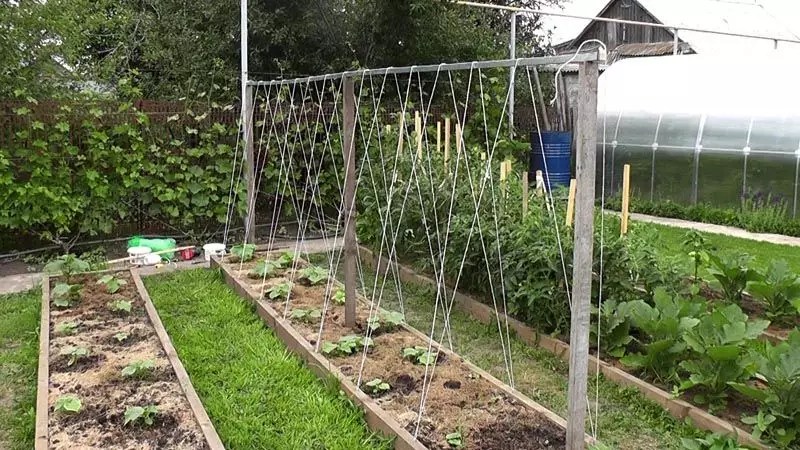
Weaving arch
At the summer cottage, you can build an arch from weaving types of crops, for example, cucumbers. To do this, we need several boxes, where we fill the soil and plant cucumber seedlings. Then it is necessary to build an arch from small pipes (if you make an arch yourself, then you cannot do without the ability to work with welding). After the arch is ready, boxes with seedlings must be placed at the bottom of the structure. As the cucumbers grow, they need to be tied up.

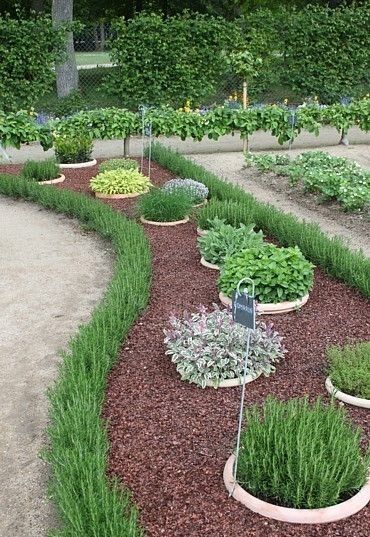
Spicy
A spicy bed in the country takes a special role, because the crops growing on it can be used as medicinal, seasonings for dishes, or simply playing the role of ornamental plants.
Attention ! It is best to place a spice bed in those places of the site where sunlight prevails.
Spicy herbs will be the perfect solution for creating an original landscape design. Spicy crops do not require close care from the summer resident, they will also help protect the garden from various kinds of pests:
- lavender will help prevent the spread of aphids on rose flowers;
- a thyme border around the perimeter of the garden bed will prevent the spread of pests on vegetable crops;
- Yarrow will give your carrots a sweeter and richer flavor.

Suitable plants
- Melissa;
- thyme;
- yarrow;
- sage;
- fennel.
Ornamental plants
- common basil;
- lemon balm;
- mint;
- parsley;
- medicinal rosemary;
- thyme;
- caraway;
- medicinal sage;
- coriander;
- fragrant onion.
Worth paying attention
When setting up a spicy bed, it is worth taking into account that some types of crops (such as lemon balm or thyme) can grow to impressive sizes, thereby displacing other crops. For this reason, it is necessary to monitor and control plant growth very carefully.
Growth control is carried out as follows: the plants must be pruned on time, an area must be allocated for subsequent growth, or limited by building bumpers of tiles or bricks. Thus, the area where it is planned to plant the plants will be divided into squares, which are staggered using slabs or bricks. Crops are planted in free squares.
When planting greenery, you must consider:
- when planting spicy and medicinal plants, special attention should be paid to their environmental requirements;
- for a spicy and medicinal bed, you need to choose a specific planting material.
If you follow these simple rules, as well as take advantage of creative ideas, you can give your site a pleasant look.