Recently, high beds have become increasingly popular among gardeners and gardeners - an original technology that came to us from Canada. Although, in fairness, it should be noted that such structures used to be found everywhere. They were called dung beds and cucumbers were grown there.
Raised beds: what is it and what are they for?
A high, or raised, bed is a box-shaped structure with a height of 0.15–0.2 m to 0.5–0.6 m and a width of 0.5–1.2 m. Its length is limited only by the dimensions of the site. But these dimensions can vary in an arbitrary direction, depending on the desires and needs of the owner. A nutrient substrate is laid inside the box and plants are planted.
Do-it-yourself high beds can be a highlight of garden design
It is best to prepare the bed in advance in the fall, so that the soil has time to settle and compact. In addition, in the spring you do not need to spend precious time on this, and with the advent of heat, the soil warms up very quickly and sowing can be done 2-3 weeks earlier.
Video: why do we need high beds
How to make a high bed
The boards that hold the ground are made from a variety of materials and improvised means:
- wood;
- metal;
- plastic;
- slate;
- brick or stone;
- concrete;
- plastic bottles, etc.
Photo gallery: what you can make a raised bed from
To make a bed and horizontal logs very quickly A bed of vertical logs will require the application of great forces Such beds can also be made of wood High beds are most often made of boards Gravel in a mesh frame looks very unusual Often high beds are made of cinder blocks The fence can be straw The mesh frame is filled with any decorative material Even mesh plastic containers are used. The bed can be made from flat slate (OSB)
In some cases, high ridges may not have a side fence at all and are simply earthen hills.
Raised beds are also available without fencing.
Video: what high beds are made of
from wood
For the manufacture of a frame structure made of wood, you will need support bars and boards for the walls.
A wooden box for high beds can be tinted in any color and covered with paint
Work is carried out as follows:

Video: making a garden bed
From stone
Stone structures are built to last for centuries, they look monumental, but it is extremely difficult to move them to another place.
A high bed made of stone or brick will successfully fit into the classic design
The technology of work consists of the following stages:
- Along the perimeter of the selected place, they dig a trench 0.3–0.4 m deep under the foundation.
- A layer of waterproofing (roofing material, polyethylene, etc.) is laid at the bottom of the trench.
- Pour a sand cushion to a third of the depth.
- A layer of stones is laid on top.
- Filled with concrete.
- A few days later lay out the masonry.
Difficult masonry work is best left to professionals.
A brick bed is built by analogy with a stone one.
Video: making a brick bed
From sheets of slate, metal or plastic panels
For the construction of a frame structure, any pieces of old slate or metal removed from the roof will go.
A bed, the walls of which are made of sheet metal, can have a very different shape.
The sequence of actions is as follows:
- The plates are cut to size.
Sheets of slate cut into the desired size
- Dig a narrow trench around the perimeter of the future beds.
First dig a trench
- Sheets of material are installed in the excavated ditch.
- At the corners, the plates are connected using metal corners.
Slate sheets are connected using ordinary wire
- The trench is covered and the soil is well tamped.
To give greater rigidity, stakes are driven in at the corners, to which a wooden frame of bars is attached.
One of my good friends makes the sides of the beds from plastic bottles with a volume of 1.5 liters. She digs them around the perimeter with their necks down, trying to press them closer to each other. Frames intended for different cultures are spray-painted in various colors. It turns out very lively and unusual.
A high bed can be built from empty plastic bottles
Video: we make a bed of sheet material
From branches
The branch structure is constructed as follows:

Plastic containers can be placed inside the wicker box
You can simply poke branches into the ground in several rows and fix them with wire.
Branches in the bed wall can be arranged vertically
Video: making a bed of twigs
High bed: how to fill it
After installing the frame, the bed must be properly filled:
- The bottom is lined with a fine-mesh metal mesh (from rodents).
Cardboard will not let weeds germinate
- Drainage is poured (especially if the area is wet) from stones, brickwork, shards, rubble, etc. In hot southern regions, large saw cuts, branches, lumber waste are placed, which, on the contrary, will retain moisture.
Then stack thick branches, chocks, branches, etc.
- Then smaller plant residues are laid:
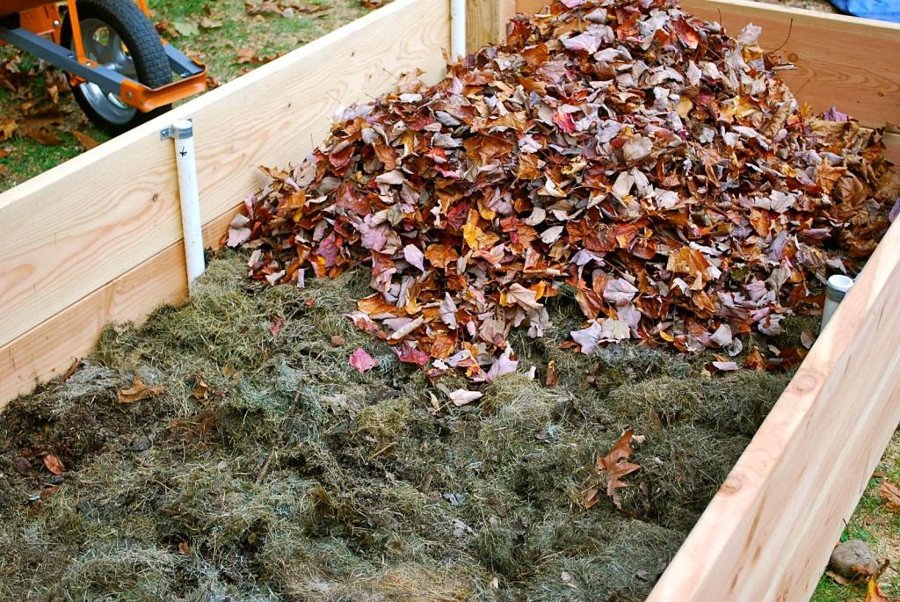
- The last top layer is fertile soil with the addition of humus and complex mineral fertilizers.

Video: filling the garden
Raised bed railings are commercially available. They are prefabricated modular structures, most often made of plastic. But it is not difficult to build such a box with your own hands.
Borders for beds are a practical and necessary fencing around them. The main purpose of artificial walls around the beds is to increase the height of the fertile layer, which can be easily created by frequent mulching with compost soil after watering. Over time, the fence for the vegetable growing area has become an element of landscape design. In an ornamental garden, borders play the role of separators and borders of territories on which cultivated plants grow.
The fence for beds will demonstrate practical benefits already in the first season.
From an aesthetic point of view, the places for planting seeds and seedlings of vegetable crops will look more well-groomed, noticeable, and expressive. They do not need to be periodically put in order, to deal with water leaks during irrigation, to maintain a horizontal plane on the slopes.
From a practical point of view, there are also many benefits:
- fenced areas for vegetables will have significantly fewer weeds than uncultivated areas;
- less physical effort will be required for manual weeding, digging, mulching, top dressing and other work;
- it is more convenient to cover such structures with a film; on high fences it is easier to fix arcs for a greenhouse in order to plant seedlings of vegetables and flowers in it;
- it is easier to make natural heating, by creating a layered bed with biofuel, for growing cucumbers, peppers and other warm-loving vegetable plants.
Fenced areas for vegetables will have significantly fewer weeds than uncultivated areas


How to make a garden fence with your own hands
There are certain requirements for the walls:
- they should be low (height 10-30 cm) so as not to obscure vegetable plants at the beginning of growth;
- neat - emphasizing the straightness or irregular, but attractive shape of the beds;
- dense - not allowing the fertile layer to spill out onto the path or spread water outside the border of the zone for growing plants during irrigation;
- beautiful to fit into the overall structure of the improvement of the suburban area.


Fencing places for growing vegetables can make the garden not only cozy, comfortable, well-groomed, but also original, maybe even unique.
Boxes from them with a thick fertile layer do not need to be dug up, so soil care in them is the easiest - loosening with a hoe before planting seeds or seedlings.
On flower beds and flower beds, borders of living plants of the same species (rosemary, calendula, boxwood, hyssop and other undersized perennial flowers planted tightly in 2-3 rows) look spectacular, pretty, stylish. Fences for areas with vegetables are also built from artificial and improvised materials - bricks, boards or wooden beams, stones, sheet metal, plastic, sawn slate and other construction waste. They can always be collected in the right amount in the nearby ownerless territories or bought cheaply in stores. Many summer residents, when asked how to protect the beds in the country inexpensively, unequivocally answer - with construction waste material, cobblestones, a low picket fence and other items that can be found in construction dumps, on river banks and in other places.
Borders for beds made of wood - it's simple, familiar, natural. Simple - because any woodwork for a summer residence is a good design option. They are easily fastened with nails, screws, glue. The pieces of wood are easy to assemble and also easy to disassemble for transfer to a new place.
Habitual - because there are a lot of wooden buildings around us.
 Borders for beds made of wood - it's simple, familiar, natural.
 Naturally - because trees grow everywhere.
The fence looks original for beds made of stumps, the same thickness of low logs or low wattle. Most often, wooden border material for beds is a cut and unedged board, which forms a capacious box without a bottom, where all the necessary raw materials are poured.
You can make a box from separate shields, which are knocked down from a slab, a picket fence, an old floor rail, lining, and other types of lumber.
Shields are attached to each other and fixed with stakes hammered from the outside. This design is easy to disassemble and assemble in a new place.  Wooden objects can be treated with protective impregnations from decay and insects, which will increase its service life at times.
Until recently, it was believed that wood is short-lived, and therefore impractical. But now wooden objects can be treated with protective impregnations from decay and insects, which will increase its service life at times.
A good option is considered to be metal walls for boxes from worn-out sieves of a sieve box of combine harvesters. Lightweight, strong, durable with many small holes for ventilation, they are easily cut with metal scissors to the desired size. Craftsmen who have a welding machine can easily weld a metal frame from scrap metal for a plant growing zone from pieces of sheet iron of the required thickness.
Now in construction stores they sell a special multi-layer galvanized steel profiled sheet, with a polymer coating. Its height is 17 centimeters, and the length is different. It is convenient to make roomy boxes from it. Although its price is not cheap, but given the durability, it is worth buying. From it, walls for territories with vegetables will last a long time.
 Metal fencing is easy to install.
 Metal fencing is easy to install. Places for planting seeds and seedlings of vegetable plants, framed by them, look neat, beautiful (you can choose a profiled sheet of different colors), practical. But iron has a serious drawback - it is a good thermal conductivity. The soil near the iron railings can reach a critical temperature that will inhibit crop plants and dry out the soil. This disadvantage is easy to deal with using any improvised means that have low thermal conductivity. It is possible to overlay metal fences from the inside with cardboard, pieces of slate, stones.
A plastic fence for planting seeds and seedlings of vegetable crops has a number of advantages. It will be light, durable, frost-resistant, not afraid of sunlight, shock loads. You can buy curb tape in the store, which has the optimal balance of rigidity, flexibility, high plasticity, due to which it can be bent at any angle. It is simply installed with your own hands, well supports the geometry of beds, flower beds, lawns. For stability, it is fixed with pegs driven in from both sides.
 A plastic fence for planting seeds and seedlings of vegetable crops has a number of advantages.
 DIY plastic bottle beds
Plastic bottles are a widely used material at hand. If desired, they can easily be dialed in sufficient quantities. The bottles are filled with any bulk material: earth, sand, small gravel, and then they are simply placed close in one or several rows, into a trench dug around the perimeter of the bed, with the neck down. From plastic bottles, you can make a major fence for a place with cultivated plants, if they are laid horizontally on a cement mortar. If you put plastic bottles on the beds with their bottoms out, then the border will have an original multi-colored look. With the help of a rich imagination, you can realize even better ideas for crafts from plastic bottles for giving with your own hands.
Owners who have just completed the construction of a brick house will be able to make stationary fences for vegetable planting sites with their own hands from the remains of a brick. The beds and flower beds framed by this building material will look like a single ensemble with a residential building. The brick can be dug in in different ways: on the edge at an angle; on edge in a row; the first row is flat, and on top of the solution a row on the edge. A decorative brick border largely depends on the imagination of the owners of the summer cottage.
 A decorative brick border largely depends on the imagination of the owners of the summer cottage.
Stones in abundance can be collected anywhere: on the river, on the slopes of hills, in gravel pits. There are many options for making permanent stone curbstones. The easiest and most affordable way is to fill up the space between two mesh metal gratings dug in along the perimeter of the box. Such a fence is called a pergon. In such a stone “bag”, zucchini and tomatoes, cucumbers and beets will feel comfortable. Yes, and other vegetable crops that are grown in the beds will be comfortable inside a natural, environmentally friendly fence.
 There are many options for making permanent stone curbstones.
 Fences of beds from wave slate
Wave slate, like roofing for roofs, has already gone out of fashion. It is everywhere replaced with a professional sheet, different types of tiles, soft roofing. But sheets of wave slate have become very popular with summer residents, who build durable, convenient, almost free fences and fences for growing vegetable plants from pieces. And if you decide: how to fence the beds in the country house cheaply, then, perhaps, the material cannot be found cheaper than the old wave slate. But first, the slate needs to be prepared for installation as a fence. Each sheet is marked into pieces of the desired size and sawn with a grinder. This work will not take long. The process of fencing beds consists of the following steps:
- Marking the boundaries of future beds with strong twine and stakes that are driven into the corners. A trench 20-25 cm deep is made along the stretched cord (on the bayonet of a shovel).
- Pieces of sawn slate of the same width are installed in the trench, leveled and slightly buried in the bottom of the trench with a light tap of a hammer.
- For the stability of the slate fence, stakes 0.5 m long are driven in from the outside, to a depth of 30 cm. A capacious box is obtained.
- For disinfection, the inside of the box is treated with slaked lime.
- The bottom of the box is lined with sawdust, dry grass and leaves. Then it is abundantly watered with water and fertile soil is poured on top.
- Next, you need to think about protecting the slate from direct sunlight, as it gets very hot in the sun and contributes to the accelerated evaporation of moisture. If possible, slate walls should be watered more often. The buried part of the slate will become an insurmountable barrier against the attack of the bear.
It is not difficult to build multi-tiered flower beds and beds from wave slate, on the tiers of which you can grow flowers, strawberries and other plants. And you can fence off a small plot of the garden, where you can prepare compost from weeds and tops from vegetable crops.
The general procedure for constructing a border for beds from any material
The height of the fence depends on the purpose of the beds, as well as on the convenience of caring for plants:
- for fertile garden land - 15 cm;
- for infertile soil - up to 30 cm;
- for potatoes and other solanaceous - up to 40 cm;
- for bioheated compost - up to 50 cm.
The sequence of actions in the manufacture of a border from improvised means;
- We clear a place for a zone for growing vegetables. We mark its borders with the help of a cord and pegs, focusing on even sides and right angles.
- We build a strong, rigid box from boards or other material. To fasten them together, we use self-tapping screws and a screwdriver, welding or a trowel.
- We line the bottom of the fenced area with rubble, gravel, pieces of dishes, stones, bricks for drainage. Then lay out an even layer of leaves, hay, fresh grass.
- We fill the prepared fertile soil into the box, level it. It should not contain weeds. From the top edge of the curb to the leveled layer of the earth should be 3-5 cm.
- We plant seeds or seedlings of vegetable plants. Mulch with crushed bark of deciduous trees. The goal is to create an optimal microclimate and retain moisture.
- If the box surrounds the lawn, then it is advisable to strengthen its bottom with a liquid blind area of water, cement and sand. The layer is small - up to 3 cm. For strength and beauty, bricks can be laid on the hardened blind area with a gap of 1-2 cm. Pour a dry sand-cement mixture into the gaps between the bricks.
Many summer residents are categorically against the use of those materials for the fence of beds, which are many in cities and towns: metal, concrete, brick. It is necessary to make borders from natural flowers, grass, stones and wood. It’s hard to disagree with this, but you shouldn’t forget about practicality either. The main thing is to be useful, not harmful, contribute to high yields and please the eye! Let's also not forget about the durability of the borders and the convenience of caring for plants.
The organization of the garden space can be different, but fences for beds, bushes or flower beds will easily fit into the landscape design. The designs are practical, they can be created with your own hands, using the appropriate technology and choosing materials.
Types and features of fences
The fences used in the garden are varied and differ in appearance, design, materials. The main goal of any option is to provide protection to plants from weeds or flooding, crop separation. From an aesthetic point of view, fences are also important, because they allow you to properly organize the garden space, decorate the site.
Fences help maintain order in the suburban area
For beds
Beds are present in many garden plots. To separate garden crops, to ensure order in the country, bumpers for beds are needed. They can be made from various materials, but all designs are easy to do with your own hands. It is important to use high-quality and environmentally friendly materials. Otherwise, plants will not develop as efficiently as possible, because many artificial materials are unsafe for them.
Wooden boards
Fences for beds with plants are often wooden bumpers. This option is practical, easy to create and allows you to neatly divide the beds. Structures must have parameters equal to the parameters of the beds. Wooden products in the form of a box are made from boards with a thickness of 2 cm or more. The elements are fastened with self-tapping screws, treated with a wood preservative or painted. When choosing a material, it is best to give preference to larch, as it is more durable. Pine or other elements are also suitable, but processing is always necessary.
Wooden fences are practical, environmentally friendly and simple, but they have such a disadvantage as fragility. Under the influence of moisture, ultraviolet radiation, temperature changes, the wood becomes cracked, deformed or rots. Therefore, the boards need to be treated with antiseptics or stained.
Slate
Simple slate products are easy to do with your own hands if you already have the material. To create the sides, old slate is often used, removed from the roof when replacing the roof. The canvases are cut into long elements, the height of which corresponds to the thickness of the soil layer of the bed. The main advantage of this option is the availability of the material. The disadvantages are expressed in the fact that the old slate is very fragile and releases harmful components into the soil.
When creating the sides, it is necessary to additionally strengthen the slate elements with reinforcing corners or rods. They are installed along the length of the beds every meter, the rods, as it were, support the slate parts. The appearance of such fences is quite concise, the structures can be painted with compounds intended for outdoor use.
Metal fences
Reliable fences for beds can be made of corrugated board or sheet metal with a galvanized or polymer coating. The cost of such structures is high, but if there is such a material, then it is important to know its features. The sides are strips of metal, which are fastened with special corners. A protective corner is also fixed along the upper edge, which makes the operation of the structure convenient, because the edges of the sheets are sharp.
Metal structures quickly heat up in the sun and contribute to the heating of the soil. This should be considered when using metal to separate the beds.
Video: beautiful garden fences, a selection of ideas
For bushes
Raspberry bushes, currants or other crops need additional support, as they spread branches a lot and lose their shape. For this purpose, fences made of wooden bars, PVC water pipes, metal and metal-plastic pipes are used. In any case, the structure consists of supports that go deep into the ground and provide stability to the fence. Support for the branches of shrubs is carried out with the help of the upper part in the form of a hoop. This option is versatile, in demand and easy to use.
As an easy option, pegs and a strong rope are often used. Along the circumference of the bush, supports are installed in the ground, and then the rope is pulled. The height of such a structure should be slightly less than half the bush. The structure allows you to raise the lower branches and make plant care simple and easy.
The advantages of bush stands are as follows:
- prevention of crop rotting, since the lower branches of the bushes do not touch the soil;
- ease of watering and caring for plants;
- more convenient harvesting;
- simplicity of designs from various materials;
- preventing the growth of shrubs;
- the possibility of forming the necessary shape of the bush.
The disadvantage of this design is that it cannot be used for very voluminous bushes with heavy branches. In this case, more reliable options are preferable, having reinforced supports and a square shape. Similar products can be made of metal or wood, metal-plastic pipes.
Fencing front gardens and flower beds
The front garden or flower garden can be open or closed. In the first case, no fences are used, and in the second, a fence is necessary. At the same time, the design separates ornamental plants from the rest of the site and complements the landscape design of the territory.
You can separate ornamental plants using a variety of wooden structures. A classic low picket fence is a versatile option for any site. And also effective are metal fences, which are made from strips of metal with a polymeric color coating. Wrought iron fences for the front garden look beautiful, but are very expensive.
Any option for fencing a flower garden or front garden should be beautifully designed, because the decorative function is important when using such structures. The height is calculated depending on the size of the plants that need to be separated from the main plot.
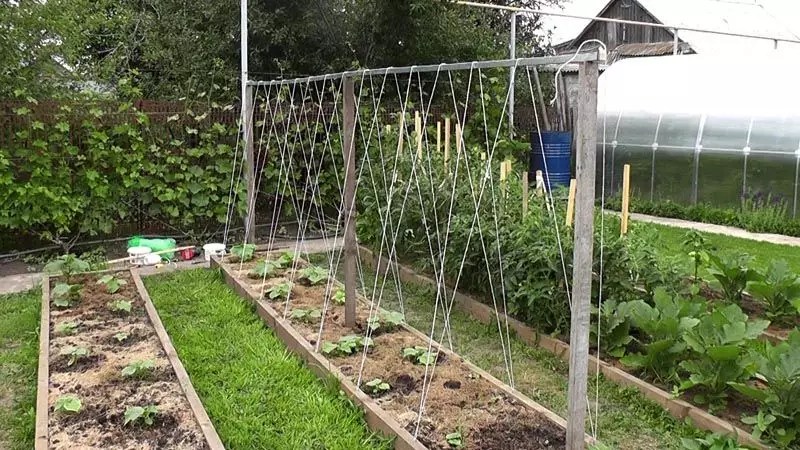
Supports for grapes
Grapes are often grown for ornamental purposes. This requires pergolas or horizontal trellises. Such structures can be in the form of gazebos, bowl-shaped or arched. The material for the manufacture is often wood, as it is environmentally friendly and easy to use.
It’s easy to make wood trellises with your own hands, but when using metal elements, you need a welding machine, fasteners with an anti-corrosion coating and other details. Wooden elements treated with stain and varnish are fastened with nails or self-tapping screws, creating a structure of the required shape. In any case, the dimensions of the tapestries are selected depending on their location. It is possible that the finished gazebo on the site will serve as a support for the grapes.
Video: do-it-yourself trellis making
Preparing for installation
To create any fence or small fence, it is important to calculate its parameters. Dimensions depend on the type and purpose of the structure. For example, fences for flower beds often do not exceed 50 cm in height, and higher structures are needed for ornamental shrubs. The length of the fence depends on the perimeter or circumference of the flower bed, but you should not place the structure close to the extreme plants on the flower garden. About 30 cm should be retreated from them, which will ensure comfortable care and proper development of greenery.
Before the construction of the fence, you can draw a diagram that reflects the shape, design parameters. And also on the diagram indicate the location of the main supports in the form of columns, the distance between them. This will allow you to calculate the required amount of material and determine the features of the installation.
How to choose material
Sides or a small fence can be made from a variety of materials. When choosing, you should be guided by the purpose of the fence. For example, concise, easy-to-use and eco-friendly wooden sides are best suited for arranging beds. Shrubs or a flower garden can be separated with brighter and more original options. For this purpose, improvised elements are also suitable. In any case, the quality of the material must be high, and it is also worth considering the installation technology.
The base for the fence can be made of the following materials:
- Plastic bottles. You will need a large number of parts, which depends on the length of the fence. The bottles should have approximately the same bottom size, and for installation they just need to be deepened into the ground around the perimeter of the flower bed. Tanks should be filled with sand for greater strength. Pre-painting in bright colors will make such a fence unusual and beautiful.
- Polycarbonate. From segments of cellular polycarbonate, colored or transparent, it is easy to make a fence for a flower bed. The ends of the elements must first be coated with a transparent sealant or silicone, and after drying, deepen the parts into the ground around the perimeter of the flower garden. The segments are glued together with a transparent adhesive for outdoor use.
- Wooden boards, picket fence. There are many options for fences made of wooden elements. It is easy to make designs of any shape bright and original, or create practical borders for the garden.
- Concrete slabs are convenient for durable fences. Elements of the same size are deepened into the soil along the perimeter of the flower bed. The soil around the fence should be well compacted.
Before choosing any material, it is important to pay attention to its quality. Polycarbonate, concrete products are expensive, but reliable and durable. Boards and metal profiles require anti-corrosion treatment, which will make them more practical. Therefore, it is worth familiarizing yourself with the features of the material, its advantages and disadvantages.
Table: pros and cons of materials
| Material | pros | Minuses |
| Plastic bottles | Availability, easy installation and operation, possibility creating any garden design. | Low strength, need a large amount elements, it is necessary to strengthen the bottles. |
| Polycarbonate | Practicality and accessibility, simple fastening, variety colors, durability and comfort. | It is important to process the ends of cellular polycarbonate, high price. |
| Wood | The ability to create any type of fencing, accessibility, ease of installation and operation, versatility for any climatic conditions. | Requires antiseptic treatment or staining, fragility in the absence of processing. |
| Concrete or stone slabs | Reliability and durability, easy installation, practicality and convenience in operation. | High cost, need a large number of elements. |
Calculation of the amount of materials and tools
When constructing a fence from boards for a flower garden, you need to determine the height of the structure, which depends on the size of the plants. A fence about 40 cm high is suitable for most flowers. After that, you need to retreat 30 cm from the extreme plants and measure the perimeter of the flower bed. The resulting figure is the length of the fence. For a picket fence, support posts, cross rails and slats are required. The distance between the pillars is 1 m, and between the slats is about 5 cm. In this case, the width of the slat should be about 10 cm. For a 50 cm high structure, two transverse logs are required. Thus, for every 100 cm of fence, approximately 7 planks are needed.
A fence for a flower garden can be made from ready-made picket fence sections, which can be wooden, plastic or metal. To do this, you need to determine the length of the fence and, depending on this, select the number of finished sections.
For self-assembly of a wooden fence, you will need the following tools:
- tape measure and building level;
- shovel and crushed stone;
- nails or screws;
- hammer or screwdriver;
- brush, wood preservative, paint.
Before work, you need to prepare the picket fence by sawing the planks into elements of the required length. The transverse logs should be a little more than 1 meter long, since the distance between the support posts is 100 cm, but the bars must be fixed to the supports.
Installation of a fence for a flower garden
Before work, an antiseptic designed for wood should be applied to all wooden elements. This will preserve the quality of the material and facilitate the work. For this purpose, you can use stain, which can be of various shades of natural wood. If the boards are very rough, then they should be sanded with medium-coated sandpaper before processing. After that, you need to remove the dust and apply a protective agent.
Drying of the product lasts several hours, and the exact time is indicated in the instructions. After this period, you can proceed with the installation, which includes the following steps:
- With pegs and a rope, we mark the line of the future fence and places for supporting pillars. With a shovel we make recesses of 40 cm for the supports, the height of which should be about 1 m. At the bottom of the pits we pour sand with a layer of 5 cm, install the pillars, fill it with rubble, and tamp the soil on top.
- On the transverse logs you need to attach the strips of the fence, observing the distance between them. Nails or self-tapping screws are used for fixing, and evenness is checked with a building level. At the same time, it is worth considering that the fence is assembled in sections, mounting each section in turn. It is necessary to fasten the planks to the logs with an indent from the edge by about 5 cm.
- The prepared sections are fixed to the installed poles using self-tapping screws. Evenness is checked with a building level. In this case, the lower edges of the slats should not touch the soil closely. The distance between the soil and the sections should be about 3–5 cm.
Bush fences
Raspberry bushes, currants and other horticultural crops need a fence or a convenient support that allows the plants to develop comfortably. One of the simplest options is the design of PVC pipes, which has a rectangular shape. For work, pipes with a diameter of about 20 mm are required, as well as corner fittings that allow you to connect all the elements.
You can make a fence for bushes with your own hands using a welding machine for PVC pipes. And also pieces of products are necessary. Their length corresponds to the height of the structure (depending on the parameters of the bush). The diameter of the fittings is selected depending on the parameters of the pipes. After cutting the elements, you need to make holes near the bush, in the corners, up to 30 cm deep. The frame of the future fence is welded using a machine, connecting long sections with fittings. The structure is installed in the pits, ramming the soil.
Support for grapes
Cultivation of grapes of an ornamental or actively fruiting type requires the creation of a support or trellis. In the first case, any designs that allow vines to grow easily are appropriate. For example, a small arbor with lattice walls will provide a beautiful weaving of the stems.
Installation of a simple version of the tapestry involves the installation of two supports of 50x50 mm bars, the distance between which is determined depending on the required width of the structure. A fixing bar is attached to the upper ends, and then thin rails are mounted in the form of a lattice. All parts are pre-treated with a stain or other antiseptic. The finished structure can be varnished for outdoor use.
Video: how to make a simple fence for a garden bed or flower bed
Fences or fences will provide order and aesthetics to any garden plot. Simple designs are easy to do with your own hands, choosing high-quality materials.
Do you know what an innovation is, how high beds came to our country from Canada. There, the land has been cultivated in this way for many years. Such planting options can be used not only for growing vegetables, but also for creating original ones. Let's find out how to make beautiful and practical high beds in the country with your own hands. Photos, descriptions of technological processes and diagrams will help you with this.
Do-it-yourself high beds in the country: photos of designs and main characteristics
The rate of gas exchange, soil moisture and the presence of beneficial microorganisms depend on the size and shape of the beds. All these parameters affect the quality of the soil.
With the help of raised beds, you can grow a large crop of berries, vegetables and fruits. At the same time, you can get good performance even from a piece of land that is not fertile. A feature of high beds is that they warm up faster than low designs.

There are several types of vertical beds. They differ not only in material, but also in functionality. Some options are made from building materials, while others are made from simple ones.
Here are the types of beds available:
- trapezoidal structures;

- multi-tiered beds;

- triangular structures.

When creating isolated beds, factors such as illumination, soil composition, and also its structure can be taken into account. At what height such beds will be placed depends on the volume of the root system, soil characteristics and your own preferences. The minimum height is 15 cm, but to produce better insulation, you can raise them by 30-40 cm. Warm raised landings can be higher than 50 cm, since a layer is still laid on the bottom. Narrow beds can be up to half your height.

The length can be very varied. Most often it depends on the length of the garden. If the bed is too long, then it needs to further strengthen the sides. When arranging any garden, remember your own comfort and convenience. The best width is when you can reach the middle of the structure. The optimal value is 90-120 cm.

You can grow a variety of crops in raised beds. It is not recommended to use plants with tall stems, as it will be inconvenient to harvest fruits from them. Root crops, strawberries, peppers, herbs and cucumbers are often planted on bulk structures.
For your information! A special benefit is the filler for raised beds. It is made from organic ingredients. At the same time, the root system is located in the fertile layer, which contributes to the development and growth of plants.
Related article:
Let's find out how to make original beds and what materials they can be built from. Interesting ideas in our review will help you create a variety of designs.
Features of high beds: pros and cons
The main advantage of raised beds is that you can place a lot of vegetables and plants in a small area. High beds for strawberries, fragrant herbs and cucumbers are especially popular. Also, such structures have other advantages:
- bulk beds can be filled with specially prepared soil. In this case, the quality of the soil on the site does not matter much;
- it is possible to adjust the thickness of the soil layer for any plants;
- raised vegetable gardens are easier to weed and dig;
- raised beds can be set up anywhere, even with difficult terrain;
- seedlings can be planted on high embankments earlier, as the soil in them warms up faster;
- in raised gardens, the soil is looser, which contributes to better gas exchange;
- can be used for, which will hang from the edge of the fences for a high bed;
- depending on the material, you can create not only practical, but also beautiful designs. Some options can become a design masterpiece for your garden;
- high beds with sides are practically not subject to attack by weeds, and are also well protected from mold and fungi;
- the installation of the beds is not a difficult procedure, they can also be easily dismantled. The location of landings can be easily changed;
- inside such structures, you can create a comfortable one;
- soil on raised beds is maximally protected from freezing. During early frosts, such a landing can be covered with polyethylene;
- the erection of high landings is protected from erosion during heavy rains.

Such structures have certain disadvantages, but there are not so many of them. First of all, you will need top dressing with mineral fertilizers. It is important to monitor the invasion of the bear.
For your information! Before starting work, treat the wood parts with an antiseptic and special impregnations. This will prevent the processes of decay and protect against the destruction of materials.
Creating vertical beds with your own hands: photo options
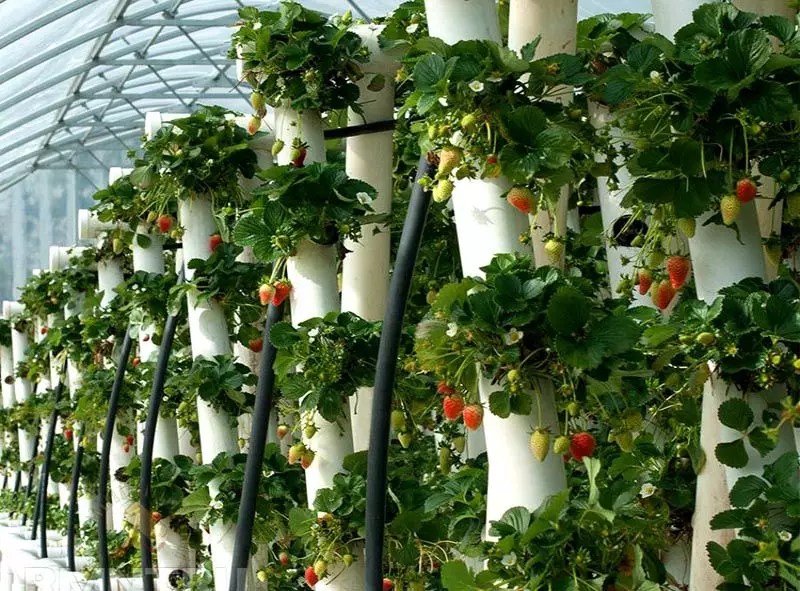
You can also create warm high beds or vertical structures. They are popular because of the appearance and space savings. In addition, this is an excellent solution for protecting plantings from various pests. Vertical structures are great for growing flowers, strawberries and herbs. You can not only make such designs from improvised raw materials, but even purchase ready-made options. You can see how to make warm designs in the video:

Why buy a vertical bed for strawberries: prices
You can see different design options for vertical beds, but their most important advantage is their miniature dimensions. Such structures can be built from any materials, even from plastic bottles.
Vertical products do not require special care. They are at the optimum height for easy handling.
You can see how to make a raised structure for strawberries in the video: To increase the rigidity of the pyramidal bed, you need to install an additional pole as a supporting element. In this case, the boards are mounted on a horizontal surface and attached to each other. A rail is installed in the base. The resulting side is fixed vertically, and then the second and third sides are attached to it. After installing the frame system, the length of the rails is measured. They are placed with an interval of 25-30 cm. To make the shelf raised, its ends should be cut at an angle of 30 degrees. After assembly, the structure is filled with soil, which is rammed.
The technology of arranging vertical beds for strawberries from plastic pipes
To grow strawberries, you can build a vertical garden bed. In this case, you need to prepare plastic pipes, a steel cable and a special knife for cutting. The volumetric section allows you to place the required amount of soil inside. The incision should be made along the structure. To fix the bed in a horizontal position, you need to make a hole in each of the halves. Then a fishing line or cable is pulled through them. Then the parts are placed one above the other. At the same time, you can make different levels of beds from pvc pipes with your own hands.

For your information! If you plan to place structures in a suspended state, then you need to consider that they can sway. Therefore, it is better to install them in places that are well protected from the wind.
Do-it-yourself erection of vertical beds using a building grid
A compact design can be built for crops such as strawberries, herbs, flowers or potatoes. A good solution would be a vertical bed. To do this, you need to prepare a metal mesh, straw, special soil and the necessary tool for processing the material.

To create a bed, you need to bend the grid in the form of a pipe. In this case, the cross section should be 0.9 meters. The edges are fastened with wire. Straw is laid on the sides, and the free space is filled.
To plant potatoes, such beds should be placed at a height of 50 cm from the surface level. Spaces of 10 cm are left between the plants. Then the first layer should be shed, then the soil should be laid and the seedlings should be planted.
Features of arranging a vertical garden for strawberries with your own hands: using pots
Ordinary strawberries can also be used to grow strawberries. Such designs allow you to create an attractive external design. You can use both plastic and clay pots. Thus, you can create a multi-level composition.
Pots must be selected so that their diameters become smaller towards the top of the structure. In this case, the difference between pairs of pots should differ little.

The largest pot is set in the selected location and filled with soil. After that, a smaller pot is placed in it, etc. When the structure is ready, plants are planted in the soil and watered. The largest pot is installed at the base of the structure. A rod smaller than the diameter of the container is placed inside. The pot is filled with soil, and the rest of the products are alternately strung on rods. After filling with soil, plants are planted. Pots are mounted on a pole or high stump.
The nuances of creating vertical beds for strawberries with your own hands from tires: photos of products
There are different ways to grow cucumbers outdoors. In this case, you can build vertical beds. Also, this option is suitable for planting strawberries.
The tire structure is mounted on the same principle as pot structures. For this, tires of different sections are suitable. But at the same time, keep in mind that old products are not particularly environmentally friendly material.

Before mounting, the tires should be cleaned, dried and, if necessary, painted. The largest tire is placed down, and a part is cut off on the side. The hole is filled with soil and planted with plants. Thus, other elements fit in. Tires can be beautifully decorated with patterns or even unusual cuts.
Article
Growing plants in the country is not an easy task that requires knowledge and a responsible approach. To improve the site and provide favorable conditions for the development of vegetable and other crops, beds are used. Find out their types and features of the organization with your own hands.
If you plan to organize beds in the country with your own hands, familiarize yourself with the features of the process. First, understand the concept: the bed is a partially isolated small one, on which, under suitable conditions, you can grow different crops, providing the right individual care. 
When organizing beds, several points are taken into account:
- The location depends on the specific crop being grown. Some plants require good lighting, while others feel better in shading. When choosing a location, you need to take into account the relief of the site. If the place is located in a lowland, moisture will accumulate in it, which is unacceptable for some cultures. When placing, ensure free access for convenient and unhindered care. To do this, do not place the beds far from water sources and do not arrange them at short distances from each other, otherwise it will be problematic to walk between them.
- The form is determined by the preferences of the owner of the cottage. It can be standard rectangular or square, but it is possible to organize beds with unusual shapes in the form of figures. The territory also affects the shape, because the beds should organically fit into it.
- What plants will be grown? They need individual care, taking into account the characteristics of a particular species, so the characteristics of the culture affect the choice of location in the country, the size of the beds. And some vegetables do not get along, so they need to be planted separately at a considerable distance.
- Skills. If you are planning to organize beds on the site for the first time and do not have the knowledge, choose unpretentious crops and beds that are easy to arrange. If you decide to create complex designs, you risk making mistakes and reducing or spoiling the crop.
There are several types of beds, and they should be considered in detail and separately.
Bed-box
A box-bed is a convenient and popular method of arranging a garden that allows you to create a separate isolated area for a particular crop, giving the area a neat, aesthetic and well-groomed appearance. 
You can make a bed-box by preparing the place and fencing it with shields. To mark the boundaries and arrange the walls, sheets of polycarbonate or plastic, boards, slate (wave, flat) are used. It is advisable to choose a material that is practical and resistant to moisture, able to serve one season and maintain strength. 
Do-it-yourself organization includes several stages:
- Border designation. Draw them or arrange the pegs, taking into account the shape and size of the beds.
- Wall installation. They are placed in the ground, in which furrows are preliminarily prepared. The soil must be compacted to ensure the stability and strength of the structure.
- Fill in the earth and organic matter, alternating layers.
- Plant your plants.
For your information! Preparing for the winter of beds-boxes involves their collection. In the spring, the structure is erected, the soil is loosened and planted with the selected crop.
Garden beds with drainage
Drainage beds are relevant and necessary if the garden is located in a lowland, and clay or swampy. Excess and stagnant water are detrimental and provoke decay of the root system, so it is necessary to ensure timely constant drainage and optimal gas exchange. 
To organize drainage with your own hands, follow the instructions:
- Designate a landing site.
- Remove a layer of soil with a thickness of 50 to 60 cm.
- Sand is laid at the bottom of the formed pit, the thickness of the layer of which will be at least 20-25 cm.
- Lay sawdust, humus and a layer of soil suitable for growing the selected plant on top of the sand.
High
High beds should be made in a low-lying or heavily swampy area: raising the soil will prevent stagnation of moisture and ensure timely drainage. Suitable option for gourds, potatoes, zucchini. The height can be from 30-35 cm to 70-80. 
Step-by-step device of a high bed in the garden:
- Prepare the box. It is possible to build it from plastic, boards, bricks, metal.
- A metal mesh is installed at the bottom of the structure, providing protection against rodents. A geotextile is laid on top of it, preventing the germination of weeds.
- Lay drainage, including expanded clay, broken brick, pebbles. The thickness of the layer is not less than ten centimeters.
- Prepare the soil by disinfecting it and treating it from pests. Fill the box with soil, filling most of it and leaving sides about 5 cm high.
Good to know! High beds can be organized without boxes using bulk trapezoids or ridges. A compost layer is laid on the soil, which ensures the rise of the soil. Next, the earth is poured, landing is carried out. But the beds will last only one season, because during the winter they will sag under the weight of snow and get wet when it melts. If bear insects are common in the region, it is better not to use compost: pests quickly populate it and multiply, destroying the crop. The rise is provided by an embankment of soil.

vertical
A vertical garden bed will save space in the garden and will be an excellent solution if the site has a small area. But the option is suitable for crops with a not very developed root system: strawberries, lettuce, cucumbers, herbs, tomatoes. 
For organization, it is allowed to use boxes, special racks or containers. You can arrange a vertical bed from improvised materials by making containers from plastic bottles and placing them on a homemade frame assembled from boards or a metal profile. 
French
In 2018, beautiful and aesthetic French beds are relevant. Distinctive features are laconic geometric shapes, strict planted rows and paths between plantings. Fences can be made of finishing materials (decking boards, paving slabs), bricks. You can do it by planting leaf lettuce around the perimeter of the beds, a low-growing type of greenery. Elevate zones if the ground is waterlogged or the site is frequently flooded. 
English
Fans of original ideas will appreciate the English beds, which allow a mixture of cultures. , a garden area with trees and a vegetable garden do not have strict boundaries and form a single landscape design. One site may include flower beds, fruit crops, vegetable plantings.
Spaces are left between the beds for free movement and comfortable care. The territory should not look neglected and abandoned, so carefully look after the garden, make sure that the land is free of weeds and fence the beds around the perimeter, for example, with stones or bricks (it can be irregular). 
lazy
Lazy beds are suitable for beginners or busy gardeners, as they do not require complex organization and time-consuming preparation. No need to prepare recesses and dig the soil to a great depth. It is enough to weed the ground, freeing it from weeds, slightly loosen it, then land. The spaces between the bushes are filled with mulch, which ensures the preservation of moisture and the prevention of its rapid evaporation, as well as protection from weeds. This greatly simplifies care and helps to collect good crops. 
Advice! Lazy beds are ground and devoid of fences or raised and surrounded by borders.
Smart
Smart beds are not only original and beautiful, but also practical and productive. This method of organization will create optimal growing conditions and increase yields. 
It is not easy to make smart beds on the site, since you need to raise them and fill them not with ordinary soil, but with special mixtures suitable for specific crops, consisting of compost, fertilizers, clean nutrient soil, organic matter. Landings are protected by reinforced high sides. It is advisable to raise the site itself in order to protect it from stagnant water and pest attacks.
Warm
Warm beds will allow you to get an early harvest and will be a good alternative to greenhouses. Planting heat will be provided by organic matter, which releases energy in the process of decomposition. 
Arrangement is carried out at the end of autumn and includes several steps:
- Remove a layer of soil about 50 centimeters thick. You can also make a box and install it in the prepared recess. A metal mesh can be laid at the bottom of a pit or container to protect against moles.
- Lay sawdust preliminarily scalded and treated with a solution of potassium permanganate on the bottom. This layer should have a thickness of at least 15-17 cm.
- Lay organic matter consisting of fallen leaves, turf, bird droppings or manure. Compact this layer to a thickness of 15 centimeters.
- Lay organic matter that rots quickly, such as prepared compost. This layer is approximately 10 cm thick.
- Lay a nutrient mixture that includes six parts of peat and a part of sand and sawdust. Add here a tablespoon of ash and superphosphate, a teaspoon of potassium sulfate, urea, zinc sulfate. The fertile substrate has a thickness of 20 cm.
 With the first rays of the spring sun, organics will release heat, warming the soil up to 40-45 degrees, which will allow crops to be planted much earlier. So you can grow plants with a small root system: cucumbers, strawberries, herbs, radishes.
garden fences
Fencing will help to equip beautiful and neat beds and zone the summer cottage. Try to organically fit them into the landscape design and do it correctly in order to protect the plants from negative influences and create an aesthetic appearance of the garden. 
Different materials are used for fencing: polycarbonate, slate, metal, wood (boards or logs), stone, rods and pegs. Fans of interesting ideas use improvised means: plastic and glass bottles, car tires, old hoses. 
Below are the characteristics of the main types of materials used for the organization of fences.
metal
Metal fences are quite durable, but they can be exposed to moisture for a long time and become covered with rust, which will not only worsen the appearance of the sides, but also negatively affect the composition of the soil. Thin metal is subject to deformation after mechanical stress. Metal also heats up in the sun. 

Galvanized
Galvanized fences have good characteristics: they do not corrode, serve for a long time, retain their properties, are highly durable and resistant to attacks by pests and fungi. The beds will be reliably protected from wind and other natural phenomena, pests. Ready-made fences made of galvanized steel are light, easy to assemble, and have different shades. 
A big minus is the high cost of structures. They also quickly warm up and transfer heat to the surrounding soil, raising the temperature of the soil and negatively affecting the root system. 
Plastic
Plastic fencing is a modern solution. They have a small weight, are not attacked by pests and high humidity, serve for a long time and have an affordable price. Light plastic will not get very hot in the sun. But the fences are subject to mechanical stress. 
Approaching responsibly to the organization of beds in the country, you will equip the garden, ennoble the territory and get an excellent harvest. Good luck to all gardeners! 


