Drywall is used in repair work of various volumes and purposes, and this is the case when two birds with one stone are killed at once. That is - the practicality and budget of the design, all this is provided by drywall. But maybe you don't know how to work with it, and what methods of mounting drywall to the ceiling are.
The composition of the gypsum plasterboard includes a gypsum filler, in which there are various binding additives, and layers of cardboard for facing purposes. The weight of one sheet will be from 12 to 35 kg, it depends on the thickness of the material. There are six mm drywall, nine mm, and drywall twelve and a half mm thick.

Why is gypsum plasterboard so popular in renovation:
- If you fix it on the ceiling surface, it will become perfectly flat;
- Communication systems can be hidden under drywall - not in all cases such installation is possible, but drywall does an excellent job with it;
- It provides sound insulation and thermal insulation;
- It can be mounted on the ceiling in different rooms, there is a classic drywall, moisture-resistant, fire-resistant, universal;
- Putting it down is easy, assembling the frame is also quite a feasible event for non-professionals.
Finally, it is drywall that will allow you to bring complex design projects to life. It can be cut, it will correctly take the given shape. That is, with him you can really assemble the ceiling of your dreams.
How to attach drywall to a wood ceiling
Drywall to a wooden surface can be attached in three ways: on an adhesive composition, on wooden slats, on a metal frame. The glue method is not possible in all variants - the surface to be glued must be perfectly flat. As an adhesion mass, gypsum mastic is used (it combines bone glue and gypsum stone chips). The mixture is applied, starting from the edges of the sheet, in small cakes 30 cm apart, and gradually moving towards the center. Well, after that, the plate is pressed onto the finished surface.

The second method is a slatted wooden frame. It is used in the construction of single-level surfaces. When installing it, you will need a well-dried timber, otherwise the supporting elements will very soon become covered with mold.
The main beam is placed along the entire plane of the ceiling, the interval is 80 cm. Then, relative to it at an angle of 90 degrees, bearing partitions are attached at a distance of half a meter from each other. They will then become a holding base for drywall.
When the installation of the frame is completed, you can directly attach the slabs. Self-tapping screws are screwed along the perimeter of the sheet with a step of 15 cm, and it is in a checkerboard pattern. In this case, the head of the rod should be slightly buried in the material. Then these places will be putty, and the entire surface will be flat.
What fasteners are used for drywall to the ceiling
The third method of fastening is a metal frame. It is used not only for fixing the gypsum board on a wooden ceiling, but also on a standard concrete ceiling. The technology is actually the same as in the case of a wooden frame, but there are some nuances.

The guide profiles must be fastened at 40 cm intervals, and this is done so that one standard 120 cm long plate is attached to four metal slats. When the base guides are equipped, you need to fix the hangers. These devices are fixed to the ceiling with dowel-nails at a distance of 40 cm from one another. After that, the supporting profile is fixed, its ends should be strictly on the guide rail at an angle of 90 degrees, and its body should be in suspensions.
All elements of the frame are attached to each other with special self-tapping screws for metal. When installation work is carried out, the horizontalness of the profiles is always checked with a level, but the places of possible load are reinforced with jumpers or anchor fasteners.
Scheme: how to screw drywall to the ceiling with your own hands alone
Typically, you have to put drywall on the ceiling with two pairs of hands. Working together is both convenient and fast, and there is no such load that a person experiences alone. But it happens that you have to do everything yourself. In this case, you need special tools - usually a platform and supports.

This situation involves the construction of a small structure of hinges, a pair of boards, supports. And in the open form, a retractable platform is six centimeters high below the ceiling level. This gap, along with the structure, also includes the width of the drywall sheet.
The plate rises in several stages: first, set the first support to the height of the hand, then the main one. Then climb onto the scaffolding prepared in advance, and start attaching drywall sheets to the frame.
How to fix drywall to the ceiling (video)
It is worth noting that, although such work is difficult, do not simplify it with the option of an adhesive fastening method. If there are irregularities on the base ceiling, then they will be noticeable under the drywall. Therefore, the frame method of fastening is the most reliable, and the metal frame is more suitable for this.
Great results!
Today we have to figure out how to fix drywall to the ceiling. We will get acquainted with the general principles of creating frames for single and multi-level ceilings from gypsum plasterboard and learn how to sheathe the frame and prepare it for finishing. But first, let's decide in which cases finishing the flow with plasterboard makes sense.
Areas of use
Fastening drywall to the ceiling allows you to:
- Hide any irregularities(defects in the pouring of monolithic floors and differences in the height of slabs, damage to plaster, etc.);
Note: in this case, the cost of time and money will be noticeably less than in the case of a plaster ceiling. The price of a drywall sheet with an area of 3 square meters (1200x2500 mm) varies from 250 to 400 rubles, and installation on a finished frame takes a few minutes.

- (spotlights, spots, LED panels);
- Concealed to spread the wiring above the ceiling, ventilation, local network, air conditioning mains;

How to hem the ceiling with your own hands
- with an arbitrary shape of the level boundaries.
Small text
Do not flatter yourself: GKL is not ideal as a material for a ceiling. It is useful for us to know not only the list of its merits, but also, as the socialist press once wrote, individual shortcomings.
- Drywall is a fragile material (see). A sheet with a thickness of 9.5 mm (ceiling gypsum board) will have to be fixed to the ceiling with at least two people, otherwise it will break under its own weight;

- The gypsum core of the sheet is not water resistant. Even gypsum plasterboard (moisture resistant drywall), after being flooded by neighbors, can swell and deform;
However: GKLV is successfully used in wet rooms, provided that it is protected from direct contact with water with a waterproofing finishing finish. For example, in the author's article, plasterboard walls and ceilings of bathrooms are protected by tiles and rubber waterproofing paint.

- Like any suspended ceiling, plasterboard will make the room lower. The minimum difference between the floor surface and the ceiling plane is approximately 4 centimeters (thickness of the ceiling profile + thickness of the ceiling gypsum board, 27 + 9.5 mm). The exception to this rule is leveling the ceiling without a frame, which we will get acquainted with first.

Captain Evidence suggests: frameless installation excludes wiring above the ceiling of utility networks and the installation of built-in lighting. It is used only if you need to eliminate minor defects in the floor without losing the height of the room.
Glue mounting
How to fix drywall to a ceiling without a frame?
Supporting materials
In the role of glue, the following can be used:
| Image | Description |
|
|
Gypsum assembly glue (for example, domestic Volma Montage or German Knauf Perlfix). |
|
|
Any gypsum fillers or plasters. They, like gypsum glue, have excellent adhesion to mineral substrates and gypsum plasterboards, but they set a little longer (up to an hour). |
|
|
Polyurethane foam. When using it, it is important to firmly grind the sheet to the ceiling: if there is a gap of more than 1-2 millimeters between the surfaces to be glued. Expansion of the foam can deform the drywall surface. |
|
|
Liquid Nails. The best adhesion, among those known to the author, is possessed by a rubber assembly adhesive. |


In addition to glue, we need a primer. For plaster ceilings, this is an acrylic primer - a deep penetration primer; for poorly water-absorbing concrete floors - adhesive quartz soil (concrete contact).

Preparation of the base
Fastening drywall to the ceiling with glue requires preparation of the substrate. It should be fairly flat (with differences of no more than a centimeter), clean, strong and provide reliable adhesion to the glue.
Preparation includes:
- Whitewash stripping... Lime is removed with a spatula after soaking with water, the chalky whitewash is washed off with plenty of water;

- Dust cleaning(with a vacuum cleaner or brush);
- Primer. The penetrating primer for maximum penetration depth is applied in two steps without intermediate drying. It binds the plaster and the solid foundation together. The adhesive primer is applied by roller in one layer.
Installation
So how to fix drywall to the ceiling with glue? Very simple:
- The glue is applied to the back of the sheet. Gypsum mixtures are applied with cakes every 15 centimeters, liquid nails or polyurethane foam are applied in strips;

- The sheet is tightly pressed against the ceiling over the entire area. If foam is used for installation, it must be rubbed in with a couple of sliding movements. When using gypsum glue or putty, the gypsum board should be additionally leveled according to the rule, tapping the irregularities with a rubber hammer;
- To fix the sheet during the glue setting, props are used, and when installing on a wooden floor, self-tapping screws.

Lathing for a single-level ceiling
How to attach drywall to the ceiling if it has significant irregularities (as an option - you plan to install built-in lighting or hidden wiring of utility lines)?
Supporting materials
To assemble the lathing under the suspended ceiling, we need:
| Image | Description |
|
|
size 60x27 mm. It will be the basis of the crate. The length of the profile must be at least one of the dimensions of the ceiling, and the number of profiles must correspond to a step between them of 600 mm. |
|
|
PNP profile (ceiling guide) for fastening the battens to the walls. The total length of the PNP is equal to the perimeter of the room. |
|
|
Straight hanger for fixing the batten profiles to the ceiling. |
|
|
Dowel-nails are responsible for fastening the plasterboard ceiling to the ceiling and walls. Usually, fasteners are used with a size of 60x6 mm. |
|
|
Self-tapping screws for metal with a length of 9 mm are needed to connect the elements of the lathing with each other. |


Useful: in narrow corridors (no more than 120 cm wide), you can do without suspensions. In this case, the lathing is kept only on the guides, and the absence of sagging is ensured by the rigidity of the PP profile.

Preparation of the base
In dry rooms, it is not required in principle, but a wet ceiling and top of the walls should be pre-treated with antiseptic soil. A suspended ceiling will restrict ceiling ventilation, which can lead to mold growth.

Installation
So, we need to assemble a plasterboard lathing on the ceiling: how to fix the profiles?
Here are the step-by-step instructions for assembling the frame:
- Mark the line of the future false ceiling on the walls. Instrument - laser or water level and chalk line for beating;
Hint: if the installation of hidden communications is not supposed to be installed above the crate, its level should be at least 27 mm from the bottom point of the overlap - the thickness of the PP profile.
- Fix the guides along the marking. The step between the attachment points is no more than half a meter;

Useful: holes for dowel-nails are drilled with a puncher directly through the profile pressed against the wall. First, the edges of each guide are attached, then its middle.
- Mark the axes of the lathing profiles on the ceiling in exactly 600 mm increments. With this step, the seams between the drywall sheets will be exactly in the middle of the PP profiles;
- With a step of the same 600 mm, fix the hangers along each axis;

- Insert the PP profiles into the guides and press them against the ceiling with the curved perforated ears of the hangers;
- Pull several cords between the guides perpendicular to the crate (2-4, depending on the width of the room);

- Align the PP profiles one by one along the cords and pull the ears of the suspenders to them with self-tapping screws, bending the free part of the ears up. So, with a minimum amount of time, you will expose the entire crate in one plane;
- Pull the PP to the guides with the metal screws. The lathing is ready.

Important: if the size of the room exceeds the length of the drywall sheet (2500 - 3000 mm), PP profiles perpendicular to the crate are attached at the transverse edges of the edges. Fastening adjacent edges to a common profile eliminates the appearance of cracks at the seams.

Frames of multilevel ceilings
How to fix drywall to the ceiling when creating a multi-level structure?
Obviously, the differences will boil down to different frame designs. We will now get acquainted with several designs.
Shaped box

GKL boxes around the perimeter of the room allow you to build a two-level ceiling with minimal time and materials. In the role of the upper level, a plaster or stretch ceiling acts (in the latter case, the frame is reinforced with additional slopes), in the role of the lower level, a plasterboard box is sewn to the frame.
The boxes contain built-in lamps and communications. The center of the room does not lose height, which allows you to use a chandelier as the main lighting.

To assemble the frame, all the same PP, PNP profiles and suspensions are used. The curly edges of the boxes are formed by guide profiles with side walls notched with a step of 5-10 cm.
Illuminated box

How to mount drywall to the ceiling if you plan to install hidden lighting?
This two-level design assumes that the upper level of the ceiling is illuminated with LED strip. To hide the tape, the plane of the lower level of the ceiling must partially overlap the upper level. The niche frame is formed by PP profiles protruding beyond the posts.
Two-level gypsum board

Before you is a full-fledged two-level plasterboard ceiling: under the one-level lathing, the frame of the box is sewn around the perimeter of the room. The guide profile PN 100 mm wide was used as a frame for the edge at the level transition.
Curvilinear multilevel

Each new level of the frame is attached to the profiles of the previous level through the GCR layer. For the manufacture of edges, a notched profile PN was used.
Frame sheathing
How to fix drywall to the finished frame on the ceiling?
Installation of gypsum board is carried out on self-tapping screws 25 mm long, screwed in with a pitch of 15-20 cm. The self-tapping screws are screwed into all profiles covered with plasterboard, including guides and bent ones.

A few practical tips:
- To cut drywall in curved lines, use an electric jigsaw with a wood saw (with the teeth pointing towards the ski of the jigsaw).

It is better not to cut the gypsum board along straight lines, but to break it along the cuts made with a knife: this way much less dust will rise into the air.
- The sheet is cut with a knife along a steel ruler for a quarter of the thickness and broken off at the edge of the table or any other elevation, then the cardboard sheath of the sheet is cut from the back. Uneven edges are straightened with a plane;

- For screwing in self-tapping screws, it is convenient to use a bit with a limiter. It will not allow you to sink the cap deeper than a millimeter from the surface level;

- The fasteners are screwed in no closer than a couple of centimeters from the edge, otherwise the sheet core is likely to crumble;
- On curved surfaces, a thinner, arched gypsum board with a thickness of 6 mm is used.

Alternatively, the bends can be made with a wall or ceiling sheet with notches every 5-8 cm. The resulting broken surface is rounded off when puttying.

Filling and reinforcement
We figured out how to fix drywall to the ceiling; however, there is still a long way to go before finishing. We have to putty the seams and (if there are several levels and / or curved surfaces) of the ceiling planes.
For this you will need:
| Image | Description |
|
|
Plaster putty. Desirable - finishing or universal. Starter fillers contain coarse filler and give a rougher surface. |
|
|
Fiberglass mesh for reinforcing joints between sheets (the so-called serpyanka). Without reinforcement, seasonal fluctuations in temperature and humidity lead to cracks after a year of operation. |
|
|
Reinforcing corner profile (rigid for straight edges and flexible for curved edges). |
|
|
Flat spatulas - narrow and medium (10-12 and 25-35 cm). We have to fill the seams with them and putty the planes of the ceiling. |
|
|
Corner trowel for finishing inside and outside corners. |
|
|
Capacity for mixing gypsum mixture with a volume of at least 6-8 liters. The author of the article usually uses an 11-kg bucket of water-dispersion paint in this capacity. |
|
|
Mixer or drill with a whisk for mixing the putty. |


Putty preparation
The gypsum mixture is poured into a container with clean water at the rate of 1.5-1.6 kg of gypsum per liter. In this case, the mixture should be distributed as evenly as possible over the water mirror. After 3-5 minutes, when the gypsum swells, it is mixed with a mixer to a homogeneous consistency.
A few subtleties:
- When mixing the mixture, do not pour water into dry gypsum. In this case, dense lumps will remain at the bottom of the bucket, which are almost impossible to destroy with a mixer;

- The size of a single serving should be such that you can work it out in 30-40 minutes. The author of the article usually prepares about 2 kg of ready-made putty when sealing joints and about 5 kg when filling the plane of the ceiling or wall;
- The dishes and all the tools must be washed clean after the next portion of the putty has been used up. If this is not done, dry lumps of plaster remaining on the instrument will leave grooves in the finish.

Seam sealing
It begins with jointing: all rectangular edges cut at the place of the sheets are chamfered with a sharp knife. Joining will allow to fill the seams as tightly as possible, without cavities, thereby reducing the likelihood of cracks.

The first layer of putty is applied with a narrow spatula at the same time as reinforcement (gluing a serpyanka or laying an angular reinforcing profile under gypsum). When filling the inner and outer corners, it is more convenient to use an angled spatula.

If the profile reinforcing the corner leaves, it can be fixed with 20 mm studs or self-tapping screws: they will be hidden by the putty together with the profile.

The second layer is applied with a wide spatula after drying the first (after 6-12 hours, depending on the level of humidity and temperature) and hides the texture of the reinforced seam. The fasteners, like the seams, are putty at least twice: the second layer compensates for the shrinkage of the gypsum during hydration.

However: if the entire surface of the ceiling is putty, there is not the slightest need to apply a second layer of putty to the seams.
Filling planes
The putty is applied in a sliding motion using a wide trowel. Plaster is applied to it with a narrow instrument.
It is easier for a beginner to apply not one layer with a thickness of about a millimeter, but two as thin layers as possible with movements "on the sdir", perpendicular to each other: this way there will be fewer stripes from the edges of the trowel.

Preparation for finishing
It is performed after the gypsum has completely dried (at least one day after applying the last layer of putty) and consists of three stages:
- Grinding... It can be done by hand (using a hand grater with a sanding mesh) or a sander (vibrating, belt or disc). At the time of grinding, it is advisable to organize bright lighting of the ceiling at an oblique angle to the horizon: shadows will highlight all the flaws and allow you to make the surface perfectly flat;

- Dust cleaning that can interfere with the adhesion of the paint to the ceiling surface. Dust is removed with an industrial vacuum cleaner or a regular brush;
- Primers... The penetrating acrylic primer will reliably adhere the remaining dust and improve the adhesion of the paint to the surface.

Attention: it must take at least 14 days from the filler to painting the ceiling with water-based paints. During this time, the hydration processes will be completed in the gypsum. If you hurry, areas with a thick layer of putty (in particular, seams) will appear darker.
Conclusion
We hope that we were able to give the reader a general idea of the installation of plasterboard ceiling structures. The attached video will show you more clearly how to properly attach drywall to the ceiling. Good luck!
Finishing work often causes a lot of difficulties, especially when carrying out the processes yourself. The greatest problems arise when fixing sheet materials on elevated horizontal foundations. It is necessary to fasten drywall to the ceiling in compliance with all the rules in order to avoid serious problems in the future.
The fixing of the slabs is carried out in the most convenient way, which is selected taking into account the available capabilities and the type of base and ensures a flat and reliable surface.
Metal carcass
Laying drywall on a profile is the most popular. This is due to the fact that such an installation allows you to correct significant differences in height and hide communications.
Fastening of frame parts is carried out as follows:


If you do everything correctly, you will get a metal frame that has a single plane.
You should know! To avoid problems with possible shrinkage, the parts should not be located at the edge.
Wooden lathing
This option is more suitable for working with wooden substrates, since a similar thermal expansion is provided. The timber must be free from defects, well dried and must be treated with fire retardants and antiseptics.
Step-by-step instructions for the lathing device:
- The base is prepared in the same way as when installing the metal frame.
- The markup is in progress. Due to the absence of a guide system, a line is bounced off the walls, taking into account the greatest unevenness and a margin of 3–6 cm. It will be the starting point for pulling the cord.
- The beam is attached to installed hangers, which are fixed to a concrete base or wooden logs, if there is significant unevenness.
- It is recommended to install the side parts first with a distance of 10–15 cm from the walls. The edges of the elements should also not come into contact with vertical structures, therefore a gap of 10 mm is set.
- A cord is pulled between the parts. Further installation is accompanied by leveling and tensioning the rope.
 The beam is usually used for arranging suspended ceilings in wooden houses.
 The slats can be attached directly to the ceiling joists, but there should be no height differences for this. If the work is carried out with attic floors, then thermal insulation and waterproofing can additionally be installed.
Glue method
This process is rarely done by hand. The foundation should not have significant deviations and open communication systems. In addition, the surface requires mandatory preparation.
Before attaching the gypsum board, the following procedures are carried out:
- The old coating is completely removed. Whitewash, paint and wallpaper are especially carefully removed. The ceiling must be clean.
- A primer is applied. Compounds with deep penetration are used, which significantly improve adhesion.
- Eliminates cracks and crevices that can allow moisture to pass through.
 Gluing sheets is most often used for low ceilings or arrangement of multi-level structures, when one of the levels is the base
 On a note! It is very problematic to fix sheets of large format, therefore it is allowed to saw them in half.
Installing drywall to the ceiling alone
Before starting work, it is necessary to think over all the actions in order to avoid problems. It is very difficult to screw on the plates and will require accessories.
If a suspended frame system is used, drywall sheets can be fixed in several ways.
Telescopic lifts
They are a device with stops on which the plate is placed and evenly rises to the desired level. The disadvantage of this option is the high price of the equipment, which does not allow purchasing it for home use.
 There are a lot of types of professional telescopic lifts, but all these models have one serious drawback - this is a high price.
You can make such a system yourself, but not always. For this, pipes of different diameters are used:
- Thinner parts are welded into a single bottom frame. You should get a structure with two extreme supports on legs, reminiscent of an open clothes hanger.
- The posts are reamed through in steps of 5 to 10 cm. All points on the two posts must be at the same level.
- Thick pieces are worn on top. On their upper edges there is a rubber-glued vertical crossbar. The overall system consists of two T-shaped pillars.
- As the pipe rises, the larger diameter pipes are fixed with a pin at the desired level.
 It is realistic to build a lift of 4 poles and an upper support frame, but without experience it is difficult to use such a homemade technique alone
 Using brackets and hangers
A faster and easier method to secure drywall sheets. Algorithm of actions:

The technology may seem complicated, but if you get used to it, the work will not take much time and will provide excellent results.
Attention! Making a special wrist strap with a magnet or sewn-on holes for self-tapping screws will help to simplify the procedure.
Fastening with glue
To glue drywall sheets directly to the ceiling, you need to do the following:

Further work is carried out in the same order. Although the process will take a long time, it will allow you to glue all the elements extremely securely.
To hang drywall yourself, you should take into account some of the nuances:
- Everything needs to be thought out in detail, there is no rush.
- The tool is selected extremely lightweight.
- Manufactured stops must be assembled rigidly, without loose parts.
- The main thing is to securely fix the main part, since it carries the bulk of the weight.
- If fatigue occurs, work should be postponed, otherwise there is a great risk of not only damage to the material, but also health problems.
Although it is not easy for one to screw or glue gypsum boards, adherence to technology and recommendations makes it possible to achieve a high-quality result.
To align ceilings, builders and apartment owners themselves use drywall sheets. This choice is explained by the excellent characteristics of the material: moisture resistance, light weight, ease of installation, due to which, in a short time, without unnecessary noise and dust, they create a smooth, neat surface, give it a different texture or figured outlines.
The technology of fastening GKL sheets includes several stages and is performed in various ways, each of which can be carried out independently. The most common is installation on a frame made of metal profiles using dowels or self-tapping screws. A wooden structure made of load-bearing and support beams can also become a frame. But the cheapest option is gluing a sheet of drywall to the ceiling.
Whatever technology is used, the planning phase cannot be skipped. It includes measuring the height of the ceiling, preparing tools and purchasing materials. At the same stage, a drawing of the ceiling is performed, which indicates the layout of the wiring and outputs for the lamps, the parameters of the level and outlines of the frame are given, if the mounted ceiling is of a curly type.
The starting level of the framework is measured as follows:
- with a laser beam or a water level at a height of 1.5 meters from the floor, marks are made on each wall surface, which are connected to each other with a solid horizontal line;
- measure the distance from the ceiling to the resulting line;
- a mark is made at the lowest point in relation to the ceiling (at a distance of 25-30 mm from the top);
- exactly perpendicular to it on the other wall, make the same mark, which is connected to the first one using a stretched thread or chokline;
- the same is done around the entire perimeter of the room.
The resulting solid horizontal line is the lower level of the frame, to which the profile or wooden beams are attached, we will describe the distance or step between them below. If drywall is planned to be glued, such a scheme for calculating horizontal markings is not used, however, we note that the evenness of the base and the durability of the structure depend on the correctness of these calculations.
Frame fabrication
Consider how the gypsum board is fastened to a metal frame. To do this, you need a profile of two types - a guide and a ceiling (bearing). According to the finished horizontal marking, using dowels (or self-tapping screws) and a damper tape, the UD profile is attached, after which the pitch of the ceiling strip is determined. This parameter is used to calculate the number of frame suspensions and the distance between them.
To do this, on the ceiling perpendicular to the UD profile, in the direction in which it is planned to fix the drywall sheets, marks are made at a distance of 50 cm, which are connected with a horizontal line. Along these lines, at a distance of 80 cm, marks are made for U-shaped suspensions.
Using a drill, they make holes for the wedge anchor and insert the suspensions. This step of the profiles is the most reliable: it strengthens the structure and protects the plasterboard ceiling from deflection.
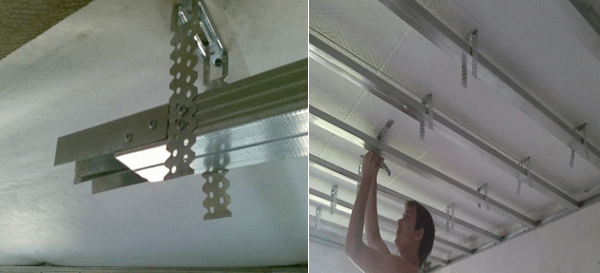 This is how the planks are fixed to the suspension.
 So that in the future the sheets of gypsum board lay flat, the screws are twisted strictly horizontally. After the installation of the metal frame is completed, they proceed to insulation and sound insulation. Laying wiring, fittings for ventilation or television will help the ceiling drawing diagram drawn up at the preparatory stage.
Finishing works
We proceed to the installation of drywall. It is cut to the desired size, holes are drilled for lighting fixtures. How the fastening technology takes place, from the planning stage to the finishing, you will see in the video, which describes in detail how to make the frame correctly, carry out the marking, and calculate the step of the guides and bearing strips.
As you can see, it is possible to securely fix the gypsum board on the ceiling with a convenient scheme of intersections of profiles, because each sheet falls just in the middle of the bearing bar. Often, metal lintels are installed in a step between the bearing strips, which even better fix the gypsum board to the ceiling, reliably protecting the edges of the sheet from sagging in the air.
Fasten the drywall with self-tapping screws, which are not screwed in very tightly so as not to damage the paper layer on the drywall.
 Fix the sheets with a screwdriver with a special attachment
 Their number should not exceed 60 pieces per sheet, that is, they are screwed in at a distance of 30 mm from each other. Then the caps of the screws, as well as the distance between the sheets, are sealed with putty, after which the surface of the ceiling becomes even. Finishing, however, provides for the treatment of the resulting surface with a primer, painting, plastering or the use of other methods of decorative design.
Above, the simplest installation technology is described, which provides for the manufacture of a frame for a continuous ceiling made of plasterboard. Curly or multi-tiered ceilings are made according to the same principle. As you can see from the article, the work is not difficult, the only thing that is important is to correctly calculate the height and pitch of the frame profiles, because the ideal basis is the key to the durability and safety of the structure.
In contact with
Among the finishing materials for the ceiling, drywall is considered the most profitable if we take into account its cost and characteristics. The most simple in terms of implementation is a single-level suspension structure, which is shown in the photo. Having figured out the technology for creating the frame and how the drywall is attached to the ceiling, you can make repairs at home on your own.
There are different ways of attaching drywall to the ceiling: directly on the base floor, on a metal frame, on wooden slats. And for each of these cases, there are requirements for fasteners and materials used.
The procedure for fixing plasterboard ceilings
Suppose it is necessary to install the plasterboard structure as close as possible to the base floor, since it is necessary to keep the height of the room as much as possible. Installation will be carried out on a metal frame.
First stage - markup. Plasterboard ceilings begin with markings. On the base ceiling, you need to find the lowest point and move it to one of the walls in a randomly selected corner of the room. The distance from this point to the lowest part on the frame should not exceed 25 millimeters (profile thickness). Having departed from the bottom point of overlap of about 30 millimeters, a mark is made, which is transferred to all corners with the help of a building level. Thus, in each of the corners there will be two marks (one on each wall).

Then, using a chokline or a thread with blue, markings are made around the perimeter of the room. To do this, a thread is pulled between two marks, it is pulled back and abruptly released. As a result of hitting the surface, the chokline leaves a control line. According to it, a plasterboard suspended ceiling will be mounted, it means the lower level of the frame.
Next, you need to decide on the direction of laying the gypsum plasterboards - according to it, you need to mark two opposite walls every 50 centimeters. Between the marked marks, lines are beaten off with the help of a chokline - they are a reference point along which the suspensions will be attached.
Fastening the frame
Second phase - the creation of metal. Along the line marked along the perimeter, screw the UD profile so that the lower part of the bar coincides with it.
For fastening, it is advisable to use 6 mm plastic dowels and screws with a diameter of no more than 4-5 mm. For screws and dowels, the length must be selected based on the density of the material of the walls of a particular room.

After that, the CD profiles are cut into pieces of the required length and inserted into the UD profiles mounted around the perimeter. To level the CD profiles, a strong nylon thread is pulled under them. It is fixed from wall to wall perpendicular to the CD profiles with small self-tapping screws on the UD profiles.
Each profile is exposed along a stretched thread and fastened to the suspensions with self-tapping screws intended for gypsum plasterboard profiles. In the same way, the CD profile and the UD profile are connected to each other, and the ends of the suspensions sticking out to the sides are bent to the sides. When the drywall frame is created, the ceiling is almost ready for the installation of finishing boards. It is also necessary to make electrical wiring for the installation of lighting devices and lay the wires in a special corrugated cable channel.
Third stage - installation of gypsum plasterboards. Each sheet has a considerable weight (about 15 kilograms) and therefore it is advisable to carry out the work on installing the gypsum board with an assistant. It should be noted that two plasterboard sheets will need to be attached to the extreme segment of the CD profile, so the edge of each of them should be located on half of the profile.

Fastening a stretch ceiling to a ceiling: installation system "). In this case, fastening a stretch ceiling to drywall is a difficult task that only professionals can handle (read:" ").