Thanks to the non-standard geometry, there are many more design possibilities in the attic room than in any other room. Roof slopes can serve as a ceiling attic floor, and at the same time be its walls.
An exclusive interior can be created thanks to the windows on the ceiling, or well-placed load-bearing beams. Great importance has and functional purpose attics - interior decoration must match it.
As a rule, the attic is located in a house that has pitched roof... It can be one steep and the other a gentle slope, or both.
If two slopes are steep and reach overhangs to the overlap, then this is just an attic:
- To be able to turn it into an attic, the attic must be raised in height, due to a small wall around the perimeter of the house. A person should be able to walk in the attic without bending his head.

- There was a time when attics were not heated, and were intended for servants, poor students and impoverished intelligentsia. Today, the look at this room has changed - it has become a full-fledged living space, subject to its high-quality insulation.
- Many materials with the help of which the internal is made allow, during the process of their installation, to produce a thermal insulation device. In this case, special attention is paid to the roof slopes, because it is they who take on precipitation, wind loads and the effect of low or high temperatures, depending on the season.
- During roofing works, roof insulation must be performed. In any case, if it is planned to do residential attic.
Regardless of this, the same list of works on insulating the roof slopes must be performed inside. A double layer of thermal insulation guarantees the room protection from freezing and drafts.
As for the walls and gables (see), if they were insulated during the exterior decoration of the house, then there is no need to do this work inside. We will not go into the details of the thermal insulation device, there are similar articles on our website.
In addition to them, watch the video. Let's just say that many materials used in the interior decoration of the attic themselves have thermal insulation properties- for example: gypsum board, fiberboard, cement-bonded particle boards and magnesite boards.
Attic floor device
When installing a kitchen or bathroom under the roof of a house, the interior decoration of the attic floor must be appropriate. Since the attic room is quite spacious and has windows that allow it to be regularly ventilated, high level there will be no moisture in it.
So:
- The main attention in preparation for finishing should be directed to the floor, so that in an emergency with water pipes, the ceiling of the room below was not damaged.

- Therefore, you need to try to make a sealed structure on the floor, and it is not at all difficult to do it yourself. Consider the option of a brick or stone house, with reinforced concrete slab overlap.
In this case, the implementation of waterproofing can be the same as in apartments.

- First, the concrete surface is treated with a penetrating waterproofing mixture, with the wall gripping to a height of fifteen centimeters. First of all, the joints of the floor and walls are coated, gluing a special insulating tape on top.

- When all corners and joints are sealed, the primer is applied to the rest of the floor. After the mastic has dried, you can make a self-leveling floor using a dry self-leveling mixture diluted with water.
The result is a perfectly flat and airtight base for laying porcelain stoneware, tile or mosaic tiles. - In principle, the floor can be made in the same way in those cases when it is planned to make an ordinary one in the attic living room, only you can do without tape, and replace the waterproofing mastic with an ordinary primer.
- But there are other options for flooring. It all depends on which decorative coating the preference is given and whether the floor mark should be raised higher.
If necessary, then on top of the waterproofing layer, which can also serve as an ordinary roofing material, covered with an overlap, wooden logs are mounted. - If the space between them is left empty, and, for example, a plank floor is made along them, each step on the floor will give off a booming sound. Therefore, the resulting cells are filled with any loose insulation: granulated penoizol, expanded clay or polystyrene chips.

- Thus, you can kill two birds with one stone: you get not only insulation, but also good sound insulation floor. So: liquid is poured into the cells with insulation cement mortar- you will get an absolutely sealed base made of foam concrete, and its price will be minimal.
In order to put a tile or laminate on such a base, it will be necessary to drown the reinforcing mesh in an uncured solution, and then perform a leveling screed. If a plank floor is to be mounted, then the mesh will not be needed.
Work on the construction of the subfloor must be carried out after plastering the walls, if any.
Decorative finishing of the attic
If exterior decoration walls were carried out without insulation or were not carried out at all, walls and gables need to be insulated from the inside. In this state of affairs, the most convenient option there will be interior decoration of the attic with clapboard, MDF panels, drywall (see) or other material requiring the installation of the lathing.
It is very convenient to lay insulation in its inner space.
So:
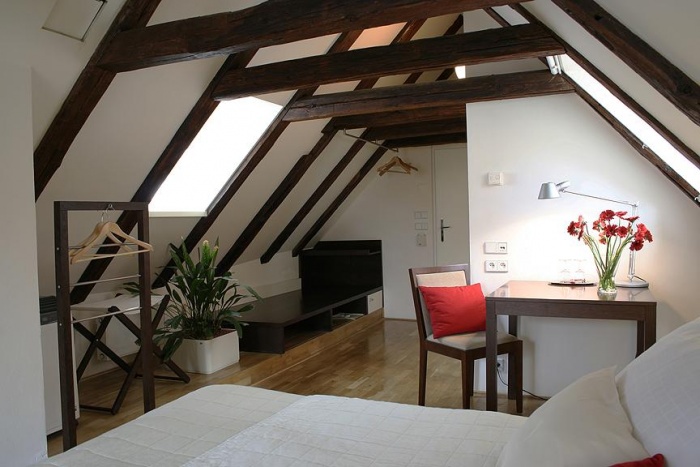
- Most often, the owners give preference to natural materials, and the clapboard is number one on this list. And it is not at all necessary to sheathe absolutely the entire room - you can do: only with a plank ceiling or only with wall cladding.

- As for the interior design, here you need to show imagination so that the room does not look dull and monotonous. And there are many options for decorating.
These are doors, skirting boards and cornices in a contrasting color; beautiful carved railings on the stairs leading to the attic. - This is painting boardwalk in original colors that hide the texture of the tree. Moreover, the painting is not monochromatic, but alternating bright hues with darker ones, as in the photo below.
- It would seem: the lining board is the most available material, known to all and sundry. How can you make an exclusive interior in the attic with its help?
It turns out you can! As a proof, we give an example designer finishes such a room with a board.

- Let's see what techniques the designer used. First: the room is divided into zones by using boards with different sections - "block house" and "standard".
The boundaries of the zones are also determined by the roof rafters, which contrast in color to the walls. A very pleasant stain has been selected for coloring the board. - Frames with a canvas stretched over them serve as wall decoration. Or perhaps it is silk wallpaper, glued to a plywood base, or directly to the wall, and framed with decorative molding.
- The window-sill space is also decorated. The interior is completed with lamps and semi-antique furniture - which is the value of one chest in the corner.
And it seems that there is nothing supernatural in the decoration, and the picture attracts the eye. - In order to "dilute" the wood in the interior of the room, you can use a variety of finishing materials. In our next example, two of them serve this purpose: decorative rock, with which part of the wall is faced, and glass in false ceiling.
Beautiful twisted pillars and balusters of the railings serve as a contrasting decoration here.

- The wall cladding of the attic, with the same success, can be done with MDF panels. As in the case of the clapboard, in order to achieve harmony in such an interior, it is important to avoid monotony.
In this case, Bottom part walls are decorated with panels with cork, used wooden skirting boards and slats of a darker color.

- Drywall is also successfully used in the decoration of the attic space. It is used to insulate and level the walls, create suspended ceiling structures and wall partitions.
And in this case, the design of the attic space will not yield to any other. Fortunately, the surface of the gypsum board can be painted, pasted over with wallpaper, decorated with tiles or volumetric panels.

- If there is no need to insulate the walls of the attic, they can be leveled with a regular one, or decorative plaster... Brick and cinder-concrete walls are treated with a universal primer, then, after it has dried, a starting layer of plaster is applied.
Having given him a grip, the surface is primed again. - The finishing layer of plaster can also be structural. The relief in this case is created by adding to the solution stone chips or other fillers.
To achieve this goal, masters use and various instruments, with the help of which a relief is applied to the wall.

- Plastered walls can be simply painted, pasted over with floral wallpaper, or used in decoration more expensive types of wall coverings with cork, bamboo, or stone veneer.

- In the example above, the walls of the room are finished with one of these coatings. The highlight of the interior is a small wall lined with 3D panels with a volumetric relief.
The attic and the beams mounted along the perimeter of the ceiling and roof slopes, which contrast with the decorative coating, are very decorating.
As you can see, there are many ways to perfectly decorate the attic floor, and we really hope that our little instruction helped you with this. Stretch your imagination, dare and please beautiful interior yourself and your loved ones!
The attic is gaining more and more popularity - an additional room that is located near the roof. After all, such usable space sorry to use it for storage of unnecessary things. But, if you complete the finish correctly attic room, then it is quite suitable for receiving guests, a relaxation room or a gym.
What is included in this finish? How can you sheathe an attic room and how to do it? Let's find out.
Attic projects
To begin with, I would like to note that your attic can be made in different variations. It is O interior space... Most developers, when planning an attic project, tend to maximize free space. Sometimes the owners do not even hide the rafter system, leaving them as additional element decor.
Basically, the layout of the attic depends on the type of roof of the house. What matters is whether the roof is low or high. The space below it can be wide or limited. Nevertheless, two types of arrangement inside the attic are often distinguished.
The first method is used when the roof has a small slope, but a large height. Finished room it will turn out non-standard form: not rectangular or square, but trapezoidal. The space inside can be made in the form of one room, or you can divide it into two. If you have a narrow and long room, then it is easy to equip two rooms there.

The second way is more traditional. The room turns out to be rectangular or square. Due to the height and width of the roof, you can make additional partitions to create perfect shape as seen in the diagram above. The cut off space is suitable for a storage room. Such extra space will never interfere and will find its application.

Note! The places where you will install the partitions are selected depending on the desired ceiling height. Partitions can be made of brick, wood, or drywall.
Attic finishing technology
It is not difficult to arrange an attic in a quality manner. The key is to be patient, take the time, and put in some effort. How you decorate the attic depends entirely on the purpose of the room. For example, you want a room to be used only in summer time or all year round? Much depends on this choice. After all, in order for the room to be operated in winter, it will need to be insulated. Let's consider a more complex option, in which it will be possible to use the attic in winter.

To begin with, it is important to make a quality cake using hydro and vapor barrier. In advance, outside the rafters, you need to fill a layer of waterproofing, which will prevent the penetration of water from the roof. Now, in the space between the rafters, you will have to lay thermal insulation material... It must retain heat well, have sound insulation qualities, be environmentally friendly and keep its shape. Basalt or mineral wool is ideal. How option - use foam.

Note! The frame for the lining and insulation can be made of wood or metal bars. When working with wood, the material must be treated with an antiseptic and anti-rotting and burning agents. And metal profiles are required to be covered from rust.
Insulation is sheathed on top vapor barrier film... Thanks to such layers of protection, the insulation inside will not lose its properties and will last much longer. After that, everything is ready. It remains only to trim (sheathe) the attic from the inside.

Attic cladding materials
Here you can roam. There are plenty of materials for cladding. What can you choose from?
- Drywall.
- Wood.
- OSB panels.
- Plywood.
- Lining.
All materials have their own advantages and disadvantages. In this article we will talk about clapboard decoration. it great stuff, which will make the attic attractive and practical. And how the lining of the attic looks like can be seen in the photo.

What are the advantages of lining? main feature - ecological cleanliness... Lining is natural material which creates a healthy microclimate inside. In addition, the lining will give the room a rustic atmosphere. Everything will look aesthetically pleasing and attractive. You can use the lining for both wooden houses, and for brick and concrete.

As for the work itself, finishing the attic room with clapboard is a little complicated. Compared with the same drywall, it will take a little more effort and time.
Note! If you are finishing the attic with clapboard, then rationally approach the choice of the width of the material. If you use products that are more than 10 cm wide, the surface may crack.
So, how can you clap the attic from the inside with clapboard? What is the technology? Let's find out.
Clapboard finishing technology
Before starting work, wooden slats have to soak protective compound and open with varnish. Now more about the stage of all work:


From theory to practice
First of all, select the direction of the lining. It can be vertical or horizontal. It depends on this choice what kind of frame is made for fastening the material. If the direction is vertical, then the frame is made horizontal, and vice versa. Keep in mind that the lining, laid horizontally, will expand the room, and the vertical sheathing will make it higher.

As for attaching the lining for the attic, then the choice is yours. There are several types of fixation:

It is allowed to mount the lining in any of these ways. It is clear that the first method is not entirely aesthetic, since the heads of the nails will be visible. This is an option for storage and utility rooms.
Work starts from the bottom up when vertical mount, and from right to left for horizontal. The first plank must be adjusted to the size of the attic and cut. Use clamps to hide the attachment points. It is attached through the grooves to the lathing. Join the second board with the first with a spike. It must be inserted into the groove.

All other elements are fixed in the same way: through the groove to the crate. The fastening step is the same as the lathing step. The finishing board does not always fit. Therefore, it needs to be cut and adjusted. The extreme joint can subsequently be hidden with a plinth. That's all. The work has been completed. For clarity, we suggest that you additionally watch a video on how to sheathe an attic with clapboard from the inside.
After finishing the attic, you can significantly expand useful area private house. The room can be used for various purposes: be an office, a bedroom or a children's room. You just need to choose the right option for finishing the attic with your own hands. Photo ready-made solutions allows you to find an idea for subsequent implementation. We invite you to get acquainted, as well as the sequence of finishing work.
The main difference between an attic and an attic space is their purpose. The attic is a living space located under the pitched roof. The attic belongs to technical premises... It can be warm or cold. The attic room should be well insulated and have.
TO design features there are no clear requirements for the attic. The attic should have a ceiling height of at least 2.5 m. From the point where the roof slope meets the wall, the distance should not be less than 1.5 m.
The costs of finishing the attic and attic space differ significantly. Decorating an attic is much more expensive than equipping an attic. Here you should not only perform thermal insulation work, but also. The attic finishing options are similar to those used in the design of any living space.
Attention! The living area of a private house includes an attic square. The area of the attic does not count.

How to equip an attic in a country house - basic rules, choice of attic floor design
The arrangement and decoration of the attic is resorted to in case of a lack of living space. The room is quite specific, so you should competently approach the development of the attic design. Photos of completed projects can be used as an idea for subsequent implementation. With their help, you can more rationally dispose of the available quadrature, providing for special niches or auxiliary rooms... How to equip an attic in country house? The answer will depend on the chosen purpose of the room, as well as on the preferred finishing option. In case of choosing difficult option, not all work can be done by hand.

Attic floor design: basic development rules
Considering that the premises will be residential, regardless of the chosen finishing option, one should start with insulation and installation. The latter will significantly reduce the available area, which should be taken into account when developing a do-it-yourself attic finishing option. Photos before and after are proof of this.
Unused space can be arranged in the form of niches by placing various household appliances... In low places you can install either. If it is uncomfortable to stand in this area, sitting or lying down, you can feel quite comfortable. Finishing should be done based on the purpose.

The finishing materials used deserve special attention. They should not only have beautiful appearance, but also be light, especially if in an attic with a slope. Photos presented in the catalogs of manufacturers will always allow you to choose the appropriate option.
Getting started styling topcoat, the base should be properly prepared so that during operation flooring there were no problems. It is laid under parquet or laminate special backing... It will improve the soundproofing of the attic by adding softness to the floating floor. Cement with a reinforcing mesh is poured under the tiles.

Finishing an attic with a sloping roof - photo, nuances
What will be the interior of the attic room with sloping roof, largely depends on the preferences of the owners and the purpose of a particular room. Finishing with materials made of natural wood... Allowed to use if it was previously performed rough finish walls.
A house with a sloping roof allows you to use the attic as a full-fledged room. To do this, mount suspended structure... Installation is allowed. We offer you to see a photo of the attic finishing with a sloping roof.
Decorating the attic floor with your own hands - the main stages
Before the start of interior decoration, a certain preparation of the premises is carried out. Particular attention is paid to design and execution. If the premises are already in operation, the order of work will depend on the previously performed insulation. We offer you to watch a master class with a photo of the attic finish wooden house inside, including several stages.

Room preparation
To make the room functional, you should figure out when it is advisable to arrange the attic in wooden house.Photos of completed projects indicate that preference is given to buildings with a sloping roof: one slope is left flat, the other is made steep.
The need for performance is determined thermal insulation works... If at the construction stage the house was not insulated from the outside, the insulation is laid from the inside into the roof and walls.

Installing the frame
The attic finish begins with the installation of the frame. Depending on the weight of the materials used, preference can be given to a wooden or metal frame. To work you will need:
- roulette;
- suspensions.
When installing metal frame you need to prepare a knife. After marking and cutting off structural elements to size, guides are attached along the entire perimeter. Every 0.6 m, vertical profiles are attached with self-tapping screws.

Wooden beams are thoroughly dried before installation. Their quality is checked: the surface should not be black, blue, moldy. A special composition is applied to slow down the decay process. Installation in progress wooden beams... Self-tapping screws are used to fasten the elements.

Warming and waterproofing
As a heat insulator for residential premises can be used various materials... When doing work with your own hands, mineral wool is very popular. If the waterproofing layer has already been installed at the stage of roofing, the insulation is performed in the following sequence:
| Photo | Description of work |
 | Preparing a sufficient amount of mineral wool required thickness, depending on the location of the house with an attic. |
 | Determine the distance between elements rafter system. |
 | We cut the insulation to size. |
 | To form straight line cut, it is worth using a template, which can be a board or plywood of a suitable shape and size. |
 | Having retreated 5 cm from the edge, we make markings for T-shaped fasteners for metal guides. |
 | We mark the attachment points of the T-shaped fasteners. They should be positioned every 40 cm. |
 | We fasten the T-shaped guides, carefully controlling their spatial position. |
 | We install the metal profile, check the quality of its fastening and then remove it. |
 | We lay between the beams mineral wool... There should be a gap between the roof and the insulation layer to ensure natural ventilation. |
 | To improve the quality of thermal insulation on top of a thick layer of insulation, lay mineral wool of a smaller thickness. |
 | We put in place the metal guides. |
 | We attach double-sided tape to each metal guide. |
 | We cut out the vapor barrier material, which will be attached to the metal profile using a double-sided layer. |
 | Remove the protective layer from the tape. |
 | We distribute the material evenly over the entire surface of the roof, fixing it with tape. |
 | On top we additionally glue a layer of scotch tape, rolling and pressing it with a roller. |
 | At the junction of the slope and the wall, we fix the material with staples. |
 | We carry out the insulation of walls and gables in the same way. |
Article
Decorating the attic inside (photo shows the variety design solutions) can be made using a popular and easy-to-work material like plywood, which is made from wood veneer and has an ideal structure for use in any premises. Due to its flexural strength, plywood is ideal for wall cladding and truss systems. The use of any material with a base in the form of wood requires laying materials for heat and vapor insulation. But it doesn't hurt to know some of the nuances of editing:
- the gaps that appear between the plates are best hidden under the moldings matched in color;
- the traces of the heads of the fasteners can be hidden with a filler that matches the color;
- furniture varnish covering plywood will become reliable protection wood surface.

The attic is a special space, as it is located directly under the roof. Accordingly, the humidity is too high here, therefore, drywall must be used moisture-resistant. First you need to calculate the amount of material, and it depends on the area of the surfaces that you plan to sheathe. Within the framework of preparatory work you need to clean the old coverings and analyze the condition of the roof: any "weak" spots need to be repaired and modified. Beams and rafter systems require no less attention: they must meet the requirements of strength and resistance to rot and moisture.
Almost every owner of a private house has an attic room. Sometimes it is used as a warehouse for various things, sometimes it is completely idle empty. But when the question of expanding the living space comes up, many remember the attic. After all, there is no need to finish building anything to the house - it is enough to insulate and equip the attic floor, to make the interior decoration of the room.
In this article, we will demonstrate the most common options for finishing the attic floor, as well as acquaint you with the complete technology for performing work.


To avoid unpleasant consequences, it is better to think over the insulation and decoration of the penthouse at the design stage of the house. This will help to properly organize the sequence of the preparatory work. Unlike work on the construction and insulation of the attic floor, which must be performed by specialists, it is quite possible to finish the attic with your own hands.
How to decorate the attic inside: preparatory work
Before finishing the attic with your own hands, you should carry out insulation end walls attic, as well as heat and vapor insulation of the roof slopes.
Advice: the comfort of this room in the future depends on the quality of the insulation and insulation. If you make a mistake at this stage, this can nullify the entire attic lining.Choice of finishing materials
When the attic floor is reliably insulated, the question arises: how to decorate the attic from the inside? There are a lot of materials for cladding a room in the construction market - consider the most popular.
Lining
Plastic lining is one of the most inexpensive and popular materials for interior cladding of buildings. It can also be used to decorate the attic. The material gives ample opportunities in the implementation of the design of the room, in the choice of color and pattern. Sheathing with plastic lamellas is very fast and does not require any special installation skills. To the disadvantages plastic lining its fragility should be attributed - the material can crack from impact.

Sheathing of the attic with clapboard (plastic)
On a note: if you want to give the attic floor a special energy and coziness, use wooden lining for finishing it.Advantages of lining made of natural wood: uniqueness of colors, natural texture, environmental friendliness. Decorating the walls of the attic with wood allows you to create a beautiful and "warm" room in which it is pleasant to be.
Among the disadvantages of wood: poor resistance to moisture and temperature extremes. Therefore, use wooden lining for lining the attic only if you are sure that the room is reliably insulated and insulated.

Beautiful decoration of the attic with clapboard: photo example
Recommendation: when working with this or that cladding material, strictly adhere to the technology of its installation. The better the work is done, the longer the finishing will last.Blockhouse
It is a good idea to sheathe the house with a block house. Such a mansion will resemble a fairytale tower, because the material creates an imitation of a bar. Externally, the cladding of a blockhouse house looks like a real one. log cabin... But this material has one advantage over natural wood- cracks do not form on such a skin over time. Decorating a blockhouse is not afraid of moisture, moreover, it does not require regular cosmetic repair... The sloping shape of the blocks is already a decoration in itself, and the panels are tightly adjacent to each other.
The only drawback of a blockhouse is that such cladding “steals” several centimeters of the attic area.

Elegant decoration of the attic with a blockhouse, photo
Plywood
If the question is, how to sheathe the attic inside cheaply, then plywood is quite suitable for these purposes. Usually, this material is used to level surfaces for finishing, but it may well serve as self-cladding... Among the advantages of plywood are lightness, ease of installation, efficiency, strength.
Attention: plywood can be used for finishing the attic space only if the humidity and temperature are in accordance with the standards established for residential buildings.Wall and ceiling cladding with plywood is an excellent basis for wallpaper, textile decoration. And if plywood is used as an independent finishing material, then in order to protect it and enhance the decorative effect, you can cover the material with varnish or paint.

Varnishing the plywood sheathing will accentuate the texture of the material
Drywall
Many private home owners use finishing the attic floor with plasterboard... Among the advantages of cladding with this material: its lightness, non-combustibility, low cost. With the help of drywall sheets, you can quickly level any surface, be it walls or ceiling. But, since in the attic there may be high humidity, then it is better to use a moisture-resistant material for its decoration.

An example of what multilevel structures can be built - finishing the attic with plasterboard, photo
Advice: often for plasterboard sheathing hide wires and various communications. But if the attic is located in the country, where you rarely visit, then it is better to lay the wires in special boxes. So you can always get to them, and besides, they cannot be damaged by rodents.Plasterboard sheathing can be pasted over with wallpaper, putty, decorated with ordinary or decorative plaster.

The illusion of soaring in the clouds will be created by beautiful photomurals - an option for finishing the attic, photo
Ideas for arranging different types of attic
To make the attic space original and unlike hundreds of similar projects, various decorative techniques should be used in its decoration. Using simple design techniques, it is possible disadvantages attic structure turn into dignity.
Features of finishing the attic floor of a wooden house
An attic in a wooden house requires a more careful approach to its decoration. But if you properly prepare the ceiling, the surface of the walls, then you can use almost any materials for cladding. How original the interior decoration of the attic can be performed, photos from our gallery will demonstrate more clearly.


The interior of the attic in a wooden house can be executed not only in country or Provence style. You can also use bold solutions, for example, decorate a loft-style attic. But how to sheathe the attic from the inside?
As for the decoration of the attic of a wooden house or summer cottage, it either consists entirely of wood or includes wooden elements.

The combination of several materials for cladding a room looks impressive
Since the room under the roof contains a certain amount of romanticism, then fabrics will look appropriate in its design. It can be draperies with motifs that repeat the pattern. upholstered furniture, or a canopy over the bed in the attic bedroom.

Textiles in the decoration of attic rooms, photo
Ceiling decoration methods
Depending on the design of the attic roof, the ceiling in the attic may have different shape, slope, sometimes it may be completely absent. Therefore, it is difficult to find materials for its sheathing. They can be the same as for wall decoration, or they can be different.
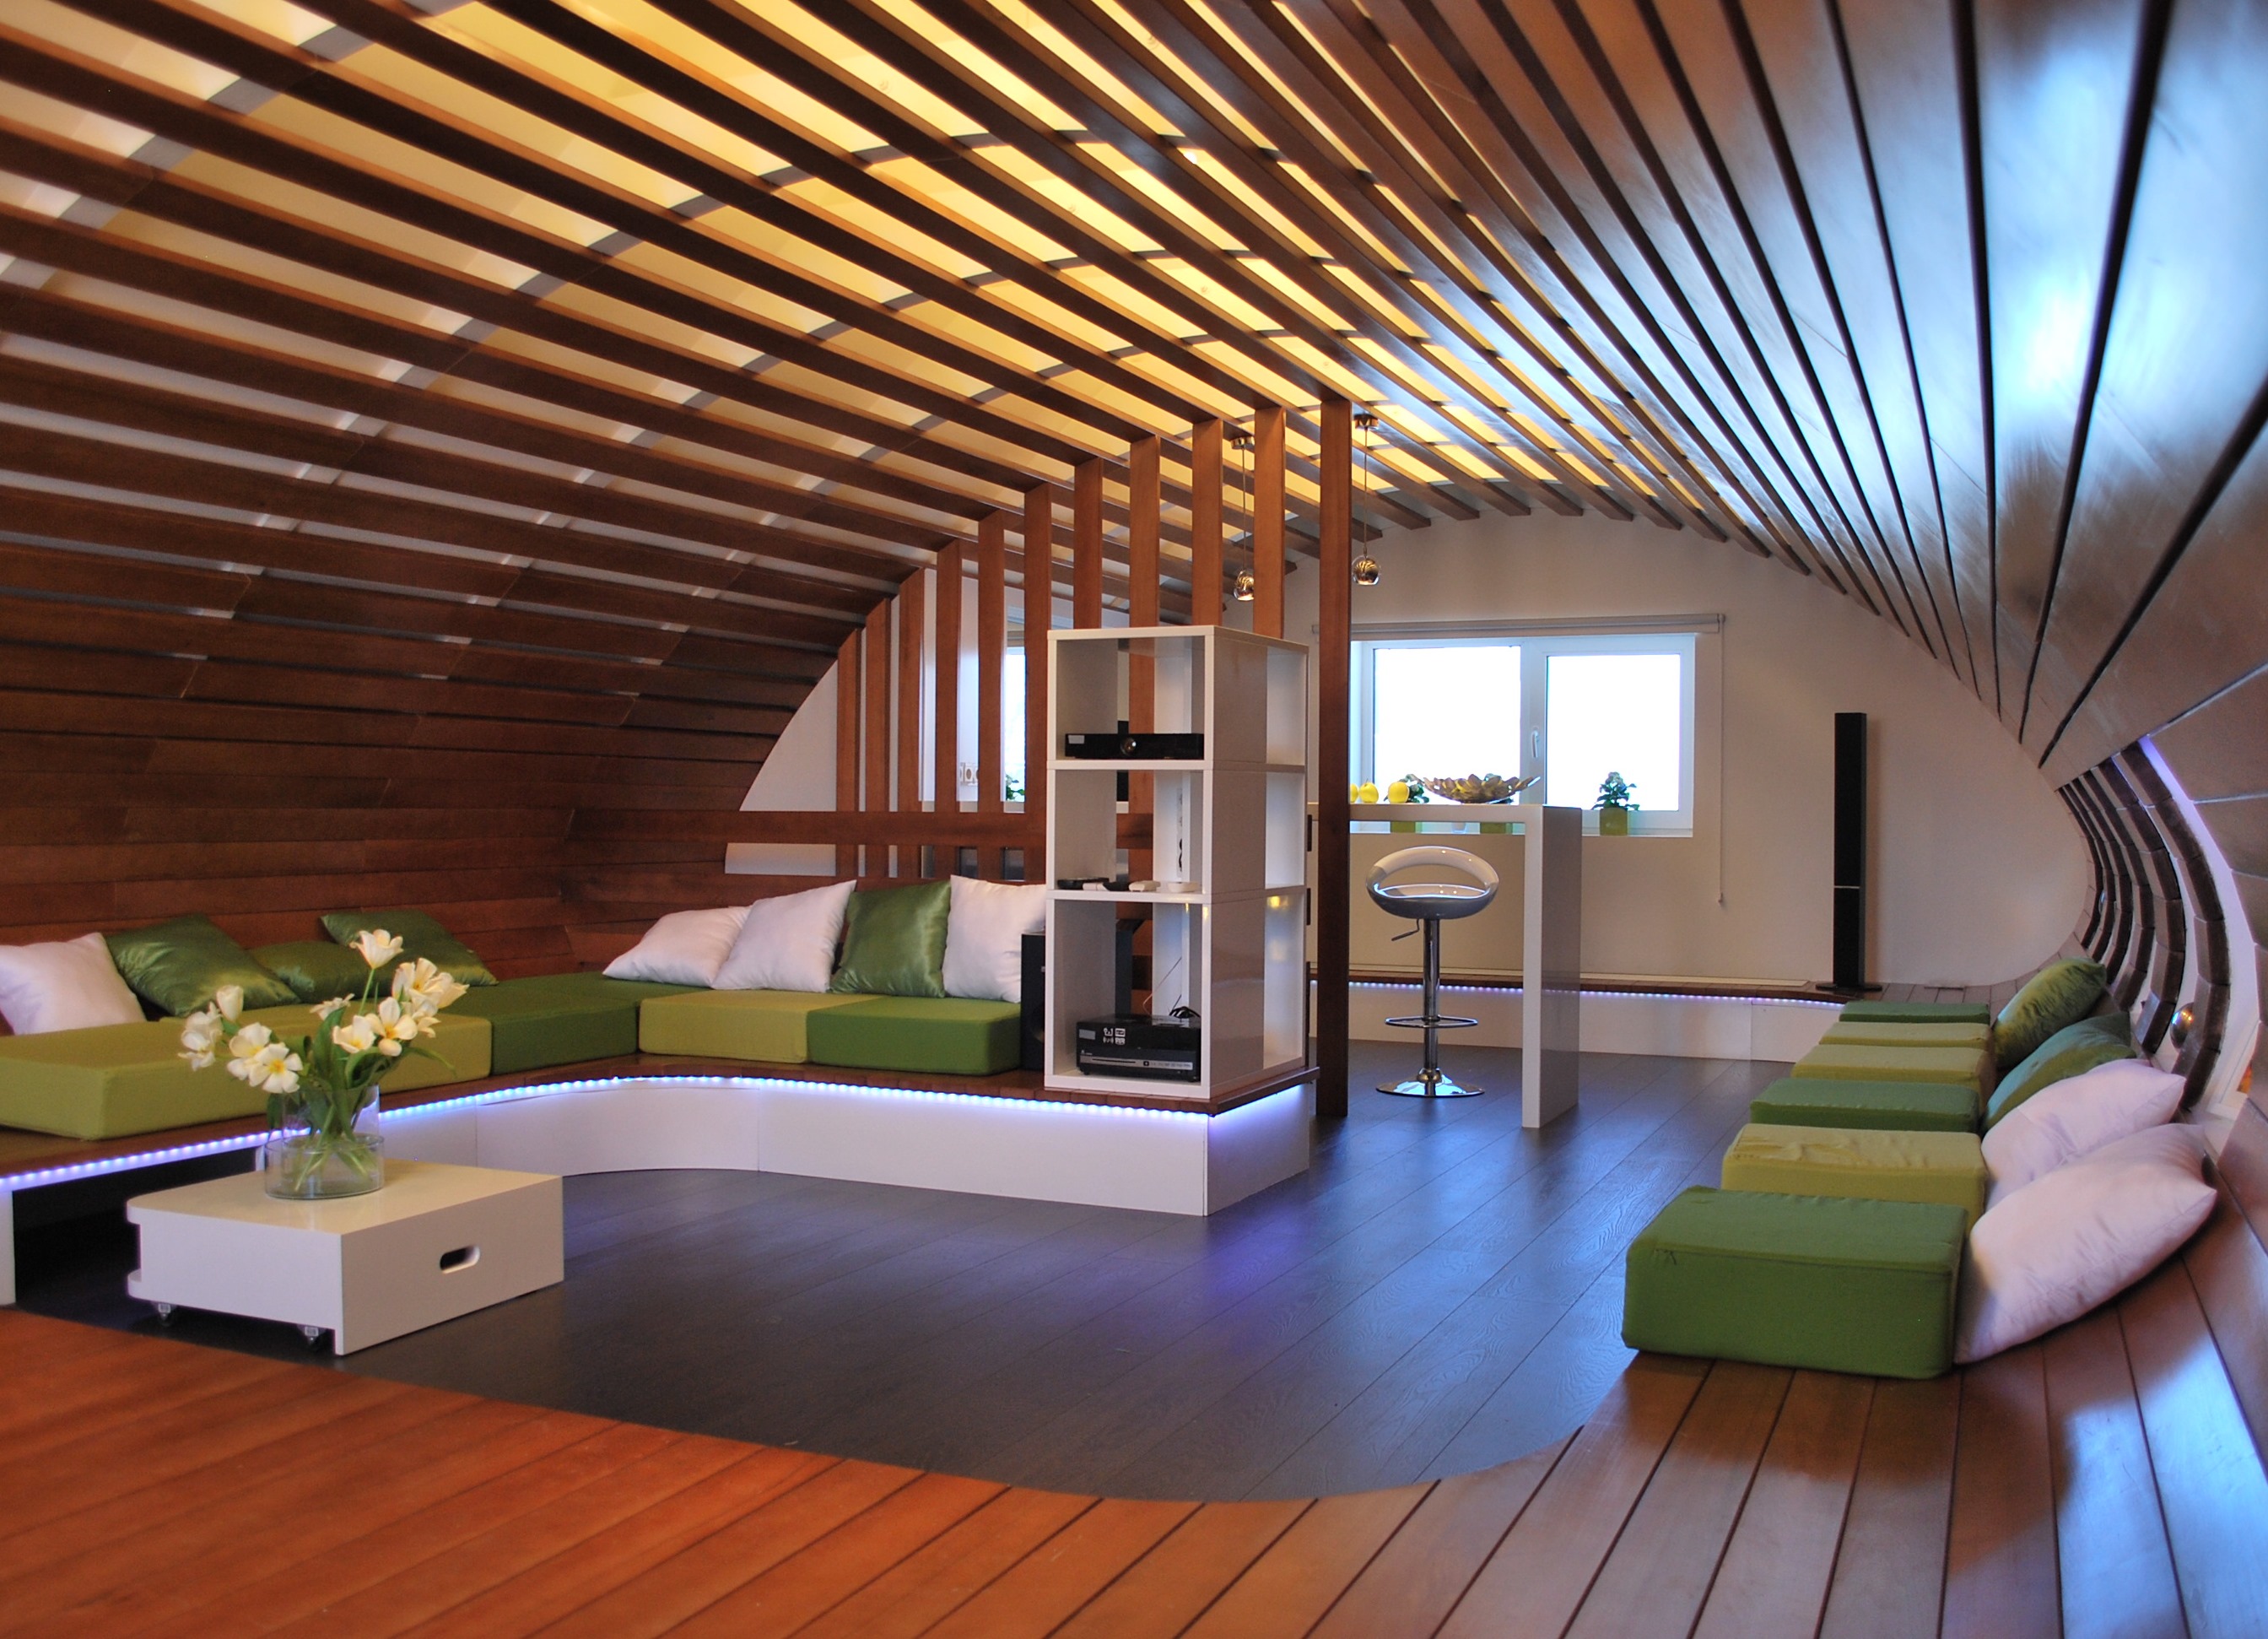
Give volume and beautiful view attic room you can use stretch ceiling... Plasterboard sheathing allows you to create a multilevel structure that diversifies the interior of the room.

With the help of a stretch ceiling, you can create the effect of a starry sky
You can make the attic in the country house unusual by painting timber cladding ceiling and walls in different colors... They can be plain or with an ornament.

Such a painting of the room looks harmonious, in which no more than three colors are used.
Attic sheathing: the cost of the issue
When asked what is the best way to decorate the attic so that the room looks luxurious, one answer is natural wood. And plywood and lining will help to save money on lining the attic floor.
Finishing the attic with plasterboard: step by step instructions
You can finish the attic floor yourself. In this section, we describe how to sheathe an attic with drywall.
Since the attic space is located directly under the roof, it is often exposed to atmospheric influences: rain, wind, snow, scorching sun... Therefore, before decorating the attic inside, you need to take care of reliable vapor barrier and thermal insulation of the structure, giving Special attention roof insulation.
- To sheathe the attic drywall sheets, it is necessary to build a frame. For this are used wooden blocks or metal profiles... They are installed in increments of 40-60 cm.

The first profile is fixed at the level
- Once installed horizontal profiles, proceed to marking and fixing the vertical.

CD-profiles are attached in 40 cm increments
On a note: in a small attic finishing the attic with plasterboard can be done without installing the supporting frame.- In the presence of a horizontal roof, they first start cladding the walls and gables, and at the end - the ceiling. If the roof is sloping, the slopes are sheathed first. For this, sheets of drywall are screwed to the frame with self-tapping screws, which are screwed in at a distance of about 25 cm from each other.

In order to securely fix the cladding material, each self-tapping screw must enter the slab by at least 1 cm
- After all surfaces are sheathed, the gaps between the drywall sheets are putty.

On the joints between the plates, you can additionally apply a reinforcing mesh, and the joints with other materials are processed with acrylic putty.
After sheathing the attic with plasterboard, proceed to its finishing... It can be putty and painting, wallpapering.
In more detail about finishing the attic with plasterboard - video:
Outcome
Roof space can provide additional living space in a home. There are many options for its use - as an office, bedroom, nursery ... inner lining attic, which will give the room a complete aesthetic look, make it cozy and comfortable for living.