In the fresh air, not only the appetite is stronger, but the food is absorbed much better. In warm weather, you don't want to sit indoors at all. Winter preservation is also easier to do outside. In the article we will tell you how to build a summer kitchen for a summer house with your own hands, demonstrate diagrams, drawings, photo and video instructions.
Choosing a type

All types of summer kitchens can be classified into two categories:
- open;
- closed.

Closed kitchens resemble a small house-like structure, which often does not have much insulation. The advantage of such a solution will be protection from insects, best protection from bad weather, as well as from the wind. An open kitchen option on one or more sides can be protected with a fabric, wood or other wall. The advantage of such a solution will be a greater unity with nature. Among the open types of buildings, there are options:
- With barbecue. In this case, you have the advantage of cooking favourite dish on the open fire... The barbecue will be available in any weather. If you additionally mount the oven, then you can please your friends with pizza.
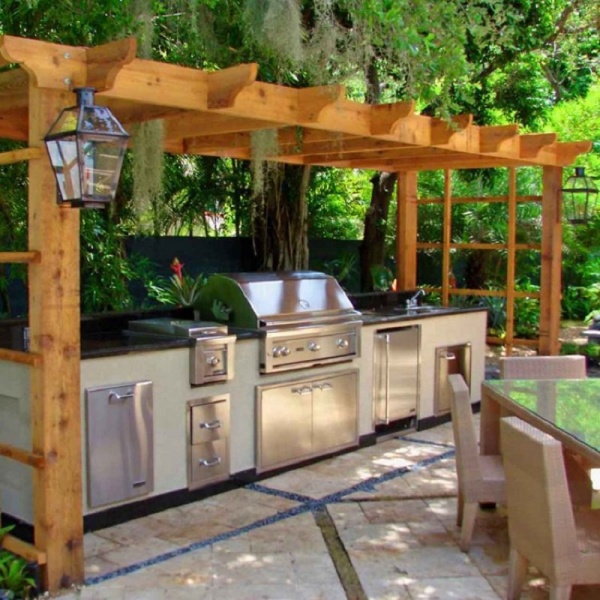
- With a gazebo or pergola. It's nice to sit among the greenery. This is exactly the solution in which the entire structure will eventually be shrouded in grapes, ivy or other climbing plants.
- Carport adjacent to the house. The easiest way to build. Requires the least investment. But there is a negative point. When cooking, all steam and smoke will go towards the house. This can damage walls or other finishing materials.
Preparation stages

Once you've chosen one of the possible options, it's time to create a small project.
- Choosing a location. It is good when there is an opportunity to place the kitchen in a cozy garden, where a pleasant atmosphere of tranquility reigns. At this stage, it is necessary to take into account the proximity of the location of various communications. They will definitely be needed. For electrical appliances wiring will be required. When preparing food, you cannot do without water and after that you need to put it somewhere. Do not place the building close to driveways and roads. Then your meal will not be spoiled by unpleasant odors. If there is a toilet on the street, then it is better to leave it as far away as possible.
- We dwell on the material for construction. If you are planning a closed kitchen, then you can approach it like a frame building, in this case you will need wood. A good option there will be a structure made of foam blocks or bricks. The open one will most likely be made of wood, or one or two of its walls will be of the material that was listed earlier.
- We decide on the roof. On an open structure, soft tiles will look great, but this is a rather expensive solution, although it cannot be ruled out, because the roof area will be small. A good option would be metal or corrugated board. Perhaps, waiting for your turn, you have sheets of slate or ondulin - they will also work.
- It is also worth considering in the project what equipment is planned to be purchased for the summer kitchen.

Foundation
A summer kitchen is usually thought of as a lightweight construction. This means that the foundation can immediately protrude and the floor, and, perhaps, pouring is not required at all.
- First, you need to clear the selected area from all debris and vegetation.
- A small layer of top soil is removed.
- One of the corners of the future building is marked with a wooden peg or a metal rod. Next, three more elements are installed. To position them correctly, it is necessary to measure the diagonals for identity. A fishing line or strong twine is pulled between them, which will serve as a guide.

If the building will consist of a canopy, then after these steps you can proceed as follows:
- The entire perimeter of the marked site is dug to a depth of 30 cm.
- The bottom is leveled and compacted.
- Sand is poured inside with a layer of 10‒15 cm. It is also leveled and well rammed.
- The remaining space is filled with screenings and the final leveling is performed.
- Next, on our "cake", which has been prepared, paving or other tiles, which are intended for the street, are laid. This can be done on a dry cement mortar, which, after spilling with water, will fix the entire base well.
- Pits are dug at four corners, their depth should be at least 50 cm. Formwork is installed inside. A crate is made of reinforcement, which will be the basis reinforced concrete structure... It fits inside and is filled with solution. With the help of a vibrator, the whole mixture is rammed. While the concrete has not yet hardened, two metal plates are inserted in the middle, to which we can fix wooden poles, which will be the support for the walls and roof.

This option of the base will be relevant in the case when the soil is dense enough. In cases where groundwater can approach very close to the surface or displacements of the upper layer are noticed, a more solid foundation must be provided. Also, if you plan to finish building a stove or barbecue on such a foundation, then separate concrete supports will need to be laid for them.
In order to make a foundation slab, we need to take the first three steps from the previous instructions. Next, we take on the following:
- Cooking 8 pieces of reinforcing rods. Four of them should be 10 cm shorter than one side of the future structure, 4 others 10 cm shorter than the other. If the building is square, then they will all turn out to be the same size.
- We lay four of them according to the shape of our future structure and fix them to each other. Then, every 40 cm, we tie longitudinal and transverse lintels... Prepare the second mesh in the same way. We connect two lattices with jumpers to such a height that future slab rose above the surface by at least 5 cm.
- We lower the entire structure into the middle of the dug hole, install the formwork and fill it with concrete. We ram with a vibrator. We level it with slats and let it stand for several weeks.
- In fresh concrete around the perimeter with a step of a meter, you can place metal plates on the width of the future timber for the walls. Or it can only be done in the corners.

It is very important that the floor is above the ground. Thanks to this, it will not flow rainwater... It is also good to make a slight slope of the floor so that rainfall, which will be carried by the wind, can flow freely into the drain or simply through the door.

In the case when it is planned to build a closed kitchen made of brick or foam block, this version of the foundation may be enough. Also for these needs, you can build a shallow tape or columnar foundation... In this case, such a large-scale excavation is not carried out.
- To a depth of 50 cm, a trench is dug around the entire perimeter future kitchen... The width will depend on the thickness of the walls. In any case, the foundation should be 10‒15 cm wider.
- A layer of sand is poured onto the bottom, which is leveled and spilled with water.
- A metal base-lattice is made according to the principle as in the previous instruction. She fits into a trench.
- Formwork is installed with the expectation that the future foundation rises 20-30 cm above the ground.
- Fill in cement mortar, ram and align it. Let it stand for 2-3 weeks.

The supply of all communications must be carried out in parallel with the laying of the foundation, so that later you do not have to hammer holes in it or dig under it. To prevent the pipes from being clogged with mortar, they must be closed in advance with a cloth and plastic oilcloth.
Open kitchen

This option can be built most quickly. We have already laid the foundation and support for the supports. If you plan to close the kitchen on one or both sides with walls made of bricks or other material, then the first step is to start building these partitions.
- At the corners of the future walls we dig metal into the ground square tube or a profile of 50 × 50 mm. We set it up by level. We do this so that the planks are close to the masonry. They will guide us.
- Pull the fishing line between them. We raise it to the height of the first row of bricks that will be laid. We set it up by level.
- Cooking cement-sand mortar in a ratio of 1: 3. This will be sufficient for our purposes.
- We make laying, focusing on the stretched fishing line, and also periodically recheck ourselves with a level.
- As soon as the first row is completed, raise the line for the next and so on until the very end.
- In order for the structure to be more stable, a reinforcing mesh can be laid in the seams.

If you do not plan on having walls of this nature, then the process will be much easier.
- We fasten a beam to the metal plates that we laid during the manufacture of the foundation, which will serve as a support. When the whole structure is of great length, then it is necessary to foresee in advance the need to install 3-4 pillars on one side. Their length should be equal to the height of our building, and the dimensions of the sides should be 15 × 15 cm or 15 × 10 cm.
- We set them in level so that they are strictly vertical. The beams of one wall must be longer so that we can organize the roof slope.
- We immediately reinforce our posts with the upper strapping. It can be made from the same logs. We fix it with metal corners.
- To give more stability to the entire structure, you can install two jibs near each post. They can be fixed to the support with self-tapping screws, and to the base with an anchor bolt.
- We mount beams for our future roof. In order for them to better hold in the places of their abutment to the harness, it is better to perform cuts. We fix it with metal corners.
- We make a crate under the flooring, as recommended by the manufacturer. We lay the roofing material.
- To create more coziness, one side (or more) can be sewn up with wooden lining or a block of house. On the other - to do wooden lattice... You can equip supports for climbing green plants.
In the case when it is planned to build a pergola, after installation ceiling beams nothing else needs to be done. They can be stained or varnished. Further, the plants themselves will do their job, creating a shade, when they fully grow.
Closed kitchen

At the design stage, it may have been decided to erect walls from a foam block or brick, then this can be done according to the principle with the installation of vertical landmarks, which was mentioned above. The walls may not be too thick. In some cases, laying in half a brick is allowed. But always consider the weight of the future roof. In the future, the outside of the building can be sheathed with siding or a block house. For interior decoration a block house, lining or other material that will be resistant to frost is also suitable, because it is unlikely that someone will constantly heat the room on purpose in winter.
A timber is laid on the walls, which will act as a Mauerlat. Its size can be 10 × 15 cm. It is fixed with anchor bolts or studs, which must be bricked up during the construction of the walls. Under it, it is imperative to lay waterproofing in the form of roofing material or bikrost. A rafter system is installed on the logs. It can be for both a gable and a pitched roof (for this option, it will be enough to make one wall higher than the other, then beams are simply installed between them). The lathing is mounted on the beams and the roofing is laid. WITH inside the ceiling is hemmed.

You can go simpler and stop at the wireframe version. For it, we need beams of the same size as for the vertical columns from the instructions for an open kitchen. We make the foundation out of them. We lay them around the perimeter of our foundation on two layers of roofing material or bikrost, which will serve as waterproofing. We make a bandage between them. To do this, at the edge of each log, there is a depression half the depth and width equal to the width of the log. Checking the diagonals. We fix them together with self-tapping screws and internal metal corners. Next, we fix it to pre-prepared plates or anchors to the foundation.
We mount corner support pillars from the same bar. With a step of 60 cm, we install additional vertical supports from a board measuring 10 × 5 cm. For greater rigidity, we fasten the jibs for each main support. We carry out the top strapping and install the rafter system for the future roof. We do this by analogy with the open kitchen option.
Home stretch

Even if a barbecue or a stove is planned in our kitchen, this does not exclude the presence of a gas or electric stove, which are much more convenient to use. It is necessary to take care of the installation of the sink, mixer, as well as the support for the dishes on which it will dry. It is good if there is a cabinet in which you can hide cutlery, as well as pots. You need to take care of the dining table as well comfortable furniture where you can relax. For greater comfort, it is better to carry out the main and decorative lighting.
For an open kitchen project, it is best to ensure that all lighting fixtures are preferably IP68 rated. In this case, you do not have to worry about any elements being damaged by rainwater.
Don't go casual about your summer kitchen project. Let her be in a sense design solution... After all, it will serve not only as a place for eating, but also as a recreation area with family and friends.
A favorite place to relax after everyday worries can be summer cuisine on a private territory. Our grandmothers also actively used the advantages of the outbuilding, turning it into a mini-cannery. Functionality and the design of modern summer kitchens has expanded significantly. The proposed ways of arranging a practical structure will help you choose suitable option for a private plot.
Summer kitchen: arrangement options
The variety of architectural solutions allows you to build a summer kitchen at any suburban area... They are attached to a private house or set apart, they are made open and closed. Each idea has undeniable advantages and some disadvantages. The list of demanded methods of arrangement:

Comment! Choice suitable project for a private house depends not only on the construction estimate, the availability of free space on the site also plays a role.
Original ideas for the arrangement of detached and attached summer kitchens in private estates are presented in the photo gallery.


Characteristics of open areas
When building a detached summer kitchen open type for arranging pillars use a stone or wooden bar, sometimes found combined option... The site is decorated with natural or artificial stone, the foundation is missing here. Protection from scorching rays or precipitation will be a canopy or roof. Any device for cooking on an open fire will help you to feel all the delights of culinary masterpieces. The stove, faced with stone, is distinguished by the sophistication of design.
If you attach a summer kitchen to a private house, you should take care of the compatibility of the materials used. Especially it concerns roofing.
The advantages of open isolated sites are as follows:
- minimum consumption of building materials;
- absence earthworks for arranging the foundation;
- installation of a summer kitchen is simple and in a short time;
- comfortable conditions for cooking and preservation;
- the presence of a barbecue, grill or barbecue in the summer kitchen expands the menu of the owners of a private house;
- a great place to relax in the fresh air for a large company.
- a summer kitchen away from a private house is optimal from the point of view of fire safety;

The operation of an open summer area is accompanied by some inconveniences:
- Complete dependence on weather conditions. Rain, wind and cold force to relocate to a private house.
- The work area is not protected from dust and provides an additional amount of work to keep it clean.
- The evening pastime in the summer kitchen is accompanied by insect attacks.
- Products need good protection against encroachment by birds or animals.
- Equipment can be left unattended only if the private territory is securely protected.
- Additional troubles with seasonal rearrangements of equipment and furniture.
- The summer open kitchen serves exclusively for the preparation and consumption of food in the fresh air.
Successful design projects of private buildings in the photo:


Features of enclosed spaces
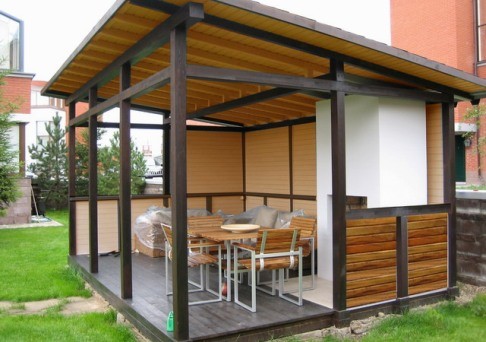
The closed construction of a summer kitchen can stand separately from a private house or be an extension to a structure.
Comment! In addition to living quarters, the kitchen is combined with a bathhouse or other utility facility.
Preference is given to a closed-type project when building a summer building in regions with an unfavorable climate. Frequent rains strong winds or early frosts make outdoor recreation uncomfortable. Therefore, the summer kitchen needs protection. Provided that the heater is installed, this will allow you to spend a pleasant time on it even in winter period.
The main advantages of a closed building:
- Lack of dependence on weather conditions.
- Protection from insects in the evening, food supplies are hidden from night hunters, and equipment is hidden from prying eyes.
- Summer kitchen can perform functions guest house, especially if the main private housing construction does not have enough free space.
- Combining the building with other economic facilities will reduce the cost of arrangement.

Achieving the goal of becoming the owner of a closed summer kitchen is accompanied by certain difficulties:
- Drafting a project requires special knowledge, the help of a professional may be required.
- The need to carry out earthworks for the construction of the foundation, even if an annex to a private house is planned.
- The consumption of building materials increases significantly.
- The construction process is much longer and more complicated compared to the open version of arranging a summer kitchen.
- The final figure for the construction budget is much higher than the projects of open structures.
Advice! In order to achieve design harmony, a summer kitchen in a private house implies a careful selection of building materials for external decoration.
The photo gallery demonstrates the attractive interiors of closed areas in private estates:


The nuances of choosing a place
Comfortable operation of a summer kitchen is largely determined by a well-chosen location. When choosing a site on a private territory, they are guided by the following recommendations:
- It is important to define optimal distance between a private house building and a cooking area. When installing the barbecue, maintain a gap to comply with fire safety. But excessive distance from a private house creates inconvenience with frequent movements.
- A separate closed kitchen requires a careful study of the characteristics of the soil.
- Try to place the summer building away from places with unpleasant amber ( cesspool, toilet or animal enclosure), the prevailing wind direction must be taken into account.
- It is better to put the kitchen away from the roadway, the excess of dust and noise will disturb the idyll of summer holidays.
- A comfortable stay is ensured by the availability of lighting, water and sewerage. Therefore, the supply of communications to a private building should be available.
- Trees and climbing plants will be an excellent backdrop for contemplating the natural landscape and will create a pleasant shade on hot days.
The next photos will give an idea of the harmonious design of a summer kitchen on a private territory.


Construction stages
The implementation of a closed building project is accompanied by the following main stages:
- Determination of the location of the summer facility.
- Preparing the foundation for the kitchen.
- Walling.
- Arrangement of the roof.
- Interior decoration.
The type of foundation is selected depending on the overall severity of the summer building and the properties of the soil. For lightweight structures, a columnar base is sufficient. Massive buildings need a strip foundation arrangement.

Attention! If the kitchen is attached to a private house, the level of deepening of the foundation is guided by the indicators of the main structure.
For the construction of walls or support pillars, the following types of building materials are used:
- A rock. Pillars made of granite, marble or slate are capable of impressing those around them with their spectacular design. Durability and presentability are the main advantages of the material.
- For walls, a traditional brick or blocks... With the installation of heating and the presence of a heat-insulating layer, a comfortable stay in the cold season is possible.
- Wood is more relevant when arranging an open-type summer kitchen. Simplicity and grace are attractive in terms of budget savings. Timely treatment with protective equipment will help to extend the period of operation.
- Building walls from wood material usually accompanied by additional trim in the form of siding.
- Lightweight constructions made of panoramic windows open a wide view of the beauties of private property. The high cost and impossibility of operating the kitchen in winter can stop lovers of year-round outdoor recreation.
The choice of roof covering determines the design of private housing construction. Regardless of whether the summer kitchen will be attached to the main building or stand at a distance, the combination of color and texture will create a harmonious background for the perception of the entire private territory as a whole. Examples of arranging a summer kitchen different types in private estates in the photo:


Selection of finishing materials and interior items
So that the operation of the summer building does not bring much trouble, materials for interior decoration must meet the following criteria:
- Show resistance to aggressive environments. High humidity, temperature changes, soot and drops of fat should not cause premature deterioration of the finishing surfaces.
- Ease of care and the ability to use chemicals to clean the dirt.
Let's take a closer look at the finishing options different surfaces for summer buildings. With open kitchens, everything is extremely simple. Stone or paving slabs are suitable for arranging the site. Installation of a deck board is possible. It is important to take care that there is no slip effect when it hits the surface of the water.

The closed kitchen provides a wider choice of materials. Decoration the floor surface is possible:
- laminate;
- linoleum;
- tiles;
- an ordinary board;
- wood-polymer composite (WPC).
It is allowed to use "planken" or "deccking" even in open private kitchens for summer use.
Wall decoration is chosen taking into account the planned interior. It is unlikely that in nature you want to contemplate laconic high-tech. In the summer kitchen, all directions of the rustic style look organically - country, Provence, and so on. Accordingly, the presence of natural wood or artificial materials that imitate natural textures is the best option for the interior design of a summer kitchen.
TO budget options painting the walls of a private building can be attributed to preliminary plastering with plasterboard.


It is difficult to imagine a comfortable stay in a summer kitchen without functional equipment. Among the main items are a stove for cooking and a refrigerator, the rest is at the discretion of the owners of a private building. Naturally, the presence of a sink cannot be disputed. The stove can be connected to a central gas pipeline, equipped with a cylinder or belong to electric type equipment. The options are determined individually in each specific situation.


The summer kitchen is furnished taking into account the operating conditions. Among the main requirements is resistance to high humidity. Well-maintained private territory looks harmonious when decorated with rattan furniture. It doesn't matter whether the material is natural or artificial.
Attention! Do not forget about quality lighting... Fixtures on solar powered- a practical modern solution for the improvement of a summer kitchen.


As you can see, there are countless forms of private buildings and ways of decorating a summer kitchen. A thorough analysis of all factors affecting the arrangement of the kitchen with comfortable conditions operation on a private territory.
Take a steam bath in the house in the summer, if you can spend time outdoors? Not the most good idea... And cooking or spinning is even worse. It is much more pleasant and useful to spend time under a canopy or in a light, ventilated building, which many call a "summer kitchen". A do-it-yourself summer kitchen is easy to build, especially open options.
Open summer kitchen: views and photos
An open one is rather an open gazebo or veranda. A very good option for the warm season. Not in all regions, even in summer, you can be outdoors for a long time. Then they make closed summer kitchens - this is already a small house that can be built using any technology that seems most attractive to you.
Summer kitchen - annex
Let's start with open areas... If it is supposed to move the main activity to fresh air for the summer, it will be more convenient to attach the summer kitchen to the existing house. In this case, do. Most often, they make it open first. The easiest way to do wooden extension... In a very open version, these can be simply pillars supporting the roof.
The simplest option is a few pillars supporting a light roof - a do-it-yourself summer kitchen is ready
This option is very good for southern regions where most You can be on the street for as long as you like. For more northern regions or if this is a home permanent residence, usually they decide to make the extension more closed. First, they make a railing, and then they often think about how to close the spans with something else: I want to extend the "period of use". As a result, the open summer kitchen becomes closed.

The most common material for this kind of extension is wood. She is flexible, forgives many mistakes, which can later be corrected without analysis of the structure, therefore it is easy to work even without skills. It is also lightweight, because the foundation for a summer kitchen made of wood can be made lightweight - columnar or
The second most popular material is brick or decorative rock... In the presence of "straight" hands and adherence to technology, and with this material, amateur developers can work. You should not undertake the construction of a house without experience, but you can try to fold the pillars and partitions under the summer kitchen.

But since even a pillar made of brick or stone weighs more than a hundred kilograms or more, a more solid base is required for it. If you consider that it will still take the load from the roof, then you will have to make pillars or piles with good bearing capacity.

Carrying out to the side of the house - an open terrace with an oven and barbecue
If you are thinking about putting brick walls later, it is better to immediately fill in the pile strip foundation, and deepen the tape below the freezing depth. If this option is not suitable - the freezing depth is large or the soils do not allow, you will either have to make a monolithic slab, or abandon brick walls, making them using a different technology, even if they are of the same tree or a summer kitchen built with your own hands is good because knowing all design features to the smallest detail, you can subsequently upgrade the building.
Freestanding building
Some people don't really like the kitchen smells that can enter the house from the extension. Then a small building is erected at some distance from the house. The presence of summer kitchens is almost an obligatory attribute of private houses in southern regions... Before the era of air conditioning, cooking in a hot place was a real torture: heat"Overboard", heated walls, and even the heat from the stove - conditions are hellish, while the rest of the rooms are also heated. Therefore, they made at least small detached houses-gazebos, in which they put gas stove and a bottle with liquefied gas, in the villages they put a small stove. Some even cooked on "kirogas" or a kerosene stove.

Modern climatic technology makes it possible to negate all these inconveniences, but detached summer kitchens are still being built. They are often still used as a guest house - by making them.
Most cheap option- pillars supporting the roof. They can be wooden, brick or combined - consisting of a base of stone, and the top of a bar. This is the best option from the point of view of operation: the wood is protected from the effects of most of the precipitation, and at the same time the weight is not very large.


One of the easy options
What to make the floor of
The floor in such a kitchen can be planked. It is easier to do it, but many are confused by the fact that the wood will be practically unprotected. There are two ways to solve the problem. The first is to use effective protective impregnations such as oils or wood wax for outdoor use. They do not create a shiny surface, but they protect well from moisture and dirt. Using varnishes for summer kitchens is not the best idea. They begin to burst and crack, in order to renew the old coating, the old must be removed completely, while oils and wax require only thorough preliminary cleaning, after drying, a fresh layer can be applied.

This terrace is treated with Pinotex Terrace Oil
The second way is to use not wood, but wood-polymer composite (WPC). These are boards that consist of a mixture of wood fibers and polymers. They look and feel very much like wood. With the only difference that they almost do not change size depending on humidity, however, thermal expansion is present. Such boards are called "decking" or "planken" depending on the profile of the board. There is also "garden parquet". This is a covering made of the same material, only assembled into boards, like parquet. They can be simply laid on the ground without any preparation.

The terrace and the floor in the summer kitchen are made of WPC - wood-polymer composite
The advantages of WPC include a long period of operation without changing the original properties. It is calculated for tens of years, but varies greatly depending on the manufacturer. Minus is not the most affordable price... Perhaps this is due to the fact that the technology is relatively new, not yet particularly mastered, although there is Russian manufacturers similar products.
Stone or specialized tiles withstands the effects of weather better, but the installation of such a floor is not an easy matter. If you just put it on a gravel-sand bed, locking it in the fall, in frost the tiles can crack or bounce. We have to make insulated monolithic slab, observing all the technology: with a sand and gravel layer, insulation, reinforcement, concrete pouring. The dimensions of this slab are 50-60 cm larger along the perimeter than the planned building. In general, the costs and work are serious, although it is convenient to operate.

One of the floor options is large concrete plates high grade concrete
After a time when the concrete gains strength (at least 2 weeks should pass, and this is at an average temperature of + 20 ° C), the coating can be laid. You can use flagstone - stone cut into layers, you can use porcelain stoneware, or frost-resistant tiles.
A simpler option is to lay out the site paving slabs... But this is exclusively summer option... But - without fiddling with the foundation.

If a summer kitchen is being built with your own hands in the country, this is perhaps the best option. It turns out inexpensive and practical.
Closed summer kitchen
Those who want to have an all-season summer area for gatherings or cooking, erect more capital buildings. Most often, these are buildings using frame technology - quickly and relatively inexpensively, more expensive, but more thoroughly - from a log or bar.

Option "frame" - racks from a bar sheathed with clapboard
In the case of a frame building, everything is very simple: with a small step, racks from a bar are placed (you can even spliced boards), then they are sheathed on both sides with some finishing material... What - of your choice, even a clapboard - wooden or plastic, a blockhouse, any other material. Inside, to save money, they are often sheathed with plywood, fiberboard, gypsum fiber board, OSB or something similar. If desired, it can be insulated. The frame is sheathed on one side, insulation is laid (usually mineral wool), the sheathing is mounted on the other side. You can insulate not only immediately, but after some time, you only have to remove the trim on one side.

What does the "skeleton" of a summer kitchen look like using frame technology
More frame building it is convenient in that it can be given any shape, and the foundation can be relatively light - depending on the soil - pile or tape. Such foundations are needed for wooden buildings- from a log or bar. All the rules are the same here. It is important to find or order a project, but assembling is a matter of technology.

Naturally, you can build from any other materials - from foam blocks - to bricks or even rubble. It's all about the amount that you plan or can spend on this building. The construction of foam concrete, aerated concrete, some building blocks, adobe will also cost inexpensively. A cinder block, like adobe, can be made independently, so the choice of material is only yours, and then everything is built according to all the rules. With only one deviation: insulation for a summer kitchen is either not done at all, or made to a minimum. Another point - heating, as a rule, is absent, and this must also be taken into account when choosing materials for construction, and for decoration.
Photo report of the construction of a summer kitchen with an open veranda
A summer kitchen was being built with the opportunity to “sit outside”. Therefore, the option with open veranda... The base of the house is assembled from a bar of 200 * 200 mm, internal walls - from 150 * 100 mm. Outwardly, I like the carriage, but it is godlessly expensive, because the timber was suspended to create a similar relief.
The foundation is columnar. Since the construction is light, the soil is normal, the posts were buried only 60 cm.

The harness was assembled from a bar 200 * 200 mm. It was pre-soaked with an antiseptic. The corners were connected as usual - they made cuts. The crossbeams were planted on metal U-shaped plates... The timber was not rigidly fastened, since there will be heaving all the same, so that the building has the opportunity to "walk".

The racks were made from a bar of 200 * 200 mm, the inner filling was from 150 * 100 mm.

The walls were assembled pretty quickly and without problems: there was no cut, just pieces of timber of the required length were nailed to the racks. The roof is made of a gable, with slight angle slope. On the one hand takeaway rafter legs more - to make a canopy from the side of the veranda, which will cover it from slanting rain.

The ceiling trim is made of unedged boards, which was then brought to mind on their machine.

Ceiling lining - board

Summer kitchen design: photo
After the construction of the summer kitchen, another problem arises: it is necessary to arrange it. The arrangement includes not only the choice of a table and chairs, it is also necessary to somehow organize the working area, store the fuel somewhere for the stove, which is often placed here. 


Cooking is a process that should be enjoyable. But here a lot depends on the conditions in which you cook. The furnishings should be inspiring and conducive to the creation of delicious and healthy dishes filled with your kind energy. In the summer, in the stifling atmosphere of the closed kitchen space, you will hardly be able to easily tune in to a pleasant cooking process. But if you have a summer house and a couple skillful hands, You should be able to solve this problem. Having built a summer kitchen in the country, you will not only save your main room from unnecessary vapors and heat from the stove, but also get the opportunity to cook outdoors in a pleasant environment, surrounded by green spaces and blown by the breeze. In addition, an open summer kitchen can be equipped with a brazier, barbecue or fireplace and arrange cozy picnics on it surrounded by people you love.
Where to begin
When planning the construction of a summer kitchen for a summer residence, first of all, it is worth finding answers to a number of important questions that will determine your further actions:
- Appointment. Will you only use the summer kitchen during the warm season or all year round? Do you want to cook on it often and a lot, or will it become a place for periodic gatherings with friends and family?
- Dimensions. Will the summer kitchen space become a workplace for the hostess for the period of closing homework and preparing food, or will it be organized in the form of a kitchen-dining room designed for a certain number of people?
- Accommodation. Will the kitchen be implemented as an extension to the main building of your summer cottage, or will it be a separate house? How will your structure be positioned in relation to the sun, wind, green spaces, communications and the roadway?
- Project's budget. The materials that you choose for the summer kitchen, the design of the room and the time spent on the implementation of your ideas will largely depend on it.

Advice ! Study the ready-made projects of summer kitchens for summer cottages offered by construction firms, and independently adjust them to your scale and needs.
Having completed the analysis of all significant points, you will need to accurately establish the following for yourself:
- Open or closed type suits you;
- Will you build a stove or limit yourself to installing a stove, do you plan to use a barbecue and grill;
- How will water supply, sewerage, electricity supply be organized in your project;
- What kind of registration are you planning to carry out.
Open summer kitchen
An open type of summer kitchen usually has from one to three walls, a canopy as a roof, and in its own way outward appearance more like a gazebo.

The advantages of an open view of summer kitchens:
- Such a design of an open type of summer kitchen can be built quite quickly and without much effort.
- It is economical in terms of creation costs.
- When cooking outdoors, you will not suffer from the stuffiness, fumes and burning typical of a closed room.
However, you should pay attention to a number of significant disadvantages:
- In the open summer kitchen, you can cook and relax only while it is warm outside;
- You cannot leave food on it;
- Kitchen furniture for the winter needs to be removed into the house so that it does not deteriorate from dampness;
- The premises are poorly protected from drafts, showers and insects.
Open summer kitchen on the veranda
You can organize an open type of summer kitchen on the veranda of your country house.

Advice ! To make an open summer kitchen look good, try to equip it in the same style as your summer cottage.
First of all, you will need to lay the foundation. Its depth should match the depth of the foundation of the house. Next, you form the frame of the walls, perform the cladding and build the roof. It is better if the roof is the same for the house and the veranda. An open summer kitchen with glazed front or side walls looks good.
Open summer kitchen annex
An open summer kitchen can be organized as an extension and connected to a summer cottage or to any utility room, for example, a bathhouse.

Such an extension is created by expanding the porch and is a kind of terrace with all the necessary kitchen attributes: gas or electric stove, furniture, sinks, etc. During the construction process, support structures are mounted along the wall of the cottage, on which the canopy is attached. The floor can be laid out with paving slabs directly on the ground, having previously leveled it. This is possible if water does not collect in this area after rain. You can protect the open summer kitchen from bad weather with the help of sliding or removable side partitions, tarpaulin, blinds. The walls can be twined with plants that will delight the eye and create coolness in the heat.

This project of an open summer kitchen is cheaper and easier to implement than the option with a foundation, but it is less reliable, since when the soil subsides, the kitchen can begin to tilt.
Open summer kitchen-gazebo
Such a project of an open summer kitchen is especially good when you want to install a fireplace, a barbecue in the kitchen and use it for a pleasant pastime with friends and family. Even in such a gazebo it will be convenient to process the harvest harvested at the dacha.


Decide which foundation for an open kitchen-gazebo - strip or columnar - is more suitable for you. The roof is recommended to be made of bitumen or ondulin. When creating a frame, materials such as stone, brick, timber are usually used. A wall can be made closed in order to place a kitchen unit and other necessary attributes along it. Leave the rest of the openings open to breathe fresh air freely. If necessary, they can be draped with fabric curtains and blinds, decorated with lattice panels, entwined with plants, or organize various partitions.
Closed summer kitchen
A closed summer kitchen is a full-fledged house, standing separately or attached to another building: a country house, a bathhouse, utility room... This option is well suited for areas where the climate is characterized by strong winds, rains, early frosts. You may like this design if you like to relax in the country in winter and prefer to cook in a separate room. It requires more capital investments, a serious approach to design, it is more difficult to build. But in the end, you can build a house with comfortable conditions, including the availability of heating, running water, sewage and electricity. Often, closed kitchens in the country are equipped with a cellar, a fireplace, and utility rooms.

Advice ! When it is impossible to supply electricity to the summer kitchen, you can buy a summer cottage diesel generator and feed everything kitchen appliances From him.

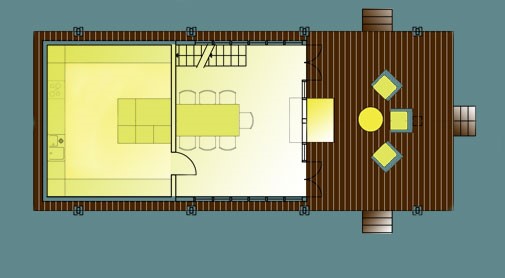
In this project of a closed summer kitchen: 1 - the kitchen itself, 2 - the dining area. Numbers 3, 4 and 5 represent the stools, table and corner bench in the dining room. The kitchen area is equipped with a cupboard (6), stove (7), sink (11), water tank (12). Also provided here: chimney (8), ventilation duct(9), window (10).
Kitchen-house with a terrace
The closed version can be organized as a detached house with a terrace. You will cook in the house, so it must be equipped appropriately, and on the covered terrace you can organize dining area where the table and chairs will be located.
Such a project is quite labor-intensive, since it requires a bookmark monolithic foundation, wall construction, installation of windows and doors.

When equipping the walls, one should take into account the strength of the wind in the area so that they can withstand all possible load with dignity. For a closed summer kitchen, a gable roof is recommended, which reliably protects against rain and snow.
You can also consider the project of a kitchen-house with a cellar. Then, before starting the construction of the premises, you will need to dig a pit, and the walls of the cellar will serve as the foundation for the upper part of the building.
How to build a summer kitchen with your own hands
There are several main stages in the process of implementing any kitchen project for a summer residence:
- Select the location of the building.
- Prepare the foundation.
- Build up the walls.
- Build a roof.
- Carry out the interior decoration of the room.

Choosing a location
A well-placed kitchen should:
- Conveniently located relative to the entrance to the house. On the one hand, it is not advisable that the fumes from the stove get into your main home. On the other hand, too much remoteness of the kitchen from the house will lead to the fact that, in bad weather, it will be rather difficult to transfer ready-made food to the house.
- Stay away from areas with unpleasant odors, such as country toilet, pets, cesspools, etc.
- Be far enough from the road so that exhaust fumes and road noise do not interfere with your cooking and breathing fresh air.
- Be available for connecting communications: water supply, sewerage, heating, electricity.
- For an open summer kitchen, you should take into account the wind blowing, warming up by the sun's rays, the presence of greenery around.
- You should also pay attention to the level groundwater, as well as the relief of the area on which the dacha will be built.
Attention ! The country house and the summer kitchen room should be at a distance of at least 15 meters from the cesspools, toilet and livestock enclosure.
Preparing the foundation
What kind of foundation you will lay depends on the chosen kitchen project for the summer cottage. The construction option is also possible without a foundation, for example, when you concrete a site of a suitable scale and reinforce it with a metal mesh. This will be appropriate for an open summer kitchen with a light canopy. For closed brick or stone summer kitchens, a strip foundation is usually prepared. Columnar supports are suitable for open kitchens or tree houses.
The foundation formation algorithm is as follows:
- Perimeter the kitchen being created select soil or dig small pits with a scale of 30x30 cm and a depth of 70-80 cm.
- Create a 20 cm thick cushion of rubble and sand and tamp it down carefully.
- Fill in the foundation, platform, or pillars. Concrete can harden from 7 days to a month.
- If it becomes necessary to fill the floor, after removing the layer of soil from the area under the kitchen, pour sand 15 cm thick, on top - crushed stone and fill the pillow with a solution of cement. If you plan to lay out tiled floors, the surface must first be leveled using sanding or a cement screed option.

Attention ! For an open summer kitchen, raise the floor above ground level to a height of five to seven centimeters so that rainwater does not flood the room.
Building the walls
Your kitchen project may imply the presence of walls or their absence, however, the support pillars, on which the roof or canopy will be held, will most likely have to be mounted. Materials for the construction of walls can be:
- Stone such as marble, limestone, granite, slate, concrete. The advantage of the stone is its reliability and durability, but its prices are quite high. The thickness of the walls will depend on temperature regime the environment in which the operation is planned. The thickness of one brick may be enough for you. For use in the cold season, additional insulation may be required.
- Tree. This material is cheaper than stone and easier to use. Buildings made of it look elegant and are popular with summer residents. However, it should be borne in mind: so that the tree does not deteriorate over time, it must be subjected to special processing. The outer cladding can be made of boards or siding, for the inner one - use lining, drywall. To create fasteners, use metal corners or self-tapping screws.
We build a roof
You can choose the following roof options:
- Flat or shed. It is an easy-to-build and inexpensive roof.
- Gable. More reliable, durable and popular.

Attention ! The long visor will protect your walls in the rain and extend the life of your kitchen.
We are engaged in interior decoration
Often, floors are finished using linoleum, parquet, laminate, decking or ceramic tiles.
In the case of woody walls and ceilings, they can be covered with a protective layer of drying oil, which will prevent the negative effects of moisture and time on this material.
The interior of the kitchen should be pleasing to the eye, create coziness and comfort, so furnish the kitchen so that it would be pleasant for you to be there and, of course, take into account your financial capabilities.

To complete the picture, do not forget about the aesthetics of the area on which the kitchen will be located. You can surround it with flowers and shrubs, lay out paths beautifully, and even create a fountain.
The summer kitchen is a comfortable room that allows you to enjoy the fresh air, cook Tasty food and spending time with good company. To make the kitchen as comfortable and convenient as possible, you need to competently approach its repair. Interior decoration, correctly selected materials and design will make the kitchen in the country not only attractive, but also cozy. What you need to pay attention to when starting a repair, and how to do it yourself - we will talk about this.
Features of internal repair
Repair of a summer kitchen in a country house or in a private house will largely depend on its type. And they build summer kitchens either closed or open. Open kitchens are easy to build and repair. The absence of walls, and sometimes a roof, limits the choice of materials for finishing the work area, because the material must withstand not only summer rains and autumn dampness, but also snow in winter.
Closed-type kitchens are capital structures that presuppose not only the presence of a roof, but also a foundation and walls. It is about such kitchens that we will talk about interior decoration. If such a kitchen has heating for the winter, then choosing a material for interior decoration, you can not be limited to anything.
However, most summer kitchens do not involve heating and are used only from spring to autumn, especially those in the country. The material for finishing such a room must meet a number of requirements:
- be resistant to temperature extremes, moisture, grease splashes and smoke;
- to be easy to clean, this means that the material should be easy to wash and not change its properties from repeated washing;
- be environmentally friendly and safe, that is, microbes and microorganisms should not accumulate on it, as well as mold and fungi should develop.
For your information! You should not build a kitchen in the open air; the kitchen should have a roof that will protect the stove, barbecue, furniture and kitchen utensils from minimal rainfall. Repairing such a corner would be advisable.
Work order
When starting to repair a summer kitchen in the country with your own hands, you need to think through everything and this applies not only to the choice of materials and design of the room, but also to the procedure for carrying out the work. What is better to do in the first place, at what stage to decorate the walls - all this is very important. Most experts recommend carrying out renovation work do it yourself in the following order: 
- first, the windows and doors in the summer kitchen are changed, if necessary;
- communications are carried out: electricity and water;
- then the floor is laid;
- then they carry out rough work with the ceiling and walls, namely, prepare surfaces for painting, wallpaper or panels;
- trim the ceiling;
- decorate the walls;
- install equipment;
- arrange furniture, interior elements and decor.
Walls, floor and ceiling
For finishing the surfaces of the summer kitchen can be used as natural materials and synthetic. Of course, natural ones are much more expensive, but they also look nobler. For a summer kitchen in a private house or in the country, they fit very well.
For finishing the floor of a summer kitchen, it is best to use ceramic tiles or porcelain stoneware. This material is not only resistant to moisture, but also fireproof. It can even be laid in an open summer kitchen. Laying these materials with your own hands is difficult, so help may be needed. For a closed kitchen in the country, linoleum is suitable, its properties and quality have been tested over the years, and it is inexpensive.
Important! If the kitchen has an oven or a barbecue, then it is better to lay the floor near them with tiles, and cover the reception area and the recreation area with linoleum.
In a closed kitchen, part of the floor can be made from planks with your own hands. Correctly processed wood, impregnated with a special compound, will serve for a long time... It is the most environmentally friendly clean material, which gives comfort and warmth to the interior.
As for the ceiling, then for its decoration are suitable: 
- dye;
- drywall;
- plastic panels;
- lining.
But you should not glue the ceiling with wallpaper or polystyrene tiles with your own hands. They will very quickly deteriorate from soot, grease and high humidity. This finish will have to be redone every two years, or even at the beginning of each season. The wallpaper ceiling in the food preparation area is not safe, so don't experiment when there are tons of materials on the market.
And finally, the walls. When finishing them, the material will have to be combined, since any summer kitchen in a country house or in a private house combines at least two zones: a cooking area and a food or relaxation area. It is better to use ceramic tiles in the cooking area, near the countertop and the stove. The use of natural stone will be unusual, decorative bricks... The cheapest option would be plastic paneling. They are easy to do-it-yourself and easy to clean.
The walls in the dining area and in the recreation area can be finished with:
- vinyl wallpaper, after plastering the walls with your own hands or sheathing them with plasterboard;
- paint;
- wall panels made of plastic;
- decorative plaster;
- wooden boards or clapboard, having previously processed them.

Arrangement of space
The space in the summer kitchen in a private house should be functionally equipped, and its convenience will depend on it. There must be zones: reception and preparation of food. A gas, electric or wood-burning stove must be installed in the cooking area; it is also necessary to have a worktop, sink, hood, cabinets for storing dishes, cutlery and food, in addition, it is advisable to put a refrigerator.
For your information! In an open summer kitchen in a private house, you can put a barbecue or barbecue, and also make sure to make a small niche for firewood.
In the eating area, depending on the area of the space, they put:
- table and chairs;
- benches;
- sofa or armchairs.

When equipping a closed kitchen, people try their best to create cozy atmosphere... You can often find a TV in the summer kitchen, a fireplace, in a large summer kitchen they equip a recreation area and attach a terrace, they are very common. But this already depends on financial capabilities.
Room design
The design of a summer kitchen in the country depends on the chosen style. Kitchen in rustic style presupposes wood stove, which will become the main design element. The main material for decoration is, of course, wood. The floor is made of wood, the furniture in such a kitchen is also wooden. Light curtains are hung on the windows. The interior is decorated with earthenware and wooden kitchen utensils, a linen tablecloth on the table, embroidered towels, the presence of a samovar is not excluded.

If there is a stone finish or a fireplace in the kitchen, then it will be perfectly combined with them. wicker furniture from rattan. Spread pillows on rattan chairs for softness. In the summer kitchen in modern style a soft corner sofa made of brown leather would be appropriate.
Note! The optimal color combination will be dark furniture and light material for wall and ceiling decoration. The room will seem more spacious and comfortable, and the furniture will not be too branded.
In a closed kitchen, you must definitely take care of the lighting, because natural light may not be enough. For a summer kitchen in the country, pendant lamps in small lampshades located in different parts premises.

Summing up, we note that repairing a summer kitchen in the country is not much different from repairing a kitchen in a house or other room. DIY repair steps are carried out in approximately the same order. The most important thing is to think over the design, choose the appropriate construction material, and then you and your guests will like the result.