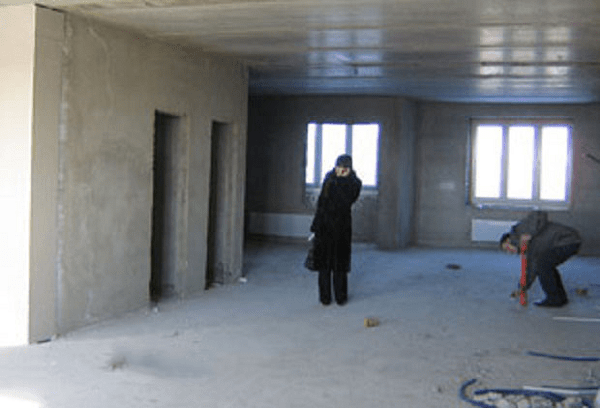
Almost always, new housing is purchased by a happy newcomer from a developer company without interior decoration and repair, but with communications brought into the apartment. Firstly, such housing in a new building will cost less, and secondly, almost always the repair and arrangement of the apartment by the developer is carried out extremely carelessly, using cheap materials. Thirdly, there is a desire to perform some stages of apartment renovation with your own hands or the hands of good craftsmen.
How to start repairing an apartment in a new building
First you need to make an audit and inspection of the apartment, identify problem areas of walls, ceilings and floors. We proceed in the following order. We determine what needs repair and finishing in the first place. If there is not enough time and money for a complete apartment renovation, it is necessary to put in order first of all:
- Entrance door and windows, apartment ventilation;
- Perform a full and highest quality electrical wiring and wiring sockets in the apartment. This stage needs to be thought out as detailed as possible, to draw up a connection diagram and a circuit for laying wires into the walls;
- Connect water and collect sewage in the bathroom and toilet, install a toilet, washbasin and shower;
- If the start time of apartment renovation in a new building coincided with heating season, be sure to check the degree of heating of the aluminum registers using a remote thermometer.
Advice! Before starting the repair, a list of claims for the presence of defects or defects must be presented to the representative of the seller. You may be able to get compensation for repairs in a new building. Do not settle for rework by the company.
In the process of carrying out the above preparatory work, it is possible to calculate the sequence of repairs in a new building.
What affects the sequence of repairs in an apartment in a new building
Much in the repair of housing in a new building depends on the availability of resources of time and money. Having bought a "naked" apartment and issued Required documents for the right to own, you automatically start paying rent and house payments, for the use adjoining territory, for export household waste and construction waste. After connecting electricity and water, a new apartment in a new building began to bring you a loss in the form of costs for its maintenance and decoration. How longer time repairing an apartment in a new building, the more expensive it will cost you.
There are two main options for approaching the issue of finishing a new apartment in a new building:
- Planned renovation and finishing of the apartment. In this case, the hosts are detailed map and a schedule for the completion of finishing works, in which all the main types of finishing and installation of appliances are prescribed in stages. Such repairs, as a rule, are carried out from scratch to its completion by one team of craftsmen. The turnaround time for a repaired facility can take several weeks or months. The disadvantages of this approach include the ever-increasing price and cost of the work, sometimes exceeding the estimated costs by more than two times. As a result, if due to unforeseen circumstances there are not enough funds, the repair may be delayed for an indefinite period.
- Quick repair from scratch. In this case, all of the above stages of repair in a new building are carried out by hired craftsmen with direct quality control on your part. The apartment in a new building will be prepared for further finishing of the rooms within a week. In addition to communications, they finish and equip the smallest room of the apartment with laying temporary linoleum and wallpapering. There are no amenities in such a room yet, but it can be used as housing - a temporary hut and a warehouse for building materials. All other work is carried out as free funds and time become available.
The first option is well suited if the family has small children or elderly people who need to provide some comfort and convenience. The second option is considered more economical and faster, especially if, after finishing the kitchen, bathroom, toilet and one room, housing is rented out, with the remaining rooms of the new building being consistently brought to condition.
We carry out apartment renovations with our own hands and head
Among the most popular horror stories for new buildings are considered to be stories about the shrinkage of the walls of the house and its foundation. In reality, a similar process for high-rise building must be completed by the time the building is put into operation. This period averages no more than 18 months. If after 1.5 years in the corners, ceiling or cracks form at the joints and in the masonry of the walls, the tiles in the bathroom fall off, the hatches are deformed with the doors skewed - this means that the new building has certain problems with the stability of the foundation. It is worth waiting with repairs until the main thing is clarified - what is happening with the new building.
How to start renovation in a new building
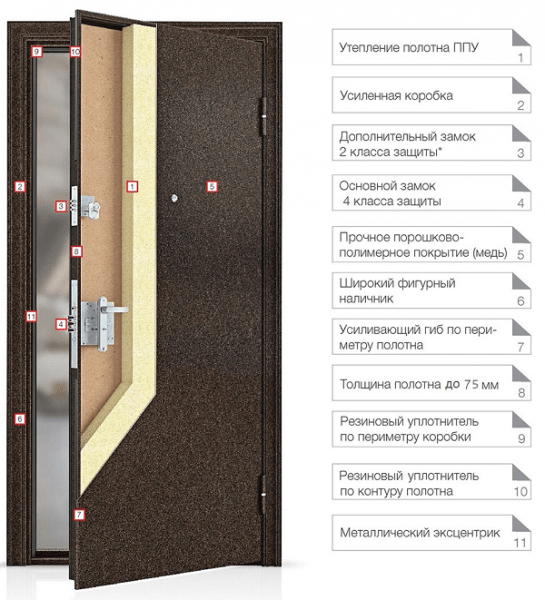
Before starting work, first inspect the lock for front door. The model and standard equipment of the door can be subject to separate agreement. Specify in the addendum to the contract which model of door and lock you need to install. If there is a need to take additional security measures, first of all change the lock supplied when the new building was handed over.
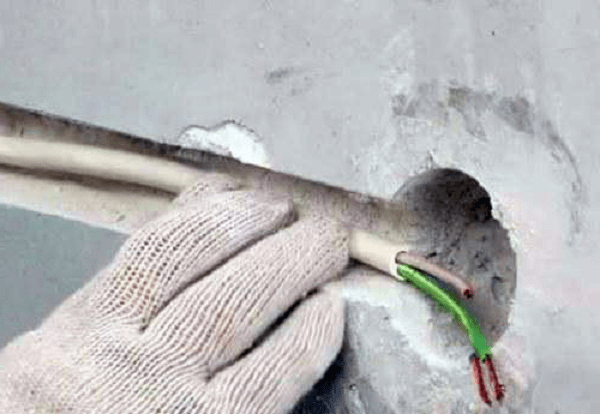
At the next stage, it is necessary to resolve the issue of installing a distribution electrical panel, connecting an electric meter. This will make it possible to start using power tools when repairing an apartment. To get rid of the need to use a large number of carriers and extension cords, plan the layout of the electrical wiring in the apartment. In doing so, the following should be taken into account:
- For the kitchen and bathroom, the wiring must be laid in sealed hoses, sleeves;
- Lay a separate residential wire in the bathroom to connect the boiler or washing machine. The cross section of the cable must be designed for a current of at least 25 A;
- An additional wire must be laid to the installation site of the air conditioner;
- In the bathroom, in the kitchen, in the hall, it is necessary to conduct a wire, which will be connected and used in the future when organizing additional grounding.
Advice! When wiring, use only copper cable without twists and adhesions.
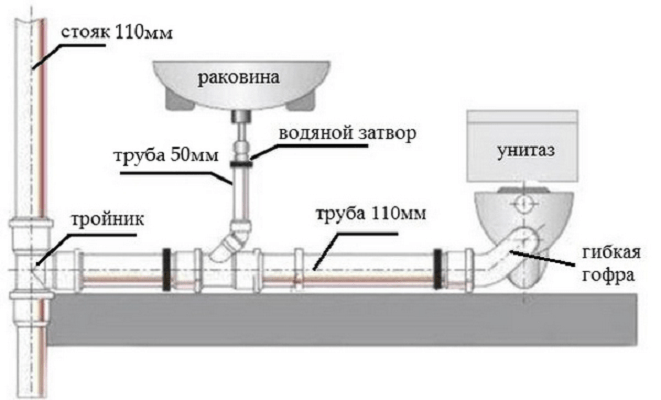
In addition to electricity, in order to create more or less normal conditions, it is necessary to connect hot and cold water meters. cold water and collect sewage in the bathroom and toilet. It is necessary to start work with the installation of a toilet bowl and a washbasin.

Considering that good plumbing is expensive, for the first time you can install inexpensive option toilet bowl, assemble and connect plastic sewer pipes, bellows and washbasin. During the renovation of the apartment plumbing can be replaced at any time. Installing expensive plumbing increases the risk of damage to it during repairs; it must be installed at the final stage of repairing a new building.

For gasket plastic plumbing using a perforator, we will drill channels in the walls of the bathroom, toilet, kitchen with a depth of 2.5-3 cm. Next, you need to solder water pipes and connect the leads to the drain tank and washbasin. Lastly, we will install and connect water meters to the cold and hot water to domestic plumbing.

Rough operations
Before starting work, it will be necessary to perform a large amount of cleaning up the remains of concrete, mortar. The main part will be for rough cleaning of walls, floors, ceilings, their chasing, leveling and cutting seams. Such work gives a large amount of dirt and dust, so it will be necessary to organize good ventilation and wet cleaning inside the new building.
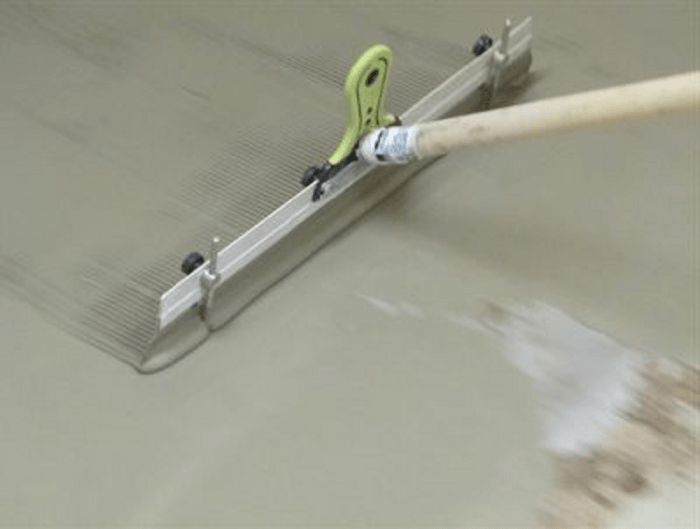
A separate point is to highlight the preparation of floors in each of the rooms for fine finishing. During the repair in the apartment, it will be necessary to close up all the cracks, holes in the seams between the plates, in the floor, in the interior walls of the new building. The most difficult will be leveling the floor with a screed made of cement mortar and reinforcing mesh. This procedure will need to be performed upon completion of the preparation of the walls and ceiling for fine finishing.
We will perform similar work in the kitchen, bathroom and toilet.
Carrying out finishing work
After rough cleaning, it will be necessary to prepare the walls in the kitchen and toilet for laying tiles on the walls and floor. Facing tiles can be laid with your own hands, but this is a troublesome business and requires a large number time. Therefore, it is better to entrust the laying of tiles to craftsmen who specialize in this kind of finish. While the tiling work is underway, you can do the repairs yourself in one of the rooms of the apartment. Most the best option will lay decorative plaster or liquid wallpaper on the walls. If at the time of the start of the repair in the apartment of the new building, the double-glazed windows in the windows were in a satisfactory condition, then you can start applying plaster on the walls of the room immediately.
Upon completion of laying tiles on the floor and walls in the kitchen, bathroom and toilet, you need to lay inexpensive linoleum in the corridor connecting these three rooms and the room in which the repair was made using decorative plaster. This will reduce the amount of dust raised and make it easier to clean the apartment.
The most important stages of the renovation of a new building
Before finishing the walls in the apartment, it is necessary to align, and in case of a defect, repair the interior doors. If your future plans include wallpapering, normally closing doors are simply necessary for quality performance wallpapering work. After the wall decoration is completed, we proceed to laying linoleum, laminate or carpet on the floor of the apartment. The most practical is considered to be a laminate for living rooms, for the corridor an office version of linoleum with increased abrasion resistance. This type of work does not require special qualifications and is easily done by hand during the renovation of a new building apartment.

Conclusion
The final stage of the repair is the connection of lamps and the installation of furniture in the apartment. Approximately 70% of the amount of work during repairs in a new building is quite affordable for do-it-yourself work. And only when doing special types finishing - laying parquet, installing stretch ceilings, installing double-glazed windows or entrance doors in a new building, you will need the services of specialists.
When carrying out repairs in the apartment, it is necessary to adhere to the sequence of stages. Violation of this rule leads to numerous returns to the already done part. As a result, the time and financial expenses.
At proper planning work is achieved:
- Significant financial savings.
- Optimization of repair time.
- Achieving high reliability of results and aesthetic appearance of the premises.
With poor planning, unforeseen work will inevitably arise. It is necessary to draw up a detailed list of works, starting from laying a warm floor, if the apartment is in a new building, and ending with the arrangement of furniture.
Start
A typical mistake in starting a renovation is to purchase all the desired materials. It's better not to start with this. Basically, a simple layman is able to carry out repairs in an economical mode. You need to select materials from optimal ratio price quality. Of course, you can buy Consumables to complete one step. It is easier to use the services of professionals, otherwise the preparation of estimates will be very tedious. Next, you need to decide on the interior of the rooms, including the kitchen, bathroom and toilet.
Initial work for a major overhaul
Regardless of the repair option (by professionals or with your own hands), it always includes mandatory steps for any choice of interior direction.
Preparatory work consists in removing old materials (wallpaper, tiles, linoleum, etc.), if the apartment had a finish, closing any surfaces that still need to be kept clean. Everything that could interfere with the repair is removed. If moisture is present, the room is dried out, for example, an old bathroom.

Development of a plan before repairing an apartment
Mandatory rough finishing work, examples of materials
Partitions in an economical mode are usually created from foam blocks or drywall, as well as from bricks. At the same time, they use soundproof materials: plaster of a special composition. Drywall is usually installed with metal frames, additionally inserted into them mineral wool muting the sound.
Next, the walls are leveled with plaster and the formation cement screed. Plastering can be carried out using standard compositions, for example, a mixture of sand and cement or gypsum. Important elements when plastering, there are beacons that are installed under the square. Such devices achieve flat corner, close to 90°.
Electrical and plumbing
If the housing is old with wiring running inside the walls, then it is not necessary to completely remove the wires. Enough to de-energize and insulate. The new network is laid in a slightly different place. The final wiring of the electrical network and plumbing is carried out after plastering the walls and pouring the floor screed. As a result, the absence of inaccuracies is achieved when installing sources of electricity and plumbing equipment, for which convenient pipe outlet is important.

Finishing work, more about drywall
The stage of finishing works has its own procedure, while it is necessary to comply with specific standards so that the finish is durable and does not “float” in the very first days of operation of the apartment after repair. Before starting finishing work, you need to remember your preferences again, purchase materials if they have not yet been purchased.
After the rough finish, the room is kept for some time so that the moisture leaves the walls. For example, when installing drywall, as an option finishing, it is necessary to withstand the time (1-2 weeks) after plastering the walls with a mixture of sand and cement. Drywall is becoming more popular because it is inexpensive, easy to install and allows you to achieve completely smooth walls.
If you violate the regulations for the work, then the likelihood of cracks on drywall increases significantly. When installing sheets of material, a carefully fixed profile is required. Additionally, to obtain a smooth surface, fiberglass and special putty are used to mask the joints.
Tile
It is difficult to lay tiles evenly and securely without special skills. It is better to entrust this stage of finishing to a specialist, having previously consulted with him about the purchase of materials. It is necessary to decide whether a lot of inserts and decor are planned on the walls. Plumbing is installed only after fully completed finishing work, up to rubbing the joints between the tiles.
It is desirable that the plumbing is installed by the person who worked with the tiles. Cracking of tiles during the installation of plumbing is a common occurrence. Usually the master replaces it.

Wall tiling (photo)
Learn more about wall and floor work
Unlike, where tiles are the standard way of finishing the surface, walls are more often painted in rooms and wallpaper is glued. First, the stage of leveling surfaces and corners is performed. Finishing steps for leveling walls include: applying a primer deep penetration, overlaying a paint grid (2 × 2 mm), the first and second layers of putty. The smoother the surface, the better the wallpaper or paint (water-based or acrylic) will lay down.
Finishing repairs are not difficult smooth walls. Wallpaper gluing in three-room apartment When working with two people, it usually takes 2-3 days. Specific terms depend on the complexity of the texture and pattern of the wallpaper.
Flooring, according to most experts, should be installed at the end of the repair, regardless of the material (laminate, linoleum, parquet, carpet).
Briefly about the stages of repair and the importance of knowledge of the process
Regardless of the choice of repair contractor or the decision to do it yourself, you need to know the stages of work. A knowledgeable landlord better controls the process and monitors the master, clearly aware of the time and financial costs. From the performer who does not like the meticulousness of the owner, you must urgently refuse. The specialist must discuss all the stages with the customer during the repair. Consensus contributes to a better outcome. You should not be afraid to “torment” the master with questions. He is a specialist and is obliged to bring the client up to date.
Brief repair plan:
Definition with dimensions. The area of the room, the height and width of the walls, the dimensions of the openings, the assessment of the unevenness of the room (floor and ceiling difference), the marks of future or current switches and sockets. You can designate the appropriate level of the floor and ceiling.
- Dismantling of everything unnecessary that you want to get rid of or replace. In a new building, this stage of repair is relevant only when the partitions are demolished.
- Replacement of heating radiators (if necessary). You can not leave this stage for later, it will be more expensive.
- Garbage collection after dismantling or at the entrance to a new building. Usually an apartment with a rough finish is not cleaned, it is polluted with sand and dust.
- Purchase necessary materials for the entire repair or the next stage, depending on finances.
- Electrician. Laying a new network or upgrading (improving, repairing) an old one.
- fill concrete screed in the premises. All this should dry, you need to wait for time and do other rooms.
- Plastering the walls of rooms with bathrooms, their alignment before finishing.
- Finishing the walls of the bathroom and toilet (painting, laying tiles).
- Installation of plumbing and piping.
- Checking the evenness of the walls in living rooms and alignment work.
- Installation of slopes and window sills.
- If the screeds in the rooms are not mounted, then you need to proceed with them.
- Door installation. Before installation, it is necessary to evaluate their compliance with the dimensions of the opening.
- Planning work with the ceiling, the choice of finishes (whitewash, stretch, suspended). If a suspended or bleached ceiling is planned, then the work is carried out on last step rough finish.
- Wallpaper pasting. Depending on the material in this process, there are nuances. For instance, vinyl sheets smell. There are soft wallpapers, pressing on which immediately leaves dents.
- Floor finishing, installation of skirting boards.
- Recommendations for some stages of apartment renovation
- How to do plumbing installation with least effort? Better to use metal plastic pipes which are mounted without special tools.
- Floor in the rooms. With dry screed less problems due to the speed of installation than with cement. Coatings may vary. Cork is the most expensive and warmest.
- Choice of ceiling type. It is rare that during construction an even arrangement of the ceiling is obtained. Whether to engage in alignment or choose a stretch ceiling. The latter option is of course easier and faster.
- Wallpaper. It is better to choose meter wide canvases. Sticking half a meter takes much more time.
More about the new building
New house will necessarily undergo a shrinkage process, so the use expensive material- money down the drain. The appearance of cracks on the walls and smudges in heating and water supply complexes is inevitable. It is better to leave your choice on a domestic product.
It begins with the determination of dimensions (fluctuations in the heights of the floor, ceiling, inclination of partitions). Requires the use of a water or modern laser level. Preliminary measurements allow you to determine the technologies for finishing and eliminating differences.
Any demolition or erection of partitions, the materials of which are gypsum block or foam block, less often brick, require approval by the BTI, otherwise a fine is inevitable with the requirement: to return the apartment to its original state at its own expense.
Next stage:
- window replacement;
- window sills;
- heating systems (radiators).
If necessary, riser cranes are installed at this stage. Installation plastic windows should be carried out taking into account shrinkage. Experts, understanding this, leave special gaps, as a result of which the window is not deformed.
Alignment of walls by plastering using beacons. It is better to carry out the process by first installing a reinforcing mesh. In rooms where it is planned to lay tiles, it is necessary to create ideal right angles (90º). In the case of even joints, the trimmings of the material will be the same size.
Then it was time for the first stages of installing plumbing, electrical, and ventilation systems. At this stage, sewerage and water supply pipes are being laid, cables are being pulled, and socket boxes are being installed. It is impossible to carry out such work without a preliminary plan. It is better to use plastic pipes that do not deform during shrinkage. The following are the standard steps:
- floor screed (dry or wet);
- cleaning work.
Many people ask themselves: how to make repairs in an apartment with your own hands in order to save money. After all, inviting experienced finishers, you will have to pay a lot of money.
This article will tell you about the main stages of finishing apartments.

Repair types
First, let's figure out what types of repairs are:
Capital
During such a finish, the appearance of the apartment changes completely, that is, new doors and windows are installed, a different coating of walls and floors is applied, plumbing is reconstructed, and the location of sockets may change.

To reduce costs and time for overhaul you need to make a work plan.
Cosmetic
It involves carrying out work that will update the look of the apartment. This includes finishing walls and ceilings, changing floor covering.

It will take less time and money than a major overhaul

Renovation
In the 90s. this concept meant expensive work according to European standards. Now it means modern renovation apartments, the use of bold design solutions, application of room zoning and much more.

The result is an exclusive room in which it will be comfortable to stay.

If you need to completely transform your home, then choose a renovation. But you need to remember that the price of such a transformation is high.

Before you start work, you need to create a housing project and come up with a design.
Main stages
To start, you need to create phased plan your repair. It will help calculate the costs and calculate how many materials will be needed.

The main stages of the repair will be the following
- If major repairs are required, then first of all, partitions are installed, floors are leveled, walls are plastered and ceilings are mounted.
- Then they do the flooring.
- Install plumbing.
- Install doors.

Before starting work, clean old finish. It is impossible to leave old wallpapers and glue new ones on them, as some do, as they can peel off along with the new ones. Then remove the remnants of glue, remove the cracks.

The most important process is the installation of wiring and pipes. For this, strobes are made, where pipes and cables are laid.

If construction work is carried out by specialists, then they should be asked to draw up a communication plan. This will help to avoid damage to pipes and cables in the future.

The next step is to install windows. When they are ready, you will have to cover them with oilcloth so that dirt does not get in.

Note!

After the windows, you can move on to the walls and ceiling. The surface is rubbed, puttied and primed. Wall primer is required to give strength. When it dries, you can start painting.

If you want to change the floor, it is better to use a self-leveling mortar. It will require less time than a screed on your own.

Now you can start wallpapering. Beautiful renovation in the apartment can be done with the help of cheap finishing materials.
The main thing is that everything looks harmonious. Be sure to combine the pattern on the wallpaper and align it so that they do not bubble.

Floor covering can be anything. If you lay tiles, then you need to do this after finishing the ceiling.

The ceiling can be whitewashed, painted or laid out ceiling tiles. Many install suspended ceilings which also looks great.
Note!


On the final stage install doors. Then you can start arranging furniture and adding decorative elements.
Numerous photos of repairs in apartments are on the Internet. If you can not decide on the design, then they will help you.

In order for the repairs to be done to bring joy, you need to adhere to certain rules and listen to the following tips:

In order not to disturb the noise from the corridor, there were no drafts, it is necessary to install doors with high sound insulation.

Before starting repairs, be sure to remove furniture from the home so that it is not damaged.

Note!

Do you have small children? So, choose washable wallpaper to easily wash off their patterns.

You can not save on wiring, as cheap cables can start to melt, which will lead to a fire.

If you do not want the pipes to be on the surface, then you need to purchase polypropylene, the joints of which are soldered. Metal-plastic ones are twisted, and they will sometimes have to be tightened.

If it is impossible to level the ceiling to the end, you need to install a stretch ceiling.
To prevent the plaster from pouring from the interfloor floor slabs, you need to properly close up the seams.

As you can see, it is not so difficult to make repairs in the apartment on your own. The main thing is not to deviate from the basic rules and everything will work out.

DIY apartment renovation photo


If you are going to make a serious repair in a separate room or apartment as a whole, you should draw up a complete work plan and cost estimate, including items such as the dismantling of old equipment (batteries, window sills, lamps, switches). If windows and doors are to be replaced, include cleaning and removal of construction debris in the list of works. In most cases, this is a significant item of expenditure, especially in apartment building in the city.
It is very important to determine the actual scope of work and correlate them with your financial capabilities. It is highly undesirable to make adjustments after the start of repair and finishing work - for example, after painting the walls, you want to lay parquet instead of laminate or stick wallpaper instead of decorative plaster. Therefore, all design and design decisions must be made before the actual repair work begins. Redoing is expensive, time-consuming and sometimes impossible.
Where to start renovating a room?
Dealing with preparatory process and finding yourself in front of bare, peeled walls, you still do not fully imagine the total amount of upcoming expenses and work. However, it is already possible to find out where and what will be located, what colors are optimal in a particular room and where a computer, TV and other electrical equipment will be installed. Be sure to pay attention to the location of windows and the need for additional lighting in rooms. What for? Because the repair should begin with the equipment or the re-equipment of the electrical network, including the location of the fixtures - the main and additional ones.
This should be done both in old apartments, which are completely renovated, and in new buildings. It's no secret that in new houses the wiring is installed without taking into account the wishes of the owner. Each newcomer invariably has a desire to maximally adapt housing to their needs. The abundance of electrical technology requires an optimized high power grid with many branches. very uncomfortable in new apartment unwind all kinds of extension cords and install additional sockets.
Parallel to electrical network it is necessary to mount the air conditioning system and the fastening elements of the heating network devices. It is also necessary to perform work that requires chiselling, drilling, grooving, chiseling, recesses and other mutilation of walls, floors and ceilings, accompanied by the formation of dust and fragments of brick, concrete and gypsum. Then we calmly remove the debris and proceed to prepare the base of the future floor. There are several options here:
- installation of a rough plank floor;
- pouring concrete screed;
- preparation for installation of a warm floor;
What's next?
The next stage of repair work concerns windows. If a replacement is required, we change it. If the windows have already been installed and satisfy your request, then we skip this stage, not forgetting to inspect the condition of the slopes, the presence of thermal insulation, and the sealing of cracks. It is worth checking how the doors open and close, if there are any distortions, what are the vertical and horizontal levels. It is very difficult to eliminate these seemingly obvious flaws after plastering and painting walls or wallpapering. It is also desirable to install internal window sills. Plastic wrap will help protect them from splashes of paint and putty.
Of course, this work can be done later, when installing interior doors, but this option is more practical.
If the walls in the room require additional alignment and a significant amount of work before painting, then calculate total building mixtures necessary for the processing of all walls to be repaired. Building materials, despite the high cost, should always be taken with a small margin. It is very inconvenient to run after a bag or two of putty, which, as a rule, ends at the most inopportune and crucial moment.
The sequence of work on the repair and decoration of the room: frequently asked questions
What comes first: floor screed or wall plaster/putty?
The answer to this question is unequivocal - before starting to finish the walls, it is necessary to complete all the preparatory work with the floor. It should be ready, after cleaning, for the installation of decorative flooring.
The floor covering is mounted last, whether it is a laminate, parquet or self-leveling floor with a 3D effect. The prepared floor base is covered with cardboard or film - this will make it easy to remove traces plastering works, and these are inevitable.
Prior to the start of puttying and plastering, all manipulations with drywall, if any, must be completed. All partitions, niches, decorative and functional details must be done before the start of the “wet” finishing phase. All work of this kind, including leveling the ceiling, must be carried out in one technological cycle so as not to return to them, remembering, for example, that “somewhere here” a niche for storing skis or installing a safe was conceived.
What comes first: flooring or door installation?
Flooring of any type should be laid before installation of interior doors. This will help to avoid errors during their installation and achieve a minimum gap between the threshold or floor plane and the door leaves. Installing the door is a clean and precise job that does not require the use of mortars, adhesives or other substances that can stain a clean floor. The tools used in this case cannot damage it, with careful work.
But this applies directly to the door. The door frame can be put earlier - before leveling the walls. This will remove all the cracks and bumps near the opening. If the walls and openings are initially ideal, you can postpone the installation of the box for later. When installing the box ahead of time, it is important to take into account the height of the future flooring!
What to do first: glue wallpaper or lay laminate (parquet, carpet)?
Wallpaper of any type on the prepared walls is glued before the start of laying the decorative flooring. This is also true for wall painting.
True, on this issue there different opinions. Supporters of the second option answer this question in the same way as the question of what comes first: paint the ceiling or glue the ceiling plinth. According to their position, the wallpaper is glued after the installation of the floor and ceiling plinth, because you can replace the wall decoration at any time without touching the skirting boards either from below or from above. And the edges of the wallpaper can be simply cut evenly to the level of the plinth.
The ceiling is painted after the installation of the upper plinth. In this case, it is very convenient to eliminate all the unevenness and looseness of the connection, and then the baseboard and ceiling are painted in one go and look monolithic.
What first: stretch ceiling or wallpaper / painting?
The specificity of stretch ceilings allows you to install them at the final stage of repair work, after painting the walls and sticking wallpaper. This work is very clean, and it is quite difficult to damage the walls or floor while doing it.
The principle of order of work "from top to bottom" in this case does not work. It concerns, mainly, traditional repair works. New technologies are making their own adjustments. The experts who install stretch ceiling, recommend inviting them to the end of the repair.
If you make a short list of the sequence of repairs in the room, then it will look like this:
- wiring;
- heating and air conditioning system;
- floor preparation;
- dismantling / installation of windows;
- preparation of walls for wallpaper or painting;
- ceiling (all works);
- wall painting or wallpapering;
- finishing floor;
- door installation;
- rapids and floor plinth;
- stretch ceiling.
This order is not an axiom. Each master chooses the sequence that is convenient for him. But in general, the sequence looks something like this.
How to paint a ceiling without streaks? What are the causes of stains and streaks and how to fix it?
At what height should sockets and switches be located?
How to patch a hole in a wall?
How to remove old wallpaper from walls?
www.domfront.ru
Repair in the room: where do we start?
The very first thing to do before you start renovating any room is to understand what we want to achieve as a result.
Ask yourself a few questions:
- What should the room look like after renovation?
- What would you like to keep unchanged?
- What does not suit you in the first place and needs to be changed?
- What wishes do the people who will be using the room (e.g. other family members) have about the look of the room?
- Do you need a major overhaul or will a cosmetic one suffice?
You can think through the details of the appearance of the room yourself. If this is difficult, you will have to contact a professional designer. This stage should not be postponed until later, they say, we will start the repair, and then we'll see what happens. Much depends on how we want to see the room - from the choice of materials to the execution of the different kind works. It's better to think things through beforehand than to redo them later.
Preparation stage
So, the future view of the room is thought out. Before you start any manipulations in the room, you need to take the following steps.
- Describe the sequence of repair work in as much detail as possible.
- Learn about the materials you plan to use and any work you intend to do yourself.
- Choose a start and end date for the repair, allocate a period for preparation. This is necessary so that the goal is clearly defined, and the repair does not drag on for many months.
- Calculate the amount of necessary building and finishing materials.
- Select and buy all the building materials and tools you will need throughout the renovation.
- Decide who will do the repairs. Think about whether you will do everything yourself, find assistants for yourself, or still entrust certain types of work to hired specialists.
- Order windows and doors in advance so you don't delay work by waiting for them to be made.
- Think about how and where the garbage will be taken out. In any case, there will be a lot.
- Outline the new location of switches and sockets.
Tip: building materials should always be bought with a small margin.
Getting the room ready for renovation
Consider the option of a major overhaul in the living room, which involves not only changing wallpaper, baseboards, updating paint on the ceiling and walls, but also replacing windows, doors, electrical wiring and other large-scale events.
Before you start the repair itself, you need:
- free the room from furniture and other things - the room should remain completely empty;
- remove from the walls and ceiling everything that can be screwed to them, leaving them empty;
- remove old wallpaper, remove tiles, old flooring (if the floor remains unchanged, you need to take care of its safety, for which you should cover it with a strong film);
- hang doorways with a damp sheet so that later construction debris does not scatter throughout the apartment.
- remove doors;
- remove the old wiring, not forgetting to turn off the power supply;
- dismantle old heating radiators in case of a decision to replace them.
Repair sequence
The plan for the repair of the room is drawn up individually, depending on what work will be carried out. In order to compose it, you need to know where to start. Experts recommend an approximate sequence of actions that does not have to be strictly adhered to, but must be kept in mind.
- It is advisable to start with the replacement of windows, including window blocks, window sills, slopes. After installation, the windows must be closed to avoid contamination and scratching. plastic wrap, window sills are covered with hardboard.
- Electrical is changing. old wiring already removed, the channels for a new one are being shuffled. After that, the cable is laid, and the channels are covered with plaster.
- Heating radiators are installed.
- The ceiling and walls are leveled, the rough preparation of the floor is carried out (screed, insulation).
- A complete ceiling decoration is carried out, up to painting and gluing a baguette.
- If parquet or laminate is chosen as the flooring, it is laid after wallpapering. Block parquet laid earlier, cycled and covered with the first layer of varnish. After that, you need to glue the wallpaper, and only then the parquet is covered with subsequent layers of varnish.
- New doors are being installed. You can change windows and window sills not only at the very beginning, but also at this stage.
- Wallpaper is glued.
- Skirting boards and platbands are attached.
- Holes are drilled for wall shelves, cornices, paintings, etc.
Making repairs in a room from start to finish is a rather long, laborious task, requiring a variety of skills and, in addition, patience. But when arranging furniture in a renovated room, you will realize with satisfaction that it was worth it.
mr-build.com
How to start apartment renovation and finish it as soon as possible
How to start apartment renovation repair work did not stretch out for an indefinite period, and the end result undoubtedly pleased you, this is what will be discussed in today's article. Repair in the apartment requires serious pre-training. The most important point is to draw up a detailed plan for future repairs, taking into account the smallest nuances. Consider, point by point, the advice of professionals on proper organization repair work in houses and apartments.

First of all, you need to decide on the complexity and scope of future repairs. To make an apartment bright and clean, sometimes it is enough to carry out cosmetic, surface repairs: replacing wallpaper, whitewashing the ceiling, replacing old linoleum, painting walls, etc.
If you want to completely get rid of everything boring and old, decide on a major overhaul with replacing windows, leveling walls, installing new floors, modern ceilings. Your home will be transformed and become new and beautiful.
You should not refuse the help of experienced professionals during the overhaul. This is especially true for creating a modern design for your apartment, including redevelopment and demolition of some walls and partitions.
Plan your renovations according to your budget.

Decide on the interior design and renovation plan
First, decide on the interior and design of each individual room that you plan to change in your apartment. You can seek the advice of a professional designer, which will slightly increase your total financial costs for repairs. For rooms where repairs will be carried out, it is necessary to make detailed drawings of the successive stages of repair work.
We recommend that you complete five detailed renovation sketches for each individual room. In the first drawing, display the view of the room from above, and in the remaining four - each wall. Add each drawing detailed description and a plan for the consistent implementation of repairs, which will avoid omissions and inaccuracies in the work.
- Think about the location of the furniture. Those walls that will be most conspicuous must be given Special attention and apply the highest quality finish.
- Think about where it is best to place lamps and chandeliers so that the light illuminates the room as much as possible.
- Given the location household appliances, indicate the places for sockets. To then competently design the installation of electrical wiring in all rooms.
- Consider the location of the main decorative elements: paintings, mosaics, brick wall.
In the repair plan, you need to indicate the desired finish option: wallpapering the walls, painting, etc. To divide the room into separate zones designers recommend painting one of the walls with a different color to focus attention on it and visually divide the room. These points also need to be reflected in the plan.

Determine the order of renovation of rooms
According to the advice of experienced professionals, in order to avoid excess dirt and dust during repair work, it is recommended to first carry out repairs in the rooms most distant from the front door. As the final stage of the repair, it is advisable to choose passage rooms and a corridor through which Construction Materials and tools. This is necessary in order not to stain or scratch the finish of the already repaired wall, not to damage the new floor.
Additional protection a repaired room can be a cellophane film (fixed on the outside of the door), which will reliably protect the room from building dirt, dust, plaster, paint, accidental damage.

Repairs will be carried out independently or with the help of specialists.
Do not carry out all repairs yourself. At your request, all repairs or only particularly complex repairs can be entrusted to qualified specialists. Firstly, experience and knowledge will allow them to carry out repair work quickly and efficiently. Secondly, you do not have to additionally buy expensive tools with which the screed is ideally poured onto the floor or laid out tile.
Even if it seems easy for you to install an interior door, the slightest inaccuracy is unacceptable here. Of course, hang and arrange kitchen furniture, you can level the walls and make a little painting yourself. But trust more complex repairs to specialists so that you do not have to redo it, which can significantly increase your financial costs for repairs.
Make a list of required materials and tools
#one. After the final choice of the design of the appearance of the rooms, furniture and interior, it is necessary to draw up full list necessary building materials. Their number and total cost depends on the amount of repair work and how they are carried out. If your budget allows, you need to purchase building materials with a small margin.
#2. Separately, make a list of decor items: holders, shelves, mirrors, paintings, etc. Start shopping with the selected decor items. If the planned decor element is not available, you can quickly change or create a new one. design option apartment renovation.
#3. Make a list of what you need building tools to carry out repair work. To do this, you can use the advice of a sales assistant in construction stores or qualified repairmen.

Cost Counting
When carried out preparatory work: plans and sketches of repairs were drawn up, lists of necessary materials and tools were prepared, a decision was made on the possibility self repair or with the help of repair specialists, you can calculate the estimated total cost of the planned repair.
You should not rush to purchase all the materials when you visit the first store. In the compiled lists of materials and tools, put down the prices of different stores, which will allow you to make purchases at the lowest cost. Carefully consider the choice of services of repair teams. Pay special attention not only to the proposed cost of repair work, but also to the reviews of your friends about the quality of repair services.

Exemption of premises
To protect furniture from damage, construction dirt and dust, collect it in the center of the room. Then carefully cover with plastic wrap. So you free access to the walls and ceiling. Move expensive equipment and clothes to other rooms.
Where to start repairing a separate room and what is the sequence of work
Repair work should begin with the most dusty: replacement of window blocks, window slopes and installation of new window sills. This will avoid dirt and dust during the run. painting works when it is forbidden to open windows to avoid temperature fluctuations and an increase in humidity. When windows, slopes and window sills are installed, cover them with plastic wrap or hardboard to avoid accidental mechanical damage and contamination.
Mark the places for installing additional sockets, make an eyeliner electrical wires. At this stage, do not install sockets and do not connect them to the shield.
In the case of welding work (for example, when replacing heating radiators), perform them simultaneously in different places in the apartment in order to quickly complete this dusty and difficult stage of work, sometimes including the breakdown of walls.
Before repairing walls, floors, ceilings, it is necessary to check their condition with a laser or water level. Start by applying the thickest layers of mortar. While they dry, you can carry out other minor repairs without downtime.
After completing this preparatory phase proceed with the repair work, performing them in the following sequence: repair of the ceiling, walls, floor. Initially, work is carried out using putty, cement, gypsum mixtures. Then proceed to work on the installation of the floor, doors, slopes.
Final repair work:
- Ceiling wrapping or painting.
- Wallpapering or wall painting.
- Floor covering installation.
- Installation of skirting boards, sills, platbands.
Video: What you need to know before starting an apartment renovation
srbu.ru
Where should you start renovating a room?
Room after renovation
"Do you have a plan, Mr. Fix?" This is a phrase from a very popular earlier cartoon. But it contains the answer to many questions. So, if you do not know where to start renovating a room, then think about what you want to do in this room and make a plan for the work to be done.
The general order of work in the room is published on this site, but in addition to the order of all the work that we have planned, we need to know if we have enough money to carry out repairs. And this requires at least a primitive estimate for Finishing work in the room. How to draw up the entire estimate for finishing work, you can see on this site.
What materials will be needed for repairs in one room
Studio room
So, you already know how you want to see your room. Make a simple estimate for the cost of purchasing materials and paying specialists for work that you cannot do yourself. How to make an estimate for repair and construction work, you can see here, on this site. For now, let's just see what materials you will need for the repair so that you can include them in the estimate.
You will need plasterboard sheets, most likely, only for ceiling installation, since installation drywall sheets it takes up free space on the walls, and we don’t have a lot of it. So you need ceiling drywall.
Since drywall needs to be hooked to something, you will need to make a frame for which you will need CD profiles, UD profiles and mounting brackets for profiles. To assemble the frame and hang the sheets, you will need dowels and screws. You will also need baguettes.
You may want a ceiling made of MDF panels. In this case, you will need the MDF panels themselves and a decorative strip to go to the wall. The frame for MDF panels is usually made of slats. To do this, you need rails and, again, mounting brackets for attaching the rails. To assemble the frame and the entire ceiling, you will need dowels and screws. And to attach the MDF panel to the rail, you will need clamps.
Laminate floors in the room
To putty walls and ceilings, you will need two types of putty - starting and finishing. Before applying the putty to the surface, a layer of primer must be applied to it. And at the end of the putty work you will need paint.
If you decide to lay laminate floors, then you need to prepare a subfloor for them. And this, as a rule, is the pouring of the screed, for which you will need sand and cement, and in order for this screed to be even, you need beacon profiles. And for laying the laminate itself, you need a substrate, and to complete the floor - a plinth.
If you want to glue the wallpaper, then you will have to level the wall with a starting putty, for which you will need lighthouse profiles and a primer. For direct wallpapering, you also need a primer and, of course, glue.
You may need to replace the window and interior door. The cost of the window includes all components and work, but to install the door you will need a door frame, hinges and a lock. You will also need screws of different lengths, dowels and polyurethane foam.
You may want something else that is not on this list. But the principle remains the same - in order to hammer a nail into a wall, you need not only a nail, but also a wall and a hammer.
Beginning and short sequence of repairs
Wallpaper in the children's room
Based on experience, I can say that at the beginning of the repair, it is best to change the window. Then proceed to cleaning the walls, ceiling (if you putty on the slab) and dismantle the old floor. Then fill in the screed. Make the wiring and install the door frame. Hang the door later.
Spend rough finish walls (starting putty) and make slopes on the window, and then take care of the ceiling. Do the ceiling to the end, up to painting and glue the baguette, and only after that proceed to the fine finishing of the walls and slopes. Lay the floor and then hang the door. Install sockets and switches fine finish walls.
T Anything can be a repair tool. For example, replacing a window block with a plastic one. Further on, you will find that everything in the room is interconnected like a garland of monkeys holding each other by the tails.
At the same time, we clean everything that crumbles and can be cleaned without much effort.
If the coating, like an archaeological excavation, has many layers, we remove everything, if possible, up to putty or plaster.
After clearing the main arrays, we carefully remove all kinds of dowels, nails and screws.
Rough work is the basis of a quality repair
We start the repair with rough work, the purpose of which is repair and to the application of finishing coatings:

Good foundation preparation is the key to quality repairs
We cut large cracks, minted them with gypsum putty. We close potholes, holes from dowels, screws, etc. with the same composition.
Plastic plugs - dowels, it is easy to pull out with a self-tapping screw and pliers: insert the screw into the dowel and tighten it with your hand until there is enough force, and then tighten it with a screwdriver a couple more turns. Pull the screw with pliers, the cork will easily come out of the wall.
Removing old outlets
- turn off the electricity supply;
- unscrew the cover, remove or loosen the fixing and spacer screws, remove the socket and disconnect the wires;
- we isolate the ends of the wires, and fill them into socket boxes, fixing them with tape.
We clean the walls from roughness with the help of a fine plaster mesh. Apply a deep penetration primer. It solves three problems at once:
- increase adhesion;
- strengthen the top layer of structures;
- dust off the surface.