Do-it-yourself wall plastering is recommended only to those home craftsmen who have experience in finishing work. In the absence of such experience, you should choose a small section of the wall or take a sheet of drywall and practice on it. If the result is far from what you want, it is better not to try to save money, but immediately contact a construction company. Others are encouraged to follow the instructions provided.
Wall plastering can be done in two ways. In the first case, the solution is simply applied to the walls, after which it is leveled with a rule. In the second, before plastering the walls, paint beacons are installed or threads are pulled to indicate the level. This operation is only required in the case of very uneven walls. These two methods of plastering walls are considered basic, but each master can make minor amendments to the technology.
According to the modern rules of SNiP III-21-73, there are 3 types of coatings:
- Low quality. This type of plastering is suitable for wall decoration in non-residential premises. The permissible vertical and horizontal deviations are 3 mm per meter. Also, for every 4 square meters, 3 smooth irregularities are permissible, the depth of which does not exceed 5 mm. Plaster surfaces can be done with cheap starter mortars.
- Average quality. In this case, the requirements for surfaces are more stringent: vertical or horizontal deviations should not exceed 2 mm per 1 m. As for smooth irregularities, their number is limited to 2, and the depth is 3 mm. So you can plaster the facades.
- High Quality. The requirements for this type of coating are the most stringent. Horizontal and vertical deviations should not exceed 1 mm per 1 m, and there can be no more than 2 smooth irregularities, while their depth cannot be more than 2 mm.
VIDEO:
Process features
Depending on the material from which the walls were made for plastering, as well as on their location (outside or inside the building), different plaster mixtures and application techniques are used. Before plastering the walls with gypsum plaster or other composition, you need to find out some of the nuances of finishing various bases.
Brick walls
Such structures are usually finished with cement-based plasters. In some cases, a little lime is added to them to increase the plasticity and moisture resistance of the material. The thickness of the plaster layer on brick walls should not exceed 3 cm. It is also recommended to use a reinforcing net to strengthen the layer.
 When finishing a brick wall, it is necessary to use a reinforcing mesh to strengthen the plaster layer
 When it comes to facing brick, then working with it is quite difficult. Its surface is very smooth, so the mortar can fall off even if a reinforcing mesh is used. Such material must first be impregnated with special primers, only then proceed to finishing.
Concrete walls
Smooth surfaces of this type are pre-treated with primers containing quartz sand or flour. This material increases adhesion and provides a tighter contact between the plaster and the wall. For finishing such surfaces, cement-based plasters are used, to which a little gypsum or lime-gypsum mixtures are added. For rough concrete walls, conventional cement plasters are sufficient without additional components. The main thing is to process them with "Betonkontakt" before plastering the surface yourself.
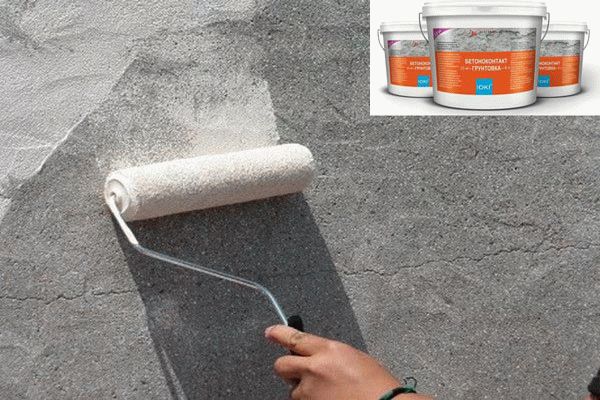 Concrete walls are recommended to be treated with a primer “concretekontakt”
 Aerated concrete walls
If the building was erected or insulated with gas or foam blocks, then they will be quick and easy. At the preliminary stage, it will only be necessary to treat the walls with deep penetration impregnation. Such surfaces can be plastered with concrete or lime mortars.
On a note! At the moment, a wide range of plasters is presented in hardware stores, suitable for certain surfaces and operating conditions. Manufacturers indicate the proportions in which to dilute the mixture, and give various recommendations for use, so there will be no problems with the choice.

Required tools and materials
To plaster a wall, you should stock up on the following consumables and tools:
- mortar, primer (acrylic or "Betonkontakt"), putty;
- painting beacons, screws, dowels;
- screwdriver, hammer, metal scissors or grinder;
- perforator with a set of drills and a mixer attachment, mixing tank;
- building level, plumb line, tape measure;
- thread, marker or pencil;
- spatulas (wide and narrow), brush or roller, usually ironed.
In addition, you need to take care of work clothes, protective gloves and a headgear. The above list is quite large, but the main thing here is a hammer drill and a set of drills, everything else is not very expensive.

Plastering works
There are several stages of wall plastering. Only with full compliance with each of them can you get a high-quality coating that will last for many years.
Preparatory stage
Plastering walls with your own hands requires careful preparation.
- First of all, you should get rid of the old coating. Remove paint, wallpaper or decorative plaster. The starting layer of plaster can be left only if it is strong, otherwise it is also knocked down.
- After that, you need to tap the entire surface of the wall with a hammer in order to identify weak points, which are sealed with putty or cement-sand mortar.
- The metal elements that can be obtained are removed from the wall (these can be nails, self-tapping screws, and so on), and the fittings are cut with a grinder and treated with an anti-corrosion compound.
- Before plastering, furniture and other surfaces are also covered with foil.
 Preparatory work before plastering
 Marking
First, you should check the walls with a building level and find out the deviation, for this you need to apply it to different parts of the surface horizontally and vertically. After that, you need to find all the bumps and depressions, applying the rule to the wall. Mark these defects with a marker or pencil. If the deviations are more than 3 cm, it is necessary to remove the bumps with a grinder, and fill the cavities with putty.
Now you can proceed directly to the marking for the paint beacons. You should start from the corners of the room, stepping back 30 cm from them and drawing straight vertical lines from ceiling to floor. Then step back 160 cm from the drawn line and draw the next one, and so on to the end of the wall. After that, you need to decide on the length of the beacons. It should be borne in mind that you should step back 15 cm from the floor and ceiling and mark these points. Holes are drilled at the points and dowels with self-tapping screws are installed.
 Marking rules for plaster beacons
 Then the cord is pulled from corner to corner horizontally - at the ceiling and floor. The result should be two parallel lines. The cord will cross the rest of the vertical lines, markings should be made at the intersections, holes drilled and dowels installed without self-tapping screws. As a result, you should get two rows of holes going exactly along the same line.
Primer
This stage is mandatory, since the duration of the operation of the future surface depends on it. The primer increases the adhesion of the wall, so the plaster will stick better and longer on it, in addition, primers can serve as an antiseptic, improve surface ventilation and serve to remove dust. Deeply penetrating compounds are used for finishing brick walls or surfaces made of aerated concrete, for smooth ones you can do with "Betonkontakt".
The selected primer is poured into a paint container, and a roller or brush is dipped into it, then the tool is squeezed against a special surface on the container and the entire area is treated. After applying the first layer, you need to wait about 2-3 hours, then repeat the procedure and leave the walls to dry for 10-12 hours.
 The priming process improves the adhesion of the plaster to the wall, which means the coating will last much longer
Lighthouses are installed using the following technology:
- First, the upper self-tapping screws are screwed into the holes, after which a rule is attached to one of them and they check how deeply the lower self-tapping screw needs to be screwed in so that a straight vertical line forms between their caps. You can also check this by making a plumb line from the top self-tapping screw. Thus, all fasteners are checked and adjusted.
- Then you need to pull two diagonal lines between the heads of the fasteners, then put a lighthouse under them and hold to check if the lighthouses will subsequently protrude. If the product clings to the thread, you need to double-check the level of the screws. Next, you should pull the cord between the upper and lower fasteners and also check them with a beacon.
- Now you need to calculate the distance between the upper and lower dowels and cut off the beacon profile so that it retreats by 5 cm on each side.
- After that, prepare some plaster according to the recipe given by the manufacturer on the package.
- Then they collect the solution and apply it to the wall along a vertical line, after which they take the cut off beacon and press it into the solution so that it is at the same level as the caps of the screws. This operation is best done with a partner in order to simultaneously press the beacon from above and below.
- At the end, you need to check the correctness with the level and remove the screws from the wall.
- Thus, profiles should be installed along all marking lines and the mixture should be allowed to harden.
VIDEO NEW: preparation of walls for plastering and installation of sinks
We will talk about how to properly apply the plaster solution further.
Plastering of walls
We will consider the application of material to the wall using the example of a gypsum composition.

Areas in the corners, near the floor under the ceiling, remain untreated. The technology of gypsum plastering of walls implies their finishing after the main area has dried.
Decoration of corners and areas near the floor and ceiling
The application of gypsum plaster to these areas is very quick. It is recommended to start from the ceiling. Before applying the plaster to the remaining surfaces, again prepare a solution of the same consistency as for the main area of the walls. The solution is collected on narrow spatulas and gently stretched. If you get a small overlap, it's okay, then you can grind it with sandpaper. In the same way, the area near the floor is trimmed.
The plastered wall element is leveled with the same rule, cutting off the excess material. The corners are made using the same technology, but the perpendicularity of the walls is constantly checked with a square. Instead of lighthouses, the finished wall surface now serves as a reference point.
 Checking the perpendicularity of walls using a square
 At the end, you need to check the surface for cracks, if any appear, you should seal them with a liquid solution and level it with a rule. You also need to check the coating with a level, if there are differences of more than 1 mm, they are removed with the sharp edge of the trowel.
After that, the lighthouses are removed from the wall, and the resulting grooves are sealed with a solution, the plastered area is leveled. Then the seized surface is treated with sandpaper. Plaster plaster does not require finishing.
This completes the gypsum plastering. It remains only to wait for the coating to gain strength, after which it can be used. The required time is indicated by the manufacturer.
Plastering walls is a fundamental process in any renovation. If you have smooth walls, then even cheap furniture will fit harmoniously and adhere to walls and corners without gaps. If you have already decided on the choice of plaster and calculated the required amount of material, then let's talk about the preparation and the plastering technology itself.
What tool to plaster the walls
I will mention the main tools for manual application, and we will talk about them. And so what we need:

| Tool | Description |
|---|---|
| Rule, cutter | Aluminum long tool for leveling plaster on the surface (see pictures below). It comes in different lengths up to 3m. Usually, for indoor repairs, we need 3 cutters of different sizes (1m 1.5m 2.5m), if there are hard-to-reach places, then you can cut it to any desired length. |
| Level | It will be needed to detect deviations from the horizontal or vertical level of the surface, to set beacons, to check the finished wall, to set corners, etc. you can use both a bubble level and a laser level (will speed up the process). |
| Spatula and trowel | For applying material to the surface. We need a smoothing trowel with an average length of 30-35 cm.spatula 10 cm |
| Trowel, trowel | It will be needed for sketching the material. Has different shapes and types. For pouring mortar, a drop-shaped "drop" trowel is usually used, but often craftsmen also use square, bricklayer's trowels. A matter of taste. |
| Roller and bucket and brush | For priming and wetting surfaces. |
| Polyurethane grater | For finishing grinding of cement and lime composition |
| Trough, container for mixing and water | For kneading, you will need a trough with a volume of 40 liters, and a bucket of 10-15 liters for water, and preferably 2 buckets, because you will need to wash a mixer or a whisk for kneading in one. |
| Mixer, whisk | Without a construction mixer or something similar, I do not recommend starting such a process as plastering walls at all. |
| Covering film, masking tape | To cover window sills, doors, windows, radiators, or simply to paste over adjacent walls. |
| Plastering bucket | If there is no skill, then it is better not to take it into your hands. We will talk about how to plaster walls with this tool in another article. |

Preparing walls for plastering
Plastering the walls with your own hands means preparation. Any finishing begins with preparation, the better the surface is prepared, the less chances that you will have cracks or pieces of mortar falling off. Below we will consider different options for preparing walls and features of plaster. Let's start with a primer and what it is.

Padding
The preparation may include different stages, it all depends on the condition of the surface. One of the most important stages of preparation is (I devoted a separate article to this). It can be of several types, but we need a maximum of two:
Deep impregnation primer - Liquid formulation, sold in cans, yellow or white. Often concentrated, therefore dilution is required in the proportion indicated on the canister. It is applied with a brush or roller, penetrates the surface and holds small particles both outside and in the depth of penetration.

Sand primer, putz primer, concrete contact - Primer designed for better adhesion of smooth, concrete surfaces. It contains quartz sand. Mix well before use. It is advisable to pre-prime the surface with deep-penetrating soil. It is applied with a large brush in different directions. After application, it is required to wait for complete drying, preferably a day.


General preparation
We remove the old wallpaper, everything that rings, does not hold well, falls off. Do I need to be primed? You need to prime any surface before plastering or putty. If you have a well-prepared surface, this is a third of the success.
Dismantling old plaster
If you need to level the old walls, then initially you need to tap it, perhaps you need to beat off poorly adhered pieces of the old mortar or even knock it all down. We'll talk about how to shoot down a little below. Then we remove dust from the surface as much as possible and primer deep penetration with soil. waiting for the primer to dry completely.
How to remove old plaster? how to fight off? For this we need:
- Rotary hammer with paddle attachment
- Hammer
- Respirator, gloves, headphones
- Garbage bags

Plastering of walls usually takes place in several stages, one of them is the preparation and dismantling of the old coating. We begin to beat off the layer of solution from the places where it best leaves, falls off. If a conventional rock drill does not cope with its task, then you need a large powerful hammer drill (you can rent it for a day) and things will go much faster. When everything has been recaptured, we remove dust from the surface, or we vacuum it, or we sweep everything from the surface. We collect the broken off garbage in bags and take out. After we have managed to remove the old plaster and collect all the debris, we prime the surface with deep-penetrating soil, preferably 2 times.

Preparation of different surfaces
Again, different surfaces are prepared a little differently, that's the whole difference. As much as I would not like to write the same thing, but demand generates supply.
Aerated concrete, gas block, foam block
We clean with a spatula (35cm) from excess glue, poorly adhering particles. Not sparing the primer, we saturate the wall with deep penetration soil. How to plaster the foam block inside and outside? Inside, you can plaster both gypsum and cement. But outside, only with cement plaster, having previously reinforced the surface with a facade fiberglass mesh. Plastering walls with your own hands from gas silicate blocks is carried out in exactly the same way as on other surfaces.

Brick
The protruding mortar, protruding bricks are beaten off with a hammer and everything is also primed. The whole difference in plastering bricks and other surfaces is preparation, although the preparation all comes down to the fact that we remove, beat off the excess and prime it well. The plastering technology is the same as on other walls, read the chapter on technology below. If the brick is chipped off, or there is a large gap between the ceiling and the walls, then it is better to close up such gaps of the brick with a cement-sand mortar 1: 4 (sand-cement). Such a masonry mortar has much better bearing characteristics than a plaster mixture.

Arbolite plates
Preparation and plastering of wood concrete slabs is carried out in the same way as on brick surfaces.
Panel house, concrete walls
All excess is removed from the concrete surface. We make a thorough cleaning, if the walls are plastered with gypsum plaster, then the concrete is primed with sandy soil or concrete contact. If it is cement, then it is simply primed. waiting for the primer to dry completely. And only then the solution is applied.
Wooden surfaces, SIP panels, OSB (OSB), Plywood
Such surfaces are NOT PLASTERED! They are initially flat and must be mounted level and flat, so there is no OSB and plywood plastering technology. Large drops can be smoothed out with special compounds, having previously sanded the surface and gluing all the seams with serpyanka tape. Then the entire surface is pasted over with a reinforcing fiberglass mesh, but only then large differences can be leveled with specially designed mixtures.
Whitewash
Is it possible to plaster on whitewash? no, you can't, you need to thoroughly wash off the whitewash, if possible, make it with a notch with a hatchet or a perforator, and then prime it 2 times, wait until the soil layers dry.
How to prepare a solution
And so, we knead. First, clean water is poured into the bottom of the trough or bucket, for each type there is a different amount. Gypsum plaster is mixed exactly as it is written on the package, usually this proportion is 2: 3 (water-plaster). The technical characteristics of the VOLMA mixture indicate that 18-19 liters of clean tap water will be required per 30 kg of dry composition. For the convenience of work, we make a batch of medium density so that it fits well on the spatula, but does not drain. Wait 2-3 minutes and mix again. The solution is now ready for use.
Never add water to the solution after mixing. It is allowed to add a little dry mixture if the solution came out very liquid, but do not add water if it came out thick. It is allowed to stir once if the solution began to thicken, but you do not have time to work it out.

For cement plaster, you need about 1: 5 in the technical characteristics of the LUX dry mix, it is indicated that you will need 5-5.5 liters of water per 25 kg bag. and in the process of mixing, add either a little water or a little free-flowing mixture so that it is convenient to work with the solution (not very liquid and not thick). It all depends on the brand and manufacturer, a different amount of plasticizers and cement in a solution requires a different amount of water. After kneading, wait 5 minutes, mix again. Ready for use, it remains to figure out how to plaster the walls, but more on that later.

You need to add a little less water to lime plaster and gradually, it has strange properties when mixed, it can become very liquid if you mix it for a long time, so the main thing is to observe the proportions for preparing the solution (lime-cement) 1: 5, and add water in fact and little by little. Sometimes lime is frozen or already damp, so we regulate the amount of water ourselves. I also recommend adding a little liquid soap to each batch, or dishwashing detergent (just a couple of drops), the soap will play the role of a plasticizer and prevent the solution from squeezing out water. The solution will dry evenly and the smell will be pleasant.

Lighthouse plaster
I devoted a separate article to this chapter - "Plastering walls on lighthouses". There is a detailed description of the method of displaying beacons.
Plastering technology, stages of wall plastering
If we managed to install beacons and it worked out well, then the rest is a matter of skill. And so, what we have, but we have a well-prepared wall with exposed beacon profiles. You could call this chapter “lighthouse alignment”. We mix the solution, I wrote about this above. Here is a quick guide to plastering with your own hands.
Application and plastering technology:

Finally, talk about how to plaster walls with your own hands. Let's start in order.
- We smear the wall with a thin layer of mortar
- We throw the plaster mixture onto the wall with a trowel (trowel) evenly without gaps. We start work from the bottom up. Throw in so that the solution goes beyond the plane of the lighthouses
- We use the rule to pull the solution from bottom to top (not in one movement, but smoothly at a low frequency moving left and right), do not press on the rule, just touch the lighthouse profiles and move it upward along the vector.
- We send the removed plaster up to the wall or back to the trough.
- After the wall was thrown and pulled down, all the fallen mixture and debris were removed, we are waiting for everything to dry.
- We pull out the lighthouses, close up the resulting grooves, wait for them to dry
- We wet the wall with water (using a roller)
- Apply a thin layer of plaster with a 35cm trowel (the solution is slightly thinner than it was)
- We tighten the rule in different directions, in priority diagonally and vertically, remove as much of the applied composition as possible, but do not press hard on the rule so as not to deform it.
- If the finish is gypsum, then we simply remove the excess well (we drag it in all directions with the rule) and wait for drying, after that we go through with a spatula and remove the excess drops and slugs
- If we work with cement, then while this layer is still a little damp, moisten it with water and grind it with a polyurethane float,
- If lime plaster, then it is not smeared at first, but immediately thrown over. removed by the rule and after removing the lighthouses, it is advisable to drag the cement mixture (with a thin layer). And grind everything using cement technology.


Do-it-yourself finishing plastering of the walls, grinding the walls
The cement plaster is rubbed with a special grater for grinding. There are foam graters, polyurethane graters and felt graters. The first two leave the same rough circular motion effect. Felt more pleasant sand effect (if you need to prepare it for painting) Finishing plaster means grinding. This sanding of the wall is done until the surface becomes an acceptable, neat look.


Reinforcement of plaster
Do you need mesh for reinforcement? the surface must be reinforced with large layers, starting from 2 cm. Reinforced with a special mesh:

- polymer mesh
- galvanized mesh
- metal grid
- nylon mesh
- fiberglass mesh

I would like to note a fiberglass mesh, it is more convenient for it to reinforce all small layers from 2-3 cm. It can be reinforced like a plaster mortar, it is imperative that it be in the center of the layer. Or you can use cement glue for a reinforcing mesh, which is also not a bad option. After reinforcement, the mortar can be applied for another 2 cm.

If the layers are huge, then a galvanized mesh (mounting mesh) is stuffed, it is fastened with dowels with plastic washers so as not to rust. After stuffing the reinforcing material, a layer of liquid plaster should be thrown over the mesh so that the solution penetrates and envelops the reinforcing material after drying, you can continue to throw the main layer. The maximum thickness of the mortar layer with the reinforcement of the galvanized mesh is about 5-6 cm. The thickness of the mesh should not exceed the standards indicated on the packaging.
Corner plaster
At the stage of exposing the beacons, the outer corners are exposed, I recommend immediately installing the perforated painting ones (the main thing is to buy hard ones). detailed technology for setting the corners, I will tell in another article.

The outer corners should be used as an additional beacon, and it should be set flush with the rest of the beacon profiles. We form the inner corner as a rule during the alignment of the adjacent walls. The main thing is that the edge of the rule is not blunt, but cut through the corner until it is sharp. Further, the corner is formed at the grinding stage (if it is a cement composition). To make even corners, you need a polyurethane float and it should not be dull, but with a good right angle, you can even make the angle sharper (you can sharpen it with sandpaper). If you have an even corner, then the plaster of the walls looks smoother, even if the plane is a helicopter.


How to repair a crack with plaster
As easy as shelling pears, let's start by preparing the crack. We sew a crack with a spatula or trowel, if it is deep, you can embroider it with a hatchet. Dust the crack, prime it. After complete drying, we cover well with a solution. when the solution dries, it will shrink, so you can re-spread it with a thin layer and rub with a polyurethane float.
Gypsum plaster without putty under the wallpaper
There is a way to prepare gypsum plaster for wallpaper bypassing 3 layers of putty, but this takes practice. Now I'll tell you everything:
- pour water, mix the solution, let stand for 2-3 minutes, mix well.
- lighthouses on display
- plaster
- leave a little solution in the bucket
- wait 30 minutes
- we remove the lighthouses, we close up the rest of the groove solution
- wait 15 minutes
- drag the entire wall with a trapezoidal rule
- after another 15-20 minutes, moisten the surface with water and rub with a spongy float (in a circular motion)
- wait until the surface becomes matte
- smooth everything down with a 35cm hard spatula

The entire surface is ready for wallpaper, a little less effort is spent than on putty and time is saved. But personally, I support the option with putty, it turns out to be of better quality, in my opinion.
Plaster without beacons
If you do not care about the evenness of the walls, their level and the error of unevenness, then you can plaster the wall without beacons. This method will take you twice as long as with lighthouses. such technology does not bring anything good in the future, especially high-quality, aligned walls. If there is no proper skill, then it is better not to take it, but for those who do not see other options, then I will tell you about this method. How to properly plaster walls without lighthouses is not realistic to teach in words. You need to understand very well the curvature of the plane and what you are doing. In other words, everything is done by eye:
- Apply with a trowel (if a small layer)
- If it is large, then we throw it with a trowel (trowel)
- We tighten the rule from bottom to top horizontally, then vertically
- After drying, you can comb everything that turned out crooked with a metal rule.
- If there are a lot of pits, then apply the solution and pull it off again in different directions.
- Then rub with a plastic or polyurethane float.
How to plaster the walls of the facade
Facade wall plastering does not differ much from indoor technology. The difference is in the size of the walls, and the uselessness of lighthouses. The corners of the corners of the building and the corners of the window play the role of beacons on the facade of the cottage. Here we will pull the plaster along these corners. I will immediately answer the question, "which plaster is better for the facade?" We use exclusively cement, it can be special for facades, or it can be universal. It is impossible to plaster the facade with gypsum materials! Lime plaster is allowed to work only on the basement of the building, where there are large drops and high humidity and serious reinforcement is required (although there are different cases, and many where this is not required).
The surface of the facade must be prepared. if your house is insulated, then it should already be marked with a reinforcing mesh. All front corners should be exposed and all primed and dried. Now we mix the cement composition of the usual consistency (so that it spreads well), we work, preferably in cloudy weather, so that the solution does not dry out.

Apply the mortar to the facade with a thick layer of a 40-50 cm long trowel. We pull together everything that has been applied to the corners with the rule, the longer, the better. If there are no corners nearby, we pull together large pits and smooth them with the bulk of the solution. wait until it dries up a little and rub it with a foam float (40-50cm long).
If you ask the question “is it possible to plaster in frosty winter?”, Then the answer is definitely no! Even if there is a special plaster for working in frost, I personally do not recommend working outside in winter, at 0 degrees it is also impossible to plaster. after thawing, everything can fall off and lose its properties. Plastering is possible after +5 degrees, in any case it is written on the bags. But at night the temperature can drop lower, so do not take risks, but carry out the work in good weather. Do not plaster in direct sunlight.
How to plaster the walls in the bathroom
Plastering the walls in the bathroom should be done exclusively with cement mortar, no need to bother with lime, etc. "Can gypsum plaster be used in the bathroom?" - Gypsum can not be used in rooms with high humidity. Therefore, we take any cement plaster and perform all the same operations as described in the chapter on how to “plaster the walls along the lighthouses?”. There are certain nuances in the bathroom if you plaster under good tiles and make good repairs.

Firstly, for high-quality repairs for tiles, it is imperative to plaster and do it along the lighthouses. It is necessary to observe the geometry of the room, especially where there will be a bath or shower. for this you need a large square (corner) and the lighthouses need to be set so that there are 90 degrees in each corner. Often there are a lot of disputes and questions about this, because it is in the setting of angles of 90 degrees that large layers appear. There is only one way out - to plaster!

Do not skimp on the geometry of the room, the tiles are square, it will show all the errors in the bathroom. It is unlikely that you will want to give a lot of money for tiles and a bathroom, and saving on plaster, you will get ugly wedge-shaped tile trims and huge gaps between the wall and the bathroom. I hope I answered the question of how to plaster the wall in the bathroom under the tiles, etc.

Plaster for different types of finishes: tiles, wallpaper, putty, painting
Any leveling of walls with plaster begins with surface preparation. Here I will tell you the main nuances of preparation for different finishing.
Tile plaster
I told about the bathroom, but the same situation awaits us in the kitchen, when leveling the working area under the tiles. I emphasize again, do not save on the amount of solution, while observing the angles of 90 degrees, especially in the bathrooms and the kitchen. In the kitchen, it is also advisable to plaster with cement mortar according to the norms. Practice shows that cement-based glue adheres better to cement plaster than gypsum, in general, gypsum and cement mix poorly contact and exfoliate (I repeat). Practice shows that the working area in the kitchen under the tiles can be plastered, for example, with a rotband knauf, or VOLMA, nothing has fallen off or cracked over the years. However, high humidity can lead to the spread of mold behind the sink. the choice is yours. Before laying the tiles, the surface is well primed.


Wallpaper plaster
A common question that arises among people who have started repairs is "how to plaster under the wallpaper?" The answer is simple, just like any other wall under any other type of finish. Plaster is a rough leveling of the surface, and preparation for finishing is already a function of putty. We putty 3 times, grind and voila, the wall is ready for wallpaper. Before gluing the wallpaper, we prime the surface well. If plastering of the walls for painting is required after the wallpaper, or rather, if the wallpaper is painted, then special attention should be paid to the abutment to the ceiling. The smoother the abutment, the neater the painting will look.


Plaster for painting
And how to prepare and plaster for painting. Plastering walls for painting is not a very good solution, of course, unless you mean the following. Although, in repairs with brick restoration, it goes well. It is enough to grind the cement trowel either with a polyurethane trowel, or with a foam plastic (for a rough effect). Or you can grind it with a felt trowel for a finer texture of grinding. The most acceptable option for grinding for painting is a balcony and a loggia, there it is very useful. Gypsum can be prepared both for wallpaper and painted. In my opinion, plastered walls should be putty for subsequent painting.


If you need high-quality painting, then here are all the stages of preparing the wall for painting - the order of work:
- plaster
- 2 layers of putty
- grind
- primed
- we glue a cobweb, or fiberglass
- 3 times of finishing putty
- grind with fine emery
- ready))
Mechanized plaster - pros and cons
A few words about mechanized plastering. Mechanized plastering of walls implies the use of all kinds of equipment. This article is about DIY plastering, so I won't write much about it. There are many types of equipment: a plastering station, a powerful compressor in which a special gun is used, or special plastering machines on rails.

Of course, there are a lot of advantages in using technology, it is speed, huge output. But the disadvantages are that if you plaster apartments, then this is not such a huge amount of work in which you can use a plastering station. It takes longer to wash it than to plaster an apartment. A compressor with a special gun (hopper) is a more suitable option for apartments and small cottages. But you still have to knead the solution manually and, accordingly, tighten it with the rule. One of the advantages is the speed of application, but you still have to sweat. There is also such an apparatus as a "hand-held plastering machine", but this is a completely different story, which is used in decorative coatings. In general, the thing is quite funny, I would not get involved with this.

So we figured out how to properly plaster the walls in theory, everything else will come with practice. We ask all questions in the comments.
How and with what to plaster the walls?
When carrying out measures for the overhaul of a residential or industrial premises, the need to eliminate irregularities and ensure flatness inevitably arises. Knowing how to plaster walls, you can do the work yourself, while saving financial resources. It is important to choose the right type of mixture, to deal with the technological subtleties, to study the techniques of working with the tool. The recommendations given in the article will help you to perform the work correctly, ensure surface quality and avoid unforeseen mistakes.
What plaster is better to plaster the walls
The implementation of finishing activities requires professional training and requires a qualified selection of materials. It is advisable to entrust the selection of the plaster composition and finishing to specialists. When performing activities on your own, it is important to study, before mixing the components and plastering the walls, the best finishing work.

Depending on the specifics of the work, various types of working mixtures are used for plastering. Consider the types of formulations used:
- sand-cement. It is used when it is necessary to apply a thick layer of plaster on the outside or inside of buildings. The mix is made from available ingredients that, at an affordable price, provide improved finish reliability. The preparation process is pretty straightforward. It provides for mixing Portland cement with river sand, with the gradual introduction of water to the required consistency. Depending on the brand of cement, its ratio with sand ranges from 1: 2 to 1: 5. A feature of the cement-sand composition is a long hardening period, due to which the mixture can be prepared in an increased amount. This makes it easier to finish finishing on larger areas. The ready-made mixture can be purchased in specialized stores, then mix it yourself according to the recipe indicated on the package;
- gypsum-lime, as well as gypsum-clay with the addition of lime. They are used to ensure the flatness of wooden walls, as well as to carry out finishing activities from the interior of the premises. The preparation technology involves mixing gypsum and lime in a ratio of 1: 3 with the addition of clay to improve bonding. The gypsum composition is prepared in a separate container with water, into which gypsum is quickly poured and thoroughly mixed. It remains to add the dissolved lime - the plaster composition is ready. A feature of the gypsum composition is fast hardening, a reduced coefficient of thermal conductivity, and increased adhesion. Disadvantages include susceptibility to increased moisture concentration and the need to prepare small portions due to accelerated hardening. Gypsum plaster hardens within 7 days with a layer thickness of up to 5 cm;

The better to plaster the walls depends on the wallet of the owner of the house, as well as on the characteristics of the room in which repairs are required.
- calcareous. Lime-cement is prepared from cement, lime paste and sand in a ratio of 1: 2: 7. The sand is mixed with dry cement with the introduction of lime "milk" and the addition of water. Clay-lime is prepared by combining lime dough with clay with the gradual introduction of sand. Clay dough in a liquid consistency, lime mortar and sand are mixed in a ratio of 1: 3: 5. Sand and lime plaster provides for the addition of 1 to 5 parts of sand to one part of lime. The consistency of the sand-lime mixture must be pasty. The mixture should adhere slightly to the working tool. Using lime-based plasters, you can significantly reduce the concentration of moisture in the room, which contributes to the formation of dampness, as well as insulate the walls.
The final decision, the better to plaster the walls when performing finishing activities, developers take individually, depending on the following factors:
- building material;
- humidity level;
- availability of ingredients;
- financial capabilities;
- timing of activities;
- assigned tasks.
Each of the presented finishing compositions has its own advantages and disadvantages, which should be paid attention to when solving the problem of choice.

Cement-sand mortar. Can be used for leveling internal and external surfaces
How to plaster walls - tools and application rules
Every homeowner wants to have high-quality plastered walls in the room after finishing the finishing activities. This is achieved by using a professional tool, following the technology.
Initially, you need to prepare a tool for performing work:
- a medium-hard steel wire brush used to ensure surface cleanliness;
- chisel-like serrations with a serrated working portion that facilitates the application of grooves to improve adhesion;
- falcon, which is a square shield with a handle, which is used as a platform for plaster;
- a spatula designed for mixing the plaster composition and applying it to the surface, followed by grinding;
- a half-trowel, which is a platform up to 1 m long with a handle, which facilitates leveling the plaster composition;
- a grater used in finishing operations to facilitate sanding and final finishing;
- a rule in the form of a strip made of wood or metal up to 2 m long, designed to ensure the flatness of the applied layer;
- plumb line or building level, facilitating control of the performance of work in the horizontal and vertical plane.

Anyone can learn how to plaster walls, although it will be more difficult for a beginner to do this than for a professional plasterer
After preparing the tool necessary to perform the work, you should study the technological sequence of operations. Standard finishing technology includes the following steps:
- Preparatory work to ensure the cleanliness of the treated surface and improve adhesion.
- Installation of guides (beacons), which are a guideline for ensuring flatness.
- Application of plaster and preliminary finishing, forming a finishing surface.
- Removal of guide elements with filling of cavities with cement and preliminary grouting of the surface.
- Finishing, which is carried out on the hardening solid and is cyclically performed with radial movements.
Each building object has its own characteristics, in accordance with which the developer determines the appropriateness of the implementation of certain stages. Let's dwell on the main technological points.
Getting ready to plaster the walls: how to ensure adhesion
Prepare the surface for plastering according to the following algorithm:
- Inspect and clean the walls with the obligatory removal of plaster residues, sagging, greasy stains, fasteners and dirt.

If you find impressive cracks or any other mechanical damage on the wall, then they must be expanded and then cleaned of the existing sand
- Seal cracks and crevices in brick surfaces that impair sound insulation and increase heat loss.
- Treat the work area with a deeply penetrating primer that inhibits moisture absorption, providing improved adhesion.
- Perform 3mm notches on a smooth surface with a percussion method using a gear, followed by cleaning the wall and moistening it.
- Stuff on a wooden base a diagonal lathing or a mesh-netting, and, if necessary, reinforce with a plastic mesh.
- Prepare a working composition for plastering in the required volume, choosing the appropriate recipe.
After completing the surface preparation, you can start applying the mixture.
Learning to plaster: how to apply the mortar correctly
Carry out the operations for applying the plaster composition, observing the following sequence:
- Check the readiness of the instrument and the consistency of the mortar.
- Moisten the foundation slightly until moisture is absorbed.
- Draw up a portion of the mixture that will fit on the surface of the falcon.
- Take the mortar with a plastering trowel and scatter it over.
Self-construction and repairs require a careful approach to the implementation of the plan. One of the common topics is,how to plaster walls with your own hands. Video for beginnerwill help you cope with the task at hand. Additionally, we suggest that you familiarize yourself with the theory of work execution technique.
In contact with
Why are these events needed?
Plastering of walls in the general composition of the design of the room is not visible, but without it it is impossible. The presented technique is necessary to insulate the building and protect it from the influence of the external environment. Moreover, plaster can provide an excellent fire protection as modern building materials cannot prevent rapid ignition.
Considering the plastering of the walls, the following points of the need for the process can be distinguished:
- With the help of a layer of plaster, "rough" walls and ceilings are leveled, which are then simply painted or whitewashed.
- During the construction of houses, seams of partitions are formed, you can find numerous, albeit minor, but masonry defects. This can be easily eliminated.
- The main task of plastering for a simple layman is the preliminary leveling of walls for decorative work - gluing wallpaper, painting surfaces.
The main types of mixtures and their preparation
DIY plastercarried out by dissolving ready-made mixtures purchased in hardware stores.
The choice of products is huge, so you need to know exactly which one is best to use so as not to provoke a collapse - yes, a poor-quality mixture or improperly applied plaster can simply move away from the wall.
This happens in the event of a mistake, or immediately after application and drying, or already after the finished wall decoration, which is typical at the time of freezing in winter. To avoid such problems, you should study all possible types of plaster mixes.
For wall decoration, gypsum and cement mortars are suitable, each of which, in addition to the main component, includes binders and minor additives that perform a particular function. Mixtures in powder form are packed in sealed bags, so their shelf life exceeds several years.
Gypsum mix
It has a low cost, but at the same time a high adhesion rate.Adhesion is the degree of adhesion to a surface and rapid curing.Due to the indicators presented, this type of finish is used to level ceilings. The composition of the gypsum mixture includes gypsum and fine sand. Sand makes it possible to achieve the smoothest, smoothest surface, so these mixtures are used to decorate walls for painting or for decorative processing.
The advantages of the gypsum mixture are as follows:
- the finished wall has good thermal insulation;
- gypsum can absorb excess liquid, and then repel it;
- plaster is great for living quarters in which a constant microclimate is maintained;
- gypsum mixture is able to prevent the spread of bacteria and fungi.
Gypsum-based plaster hardens quickly, so special substances are added to it to prolong this process.
Important!Despite its positive properties, gypsum plaster is not recommended for use in rooms with a constantly changing microclimate. These include bathrooms, private verandas.
Cement mix
 It is based on cement, but for better adhesion and quality of laying, sand or crushed limestone is used.
The sand can be coarse, it all depends on the amount of added limestone and cement in general.
Plastering the walls can be carried out with other compounds that are easy to make yourself. The proportions of the mixtures are presented in the table.
If there is no exact data on the mixing proportions of the basic substances to create a certain type of plaster, it is better to purchase a ready-made package. Manufacturers always indicate the features and characteristics of their products.
Pre-priming the surface
Having decided how to plaster the walls, proceed to surface priming - a procedure that allows you to further reduce the absorption of moisture by the plaster.The primer is carried out with special compounds that prevent the growth of fungi and bacteria on the wall.It is designed to improve adhesion, whereby plastering walls with your own handswill be more thorough.
For the primer, special dry mixtures are used, which are diluted with water in the proportions indicated on the packages. Then the following is done: 
- The roller is wetted in a special diluted primer.
- It is important to squeeze the roller as best as possible - the mixture should not drip.
- The wall is treated with a primer with simple roller movements - first horizontal, then vertical.
- If the primer is absorbed into the wall quickly, then you should wait until it is completely dry and prime again.
Applying plaster to the walloccurs only after it has completely dried - sometimes you have to wait 1-2 days for this. Of course, a preliminary surface preparation procedure should be carried out before priming.
Surface preparation
The only thing DIY plaster ruleconsists in mandatory preliminary preparation. This procedure includes 3 main processes - surface cleaning, wall marking and priming. The presented technology impliesdo-it-yourself plastering of walls on lighthouses.
The preliminary work is carried out in several stages:
- To begin with, you need to get rid of large defects on the wall - often these are large cement leaks that arise due to improper laying of bricks, foam blocks and other building materials. If there is paint or decorative plaster on the walls, it must be knocked down.
- Then the entire wall is tapped with a hammer - this provides shedding of weak points, which in the future will prevent a new layer of plaster from cracking or peeling it off the surface.
- If there are metal elements on the wall - nails and screws - they are removed. In the presence of fittings, use a grinder. It is better to treat the remaining parts with an anti-corrosion compound.
- DIY plastering workthey are necessarily carried out with a large spray of diluted compounds, so it is better to cover the furniture with polyethylene.
- Next, the walls are checked with a building level to determine the presence of deviations. All places with depressions and other irregularities are marked with a marker.
- If there are dimples more than 3 cm, they must first be sealed with putty. If there are bumps, use a grinder to maximum alignment.
- 30 cm recede from the corner and draw an even vertical line using a building level. Further, they retreat from the line 1.5 m and draw another line.
- On all surfaces of the walls from the floor and ceiling, 15 cm recede along the drawn line and a hole is drilled. A self-tapping screw is screwed into it.
- Now you should pull the thread from corner to corner on the self-tapping screws - you get 2 horizontal lines on each wall. These lines will cross the vertical ones. At the intersection, marks are made and holes are drilled for dowels without self-tapping screws.
- Next, proceed to the priming procedure, which was described above.
 Lighthouses help to track the thickness of the applied layer of plaster mixture.
With their help, precise leveling of the treated surface is carried out.
This significantly speeds up the process of work, and also makes it of high quality.
Lighthouses are purchased ready-made in hardware stores.
These are metal layers that have a mark that determines the thickness of the plaster layer.
Materials (edit)
Process, how to plaster a wall,depends on its type - from what building materials it is built. Let's take a closer look at three types of walls:
- Brick - for them, cement-based compositions are used. In addition to them, lime is added to make the mixture plastic and moisture resistant. The layer thickness should not exceed 3 cm.A reinforcing net is preliminarily attached to the wall to strengthen the layer and improve adhesion - this will improvedo-it-yourself plastering of walls with cement mortar.
- Concrete - require mandatory priming with a mixture containing quartz sand and flour. For the main process, a cement slurry is used, to which gypsum or lime can be added. If the concrete has a characteristic roughness, use mixtures without additional inclusions. Adhesion can be improved by treating the wall with "Concrete Contact".
- Aerated concrete simplifies the wall decoration procedure. To begin with, you should treat the surface with a deeply penetrating impregnation, and then plaster it using solutions - gypsum, lime or concrete.
Attention!In hardware stores, a huge number of all kinds of mixtures are offered, which contain different compositions intended for processing a particular surface. The packages indicate the characteristics, methods of dilution: the contents are simply poured with water in a certain proportion, which is also indicated on the bags. If you follow the instructions, then there will be no problems with diluting the mixtures.
Using cement mortar
DIY brick wall plasterwith the use of cement mortar, it begins with preliminary surface treatment, which was described above. As soon as the preparation for the installation of beacons is over, and the walls are primed, you can proceed with the following activities:

- Self-tapping screws screwed into the upper holes are the starting point for working with the rule. The rule is applied to the self-tapping screws so that a vertical line is formed - this will be a level indicating to what depth the self-tapping screw will have to be screwed in from below.
- After that, 2 diagonal lines are pulled between the hats of the fasteners and a lighthouse is placed under them. If it touches the thread, it means that they check the level of the screwed in self-tapping screws. As soon as everything is aligned, start pulling the cord between the upper and lower self-tapping screws.
- Next, the lighthouse profile of the required length is cut along the vertical line of the location of the screws and an additional protrusion of 5 cm on both sides.
- Then a line of plaster is laid out with the prepared solution along the marked vertical line. The lighthouse is pressed into the cement to a depth, in accordance with the located screws.
- The location of the beacons is checked with a level and self-tapping screws are removed.
- After waiting for the solution to dry on the wall, proceed to the complete plastering of the walls using the "Spray" method.
- If the wall is concrete or brick, its surface is preliminarily moistened with a roller or sponge.
- Then, with a spatula, they begin to throw the solution onto the wall from bottom to top. For beginners, this technique will cause difficulties, but it is easy to cope with them through training, which takes no more than 10-15 minutes.
- If the cape of the solution does not work out, you can use a simple method - pour the mixture onto a wide spatula and gently transfer it to the surface, gradually stretching the amount into an even layer.
- Having applied the plaster first to a small section of the wall, take the rule and, setting it perpendicular to the beacons, begin to draw a line in zigzag movements from the bottom up. This will help cut off excess solution.
- When working with the rule, bubbles can form - these areas must be cleaned of the mixture, and then apply it again, carefully leveling the wall.
- Next, the rule is to draw an even vertical line again - in this way they do it at least 5 times, achieving a perfectly flat surface. \
Advice! Plastering the corners of the walls with your own handscarried out quickly with a small spatula. They apply a solution and gently distribute it as evenly as possible with the main canvas. If there is a bump, it is sanded with sandpaper after the solution has dried. The corner is formed with a square.
What is grout
Grout is DIY finishing plastering of walls, which is designed to remove small errors on machined surfaces. Grouting is carried out with special brushes, similar to sandpaper. Grouting should be carried out immediately after the plaster layer has set, but before it is completely dry. The grater is pre-moistened with water if the solution is completely dry.Wear a respirator before work, as a lot of dust is generated during the process.
The grout can be dry or with mortar. If a method of grouting with a solution is chosen, then a plaster solution is first made - thinner than used for the main process. The solution is grated in small quantities and the surfaces are leveled.
The above question was considered in detail,what is needed for plastering walls, as well as all the nuances of independent work with the condition of certain existing features. Subject to the recommendations and rules, there will be no problems with an independent surface finishing process.
Unfortunately, the quality of their finishing is often such that it is impossible to either stick wallpaper or paint without preliminary work. Best solution in most cases. We offer detailed complete instructions on the walls with our own hands. It will help even a novice master to cope with a difficult job.
Varieties of plaster mixes
Two types of materials are used to level surfaces. Their main difference lies in the base, on which all the characteristics of the solution depend. This could be:
- cement;
- gypsum.
Quartz sand of various grain sizes, plasticizers and other fillers are added to the base, which determine the purpose of the plaster paste. So, coarse sand allows you to level significant drops, while fine sand is used only for applying the last layer, covering fine roughness.
Let's take a look at the pros and cons of each type of material.
Cement compounds
They are distinguished by their special strength, resistance to mechanical stress. They are not afraid of moisture, can be used in rooms with special conditions: kitchens, etc. They do not collapse from temperature extremes, are durable, have a low cost and can be made by hand. Even significant drops are well leveled. If a layer with a thickness of more than 20 mm is applied, a reinforcing mesh must be used.
Lime, clay, gypsum, which impart plasticity and antiseptic properties, can be used as fillers. Of the shortcomings, it should be noted a large mass of cement mortars. They give a significant load on the base, which must be taken into account. Low ductility leads to shrinkage and possible cracking. For the same reason, it is quite difficult to lay such a paste. Moreover, it does not lie on all grounds. The cement dries for a long time, completely hardens only after a month.
Gypsum mix
The main advantage is plasticity and ease of application. The paste fits well on any base and sticks to it tightly. Gypsum is lightweight. Even a thick layer of such a mass will not weigh down the structure. She never shrinks, practically does not crack. Dries much faster than cement analog. The finishing mass is so good that subsequent filling is often unnecessary.
The most significant disadvantage of the material is hygroscopicity. Gypsum easily absorbs water, soaks and breaks down. Therefore, it is forbidden to use gypsum varieties for outdoors or in rooms with high humidity. Moisture-resistant mixtures are available for interior styling, but they should also be used with caution. The disadvantages include the high cost of the material and the inability to manufacture it independently.
How to plaster walls correctly: the choice of tools and material
To make it clear to the novice master what is required to carry out the work, we list everything you need.
- , plaster or cement. We choose depending on the purpose of the room and our own skills. It is easier for a beginner to work with plaster, but it is more expensive and can only be used for dry rooms.
- Suitable primer. It is necessary to prepare the foundation.
- Beacons. Installed in case of large differences and the presence of significant irregularities on the surface.
- Long rule. If it is planned to install beacons, we choose a length of 250 cm, 200 cm will be enough to pull out the solution.
- Bubble level 200 cm long and plumb line.
- Wide spatula and trowel for applying the mixture.
- A special construction float and a metal iron to eliminate roughness.
- Bucket and perforator with a special attachment for mixing plaster paste.
In addition, you may need to fix the beacons, a tape measure for accurate marking.
Further actions will differ depending on the material with which you have to work.
Concrete
Such a base is quite smooth, in order to improve its adhesion to the mortar, it is recommended to make notches. They are performed at a short distance from each other, deepening by 10-15 mm. Then they cover everything with a primer. Given the hardness, the job will be very time consuming. Therefore, you can do otherwise: prime it with a special primer. Select a deep penetration adhesive primer.
It contains sand, which, after drying, should remain on the base. Sometimes this technique does not work well, so it is recommended to test the primer before plastering. They treat a small area and wait until it is completely dry. Then hold it with your hand. If the roughness is well felt and the sand does not crumble, the entire surface is treated. Otherwise, notches are made.
Brick
Despite the fact that it is quite rough in itself, it is recommended to walk over the cleaned material with a grinder or wire brush. The seams between the bricks must be embroidered, so the mixture can get into them, which will improve the adhesion of the plaster. Then dust is removed first with a brush and then with a damp cloth. Finally, two coats of primer are applied.

Wood
In order for the plaster mass to firmly anchor on a wooden base, it is necessary to equip the crate. It is made of slats, which are also called shingles. Elements are nailed diagonally. It is important to use only high-quality shingles, additionally treated with an antiseptic. Otherwise, it will quickly rot and destroy the coating.
To facilitate the task, you can use a netting mesh instead. It is nailed to slats that fit between the base and. They, like shingles, can serve as beacons during the alignment process. In this case, the elements are set strictly according to the level. All wooden parts are treated with an antiseptic and dry well, only after that you can plaster the lathing.
Technology for applying solution on beacons
Used to compensate for significant differences. Metal guides are used as landmarks to show how the walls are. You should not save on their purchase. High-quality metal can subsequently be left inside the base, and it will not rust over time. It is better to remove parts of dubious quality, which is rather laborious.
The guides are installed along the entire length of the wall at a distance of about 150 cm from one another. Such a distance is chosen so that during the alignment process the rule moves along two adjacent profiles. They are set strictly in level and securely fixed to the base. The easiest way to do this is to use a gypsum solution, which sets quickly and holds the elements securely. Can be mounted on self-tapping screws, but this is more difficult.
Then the plaster mortar is prepared. This should be done in strict accordance with the manufacturer's instructions. Next, they start plastering:
- Outline. We throw the mixture onto the base. This can be done manually, with a trowel, or with a special device if mechanized laying is intended. The thick paste is collected on the tool and with some effort it "sticks" onto the base. A layer with a thickness of about 5 mm is placed on concrete, and on wooden 8-9 mm. We put the rule on the beacons and pull the cover up from bottom to top, leveling it. Leave it to dry for at least 2 hours.
- Priming. Prepare a dough mixture. We apply it with a wide spatula, performing movements in an arbitrary direction, but with some effort. Using the rule, we check the alignment quality. Remove all protruding areas with a grater soaked in water. Gently rub a small amount of solution into the cavities. Leave to dry for at least 3 hours.
- Covering. We prepare a solution of a creamy consistency. You can apply it with a spatula or draw it into a bucket and pour a small amount of liquid paste from top to bottom. We smooth it out with the rule, completely leveling the base. Let it dry for 8 hours, then slightly moisten and clean it with a construction float.
Plastering yourself is not so difficult, even if a novice master takes up the job. Skills are developed in the process. Before taking on the finishing, it is advisable to practice in a small area. So you can identify all the "weak" spots, work with them, get the necessary skills and a little experience.
