The attic is gaining more and more popularity - an additional room that is located near the roof. After all, such usable space It is a pity to use for storage of unnecessary things. But, if done correctly attic space, then it is quite suitable for receiving guests, a relaxation room or a gym.
What is included in this finish? How can I sheathe an attic room and how to do it? Let's find out.
Attic projects
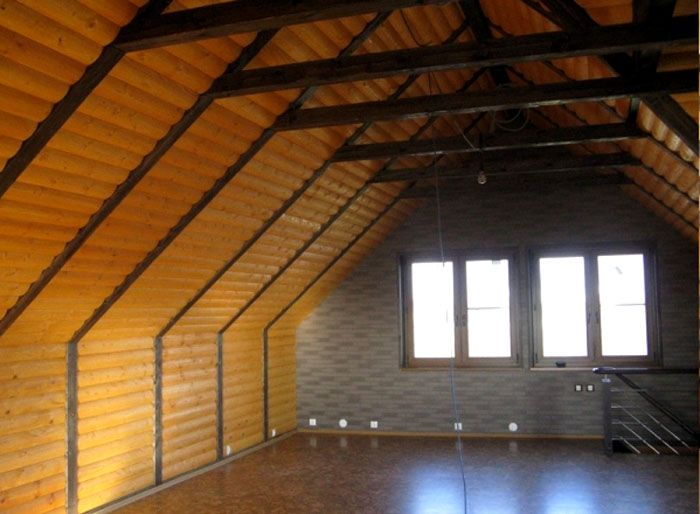
To begin with, I would like to note that your attic can be made in different variations. It's about O inner space. Most developers, when planning an attic project, tend to maximize free space. Sometimes the owners don't even hide truss system, leaving them as additional element decor.
Basically, the layout of the attic depends on the type of roof of the house. What matters is whether the roof is low or high. The space below it can be wide or limited. Yet often there are two types of arrangement inside the attic.
The first method is used when the roof has a small slope, but a large height. The finished room will turn out non-standard shape: not rectangular or square, but trapezoidal. The space inside can be made in the form of one room, or you can divide it into two. If you have a narrow and long room, then it is easy to equip two rooms there.

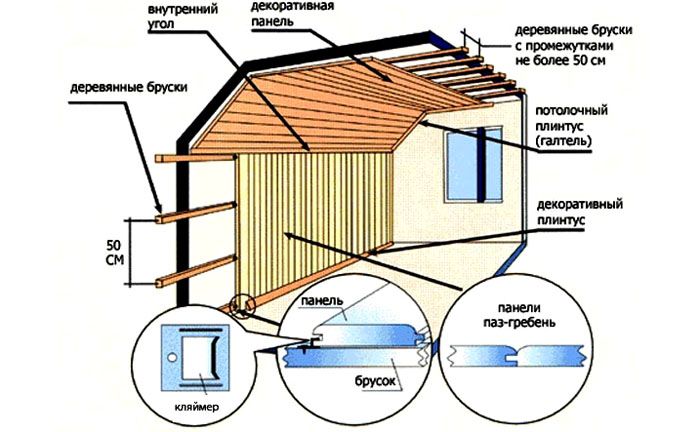
The second way is more traditional. The room is rectangular or square. Due to the height and width of the roof, you can make additional partitions to create the perfect shape, as seen in the diagram above. The cut off space will fit under the storage room. Such extra space will never interfere and will find its use.

Note! The places where you will install partitions are selected depending on the desired ceiling height. Partitions can be made of brick, wood or drywall.
Attic finishing technology
It is not difficult to arrange a high-quality attic. The main thing is to be patient, take the time and put in a little effort. The way you finish the attic depends entirely on the purpose of the room. For example, do you want the room to be used only during the summer or all year round? Much depends on this choice. After all, in order for the room to be used in winter, it will need to be insulated. Let's take a look at more difficult option, in which it will be possible to use the attic in winter.

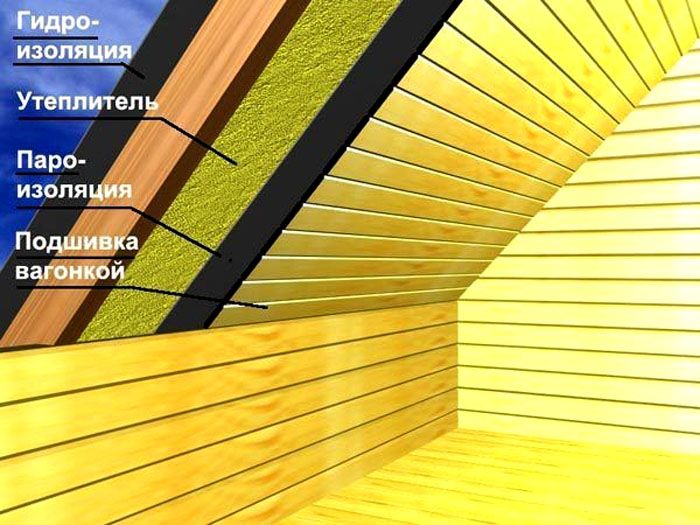
To begin with, it is important to make a quality cake, using hydro and vapor barriers. In advance, outside the rafters, you need to fill a layer of waterproofing, which will prevent the penetration of water from the roof. Now, in the space between the rafters you will have to lay thermal insulation material. It must retain heat well, have soundproofing qualities, be environmentally friendly and keep its shape. Ideally, basalt or mineral wool is suitable. How option - use foam.

Note! The frame for lining and insulation can be made from wood bars or metal profiles. When working with wood, the material must be treated with an antiseptic and anti-rotting and burning agents. A metal profiles needs to be covered against rust.
From above, the insulation is sheathed with a vapor barrier film. Thanks to such layers of protection, the insulation inside will not lose its properties and will last much longer. After that, everything is ready. It remains only to finish (sheathe) the attic from the inside.

Attic sheathing materials
Here you can roam. There are plenty of materials for sheathing. What can you choose from?
- Drywall.
- Tree.
- OSB panels.
- Plywood.
- Clapboard.
All materials have their advantages and disadvantages. In this article we will talk about lining the lining. This is an excellent material that will make the attic attractive and practical. And what the attic trim with clapboard looks like can be seen in the photo.

What are the advantages of lining? Main feature - ecological cleanliness. The lining is natural material which creates a healthy microclimate inside. In addition, the lining will give the room a rustic atmosphere. Everything will look aesthetically pleasing and attractive. You can use lining for wooden houses, and for brick and concrete.

As for the work itself, the decoration of the attic with clapboard is a bit complicated. When compared with the same drywall, it will take a little more effort and time.
Note! If you are finishing the attic with a clapboard, then rationally approach the choice of the width of the material. If you use products whose width is more than 10 cm, then the surface may crack.
So, how can you trim the attic from the inside with clapboard? What is the technology? Let's find out.
Lining technology
Before starting work, wooden lamellas will have to be impregnated protective composition and open with varnish. Now more about the stage of all work:


From theory to practice
First of all, choose the direction of lining. It can be a vertical plane or a horizontal one. It is on this choice that depends on which frame is made for fastening the material. If the direction is vertical, then the frame is made horizontal, and vice versa. Keep in mind that lining laid horizontally will expand the room, and vertical cladding will make it higher.

As for fixing the lining for the attic, then the choice is yours. There are several types of fixation:

It is allowed to mount the lining in any of these ways. It is clear that the first method is not entirely aesthetic, as the nail heads will be visible. This is an option for storage and utility rooms.
Work starts from the bottom up vertical mount, and from right to left when horizontal. The first board must be adjusted to the size of the attic and cut. Use cleats to hide attachment points. It is attached through the grooves to the crate. Connect the second board to the first with a spike. It must be inserted into the groove.

All other elements are fixed in the same way: through the groove to the crate. The fastening step is the same as the crate step. The final board is not always the right size. Therefore, it must be cut and adjusted. The extreme joint can later be hidden with a plinth. That's all. Work completed. For clarity, we suggest that you additionally watch the video on how to sheathe the attic with clapboard from the inside.
The attic is, in fact, attic space. It differs from an ordinary attic in that it is located in a building with a pitched roof, consisting of: one flat, and the second - its steep parts. They give the house additional space that can be used as a living space.
This roof design was developed by an architect from France by the name of Mansart, from which the word "mansard" was formed.
In those days, these premises were the abode of students, impoverished creative intelligentsia, servants. And all because the attics were not insulated, and were poorly protected from moisture.
But the situation has changed a long time ago: thanks to the development of the construction industry and the latest design developments, the attic space has become a full-fledged addition to a residential building. Now in the attic area you can arrange almost any room, even a kitchen and a bathroom.
Naturally, both the methods of finishing the attics and the choice of materials will depend on this. But before finishing the attic from the inside, it is necessary to sequentially perform several preparatory work which we will now tell you about.
A well-made roof of a building does not guarantee that the attic will be warm and dry. To achieve this, all its surfaces must be insulated.
The technology of these works will depend on whether the external thermal insulation of the roof was performed during the construction of the house:
- If yes, then it will be easier to additionally insulate the slopes: you can simply hem them with fiberboard, clapboard or drywall, laying them under the crate thin layer polyethylene foam or isolon. It is better to use foil options, they prevent the formation of condensate.

- Well, if the roof slopes were not insulated, you will need to do this work from the inside. Then the insulation and finishing of the attic will require the sequential laying of several layers, the first of which will be a waterproofing membrane.

- fixed waterproofing film counter-rails directly to the wooden roof sheathing. Only after that it will be possible to lay a stand of thermal insulation.
To insulate the roof slopes, it is better to choose a soft, and as thick as possible, rolled insulation. - Slab materials are not very well suited for this, especially if the roof is hipped or with another complex configuration. They are best used for wall insulation.

- The method of fastening the heat-insulating layer depends on the roof structure. If there is a small step between the rafters, you can pick up a material whose width is slightly more than this distance.
Then the insulation fits tightly between the rafters and does not need additional fastening.

- When the distance between the rafters is large, bars with a small cross section are used to fix the insulation. In this case, first, a wire is pulled between the rafters, fixed with self-tapping screws, and a heater is already laid on it.
It is best to watch a video on this topic. - If you use the usual mineral wool, then it will be necessary to stick a vapor barrier film on top of it, and only then fix this entire structure with bars. It is much easier to use a material with a ready-made vapor barrier layer.

- When insulating the walls of the attic, you can do without a waterproofing layer, but only if you use polyurethane foam materials as insulation.
- Mineral wool tends to get wet and rot. It is better not to use polystyrene for this, because it is highly flammable, and when burned, it is quite toxic.
- It is very good if there is a gap between the waterproofing and the insulation, which ensures ventilation of the insulation. Doing the work with your own hands, do not forget that all wooden structural elements must be treated with an antiseptic composition.
- If external thermal insulation of the walls was performed in your house, then the attic gables will not need to be insulated. But the floor is still better to insulate, especially if there is a sleeping room in the attic.
- For floor insulation, it is better to use loose insulation: expanded clay or expanded polystyrene crumbs are very convenient, and the cheap price of the material can significantly save the budget.
- The floor is covered polyethylene film, mount wooden logs, and fall asleep in the resulting cells insulation. Topped with liquid cement mortar in which the reinforcing mesh is embedded.
On the Internet there is a more detailed instruction on the device of such a floor.

When the solution sets, it will be possible to make a screed, and the floor will be ready for further finishing.
This method of floor insulation creates excellent sound insulation, as well as reliable waterproofing of the room. You can even arrange a bathroom or kitchen in the attic without fear that water will flow down.
Finishing example attic floor under the bathroom in the photo above.
Decorative trim attic
Naturally, the interior decoration and insulation of the attic depend on how you will use this room. Most often, a living room is arranged in the attic space: a bedroom or a nursery, although there are exceptions.
Wood in the attic
Reflecting on the question: “What is the best way to finish the attic?” - you start sorting through everything possible options. And the first thing that comes to mind is a tree.
Most likely, this association arises because the supporting structures of the roof are made of this material.
- In addition, attic wood trim creates additional thermal insulation, as well as a unique microclimate, filled with woody aroma. WITH remarkable properties natural wood no other kind finishing materials can not argue - it's a fact.

- The lining board, which is most often used for finishing work, is the most simple option skins.
There are five profiles of this board, and several standard sizes. Its installation can be done in various ways. - The location of the board on the surface can be horizontal or vertical, diagonally, in a circle, herringbone. Thus, a certain pattern is created, and the monotony of the surface is broken.

- Using lining as a finishing material, you can zone the attic by painting each zone in your own color. The picture above is very good example such an interior solution.
Columns with beautiful finishes also play a significant role in this.

- Finishing the attic with wood can be done in another way - using wood panels. They can be made of solid wood, or they can be stacked slatted panels from the same lining.
- These can be MDF with wood veneer or bamboo veneer. How a budget option, laminated and veneered fiberboard panels are used.
Wooden panels good for wall decoration, and for suspended ceilings. - Attic decoration MDF panels is made if this room is used as an office or a room for sports. It is not customary to make such a sheathing in sleeping quarters - the interior will be associated with some kind of office.
Therefore, they are combined with other types of finishes, such as wallpaper, decorative plaster and painting.

Few people know that a new finishing material has appeared on the construction markets - wood wallpaper. They are a set of profiled panels wooden elements glued to the base.
For the production of these wallpapers, wood is mainly used. conifers. Their thickness does not exceed two centimeters, with a width of 1.2 meters and a length varying from two to six meters.
Such panels are glued to the wall, as ordinary wallpaper, and allow you to quickly and beautifully decorate a room under a tree.
Ceiling beams
Ceiling beams can also become the main decoration of the interior of the attic. Depending on the design of the roof, these beams may be load-bearing, rather than hollow false beams, which are used in ground floor rooms.

So:
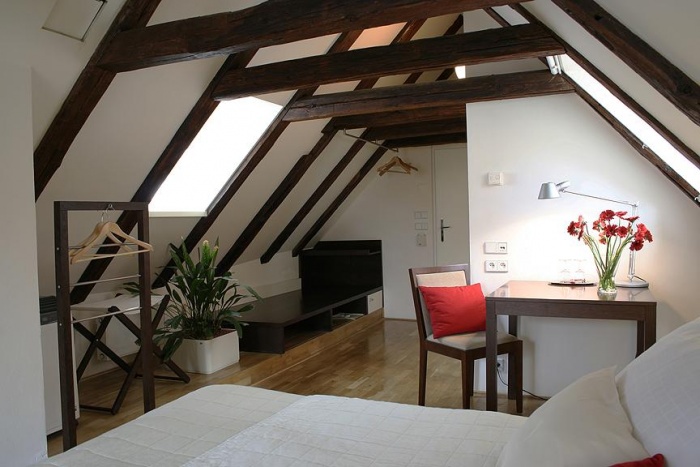
- Rafters can also play this role - it is enough to carefully decorate them. Our examples of finishing the attic floor, using ceiling beams, clearly show how beautiful and original it is.

Wherein decorative trim walls can be the simplest - all attention is attracted by beam structures, which necessarily have a contrasting color in relation to other surfaces. An important role in such an interior is played by original ceiling lights in harmony with the beams.
Plasterboard constructions
As we have already said, there is nothing in the attic space that could interfere with the implementation of any structure: partitions, columns, arches, suspended ceilings. The main thing is to be spacious.
You can divide the room into zones using any of these elements.

So:
- Fine finishing of attics lined with drywall can be a surface painted acrylic paint, covered with wallpaper. Often the attic has good height- this is what most apartments in high-rise buildings lack.
- Sometimes it even needs to be hidden, so plasterboard suspended ceilings can have several levels and recede from base surface not by 10-12 cm, but much more.

- In design projects, even stretch ceilings are found in the attic room. On the top photo, plasterboard walls and stretch glossy ceiling milky, create beautiful interior living room.
This is facilitated by good natural lighting in the attic. - Not all attic spaces have enough windows. If windows are not provided in the roof slopes, but there are only small windows on the gable walls, you have to rely more on lighting fixtures in terms of lighting.

That is why the attic finish is fine, done mainly in light colors. Only some elements of the interior can be dark.
The example above shows a very popular technique for finishing a wall as a continuation of the ceiling. It looks like this: along the head of the bed, which stands with its end to the wall, a strip of wallpaper with a thick pattern is pasted.
The pattern usually contrasts with a light surface and visually stretches the room in height.
Other finishes
Designers are constantly coming up with ideas that might seem out of the ordinary. But that's what makes the design different.
And often for internal arrangement attics, use those materials that are intended for exterior decoration of facades.

So:
- This includes materials such as vinyl and aluminum siding, different kinds composite panels, HPL plastic panels. Some manufacturers even offer complete options designed specifically for finishing the attic.
- Such kits are made for a specific object, according to preliminary measurements - this is called individual design. In this case, the fine finish of the attic is an assembly of a certain design, which is done quickly, and without unnecessary dirt.

- Attic walls lined with HPL panels look especially good. These anti-vandal facade panels made from plastic high pressure, have extraordinary strength, dielectric and thermal insulation properties, and practically do not absorb moisture.

- The production of this material is carried out simultaneously with the pressing of the upper decorative layer. As a result of this technology, compact, non-porous hygienic panels with a strict geometric shape are obtained.
There are options with double-sided trim, and different. So the surface design can be created by simply turning the panel to one side or the other.
We told you about the most interesting options for finishing the attic space, but the choice, of course, is yours.
Additional square meters are never superfluous either in the country or in the center of the metropolis. And getting out of a cold attic is quite real. It will be doubly pleasant if the attic is finished with your own hands. The attic will turn into a romantic corner with an unusual panorama of the starry sky or a strict Personal Area, or..
It is not worth continuing, since the decoration of the attic floor, as Magic wand will make all your fantasies come true. But for now, you only have an uninhabited attic, and the answer to the question of how to finish the attic with your own hands awaits ahead.


The non-standard geometry of the attic gives excellent finishes and even more variety than for other rooms. That is why attic decoration is not as difficult to implement as it is to choose a project and materials.

Finishing the attic with wood: simple, cozy and environmentally friendly
Preparing the attic for decoration
Before sheathing the attic from the inside, you will need to perform a number of preparatory work.

Finishing the attic with a clapboard: a photo of a designer finish - zoning the space with a blockhouse and a regular clapboard
Qualitatively executed yet does not guarantee that it will be warm and dry under it. This means that it is necessary to insulate all its surfaces. What will be the technology of thermal insulation work directly depends on whether external insulation was provided during construction. In addition, the insulation must be reliably protected from moisture, so do not forget about vapor and waterproofing.

Interior decoration of the attic: photo of the bathroom on the attic floor
The attic as a room is quite spacious, and the presence of windows makes it possible to ventilate it regularly. This is a big plus when choosing an interior finish, since the humidity level there will always be within the normal range.
When preparing the floor for finishing, it is especially important to protect it from emergencies associated with water pipes. Otherwise, the ceiling of the room from the lower floor will inevitably suffer.

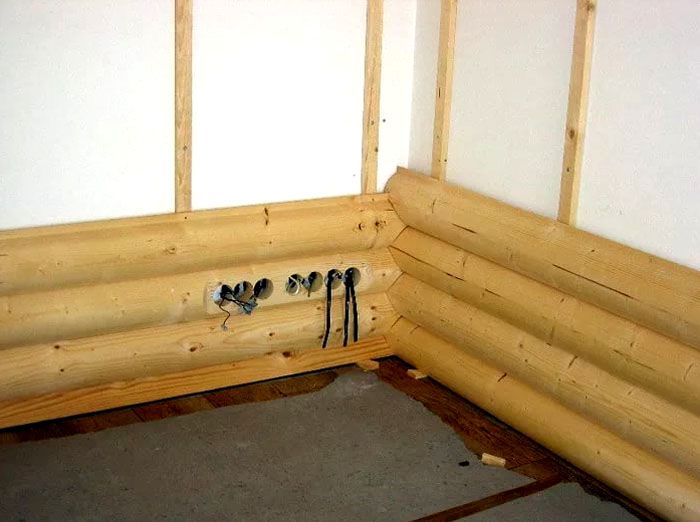
The structure of the internal partition
The attic, as a rule, is the privilege of a sloping roof, however, and an attic space under two steep slopes can be turned into an attic, limiting its space around the perimeter to a small partition wall. In the new room, it will already be possible to walk without bending your head.
On a note: the partition in this case will be sheathed with the selected finishing material on one side.
Finishing attic rooms: baby photo
How to sheathe the attic inside
The options for finishing the attic floor are quite diverse, but if you ask: “What is the best way to sheathe the attic?”, Many will answer that this is a tree. And in fact, wood paneling of the attic is very popular.
Natural upholstery materials are special atmosphere in room. Ecostyle in the urban attic is a great opportunity to transfer the beauty of nature there.

Attic finishing options: photo of walls sheathed with wooden wallpaper
How to finish the attic inside with plywood
A fairly common option for sheathing the attic with plywood sheets. This is not the most expensive material, and sheathing them is quite simple. Even the most reliable is not guaranteed against leaks, so it is better to give preference to sheathing from moisture-resistant plywood sheets.

An example of attic sheathing with plywood with built-in niches under the roof slopes
Sheathing the room begins with the creation of a frame. To fix the elements, nails or self-tapping screws are used. But in any case, they are hammered or screwed in, stepping back from the edge of the sheet by 15 cm and further at a distance of 30 cm from each other. The work is carried out in the following sequence: first, inclined planes, gables are sheathed, and then the horizontal ceiling is sheathed, if any. Sheets, with the exception of plywood with tongue-and-groove edges, are laid with a small - only 3-5 mm, thermal gap in a checkerboard pattern - they should not be located on the same line.
Important: plywood sheathing the best way for finishing rooms with high humidity, because in such conditions, due to the deformation of the wood, the butt joints can open, and as a result, the aesthetics of the general appearance will be completely lost.
Interior lining of the attic in a country house
Finishing the attic floor wooden house often also performed as a blockhouse - this is a decorative lining with imitation of timber. It is usually used for horizontal cladding. The undoubted advantage of this lining option is considered to be excellent ventilation characteristics, which provide grooves on the back of the material.


Sheathing attic clapboard
And yet, lining remains the most popular wood paneling. It is not difficult to obtain such coverage. Finish with basic skills construction works, you can do it yourself. Products purchased for sheathing must first of all be treated with protective agents: antiseptics, fire retardants, etc. Well-dried lamellas after this procedure are left in the attic for about a day, to adapt to the microclimate of the room.

Sheathing clapboard with vertical fastening
For sheathing clapboard, mainly three methods of fastening are used:
- on ordinary hardware, for example, decorative screws, self-tapping screws or nails. The slats are screwed or nailed to the base from the side of the groove at the place where it joins the spike;
- on galvanized steel clamps different shapes and sizes;
- on special brackets, which are fixed with a construction gun, punching a groove.
Clapboard finishing options
Basically, the horizontal sheathing of the attic with clapboard is carried out directly along with the simultaneous between them.
For horizontal arrangement finishing slats installation is carried out from top to bottom. With this direction of the sheathing device, excess particles do not get into the grooves, which can cause the onset of destructive processes. The easiest way is to sheathe the material with fastening to the kleimers.

Attic fully finished with clapboard
- The first plank, cut to size, is fixed along the top with finishing nails.
- A kleimer is inserted into the recess and attached to the rafters.
- The next panel is inserted into the installed one, with a spike in the groove, covering the clamp.
- Install the rest of the panels in the same way.
- The last bar is adjusted in width.
- The resulting gap when finishing the floor is covered with a plinth.

Scheme of the device for finishing the attic with clapboard
For vertical arrangement clapboard panels are assembled from a frame of horizontally arranged rails. The installation of cladding elements is carried out from corner to corner. The best option is the direction from the window to the opposite wall, since the shadows in the gaps in this case will be less noticeable. Finally, the skin can be decorated with slats.

Option inner lining attic clapboard
- Lining of lighter tones visually expands the space, so it is advisable to use dark-colored wood as a decorative element.
- It is better to finish inclined surfaces with flat lining lamellas so as not to visually reduce the space.
- Vertical laying visually raises the ceiling, and horizontal - visually expand the room. Installation options can be combined.

Light lining in the attic department in contrast with the dark rafters
How to sheathe an attic with drywall
Drywall as a finishing option is perhaps the most practical. What are its benefits?
- simple installation;
- the ability to equip various niches and install partitions;
- high-quality insulation;
- enough low price etc.
Such a sheathing can, if necessary, become a “rough” surface for future cladding.

Finishing the attic with drywall: photo of the bedroom
Drywall is mounted on a crate made of wood or a metal profile. crate from wooden slats with a certain step attached to the rafters. The choice of their section depends on the parameters of the rafters and the drywall itself. For fastening to the gable wall, dowels are used, and the panels themselves are attached to the crate with screws in increments of about 25 cm. The wooden crate is pre-treated with an antiseptic.

Lathing from a metal profile for drywall in the attic
More versatile, of course, is the second option - a drywall sheathing device on CD and UD metal profiles. Depending on the configuration of the room, gypsum boards can be installed vertically or horizontally, which, in turn, requires a certain installation of the frame. However, the only requirement remains the following:
- at a longitudinal intersection, at least 4 profiles should fall on the plane of each drywall sheet (30 cm step),
- with a transverse - at least 6 (step 50 cm).

Attic ready for plasterboarding
GKL plates are fixed with a profile using a screwdriver, having previously cut them to the same size. To make the edges even, you need to cut with a jigsaw or planer. The sheets are firmly fixed using screws in increments of 20–25 cm. When finishing a window or door, fastening is also performed along the perimeter of the opening. For single-layer sheathing, the screw-in depth is 1 cm, and for double - 3.5 cm.

Fastening sheets of drywall when finishing the attic
Important: between the edges of the sheets of sheathing material, taking into account the swings of the roof and the wind load, it is desirable to leave gaps of up to 5 mm. In the future, they are puttied and sealed with reinforcing tape.This is how the finishing of the attic with drywall is schematically carried out. Video materials on this topic will help to better understand the nuances of the process.
As for further finishing, it can be completely different, because you can stick wallpaper on drywall sheets, lay ceramic tiles or decorative rock, putty and paint.
Attic ceiling decoration
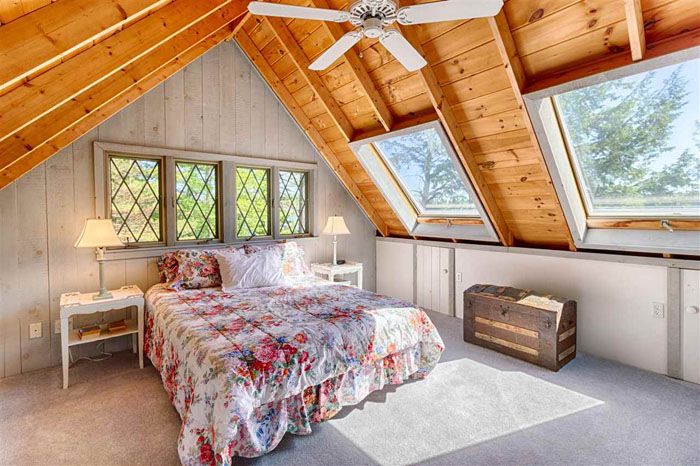
The best option is a stretch style - in any case, it gives style. Another thing is if you want to specifically preserve the rustic style in the attic, then it would be best to leave it open. They are usually stained or treated with wood stain.

A harmonious combination of matte stretch ceiling and bamboo wallpaper in attic sheathing
On a note: The use of open rafters in Lately has become a favorite technique for designers. With skillful use with attic trim, it gives the most unexpected interesting results.
attic country house if desired, it is not difficult to convert it into a living space - a bedroom, an office or a nursery. At the same time, the appearance from the inside will largely depend on what kind of finish is chosen for decorating the walls, floor and ceiling.
Today there is a large number of a wide variety of materials, perfectly suited for this purpose. Which one should be chosen in this or that case, and how to do the attic sheathing with your own hands? We will talk about this later in the article.
Varieties of finishing materials
Do-it-yourself attic decoration can be done using only two main types of materials - traditional and modern. The traditional ones include lining, imitation of timber, blockhouse. To modern ones - drywall, plywood, cork panels, decorative plaster, etc. The choice of finishes depends largely on what style of attic design is provided for by the design project. If it is country, Provence, Scandinavian or classic, you should use traditional materials. For cladding the attic inside in a hi-tech style or minimalism should be used modern views finishes.
On a note: In some cases, the decoration of the attic floor can be performed with a derogation from this rule. For example, in a room whose interior is decorated in Provence style, it can look good decorative plaster light shade with a discreet "pattern".Thus there are the most different variants attic finishes. The photos below clearly demonstrate exactly how this room may look, sheathed with one or another type of material:


Pros and cons of using drywall
So, how to sheathe the attic inside? Very often, the internal surfaces in the design of this room are finished with drywall. The main advantage of this material is that with its use it is possible to perform very original finish attic floor, arranging curved surfaces.

Attic sheathing, made using drywall, can be very original and unusual.
The only difficulty may arise when marking for sheets, since the walls of the attic are beveled at a certain angle. However, using a level, a sufficiently high-quality finish of the attic with drywall can be made. The video demonstrates the markup technique in detail:
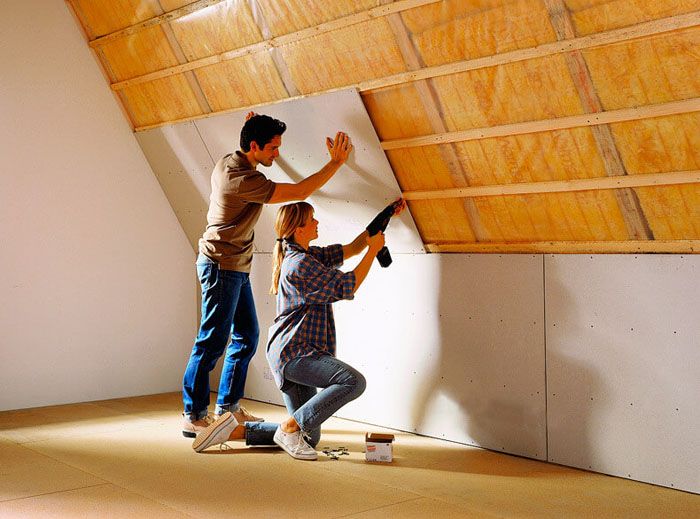
Drywall sheets are mounted on the crate.
Important: Of course, before you start finishing with drywall, you should perform insulation and waterproofing of the roof.As you can see, the question of how to sheathe an attic with drywall is not particularly difficult.
There are some disadvantages in using this material for sheathing the attic floor from the inside. The fact is that roof structures sometimes shift slightly as a result of shrinkage of the house or for other reasons. As a result, cracks may appear along the skin. However, the likelihood of such an outcome of events is not too high. The result can exceed all expectations.

Finishing the attic with plasterboard. Photo of the finished result
Advantages and disadvantages of lining
The main advantage of lining is its ecological cleanliness. Even more than that, wood contributes to the creation of a healthy microclimate in the room. In addition, lining the attic with clapboard will help create a special “rustic” atmosphere in this room. Walls finished with wood look unusually aesthetically pleasing. You can use the lining both for finishing the attic floor of a wooden house, and brick or concrete. The only drawback of this material is only some difficulty in installation. Sheathing walls with clapboard is a somewhat more laborious process than decorating with the same drywall.

Sheathing with imitation timber
How to finish the attic from the inside yet? Today, for cladding rooms, you can use not only ordinary lining in the form of a board. A very interesting option for the design of the attic can be surface finishing with an imitation of timber - one of the varieties of this material. When using it, the walls and ceiling look like they are made of ordinary or glued beams.

Attic sheathing with imitation of timber gives the attic a stylish appearance
Blockhouse sheathing
Often attics are trimmed with a blockhouse - another type of lining. With its use, you can get a sheathing that imitates chopped walls. This allows even concrete and brick structures to be decorated in a "rustic" style. In the country, such a finish looks just great.

Finishing the attic with a blockhouse. "Sliced" walls
Important: Various options finishing the attic floor with wood allows you to get very harmonious design. However, the blockhouse, lining and imitation of timber must be treated with special compounds that reduce the risk of fire and prevent decay.The attic can be finished with clapboard of light wood species, as well as dark ones. In small areas, it is best to use the first option.

Attic interior decoration. Photo of rooms with sheathing from dark and light lining
Other finishes
To the question of how to sheathe the attic from the inside, there is another answer - plywood. The advantages of this finishing method include not only the maximum ease of installation, but also the low cost of the source material. The disadvantage of using plywood for sheathing is that when the roof moves, the sheets can diverge and gaps form between them.

Sheathing with plywood allows you to perform a fairly aesthetic design of the attic
Plywood looks quite aesthetically pleasing on the walls of the attic. However, often when making it pasted over with wallpaper. Similarly, you can finish the top and drywall. In the latter case, sometimes fine finish is also decorative plaster.
You can decorate the attic beautifully using any of the materials available for sale. The choice of a particular type of finish depends mainly on the tastes of the owners of the house themselves. With a little imagination, it will be easy to get something like this:


Technology for finishing the attic with clapboard
Next, we will consider in detail how to decorate the attic inside with a clapboard. The use of this material for sheathing requires a mandatory waterproofing of the roof. For this with outside a special membrane is fixed to the rafters. A counter-lattice under the roofing material is mounted on it.
Before proceeding with the decoration of the attic floor, the ceiling, walls and floor should also be insulated. On roof slopes from the inside, thermal insulation material (usually mineral wool) is inserted between the rafter legs. On the gables under the cotton wool and lining, a crate is preliminarily arranged. Next, using brackets, a vapor barrier layer is mounted.

Before sheathing, the attic should be insulated
On a note: In order to prevent the heat insulator from falling out, a wire should be pulled between the rafters and the lathing beams.After installing the vapor barrier, you can proceed to the actual installation of the lining. So, the lining is done as follows:
- Before starting the sheathing, each lamella must be treated with a special compound that prevents rotting;

Before installation, the lining should be treated with special compounds
- On the pediment crate and rafter legs, a counter-lattice must be stuffed over the vapor barrier material. This is necessary for the installation of a ventilation gap. The counter-lattice will serve as the basis for the lining. In the event that the sheathing boards are located horizontally, the slats under them are stuffed vertically and, accordingly, vice versa. In extreme cases, this step can be skipped and sheathed directly on top of the film. However, at the same time, it should be ensured that the heat insulator, together with the film, is between the rafters, and does not stick out;
- The decoration of the walls of the attic begins from above if the lining is located horizontally (while the elements are mounted with grooves down to prevent moisture from entering them) and from the window to the opposite wall in a vertical orientation;

Finishing the attic clapboard. Photo of the wall cladding process with lamellas. With vertical orientation, work starts from the window
- To fasten the cladding elements, special clamps can be used, which must be installed in the groove, followed by closing them with the crest of the next board. You can also use nails for this purpose, which must be sunk into the tree. When performing open fastening, finishing nails are used. In the event that the counter-lattice is assembled not from a bar, but from a metal profile, self-tapping screws are used;

The slats are fastened with special clamps during sheathing.
- Finishing the attic with wood also involves lining the window openings. At the final stage, they are trimmed with platbands from the same wood as the lining. Further, all joints are closed with a layout.
In order to make it clearer to you how to decorate the attic with your own hands, we present to your attention a video in which this process is considered step by step.
So, we examined a variety of examples of finishing the walls of the floor and ceilings of the attic. For sheathing, you can use both plywood and drywall or lining. Of course, finishing the attic floor of a wooden house is best done using the latest material. Thus, you can save the overall stylistic idea of a country building.
We will send the material to you by e-mail
With a sufficient height of the roof of a private house, free space remains inside, called the attic. From today's review, you will find out what its features are, what rooms can be equipped there. The materials used for finishing surfaces and floors will be considered, do-it-yourself attic finishing options, photos and tips for arranging it will be shown.
Exquisite combination of unusual configuration and finish texture
The word "mansard" owes its origin to the name of an architect from France. Francois Mansart in 1630 used the space under the roof for residential and household needs. In the 9th century, mostly poor people and servants settled in rooms equipped under the roofs of houses.

If the attic area is quite spacious, then in the spirit modern trends can be equipped stylish space, which combines the living room and. In such a situation, comfort is greatly increased.

- Living room.
Equipping the space for the living room, you need to provide additional windows, as this room should be well lit. To create a cozy home furnishings install comfortable, tables, a sofa. The decorative fireplace fits perfectly. To hold family gatherings here, they install shelves with books and a TV.

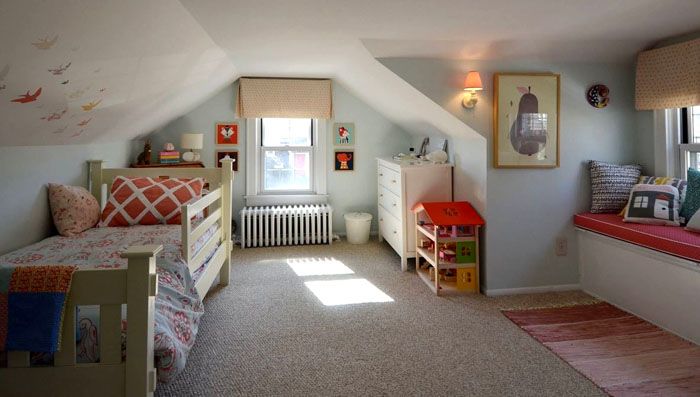
- Children's room.
A growing child needs to allocate personal space. With a shortage of space for these purposes, an excellent option would be arrangement in wooden house attic. A photo of some options will allow you to evaluate the practical meaning of the idea.
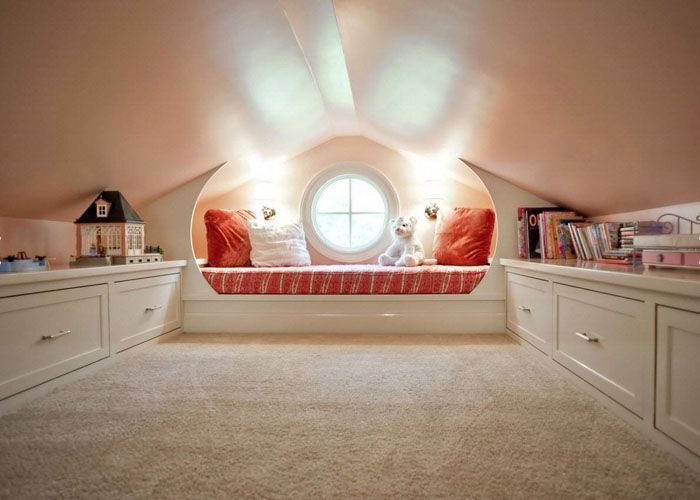
In such a space, you can make a cozy corner in which middle-aged children will feel like full owners. Install handy storage cabinets various items, equip sleeping place, leaving the middle segment free for the child to play.
The window should give enough light. For the design of window openings, comfortable or blinds are used so that the regulation of light fluxes can be allowed.


- Playroom.
Often family members are addicted to some kind of gaming activities. To ensure complete comfort, you can install in the attic, for example, billiards. Complement the decor with a sofa on which they lay out their favorite board games.

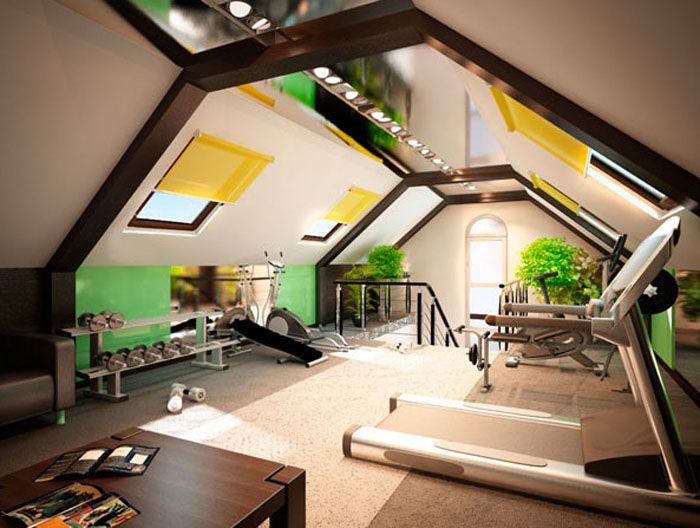
- Sports room.
Trainers often do not have a place in living rooms, so lovers of an active lifestyle will like the equipment in the attic. Here you can put simulators, place a sports wall, given that you need to make a reliable soundproofing of the floor. The attic room is not suitable for heavy sports. Here they do not lift or throw kettlebells and barbells.
- Restroom.
You can create an attic design aimed at relaxation with the help of decorative fireplace, enchanting with the play of flame. They put floor lamps, armchairs, sofas, coffee table, place the TV.

- Wardrobe.
By installing rods with hangers and equipping shelves along the walls, you can turn the former attic space into a convenient and comfortable one. If necessary, there is a place for built-in cabinet furniture, which allows you to conveniently place all the necessary items of clothing. They are now easy to find and try on.

- Bathroom.
You can even equip an additional one under the roof, providing reliable waterproofing and making the necessary communications.

- Kitchen.
The option of placing the kitchen in the attic space must be carefully considered at the planning stage of the alteration. For a family with children, this may not be very good decision, while a young couple of romantics in love will manage to get an unusual exquisite room.

- Tasting room.
Unexpected and original solution design of the attic floor is the equipment of a cozy tasting room with comfortable sofas, buffet. Here you can put a display cabinet for dishes and create a great environment for communicating with friends.

At creativity to the solution of the interior of the attic room, it is possible to turn the unusual configuration formed by the roof slopes into advantages. Even in such conditions, elements of certain style directions can be introduced.
Country - characteristic is the predominance of natural finishes. The most commonly used materials are wood. Among the color palette, preference is given to natural tones, pastel shades, floral ornaments.
Minimalism - this direction involves the use in the interior of only the necessary pieces of furniture of a simple form with calm facades in color and a minimum of bright accents.

Classic - if it is supposed to create a design for the attic floor of a wooden house with elements of noble classics, then pastel and chocolate tones, solid wood furniture, and luxurious curtains on the windows are selected for decoration. This attic design option does not tolerate fuss and variegation.

Scandinavian style - if you analyze the photo of the attic design with elements scandinavian style, you can understand that it is based on natural shades and materials. Wall, ceiling and other surfaces are made in achromatic light color. The lines are clear, straight, without pretentiousness.

There are many photo options for finishing the attic on the Internet. We were able to present only a small part of them. An analysis of harmoniously executed interiors makes it possible to evaluate your own creative possibilities and develop an exclusive project.
Types of materials for finishing the attic
In order to choose the right options for finishing the attic with your own hands after viewing the photo, you need to have information about the range of materials used for this purpose. The main selection criteria are modern decorative characteristics, environmental safety, the successful performance of the role of a heat insulator, good performance.
clapboard
Finishing the attic with clapboard is especially popular, thanks to convenient system installation and obtaining a flat plane with a noble wood texture.

Separate dies are tightly connected with a tongue and groove. There is a docking option using a single groove. In such a situation, the joints are additionally closed with a narrow rail. Optimal Width wooden lining is 10 cm. For the attic, you should select a material that has good moisture resistance.
The modern version of eurolining has a wider tongue of 8 mm, which avoids the appearance of cracks and crevices during shrinkage. There are also special ventilation grooves on the reverse side. Width varies between 60-160 mm. Depending on the connection method, Softline and Standard are distinguished.

MDF panels
Often used for finishing the attic MDF panels with decorative coating with imitation various materials, including colored mosaic, wood, marble. The advantage is light weight. Consider what is best this species finishes for office equipment, home gym or .

It has good thermal insulation characteristics, is an excellent sound insulation. Installation does not require perfect alignment surfaces. For installation, a wooden crate is stuffed with a step that takes into account the dimensions of the material. Special brackets are used as fasteners.
Related article:
and for what kind of work is it suitable? From this article you can find out important characteristics this material, its advantages over alternatives and a lot of other useful information.
Drywall
The attic finishing with drywall, which is gaining more and more popularity, is based on low cost, ease of installation and environmental safety this material. For the attic, plates with a thickness of 12.5 mm are suitable. If additional sound insulation is required, then you can finish in two layers or take a thicker material. If it is difficult to lift sheets 120 cm wide, then you should purchase material 60–90 cm wide and 130 cm long. Due to the rather large sizes of the sheets, installation is carried out quickly and efficiently.

It remains to seal the joints with reinforcing tape, putty and finish by painting, applying or.
Related article:
PVC panels
Modern panels made of polyvinyl chloride - PVC, are resistant to fire. They do not harbor fungus. On smooth surfaces, this material can be fixed with glue.

The advantage is a fairly extensive color palette and a variety of ornamental solutions. Among the shortcomings, there is the possibility of cracking upon impact, poor resistance to ultraviolet radiation, and a decrease in strength during sudden temperature changes.
Related article:
In the review, we will consider the advantages and disadvantages of the material, varieties, sizes, characteristics of ceiling and wall products, average prices, selection criteria, do-it-yourself installation.
OSB

The variety of finishing materials allows you to create internal surfaces of the desired texture and color shade.
Finishing attic floor: options
As various photos show, the decoration inside the attic is not limited to slopes and walls. Much attention is paid to the floor. After cleaning the base from dirt and dust, placing waterproofing, vapor barrier and plywood subfloor, it can be used as finish coat the following materials:
Floor design options modern materials shown in the photo.


Color solution and invoice floor covering are selected taking into account the general.
Self-finishing an attic with a sloping roof: photos, nuances
The sloping roof allows you to expand the space under it and increase usable area allocated for the arrangement of the attic.

This design is one of the gable roof with more complex configuration. The name is due to the presence of broken lines.

The advantages of this roofing solution include the possibility of arranging a spacious attic floor. Thanks to the broken silhouette of the roof, the room acquires an original appearance. And the building looks presentable and luxurious. When performing competent installation of interior decoration, heat losses are reduced.
Given the complicated configuration, it is necessary to approach the selection of the attic arrangement option more carefully. If you decide to cut window openings on the slopes, you will need to install special skylights.

You can not install inclined types of windows, preferring window openings located on the front section of the attic wall. This option is easier to install.

When planning the decoration of the attic, follows the design features broken roof turn into advantages, focusing on interesting curves. To make it more convenient to place furniture, the walls are most often finished with drywall, wood, creating additional planes.

If the room is small in size, they select compact low furniture that can be conveniently placed in the allotted space.

Increasingly, sloping roofs are becoming commonplace in private homes. This is explained by the possibility of designing the upper room as a full-fledged living room, which allows you to complement the appearance of the building with balconies, expressive structural elements.

The interior of the attic is determined by the preferences of the owners. Here you can equip a comfortable living room, cozy bedroom or combine several functional areas. Given the fairly spacious volume of such a room, you can do it. An excellent solution is wallpaper in the attic with a slope. Photos of the interior can be seen below.

Finishing is used in a variety of ways. It can be a cozy tree, democratic modern MDF boards, or creative .
Finishing the attic floor with your own hands: the main stages
To independently finish the attic of a wooden house inside, photo phased implementation works will help to understand the main subtleties of the work. This does not always require the hand of a professional.
Room preparation
At the stage of preparing the attic space for alteration, a detailed examination of all available surfaces is carried out. They clean the slopes of roofs and walls from dirt and dust. Align, if necessary, the draft floor. If you plan to equip a bathroom or kitchen, make holes for pipes and.
Frame installation
If the room has a small area, select for the frame wooden blocks. For spacious rooms, you can use metal profiles. First, guides are installed, and then, taking into account the dimensions of the selected insulation, vertical profiles are fixed with self-tapping screws.

If the frame will be made of wood, then the slats are treated with protective equipment. They are fixed with self-tapping screws in the same sequence as the metal profiles.

Warming and waterproofing
The waterproofing material is cut into sheets of the required size. To fix them on surfaces, apply construction stapler. Separate pieces of waterproofing are applied with an overlap to ensure tightness. Then comes the insulation layer.
Advice! For the attic, you can use mineral wool, expanded polystyrene, extruded polyurethane foam, glass wool, ecowool. Separate insulation boards are inserted tightly into the frame cells. For additional fastening, you can use liquid nails or wooden slats.
A gap is provided to allow air circulation.

Then the vapor barrier is fixed with brackets.

Finishing material
It is necessary to start facing when all operations for warming surfaces are completed. Most often, drywall sheets are nailed to the prepared frame. This will allow you to decorate it in any color in the future. Wanting to get an image of retro rustic comfort, they finish the internal planes with clapboard or block house. If trim is selected plywood sheets, then their orientation is carried out in a checkerboard pattern. It is taken into account that this material is not suitable for rooms with high humidity.
Below are the finish options.