Most often, a cement screed is used to level the floor under the laminate. However, in the event that there is no desire to dismantle the old floors or when the floors are made of wood, the laminate is laid on plywood, that is, ordinary plywood sheets are used to level the base.
Do I need plywood for laminate
Plywood for laminate is a simple and affordable way to prepare subfloors for laminate flooring. The technology of laying a laminate on a plywood base is practically no different from laying a laminate on a cement screed. The base can be not only wooden logs, wood or parquet floor, but also the same cement screed. In each case, the technology will be slightly different. To achieve a truly high-quality result, you need to know and take into account all the features of the technology. But - the answer to this question is yours.
Plywood thickness - what kind of plywood to lay under the laminate
Leveling the floor with plywood under the laminate raises a number of legitimate questions, the main of which is - what should be its thickness? The answer to this question depends on a number of factors:
- If the base of the floor is sufficiently flat and strong, then it will be enough to use plywood with a thickness of 8-10 mm as a substrate.
- If you have to use pads to level the common floor plane, you should purchase plywood with a thickness of at least 12 mm.
- If plywood will be laid on logs, it must withstand heavy loads. The thickness of plywood when laid on logs must be at least 16-20 mm. Its cost is quite high, but you should not save on this.
Laying plywood on a wooden floor
It involves the use of self-leveling floors or cement screed as a base. But this is not always possible. For example, installing plywood in a house with wood floors will reduce renovation times and the cost of installing new laminate floors.

The order of work depends on the condition of the floor covering. If it is an old covering made of badly damaged boards and requires preparation, it is necessary to open the flooring and make sure that the boards and joists have not started to rot. If the process has affected the old floor, the damaged elements will have to be replaced. After that, fix all the boards well, sink the nail heads as deep as possible into the wood. Then start cutting and trimming the sheets.
In order to minimize material consumption, spread the sheets on the floor and determine their optimal position. First, whole sheets are laid out in the center of the room, which do not require sawing. After that, the rest of the pieces are cut out. When cutting plywood, leave a small gap between the sheets. This gap is left so that the floor does not rise as the material expands due to changes in humidity and temperature. There should also be a gap between the wall and the plywood.
Further, the plywood sheets are numbered, and a diagram of their arrangement is sketched. After that, the plywood is removed, the base is cleaned of dust and shavings. Laying plywood on a wooden floor under the laminate should be started from the wall, securing the sheets with special screws. The step between the self-tapping screws should be no more than 0.5 m, and their caps must be sunk into the material. During installation, it is necessary to constantly monitor the evenness of the surface. Any piece of wood can be used for leveling.
Laying plywood under laminate on logs
The thickness of the plywood under the laminate, which is laid on the logs, must be sufficient to withstand heavy loads and not bend in the places where the furniture is located. Regardless of what material the logs are laid on, they must be treated with an antiseptic solution. The dimensions of the sheets must be selected so that the joints are just on the logs. This must be taken into account even at the stage of laying the lag. If the logs remain from the old floor, you will have to saw the plywood specially according to the distance between them. If the logs are too long, to strengthen their strength, they need to be connected with transverse jumpers at the joints of the sheets. In addition, the logs must be leveled horizontally before laying the plywood. But it's up to you to use it.
Laying plywood under a laminate on a screed
A cement screed is used to level the subfloor and by itself can serve as a base for laminate flooring. For this, a conventional cement-sand mortar or special self-leveling self-leveling compounds are used. If the screed is made with high quality, plywood under the laminate may not be needed. But if there is an opportunity to use it, it will only be better: thermal insulation and sound insulation will increase.
Check the moisture level of the substrate before installing the plywood. To do this, put a piece of plastic wrap on the screed and check it after a few days. Even if there is no condensation on the film, you need to give preference to moisture-resistant plywood. After that, adjust the dimensions and cut the sheets. Then number the sheets, remove them and clean the base from dust and sawdust. Cover the screed with a special penetrating primer and lay the plywood on top of it. You can fasten the plywood to the screed with self-tapping screws or dowels. Which plywood is best to lay on the floor under the laminate, you need to decide based on financial capabilities.
The plywood must be sanded before placing it on the wood floor under the laminate flooring. So it is possible to avoid drops and irregularities at the joints. This must be taken into account in the process, and after installing the laminate floor it will not hurt to know. This will preserve the presentability and attractiveness of the laminate floor, which, with proper care, will last for more than a dozen years.
Block flooring is quite sensitive to the quality of the subfloor. Laminate flooring is no exception. Increased requirements are caused by the fact that in the presence of serious irregularities, the system of fastening parts to each other is damaged when the floor is loaded. To avoid this, plywood is laid under the laminate on a rough wooden floor in the presence of elevation differences and gaps between the boards.
Material selection
Laying rough plywood under the laminate on a wooden floor performs a very important function, so the choice of material should be taken responsibly. First of all, it is worth deciding on the variety, of which there are three sheets. The first is distinguished by increased requirements for the outer surface and an attractive appearance. The cost of such sheets is higher than that of lower grades. Laying plywood as a rough covering on a wooden floor under a laminate does not impose any requirements on appearance, therefore it would be more rational to focus on materials of the second or third grade. This will save your repair budget.
The right choice of material
The thickness of the flooring plays an important role, since the strength of the sheets and their ability to withstand the load depend on it. Laying plywood on a wooden floor under a finishing laminate presupposes the elimination of rather serious irregularities, therefore, the support of the sheets cannot be called continuous. The minimum thickness is 10 mm, but this is an acceptable value. The optimal calculation depends on the expected floor load, the severity of the irregularities and the distance between the bearing points. The recommended thickness is between 14-22 mm.
Laying plywood sheets on a wooden floor under the laminate is recommended using material sanded on both sides. This will ensure a high quality of adhesion between the flooring and the rest of the flooring pie.
Choice of mounting technology
Plywood as a sub-floor under the laminate can be installed in two ways:
- without intermediate supports;
- with intermediate supports.


In the first case, fastening to the boarding is performed with glue and self-tapping screws. The second option involves the use of two types of supports. Here it is possible to install point elements, which are called shabashi, and lag bars. The use of a lag allows you to provide a more reliable base, but the first method is preferable in terms of material savings.
Without installing intermediate points of support, it is possible to lay plywood under the laminate on the floor with height differences of no more than 1 cm. It is precisely such irregularities that can be corrected by sheets fixed to adhesives.
If it is required to correct irregularities of more than 1 cm, then the installation is carried out using lags or cobs. It is important to remember that the gaps between the boards, slots or areas where there are no floor elements should not exceed 5 cm in width. For more serious problems, it is better to sort out the rough floor covering to prevent problems during operation.
Laying on glue
Fastening of sheets can be performed both on adhesives and on liquid nails. Self-tapping screws are used to provide additional fixation. Two-component, water-based adhesives are used as adhesives. Assembly glue or bustilate can be used.
 Layout of plywood on glue
 The work is performed in the following order:

- The laid out elements must be numbered. Then they are removed from the horizontal surface. Numbering is needed so as not to make mistakes during editing and to complete it without temporary hiccups.
- After removing the sheets from the floor, holes are drilled in them for self-tapping screws. Using a larger drill diameter, these fastener holes are countersinked. The location of the fasteners is chosen so that they are located at a distance of at least 2 cm from the edge of the sheet. In this case, the step of self-tapping screws is taken within 15-20 cm.
- After completing the preparation, you can start the main work. Installation begins with niches, ledges or podiums. First you need to apply glue to the base. The layer should not exceed 2-3 mm. The sheet is installed in the design position and pressed against the surface. Then move on to the next item.
- You can start installing self-tapping screws only after the glue solution has dried. The fasteners are installed in the prepared holes and screwed.

Important! When laying out the sheets, you must observe the dressing. This means that each subsequent row is displaced relative to the previous one. The displacement is taken at least 10 cm, but it is better to make it larger, for example, by half of the flooring element.
Laying on logs
Most often, lags are used as intermediate supports. They make it possible to simplify the installation of the frame under the plywood, since the number of operations and measurements is reduced. Preparation of the base is carried out in the same way as in the previous case. The complexity of the work increases, but it becomes possible to eliminate serious drops without removing the wooden flooring boards.
 Plywood strap support device
 After cutting the sheets, they begin to mount the logs. For their manufacture, boards with a section of 15 by 40 mm are used. The step is selected at the stage of development of drawings or sketches and depends on:
- sheet thickness;
- the width of the sheets (since their joint should be located on the log).
If a material with a thickness of 14-16 mm is selected, then it will be necessary to assign a lag step of 30-40 cm.When using material of 18-22 mm, intermediate supports are laid more sparsely, at a distance of 50 cm from each other. The lag is fastened to the wooden flooring with self-tapping screws; when installing the sub-floor sheets, you can use the fastening with self-tapping screws or glue.
Most construction professionals, both theorists and practitioners, believe that it is undesirable to lay laminate flooring simply on a base, even perfectly aligned. Moreover, this applies equally to both concrete and wooden bases.
The interlayer between the subfloor and the laminate is desirable in any situation. And the best option for such a substrate would be laying plywood under the laminate. This simple operation will not only remove all the unevenness of the base, but will also become a good shock absorber, and will also serve as a good heat and sound insulator.
Choice
Depending on the base, the question is resolved, what thickness sheets need to be purchased. If it is a concrete base, new or pre-leveled, then there is no need to purchase high-quality expensive material for the base. 3-4 mm of thickness is quite enough, even if the appearance of such plywood is not too presentable. After all, for laying the substrate, it is only necessary that the surface is flat.

For the laminate, you can choose plywood of 3 or 4 grades.
A different approach must be followed when choosing a material for a wooden base. Here, in addition to leveling the surface, plywood also serves to increase the rigidity of the subfloor. Therefore, you need to take thicker sheets - from 10 mm and above.
More precisely, the required sheets can be determined only by assessing the condition of the wooden base in each case. If the floor is in a satisfactory condition and does not sag underfoot when walking, then you can get by with a sheet thickness of 10 mm.
If, when walking, the floorboards sag or creak, then in this case it is necessary to use sheets with a thickness of 16 or even 20 mm. This thickness of the plywood sheet is enough to give the base the required rigidity. In any case, the cost of plywood will be much lower than the cost of laminate flooring damaged due to an uneven base.
But, having acquired sheets of the required size, you should not immediately put them under the laminate. First, you need to perform a few preliminary steps, which are equally important for any foundation. You need to carefully sand the subfloor to remove any irregularities, and after sanding, remove all dust and small chips with a vacuum cleaner. If necessary, the concrete base must be primed to eliminate small depressions and cracks. And only after that you can start laying plywood under the laminate.
Back to the table of contents
Styling features

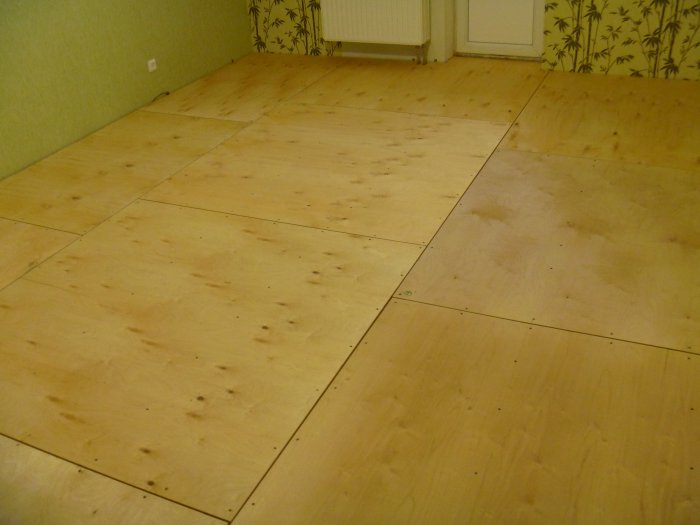
Plywood is stacked with a shift to give the floor more rigidity.
An ordinary plywood sheet in hardware stores has the shape of a square with a side of 1.5 m.It is difficult to work independently with such a large sheet, and in the process of operation such a large area will undergo expansion and warping. Therefore, for convenience and to increase the number of expansion gaps, it is better to cut a large sheet into 4 equal parts.
It depends on the base how the plywood sheets will be attached to it. If the floor is wooden, then self-tapping screws are needed, and for fastening to the concrete floor, you will need a water-dispersion glue, the basis of which is PVA.
It is very important that the installation is carried out in sheets, the humidity of which does not differ from the humidity in the room. The secret is that plywood is moistened with water at room temperature and left to dry indoors for 2-3 days.
But if plywood sheets are attached in different ways, then there is one general rule in the stacking order: they must be put in a checkerboard pattern. Those. the sheets of the next row are placed with an offset to those already laid by at least 30 cm. This is necessary both to give the floor more rigidity and for better functioning of the expansion gaps.
Back to the table of contents
Installation of the substrate

Installation should begin with the preparation of the required amount of material and with a trial installation. It should be borne in mind that plywood must cover the entire floor area, and do not forget about expansion gaps. Such gaps are left at the walls of 12-15 mm, between the plywood sheets - at 4-5 mm, and near the communications going into the floor - at 8-10 mm. Upon completion of the test installation, the sheets must be numbered, indicating on each row and place in the row.
To mount the plywood backing you will need:
- jigsaw;
- construction laser level;
- an electric drill and a special grinding attachment for it;
- screw gun;
- vacuum cleaner;
- paint roller or brush.
When laying plywood on a concrete base, it must first be cleaned of minor damages and distortions. To do this, it is enough to prime the plywood sheet with a special glue - mastic. Then this mastic is applied in a thin layer (2-2.5 mm) on the leveled base, and plywood is immediately laid. To make the fastening to the base more reliable, self-tapping screws and dowels are used.
It is better to prime the plywood when laying it on a wooden base. But there is no point in gluing plywood to wood - it is attached to the subfloor with self-tapping screws. In this case, it is very important that the caps of the self-tapping screws are recessed into the plywood, otherwise they will quickly damage the laminate board laid on top of the plywood with their protruding edges.
In order to correctly perform this technological operation, you first need to drill a hole in the sheet equal to the diameter of the self-tapping screw, and then in the same place with another drill, drill a third of the material thickness of a larger hole, equal to the diameter of the head of the self-tapping screws.
Sheets are stacked and fixed in accordance with their numbers.

The plywood sheet is fastened with self-tapping screws or nails at a distance of 15-20 cm.
The self-tapping screws used for fixing must be screwed in in increments of no more than 20 cm, while the distance from the self-tapping screw to the edge of the sheet should be at least 2 cm.Also, the rule must be observed: in order for the fastening to remain strong for a long time, the screws used for fastening must be at least 3 times longer than the thickness of the sheet. Those. with a plywood sheet thickness of 10 mm, the length of the self-tapping screws must be at least 30 mm, and with an indicator of 16 mm, no shorter than 48 mm.
Since the perfectly flat surface of the subfloor is therefore called ideal, because in the practice of installing floor coverings it is practically never found, when laying the substrate, certain difficulties may arise with the organization of a flat horizontal plane under the laminate.
If the plywood is laid on a concrete base, then this problem is solved simply: the laid plywood is tapped over the entire area, and if there is a suspicion of a void under the sheet, more glue should be added to this place.
When leveling a wooden floor, a different technique is used to eliminate the detected voids: plywood strips 30-50 mm wide are placed in these places. Such places must be attached to the floor even if the attachment pitch jumps over them.
There is nothing complicated in the device of a plywood substrate for a laminate. Anyone who knows how to hold a hacksaw, drill and screwdriver is quite capable of making it. These are additional costs of both certain funds and time, but on the other hand, by making such a substrate conscientiously, you will provide your laminate floor with at least 30 years of reliable service. If we neglect such a substrate, then depending on the condition of the subfloor, the service life of the floor will be reduced by 2-3 times, or even more.
Think and make an informed decision. Good luck!
With all the variety of methods used to create the base of the flooring, plywood for laminate on a wooden floor is considered one of the most modern and technological solutions for arranging laminate flooring substrates in residential premises.
Floor laminating technologies
The variety of laminate flooring solutions can be conditionally divided into two large groups, differing from each other in the basis of the laminate itself:
- Rigid laminate - made on the basis of particle board (chipboard) or fiberboard (fiberboard), it involves laying on a pre-leveled surface or using leveling substrates. In the case of laying on a pre-leveled surface, its curvature should not exceed 2 mm per linear meter. In the case of laying the laminate on special leveling substrates, they are able to compensate for unevenness to a large extent, and this depends on the thickness and material. As an example, a 5 mm thick polyurethane foam backing is able to compensate for irregularities of up to 3 mm per linear meter. Exceeding these indicators leads to the occurrence of excessive stresses in the laminate joints.
- Flexible laminate, unlike the previous ones, i.e. rigid laminates, has a vinyl base, which allows it to be laid on a poorly prepared base, allowing height differences up to 5 mm. In appearance, the floor covering made of such material differs little from traditional solutions, but at the same time it is much stronger than them and absolutely moisture resistant.

Technology for laying laminate on wooden floors
Constructive decisions related to laying laminate on wooden floors will depend primarily on the condition of the floors themselves.
In any case, the preparation of the floor is preceded by diagnostics, during which the actual condition of the wooden flooring is analyzed and a decision is made on how to prepare and compensate for irregularities. In accordance with SNiP, the following gradation is recommended:
- New wood floors. It is assumed that they are laid in accordance with the requirements, i.e. appropriate treatment against fungi, etc. Height differences are checked, fastening nails or self-tapping screws are recessed, and the slots are filled with a special solution. If the unevenness of the flooring exceeds 2 mm per linear meter, additional measures are taken.
- Old wooden floors require dismantling in order to assess the condition of the logs and other structural elements. When repairing, it is recommended to turn the logs upside down, check their condition, and also minimize level drops. Remove worn elements by replacing them with new ones. The flooring is then reassembled. If necessary, remove old paint, sand the floor mechanically.
- Sometimes a method is used in which a new floor is laid on top of an existing wooden floor at an angle of 90 ° (in a cross) - if there is confidence in the quality of the base (of course, if the height of the room allows).

Types of plywood
Laying plywood on a wooden floor is a very affordable way to renovate a room, since the industry produces a fairly large number of types of this sawn timber. A distinction is made between softwood plywood and birch plywood.
According to the degree of moisture resistance, plywood is divided into three categories:
- FOF - has the lowest level of moisture resistance, but low-toxic adhesives are used in its manufacture;
- FC - plywood with an average level of moisture resistance, most suitable as a basis for laying laminate;
- FSF - an increased level of moisture resistance, but toxic adhesives are used in the production of such plywood, i.e. it is not recommended to use it in residential premises.

In addition, according to the quality (presence of inclusions, heterogeneity of composition, rottenness), plywood is divided into 4 grades. The most expensive is 1 (first). When creating a substrate on a wooden floor, laying plywood of the 3rd grade is quite acceptable. Plywood is produced in a standard size, in sheets with a width of 1.5 m. It is advisable to cut such a sheet right on the spot, based on cutting the sheet into 4 parts - for ease of transportation.
Plywood laying technology
The laying technology is described in detail in the relevant literature, but it is necessary to note several fundamental points:
- On the slats or directly on the floor - if the warping of the floor boards is insignificant, and the overall height of the room allows, - it is permissible to fasten plywood panels directly to the floor (plywood thickness - 10-18 mm). Otherwise, the fastening is carried out through special slats, which are evenly placed on the base and thus level the surface.
- Thermal clearances are extremely important to avoid warping due to thermal expansion of the plywood backing. It is recommended to leave at least 8-10 mm between the sheets, and the indents from the walls - up to 15 mm.
- Layout of plywood sheets is carried out on a wooden floor under a laminate with bandaging - a technique adopted when laying bricks, excluding the formation of long seams, as well as the corners at which all four sheets converge. This solution minimizes the load on the locks of the laminate structures.
- Fastening is carried out with self-tapping screws through pre-countersunk holes, which allow the caps of the self-tapping screws to be sunk into the sheet.
- Finishing allows grinding the formed surface mechanically to remove protrusions and focal irregularities.

When laying laminate flooring, a subfloor made of plywood provides the necessary smoothness of the coating.
If the laying technology is violated or when the wrong grade or humidity is selected, the coating sheets will undergo deformation. Bumps and depressions will appear.
Unlike parquet or flooring, laminate flooring cannot be sanded, therefore mistakes in choosing or laying plywood will lead to the need to re-grind or replace the laminate.
In order to pick up plywood on the floor under the laminate, you need to understand the marking. Russian-made products, as well as those supplied from abroad legally, are labeled in accordance with GOST.
If the sheet is unmarked, then it is impossible to determine its properties and quality, it remains to trust the seller and risk the future laminate coating. Or look for branded products.
Among the abundance of symbols on the package and each sheet, you need the following:
- Type of glue. Marked with the letters FKM, FSF, FC. The sheet with the FKM marking is not used for laying laminate, because it has a very low moisture resistance. If water gets under the coating, the material will swell and deform the laminate.
- Environmental hazard. It is designated as E1, E2 and E3. It is undesirable to use plywood with E3 marking. It contains over 300 mg of formaldehyde per kilogram.
- Plywood size. It is specified in the format length * width * thickness in mm.
You need to carefully inspect the storage area and ask the seller to show you the top ten sheets.
If the plywood is stored outdoors, the humidity will be higher than necessary, so you will have to dry it for at least two weeks, and hope that the sheets will not lead during the drying process.
If any of the sheets has areas of fuzz, darkening that does not fit into the pattern, or white spots, it has been exposed to mold. If you lay such a sheet in a room, then mold spores will be released into the air.
Plywood thickness for laminate
The required thickness is directly related to the subfloor. If it is a concrete screed made of suitable concrete, with double-sided reinforcement, then 15 mm is enough. The thickness of plywood for laminate on a wooden floor should be 15-20 mm.
If these are only floor logs, without lining with wood or plywood, two layers of 20 mm thick may be required, because plywood with a thickness of 30 mm or more is difficult to find. You can use the first layer with a thickness of 25-30 mm, and the second with a thickness of 10-15 mm. This construction will give the floor maximum rigidity and keep the laminate flooring from warping and damage.
With a reinforced concrete screed base, the minimum plywood thickness is ¾ of the laminate thickness, but not less than 15 mm. If the plywood is thinner, it will be difficult to fix the deck. The maximum thickness depends on the required level and the budget for its purchase.
Coniferous or birch plywood
Not all buyers know that coniferous and birch plywood differ only in outer sheets. Coniferous cladding sheets are made of spruce, fir, pine or larch. Birch has birch. The inner sheets are made from inexpensive softwood and hardwood. Therefore, the performance properties are the same for both types.
The texture of birch plywood is lighter and the flexural strength is 10-15 percent higher than that of softwood, but this difference is not important for laying laminate flooring. After all, plywood does not experience lateral and torsional loads. It is subjected to pressure with a force of 1-5 kilograms per centimeter square, which is less than the loads for which even the lowest-grade plywood is designed. In such conditions, both species behave exactly the same.

The size
Industrial plants supply sheets of various sizes. From 1.25 * 1.25 meters to 1.5 * 2.5 meters. Using sheets of 1.25 * 1.25 and smaller increases the convenience and comfort of work. Sheets larger than 1.5 * 1.5 increase the rigidity of the subfloor by 1-3 percent. Therefore, each master chooses the size with which it is easier for him to work. For example, a 3 * 5 rectangular room. Sheets 1.5 * 1.5 will have to be heavily cut, and sheets 1.5 * 2.5 will only need to be adjusted.
The size depends on the geometry of the room and the preferences of the craftsman doing the work. There are no other requirements for the dimensions of plywood.
Variety
The grade describes the state of the outer sheets. The highest grade, marked with the letter "E", is assigned to sheets, where the outer sheets are without cracks and inserts. The first grade allows the presence of cracks, the length of which does not exceed 20 cm. It is also permissible to insert veneer of a different color or texture, with an area of no more than 2 percent of the sheet area. The number of defects in the outer layers does not exceed three.
The second grade differs from the first in that the number of permissible defects is six. The third grade has no restrictions on the number of small cracks, and on the surface sheets there are knots up to 1 cm in size, cracks up to 30 cm long, and areas of dried glue. The fourth grade allows the presence of dropped knots in the outer layer up to 4 cm in size, edge defects and other damage.
For laying the layer under the laminate, it is advisable to use the second and third grade. The first layer is more expensive, but does not provide any advantages, and the fourth layer affects the performance properties and its installation is of increased complexity. Film faced plywood for flooring has no advantages even over unsanded plywood, but costs 30-40 percent more.
Sanded or not sanded
Sanded plywood is 10-20 percent more expensive than unsanded plywood, but it does not affect the performance of the floor in any way. Indeed, when grinding, irregularities are eliminated, the size of which is tenths and hundredths of a millimeter and they cannot affect the coating in any way. The use of sanded, painted or film faced plywood for laminate backing is not economically feasible.

For installation under laminate flooring, it is advisable to use medium grade waterproof plywood. This will avoid overpayments for the quality of plywood, which will not in any way affect the performance of the floor covered with a laminated board.
It is undesirable to use plywood from "E3" class in bedrooms, but it is acceptable in hallways, corridors, walk-through rooms. Or, for example, in a cafe or shop.
The use of plywood thinner than 15 mm is undesirable, because it will be difficult to fix the laminate. The required thickness is determined based on the type of base. The size of the sheet does not matter, so do not worry if the plywood that the master prefers is not in the store.
Different sheet sizes will not affect the quality of the floor.
Correctly selected plywood under the laminate provides reliable fastening of the coating and the operation of the floor for five or more years.
Video - types of plywood and the rules for choosing it for a laminate: