Many seedling buyers kennel "Kedr18" ask: How to plant correctly? It's complicated? Please tell us in detail! etc.
I have specially written and post here DETAILED INSTRUCTIONS FOR PLANTING CEDAR SEEDLINGS (for about 2-10 years old) In this article I give recommendations based on our experience of transplanting several thousand trees.
For landing you will need: bayonet shovel, fertile soil (approx. 5-10 liters), mulch - dry leaves, grass, sawdust or coniferous litter from the forest, for dusting the earth around the seedling after planting, and of course, the cedar seedlings themselves, from a proven nursery.


Any adult or teenager can plant a seedling (transplant from a container) !!! Cedar seedlings are planted in the same way as ordinary trees, it is necessary to take into account only a few not at all difficult moments, below they are in the description, so point by point:
1. Planting cedars is a serious matter - YOU shape the future of your garden in TENS AND HUNDREDS !!! YEARS forward! You sit down beautiful tree - a symbol of strength and health - so treat the landing with PLEASURE !!!
2. Choice of planting site: Adult cedar is a powerful HIGH tree. Usually, cedars are planted along the edge of the site and WITH A CALCULATION, so that when it grows, a shadow falls on the house, bathhouse, utility block, car parking, etc. At first, the seedling takes up little space, and after a few years, the lower branches can be removed and one trunk will remain below - it will not interfere - like pine trees in urban forest plantations.
A sunny place, shade or partial shade for low seedlings is not important, when the Cedar grows up, CAM will take its upper tier. (growth retardation is possible only when complete absence sun).
The distance of the seedling from buildings and foundations, we recommend from 1.5-2m, in our practice we met a 20-year-old cedar at a distance of 1.2m from the house in the front garden and a cedar that grows normally after 100 years, maybe (or maybe not) will create a threat to the house-foundation, or what is left of them. Some CEDARS grow up to 800 years! the common age of cedars in plantings is 200-400 years.
This article was written by me in 2013. For updated boarding instructions fill out the form below and click Get
Head of the Kedr18 kennel A.G. Ignatiev
3. The distance between trees, we recommend choosing from 4-5 meters for small garden plots, and 6-8 meters for an alley or sparse planting. In the case of using cedars for fencing, the seedlings can be planted after 3 m, after a few years, if the lower branches are not cut off, the wall of trees will be impassable!
4. For planting, you need to dig a hole with a volume of about 10 liters, add and mix the forest soil, peat or humus inside. Seedlings from our nursery "Kedr18", as a rule, are in 5 liter plastic containers.
5. A seedling is transferred into the prepared hole, trying to preserve (not disturb) the earthen ball with the root system as much as possible. To remove the seedling, the container is usually lifted and turned over while holding the ground with the palm of your hand, sometimes the container can be simply cut open. Saplings from our nursery "Kedr18" have not destroyed: the root ball of the earth and the top fertile layer.
6. The seedling is placed VERTICALLY in the center of the hole and sprinkled with earth, a near-stem circle is formed around the seedling (a water-retaining edge from the ground), slightly larger in diameter than the dug hole, so that when watering the water does not go past the roots of the seedling. When planting, it is necessary to ensure that the ground level in the near-stem circle is 1-3 cm below the surrounding ground level. The orientation of the seedling to the cardinal points for seedlings up to 70 cm is not critical, for seedlings OVER 70 cm in size, a mark is tied on the southern side of the crown and the cedar in the hole is located in accordance with it.
7. IMMEDIATELY watering the seedling with CROWN large quantity water from a watering can, then restore the verticality of the trunk, add fertile soil and correct the water-retaining side. Thanks to abundant watering, air bubbles at the roots are removed and the earth acquires a homogeneous structure.
8. After planting and watering, the soil must be mulched from above - sprinkle ON TOP of dry grass, leaves, sawdust or coniferous litter from the forest. And again pour from the watering can with the crown.
9. The first days require abundant watering ALWAYS with the crown! In the future, we recommend monitoring soil moisture and regularly watering, preferably with a crown, for seedlings conifers this is an important point!
As you can see, despite the long description, the planting process does not present any difficulties, and as our experience shows, when these recommendations are followed, almost complete survival of the seedlings is ensured.
The cedar planting looks very nice: the cedar, in comparison with the pine, has more lush crown - needles grow from twigs in bunches of five, ordinary pine has two, in addition, the needles are softer, longer and more fragrant.
CEDAR - evergreen coniferous, powerful, beautiful and useful tree - a symbol of strength and health. Useful qualities: decorativeness, winter hardiness, healthfulness, durability and also gives nuts !!! Not many plants can boast of such a set of qualities.
Head of the kennel "Kedr18" Ignatiev Alexey Gennadievich
Buy cedar seedlings in Izhevsk: tel .: 8-912-765-71-38 Alexey, 8-904-316-64-98 Vadim
We organize the supply of cedars to other regions through transport company, call - we will agree on the time and terms of delivery.
Planting and caring for Siberian cedar
The root system of the seedling should be freely placed in the planting pit without bending the ends of the roots. At the same time, given the superficial nature of the distribution of the root system in Siberian cedar, the roots should be located within the upper fertile soil layer. IN middle lane Russian soils are thin. The thickness of the fertile layer rarely exceeds 20cm.
When planting a cedar in heavy clay soil, it is necessary to add sand to the planting hole.
- Dig a planting hole 1m deep, 1.8m in diameter (when planting large cedars, the diameter is larger).
- Fill the hole with a mixture of fertile soil and sand (if the soil on the site is clay), if the soil is sandy loam, no sand is required.
- Add 10 compost buckets on top and dig thoroughly.
Top 20cm. the soil layer should be light fertile sandy loam (to provide air access to the roots of the cedar).
- Carefully remove the seedling from the container (squeeze the sides of the container first - it will be easier to remove the soil ball).
- Spread out the twisted ends of the seedling roots without breaking the soil ball.
- Place the roots of the seedling in a bucket of water (the roots should not dry out during planting).
- Form a cone of soil in the upper part of the planting pit and carefully spread the roots of the seedling along it.
If the crown of the cedar is asymmetrical, less developed side - are located to the south (in the southern direction, the branches grow faster, and the crown will even out).
When planting large seedlings, drive a strong stake into the center of the hole and tie the cedar stem to the stake with a cloth tape ("eight").
- Cover the roots with soil and compact the soil with your hands.
- Form an annular bead of soil around the planting hole and water the seedling abundantly (about 5 buckets of water).
- Cover the soil surface with compost (after the water is absorbed into the soil).
The soil in the pit will settle by 8-10 cm, so plant the cedar in a small knoll so that after precipitation the root collar is at the level of the soil.
In damp areas, with high level groundwater, cedars are planted in bulk plots, 0.4-0.8 m high, with a diameter of at least 3 m. The soil is pre-dug up with the addition of compost and sand (if the soil is clayey). Fagots are placed in the sites (cedar supply, improvement of soil structure). Along the edges - it is advisable to lay sod layers (protection against soil erosion).
The active part of the root system (small suction roots) in cedar is located directly under the forest floor. Therefore, when planting a cedar, it is imperative to mulch the soil surface to maintain high fertility and good aeration of its upper layer. The best mulch is a litter of deciduous stands. In such a substrate, the activity of soil animals and microorganisms is active. It contains the mycelium of fungi - symbionts that improve the mineral nutrition of Siberian cedar and protect its root system from pathogens of the root sponge and other diseases.
The mulch layer retains moisture in the upper soil layer, which is especially important when growing cedar on light sandy loam, and on heavy clay soil protects its root system from squeezing into winter period... Add a layer of mulch annually to stimulate cedar formation adventitious rootsthat enhance its growth.
In dry periods, watering of cedars is mandatory to maintain the moisture of the topsoil. It is also advisable to periodically spray the crown of young cedars with water in the evening hours to remove dust and improve gas exchange through the stomata in the needles.
The soil under the cedars must not be dug up - the roots will be chopped off (only its top layer can be loosened).
Side branches should not be removed from a cedar (the more needles, the faster the cedar grows).
When small cotton balls appear on the needles (under them there are small sucking hermes aphids), wash them off with a strong stream of water and treat the shoots with AKTELLIK.
Trees and shrubs should not shade cedars. On open place cedar forms a decorative, spreading crown, is resistant to the action of wind and snow, begins to bear fruit earlier and is more productive.
Cedar is a self-pollinating species, but for better cross-pollination, it is advisable to plant not single trees, but groups of 3-4 trees (at a distance of 8-20 m. From each other).
More details about the Siberian cedar and the peculiarities of its cultivation - on the author's website "Growing Siberian cedar in central Russia" http://kedrovik.forest.ru.
Below are my detailed step by step recommendations for planting cedar.
Planting a Siberian cedar seedling
Notes:
The root system of the seedling should be located within the upper fertile soil layer on the site (about 20 cm). In the zone of the root system and above it, there should be a light, fertile sandy soil (to provide air access to the roots of the seedling).
During the growing season, it is necessary to feed the seedling 3 times with a solution of potassium sulfate - 20g / 10l. water (pour over near-trunk circle, consumption - 10 liters. per seat).
Top dressing - at the end of May, June and July. Nitrogen fertilizers can only be applied one year after planting.
Regular watering is required in dry weather so that the top 5 cm layer of soil does not dry out.
Mulch is forest litter harvested under alder, birch, or hazel (you can use cut grass). The soil in the pit will settle by 8-10 cm, so the seedling should be planted in a small mound (taking into account the soil settlement).
Planting Siberian cedar.
Photos were kindly provided by the customer Troshin Igor Mikhailovich.

Photo 1. Cedar extracted from a container

Photo 2. Landing pit 1m deep and 1.8m in diameter.

Photo 3. Fill the planting hole with a mixture of the top fertile soil layer with compost (if the soil is clayey, add sand to the mixture)
The mixture, when filling the pit, constantly moisten so that there are no voids.

Photo 4. Upper part fill the planting hole with fertile sandy loam (lighter fertile soil) and form a gentle cone of soil.
The planting hole must be prepared in advance, 2-3 days before planting the cedar, so that the water is absorbed into the soil and the soil settles!
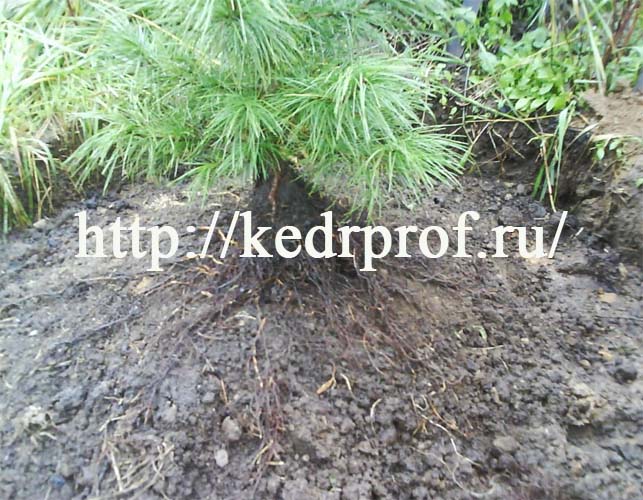
Photo 5. Place a cedar soil clod in the center of the planting hole, free the twisted ends of the roots (without breaking the clod) and spread the roots along the soil cone.

Photo 6. Fill the roots with fertile sandy loam, compact the soil with your hands, form a ring roller of soil around the planting pit and water the soil abundantly in the planting hole (about 50 liters of water)
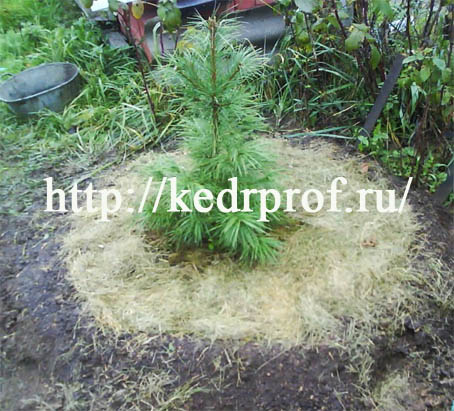
Photo 7. After the water is absorbed into the soil, cover the soil surface with 3cm. a layer of compost and, additionally, 5 cm. a layer of cut grass (to retain moisture in the soil)
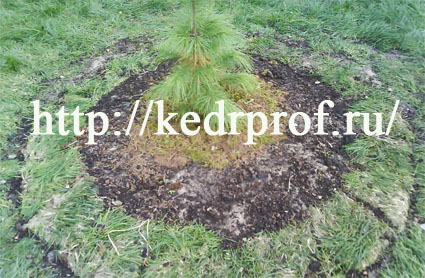
Photo 8. Pieces of turf can be laid along the edge of the planting pit.

Photo 9. Cedar - one year after planting.

Photo 10. Cedar - 3 years after planting.
I wish you success in growing these wonderful trees.
Respectfully yours, Candidate of Agricultural Sciences Ageev Alexander Borisovich.
Cedar is a coniferous tree. It stays green throughout its life. Wood made from cedar is characterized by strength and durability. The excellent characteristics of the wood have contributed to the destruction of entire forests.
Characteristic:
- The length is 30-60 meters.
- The cones are large.
- Various colors.
- Long life expectancy.
- The wood has a pleasant smell.
- On an adult tree, 1000-1500 cones ripen.
- The needles are bright green in color.
- Branches branch off horizontally.
- Exists various forms crowns.
- The length of the needles is 0.8–6 centimeters.
- It grows in a variety of soils.
- The ripening period of cones is on average 1 year.
To date, thirteen varieties of this tree are known:
- Korean.
- Canadian.
- Mexican.
- European.
- Red.
- Siberian.
- Slate.
- Far Eastern.
- Lebanese.
How to grow a cedar from a nut
On the plots of many gardeners, cedar grows. As a rule, they are grown from a common nut.
How to do the same:
- For successful cedar harvesting, a wet cone with seeds must be cold treated in the freezer. We put it there for three days.
- Then we take it out and take out the nuts.
- In the bottom of the plastic bucket, we make drainage holes with an awl.
- We put the earth in a plastic bucket and plant the nuts.
- Water, close the lid and put the container on the battery, placing a towel rolled several times under it. Heat is needed for rapid germination.
- When shoots appear above the ground, remove the cover.
- Cooking new house for cedar. Place an inverted pot at the bottom of the bucket. This will be the stand.
- We put a container with seedlings on an inverted pot.
- Pour water into the bucket. It should not reach the plant container.
- Cover the bucket with glass. The result is a greenhouse.
By summer, your little cedars will get stronger and you can plant them in the garden.
How to properly land in the open field
Before planting a seedling, you need to know at what depth the groundwater lies. Groundwater can be close to the surface as well as far from the surface.
For a tree, it is better if the groundwater is located far from the surface. If the water is close to the surface, then it is necessary to plant the tree on a hill. In this case, the development of the seedling will proceed normally.

It is recommended to pour rotted manure and compost into the planting pit. Moreover, it is not easy to pour it in, but mix it with the ground. This must be done. There should be no direct contact of the roots with fertilizers. Otherwise root system may "burn out" from oversupply nutrients.
In no case should fresh manure be poured. Without air access in this pit, manure will not be re-heated. Moreover, it will be colder there than on the surface. All sorts of bacteria will multiply there, and when they reach the roots of this layer, they will rot and work poorly.
1. Choice of landing time
Picked up right place... Now we are preparing the pit. When is it done?
It is advisable to dig holes in the fall:
- The earth will be disinfected.
- The walls of the holes will break through with frost.
It is important that the hole be dug 1–2 weeks before planting a young cedar seedling. Thus, the pit is perfectly weathered. In addition, all the walls of the pit will loosen.
The shape of the landing pit can be varied:
- Round.
- Square.
- Oval.
It is important that the shape of the pit is deep enough (70–100 centimeters). The diameter should be 80-100 centimeters. Thus, the shape of a flowerpot bowl is created. This pit is then filled with fertile soil.
The advantages of such a pit:
- Promotes the rapid development of a young tree.
- Roots will have room to grow.
- The underground and aerial part wood.
2. Site selection and soil preparation
So, we plant a cedar. Found appropriate place, it is better if it is a place lit by the sun. The soil must be fertile.

The tree grows better on such soils:
- Lungs.
- Loamy.
- Clay.
- Sandy.
On sandy soils, more watering is required and in winter it will be necessary to remove the trunks to increase frost resistance.
3. Treatment and preparation of soil
We start digging. For this, of course, you need a good, sharp shovel (titanium, steel):
- First, we dig in the fertile layer and throw it in one heap.
- Next comes a layer of clay, sand, loam (this layer is the least rich in nutrients, so it is disposed of).
If you dug a hole in the fall, then during the winter it slid a little and weathered. Therefore, you need to dig it up a little, correct it and throw away unnecessary soil. After you have purchased the seedlings, you need to start filling the hole.
4. The process of planting in open ground
- We take a fertile layer and throw it to the bottom (10-15 centimeters).
- In order for the soil not to settle, you need to use manual rammer or of own weight to compact the earth (if the earth is too dry, then you can pour water).
- Now we throw in more good fertile soil.
- Next, you need to fill up 3-5 buckets of humus or compost (every 10-15 centimeters it is necessary to ram the earth so that the root collar does not fall below the horizon).
- Then you need to move everything with a shovel and add some kind of fertilizer.
- So, before the final filling of the pit, 20 centimeters remain, so you need to drive in two pegs (support for the seedling).
Now we look at the root system of the seedling. If the taproot is slightly broken, then it is necessary to cut off the damaged part with a secateurs. When choosing a seedling, you need to pay attention to the fibrous roots (suction).
Rod roots is the skeleton of the root system. But the main supplier of nutrients is the thin, fibrous roots. The more of them on the seedling, the better. planting material... Moreover, these roots must be necessarily wet, damp. They should not dry out.
We look at a young cedar. The root collar is located between the underground and aboveground parts. This is the transition point of the trunk to the root system. The root collar should be in rhubarb with the plane of the ground. Moreover, the vaccination site must be on the surface. Otherwise, the tree begins to branch and branch out.
You can place a shovel on the ground to determine the horizon. After that, you need to try on a young cedar. It should be borne in mind that the earth will shrink. If the cedar is below ground level, then it is necessary to add more earth.
After the correct position has been chosen, it is necessary to backfill with earth. The main ones are the suction roots (fibrous).
Therefore, if you just cover them with earth, then voids will form between them and the roots will dry out there. That is, it will not direct contact with the ground. In this case, the cedar will be on a starvation diet.
In order to prevent this, you need to follow the following recommendations:
- Holding the tree with one hand, take some earth.
- Break it down into small parts.
- Gently sprinkle this earth between the roots.
Thus, the voids will be filled, and the earth will encircle the suction roots. In order to achieve a more dense abutment of the earth to the roots, you need to take it lightly and shake it. The earth becomes even more compact from such a vibration.
You also need to make a small depression for the water. After that, you need to make an earthen roller around the seedling so that the water "does not run away" prematurely after watering.
After that, you need to water the young cedar with water (0.5–2 buckets):
- The water should be warm.
- Water does not immediately go into the ground (it stays on the surface for some time).
- Small individual breasts of earth will go down, as if sagging.
- When the water finally leaves and earthen voids are formed, they need to be filled.
In good weather, the cedar will stand just fine. And when the weather is bad, how will he behave? He will be uncomfortable.
In order for the tree to be good, you need to take a pre-prepared rope and tie up the seedling. The rope must be strong and soft. You need to form a loose loop and twist the rope. Do not drag the seedling to one side. He should be free to stand. Thus, the tree will be protected from the winds.
Reproduction
Experienced gardeners propagate this species in two ways:
- Seeds that are located on the cone.
- Vegetatively (grafting).
For vegetative reproduction, a pine tree is grafted. Most gardeners use the first method. Because it guarantees an excellent result.
When propagating by seeds, it is imperative to carry out the classical stratification of seeds.
Cedar care
- Regular sanitary cleaning.
- Fertilizers.
- Plant protection.
1. Watering
Conifers are not all the same about watering. Watering young newly planted trees should be done once a week, especially in summer period... Pouring one to three buckets of water under each tree.

Mature plants that are well established and grow for several years require much less water. It is usually watered 2-3 times per season. But under each tree you need to pour enough a large number of water.
Well, sprinkling. Without exception, all conifers are very fond of sprinkling. While the tree is small, you can water it from a watering can. In the summer, the trees do not tolerate dry, dry air very well.
2. Soil and fertilizers
Following important stage leaving is weeding. The fact is that weeds can grow under the crown of a tree, which serve as a refuge for many insects and pests, and the spread of diseases.
- Weeding should be done shallowly, 5-10 sentiments, without affecting the root system.
- Weed control chemicals must be used with extreme caution because the root system is shallow.
The best way to retain moisture in plant roots is, of course, by mulching. Not only does it retain moisture well, it also creates more or less stable for the root system temperature regime and with frosts in winter and summer with heat.
The following materials can be used as mulch:
- Chopped bark conifers.
- Peat.
- Dry leaves.
3. Top dressing
In principle, all types of cedar are unpretentious and do not require any additional feeding. But, of course, they respond very well to them. The most the best fertilizer compost is considered for needles. Its composition is closest to the natural soil in which the tree grows.
- In order to properly add compost, you need to loosen the tree trunk circle.
- Add a little compost by scattering it around the trunk.
- Mix the compost with the top layer.
It is necessary to loosen shallowly. Because the root system of the cedar is too close to the surface and therefore can touch it.
Mineral dressings are added once a year, scattering evenly around the trunk circle. Before that, you need to read the instructions. After applying mineral fertilizer, it is necessary good watering... In order for the fertilizer to be well absorbed.
It is forbidden to apply mineral fertilizers under the needles in the fall.
4. Diseases and pests
Diseases of the cedar are quite diverse.

Symptoms of diseases are visible when the plant is seriously ill:
- Inspect the tree regularly.
- Antifungal treatments are recommended for all types in spring and fall.
- Fungicide treatments are best done by spraying.
5. Transplant
After the planted seeds have turned into young seedlings, it is necessary to transplant. Cedar loves nutritious soil.
To transplant, follow the instructions:
- Prepare the place.
- Dig up a young seedling.
- Dig a suitable hole.
- Insert a young seedling into the hole.
- Drizzle with water.
- Sprinkle with earth.
Answers to frequently asked questions
In the summer, the tree fell off and also turned yellow.
Almost all coniferous trees fall off in autumn. As a rule, the cedar falls off once every three years. In the process of shedding, the tree turns yellow. A healthy and well-groomed cedar should not crumble and turn yellow in summer. As a rule, the needles fall off due to insufficient watering or a variety of diseases.
Different growth of the tops of young trees.
Each cedar pine is unique in its own way. One will grow rapidly, while the other will develop slowly. Typically, rapid growth is noted one year after planting. Whereas the first two years the root is formed.
Why appears white bloom on the needles?
All types of cedar are susceptible to a touch of Siberian hermes. This insect got this name. Siberian hermes does not cause significant harm to the needles. With an increase in the number of Siberian Hermes, other insects destroy them.
How are nuts obtained?
First of all, you need to get a stab. In order for the fruits to crumble with a special punch, they beat the cedar. In windy weather, the fruits crumble themselves. To obtain nuts, a special device is used that grinds them. As a rule, the fruits are harvested in late summer.
Planting and caring for cedar seedlings
Planting cedar seedlings
The soil
For planting cedar, drained soils with a high level of groundwater and loamy, sandy loam, podzolic gray forest soils are most favorable. Landing on black soil and sandy soils is less favorable. Avoid heavy soils (heavy clay soils), excessively moistened soils (swampy).
In its natural habitat, cedar is found in a fairly wide range of soil conditions: from upland and lowland bogs to dry lands with loamy soils, from poor to medium-rich, from neutral to slightly acidic soils. In the upper part of the mountains, it lives well on gravelly soils and even on stone placers.
Landing scheme
Landscaping personal plot, dachas, territory of the organization. It is recommended to plant in rows along sidewalks, fences, roads. With a distance between trees in a row from 3 to 5 meters.
Preparing potting soil
The soil from the holes is mixed with peat, humus is added - rotted manure, wood ash, if possible 3-4 handfuls of coniferous forest litter. This contributes better development on the roots of mycorrhiza (symbiosis of root endings and hyphae forest mushrooms), providing good mineral nutrition for conifers in the future.
Proportions: 3 land, 1 peat, 1 humus, 0.5 ash, 0.5 land from the forest. OR
Proportions: 2 soils: 1 peat: 1 sand + preferably 3-4 handfuls of forest floor. OR
Proportions: 2 lands: 1 sand: 1 earth from the forest.
Digging a hole and landing
When digging a hole, a small earthen dump is made from the sod around the seedling 50x50 cm in size.This will retain water when watering.
Sprinkle the soil in the hole - mulch (mulch: peat, chips and bark, pine / spruce needles, well-rotted manure, garden compost, mowed grass, green manure plants, sawdust, straw cutting). This keeps moisture in the soil, raises the temperature of the soil, enriches it with nutrients.
During the first year after planting, the soil in the holes will settle. It is recommended to fill the gap with potting soil.
Growing cedar seedlings
Watering
The intensity of shoot growth mainly depends on the moisture regime during the growth period. When sufficient watering plants more and better absorb trace elements from the soil necessary for development.
Can't be watered cold water from the well. The water temperature should not be lower than +15 C. Good results are obtained by irrigation of trees by leaves / needles (sprinkling of crowns). Irrigation is carried out early in the morning or after sunset.
Herbaceous vegetation
We do NOT recommend strongly fighting the grass, since a young cedar (3-6 years old) and at the stage of survival, needs shading from bright sunlight. IN natural conditions small cedars grow under the canopy of mature trees. In addition, a large number of beneficial insects, in particular, ladybugs, bedbugs, which are happy to eat aphids "Siberian hermes". Huge weeds can be removed / pruned.
Monitoring planting conditions
Cedar plantings need attention and care. It is recommended to constantly monitor soil moisture, insect and disease reproduction. Identifying lesions in the early stages of development will keep the planting from dying.
Aphid "Siberian hermes". A small insect, about 4 mm in diameter, covered with a white "fluff" due to which it is extremely unnoticeable among the cotton-like plaque left by the processes of its vital activity on the branches of the cedar. He especially loves young soft spring shoots. If there is a little hermes, then DO NOT do anything. And a small amount is not critical for a plant, this is normal for a cedar. Kind of like developing immunity.
If the cotton wool coating is very abundant\u003e 30-40% of the area of \u200b\u200bALL branches, then buy FUFANON (insecticide) and spray.
Markovsky Yuri - any books.
Siberian cedar - a symbol of health and strength, a tree of life that you can try to grow at home. Growing a cedar from a nut is not as difficult as it seems. First you need to purchase planting material: it is desirable that it be a whole cone with large scales - the seeds are stored in it better. It is important that it is fresh, of a new crop, without mold or foreign odor: such buds are sold in the fall, from the end of September. Fried or dried pine nuts are not suitable for this purpose - the embryo dies when high temperatures... It is better to find a reliable seller in advance. You should not buy cones in places where cedars definitely do not grow.
To extract the seeds, the cone must be boiled with boiling water - then it will open. From the remaining scales, you can prepare a healing tincture or decoction, which are used to treat many diseases.
Seed stratification
When growing cedar at home, the only difficulty may arise: the stratification of seeds, which is necessary for their germination. It takes place in several stages.
- First, the nuts are soaked in hot water for three days, changing it daily. Some of them may float up - these are empty seeds, they can be thrown away immediately.
- The rest must be treated with a pale pink solution of potassium permanganate and fungicide, dipping nuts into it for several hours.
- The next stage is cold stratification. Nuts should be mixed with clean, moist fine-grained sand (you can pre-calcify it in the oven), sawdust or peat chips in a 1: 3 ratio.
- The resulting mixture must be placed in a cloth bag and put in a small wooden box, in which holes are made in advance so that there is air access.
- The container with nuts is placed on the bottom shelf of the refrigerator (in the vegetable compartment) or placed in the cellar for at least 3 months. The temperature for seed germination should be about + 4-6 ° C, lowering to –4 ° C is allowed for no more than 2-3 days.
Every 15 days, the bag must be ventilated, the mixture must be moistened to its original state, and the nuts must not be rotted or moldy (the damaged ones must be removed and the sand replaced). After a while, they will start to sprout. The best seeding season is April-May. If at this time the seeds are sown without treatment, they can germinate after a year.

Accelerated stratification
There are more quick way germinating cedar seeds at home, but it is less reliable than stratification in the refrigerator. You will need fresh, clean nuts, which must first be washed in warm water, free from resin, and then keep in cold (no higher than 0 ° C) for about 3 days. It should not heat up, otherwise nothing will work. To prevent this from happening, ice cubes can be periodically added to the container. Seeds that have sunk to the bottom are suitable for planting.
You can plant them in a substrate prepared in advance (sandy loam, loamy soils or a mixture of peat and sand are best suited), the temperature of which should not be higher than 15 ° C. Nuts are sown to a depth of 2-3 cm, compacting the soil from above - this will help the sprouts to get rid of the hard shell. The containers are needed with a height of at least 8 cm and a volume of about 300 ml. Crops are mulched with sawdust or peat chips, placed in the lightest part of the house, but without access to direct sunlight, and watered regularly. The seedlings need a temperature of about 20-22 ° C.
Another option for fast stratification can be used.
- Pine nuts are soaked in warm water for about 8 days. It needs to be changed every 2 days.
- After that, a sand-peat mixture is made, into which the seeds are placed.
- Crops are kept at home at room temperature, periodically moistened and shaken, for 30 days, until they begin to hatch.
- The seedlings are then refrigerated and stored at about 0 ° C until planted in the ground, or immediately planted in a pot.

Seedling care
Growing cedar at home from seeds is somewhat more difficult than in the open field, since this tree is very demanding on lighting. If there is not enough light, it is best to supplement the seedlings with special lamps. It is necessary to prepare for the wintering of seedlings in the first year of life, if they stay at home, and will not be planted in the ground: they will need a temperature of no higher than 10 ° C. Such parameters can be on glazed balcony or in a barn. If this condition is not met, young plants will die after transplanting into open ground.
One of the main enemies of crops is fungal disease - "black leg". To prevent it, you need regular treatment of plants with a fungicide (once every 2 weeks).
It is better to start immediately accustoming young cedars to the open air: as soon as the threat of frost has passed, take them out into the garden or on the balcony. This should be done gradually. Plants from seeds, grown at home, and not in the ground, are very delicate and can easily die from hypothermia or, conversely, overheating. The soil from above should be mulched with sawdust, pine needles or peat chips so that it does not dry out. Watering these plants needs moderate, no frills, otherwise the risk of decay of the root system will increase, but the soil should not be allowed to dry out. Cedars respond very well to feeding. For this purpose, you can use special fertilizers for conifers... They need to be brought in infrequently: 1 time in spring and 2 times in summer.

Wintering and transplanting seedlings into open ground
Young cedars grow very slowly: in the first year of life, they look like stems about 2–3 cm high with a bunch of short needles at the top. On the second, they can grow up to 7 cm, and in four years they can reach 20-30 cm. As they grow, the seedlings will need to be transferred into larger containers, making sure that they are planted at the same depth. Plants can overwinter at home on the balcony or in the garden; it is not necessary to add pots in drops if the temperature is not lower than 10 ° C.
Young cedars should be transplanted into open ground before they reach a height of 1 meter. The landing site should be shaded, with a low groundwater level. Such seedlings will bear fruit no earlier than in 20 years - for this you need to plant several trees so that they pollinate each other.

Output
Growing cedar at home from seeds is complicated only by the need to stratify and create the right temperature for wintering seedlings. The latter is necessary to prepare plants for transplanting into open ground. Caring for young trees consists of regular watering and feeding.
In many ways, getting good seedlings depends on the planting material. When choosing, you need to focus on the size of the cone and its scales - the larger they are, the better. Cold stratification for several months gives an optimal result, as it is close to natural conditions germination of seeds. You can try several ways to grow a tree that will delight with the beauty not only its owner, but also his grandchildren.