To congratulate your loved ones, grandfathers and dads on the Day of Defender of the Fatherland. Love and respect will greatly express a postcard made by your own hands. Some of them will require painstaking mom's mom, others can make even a child. Choose to your taste!
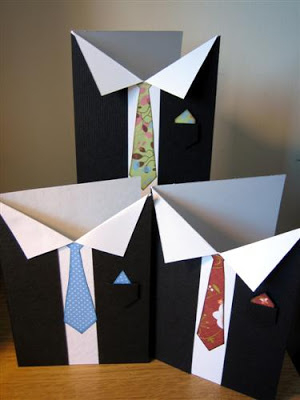
Card in the form of a male costume, shirts, a tie is a classic option that is suitable for congratulations to the Father of the Family not only from February 23, but also happy birthday and any other holiday.
You can make a complicated postcard with a lot of details that your fantasy will prompt. And it can be limited to a simple scheme with which children will completely cope under the leadership of an adult. So, flattering with colored paper - and for work!


Inside the postcard you can attach congratulations on a separate sheet, or write it on the postcard itself.

The shirt made in the Origami technique can be pasted on the usual postcard.

The simplest version of the production of postcard-shirts: We make cuts on the sides and bending the edge of the "collar" to the middle.


Several more difficult to make a postcard in the form of a male jacket. Below, give a papers folding scheme.

Another coaching scheme is this time you will have an envelope in the form of a shirt. Inside you can invest your own baking cookies.

A real man looks great in a tie. Here is a scheme for folding a tie of colored paper.

Tie can be fastened under a paper shirt collar.

Green shirt suggests a military uniform. Still, the holiday is dedicated to the Defender of the Fatherland!

The symbolism of the holiday on February 23 implies military theme. Therefore, the stars, ribbons, weapons and military equipment will be appropriate. Khaki color and motley camouflage will complement the image.


Using the proposed sweep, make this spectacular postcard will be easier.

I wonder the postcards, acquiring the volume when opening. Inside this postcard hid the ship rushing along the waves directly to the viewer. The main complexity of manufacturing is to glue the volumetric elements correctly so that the postcard can roll and open; Therefore, before sticking, check the performance of the elements. Good for this purpose rubber glue, because It allows you to adjust the position of the glued parts, not port paper.

Invite the child to decorate a postcard with sun, clouds flying seagulls. And the ship will be useful to supply anchor and rescue circle!

This postcard in the technique of through cutting () is under the power of more experienced needlewomen, but it is very effective and decorate the father's writing desk!

Below is a template for cutting card with a sailboat.

Very well looks out the outstands on a contrast background. Such a postcard can be done with the child: Mom will cut thin details, and let the toddler stick letters and numbers.

White substrate sheet is pasted in order for the extent to be perceived on a smooth contrast background. And on the next page you can accommodate a congratulation.


The popular queen technique can also be the basis of the postcard. See how fun congratulations on the background of the festive salute!

Cut from paper (color or white) Silhouettes can be pasted on a contrasting background, and get the original postcard.


Cutting templates can be chosen according to your mood. For example, in a serious style.


Or in a humorous key.


Or even in historical.


You can also use military equipment.


If these drawings seem to you are too complex as templates for cutting, simply print them (most of the pictures when saving are greater than on the screen), and offer a child as coloring. The painted drawings can be pasted on the card and give dad or grandfather.
One of the favorite men's holidays in my family is February 23, and we always make cards on February 23 with our own hands and loved ones. Perhaps someone will say that it is easier to buy ready postcards, but children really like to do them, so we do this together.
By the way, from several acquaintances heard a version that you only need to congratulate those who served in the army, but I do not support this point of view - the defender of the Fatherland is every man.
What to portray
To make a beautiful child with your own hands, first of all, you need to choose the plot of products. If a man who is intended for a present, served in any troops, then you can choose any suitable symbolism.Similar to him:

And if not, then you can find a courageous symbol - for example, my son often draws horses, my brother gets cards with a tank because of the addiction to the famous game.
Choose an artistic style of work, and proceed - the manufacture does not take much time, and your loved ones will be happy for a long time to give such a gift.
Option with applique
Different labels for download:


The applique is quite simple - you can look at the photo of the posts you like and repeat. But if you want to do everything from scratch, then follow the instructions.

- On ordinary paper (you can also in the cell), first make a sketch of the future postcard - determine the form and color of all elements, location and composition, work the form.
- Make a pattern for each element (especially if you do with the child - it is easier for them to cover the finished pattern). To do this, draw all the items on one sheet of thick paper or even cardboard (if you plan to use the pattern repeatedly), mark the front side and cut out with an acute damp knife or good scissors.
- Select the basis for your postcard. It can be a piece of dense cardboard or even conventional white watman, special paper or sheets from a watercolor album.
- Give the workpiece the desired shape - cut the corners, cut the edges, make a bigka - the grooves, along which the postcard will be folded. To do this, you need to hold a line in a line with any unpaid pointed subject. Most often used old ballpoint pen.
- Pick up the color paper for appliqué and cut the desired items. You can use conventional colored paper, you can buy shiny or velvet, neon or with sparkles.
Our houses always have paper for scrapbooking, and I allow children to take several sheets for their postcards. And if you really need some color paper, which was not at hand, you can always just mix the paints and paint the desired leaflet.
- Sequentially lubricate the elements with glue and glue into the right places, carefully smoothes with a dry clean cloth.
- Put the applique for the press to remove excessive waves from the glue.
- Do not forget to sign a postcard.

Another option (it is better to make such a cardboard cardboard card):


Volume operation techniques
A beautiful postcard made by your own hands to your favorite dad on February 23 can be volumetric. Think about how you or the child would like to give a postcard volume - it can be quilling, a volumetric application, or even a postcard that becomes volumetric when laying.I sometimes help the kids to make postcards in scrapbooking technique, but much more I like to watch what they are invented by themselves - therefore, if the child is not averse to befang, be sure to listen to his desires.
Quilling
In this technique, the easiest way is to make a bulk card, especially since any special plot can not be invented, quilling and itself is very attractive, so it is enough to simply portray in this technique the date of the holiday, however, if you want, you can schematically portray something .

For the manufacture of congratulatory cards in the queen technique, you will need to purchase or make a blank for a postcard, as well as paper strips for queening - they can be purchased ready. You can choose color to your taste - it can be classic hack shades, symbolizing military uniforms, or any others that seem relevant.


Cut from paper
Volumetric postcards are always very impressive, and therefore there is nothing surprising in that the child may want to make just such a postcard. The bulk card on February 23 can be quite complicated - if you chose this option, then it is better to watch the video-Turk.And you can use the sketch made with your own hands - especially when you plan to make a folding bag.
For example, you can draw a paper on paper is not too complicated for cutting the plot, and make a card that can be placed on the table or shelf. Another one is sticking to the carved part - rear, and a beautiful curly congratulation is obtained.


You can try to make a postcard where the bulk design will be in the middle - for example, the ship on the waves cut and glue is not too difficult.

And you can simply make a bulk application - the carved elements are glued not to glue, but on special adhesive pads and springs, and then, decorative elements slightly lag behind.

And a few more ideas for inspiration:
Now you know how to make a postcard, which will be happy every father!
Very soon the holiday will come for the PAP on February 23. Each child wants to congratulate your favorite dads, grandparents with this male holiday and make a gift with your own hands. We offer unusual ideas how to make simple postcards on February 23 with your own hands in kindergarten.
Postcard with carnations
- Dense colored paper for the basis of the postcard;
- Slices of colored paper for colors;
- Chips from a color pencil of red (can and yellow);
- PVA glue;
- Markers or markers.
First you need to prepare nails buds. To do this, take a color pencil of red and sharpening to make several chips. End of chips to connect and glue, it turns out a flower. Make a bouquet of 3 colors. From color green paper cut stems and leaves.
Prepare the basis of postcard made of thick colored paper. Bend in half and on the front part of glue ready-made carnation flowers. Inside the postcard write good words wishes for the holiday. Such beautiful postcards on February 23 can be given dad or grandfather.
Postcard - Ship
To make such a postcard you need to cook:
- Dense colored paper for greeting cards;
- Colored paper of white, red, blue colors;
- PVA glue (you can use adhesive pencils);
- You need to prepare all the details of the compartment for the postcard.
- To do this, cut on the shape of a trapezium white boat.
- White paper also cut 2 pipes and 2 clouds.
- Red paper cut rectangles for decorating pipes and boat.
- From blue paper cut windows on the hold of a ship in the form of a circle.
- Cut 2 long strips from blue paper and roll on a pencil to make wavy stripes.
- Collect boat: plain windows, red stripes on the white basis; Glue pipes decorated with red stripes.
- Bend thick colored paper in half.
- Disclosure the postcard and outline the location of the details of the composition.
- Bend the base of the boat is about 1 cm and glue the finished boat to the postcard.
- Glue 2 clouds
- Apply glue parts for the bottom of the postcard and glue the wavy strips on them, there should be bulk waves.
- The finished postcard can be signed with beautiful words.

Postcard - Circle
To make such a postcard you need to cook:
- Dense cardboard red (you can, at will, any color);
- Colored paper of white, blue, yellow colors;
- Colored markers or markers;
- PVA glue (or glue - pencil);
- Satin ribbon.
How to make a postcard with your own hands:
- From color cardboard cut the mug.
- From colored paper Cut blue cloud, white birds, parachute and gift.
- Gift decorate atlasal ribbon.
- On the shape of the circle, it is all the elements of the composition and glue with a PVA or a pencil glue.
- Ready postcard sign from February 23.

Postcard - Mundir
Original postcards on the Day of Defender of the Fatherland will enjoy an adult. You can make them easily and quickly, without applying special skills.
For the postcard you need to cook:
- Dense colored paper;
- Colored paper;
- Markers;
- White sheet of paper;
- Buttons 2 pcs;
- Glue stick.
How to make a postcard - Mundir do it yourself:
- From colored paper cut tie, pocket, corner handkerchief.
- Tie painted drawing (optional).
- Tight colored paper folded three times and bend the edges.
- On the resulting back inside to put a white sheet for congratulations and fasten with glue - pencil.
- Top of sticking ready-made tie, pocket with handkerchief.
- On the right toreon glue buttons.
- Mundir for the holiday on February 23 is ready.

Postcard - Tank
To make such a postcard you need to cook:
- White sheet format A-4
- Black round buttons 30-5 pcs;
- Brown oblong buttons - 15 pcs;
- Colored paper;
- PVA glue.
How to make a postcard - a tank with your own hands:
- On a white sheet to place the location of the details on the postcard: Tank, Green Grass, Cloud, Sun.
- Pencil draw tank template.
- Drawn pattern lubricate plow glue.
- Black Buttons Plug Template: Top Tank, Wheels, Weapon.
- Caterpillars to poke brown buttons.
- Cut green grass and stick on the bottom of the postcard.
- Cut the cloud and sunshine, stick up the postcard.
- Sign a postcard with warm words congratulations on the holiday on February 23.

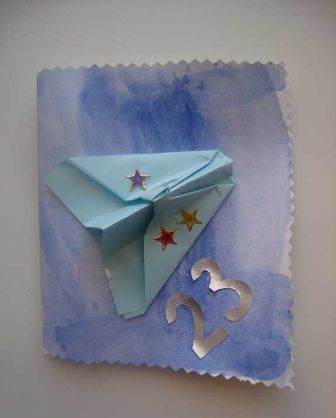
Volume card
Beautiful bulk postcards on February 23, children's hands will love not only dads and grandfathers, but brothers and friends.
For a bulk card need to be prepared:
- Dense blue paper for greeting cards;
- White paper;
- PVA glue (or glue - Kararanadash);
- Markers (or markers);
- Pattern pictures.
How to make a bulk card:
- Cut the details of the pictures from the ready template.
- Bend the blue leaf in half - it will be the postcard itself.
- Put all the details of the pictures using PVA (or Glue - Pencil Glue).
- The white loop loop from the plane roll over the pencil and glue in 2 places: on the end of the aircraft on one side of the postcard and the end of the plume on the other side of the postcard. It turns out a bulk loop.
- Flomasters paint the face of the pilot.
- The postcard can be signed on February 23.

Pattern pictures for bulk card

Festive card - painting
For such a postcard you need to cook:
- Multicolored felt (or velvet colored paper);
- Decor for composition: White buttons, yellow satin tapes, white wavy tape;
- Picture frame;
- PVA glue.
How to make a postcard on February 23 with your own hands:
- Cut from blue felt the basis of the picture.
- Cut out the felt of the sunshine, glue rays from satin ribbons.
- Cut out the felt cloud, stick on them white buttons.
- Cut sails with sails, decorate the sail with multi-colored ribbons.
- White waves shut to the base to the base.
- Half the base of the paintings paste blue water from colored paper.
- On the prepared framework of the picture paste all the details: cloud, sunshine, boat with waves.
- Put the picture in the frame.

Beautiful postcard from plasticine
This postcard on February 23 with your own hands can be done very easily and quickly. From plasticine to make a tricolor flag: white, blue, red color. To make plasticine 23. To impose all parts of the plasticine composition on the white base of the postcard from velvet paper. Beautiful and original postcard.

Postcard - Star
The simplest postcard from February 23 in a couple of minutes. Cut out of colored paper Star template, enclose or paint a star red. Sign a postcard with good words wishes for the holiday.

Postcard from February 23
To make a postcard Dad on February 23 need a little time. The most important thing is colored paper, scissors and glue.
It is necessary to cut all the details of the drawing of colored paper and stick on a beautiful tight sheet. For the basis of the postcards you can use bright colors: purple and yellow. This postcard can be done even to the smallety kids in the kindergarten. Do not forget to write congratulations on the holiday on February 23 on the postcard!

Summary: Postcards by February 23 with your own hands. Postcards for dad and grandfather do it yourself on February 23. Defender of the Fatherland Day. Postcards for the Day of Defender of the Fatherland.
Dad or grandfather on February 23 will be pleased to get a postcard from a child, made by hand. Postcards by February 23, which we offer in this section are decorated with ordinary or volumetric appliques from colored paper. There are absolutely simple applications available even to children for 3-5 years. There are crafts more complicated for children of senior pre-school and younger school age. For young children, prepare in advance, cut out all the details of the pictures so that they can only stick them to the postcard. Adult children can choose the parts of the applique. It will be interesting to make a child for dad or grandfather the origami postcard. Origami schema you will find on our site.
Pope love technique, so postcards on February 23 with her image will be very by the way. Make appliqué with machine, airplane, rocket. Application can be both simple and volumetric.
Applique boat. Applique ship
Simple applique from paper boat can be done even three years old. On the site pochemu4ka.ru you can download the ready-made template for the manufacture of a simple applique of a paper ship. See link \u003e\u003e\u003e\u003e
But examples of more complex volumetric appliques with the image of ships. How to make such postcards by February 23, you can guess the photos.


Applique machine. Applique machine
We offer you to decorate the postcard of the Pope on February 23 an unusual application in the form of a typewriter made of candy candy. Master class on the manufacture of this postcard on February 23, see the link \u003e\u003e\u003e\u003e

Applique aircraft

Applique Rocket
Finally, it will still be for the decoration of postcards for dad or postcards for grandparents. Application rocket. In the window, the child can incur its own photo or a photo of the beloved dad / grandfather. Download the ready-made rocket template.


Another interesting option for dad cards do it yourself - postcard origami shirt. There are many ways to manufacture postcards of this type, we will tell about the main, starting with simple options and ending with more complex origami postcards.
The easiest way is to fold a rectangular sheet of paper in half. From the back of the postcard cut off the strip of paper from above. Make two shallow outbreaks in front and get them back to the center to get a "collar" shirt. Separately cut the tie, decorate it with pieces of colored paper, then glue the postcard.

But everything is the same, only the "collar" at the postcard-shirt is made on the other side (so it is double) and decorated with butchers. Detailed instructions (with photos) for the manufacture of this postcard by February 23, see reference. Ready Tie template can be downloaded.

In the manufacture of such a postcard by February 23, you can use the finished template from the KROKOTAK.COM website. Download template.

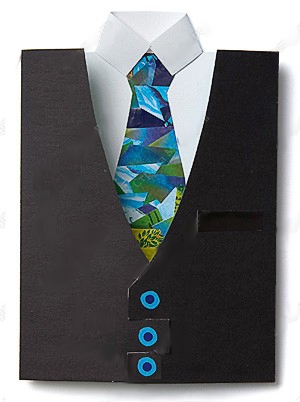
How to make an elegant postcard with a child in the form of a business suit with a tie as a gift to Pape on February 23, look and read on this site.


Make such an original origami postcard on February 23 as a gift to dad or grandfather is much easier than it may seem at first glance. With little help of adult make it can even be a child of senior preschool age. Detailed master class See below.

1. Bend the paper sheet of rectangular shape in half.
2. Bend the sides to the center.
3.4. Generate the edges of the sheet as shown in the photo number 3 and №4. Now you make the sleeves of the future shirt.
5. Turn the sheet of paper and generate the upper edge.
6.7. Turn your workpiece back and generate the upper corners to the center as shown in the photo number 6, №7 and number 7a. Now you make a collar.
8. You can only adjust the lower edge and fill it under the collar. Postcard by February 23 is ready!


Or you can write a congratulation for the dad or grandfather right on a sheet of paper from which you will fold the shirt in the Origami technique.


Probably, you noticed that paper shirts in the photo are decorated with ties. The tie can simply cut out of paper, but you can fold it, like a shirt, in the Origami technique.
An interesting idea is to decorate a postcard with real butterfly shirt, and instead of a tie to make a butterfly from pasta of the same shape. Pre-paint pasta paint, best waterproof acrylic.


Instead of making a postcard-shirt, you can stick to the Greeting card of pockets, decorate it and put a congratulation into it. Just and tasteful!

3. Postcard for dad do it yourself. How to make a postcard dad
Another postcard for dad can be made in the form of a suitcase with tools. Download ready-made tool templates. Print and cut them out. Let the child paint the tools and on each of them on the reverse side will write any one positive quality of his dad. How to make a suitcase from a color cardboard sheet you will understand if you carefully consider the photos below.

4. Postcard for grandpa. Greeting card for grandpa do it yourself
If your grandfather or dad is fond of fishing, then for him the following greeting card by February 23, made by his own hands will be appropriate. For its manufacture you, in addition to colored paper, you will need a thin rope. From it you will make the fishing rod.
For the holiday of the Day of Defenders of the Fatherland in Gardes and schools, they begin to prepare in advance: to teachers and teachers need to come up with that their pupils will give their favorite dads and grandfathers, and all these ideas are incarnating under the sensitive leadership of adults.
Congratulations to a man on the Day of Defenders of the Fatherland We offer the most expensive gift - made by the child's hands with a postcard or pattern. What can kids make for their dads and grandparents? Read in the article article.
How to draw a postcard on February 23 with a pencil and paints for children?
In kindergarten, children learn to draw their first schematic drawings. Step-by-step lessons will help educators in the preparation of gifts for the Dadas and Grandparents on February 23, because it is in the preschool institution, the kids will learn about the holiday and his meaning, and why men congratulate on this day.
Let's start with the drawing. We need:
- protractor (we will draw a star with it)
- circle or other device with which you can draw a circle
Go to drawing:
- We draw a circle and spend two lines in it, which will be divided into 4 equal sections.
- Measure 72 degrees on the transportation and diameters within two opposite sections of the line.
 Measure 72 degrees on transport and carry
 - Remember 72 degrees from the already spent line and blacks are directly straight, and then the third.
 Repeat
 - In order not to get confused, we note the points that I doubt. How to properly spend the lines in the photo.

- We should have 10 identical sections. Syllote in the middle of each line (through one straight). We draw a star and spin the corners slightly.
- I wipe the circle and extra lines inside the star. Find out the outline around the star.
 We carry out a line all over the contour
 - Now you will depict a George ribbon with bent down the edges. We will continue the edge of the tape on both sides of the star.

 Draw a ribbon
 - We carry out three parallel black lines on each part of the tape. A schematic drawing turn into a postcard, squeezing a star and a tape, and adding the inscription "Happy Defender of the Fatherland Day."
 Take the ends of the ribbon to the edges of the sheet
 Draw stripes on the ribbon
 Video: Simple drawings. Soldier
An excellent drawing on the topic of the Day of Defender of the Fatherland is a valiant soldier in the post. Such a drawing will decorate and a postcard, and a school wallpaper, prepared for the holiday.
For drawing, you will need:
- blank paper
- simple pencil
- colour pencils
- rule


- We divide the sheet into two halves, spending a vertical line in the center. The left side should be a little right. Draw an oval in the upper third. It will be head. Under it draw the contour of the future collar.
- Focusing on the preliminary markup, draw in detail the head of the soldier, to whom the hat is dressed. We add the neck, shoulders. The soldier will be in the bushlate, because they will make it a contour.


- Draw a face, hands. Dorify small details of clothes.
- Do not forget to draw our protector automatic, which he holds in his hands. First, sketch the lines, and then draw in more detail. The photo shows what you need to portray.


- Now you need to draw the defensive coloring of the shape and the contour of the banner in the back background.


- We write on the left side of the sheet inscription "Happy Defender of the Fatherland Day" and specify the background.
- After that, it will also be left to decorate the drawing.


If the previous drawing is difficult to draw, then with a schematic image of the tank, represented in a step-by-step lesson below, the child can cope without adults.
- For drawing, you will need pencils and sheet of paper. It is better to use a tetrad sheet into a cell. So the child will be easier to navigate and spend all the lines correctly.
- We draw a tank blowing: in the center of the leaf we carry a line 4-5 cm long, and above it at a distance of about 1 cm one more parallel.


- On the left side of the line connect, and on the right side, I will show the beginning of the beginning.
- Start draw tank tower. To do this, we will depart down by 1 cm and at a distance of about 1/3 from the length of the blow. Draw a stretched rectangle with a length of 10-12 cm. Departed from the edge of the base of about 0.5 cm, we put the points and connect them with a semicircle.


- Bottom draw the base of the caterpillar tank. How to do it, shown in the photo. Inside the base, draw 5 circles and sketch them with a black pencil.

 Draw a tank tracked tape
 Painter in black 5 circles at the base of the caterpillar ribbon
 - Dorisuy the star in the center of the tower and the developing flag on a long river. Spread the tank with green, an asterisk - red and add the inscription.


Video: Simple drawings. Children's tank
Video: Postcard Dad on February 23, Military aircraft
The schoolboy will easily cope with the "Military Ship" pattern, which will be a good gift of dad or grandfather, if tanks and airplanes have already been given to the perpetrators of the holiday.

Since the Day of Defender of the Fatherland was once had the name "Day of the Soviet Army and the Navy," then it is all the military: and on land, and at sea.
That's what we will draw:

To begin with, you will prepare everything you need:
- blank paper
- simple pencil and black felt-tip
- color pencils or in stock paints


- We split the sheet into two halves, having conducted a horizontal line. Do not forget that all the preliminary contours do not draw without push to the pencil so that then the trace of the broken lines are left.
- Ship will draw in the lower half. First, draw a wavy line that will portray the water surface. Draw stern with all the necessary protrusions.
- On the left on the stern draw a gun. In the central part of the stern, we add such elements: the captain's logging and radar. They are easy to draw them, if you exactly repeat all the lines, as in the photo.


- In the lower part of the Captain Cutter, I draw a torpedo battery, add a number of portholes.


- We draw a developing flag and for greater realistic paintings add a couple of flying birds flying away.
- You can stop on this and go to coloring. But for a greeting card, this is not enough: you will also have to add an inscription.
- It is necessary to figure out the drawing: a warship - gray-blue, water - blue, at the bottom of the ship draw the red stripe and pick up the desired colors for the image of the national flag.


Video: How to draw a cool drawing on February 23?
Ideas and postcard templates by February 23 in kindergarten
- The issue of preparing for the holiday on February 23 begins to disturb the educators of kindergartens and school teachers long before his offensive. This only at first glance it seems that there is nothing difficult in choosing a suitable option for the present.
- But this is not exactly the case, since the process of creating your own handicrafts or postcards, which the children will then give the most expensive people - dads and grandfathers, must pass them, and therefore from complex elements or multi-tiered paper structures stand right away.
- Simple, but the original postcard or workout is much more like the little "creators" masterpiece and adults. What can be prepared for holiday gifts on February 23 with children in kindergarten - see photo selection below.


 Cover for postcard


Ideas and postcard templates by February 23 to school
The guys in school are already able to do a lot, and therefore the simple image of a tank or aircraft will not bring such pleasure as the creation of cards with their own hands with a surprise that advanced details, special applications and so on.
See the photo presented below a selection of gifts for the holiday of February 23, made by schoolchildren, and inspire!


- From color red paper cut the star. So that it turns out to be volumetric, you need to beat the "ears" that will be glued to the postcard. The star bends over the lines by external fins, and internal - inside.
- Glue an asterisk on the wrong side of the postcard (turn).

- Decorate with stripes cut out of colored paper golden color. Little star will also make golden.
- Insert 3 golden strips vertically and horizontally on the front side of the postcard, as shown in the photo. Next we glue a golden star. So that the strips glued exactly, it is better to pre-stand the point of the point where they should be.

 How to fold the star
 - The bulk postcard can be made in the technique of quilling. For the manufacture of postcards, except paper (color and white), you will need toothpicks, glue and scissors.
- We fold the sheet so that one part is a little longer. We write on it. Large digits of the date of the holiday. Two must be on the front side of the postcard. After the twice is drawn, on the second postcard page add a triple. Cut the numbers at the outer edge.
- We prepare the "curls" from the stripes of colored paper. To make them, the strip of color paper needs to "put" to the toothpick and spin. As the resulting curls, stick to the postcard - can be seen in the photo.
- We apply each spiral with the cocked side to the numbers, trying not to leave large gaps between the curls. Add a star between the numbers and subscribe a postcard.
- Draw a boat or print a ready-made template on double-sided cardboard.
- Cut some sections in the picture.
- We fold the folding of the fold line.
- Flomaster draw a dotted line along the edges of the postcards and images of the ship.
What postcard by February 23 to do for brother?
Brother can be surprised by the original postcard "ship".
 Postcard "Ship"
 Such beauty can be made in half an hour. So let's get up!


For a brother, which has not yet served in the army, you can make a postcard-shirt.
Video: Do \u200b\u200bit yourself / Postcard - shirt / gift for February 23