When carrying out a major overhaul, the question: how to fill the floor in an apartment is very relevant. It is important not only to align the base for finishing, but also to carry out the work as efficiently as possible without unnecessary material and time costs.
Let's consider what materials can be used to fill the floor in the room and how to save money.
Carrying out work on your own

Before starting work, dismantle the old coating to the floor level
With enough free time, you can carry out all the work on the arrangement of the floor yourself. Work begins with cleaning old surface.
If there is a coating, it must be dismantled to the level of floor slabs. Not only linoleum or laminate will have to be removed, everything is removed, including old screed or fill. This must also be done because pouring a new screed will "eat up" the height of the room by at least 5-10 cm.
By purchasing new apartment under fine finishing, make sure the quality of the flooring. If the screed material is soft and loose (this happens when there is too much sand in the solution), the layer must be removed.

Mix the solution in small portions
Having removed the old coating, we proceed to pouring the floor in the apartment. To do this, you must consistently perform the following work:
- Surface priming. A special solution is used deep penetration... The surface must be cleaned from dust and fine dirt. If there are cracks, it is better to fill them. The bottom of the walls must also be impregnated with soil solution. After drying, as a rule, 2-3 hours, you can start laying the thermal insulation.
- Warming. If you do not arrange a warm floor in the apartment, it is still worth saving yourself from energy losses. Lay a layer of polystyrene foam, this will reduce heat loss at times. Laying the slabs starts from the far corner of the room, the direction of laying does not matter. Lay the plates without fixing, see which version of the layout will have less waste. Having decided on the cut, fix the plates with glue foam. The joints between the sheets and as well as the entire perimeter must be glued.
- We put up beacons. To do this, output zero level and, focusing on it, fix it on the piles of cement mortar aluminum profile... To avoid deviations, use a building level. Beacons are placed at a distance less than the length of the rule, by a quarter. The first line is laid out 30 cm from the wall. Do not try to increase the distance to be sure of the level, place the beacons a little more often. Having made sure of the even horizon of the lighthouses, we leave the solution under them to freeze.
- We make a fill. Mix the solution in small portions, in this case it will be as mobile as possible when laying out and the quality of mixing will increase. The surface of the screed is passed by a needle roller to remove possible air bubbles and make it more durable.
- The poured floor is covered with plastic wrap and left to set.
You should not speed up the process by placing beacons on a solution of alabaster or gypsum. Lighthouses will harden faster, but pieces of mortar will have to be removed from the screed. As a result, you will spend much more time.
Fill methods

The process of pouring the floor in an apartment with your own hands is time consuming. Depending on what goals are being set, it can be done in different ways. In the event that there is a good rough screed, it will be enough just to level the top layer with a special mixture.
Conventionally, there are 3 filling methods:
- Thin (up to 0.5 mm) finishing layer. For better adhesion, before such pouring, the rough screed must be abraded and impregnated with a primer. At the same time, the subfloor must be perfectly flat. This filling does not require further coating.
- Split layer fill. The thickness of the screed is 2 cm. It can be laid on any type of surface, including plywood. The separating layer is made of oiled paper, overlapping it or using waterproofing. In this way, the two floor layers become independent of each other. This is important when materials differ in physical properties and their responses to humidity and temperature fluctuations vary greatly.
- Floating fill. Such a screed is performed for the purpose of performing work on the finishing arrangement of the floors in the apartment. At the same time, the thickness of the layer is not less than 2.5 cm. Here, too, a layer of insulation is laid with allowances on the walls of 0.15 m. The perimeter is laid with a damper tape. After the screed has dried and the topcoat is laid: laminate, parquet, linoleum, the visible remnants of the insulating material and tape are cut off.

Pouring the floor starts from the far wall towards the exit.
Carrying out work according to any method, they are poured, starting from the far, opposite wall and moving towards the exit. Level the mortar with a rule between the wall and the lighthouse. Do not lean on the beacons, they serve to set the level. Rule the mixture in a zigzag manner.
Do not leave unleveled mortar on the floor, only after leveling the first batch, knead the second. Strictly observe the proportions of the solution. When finished, remove all tools and close access to the room.
Screeds different solutions have different time ripening. The first setting occurs on the 3rd day, the final readiness - after 3-4 weeks, depending on the temperature in the room. For information on how to properly concrete the floor, see this video:
Checking the readiness of the fill is easy. Place a few crumpled paper towels on the floor and cover with any utensil. If after 12 hours the napkins are not wet, then the screed is dry.
Filling materials

Strictly observe the proportions of the solution
Having decided on how to fill the floor in the apartment, it is worth choosing a solution for the screed. You can buy ready-made dry mixes or knead cement mortar yourself.
It is important not only to know how to properly fill the floor in the apartment, but also to understand what kind of solution this will be done.
The choice of materials is not great:
| Material | Advantages | disadvantages |
|---|---|---|
| Concrete mortar | High wear resistance Resistant to mechanical damage Long service life Not afraid of water Economical Fast time readiness |
Heavy Requires finishing Difficulty in preparation |
| Cement-sand mixture | High wear resistance Durability Profitability |
Long drying time Requires finishing |
| Dry mixes | Easy to prepare Durable Easy to apply |
The cost Average drying time |
| Self-leveling floors | Perfect surface Strength Wear resistance |
The cost Significant readiness period |
The instructions on the mix bags are pretty self-explanatory. It is quite difficult to mix concrete on your own, since proportions must be strictly observed.
The most economical and affordable option fill is DSP. It can be purchased at hardware store, but you can cook it yourself.
By mixing cement grade M500 and sieved river sand fine fraction in a ratio of 1 to 3.
Self-leveling floors

Self-leveling floors are leveling and finishing
Before pouring the floors in the apartment with your own hands, assess your financial capabilities. If the choice fell on mixtures for self-leveling floors, you should know that they are divided into leveling and finishing.
Mixtures are different in composition and stacking order. When filling the bottom layer with a branded leveler, it is imperative to use a finishing layer of the same construction grade. Moreover, the latter type can be applied to any type of base.

Self-leveling floors can be a decoration of the room
Features of mixtures:
- riggers function as a rough screed. They are applied on beacons, do not align themselves, require work as a rule. The layer thickness can be up to 0.3 m;
- finishing mixtures are used for final decoration. The layer is not thicker than 3 cm. They have good fluidity, they do not need leveling. For all the details of pouring self-leveling floors, see this video:
Having chosen what and how to fill the floor in the apartment, remember: the base of the floor will affect the behavior of the entire repair. It is not worth saving on this type of work. It is quite costly to change the screed. This process cannot be carried out without spoiling the repair as a whole, so follow the technology and, if you are not confident in your abilities, hire professionals.
If you start overhaul in an apartment, then you should start with a long and laborious process - pouring the floor. This is especially true for old-style apartments. Modern finishes floor materials require flat surface... Not only the quality of the coating depends on this, but the entire interior. Who wants to substitute improvised materials under the furniture so that it stands exactly. Laminate is easy and simple to put on a flat floor, and in operation it shows itself to be a strong and durable material. Whereas unevenness in the floor leads to the formation of cracks and deformation of the floor covering.
Pouring the floor throughout the apartment can be done independently, saving on the services of a master. Even if this is the first time you do it, it is enough to practice small room and in the rest of the rooms the work will go smoothly.
Pouring a new floor is required:
- with further laying of the finishing floor covering: parquet, linoleum, laminate;
- when insulating the floor or when laying the structure of an electric or water heated floor.
To work easily and efficiently, you will need:
- metal brush;
- lighthouse rail;

- primer roller;

- ditch for the mixture;

- sidewalk scraper;

- small brush for priming on a small or hard-to-reach area;

- needle roller;

- wide spatula;
- drill with stirring attachment;

- primer.

Stages of work
The quality result largely depends not only on skill, but also on the sequence of work.
Filling in the apartment is carried out in several stages.
- The surface is being prepared.
- A primer is being carried out.
- Waterproofing.
- If necessary, fit a heat insulator.
- The horizontal level is determined.
- A solution is being prepared - concrete, cement-sand or based on a dry mixture.
- A screed is being made.
- The surface is expected to dry.
Preparing the floor for the start of work
Before proceeding directly to work, you should prepare the surface. For this:

The primer hardens the surface to be treated and improves adhesion to subsequent repairs by creating a roughened surface. For ordinary concrete-sand mortar, use any of the universal primers. In small rooms the primer can be applied with a brush, in larger rooms it is more convenient to use a roller. Allow the primer to dry before proceeding. This will take up to two hours.

Porous and dry surfaces require re-priming. Allow the previous one to dry completely before proceeding with the next coat. The primer will be needed in the future before each layer if the alignment is done in several layers.
| Manufacturer | Description | Consumption | Volume and price |
|---|---|---|---|
| Prime | Deep penetration primer with antiseptic | 0.08 -0.2 kg per 1 m2, depending on the absorbency and the treated surface | 10 l, 600 rubles. |
| CT 17, Ceresit | Deep penetration primer | 0.1-0.2 l / m2 with a single application depending from absorbent foundation ability | 10 l, 500 rubles. |
| OSNOVIT UNCONT T-51 | Universal primer | 100-200 mg. for 1m2 | 10 l, 450 rubles. |
| BASIS DIPKONT T-53 | Deep penetration soil | 50-100 mg per m2 | 10 l, 500 rubles. |
| Knauf-Tiefengrund | Universal primer | 0.07 - 0.1 kg / m2 | 10 l, 650 rubles. |
In cases of laying on the ground, reinforcement is used to strengthen the screed. Craftsmen often use special steel mesh in its role. The reinforcement effect creates a fibrinous material. It represents metal or plastic and is simply added to the grout to grout the floor surface. At the same stage, if necessary, the installation of additional equipment is carried out - or the distribution of wiring.
Waterproofing
It is necessary if there are large slits... Especially in the places where the walls adjoin the ceiling or where communications pass.


The main water-repellent component defines the following types of waterproofing:
- polymer;
- bituminous;
- bitumen-polymer;
- based on mineral components.
Among the varieties of materials for waterproofing, the following materials are distinguished:
- roll or film. They are considered the most popular and are multi-layer polymer membranes that combine not only waterproofing, but also thermal insulation properties.
- mastic. Is a plastic adhesives... They are based on resins, polymers, liquid rubber... They create an excellent waterproof layer.
- liquid materials. They penetrate the pores and differ in the degree of viscosity. Creates a thin and water-repellent film.
- powders. Created on the basis of binders and plasticizers, they look like dry mixes, which are enough to dilute with the amount of water specified in the instructions.

Determine the floor level and set up the lighthouses
Armed with the level rule, we determine how flat the floor is. We mark the level of the future floor on all walls. We remove the plaster on the plastered walls 0.25 cm above this level.
It is most convenient to do this when the room has already been cleaned and the floor surface is clean. The floor level is determined in order to establish the highest point of the surface and to fill the floor correctly.
This is done following the instructions.
- One meter is measured up the wall from door threshold and a mark is put.
- A line is drawn around the perimeter of the room. Its parallelism is checked by level.
- Another parallel is drawn one meter down from the control.
- To make it easier to navigate, nails are hammered on the bottom line in the corners of the room and the construction cord is pulled.
Marks on the wall help you navigate when placing beacons. They serve wooden slats or metal profilesthat fit on the edge. The distance between them should not be more than the length of the rule with which the mixture will be leveled.

You should not rush to set the rails. The quality of the fill largely depends on this. At the end of the work, they are removed if desired, and the space that remains after them is filled with the same filling solution.
The use of beacon technology simplifies the process and guarantees a flat surface after screed. Even if work is underway on a small area, it is desirable to strengthen minimal amount lighthouses.
Lighthouses - self-leveling tripods are a professional tool

Preparation of the working mixture
For a self-leveling floor, the mixture is prepared easier and faster. It is enough to pour it into the amount of water indicated according to the instructions and mix thoroughly with a drill and a special nozzle until a homogeneous consistency.

It will help to save, especially on large volumes, concrete or cement-sand mortar. The latter is prepared as follows.
- Four parts of perlite requires two parts of water.
- Part of the cement and part of the water are added to the mixed solution.
- After re-mixing, two parts of sand and five times more water are added to a homogeneous substance.
- The solution is kneaded until it acquires a plastic consistency.
A concrete screed is more appropriate for pouring the floor in apartments on the ground floors or in a private house.

Fill the floor
It is advisable to fill the surface in one room during the day, without delaying or stretching the process. Then the surface will be homogeneous in composition.
Start pouring from the far corner of the room. A layer of grouting solution is leveled with a spatula or a rule, evenly distributed within the established beacons.

A needle roller will be needed to remove air to avoid voids inside. Only after that the screed is finally leveled. We repeat the procedure until the entire floor is filled.

A mortar based on sand and cement sets within an hour. Then it is very difficult, if not impossible, to equalize it.
Therefore, when working with dry mixes for self-leveling floors, and using other solutions, it is recommended to work with a partner. While one person prepares the solution, another pours and flattens it.
Ready mixes for self-leveling floors have a thinner consistency. The mortar spreads, leveling along a horizontal level, and the floor surface is perfectly flat.

But even when the floor is already flooded, the process is not over. Now it is important to protect it from temperature extremes, direct sunlight and drafts.
The laid solution is periodically moistened or covered with a film. This will help avoid cracking.
Concrete needs 28 days to gain strength. For a cement-sand mortar, this period is much shorter - no more than two days. In order to check that the tie has seized well, there should be no traces of pushing when stepped on. So as not to be afraid to leave a mark on the newly made floor, it is recommended to use a kind of support island made of improvised building materials.
Do not forget to remove the slats that served as beacons and fill the remaining traces in the form of grooves with a solution.
Sanding is required for the concrete floor when it is completely dry. This is the final touch concrete screed... The surface is then ready for any flooring... The floors that have been filled with self-leveling screeds are ready for use in 6-12 hours.
But don't rush to stack topcoat and even more so to arrange furniture. For maximum loads it will only be ready in 2-3 days. In the meantime, you can choose a topcoat. Laying linoleum, tiles, parquet, laminate or carpets is possible only after a week.
We hope that our instructions will help you get started on your own. In the course of work and with the acquisition of experience, it is possible that you will develop your own methods and technologies. Before getting down to business, you should decide for yourself several important questions. They will help you save on materials and organize your work correctly.
It is important to decide on the materials for pouring the floor. It will be ordinary concrete, cement-sand mortar or ready-made mixture. The latter option is more expensive, but easier to prepare and use. And the results will certainly not disappoint. To mix the other two solutions, observe correct proportions... So that the work goes without hesitation and forced breaks, it is important to prepare everything necessary tools, materials and make sure that they are always at your fingertips. And, finally, do not take up work in splendid isolation. Even when it comes about pouring the floor in the bathroom and even more so if you are pouring it for the first time.
If you want to learn new things, diligence and patience, the results will exceed all expectations. The screed will turn out to be of high quality, and the floor will serve for many years.
Video - How to fill the floor in an apartment
Not only in old houses, but also in new buildings, the subfloor is rarely even. Most modern coatings require ideal surface... Therefore, overhaul should begin with leveling the floors. So, we will tell you how to fill the floor in an apartment with your own hands.
Foundation preparation
In order to concrete pavement served as long as possible, before pouring the floors should be carefully prepared:Dismantle the old flooring and skirting boards;
Door jambs should also be removed - they will interfere with filling;
Door jambs must be dismantled before pouring
Remove large debris and poorly adhered concrete pieces;
Large cracks, so that the solution penetrates them as deeply as possible, expands, removes dust from them, moistens thoroughly, strengthens with a serpentine tape and closes cement-sand mortar; small gaps can be smeared with adhesive;

Large cracks are pre-covered with mortar
Thoroughly clean the floors from dust with a vacuum cleaner;
If necessary, rinse them with soap and water for degreasing;
To improve adhesion, after drying, the floors should be treated with a primer; porous surfaces smear it twice, the second layer - only after the first has completely dried.
Do you need waterproofing?
Protection of concrete from moisture is required mainly in rooms with elevated level moisture - bathrooms and toilets. Without reliable waterproofing, over time, cracks will quickly appear in the concrete base, and it will become unusable. A source of high humidity can be and modern kitchens with installed washing and dishwashers. High quality waterproofing protect the lower floors in case of leakage.The simplest type of waterproofing is polyethylene film sufficient thickness and strength. In this case, it is better to pre-coat the floors. bituminous mastic ... Since the flooring should only be continuous, after the roll is rolled with an overlap of 25-30 cm, all layers must be glued together. The film must be slightly brought onto the walls and attached to them with adhesive tape.

Waterproofing screed with polyethylene
More reliable protection moisture is bituminous roll waterproofing or fiberglass flooring. The cost of bitumen-rubber mixtures is slightly higher, however, they are considered more durable, plus heating and melting are not required when using them.
Important! Waterproofing can be located both under the screed, and above it. When applied over concrete, it will remain dry even in the event of leaks. But still liquid species waterproofing, which can be easily damaged, it is wiser to apply under the screed.
Cement-sand mortar. Proportions
For getting durable coating better to take quality cement grade 300-400... Do not get confused - after all, the resulting solution also has a brand. For example (see photo), when mixing M400 cement with sand 1: 3, we get concrete grade 150, and when mixing sand and cement M300 in the same proportion - less strong concrete grade 100. For screeds, it is recommended to use concrete (not cement, and concrete) grades 150-200.
The concrete grade directly depends on the cement grade and mortar proportions
So, we prepare the solution:
It is better if the sand for the solution will have both coarse and fine fractions; best to use dry river;
Before kneading it must be sieved;
To obtain a homogeneous mass, sand and cement are mixed only dry; water is added gradually, until the consistency of liquid sour cream, such a solution should not be too liquid and drain from the trowel;
It is simply impossible to ideally mix a large amount of mortar without a concrete mixer; therefore, it is better to rent it or borrow it from friends, otherwise you will have to knead the solution in small portions; for pouring small areas, concrete can be mixed with a drill with a nozzle.
Floor level markings
Marking - determining the level of the future floor by drawing horizontal lines on the walls. To begin with, we arbitrarily define the highest point of the room (in case of an error, the line can be easily redrawn).Now using building level draw horizontal lines along all walls. It is along these lines that beacons will be exhibited.

Lighthouses are displayed according to the markings on the walls
What are lighthouses?
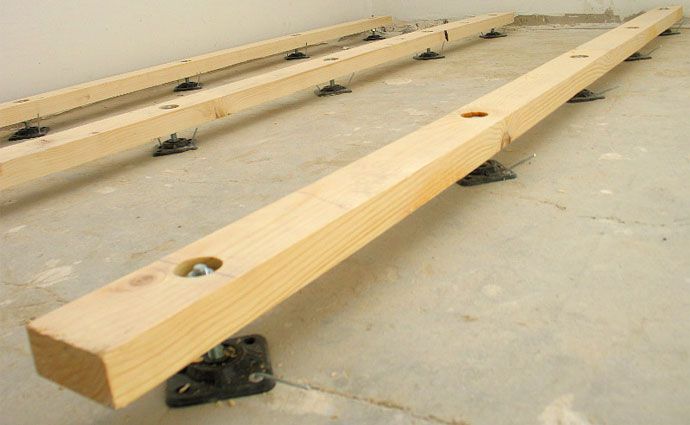
Beacons in the construction business, slaps of mortar or alabaster are called, on which metal or wooden slats are laid, which serve to level the floors. Self-tapping screws screwed to a certain height are sometimes used as beacons. For convenience, they are preliminarily fixed on small pieces of wood. The distance between the beacon rails is selected in width regulations – construction toolused to stretch (level) the mortar (see photo below).
Easy way to install beacons
Since the cement mortar sets for at least 2 days, it is sometimes used to place beacons alabasterhardening in 15-20 minutes. But experienced craftsmen it is recommended to refrain from using it - the resulting screed will be unreliable due to the heterogeneity of the composition.

Leveling the mortar with the rule
Important! Note that too thick a layer of concrete will dry out unevenly, and its quality will not be up to par - it will crack right there. If a screed with a thickness of 5 cm or more is required, it is applied in two layers or the screed is reinforced with a reinforcing mesh.
Main steps
Pouring the screed begins after the beacons have completely dried out (that is, after 2 days):Work should start from the farthest corner, moving gradually to front door;
With the help of a trowel, the space between the beacons is completely filled without gaps and voids;

Laying out the solution
After laying a couple of meters, they begin to level the mortar with the rule, first in different directions "right-left", and then along the rules;
It is not necessary to ideally level the surface - after a couple of hours, when the concrete slightly grabs, small irregularities are leveled with a float;

Grouting the screed with a float
The screed obtained is covered with polyethylene for uniform drying;
The lighthouses are removed after a day; the voids formed in their place are poured with a solution and carefully leveled.
Important! Despite the fact that the screed at room temperature can dry out in 2-3 days, and it will be possible to walk on it, the main work should begin only after a month, when the concrete has fully gained strength.
Video: How to fill the floor with your own hands
When building a new one or during the redevelopment of an old living space, everyone is faced with the need to replace floors.
The main purpose of the floor screed is to create a reliable base with a certain level of plane.
It is very important to remember that when creating new floors, the builder has to spend less effort than if he renovated old ones. entails consistency simple actions... But these actions must be performed correctly. How to fill the floor in the apartment yourself, read on.
So, the walls are already finished, the ceiling is installed, electricity and communications are connected, the windows are in their places ... Now is the time to start pouring the floors. Pouring in each room must be done separately in order to facilitate the task for yourself.
What is needed to level the floors with fill?
List of tools

Aluminum beacons are required to obtain even screed at a given level.
- "Water", the usual 2-meter (or longer), and, if possible, laser levels (for precise setting of marks, under which concrete will be poured, and lighthouses);
- regular tape measure 8 m;
- roller under;
- construction pencil;
- spatula 400-600 mm;
- angled inner spatula;
- rule (a little more than a meter long);
- master OK;
- construction knife;
- a drill or perforator with a mixer (to evenly stir the batch if the pouring area is not large);
- lighthouses. As beacons, you can use a specially designed T-shaped profile beacon, which will remain in the floor after pouring. But it is better to use flat steel pipes with a diameter of up to 70 mm, which can be removed from the still not completely frozen surface to be poured, thus saving the future floor from unnecessary and rusting elements over the years. By the way, steel pipe much stronger than a T-shaped beacon, therefore, during pouring, it will not bend and move much, which will significantly affect the evenness of the surface. Therefore, the surface will be almost perfectly flat;
- also do not forget about gloves, self-tapping screws, screwdrivers, pliers, hammer, goggles and other small tools. After all, a good builder should always have everything at hand, for a construction site, like a theater, is full of improvisation.
Surface preparation

Floor screed device diagram. All visible irregularities are preliminarily removed, and the surface under the screed is treated with concrete contact.
For everything to be correct, before starting, you need to inspect the surface on which the pouring will be made. Debris and other contaminants must be removed. It is best to sprinkle with water and sweep over the surface with a broom. Thus, the builder will not raise a lot of dust and thoroughly clean the floor surface.
If the overlap has drawbacks in the form of cracks, chips, voids, they must be sealed with a mortar of cement, sand and, if necessary, fine crushed stone or fine expanded clay even before pouring.
After cleaning and sealing the old floor surface, it is imperative to apply a waterproofing coating with a roller prepared for that.
Important: not in quality waterproofing coating use PET film, roofing felt, fiberglass, polystyrene and other similar materials, because they prevent the filling from "sticking" to the floor surface. This can especially be distorted with thin fillings - after a short time, it can crack. It is necessary to follow the installation technology correctly! Only special mixtures should be used for the waterproofing coating! There are many varieties of these mixtures at different prices, and you will have to choose based on your priorities.

Beacons can be installed both on cement-sand mixture, so on the alabaster mixture, which solidifies many times faster.
The waterproofing mixture dries very quickly. Therefore, after applying it, you can very soon proceed to the next stages of creating a floor screed. It is now time to determine the highest place on the floor surface. As a rule, it is located either in the corner or under one of the walls. To do this, you need to mark the "water level" around the perimeter of the room on the walls, starting from a height of about one meter above the floor. Next, you need to measure the height from the floor to the marks. And in the place where the height will be the smallest, there will be the highest point on the floor, the screed above which will have the smallest thickness.
If the height difference turns out to be large (more than 40 millimeters), you will have to think carefully about what to make the solution from. After all, the weight of the screed can be large, depending on the area of \u200b\u200bthe room and the difference in the floor (there are cases with a difference in the height of the floor up to 13 centimeters, and this is where you need to think carefully about the mass). To get out of this situation, you need to use the so-called "light" solutions, which include expanded clay of different bulk mass, or you can use very light polystyrene concrete. In any case, if your apartment is on floors or above another void, you will have to think about it. On a note: reinforced concrete slab slabs withstands a load, in tons, approximately equal to the number of voids in it. That is, a slab with six voids must withstand 6 tons.
Installation of beacons
Lighthouses serve as guiding elements. They are needed for correct and even distribution of the solution over the entire plane. Therefore, they need to be set as evenly as possible.

The solution prepared for the screed is laid out between the beacons and leveled with a rule that is established between neighboring beacons.
With the "water" level, we have already put marks on the walls, which are equally distant from the center of planet Earth. And this means, connecting them, you get a plane, parallel to which the plane of the surface of our screed should be placed. Therefore, you need to remember the size from the mark to the highest point on the floor slab (let's call this mark "first"). And now you need to make new lower marks, distant from the upper ones at the same distance as the "first" mark is distant from the highest point.
Only focusing on the lower marks, using a simple 2-meter level, we correctly set the beacons and check laser level... It is better to pre-fix the lighthouses with a solution to avoid them shifting. The fixing points must be set in increments of one meter, depending on the strength of the beacon. If this is, for example, a pipe with a diameter of 30 mm with a wall thickness of 3 mm, with a total length of 5 meters, then 3 points will be enough. And if it is a T-shaped profile, then with its length of 5 meters, it is better to make 5 points. By the way, if the fixing points are made of mortar, then it is better to expose them in the evening, so that by the morning the mortar “grabs” and can keep our lighthouse motionless. The first lighthouse should be placed at a distance of about 100 millimeters from the wall, all subsequent ones about one meter from each other.
The beacons are on display, the materials for the mortar have been prepared, and all calculations have been made. Now is the time to make the grout and start pouring.

To obtain a perfectly flat screed surface, a grinding machine is used.
After a correctly calculated proportional ratio of the compound solution, start mixing. The solution should be homogeneous, like sour cream in consistency. You need to fill in from the corner located further from the front door. Using the rule, correctly smooth out the newly formed surface by stretching the rule along the beacons, touching at least two beacons at once. The solution must be carefully poured over all irregularities and the appearance of voids must be avoided.
Important: when buying a rule, pay attention to it working side... It should be perfectly flat. This is especially true for a rule longer than 1.5 meters.
The solution, depending on weather conditions, will dry from 9 to 35 days. Remember to remove the beacons (if you planned to) on time. The resulting voids must be cleaned and filled with the same solution and leveled with a spatula if the rule is long, otherwise it will not be convenient for them to work. Level the corners with the inner angle trowel.
The floor can be poured twice or even three times, each time reducing the layer thickness. A room with a flooded floor must be closed. If there are no windows or doors, it is better to close the openings with foil or other methods to avoid drafts.
That's all, the fill was successful and correct.
The ground floor is one of the main rooms in the house. If it (the floor) is properly equipped, then it will always be warm and cozy in the higher floors. Also, the basement may well serve as a warehouse or garage, have a different purpose. Sometimes they even equip rooms in it. Therefore, it is important to maintain dryness here, and the floors must be of high quality. How to properly fill the floor in basement floor? Let's figure out what is needed for this and how the procedure is carried out.

The basement can be not only a place where various communications pass, heating boilers are installed or all kinds of old and unnecessary things are located. The basement floor in the house can become:
- storage for products, blanks;
- living room;
- garage;
- a gym with all kinds of exercise equipment.
If you include imagination, then you can come up with many more options for how the basement can be used. However, in order to implement all these ideas, it is important to attend to the presence of a good floor in it and provide waterproofing. This need is associated with functional features basement room.

Most people always associate the basement of a house or any other building with dampness. However, excessive dampness or the ingress of water into the basement threatens to destroy the foundation of the house, and therefore damage the structure itself in the future. That is why it is produced during the construction phase or later.
May be present here high humidity not only walls and floors, but even air. By the way, this indicator will in any case be higher than in the house itself, even though high Quality waterproofing. Moisture from the soil easily penetrates concrete and other materials with which the plinth is finished. It gets into the basement especially actively if the groundwater is close to the surface of the earth in this place. Do not forget about spring floods, when the water level sometimes rises very high.

On a note! A large amount of water in the basement is dangerous not only because it creates a humid environment and stimulates the development of mold and mildew, but also because it negatively affects the concrete, washing out of it various substances... The material from this loses its performance.

Also, the basement is characterized by such an effect as rather sharp and significant temperature changes. If it does not provide heating, then, most likely, it will be pretty cool in the basement, which, of course, has a beneficial effect on the products stored in it and home preservation. But even if the basement serves only as a place for storing food, there should still be a high-quality floor in it. Although it may not be as beautiful and neat as in the residential part of the house.

The floor in your basement
Floors fitted in basement, must meet certain requirements and be:
- durable;
- made of quality materials;
- mounted strictly according to the instructions;
- well waterproofed;
- insulated.
Usually, if a concrete floor is installed in the basement, then it is laid immediately on the ground. If the work is done correctly, then there will be no voids under it and the base will be of high quality. In this case, the entire load on the base will fall on what is under it, which means that the floors will be reliable and durable and will last for a long time.

On a note! It is quite expensive to build a good basement floor, especially when it comes to a room located next to groundwater. However, you can save a lot of money on finishing, because the basement does not always have to look pretty. The main thing is that it fulfills its main functions, and it is dry inside.

Floor construction methods
Basement floors can be made in several ways, each of which has its own characteristics of work. To create you can apply wooden logs and boards, directly soil and clay, concrete mixtures, etc. The main thing is that the materials are reliable, strong, durable.
On a note! The highest strength is possessed by a floor made of monolithic slabs... However, such a structure can only be built on initial stage building a house, slabs just can't be carried into the basement.

Concrete floor
This is perhaps the most common option for creating a basement floor, since concrete bases it is not in vain that they are considered strong and reliable (their durability has been tested for decades), and the cost of the work will be quite small. In addition, in this case, work can be carried out directly on the compacted ground. If the gravel and sand lie tightly, then the reliability of the structure will increase significantly.
On a note! Concrete floors are always recommended if the groundwater is close enough to the ground.

You can create such floors yourself. The main thing here is to equip a good sand pillow, which will have a thickness of about 15 cm.Also, expanded clay or crushed stone is poured on top of the compacted layer, which are also compacted, after which it is important to lay a strong and reliable waterproofing material (for example, roofing material). At the same time, protection from water should be as reliable as possible, which means that individual layers of material are connected tightly with each other with an overlap of at least 20 cm.
Another layer that is laid under the concrete floor is a layer of thermal insulation materials (for example, glass wool, basalt material, polyurethane, foam). They will ensure the retention of heat indoors and block the flow of cold coming from the ground. It is also recommended to close the joints between the layers of thermal insulation using polyurethane foam.

Important! Between the wall and thermal insulation material there should be a small gap. It will provide the possibility of thermal expansion of the material, which means it will help to avoid deformation of the insulation.
Reinforcement, which is performed using, will help to strengthen concrete floors. It will allow the substrate to withstand critical loads without cracking. It is best to use a mesh with a wire thickness of about 5 mm. Only after that the floors are poured concrete mix... The thickness of the poured layer should be at least 5 cm, but if it is planned to install heavy appliances, then the screed is made about 10 cm thick.

Clay floor
Sometimes the floors are built on clay soil. This option saves you money. Such a base is also distinguished by the fact that the basement will be much warmer than in the case of concrete floors... It is usually finished with clay, which in itself is an excellent waterproofing agent. The service life of such a foundation will be more than 10 years if everything is done in accordance with the rules of installation work.
On preparatory stage the soil is compacted and leveled. The base is covered with expanded clay - this is how an additional heat-insulating layer is formed.

Advice! The maximum strength of such floors can be provided by concreting the first crushed stone layer.
Then the crushed stone is mixed with clay, and the resulting composition is poured onto the compacted soil with a layer about 20 cm thick. The mixture is leveled, and after it dries, another layer of the same materials is formed. By the way, the thinner the layers, the stronger the floor will be.
The final stage is coating the dried surface with liquid clay. It will also help to patch up all accidentally appearing cracks on the surface of the base. Such a base can be closed in almost any way finishing material... But most often the clay floor is covered with paving slabs.

Laying the floor on logs
A subfloor in the basement, made of wood, is only carried out if the likelihood of flooding is minimal or there is a high-quality waterproofing. In this case, the base is installed on logs - supports that raise the subfloor above the ground surface.

For logs, you should use strong and reliable wood - a 15x15 cm timber that is well dried is best suited. And the base can be made from boards up to 5 cm thick.
On a note! A multi-layer "pie" of the floor in the case of arranging the base on the logs is not necessary. But, nevertheless, the indentation under the floor must be at least 30 cm, since the floors will still be quite thick.
When wooden base it is important to think over the arrangement of waterproofing. And the wood itself is treated with antiseptics and protective compounds... The logs are installed on the ground and leveled. Roofing material is spread under the supports, which will protect the tree from moisture.
Installation of a reliable floor in the basement of a private house
Let's see how the subfloors are created on the basement of the house. The first step is to prepare all the necessary tools, the set of which is selected depending on the selected technology for creating the floor in the basement.
Tools and materials
To create a clay floor, rubble, clay, sand, water, shovels and buckets are useful. For wood - timber, boards, roofing material, crushed stone, nails or screws, saw, cutting tool, a hammer. To create concrete floors, you need to purchase:
- a concrete mixer or large container and construction mixer;
- grater and rule for leveling the poured base;
- strips that will act as beacons (beacons can be made from a cement mixture);
- the building level to which the floors will be leveled.
Advice! To create a screed in the basement, it is recommended to use quarry sand, crushed stone and cement of the M400 brand. Sometimes crushed stone can be replaced with expanded clay.
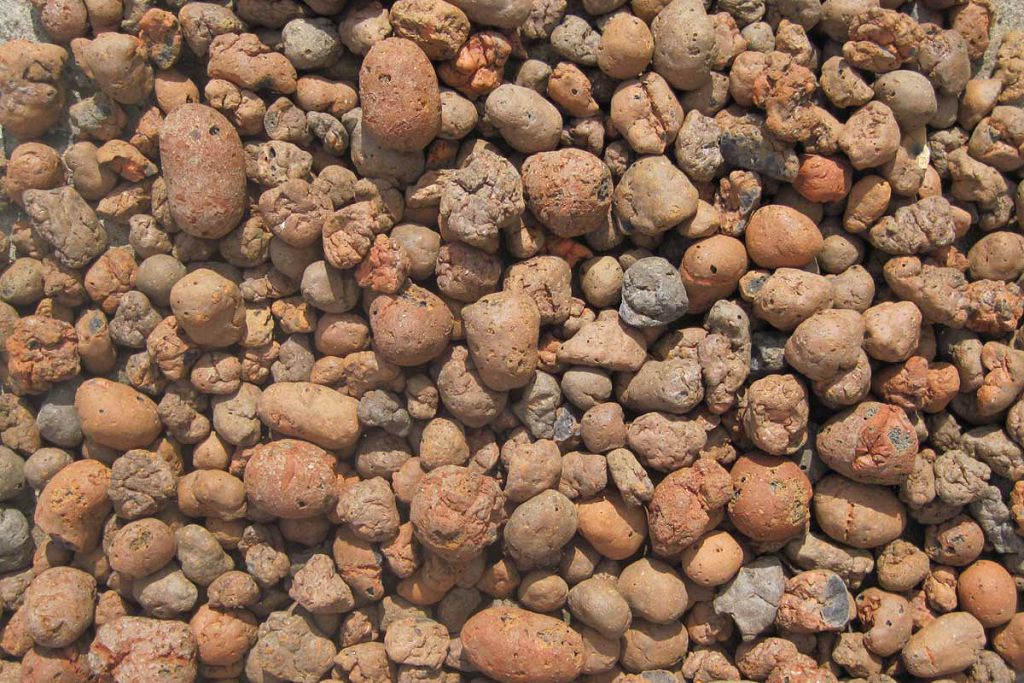
Table. Comparative characteristics expanded clay and crushed stone.
| Characteristic | Crushed stone | |
|---|---|---|
| Weight | Very light material, despite the rather large fractions. | The material has a significant mass, it is possible to work with it in the basement, although it is not easy to drag rubble even in small portions. |
| Thermal insulation properties | With the use of expanded clay, it is possible to create a fairly warm base - the material has improved thermal insulation characteristics. | Poor insulation performance, floors will be cold. |
| Reaction to contact with water | It absorbs moisture actively, as it is a porous material. | Does not react to moisture, does not absorb it, which increases the service life of the floors. |
| The cost | Quite expensive stuff. | The material is cheap. |
| Strength | Not high, which is why floors with the addition of expanded clay will be less reliable than with gravel. | Enough durable materialthat is able to withstand critical loads. |

Thus, in the basement, where flooding is not expected, expanded clay can be used instead of gravel. This is especially true if there is a desire to make the base as warm as possible. But on the other hand, the use of crushed stone allows you to reduce the cost of manufacturing the base in the basement.
Training
Before work begins on the arrangement of the floor in the basement, a number of preparatory workwhich includes level determination groundwaters, and the higher it is, the more difficult the work itself will be. It is also recommended to immediately find out the height between the floor and the ceiling of the basement. Usually it does not exceed a couple of meters, however, if the water table is quite high, the height between the floor and the ceiling can be further reduced. Next, the required amount of materials is calculated.
Only after that do the earthworks start, that is, a foundation pit is created, where the floor will be formed. Excess soil carried out from the basement. Further, a drainage layer of expanded clay and sand is created with a thickness of about 5 and 15 cm, respectively.

Video - Preparing a shaky base for a screed
Features of technology when working on flooring
The most popular are concrete floors. Therefore, we will consider the procedure for creating them. Here are a few tips to help you make your basement concrete floors as high quality and reliable as possible:
- if the soils under the floor are soft, then it is recommended to reinforce the screed - this will increase its strength;
- in rooms with an area of \u200b\u200bmore than 6 m 2, it is necessary to form a special expansion joint. It will avoid cracking of the concrete base;
- concrete after pouring will set in about 5 days, subject to moderate humidity and an air temperature of about 21 degrees. If it is colder in the basement, the screed will dry out for at least 10 days. The complete drying period takes at least 30 days;
- it is possible to operate the screed and carry out further work only after complete drying;
- all tools and materials in the required amount should be at hand during work; otherwise there is a risk of ruining the screed while the search for a particular tool or material is going on;

- concrete mixer - the best option for kneading a large number mixtures. You can rent it instead of buying;
- pouring the screed begins from the corner farthest from the exit from the basement - this will avoid the need to move on non-frozen concrete;
- to level the surface is given only 30 minutes. After that, the concrete will set and it will no longer be possible to correct mistakes;
- the soil under the screed should be compacted as much as possible.