One of the ways to diversify the type of cladding is to lay the tiles diagonally (see also the article about). In this article, I will show you how to style at 45 degrees using a small bathroom as an example. Since the size of the room is small, we will not draw the layout.
Previously, we poured a screed onto the floor. The height of the floor was adjusted to fit the wall tiles, leaving a gap for laying the floor with a layer of adhesive.
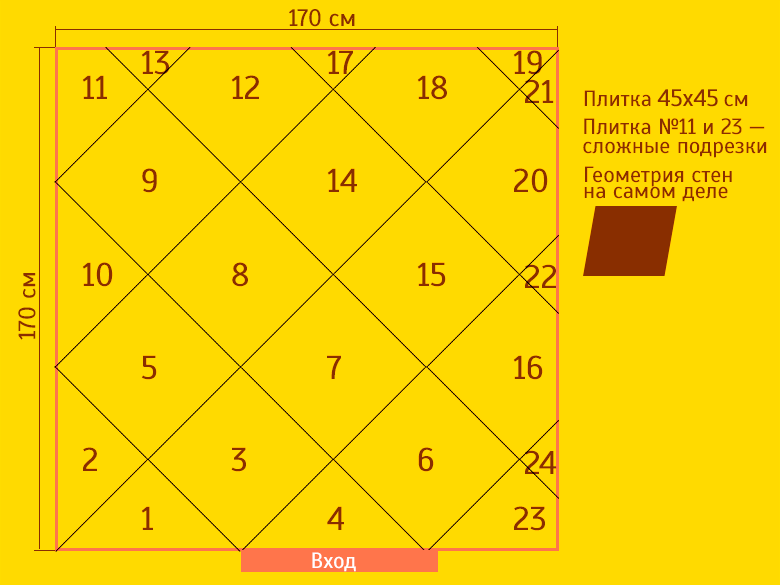
Before starting work, we sort the tiles by size into 2-3 groups. We put the defective tiles aside - we will use them under the furniture.
Fast navigation through the article
Pruning
We start by trimming the first two tiles. Let's cut each of them in half diagonally to make a preliminary layout.
We apply tiles and combine the drawing.
Draw diagonal lines and make a shallow (3 mm) cut with a grinder with a disc on the tile. We break off the tile along the incisions. 
We do not use a tile cutter because the tile does not fit diagonally. But they can do trimming of small corners. Because of this, diagonal laying is more expensive for tilers.
Measure each cut in place to avoid mistakes, and consider the width of the seam.

Pre-layout
We will start laying from the most prominent wall. In this place, there should be even half-cut cuts. The opposite wall will be closed, so it doesn't matter to us how wide the triangles are.
If you want to get the same trim on both sides, you need to align the center of the first tile with the center of the room.
We lay out the first 1.5 rows of tiles on the floor without glue in order to see all the irregularities, and, if necessary, also cut it under the walls. If all is well, apply glue to this area of the base.

Styling
The adhesive is applied to the floor with an even trowel or trowel. I use Lux Plus cement glue. The consistency of the mortar is liquid: this ensures better adhesion and adjustment.

We put the tile on the mixture and tap it. Align the plane and seams. Since the floor is perfectly flat, there is almost no need to look at the general laying plane, you can focus on the adjacent tiles.
We start the floor tiles under the wall tiles. There should be a gap between them.

We insert crosses to avoid displacement of the seams. I use thin crosses with a thickness of 1.5 mm, as I am confident in the evenness of the tile and the base.
We immediately clean the front part and ends from excess glue.
In the last row, there is a complex pruning. In addition, the walls in the room have an irregular geometric shape. To cut it off accurately, take a triangular half of the tile and use it to measure all the indents, taking into account the thickness of the seams and the overlap of the wall tile. We make a cardboard template according to measurements. If everything fits together, transfer the dimensions to the tile, cut it off and lay it down.

At what time and in what century the tiles were invented - there are no exact data, but tiles made of ceramics, as well as from porcelain stoneware, have firmly established their positions in human everyday life as the main facing material for the floor. Numerous options for its installation have been invented and developed and displayed in the form of diagrams.
Diagonal tiles in the kitchen
Among the wide variety of developed types of schemes, the diagonal arrangement stands out. In this way, you can decorate the floor of rooms of significant volumes, as well as small rooms.
The easiest way to get a beautiful front lawn
You, of course, have seen the perfect lawn in the movies, in the alley, and possibly on the neighbor's lawn. Those who have at least once tried to grow a green area on their site will no doubt say that this is a huge work. The lawn requires careful planting, care, fertilization, watering. However, only inexperienced gardeners think so, professionals have long known about an innovative tool - liquid lawn AquaGrazz.
FEATURES OF DIAGONAL INSTALLATION
Laying the tiles, made with all the rules, will help to visually enlarge a small room in volume, add showiness and make it attractive. If a non-professional who has no experience in such a matter takes up the matter, he needs to carefully prepare himself: to study all the information of the laying process diagonally to the smallest details, to learn the features of such a schematic arrangement of tiles. All this is necessary, since such styling is a very time-consuming and complicated procedure.

CHOOSE TILE
Since tile is a very popular material, it is subdivided into many types and produced in different variations.
The most important thing is that you should not forget, when making a choice in favor of this or that type of tile, what it will be intended for and in which rooms it will be installed. Depending on the conditions to which the tile will be exposed during operation (mounted on the floor or walls), we choose the material, taking into account all its features. They can be as follows:
- resistance to any precipitation (provided that the installation is done outdoors);
- high coefficient of friction so that the constantly wet surface does not slip;
- strength and hardness;
- the presence of a layer that protects the tile from cracks and preserves its pattern and color;
- the number of firing times the tile was subjected to;
- the quality of the clay from which the tiles are made;
- susceptibility of tiles to chemicals.

If we cover the floor with tiles, then the higher its characteristics, the longer it will last. It also matters what price a person is counting on. In order to save money, you can also purchase cheaper options. Finishing a bathroom or swimming pool will require the use of a higher quality material. The absence of a porous surface is the main requirement for such a tile. At the end of the installation, the seams are treated with an airtight compound.
PORCELAIN TILES
A very popular type of tile is porcelain stoneware tiles. It is formed by a combination of spar chips and basalt. Porcelain stoneware material is a completely new solution in modern construction. Such a tile is an unglazed tile. Suitable for absolutely any room in your house or apartment. Manufacturers produce tiles in various colors. It can be used to create mosaics or be combined with other types of tiles.

Porcelain stoneware tiles do not slip as much as other types, this allows you to successfully tiled the floor of the bathroom and toilet. If it was decided to install a warm floor, then such a tile is quite suitable for covering it, since it has the property of retaining heat and is resistant to high temperatures. The tile has a special protective coating that protects it from scratches caused by shoes or children's toys. The tiles are made of a very wear-resistant material, therefore, they are expensive to install.
DIAGONAL INSTALLATION OF TILES AS A METHOD OF DECORATION
Technically, such a procedure will be difficult to carry out. Therefore, in order to arrange the floor in a diagonal way, it is better to use professional help. But if you study all the technology thoroughly and follow the necessary instructions, then the result will exceed all expectations and save you money. You will only have to admire the result and be proud of yourself.
Before getting started, let's consider all the advantages and disadvantages of the diagonal layout.
Advantages:
- the space visually increases;
- an unusual effect is created. By combining different colors, you can give a special look to the room, it is interesting to design it, emphasizing a certain style;
- the wrong perimeter of the room is masked.

Disadvantages:
- work may be accompanied by certain complex tasks, since it is necessary to correctly apply the markings on the floor and cut the tiles according to the specified scheme;
- uneconomical consumption of material;
- it takes much more time to cut the required amount;
- when cutting, you can spoil a certain number of tiles, therefore, you need to buy it with a good supply, which is expensive.
INSTALLATION MATERIALS AND TOOLS
Before starting work, we purchase the necessary tools and material in sufficient volumes. First you need to calculate how many whole tiles you may need for laying in the selected room. Then count the details that will need to be cut, taking them for a whole tile. A certain amount of small scraps can also be mistaken for a whole fragment. After that, the resulting quantity is increased by 10-15%, since the tile may deteriorate during cutting, or there is a possibility of marriage.
We acquire the following tools for work:

DIAGONAL INSTALLATION TECHNOLOGY
Floor preparation
In order to start tiling the floor with the selected tiles, you need to carry out preparatory work.
First you need to make the floor perfectly clean. Any old coating is removed: linoleum, wood or laminate. We clean the surface from various greasy stains and debris.
Before laying, the floor surface is leveled. It is best to use a self-leveling flooring mixture for this procedure, which will facilitate further work. Dilute the mixture with water in a special container and distribute it evenly on the floor. The next steps can be continued in a couple of days. In order for the tile to be better attached to the floor, it is covered with a special primer. After it dries, it is necessary to distribute the tile glue diluted to a liquid state on the floor - this will fill unnecessary pores. The next stage will be marking.
Markup
The laid tiles should ultimately look perfect so as not to spoil the intended design. To do this, you should not repeat the mistake of many tilers when choosing the main diagonal, from which all further installation work is based. The result - the rhombuses are uneven, the tiles are consumed in large quantities.

If you want to be satisfied with your work, you need to draw an isosceles triangle on the floor. This will serve as the starting point for the first diamond. This technique must be used due to the fact that the perimeter in rooms often has uneven corners, and also so that the styling takes on a holistic look and is attractive.
Small rooms take less time and effort to mark up, but the process can be more difficult. For example, in the bathroom and toilet, it is necessary to bend around plumbing installations, which causes unnecessary waste of material, since the design is done diagonally, and many small scraps remain. In such premises, in terms of quality, it is better to install porcelain stoneware tiles. You only need to glue it on the surface after perfect alignment, so as not to spoil the expensive material. Get the glue that has special moisture-resistant qualities.
Installation of tiles
We lay the tiles according to the marked scheme. It is required to properly dilute the adhesive and apply it to a notched trowel. This type of trowel will allow you to evenly apply the adhesive to the tiles and align it correctly on the floor surface. First, the floor surface is treated with glue, then the inside of the tile. To neatly make the facing diagonally, crosses are used to separate the seams between the tiles.

First of all, the uncut tiles are laid, then the pieces. After laying out the next row, we check it with a building level. If the drawn up schematic drawing requires it, we cut the tile using a tile cutter.
After the floor surface is completely covered with tiles, it does not need to be touched during the day. Then we grout the joints, remove the crosses. By using the quick-drying glue, you can use the room the next day without any problems.
When the question arises of choosing a good glue, the room in which the decoration will be made is taken into account. Will it be heated or not? What is the degree of humidity? The instructions indicate all the features of the glue.
The tiles laid out in a diagonal order will look great in any room. For this, tiles must be chosen of the same size and preferably from the same batch. So that the design does not look monotonous, it is best to dilute the tiles with different colors or decorate with decorative inserts. You can also use a stencil to apply a pattern to some elements with special paint.
CONCLUSION
So that the choice of floor tiles does not disappoint you, and it has served for a long time, approach this with all responsibility. Regardless of the type, it must be of high quality, made by trusted manufacturers, have a certificate, comply with all norms and quality standards.
Tiles laid on the floor along a diagonal can make a beautiful pattern, which is one of the very beautiful and common. Unlike direct laying, you will need a little more materials and the process itself is more difficult, however, it has specific advantages in hiding wall irregularities.
Facing with tiles for the floor along the diagonal will make it possible to visually enlarge the room and hide wall irregularities
Pros of diagonal styling
Before you start laying tiles along the diagonal, you need to understand the specifics of this method. First of all, it should be noted the advantages and disadvantages of the diagonal orientation of the tiles.
Attention! Diagonal masonry can be implemented with both square and rectangular tiles.
So what is so great about the diagonal method? Pros:
- Visual increase in space. When rotated, the room visually becomes wider. In this case, it is necessary to carefully choose the design and color of the coating.
- Decorativeness. The diagonal styling effect is more interesting as it looks original. In order to increase the effect, different colors are combined.
- Hides wall irregularities. In case there is no complete parallelism of the walls, masonry floor tiles along the diagonal make it possible to hide this.
The laid surface in a diagonal way can be called more interesting and also costly than the direct method.
However, there are also disadvantages of this method, which are associated with the installation:
- Difficulty. It is much more problematic to make styling, since it is necessary to maintain the parallel of the inconspicuous diagonal correctly.
- High consumption of tiles. The tiles will be cut diagonally, and this increases the consumption when compared with direct laying by 5-10 percent.
- Tile cutting. It will take a lot of effort to cut the slabs.
Required materials and tools
To lay tiles at 45 degrees, you need a tool that makes it possible to cut the halves along the diagonal
In order for the overall process of diagonal laying to go well, you need to prepare complex tools and stock up on the necessary amount of material. The difficulty will be that a considerable number of cut plates that are not suitable for subsequent use appear. Therefore, you will have to make accurate calculations.
To determine the required number of tiles, it is much better to do this schematically, by calculating the smaller area from one wall to the other and multiplying by the index of the division of the site. First of all, whole tiles are calculated, after that it is calculated how many pieces will have to be completed. If possible, try to make two pieces from one tile.
The resulting quantity must be multiplied by 10% by the situation of marriage, inaccuracies in the calculation, the appearance of defects during cutting.
You will also need the following tools:
- container to prepare the solution;
- spatula (notched, flat);
- glue;
- trowel grout;
- bubble level;
- twine;
- felt-tip pen or chalk for marking;
- roulette;
- spacers and assembly seam crosses;
- rubber hammer;
- tile cutter.
Surface preparation and marking

Laying tiles with a plane builder will be more convenient
The level of difficulty of installation is very often determined by the quality of the substrate. Therefore, it is necessary to prepare it. In order for the final result to be achieved without problems, you need to carry out surface alignment:
- The protruding parts are ground.
- The recesses in the base are sealed with a cement mortar.
It would be much better to make a new layer from a mixture that evens itself out, so that the installation process goes even better.
For this, a specialized dry composition is stirred in a water mass. After reaching the desired consistency, it is applied to the base and equally distributed with a roller with needles. It levels the composition itself, and the roller is needed to direct it in the required direction and save it from air bubbles that remain in the solution.
As soon as 3-4 days have passed and the screed has passed the polymerization process, the surface is treated with primer compositions that will improve the adhesion of the tile glue composition... Impregnation is applied with a thin layer of 1 mm.
On the prepared base, it is necessary to make marked lines along which it will be possible to make laying parallel to the diagonal. This is done like this:
The main thing! In order to carry out accurate marking, it is worth removing all interfering parts. It is removed from the perimeter of the walls and the door frame is removed. However, this process must be done even before the surface preparation of the substrate begins.
- If the room is in the shape of a square, then the reference line will be diagonal, which is carried with a twine. You can use more advanced tools, for example a plane builder, but they are not cheap and Not everyone has it, so you will need to get by with a primitive rope and chalk.
- Since rooms with right-angled corners and straight wall surfaces are very rare, you will need to use the method with the construction of an isosceles triangle. To do this, from the corner of the beginning of the installation of the tiles, lines equal in length are laid and connected by a line. This line (the base of the isosceles triangle) will serve as the side of the tiling.
Material calculation
Another essential stage in the installation is calculation. It depends on the quality properties of this stage whether there are enough materials or not. If you buy an extra amount of material, then this will ask for an extra waste of cash, and big savings usually lead to an insufficient amount of material, which afterwards may be difficult to find on sale.

We put a not very large section to determine the approximate expense
In order to carry out the calculation, you can use the following methods:
- Online calculators.
- Highly professional programs for tilers: "Tile", " Tile 3D ".
- Manual method.
You shouldn't trust an unknown program just like that, without checking the calculations: “trust, but verify!”. Moreover, you can make a manual calculation in two ways:
- The area of the room is divided into the area of one tile. The resulting amount needs to be expanded by 10%. If masonry tiles on the floor with their own hands will be made with a rhombus, then the stock must be taken at least 15%.
- A calculation is made for one row of the surface to be coated, after which the resulting quantity is multiplied by the number of rows. It is also necessary to remember about the stock of 15% if masonry diamond tiles will be carried.
To calculate the required amount glue composition influenced by the following factors:
- base material;
- evenness of the surface;
- dimensions of slabs;
- quality glue composition.
You can use the average value of the adhesive mixture. To calculate the flow, they work as follows. The package indicates the consumption per square meter, which is multiplied by the area of the room, thus obtaining the average consumption value glue composition.
Styling technique

Diagonal masonry thinks starting from the center of the room
There are two options for laying ceramic tiles along the diagonal:
- Starting from the center of the room. This method is used if the open floor area to be laid is located in the center of the room. Place modules in sectors. The starting origin is set by the intersection of the diagonal lines. The lines divide the entire laying area into 4 sectors. The corner of the first tile should be at the center point.
- Starting from the corner of the room. The first elements will be sliced tiles with a triangle shape. For this, a tile cutter or angle grinder is used, which tile cut out in the shape of an isosceles triangle.
In general, the overall process of tiling the surface is virtually indistinguishable from direct tiling. So it should go in the following sequence:
- The adhesive is applied to a small area of the floor and on the other side of the tile.
- The tiles are laid with respect to the gap between adjacent tiles. In this case, it is necessary to execute the parallelism of the previously marked line.
- Tile slightly pressed into the glue composition, the general horizontal level is examined. If necessary, tap with a rubber-based mallet.
- Next comes the next tile, which must be of the same horizontal level with the others.
The first installation step takes place using solid tiles, and the trimming and finishing of the contour will be done in a few days, when the glue is dry enough to walk on the tile covering.
The last step will be the grouting of the tile joints, while it is necessary to select a grout mixture, which will focus on the diagonal arrangement of the modules.
Pay attention to the video on how to lay tiles on the floor with a diagonal orientation:
How to lay curved tiles on the floor when repairing a bathroom with your own hands
Laying tiles diagonally has some advantages over the usual (generally accepted) tiling method:
Diagonal floor tiles.
- When there is a narrow cut under the wall, the triangular pieces look more natural and less noticeable. Oblique, narrow pieces with a checkerboard (normal) cladding are constantly eye-catching.
- When laying porcelain stoneware of the same pattern in several adjacent rooms, the geometry of the rooms does not affect the seams and the resulting layout of tiles near the walls. The location and shape of these rooms can be of any configuration and the tiles on the floor will look natural.

Laying tiles diagonally.

Diagonal tiling in two adjacent rooms.
- When facing two adjacent rooms with floor tiles with different colors and patterns, it is possible to play with contrast on the door line. This can be done by placing the tiles diagonally on the floor in one room and in straight rows in the other.

Contrast when laying tiles in different ways
I am not alone in my reasoning about the ability of tiles laid with a diamond on the floor to hide violations in the geometry of rooms:
The technology for laying tiles on the floor diagonally.
There is an opinion that in order to lay the tiles diagonally, then it is necessary to draw diagonals on the floor and begin cladding along these lines.
This condition is possible only in one case. If the room is square in plan. That is, the sides are the same, and all the angles in the room are 90 degrees.
There is an easier way to glue tiles diagonally. To do this, you need to cut several tiles exactly diagonally and start the cladding using these slanting halves. The first whole 4-5 tiles placed in a square will give one flat side. It must be taken as basic. Align, if not a straight line, with a wedge. And in the future, continue the straight line with a chopping cord or a laser beam. At some stage (site), you can reproduce a right angle on it, and already carry out all further styling according to this angle. This will help to get even rows of seams even on non-calibrated tiles.

technology for laying tiles on the floor diagonally.
After filling the space with whole tiles, the trimming can be done the next day. These triangular pieces no longer affect the geometry and layout.
Where to start laying diagonally.
The impracticality of facing on the diagonals applied to the floor is that you have to start from a corner or some kind of wall. But the most prominent place is often the passage of the room and the doorway without a threshold. At this point, there are usually two different coatings. If you start gluing tiles from a corner, you can get a kaleidoscope of pieces on the aisle.

Beginning of cladding diagonally
Therefore, the technology for laying tiles in a "diagonal" way is slightly different. Installation begins with walkways and areas that will not be covered by furniture or equipment.

Diagonal tiles on the aisle.
In arbors of irregular shape, when laying diagonally, the perimeter is better to go around with a whole tile. And fill the middle, then, with diagonal rows.

Diagonal tiles in the gazebo.
This will help to avoid the appearance of pieces at the edge of the site and the formation of a cut, not always straight edge. Small sections do not adhere well, especially at the edge of steps or landings. A range of perimeter tiles also create a visual frame. And the frame in the design is always a winning option. Be it a frame or the frame of the ceiling frieze.
Where to start laying tiles diagonally in the garage on the floor is shown
How to measure and cut diagonally tiles.
In the West, for this case, various devices have been invented to facilitate the procedure.

Measuring tools for porcelain stoneware for trimming
But, often, this is all vanity from scratch. There is nothing easier than to mark with a pencil the points along which the cut of a hand or electric tile cutter should cut right on the tile.
This idea is clearer in a short video. All videos are short. No introductions and philosophy. The main essence that complements the text on the site.

Difficult tile trims are easier to do with a pre-cut paper stencil.
Details below:
Diagonal calculation of tile consumption.
Earlier, in the article on , it has already been said that the diagonal consumption of tiles is the same as in normal laying and is 7-8 percent. And this figure depends on the size of the tile itself and the presence of a complex pattern on it, representing a set of several tiles. The smaller the tile, the lower the percentage of it goes for trimming.
Price (rates) for laying tiles diagonally.
It is considered to be such a method of installation as of increased complexity. Therefore, the cost of this work is slightly higher than with the usual method. The rise in price can be expressed 1.2 – 1.3. This value can change and depends on some incomprehensible accidents, fluctuations in currencies and traditions of a particular area.
As you know, tiles are laid along one of the walls or diagonally. The second method is more complicated, however, it visually expands the space. Consider this method of laying tiles from the very beginning of the process to its completion.
Preparing the base and applying the markings
The first thing almost all tile builders start with is the choice of a reference point according to which the tiles will be laid out. And here, many make a simple mistake, marking a diagonal for themselves that connects the two corners of the room. As a result, the tiles are not laid out as smoothly as we would like. And the thing is that the diagonal should run at an angle of 45 degrees, which means that it will connect the corners only if the room is equilateral. In all other cases, the angle of the diagonal will change, as will the perception of the laid tiles. In some cases, this error is invisible, but it is still better to do without it.
Diagonal tiling visually expands the space even in the smallest rooms
For the correct laying of the tiles diagonally, an isosceles triangle is used, which is drawn along two adjacent walls. Equal segments are measured along the walls, the ends of which are connected by a third party. This side will be the reference point for the side of the first tile. The segments can be of any length, but the diagonal of the tile is considered the best segment, thanks to which you will start laying out the surface from a solid tile, and not from its pieces, which often lead to a gap.
Substrate preparation is the simplest part of the process. For its high-quality performance, you will need a comb, which will not allow you to lay the tiles crookedly, even with all your efforts.
Sequence of work
It is easier to present the progress of work in the form of step-by-step instructions. It should be noted that these rules apply both to laying the floor and walls, but with only one caveat - the tile must be propped up on the wall, do not let it slide down.
The whole process can be divided into the following stages:
- Markup.
- Surface priming.
- Primer with glue.
- Working with a notched trowel.
- Laying the main tiles.
- Laying the remnants of tiles around the edges.
- Grouting.
Photo gallery of stages of work
Marking and priming
With the application of markings using an isosceles triangle or a diagonal of a tile, everything is clear. But what if we cover an uneven surface? In this case, you will have to set the tile laying plane. At the ends of the segments, we drive in along the dowel and pull the thread between them. This thread, by its location height, indicates the height of the laid out tiles and is at the level of the horizon. Thanks to these marks, it will be much easier for you to lay the first tile.
 The primer allows you to plant tiles as tightly as possible on the surface to be faced
 The primer is an integral part of the work. If you bypass it, then after the glue dries, you will have to rearrange the tiles. The primer penetrates deeply and holds the top layer of the substrate together, increasing the adhesion of the surface to the adhesive.
After the primer has been applied, the substrate should be allowed to dry for at least an hour.
Since the tile is laid seriously and for a long time, additional priming measures will not be superfluous. Such a measure is an adhesive primer. Tile glue is diluted a little less often than the instructions require, after which the surface of the floor and wall is plastered with it. Such a move allows you to fill in all irregularities invisible to the eye with glue, increasing the contact area of the tile with the base. The main thing is not to wait for this layer of glue to dry.
Working with a spatula
Now it's time to arm yourself with a notched trowel with a tooth depth of 10mm. With this trowel we apply glue to the base and to the surface of the tile. By the way, it would be nice to prime the base of the tile with glue in the same way as the surface of the floor and walls. This will create a high-quality adhesion of the tile to the surface. Sometimes the masters miss this moment and do without it. As a result, after five years, the tile ceases to serve faithfully. But the tile, primed before laying, can last two decades without giving up its position.
 Notched trowel designed to apply adhesive to subfloors and tiles
 Laying tiles (video)
We orient the tile according to the drawn line or the stretched thread. After we have laid the tiles on the floor, we begin to tap them with a rubber hammer until excess glue appears from under it. Their appearance means that there are no more voids under the tiles. This means it's time to move on to the second tile. We put it down - we take the building level and check the plane of the finished floor. There are two points to note here. Ideally, the bubble should show the level in any direction, that is, no slopes are allowed. Also, there should be no free space between the tile and the level. If all these conditions are met, we continue laying.
We lay out the rest of the tiles, constantly checking the floor surface with a level. During this process, you do not need to be distracted by laying tiles against the walls and, therefore, trimming. First, the bulk of the tile must be allowed time to dry, and only then proceed to the rest of the work.
To work with tiles, in this case, you will need a tile cutter or grinder with a diamond wheel.
Grouting
This is the final stage of the tile work. The dry mixture is diluted with water to a thick sour cream, and then with a rubber spatula they begin to fill the joints between the tiles with the mixture.
Grouting does not tolerate haste, because in the event of an error in the work, it will be almost impossible to correct the defect. After every one and a half to two square meters of tiles, remove excess mortar from the joints with your finger, and from the surface of the tile with a dry cloth.
Tile calculation
It is worth briefly mentioning how to calculate the number of purchased tiles when laid diagonally. There is no difficulty here - we measure the surface covered with tiles and add ten percent of the total. As a result, we get the required volume of tiles with a small margin in case of unforeseen material costs.
 Tiles neatly laid diagonally look even more interesting than those laid in the usual way
 At its core, diagonal tiling is not much different from conventional tiling. The difference is only in the direction of laying and the number of tiles used. Correctly laid tiles can serve faithfully for more than a dozen years, as is required from this coating.