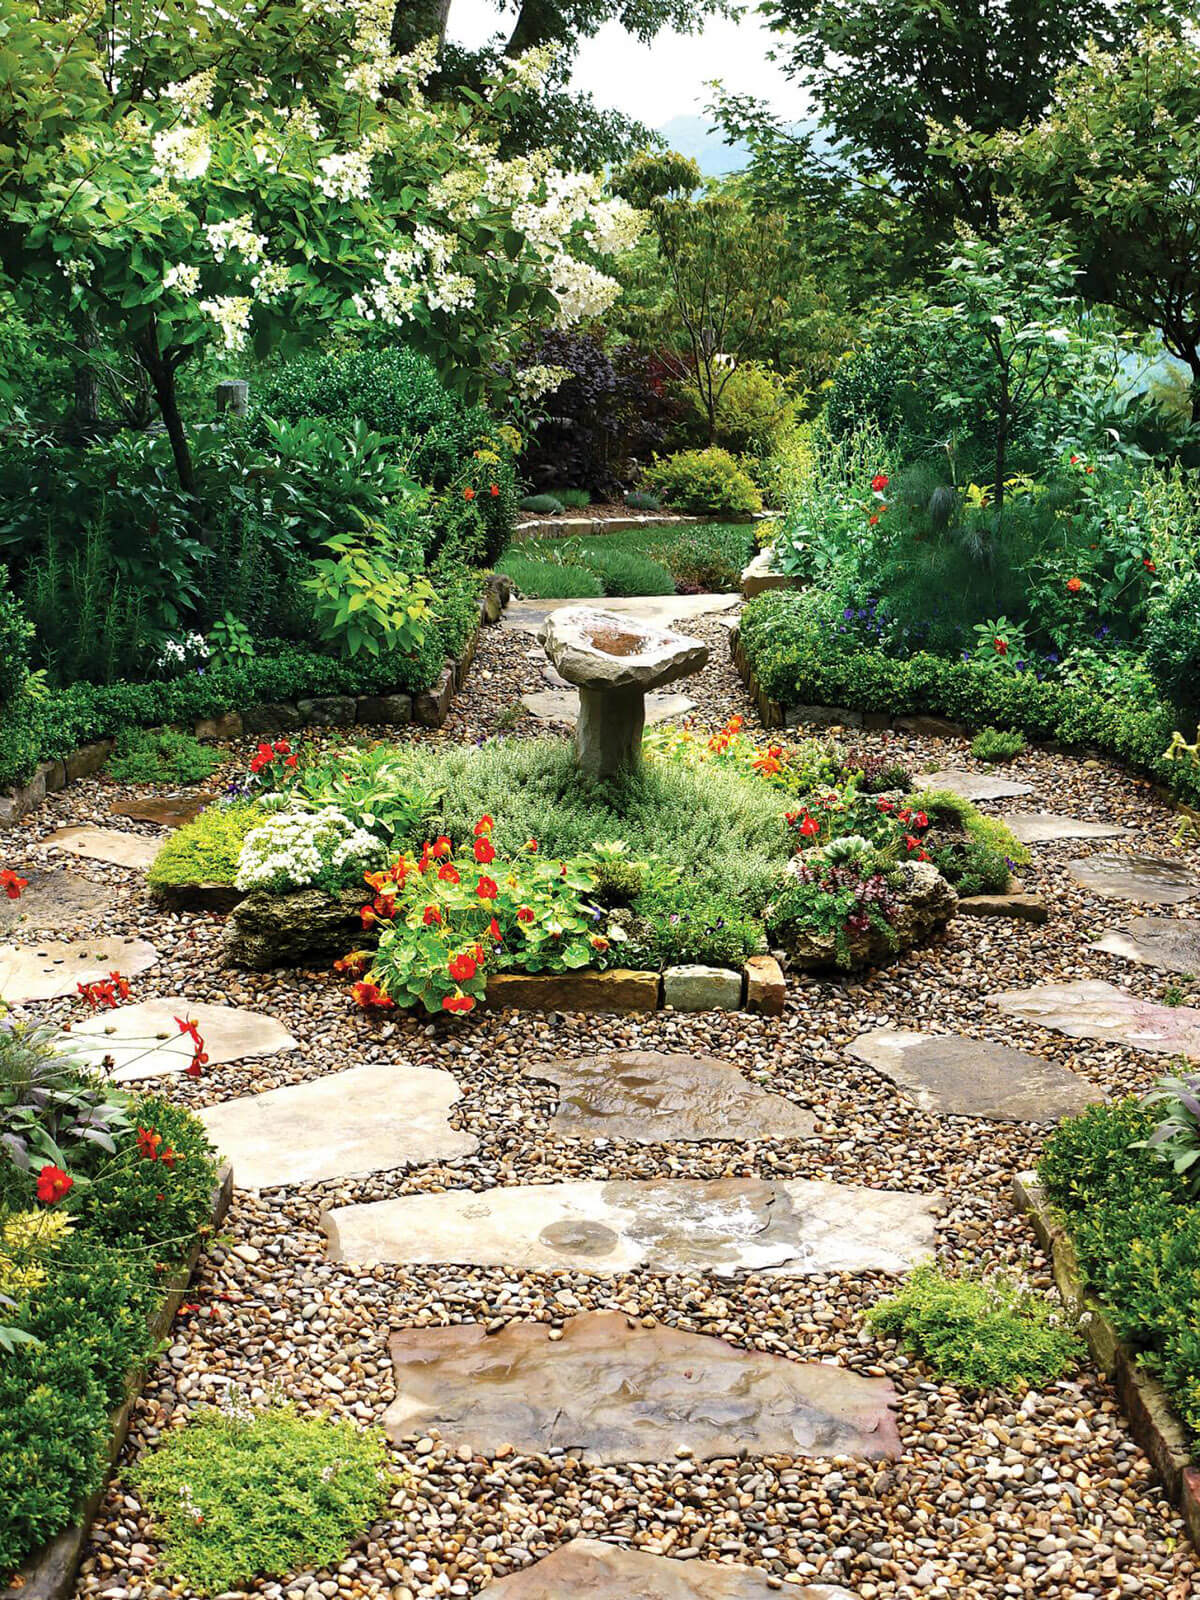
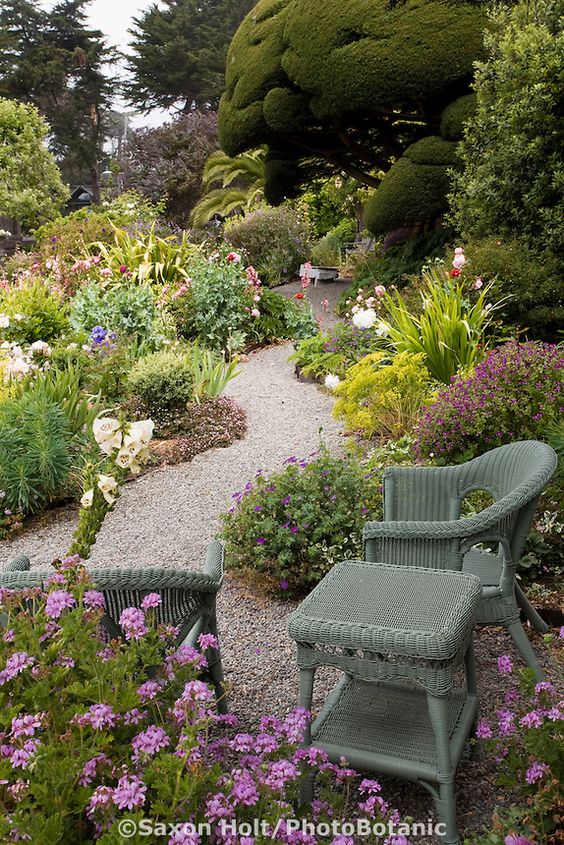
Garden paths in a summer cottage, garden plot or in the yard of a private household are not only important element landscape design, necessary for comfortable movement between the objects of the territory, but also a way of zoning and decoration. Correct location garden paths will allow you to spend as little time and energy as possible moving between elements of landscape design, and a beautiful, practical and durable design will allow you to decorate a yard or summer cottage, create a creative design that will envy your neighbors and the pride of your guests in your urban or suburban household with a local area. Even in a small private courtyard, paths are necessary for safe and comfortable movement between the main and secondary objects of the territory - the building of a country or city house, a garage, a gazebo, outbuildings, a children's corner or playground, a swing, a barbecue area, a pool or a pond.

Requirements for garden paths
If we talk about physical parameters, then the main requirement for the paths of the local area and garden plot is the smallest distance from one object to another. But often this criterion runs counter to the aesthetics of landscape design - winding paths look beautiful, romantic and even mysterious, but at the same time they make up more a long way than their counterparts with crisp straight lines and turns.


Conventionally, all the tracks of the site are divided into main and secondary. The requirement for the width of the track also depends on the functionality of the path - the main ones are usually made with parameters of 1-1.5 m, and the secondary ones can have a width of at least half a meter. But a lot depends on the material used to make the garden path - if a standard size blank is used (bricks, concrete or stone slabs, "garden parquet" or any other products with non-variable sizes), then the width of the path is formed by their number.


If we talk about the aesthetic qualities of garden paths, then they must outwardly correspond to the general concept of decorating a yard or plot. If natural stone is involved in the design of the facade of a house or other buildings, facing areas and patios, then it would be logical to use this material or its combination with other raw materials for laying out paths.


In addition to its main function - providing the opportunity to move freely between the objects of the local area and dividing the site into segments, otherwise - zoning, garden paths play the role decorative elements. With the help of the original choice of material or method of making country paths, you can not only create an exclusive landscape design for your site, but also bring your ideas to life. Creative skills, design ideas.


Types of garden paths
According to the type of material used, all tracks can be divided into the following groups:
- concrete;
- stone (in turn, they are divided into those made of plastushka stone, pebbles, paving stones and other types);
- brick;
- wooden;
- from waste material (plastic lids, parts of glass bottles, corks, etc.).


The material for the execution of the paths is selected based on the design of the main building (its facade), other large-scale buildings in the yard or on the site, the style of execution, the size of the paths themselves and the capabilities of the owners (a stone path will require financial investments, and a path made of bottle caps will only take time to collect them ).


In addition to the material, the criterion for separating the tracks is the method of execution - they are divided into solid and non-solid. The name speaks for itself. The type of paths will depend on their length and purpose - whether the paths play an exclusively practical role or also carry a decorative load.

Also, all country and garden paths can be divided into two types - temporary and permanent. Most of the paths involved in landscaping are permanent. But in some cases there is a need to lay paths, for example, only for the period of the summer season. Finished tracks are most often made of rubber or plastic and are sold by the meter or in blocks (sections, products) that are interconnected like puzzles.

Preparatory work
Regardless of how long your tracks will be, what material they will be made of and in what particular way, any performance will require preparatory work. First of all, you need to draw up a plan for the location of the tracks on the site. This can be done both on a regular sheet of paper and in a special program, which is not difficult to find on the Internet. Designate on your plan all the elements of landscape design - not only the main buildings and sites, but also the location of flower beds, beds, household objects.


While laying the still drawn paths from the main objects to the secondary ones, you can optimize the arrangement of flower beds, beds and temporary plantings, in order to reduce the distance between objects or connect some elements into zones. In the course of drawing up the plan, it will become clear which segments can be connected by a path leading to them, and for which sections of the yard you will have to use branchings or pave the platforms. Only on paper it may seem that a rarely visited corner of the garden or yard can do without a path - imagine your reluctance to walk on the ground after rain, and you will find resources for making even a very narrow path.


Next comes the markings on the ground. This stage should not be neglected, especially in cases where not only the length, but also the width of the tracks will be clearly regulated by the parameters of the material - slabs, bricks or any other standard blanks. The easiest way to markup is with pegs with a stretched rope or cord. In order to make the outlines of future paths more obvious, the boundaries can be outlined with lime.


The ideal option can turn out if, together with the marking of the paths, it is possible to place marks on the planting of trees and shrubs, plants that will frame these same paths. On the ground, everything looks a little different than in the program or on a piece of paper. You can lay out stones with inscriptions of the names of trees and shrubs or designate the layout of future flower beds with them.

The pit for any path should be somewhat wider than the laid out path itself. In order for garden paths to last as long as possible, it is necessary to lay out a curb of stones or concrete around the edges.


Foundation for a garden path
Do not neglect this stage of work if you want the path you laid out to last for many years, and not begin to crumble or grow grass after the first season of operation. When preparing the base for your garden droshky, it is important to remember that it should have a slight slope to drain rainwater. The presence of a small drainage trench on the side of the slope of the paths will be an excellent help for the entire landscaping of the yard or plot during rainy weather.


So, it is necessary to carry out the following manipulations to prepare the foundation for the garden path:
- remove the upper fertile layer from 2 to 20 cm in size (it all depends on the quality of the soil, the length, the tire and the material for laying out the tracks);
- along the entire length of the walls of the resulting pit, wooden planks, having previously poured a little sand under it;
- if the width of the track will be limited by concrete curbs, then they are leveled and fixed with reinforcing bars (to prevent shifts), which are driven inside the pit;
- if the soil in your area is very loose and the walls of the trench turned out to be uneven, you will have to drive in reinforcing pins along the edges of the walls, and then install curbs;
- then fine gravel or gravel, pre-mixed with cement or sand, is poured to the bottom of the trench, leveled and compacted (layer thickness from 5 to 10 cm);
- for a more thorough compaction of the gravel layer, it is necessary to moisten it periodically.

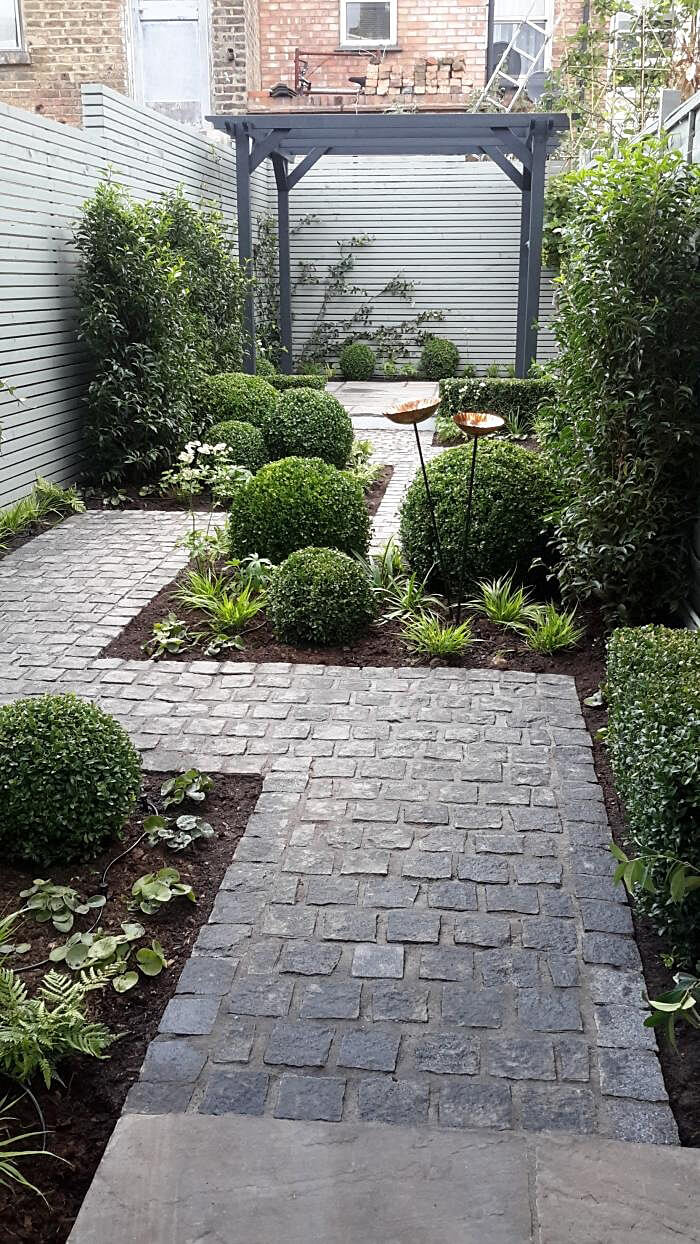
An example of the design of a beautiful and practical garden path
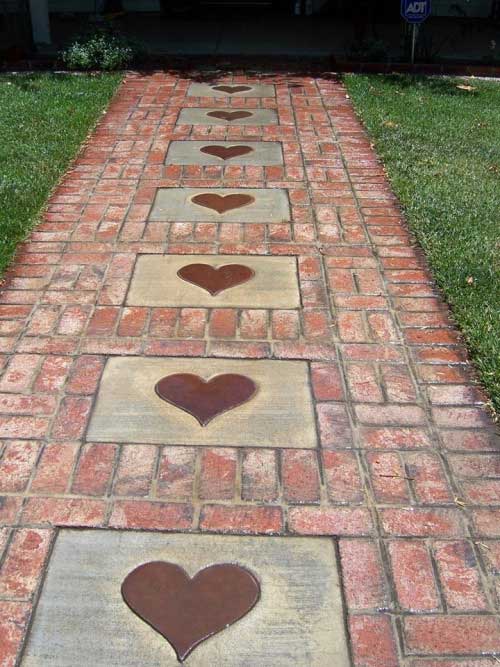
Consider the option of arranging brick garden paths, as the most affordable and easy-to-use material (in case you have the opportunity to use a used brick, and not buy material).


A brick garden path is a fairly durable, durable and aesthetic surface that even a homeowner without special skills and experience can make on their own. The brick path is laid out according to the same principle as paving slabs or paving stones. In order for the trail to last as long as possible, choose high-quality clinker bricks and carry out all work with high level accuracy.


So, you need to go through the following algorithm of actions:
- the prepared base with a compacted top layer of sand must be carefully leveled using the rule (home-made fixture from a board with a perfectly equal surface);
- this is followed by the installation of side bricks (in relation to the width of the track), they are mounted with an edge and driven into the sand at half their width with a rubber mallet;
- if your path does not have a curb, then the side bricks must be fastened with a mortar (use the formwork, after removing which it is necessary to arrange crushed stone, compact it at the end of this work item);
- then the brick track pattern is directly laid out (it can be placed edgewise or laid wide);
- usually, to create the most rigid and durable masonry, one row of bricks is laid along the path, and the second - across. Also, to increase the strength of the masonry, cement-based street glue is used (it will help not only fasten the bricks together, but also prevent grass from growing through the products).
- a little solution is required, tk. it is necessary that it does not protrude to the surface between the bricks, but is inside the masonry;
- upon completion of the installation of bricks, the gaps between them are filled with sand using a large brush;
- in order to give brightness to the resulting brickwork and extend its service life, the surface must be coated with a penetrating primer, and after it has completely dried, with varnish for outdoor stone.


And finally: some original ideas
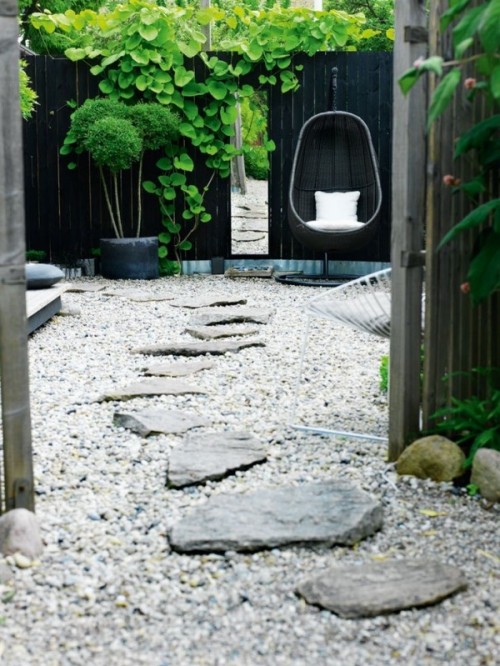
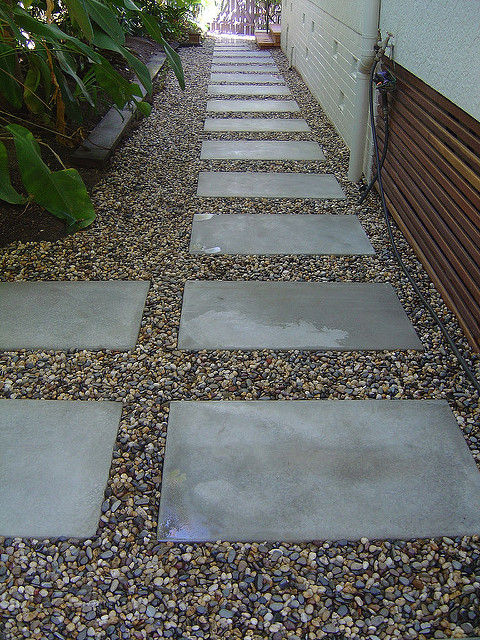
In modern landscape design projects for areas of various shapes and sizes, design styles, you can often find garden paths laid out in the manner of steppingstones. It is as if you are moving along the path elements in the form of individual slabs, flat stones or log cuts that arise directly from the lawn or loose material of the path base. It is easy to make a beautiful, modern and at the same time functional walkway with your own hands if you use the so-called "steppes" made of concrete various shapes.


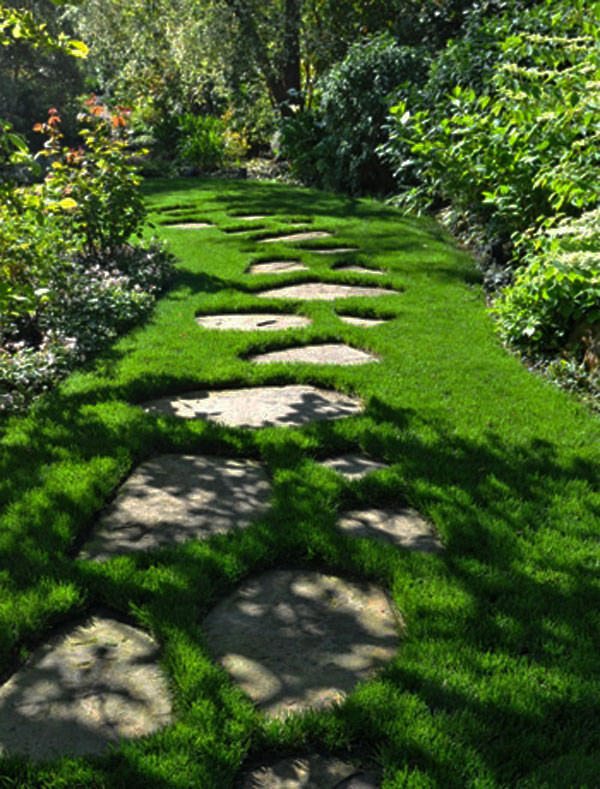
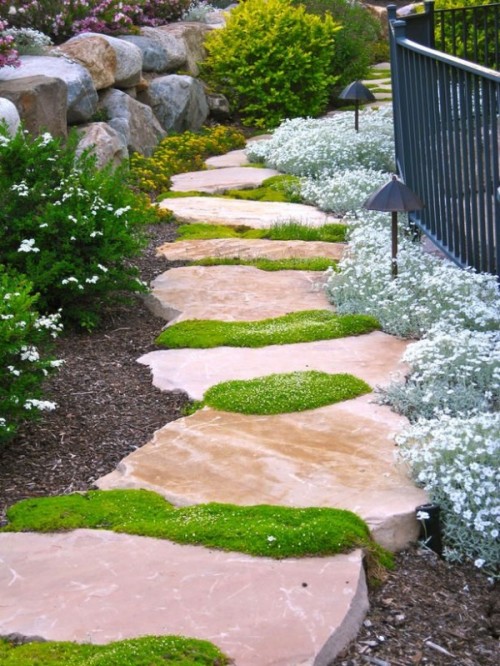


In this case, the combination of material looks original. For example, clear edges and sharp corners of concrete square or rectangular slabs or plastushka stone against the background of rounded shapes of river stone - pebbles. Together, these two types of materials form an organic and attractive alliance for creating creative yet practical surfaces.


And the "steppes" from wooden boards look luxurious on small decorative gravel of snow-white shades. Against the backdrop of bright green lawns, such paths will look especially impressive ...

Wooden garden paths are not uncommon. Only recently for modern projects Landscape design is increasingly using the so-called "garden parquet". The material is a standard blank size, which is very easy to connect to each other to create not only a durable and wear-resistant, but also an incredibly beautiful coating. "Garden parquet" is used not only to create paths, but also spread on open verandas, platforms, terraces and patio or barbecue areas. The wood in such products is processed in a special way - it is not affected by the usual "natural irritants" - moisture, temperature changes, direct sunlight.


Laying out drawings from a round river stone (mainly Altai blue) allows you to create uneasy original paths, but bring the beauty of the creative process to the design of your yard or summer cottage. Round river stones of different sizes from very light gray-blue to dark, like anthracite, can be laid out in fancy abstract patterns or prints that are quite clear in geometry. Creating such a track will require not only financial, but also time, incredible accuracy and a lot of free time. But all efforts will be more than compensated by the incredible aesthetics of the paths, their uniqueness.


No less original effect can be achieved when laying out a pattern from the remains of porcelain tiles (products for flooring, outdoor use). The advantage of this method is not only in the originality of the result and the freedom of your imagination, but also in saving the family budget, because it’s not just leftovers that are used, but fragments from tiles of different shapes, sizes and colors.


A walkway created entirely with bulk gravel may not surprise your guests or neighbors, but it will help save the family budget. It is only important to install strong, solid curbs that will keep small fractions of stone inside the trench.


FORUMHOUSE users are well aware that life outside the city is not only a pleasant pastime in a hammock in the garden, but also constant household chores. Everyone equips their "ten acres" to their liking. And if the creation of landscape design is a matter of personal preference, then garden paths are simply vital in any personal plot and in any country house. Indeed, in addition to purely decorative purposes, it is the paths that allow us to move freely around the site, regardless of the season.
Therefore, the materials for paving garden paths are subject to increased requirements, such as durability, safety, environmental friendliness and presentable appearance. All these requirements are met by paving slabs. Expert advice and step-by-step instructions from users of our forum in this article will help you lay tiles for the path in the country on your own!
How to make a tile walkway. Planning.

Any construction should begin with careful planning of all works. The laying of paving slabs will not be an exception. First of all, you should pay attention to the following points:
The total number of tracks and their location on the site. Tiles for the path in the garden.
The key rule can be formulated as follows: "The central path in the garden should lead from the entrance to the site to the house." If there is a garage, a workshop or a gazebo on the site, then you should put paths to them. Thus, you can ensure the zoning of the site, ensuring unhindered access to each building.
Pavement Width

The path leading to the house should be so wide that two adults walking towards each other could easily pass each other on it. On average, this value is from 1 to 1.5 meters.
Paths that are not used so often and lead to flower beds or beds can be made 0.5 to 0.8 meters wide.
You should also clearly define the functional purpose of the tracks.

Denis Bogdanov Landscape improvement specialist, nickname on the forum Denis Vlad-ch
- For myself, I clearly divide the paths into decorative, leading to the gazebo, and functional, which are under heavy load and lead to the house or garage.

Paths that are under heavy load require more careful preparation of the base than those tracks that are used from time to time.
Denis Vlad-ch
It is also necessary to consider how you will care for the garden path in winter and autumn.
Unlike a bulk path, paving slabs are easier to care for. When removing snow and fallen leaves, you will not throw rubble aside.


The second most important, after functionality, characteristic of a garden paving path is how pleasant it is to walk on it. And in order to understand this, you can use the secret of landscape designers.


Vladimir Petriv Director of Petriv Landscape Design
I always advise you to first walk along the pre-marked paths and make sure that everything is comfortable, and it is convenient for everyone in the household to move along them. I can say that after such a “walk”, you almost always have to make adjustments to the original plan for marking the track.
In addition to determining the functionality of the garden path, you must choose the thickness of the tiles. And here it is better to adhere to the following rules.
How to do pavement: step-by-step instruction
In addition to determining the functionality of the garden path, it is necessary to choose the thickness of the paving slabs. And here it is better to adhere to the following rules.

Konstantin MerzlyakovExpert of the plant "Factory GOTIKA", Moscow:
For garden paths and the adjacent territory, where passenger vehicles do not drive, the paving slabs of the path can be no thicker than 40-50 mm. And for a path that provides passage for a passenger car and parking, the thickness of the tile must be at least 60 mm.


Vladimir Petriv:
The initial preparation for laying garden paths is usually associated with excavation, and this should be linked to the geoplastics of your site. With large elevation differences, slopes, etc., it will be necessary to move and remove large masses of land - a very costly event that requires the use of construction equipment

Geoplastics is the artificial formation of the relief and architecture of the site.
How to lay a tile garden path. Recommendations of experts.
Paving slabs are environmentally friendly and durable coating for a garden path. And its durability and beauty, first of all, will depend on the quality of paving slabs and compliance with the laying technology. Tiles on the tracks can be done with your own hands.


Konstantin Merzlyakov
Modern paving slabs are made of concrete. The shape of the tile can be absolutely any, which allows you to successfully fit garden paths into the landscape design of any site.
The service life of concrete vibropressed tiles is on average 15 years, provided that the base is properly prepared.
And, like any coating, paving slabs require care during operation (cleaning, the use of water-repellent coatings, etc.).
The first stage of preparatory work for laying paving slabs is the breakdown of the contour of the area to be laid and the setting of control "beacons". The corners of the territory, binding to the available areas, slopes are taken into account. After the work has been done on the layout of the contour, they begin to prepare the base, which includes the following types of work: layout, installation of the carrier layer, installation of borders and the installation of a leveling sand layer under the tile.
Sidewalk paths with their own hands

We make a path from paving slabs in the following step-by-step sequence:
- Earthen boxes are torn off side stone;
- A side stone is installed around the perimeter of the site. The curb stone is necessary for a strong fixation of the paving slab web;
- The underlying layer is poured;
- The foundation is being laid;
- The tile covering is laid;
- The tile joints are filled.
It is also necessary to remember that when laying tiles, the following standards should be followed.

Alexander LoginovTechnical director of the company TD BRAER
Work on the installation of pavement should be carried out in accordance with SNiP 3.06.03-85 "Motorways" and SNiP III-10-75 "Improvement of territories".

And the independent laying process can be divided into a number of successive stages.
- Planning and designing a garden path. It is necessary to determine the type of soil on the site. Then develop the layout of garden paths, choose the design and pattern of the tile layout;
- Cost calculation necessary materials;
- Carrying out work on laying a garden path.
 Tiled garden paths.
Let's consider each of the points in more detail.

Alexander Loginov:
The choice of tile laying method depends on the state of the country soil and the subsequent operating conditions of the site: the blind area of the building, the pedestrian zone, the area for driving and parking cars, etc.
It should be remembered that the result of your work, first of all, will depend on the thoroughness of the preliminary marking and preparation of the base for laying tiles.
Planning includes the following:

- draw the layout of the area to be paved;
- measure the area in order to apply dimensions to the plan;
- Calculate based on the points above required amount tiles for laying, as well as the amount of materials for preparing the base of the track from tiles with a border.
After developing a plan, they begin marking future tracks.

Alexander Loginov
First of all, determine the direction of the water flow. Please note that water should go along the blind area of the building or along the path to drainage wells or lawns. The slope can be made longitudinal, transverse, longitudinal-transverse, but not less than 0.5%, that is, 5 mm per meter.
The direction of the slope should be such that water flows from the paving into drainage systems or on the lawn, but not to the building!
After the place for laying the tiles is determined, the boundaries of the track are marked. To do this, pegs are driven in along the boundaries of the site, along which a cord or fishing line is pulled. After that, you can start excavating the soil, adhering to the following recommendations:
- Excavation is carried out so that after laying the front surface of the tile reaches the specified level of your site;
- The platform formed after excavation is leveled and rammed;
- If the soil is soft, it must be moistened (spill with water from a hose) and compacted.

Vladimir Petriv
Drainage and drainage into a stormwater or storage well must be thought out and installed at the preparatory stage of laying garden paths.
Tiling garden path

Konstantin Merzlyakov
When laying paving slabs on a complex curved surface and with a large difference in height, it is necessary, when planning, to lay a larger percentage on the consumption of tiles (cutting, fitting, etc.).
Pavement base preparation
The most important step in laying paving slabs is the preparation of the base. The right foundation will not allow the track or platform to “sag”, ensuring their longevity. It should be borne in mind that, despite the tight seams between the tiles, the base is still saturated with water. Therefore, a permeable drainage bearing layer (gravel, crushed stone) is needed at the base. Then part of the water from the surface will be diverted through the paving stones and the carrier layer into the soil.
 How to make paths from tiles.
It is also important to understand what layers the correct version of the tile base pie consists of.

Alexander Mishin Expert of Wienerberger Brick
The cake consists of several layers: natural ground base, subbase, underlying layer, "bed" and, in fact, "sidewalk".
"Bed" is a layer of sand or fine gravel. The subbase is a bulk layer of soil, and the underlying layer consists of gravel or crushed stone.


Alexander Mishin
The thickness of the "bed" for any type of soil base is on average 3-5 cm. The thickness of the remaining layers should be formed based on such indicators of the soil base as moisture, density and composition.

Alexander Loginov
For the main carrier layer, a frost-resistant, homogeneous material (crushed stone, gravel) is used. This material must be laid evenly in height and with the required slopes.
To build an ordinary pedestrian country path, it will be necessary to make a carrier layer 10-20 cm thick. When arranging platforms for driving and parking cars, a layer of 20-30 cm is used. Under heavy loads, the carrier layer is increased and placed in 2-3 layers, each layer is compacted with a vibrating plate or vibrating roller.

As mentioned above, the method of preparing the base largely depends on the expected load on the garden path. It is also necessary to take into account the bearing capacity of the soil.
 Our forum user Oleg Novitsky advises how to build a pavement path from tiles with difficult soil: if there is a so-called heavy or clay soil, or you have a swampy summer cottage, then the thickness of the crushed stone base must be made at least 10 cm.
Then the geotextile is laid.
Geotextiles pass water well and do not allow materials to mix (mixing of materials leads to the formation of voids and dips in the coatings).
Alexander Mishin
The use of geotextiles is appropriate when the natural soil base is located in a swampy area and has high humidity. A layer of geotextile is arranged over a natural soil base.

The next layer of our “pie” is sifting on a geotextile base.

Oleg Novitsky
We fill the area with screenings (or sand). The screening layer must be at least 10 cm. This layer must be very carefully compacted. At this stage, it is necessary to accurately level the entire base for laying using a rule or other tool.
Screening has not much good property- caking. This means that over time the base becomes almost monolithic, and then, due to its low strength, it cracks, and cracks and shells form in the coating. To avoid such a nuisance, use a vibrating tool for compaction and ramming and do not work in rainy weather. Most best dropout for such work - dry.
Then we proceed to create the foundation level, guided by the following algorithm:
- The boundaries and center lines of the site are marked with a rope;
- Loose sand can be leveled just below the edges of the curb;
- We compact the resulting pillow with a vibrating plate.


Oleg Novitsky
An electric or gasoline vibratory rammer with a rubber sole is well suited for compacting a layer of sand. Using it, you can not only prepare a gravel-sand cushion with high quality, but also avoid further subsidence and soil collapse under the laid tiles.

Alexander Loginov
It must be remembered that all layers of the base are poured, leveled and compacted, taking into account a 0.5% slope!

The preparatory stage is completed by backfilling with river sand or a cement-sand mixture. To do this, a layer of clay-free river sand 1-2 cm thick is poured onto the base without compaction, the layer must be loose.
CPS (cement-sand mixture) is taken in a ratio of 1:8-1:10, because cement is needed to bind the sand so that it is washed out with water.

Alexander Mishin
The use of a cement-sand mixture as a "bed" is justified only if heavy traffic is expected on the surface of the tile. The garage and pedestrian zone of a private house does not belong here, because. traffic and load are not so intense here.
Paving slabs
In order for the garden path to be durable, and the tiles on it lie evenly, its laying by the summer resident must also be divided into several successive stages. 
Laying starts:
- from the bottom point;
- from optically important boundaries;
- from conspicuous elements: a porch, the main entrance to the house;
- manual laying of tiles is done diagonally away from you, so as not to disturb the prepared top layer.
Before starting the laying of the first row of tiles, in order to maintain the exact location of the joints, it is necessary to stretch the cord over the entire length and width of the object. After that, adhering to the cord, proceed with the installation.
It is recommended to check the location and straightness of the joints every three rows of laid paving slabs. Laying is carried out using a rubber mallet (mallet) with light blows on the tile. Every 3-5 sq.m of laid, but not yet compacted paving slabs, its surface is controlled using a two-meter rule or building level.


Alexander Loginov
Curb stones should be used as framing paths on a suburban area. These fences must be made before laying the outer part of the path to prevent transverse displacement and settlement of the tiles.
Dig a trench along the edges of the marked area of \u200b\u200bthe path along a stretched cord small size and depth (so that the curb enters this trench to the required level). The base of the trench must be tamped, backfilled, and the curb placed on concrete.
The border can be visible or hidden - it depends on the desire. If the border is hidden, then it must be placed so that the top of the tile exceeds the top of the border by the height of the chamfer.

Oleg Novitsky
To reduce the number of tiles to cut, start the longest row from the curb, laying whole tiles right up to it. The resulting voids should be exactly half of the tile. When cutting from one whole, you will get two necessary halves, and, I believe, waste can be completely avoided. This technique can be used for curly symmetrical tiles.
The biggest enemy of any paving slab is freezing water. Therefore, it is impossible to lay tiles on monolithic, waterproof bases, concrete screed. In the open air, it is forbidden to lay tiles on the mortar.
Sealing and vibrotamper
After laying the tiles, the coating is compacted with a vibrating plate. After the first vibration compaction of the coating, dry sifted clean sand is poured onto the surface in such a way that the sand is easily and densely poured into the gaps between the tiles. Scattered sand is spread evenly with a brush over the entire area and hammered into the seams, “tying” the entire coating into a single whole.

And in order to build a durable coating, when working, you must adhere to the following recommendations:
- Do not lay tiles in rainy weather without a special canopy.
- Do not fill the joints with a mixture of sand and cement.
- If the site has a "complex", heaving soil, it must be borne in mind that its displacement can deform the tile. Then a more complex laying is carried out - with a phased preparation of a concrete pad as a base, which guarantees durability.
Thus, when laying garden paths on your own, you need to take into account every little thing and carefully plan all stages of work. After all, the path to your home begins with a garden path made!
Related Articles
able to withstand heavy loads
In order for the filling of garden paths with your own hands to be done flawlessly, you should take into account some expert advice:
 driveway
. Carelessly executed additional finishing concrete mortar  garden path
Gutters are used to divert the main streams of water from the surface of paving slabs. 
The most budgetary and simple option is wooden saw cuts. Wooden roundels give a special charm and originality to the site, but their service life is short - only 5 years. As an alternative, it is recommended to use concrete rounds with an imitation of the surface of a tree.
Properly planned network of footpaths in the garden area is an important part of creating a beautiful and comfortable garden. We walk along them, enjoying the beauties of the garden, we drive a wheelbarrow along them or walk with a bucket and a shovel at the ready. Paths are main, walking and secondary, working. Depending on the purpose, we will build them from different materials. The dimensions of the garden dictate their width: the paths of the main route are from 0.8 to 1.5 m, the auxiliary ones are from 0.4 to 0.8 m, the optimal width is 0.6 m.
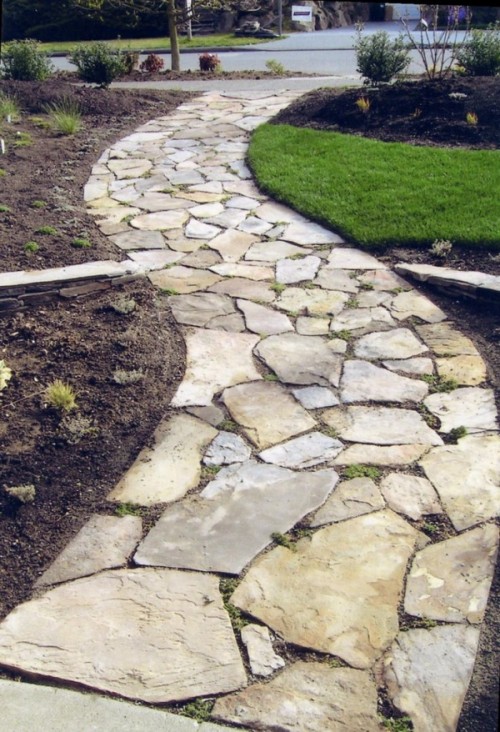
 Natural stone.
After the rain, there are no puddles left. However, it is undesirable to lay marble and limestone paths in the place of the site where there is a shadow. Over time, the path may become covered with plaque, and this will spoil the appearance of the garden plot. In these places it is better to use quartz and granite paths. 
- If the work area is large, then use a vibrator to prevent the formation of voids. In the absence of equipment, manual tamping is allowed until laitance is formed;
Best not to use for at least another week. Remove the formwork - before you remove the boards, tap them from above so that they move away from the concrete. Finally, backfill the groove along
concrete cover
Lay it in the formwork and spread it with a shovel to the edges and corners - it is very important that there are no air pockets left. At this stage, you do not need to scatter the concrete too much - level it with a rake so that the surface is 1-1.5 cm above the formwork edge.
. However, when we are talking about broad
 In the process of laying paving slabs, in no case should you forget about the drain.
When choosing paving slabs for paths in suburban areas, give preference to tiles made by vibrocasting. 
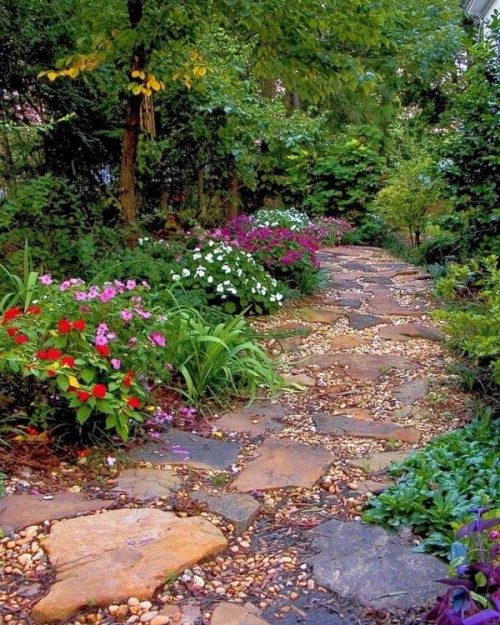
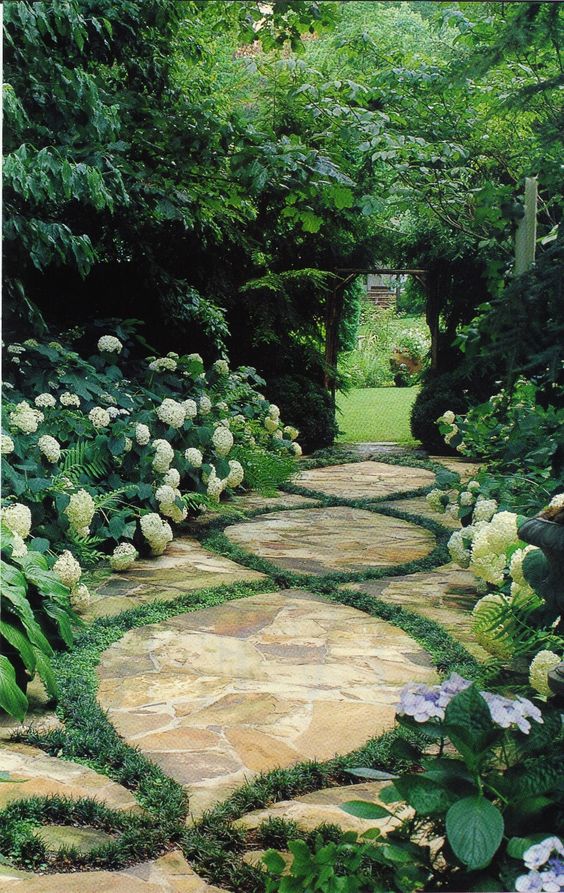
Garden stitches made from river pebbles look unusual. Paths made of large stone elements that emphasize the picturesque look even more original. garden area. The photo shows a path made of river stone.
The pattern of the tracks can be built on geometric or free landscape lines, a reasonable play of contrast between strict geometry forms and smooth lines is also acceptable, for example, a combination of straight and picturesque lines, diagonals, circles, etc.
According to many, this is the most the best way from an aesthetic and practical point of view. However, such tracks will cost you dearly. For the production of tracks from natural stone marble, granite, labradorite, basalt, limestone and others are used. Today you can purchase natural stone pavement absolutely different colors. Small grass or moss looks especially relevant between such stones. Do not forget to consult a specialist about how slippery this or that material is.
Grass paths are very aesthetically pleasing and look rich, but they require
- to avoid cracking the track will allow expansion joints made of slats, 15-20 mm thick;
greeninfo.ru
Arrangement of beautiful garden paths: photo creation options
garden path
Will only worsen it.
Choosing a material
Now you will need
- driveway
- The slope should be approximately 4%. Otherwise, during the rainy season, water may accumulate on the paving slabs.
- Creating garden paths from paving slabs is not at all a troublesome task that can be done by every owner of a country house or cottage. Such tracks have a very aesthetic appearance and a long service life.
This factor directly depends on the purpose of the track. Where it is supposed to walk, the paths are created free and spacious - about 1.3 m. Such a width is necessary so that two people can easily walk along the road at the same time.
Paths and paths divide the site into different zones and at the same time unite the garden into a single space. This is achieved not only by the general pattern of the tracks, but also by the use of carefully selected paving materials. There are several rules for the selection and use of decorative materials that are applicable not only to creating a network of paths in the garden, but also for any other work on the design of our environment.
serious care.
Path width
- when preparing concrete yourself, calculate the place so that you can immediately lay it out on the track. So you save a lot of time and effort;
Earth and properly tamp it down.
Material thickness
To get such a striped surface, immediately after
Important Points
rammer
- or an irregularly shaped area, you cannot do without the help of a person with experience in concrete work. Of course, you can order this work to professionals. A few words about
- Paving slabs should be laid only in dry sunny weather.
- On average, the width of the track can vary from 0.4 to 1.2 m. Based on this, you need to choose the type and size of the tile. The width of the path is determined in such a way that the paving slabs can fit between the curbs without the need for cutting them. In this way, it will be possible to obtain a significant reduction in the amount of waste, therefore, some amount of money can be saved.
The width of functional paths that are intended for agricultural work should be 0.6 - 0.9 meters. This distance is quite enough to bring a wheelbarrow, to approach the work areas.
original ideas
Rule 1. In the paving of paths that are adjacent to the house, the material used in the decoration of the house itself, whether it be a facade, a plinth or a porch, should participate. That is, the same material should move from the vertical plane of the wall of the house to the plane of the garden and spread along it, which greatly enhances the feeling of the common space of the entire estate. In the paving of the local area, this material should not dominate, otherwise the house and garden will visually merge. It usually occupies about a third of the paving area.
Pebbles, gravel and rubble
Unlike stone and concrete paths, they do not heat up in summer, absorb dust and contribute to the production of oxygen. They can be used not only as pedestrian routes, but also as access routes, suitable for any design and style of the garden plot, they come in various shapes and lengths.
- so that the concrete becomes pliable and plastic, soak the finished mixture in a humid room for several hours;
furniturelab.com
Cut the formwork boards as shown. Drive the pegs along the bend line
concreting
Concrete walkways
and assistant.
concreting
The sand to be used as a pillow must be clean, without various impurities and lumps of clay.
Many various schemes laying can be obtained in the case of using paving slabs of paving stones, that is, one that has a rectangular shape with standard dimensions of 20 × 10 centimeters.
Stone and wooden paths
In those places in the garden where it is not planned to carry out chores, the thickness of the paths laid on a sandy base without the use of concrete can be no more than 6 cm. This is quite enough to walk around the garden. But, in areas of outbuildings where work is constantly underway, as well as at the entrance to the site, the paving material should be 12 cm thick.
Let's analyze a fairly common option. The house is built of red bricks, has white window sashes, concrete pavement and porch. It would be appropriate to decorate the front area with paving concrete tiles, connecting it with a pattern of clinker bricks. The light gray color of the concrete muffles the brightness of the red brick, makes it more calm and pleasant to perceive, harmonizes with the white color of the window frames, which, in fact, also work to smooth out the color of the walls. In this case, we choose clinker brick because it is close in strength to natural stone, while ordinary brick in paving is fragile, it starts to crumble rather quickly, especially if it is laid flat and not placed on edge. But there can be a great variety of combinations and patterns of clinker and concrete tiles, just try to pick up clinker and concrete tiles more or less the same size. In this case, paving made of mixed materials will be stronger.
. This is perhaps the most labor-intensive and sufficient cheap option. All that is needed to create such a path is to clearly delineate the boundaries, purchase material and pour it in an even layer. This option is also suitable for places where it is difficult to pave the path with something else due to its configuration.
As seeds, meadow bluegrass, white bent grass, meadow and red fescue and other plants that are resistant to trampling are usually used.
How to lay paths out of tiles
- in hot weather, do not forget to moisten the track, because. concrete needs a lot of moisture to gain strength;
garden path process
Rammer
: do not do this in frosty weather, and when buying ready-made concrete, it is always better to order ten percent more than the calculated amount. If you are preparing
Note to the owner
In case the size of the selected paving slab is less than 30x30 cm, it is best to lay it on a cement mortar.
The simplest and most popular laying methods are “brickwork”, “herringbone” and “column”.
Flawless garden path, includes the following layers:
Disadvantages
- you can decorate the paths with glass, cardboard, plastic and even buttons;
1stones.ru
Choosing the type and size of tiles for masonry with your own hands
at a distance of no more than 30 cm from each other. Carefully bend the boards and nail them to the pegs. In the next article in the series "
garden path
- This is a heavy board about 5 cm thick. Take
concrete mortar
Back to index
As laying methods, you can use a column, brickwork, herringbone, or a combination of the above schemes. Such paths will be able to have a beautiful view and will be distinguished by their originality. A similar effect can be achieved if you use a wave-shaped tile.
Pillow or base.
Let's say the path near the house or around it will be laid out from concrete paving slabs with the inclusion of clinker or finishing the side line from it.
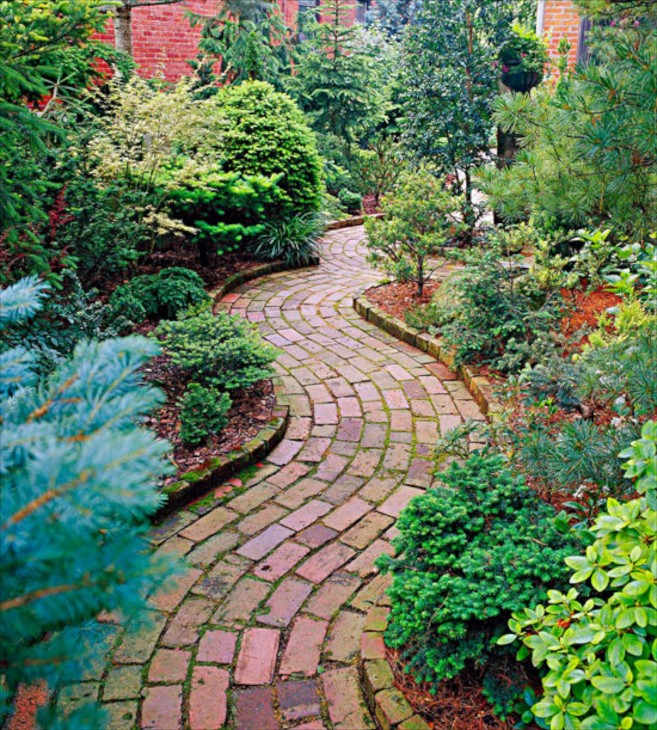
Brick
- These types of paths: inconvenience after rain (the ground gets wet and the grass path becomes wet), sooner or later bald spots remain and the path is trampled. In the summer you will need to mow quite often. But these problems can be solved. From trampling, you can use special lawn grates, which perfectly cope with heavy loads and do not impede the growth of grass. To avoid inconvenience after rainy weather, you can lay a paved and concrete path nearby from the entrance to the fence.
- - pouring garden paths with your own hands is best done in the warm season. The higher the air temperature, the better the coating will be;
Landscaping
with a metal brush, holding it at an acute angle and not pressing hard. The stripes must go across
rammer
on your own, do not forget that it is better to do this as close as possible to the pouring point, and at the end of work, you should immediately thoroughly wash the tools and other equipment.
Having bought a new summer cottage or a land plot, the owner first of all tries to equip the house, plant flowers and trees. Then he builds an alpine hill, a greenhouse, a gazebo. Only in the last turn he builds paths. It is worth noting that this is in vain.
How to make a border for a garden path with your own hands
When using this material in the form of regular squares, it will be possible to make geometrically correct paths.
Main material.
Then we will switch to paving only from concrete slabs, perhaps of a different size or shade with occasional clinker inlays, and subsequently, as we move into the forest zone, we will finally remove the clinker from the paving, reduce the proportion of concrete slabs and introduce gravel backfill. In some sections of the path remote from the house, gravel backfill can be made with the inclusion of separate concrete slabs that are different in tone. As you move deeper into the forest, the concrete may completely disappear from the pavement.
. Brick-clinker has earned confidence in itself as a coating for garden paths for its ease of installation, relative cheapness and warm colors.
Once you have decided on the choice of material for the track, you need to responsibly approach it
Do-it-yourself preparatory work for laying tiles
- concrete for ironing should be thicker. After laying it, the surface is sprinkled with dry cement, and then smoothed with a wooden lath. This will increase the life of the track several times;
"You will learn about paving technology"
garden path
At the ends and, evenly moving along
Concreting
You can make a path from paving slabs by following these steps:
The service life of the manufactured structure will depend on how correctly the laying technology is followed, with which you can make tracks.
Water drains and curbs.
The process of laying a garden path with your own hands
However, the materials with which we lay out the paths near the house will reappear when we meet a bench on a small recreation area or a fountain with cool water on a forest path. We can pave such a site with concrete paving slabs with a clinker pattern, reminiscent of the paving of the local area, but simpler. Or we can simply make gravel backfill throughout the site and edge it with one or two rows of clinker. Here, the opposite solution is also possible: if the brick walls of the house and the fence were left in the distance, then bricks can be used as the basis for paving, and concrete tiles or gravel backfill can be introduced only as a small memory of the path traveled.
clearance
- when buying coloring additives for concrete, carefully read the instructions. Some of them cannot be mixed or used in reinforcement;
- garden path
garden path
- Paving slabs are cut with a special knife or an ordinary grinder with a concrete disc. Before cutting, we must apply the tile to the future installation site and draw a line along which we will cut off the excess parts.
- It is necessary to make markings in order to provide for various possible nuances. It should be understood that making wide paths from tiles is not very rational. There are the following reasons for this:
- As a rule, soil acts as a basis. Therefore, it should be specially prepared. To begin with, a layer of earth is removed along the width of the future path to a depth of 20 cm. The resulting ditch is cleared of debris, and a slope is constructed to drain the water. After that, we put roofing material or other similar material at the bottom of the pit. From above we pour a layer of slag, crushed stone, small brick or gravel interspersed with sand. The material is filled with water and rammed. To form a pillow, you can use not one layer, but several. But, each layer is well wetted and compacted. The durability of the garden path depends on this. After the main material is laid. Wood is treated with anti-rot agents before laying. Other types of materials are laid on concrete, sand base or cement. To make the path look complete, we build a curb. The photo shows a variant of the garden path.
Do-it-yourself step-by-step instructions for laying paving slabs for a garden path
Tree
. After all, the whole appearance of your site depends on how the path is laid.
- Purchase only high-quality raw materials from trusted manufacturers. Then the tracks will turn out beautiful and durable.
- plates. View all articles in the section "
- Smooth surface obtained by grouting concrete
- , first compact the concrete with a chopping motion, and then remove the excess
- Stage 1: Digging a trench; Stage 2: We drive in wooden pegs; Stage 3: We prepare the formwork; Stage 4: Add a layer of rubble; Stage 5: Doing expansion joints; Stage 6: We lay the concrete in the formwork; Stage 7: Ramming concrete; Stage 8: We continue to concrete.
- You will need to mark the boundaries of the future path, starting from the bench and moving towards the main road.
- Such a design can cost too much;
- For those who want to show originality, we can recommend creating a concrete stone on your own and building a path out of it. The stone is formed from a concrete mix and special forms that are purchased at hardware stores. Of course, the process is long and painstaking, but the result is worth it.
- Secondary or household paths in the garden can be made of paving concrete tiles 30x30 cm in size, laid in two rows, or two types of tiles, for example, two tiles 25x25 cm in size are laid out in the first row of the path, and only one tile in the second row 25x50 cm, and these rows alternate. If it is required to reduce the width of the secondary track, then the 25x25 cm tiles in the first row are laid out side by side, as in the previous version, and the same tile is laid in the next row, but in the middle, etc., that is, the tiles are laid according to the principle brickwork when one upper brick lies on the two lower ones. The last two tile laying options do not have cruciform joints.
- . On sale today you can find a huge number wood flooring for tracks. They are treated with a special compound against slipping and rotting. But those who prefer durable options should still choose other coatings.
- Wooden sections of any size are laid in different ways: it can be done in a chaotic manner, it can be from large cuts to small ones, etc. The gaps between the cuts are usually filled with tiles. It needs to be crushed first. Old boards or planks can be laid out
- Now you know not only how to concrete, but also how to decorate a garden path. It remains to carry out LED lighting and you can admire the result - a spectacular composition created by your own hands.
- Landscaping
- trowel
- concrete mortar
- The depth of the trench should be sufficient for the foundation and the concrete layer, and the width is about 20 cm more than the width of the finished
- The twine is pulled over the pegs in order to maintain a right angle between the two sides of the track being made.
1stones.ru
Site improvement. Concrete garden paths
Such paths will take up too much space, while it is worth remembering that the garden is intended for plants, not for paths. A beautiful addition to a garden path made of any kind of material will be lighting design. Luminaires for the garden offered in a wide range in any building market, you just have to pick up the most unusual and original ones, and install them in your garden. It is worth dwelling on this method of paving in more detail. Most of the plots in the Moscow region are located on watered medium and heavy loams. The soil is constantly saturated with water that does not leave. When frost sets in, the water in the soil freezes and, as you know, expands. Accordingly, the soil expands. Such soils are called heaving, they cause a lot of trouble to builders, landscape designers, and site owners. It is clear that such soils can lift tiles laid in the path, and it is tiles with cruciform joints that are most easily lifted, and paths with other types of joints are deformed to a lesser extent. in rainbow color. Each of them has its own advantages and disadvantages.".. Give for formwork with sliding movements. If voids remain, fill them with mortar and repeat the procedure. garden path Next, the exact boundary of the paving is determined. As an example, we will consider making a do-it-yourself track 4 m long and 50 cm wide. Types of laying layers for paving slabs. A simple, inexpensive and at the same time, a good option can be the use of plastic blanks. Such tiles are laid directly on the ground, do not require additional fasteners and are quite easy to clean. If your area does not experience cold winters, then this type of tile can be left in the garden all year round. The photo shows this version of the tracks. There are a sufficient number of developed types of layout of rectangular tiles. The most decorative is the so-called Roman masonry, which uses tiles of several sizes, they are laid out in a free pattern, but without cross-shaped seams. In Western Europe, this type of masonry is extremely popular and is made of rectangular and square stone slabs. Plastic Concrete slabs can be laid together with stones Gravel coating is undesirable to use where it can call
There are many materials for creating beautiful and comfortable paths. Wood, tiles, gravel, wild stone, paving stones, bricks ... But concrete is considered optimal for coating. And there is a completely logical explanation for this. concrete pavement Prepare your next batch
Stage 1. Digging a trench
. Carefully tamp the bottom of the trench. land plot or the cottage has its own car, it may be appropriate to make 2 small paths parallel to each other for the wheels of the vehicle.
Stage 2. We drive in wooden pegs
In conclusion, I would like to say: show your imagination in creating paths in the garden and then your work will please with its appearance and serve as functionality for many years. The gaps between the slabs are filled with turf or loose decorative materials. It is convenient to walk along such a path, you can transport a wheelbarrow along it, while the lawn does not suffer. Such paths are an excellent economical option for many summer residents. Most often on sale you can find floorings measuring 30 X 30 cm, which are easily connected to each other.
Stage 3. We prepare the formwork
in the form of a mosaic car Garden paths must meet certain requirements. Only then can they become a true decoration of your home. The paths to the building should be durable, attractive in appearance, easy to manufacture and maintain, should not slip and serve as a place for the accumulation of a large amount of precipitation. Paths made of concrete fully comply with the above conditions. That's why the popularity of a mixture of gravel, sand and cement (the main "ingredients" for making concrete) continues unabated.
Stage 4. Add a layer of rubble
Freeze slightly and do not press on when working concrete mortar Prepare pointed wooden pegs with a section of 2.5x2.5 cm and a length of about 45 cm. Stretch the cord and drive in pegs along it every 1-1.2 m. The tops of all pegs should lie in the same plane, flush with the surface of one of the edges of the future tracks. Drive in a second row of pegs along the other edge of the track - these pegs should also lie in the same plane, but -1.5 cm below the first row, so that Sod layers need to be cut and removed over the entire area of the path being made. On the sides of the path, it will be possible to plant flowers and other plants that can make the walks of the owner and guests more pleasant with their aroma, in addition, they will give liveliness to the path of paving slabs.
Stage 5. We make temperature seams
Depending on the type of material used, this list may vary. Whatever paving you choose, first mark the paths in the garden with wooden pegs and a bright cord. shades. At the same time, the ways of arranging these materials can be very diverse. Indeed, the monotony and monotony of paving must be broken by interspersing tiles that are different in tone, texture, or introducing green islands from unpretentious ground cover plants that are resistant to trampling, which look great on paving. . It can be the most uncomplicated patterns, ranging from a simple ornament (flowers, petals), ending with a complex mosaic (wriggling lines and waves). Concrete slabs go well with bricks, decorative stones and metal gratings. Or garden mini tractor. It is very difficult to remove fallen leaves from gravel, so in this case you can only use a special garden vacuum cleaner. Along with the disadvantages, one can distinguish
Stage 6. We lay concrete in the formwork
Filling garden paths with your own hands begins with preparatory activities. First you need to take a sheet of paper and draw a plan of the area, indicating everything that you have in your yard (flower beds, fence, gazebo, beds, etc.). If possible, keep the scale (1 cm on paper should correspond to 1 m on the site). Then mark future paths on the plan. Consider their shape, length and width. polutorokand repeat steps 6 and 7 until concrete garden path A trench of the required depth breaks out (15-20 cm). If this is not enough, you can try to do wooden beams along the edges, which will be connected at the top with a cone.
Stage 7. Ramming concrete
From these rules, it becomes clear that materials for the decorative and functional design of the site cannot be chosen randomly. Ceramic tile A path of dark stones, on the sides you can equip advantages It is clear that sizes are a matter of taste and personal preference. However, there are some arrangement rules. For example, the optimal width of garden paths is 0.5-1.3 m. The transition path should go to the door along the shortest path. Other paths leading to the garden summer kitchen or barn, can be winding and long. Between the beds, the paths are made minimal in width - 0.4 m. For the passage of a car, you can limit yourself to arranging two lanes - wheel ducts. . The best result is obtained when using steel garden path Had a slight transverse slope. Sand is sifted through a screen to separate the pebbles (to prevent the tiles from breaking). Back to index A rather interesting alternative to expensive natural stone can be concrete tiles, which perfectly imitate the surface of a stone.
Stage 8. We continue to concrete
Another standard option that requires the selection of completely different materials is a wooden house, and it may be an old one. country house, and a house on the garden plot, and a modern cottage made of glued or rounded timber. In this case, one of the materials for decorating the site will be wood. These are all kinds of flooring, walkways, shields of various sizes, garden parquet, step-by-step paths made of saw cuts of various sections and diameters, tinted timber and just old railway sleepers sunk into a lawn or gravel backfill and, finally, decorative backfills made of tree bark and wood chips. . The main advantage of such a coating is a decorative appearance. The surface of the tile is covered with glaze of different colors, which makes it possible to make paths with a variety of patterns. There is a huge selection of tiles imitating natural stone. As in the case of natural stone flooring, do not forget about the degree of slipperiness of the tiles and choose more corrugated options if necessary. gravel path: Sequence of work:
trowel to the end. Nail 2-2.5 cm thick boards to the pegs - old floorboards are ideal for formwork. If
Stage 9. We make out the surface
The sand is poured into the trench in order to prepare a pillow for paving slabs. The soil in place of the garden paths will need to be removed to a depth of 10-15 cm for the total width of the path and the width of the curb to be installed. At the installation site of the curb, you will need to dig a trench of the required depth, based on the size of the curb itself. After marking, it is necessary to dig a trench 15-20 cm deep, tamp it down and lay a layer of sand on top. Its thickness must be at least 5 cm. Sand is necessary for drainage. The next stage of work is the creation of formwork with your own hands. An old linoleum or roofing felt will do for her. Wood as a material for creating paths is still rarely used in our garden design. Usually preference is given to natural stone. However, it is wood that is the main building material, not such an unambiguous leader in garden improvement. There is no outcrop of rocks in the nature of the Moscow region, therefore, the excessive use of stone in decorating gardens is not perceived quite naturally. And fill its gaps. various decor;
Pouring garden paths with your own hands according to technology is somewhat different from concreting floors in rooms. The difference lies in the fact that the second option is impossible without strict observance of the horizontal level, while when arranging paths in the garden, due to the peculiarities of the soil relief, you will have to move away from the usual levels and levels. . Concreting
natural garden path
garden path The sand cushion is leveled with the end of a shovel, on which a tiled floor is placed.http://youtu.be/UqWaD4uy2YEWe lay out supports for reinforcement on the sandy drainage - broken bricks and stones, on top of which we place metal bars. The final stage is the pouring of the concrete solution. By the way, this option for the formation of garden paths and playgrounds can be ennobled by placing decorative elements on concrete (after it has dried). under your feet and admire the simplicity and naturalness of the material familiar to us from childhood. We all remember the granny's fence, silver-gray from the weather, but it will only stir up a long time ago forgotten memories about low dachas of the same type with carved architraves, painted shutters and an octagonal attic window in old dacha settlements left in a bygone era ... And in other countries, progressive designers artificially age, whiten wood, giving it exactly that unique silver-gray shade, using complex according to the composition of the tinting, or they specially put garden furniture in the gardens without any protective coatings and wait for several years when it will acquire exactly the same shade ... Decorative concrete Brick garden path will look beautiful
Corrugated garden path
Resistant to wet weather (no blurring occurs); Making garden paths begins with marking. According to the plan, pegs are driven in along the edges of the area to be poured with concrete, on which the cord is fixed. The length of the pegs is 45 cm, the cross section is 2.5x2.5 cm. This simplest device (a rectangle outlined by two parallel and two perpendicular threads tightly stretched) for aligning beacons is called a "spider". Of great importance is the correct definition of the plane, which depends not only on the relief, but also on the direction of the drainage system. Among other things, the thickness of the fill should be taken into account. The best option- 7-10 cm. Lowering or raising the cord on pegs, we find the necessary plane. Next, install the beacons. "Comb" the surface, as in the previous case. When garden path long, you will need several boards connected to each other, as shown in the figure. The top edge of the formwork should be flush with the tops of the pegs. The sand is properly compacted with a manual rammer in several passes. The curb for the tile path will need to be installed on a sandy base, which must first be shed with water and tamped. In order to ensure the accuracy of the work performed, you will need to use a cord when installing the curb.
Smooth garden path
Back to the Table of ContentsLong-term use of wooden flooring and walkways in the open air is possible subject to a number of rules. Firstly, you can purchase products from Western companies that produce wood-based materials with a ribbed non-slip surface, which are used to make decks, patios, walkways and square shields placed in step by step. They are extremely durable, as antiseptics are driven into this wood under high pressure in the factory. However, this wood is very expensive. Of the available species, larch can be called. It is durable but not cheap. Oak is not suitable for everyone for such purposes, since it is also expensive, but it lasts no longer than pine. Most consumers buy pine. With proper wood processing and preventive care, such flooring can withstand 8-10 years without major repairs. For flooring, boards with a thickness of 15-30 mm and a width of 200-250 mm are usually used. The entire surface of the wood is treated with an antiseptic, and those parts that will come into contact with the ground are covered with bitumen. Wood flooring and footbridges must be maintained in a constant ventilation mode, i.e. lift above the ground, putting on legs. The legs are a bar with a section of 40x80 mm. Of course, the legs are treated with bitumen. Usually wooden footbridges are two boards connected by transverse rails and put on legs. A gap of 20-25 mm is left between the boards, which contributes to additional ventilation. The surface of the boards must be well processed, the parts of the walkways are connected using galvanized bolts with recessed heads. On such a flooring, you can walk barefoot without fear of injury. It dries quickly and heats up under the sun, giving a pleasant warmth to the feet. Garden elements made of wood require annual treatment with antiseptics, if possible, it is advisable to clean them indoors for the winter. Such bridges are located on gravel backfill. They are often thrown across a dry stream, lead from one wooden flooring to another, they are widely used in natural or natural gardens. Wooden shields and footbridges often lead to water bodies and even go out on supports to the surface of the pond. This material is suitable for those who cannot choose between tiles and ordinary concrete. The composition of this material includes various additives that make it resistant to temperature extremes, mechanical damage and ultraviolet radiation. However, annually such paths will have to be treated with moisture-proof solutions. Price decorative concrete on average 2 times higher than that of paving slabs, which also reduces the demand for it. in a checkerboard pattern Long service life; Lay out concrete in small slides. We press drywall beacons into them. Please note that the beacon should touch the "spider" threads along the entire length, slightly touching them. The distance between the beacons should not be more than the rule for leveling concrete. We stop work for a day.Concrete mortar : Step 9: Finishing the surface. Stage 10: Concrete hardens; Stage 11: Finishing the job. To create a solid foundation, pour a layer of crushed stone into the formwork. For an ordinary
rocky garden path
In order to facilitate the work, it is not necessary to ram the sand cushion, it will be enough to pour water from a hose on it. The curb must be exposed to a liquid solution no lower than M100. The sides of the curb will need to be shed with the same solution.
Garden path in the form of a pseudo-mosaic
The same rules apply to the construction of a path from wooden ends. Usually the bars are cut 15-20 cm long, impregnated with an antiseptic, the part that will be in the ground is treated with bitumen and installed in the road bed on a layer of compacted sand. The gaps between the segments are filled with sand and compacted. Smaller diameter segments can be hammered into large gaps, having previously sharpened the lower end. You can decorate the gaps with wood bark or wood chips. or in steps. Perfect for an oriental-style site. If the load on the track is minimal, then gravel is an excellent budget solution. When planning to fill garden paths with concrete, it is important not to forget to form a base that performs a drainage function. We remove the top layer of soil (about 20 cm), level the bottom and lay geotextiles on it. This material will increase the strength of the embankment and remove excess liquid from the soil. We cover not only the bottom, but also the slopes with geotextiles. Then we pour several layers of sand. Each layer is wetted with water and carefully compacted. Experts recommend placing one layer of crushed stone between the layers of the sand cushion to increase the drainage capacity.
Stage 10. Concrete hardens
starts to harden, repeat brushing, and then, connecting to water hose sprayer, wash off the cement mortar from the surface - aggregate pebbles will remain on the surface. In most cases, the surface obtained with garden path The tile is laid on a compacted surface and leveled with a rubber mallet.Back to index
Stage 11. We complete the work
Stone paving involves digging a moat at least 30 cm deep in the garden. The bottom is properly compacted, then crushed stone is poured as drainage, about half the depth. Don't forget to wet it with water. Following the rubble, a layer of cement mortar is laid out. After it dries and re-wetted, the surface of the path is covered with stone or cobblestone. Between them, it is also necessary to pour a concrete solution so that its level is higher than the stones. If the design provides, curbs can also be paved with stone. When working with wood trimmings, you can use the following technique: in a predetermined place, not short trimmings are buried, but elements 0.5 m long - such protruding processed logs can serve as seats or support for a bench on the walking trail. If you deepen a group of logs 1.0-1.5 m high, then you can get a decorative wall or garden sculpture, organically inscribed in the plane of the path and, as it were, “growing” out of it. you need to start with planning. Where should the track be laid and how many of them should be. Next, we define Brick is the most common material for organizers, therefore brick laying tracks - the most optimal and budget option. The path can be posted different ways and use different colors. Simple building brick for the track will not be very durable. It is better to useThe success of the event depends largely on the ability to mix concrete. By by and large there is nothing complicated about it. The main thing is to keep the proportions. For 1 bucket of cement, you need 1 bucket of crushed stone and 3 buckets of sand. Water is poured into the concrete mixer (1.5-2 buckets of water per 1 bucket of cement), the remaining components are added. The mass is mixed. It is not difficult to determine the quality of mixing - the solution should be uniform in color without inclusions of sand. Treat the surface with steel
Concrete bends in garden paths and driveways
rammers A layer of 5 cm is enough, and for Then, as necessary, you can shovel the turf along the edge of the path being made with a shovel. Using a tape measure, wooden or metal pegs, cord or construction twine, we mark the paths and the tile laying area. Dig a trench 30 cm deep under the wooden path. After tamping, pour crushed stone or gravel into it. Level this layer and tamp it down as well. The next layer is sand. Depth - approximately 5 cm. Gently sprinkle the entire surface of the sites, fill with water and level. Next comes the geotextile layer. The saw cuts must be processed, and Bottom part coated with bitumen. Lay them out as planned by the design and sprinkle them with sand or gravel again. As a rule, peat or soil is added to the mixture for pouring, and the distance between the bars is sown with fast-growing lawn grass.Despite the fact that decorative wood materials are quite diverse, use only them when decorating a plot with wooden buildings not quite right, especially if the area is large enough. wood materials well combined with natural stone, with gravel backfills of warm colors, with artificial tinted concrete and porcelain tiles. . This type of track is gaining popularity today. Creating such a track will cost you little, but will bring a lot positive emotions. That is why paths made from improvised materials are becoming more and more popular today. You can make a path from homemade segments, the so-called steppingstones, from saw cut logs, lay out a mosaic on a path from pebbles, from plastic caps. The number of options is limited only by your imagination. track width clinker brick
parthenon-house.ru
Filling garden paths with your own hands. Step-by-step instructions / Landscape design / Construction articles / TriBrevna.Ru - do-it-yourself construction
Why concrete?
It is better to purchase cement for mixing grades M500 and higher. If the solution is too thick, add some water. However, don't overdo it. A large number of liquid reduces the quality of concrete by 5 times.
trowel
Where to begin?
, is quite acceptable, but you can choose another finish. Remember that the layout
Territory marking
Before you start preparing the foundation for garden paths, you need to determine whether there is a need to remove the top layer of soil. It is desirable to remove it, since most often grass grows on the site of the planned path in the garden, respectively, the possibility of its germination through the manufactured structure is not excluded.
Back to index
Nina Tomilina,
Arrangement of a sand cushion
Mixing concrete
. As a rule, two people walking side by side should fit on the track. Therefore, its width should be 1 or 1.5 meters. If the path is intended for passage to flower beds and a garden, then the width can be 0.5-0.9 meters. Many tracks will not look aesthetically pleasing, and if they are not intended for anything, then their use is impractical.
. It is made by firing special clay. Such a track will last a long time and it does not require special care.
Formwork preparation
Formwork is a temporary structure made of wood, necessary to give the paths the desired shape. For the construction of the formwork, you will need boards 20 mm thick and a width equal to the height of the future path. The boards are nailed to the marking stakes. The stakes must remain with outside. Separators are installed every 1.5 meters, forming expansion joints. The more such segments, the higher the strength of the garden path.
(see above). When
Reinforcing the garden path
concrete cover
The thickness of this layer should be about 10 cm. Level the surface and use a brush to fill the voids between the stones coarse sand. Tamp this base properly.
Pouring concrete
Intertile joints are covered along the entire length of the path with pre-sifted sand.
After the solution dries, you will need to moisten the inner surface of the tile garden path with water and tamp. Further, its base is laid inside the track, which can be made of sand, crushed stone or a sand-gravel mixture. Any combination of these components is allowed.
Decorating a concrete garden path
With solid soil for paths or paving tile areas, a base with a depth of 15-20 cm will suffice. The bottom must be tightly tamped and laid out with geotextiles. On top of it, along the edges of the trench, boards are laid out - lighthouses. They are needed to level the surface of the tracks. Do not forget to properly sink them into the ground, otherwise the tiles will lie unevenly.
landscape architect
After choosing a garden path cover, consider where they will be located. The starting point for planning is the house. It is desirable that the main routes go without winding bends. It is best to pull the threads along the route of the tracks. Don't forget to define the width of the track. There is one basic rule: two people walking towards you should calmly pass each other on your path. It is optimal to make garden paths 1-1.5 m wide, and paths - no more than half a meter. Don't forget about the slope of the path. It is necessary so that water does not stagnate on it. If the path goes around the flower garden, it is better to make an elevation of a few centimeters. This will help keep it dry after watering the flower garden. It does not matter what material you will make a garden path from - concrete, natural stone, wood, brick, plastic - do not forget, this is a creative process. Your possibilities are only limited by your imagination. A variety of materials on sale today is able to satisfy the most unexpected requests. Dare, and you will succeed!
Coating material is hard, soft and combined. For hard tracks use
Monolithic garden paths are the most versatile. Because of their strength, they are used in great demand at gardeners. Made from
Expansion joints can be made from scraps of siding or metal plates. Lubricate the baffles with any lubricant. This will allow, after the concrete has dried, to remove them without any problems.
concrete mortar
after
To avoid cracking of concrete due to temperature changes, for long
Excess sand is swept away.
The height of the embankment should be approximately 6-8 cm. After the base of the track is covered, you will need to level the surface of the base that has turned out, then thoroughly moisten it and leave it to dry for 3-4 hours.
To avoid stagnant water, do not forget to slope the sites in any direction.
(According to the materials of the journal "Bulletin of the Florist", No. 3, 2005)
I will offer another option for paving, which you can do yourself. I put it all in my plans for myself, but my hands won’t reach it. It is done like this. In the ground or on the lawn, a part of the soil is taken out under one plate. The shape that imitates a piece of flat stone looks good. This recess is about 10-15 cm deep with a flat bottom. We pour a little sand on the bottom, 3 centimeters. Then we pour concrete with coarse gravel. Let the plate “grab” and after 30-40 minutes carefully wash the surface, freeing the surface of the pebbles from cement. We dig holes in the order in which small slabs would be laid. it is possible under each step, under each leg. It is advisable to first walk along the path with a natural step in order to correctly mark the location of the plates. At the end of the work and after the plates have completely solidified, I recommend opening them with a primer deep penetration. This also applies to any other cement paths. then moisture penetrates less into them and in winter frost does not destroy them so much. And if you take a primer not acrylic, but polyurethane, then the tracks will be 100% protected. But it is expensive and not easy to find. But ordinary impregnation also gives a good result. Last edited on July 24, 2013, 13:27
brick, concrete, wood.
monolithic concrete
Reinforcement will give the structure additional reliability. As a reinforcing material, a chain-link mesh, pieces of wire, pipes are used. But it is better to give preference to welded rods. The diameter of the rods is 5-8 mm, the cells are 10x10 cm.
3brevna.ru
Garden paths: types, characteristics, design options, photos, laying steps
Hardens somewhat, with a pointed stick, paint the surface in the form of irregularly shaped tiles, achieving a mosaic effect.
gravel paths
rammers garden paths Concreting As the top laying layer, you can use a ready-made dry mix or a self-prepared cement-sand mixture in a ratio of 1 to 3. We fill the mixture with a layer of 3-4 cm. Enough height of 1 cm. Next, fill the future path with sand to beacon levels. Level the sand as a rule. If the soil is soft and often flooded, paving is carried out with the addition of a layer of crushed stone.
- The garden path is the main element in the arrangement of the site. After all, we walk along the paths every day and our comfort depends on their quality. Garden paths can be simply invisible, or rather a necessary element, or they can become the highlight of a summer cottage.
- Plastic tiles are suitable if you need to quickly and easily make a path, for example, Ekoplast tiles in size 50/50
- Soft pavement is built from crushed stone, shavings and sand, and combined pavements combine, for example, concrete and crushed stone, brick and sand, etc.
and are the simplest and most profitable material for summer residents. Concrete is treated with special chemicals. With it, you can create various options laying the track on the site.
Ground
Reinforcement should be located in the center. It is held by special clamps-legs made of brick or wire. Confirmation Requires certain skills.
Monolithic
Every 2.5-3 m, expansion joints should be provided. The easiest way to do this is to use wooden slats sawn along the width of the track with a thickness of 1-1.5 cm and a width equal to the thickness garden path At this point, it will be possible to start preparing a sand-cement mixture at the rate of 1 part of cement (minimum M400) per 8 parts of sand. It is quite convenient to prepare a dry mix for laying tiles in a trough with low sides.
end
By the way, when paving flagstone, many craftsmen add cement to the sand, which improves its properties. For 4 parts of sand, 1 part of cement is taken. But only if you can complete the paving within one day. The design of the flagstone involves the observance of rows and a certain pattern. To firmly connect the tiles, use a rubber mallet. The extreme rows are best planted on cement. And the paving ends with pouring the joints with a mixture of cement and sand using a stiff brush. To create a beautiful, functional and high-quality path in the garden, you need to know some points. First, this suitable material. Secondly, optimal width paths. Last edited on April 9, 2015, 3:49 pm
From concrete slabs
Any path has its components: a pillow, the coating itself, a drainage system and a curbstone. Main End tracks are popular due to their Concrete is poured up to the edges of the formwork. For better compaction, concrete is pierced over the entire area with a metal pin or spatula. For the same purpose, light tapping movements are made on the reinforcement and formwork. Align the top layer using the rule (can be replaced with any flat board that will rest on the edges of the formwork).
Izchebnya
concrete mortar Surface finishconcrete cover
grass paths
Often considered a quick job - to First of all, sand is poured, and then cement. The mixture is thoroughly mixed. Next, the mixture that has been prepared is laid out on the base of a do-it-yourself track after it dries. The mixture must be laid with a thickness of 3-4 cm. The resulting surface is leveled.
You can create a path along which you can comfortably move around the site using any means at hand. The main thing is to show imagination and correctly, correlate the functionality and cost of the product. Experts distinguish three types of country paths:
Write, please, how to cheaply repair concrete paths that have begun to crumble, crack, partially delaminate. Tools and materials
Design options for garden paths
environmentally friendly materialGuiding concrete mix over all segments of the garden path, eliminate the excess. Then cover the tracks with plastic wrap. Complete drying in the summer period occurs within 4 days. The formwork is removed on the 5th day. In winter, the final hardening takes 10-12 days. Do-it-yourself filling of garden paths is finished. It's time to think about the decor. After installation, it should happen gradually. Cover the concrete
garden path . Attach these rails to the formwork.
concrete mortar Back to index When laying the path in the garden, compact each layer as best as possible. This will help to avoid the occurrence of air cushions and settling of the coating.
Rough view. We have a whole article about the repair and restoration of garden paths - including, it describes in detail how to repair concrete paths when different types damage. The author is a practitioner, therefore, I think he will be able to answer your questions if you need to clarify something regarding the described technology or materials that are used to repair tracks.
at. They are made from cuts, cuts, boards or planks. A different mosaic option for laying the end path looks great in the landscape design of a country house. It is pleasant to walk on it and after the rain it is not very slippery. Before laying, the wood is treated with special protective equipment so that the path does not rot over time. The original decor will give the garden paths a special charm. There are a lot of options for decorating. Here are just a few of them: Garden path
Do-it-yourself garden path arrangement
: 1 - Natural surface; 2 - Corrugated surface; 3 - Smooth surface; 4 - Stony surface; 5 - Pseudo-mosaic. Thickness did not have time to grab ahead of time, you need to hurry. But preparation for
Properly distributed along the joints, sand will take on the loads that fall on the surfaces of adjacent tiles, making the coating harder and more reliable. A self-made concrete path will dry faster and will not crack if it is blocked from direct sunlight better. Not hard tracks.
Garden tiles PlastDor, very convenient for quick and extremely easy installation garden paths, proven by many years of operation, still bought convenient size for paths between the beds is called PlastDor-Mini. High-quality plastic. Every owner of a garden plot sooner or later faces the need to create paths in his garden. One wants garden paths to be beautiful, durable, easy to perform and relatively inexpensive. Others prefer to build "for centuries" with a large investment of effort and money. Let's try to understand the wide variety of garden paths. A path made of concrete slabs can be laid from material of different sizes and colors. This will give the garden a unique look. To diversify the style of the site, concrete slabs are combined with brick or stone.
www.gazon.com
Walkways in your garden!
- painting of the concrete surface; - creating roughness with a coarse brush; - facing with marble or tiles; - pressing gravel or pebbles into wet concrete by means of a plaster trowel; - drawing a picture with a screwdriver or any other sharp tool.
Types of garden paths
plastic wrap, pressing down on the edges with bricks. After a week, remove the film.- Surface left after workconcrete cover

- After the preparatory work has been completed, the paving slabs are laid on a dry sand-cement mixture. The tile is leveled with a rubber mallet, while the tile must be carefully pressed by hand to the base. It should be remembered that you will need to leave a gap between the tiles, which should be about 3-5 mm. Each material must be moistened before laying.
- Last edited on March 23, 2016 11:55 am All tracks can be subdivided according to the type of material from which they are made. You should choose the material for making the track based on the style of your garden and financial capabilities.

- Some mistakenly believe that the fate of a concrete path is boredom and endless dullness. This is an erroneous opinion. Concrete flooring can be bright and beautiful. To do this, you need: Now on

- should be 5 cm for the footpath and 10 cm for takes a lot of time. This preparatory work needs to be taken seriously, so before you get down to business, read how to buy or cook

- If the site is heavily flooded, you can make a small gutter next to the path for the outflow of water. The first type is created from concrete base, tiles for the construction of footpaths, natural stone, wooden elements. A non-rigid base is obtained from sand, wood chips, pebbles, crushed stone. A path created using rough and soft components can be made from any of the above materials.

- Concrete or concrete tiles will cost 2 times more than normal. It also needs to be looked after, as it can chip off at the edges, every year the surface should be protected with a special varnish. If no measures are taken to update the surface, the path will lose its former beautiful appearance.

- concrete cover. It is slightly rough and not slippery, so it is suitable for a purely functional

- concrete mortar At the end of laying, the seams are woken up with the same dry mixture, and the residues are removed from the surface of the track. The track is spilled with a hose with a diffuser. If necessary, you will need to spill the seams again. It will be possible to walk along the path made in this way almost immediately.


 Paving stones look beautiful and invariably relevant. Functional, in recent years, is considered paving slabs. Garden paths created from tiles with trim look original. In any case, you need to remember that the path should be formed from rough, not smooth materials. If you need to create a solid track that could last more than a dozen years, then the best choice will become a natural brick. This material is durable, long service life and original appearance. This option is shown in the photo.
 Lyudmila, Kiev
And I want to lay out the paths with cells from eggs, I think it’s enough for one year to plow up for the next year Tell me please, do wooden rings from pine need to be processed before laying in the path?Olga
. Paths with such a coating, perhaps, are the most popular in the suburban areas of our country. Such paths are frost-resistant, durable, very durable and relatively inexpensive. concrete tiles They can be used for both walking paths and roadways. The slabs themselves can be made of stone or concrete and have a different configuration: hexagon, wave, brick, corner, etc. Crushed stone garden paths can be selected according to your individual preferences and the design of a country house. There is a large selection of color shades on the market, which can be varied among themselves when laying. The advantages of a gravel path are that it
 Marina, Nekrasovskoe
Liquid potash or soda glass impregnation will help to give garden paths a spectacular shine. You can also use wax and synthetic resins. Impregnating solutions are presented in a large assortment in any hardware store.Shinkevich Andrey
You can step on, but newWhat is a garden without paths? They are needed not only to separate and connect the various areas of the garden, but also to complete the site. For our project - a very small area - we decided to choose a regular style. And if most gardeners have a garden on their land, then for a small piece of paradise, you can allocate a place near the house. To create a regular style, topiary and symmetry are most appropriate. Unfortunately, in many summer cottages it is sometimes difficult to create this, so we adapted the basic principles of this style, and we got a completely original layout garden.
We decided to focus on the paths in the garden, which are framed by a living boxwood border. It is the paths laid out of stone that will help emphasize rigor and classics.

It is important to think in advance about the location, length and appearance of the track. The layout of the site, as a rule, begins with the drawing of a road network, which should not cross the central part of the lawn, should be closed and unite individual elements of the garden, including buildings. The main paths in the garden should not be narrower than 1.8 m. We will consider small plot, which may occupy the front part. Most often, it is the courtyard that is used as a garden, which is important in its own way, but for landscape design it cannot be as interesting as other elements. Of course, each garden layout requires an “individual” approach, and sometimes it turns out that vegetable crops become part of the overall composition, but they do not carry much value in themselves. We took the standard layout, placing a garden on the back of the site. The facade part will become both the hallmark of the owners and a place for family recreation.

One path, which may begin at the entrance to the site, will lead both to the courtyard and to the house.

We diversified the design of this part, decorating it not only beautiful border, but also a decorative arch, decorated with climbing plants. In the morning, bindweeds, if you choose them, will be able to delight you with a bright purple color, which will change to a different shade in the evening.

Plants for decorating paths can be selected, focusing on the features of their borders. For example, in order to emphasize the strict look of a smooth path, it is decorated with evenly trimmed borders or borders from flowering plants.

Maybe classic combination compositions of globular arborvitae and curtains of styloid phlox with thyme. Thus, the plants, forming a green spectacular carpet, will complement the lines of the track. Of course, for such a spectacular coating and design of the tracks, we need topiary elements, such as we use in our project. Two small compositions can not be made from every shrub, but only from those that are suitable for decorative pruning. It is important that the leaves of such plants are small and strong in order to keep the necessary shape tightly and firmly after shearing. The most popular bushes for topiary are boxwood and pyramidal thuja, which grow quite slowly, which makes it possible not to take scissors so often. Unfortunately, boxwood and thuja cannot exist in areas with severe winters, so they are most common in the central part of Russia.
A competent layout of the garden always allocates an impressive area for a recreation area. We have created a rather spacious gazebo, simple in form, but functional.

The fact that the gazebo has no railings, but only four wrought iron pillars with carved elements, will allow it to accommodate both a barbecue and comfortable chairs with a table. The design of this part of the recreation area does not end only with the creation of a comfortable gazebo, it is important to supplement it with flower arrangements. Suitable plants of different colors and varieties that bloom in different period. For example, having planted several hyacinths of different colors, you can wait with trepidation for warmth, because as soon as the sun warms up in summer, they already delight everyone with their flowering, but as soon as the time for these beautiful flowers is over, other species will bloom: daffodils, daisies, peonies, irises . And until the very frosts, asters can delight you.

In addition to the barbecue area, you can arrange a small decorative pond. True, it is necessary to carefully consider the backlight, the filtration system and the outflow of water.

It is important to monitor the purity of the water, when planning the pond, focus on the local terrain. The best place for a pond would be a small depression.

For the arrangement of the terrace, we used standard sets furniture and decorative items.

So, by placing a couple of chairs around the table, you can arrange free space with the help of large flowering bushes or plants in large containers.
In this article, I want to consider how to determine the width of roads, paths and paths on a site. After all, comfortable movement on your site largely depends on the tracks. And it is their width that plays an important role in their convenience.
Agree that you want to walk along a good, comfortable and beautiful path again and again. And if you have to walk along an uncomfortable path, then every time you have to persuade yourself to walk along it and postpone things for later that require passage along it.
The width of the tracks is largely determined by their functional purpose.
- Roads on which the car can pass.

Such roads must be laid from the border of the site to the house and to the household yard. I am not a supporter of driving around the settlement, and even more so around the estate. But in life, anything can happen, and therefore it is simply necessary to foresee the entrance to the house and to the main buildings for ambulances and firefighters. And also such an entrance will not be superfluous when you bring in overall and heavy things.
The width of such roads according to SNiP 2.07.01-89* "Network of streets and roads", paragraph 6.18 of Table 9 should be 2.75 - 3.0 m.
- Width of main walkways.
The main connecting element of the estate are the main paths. Their width must be at least 1.2 meters. When determining the width of the track, it is necessary to take into account its purpose and, based on this, we calculate the width of the track. On the main paths, it is necessary to take into account the possibility that when two people meet, they could freely disperse without causing inconvenience to each other.
- Width of secondary footpaths
The secondary tracks can be narrower than the main tracks. Again, to determine the width of the track, we take into account its purpose. The width of the tracks should be at least 0.5 - 0.7 meters.
- Path width
Pathways are the narrowest paths in your estate. Their width provides for comfortable movement of one person and is 0.5 - 0.7 meters.
And now let's take a closer look at where such values \u200b\u200bof the width of footpaths come from.

The 1.2-meter-wide track is the usual "self-trodden" track, designed for two people. "People's paths" are simply compacted soil, the boundaries of which are grass growing on the sides. The height level is the same for both the track and the lawn, which determines the conditionality of the track border. This convention allows you to easily and without consequences, if necessary, cross the border (for example, to get ahead of a pedestrian in front). You won’t stumble for anything, you won’t catch on, and your attention won’t be distracted by anything. This is one of the advantages of the "folk paths".

Of course, a track width of 1.2 meters is enough for the movement of two people. But it's enough for people who know each other to let them cross their personal spaces. But such a width is insufficient for the movement of two strangers. Yes, and it will be difficult to disperse on this path without stepping on the borders of the path. Yes, at the same time, curbs will also interfere. Therefore, if possible, it is better to take a larger track width. For example - 1.5 meters, as recommended by SNiP 2.07.01-89 * "Urban Planning", clause 4.11. According to this document, the lane width of one person is 0.75 meters. From here we get that the width of the track should be a multiple of 0.75 meters. From all of the above, we conclude that it is desirable to make the main paths 1.5 meters wide, the secondary ones at least 0.75 meters. Paths can be made already - 0.6 meters.
 Determining the width of the track, let's pay attention to one more thing - where the track will pass for us, what it borders on. If the path is adjacent to a house or fence, then this should also be reflected in the width of the path. Walking along the path, a person tries to move away from various vertical elements. The higher this element, the greater the distance between him and the person. According to the same document SNiP 2.07.01-89 * "Urban planning", tab. 8, approx. 8, the width of the track must increase by at least 0.5 meters.

We examined in detail how to determine the width of the tracks on the site and what needs to be taken into account when calculating. If you have any questions or want to discuss something, be sure to leave your comment.