If indoors uneven wood floor, it becomes uncomfortable to live in it. Boards creak, bend or, conversely, stick out, diverge, forming cracks.
The aesthetics of the room is violated, a traumatic situation is created. On such a floor, it is easy to fall and damage yourself. To avoid serious trouble and improve the condition of the home, uneven floors are leveled. They do it in different ways.
Dry methods
An uneven wooden floor must be leveled if the height difference is more than 5 cm. This uneven floor is visible to the naked eye. The surface may slope in any direction. In another case, the boards are unevenly arranged, in waves: one protrudes, the other sinks, bends. There are several options for eliminating unevenness in the floor using a dry method.
Installation of minilag from bars (tape support)
Tape support is one of the most reliable methods for leveling uneven wood floors. The method is used for height differences from 3 to 10 cm. The timber serves as a lining under the boardwalk. It should be of different thicknesses in order to be evenly spaced in the direction of increasing slope. For ease of installation, craftsmen use pieces of plywood rather than wood.
To install the minilags correctly, a preliminary calculation is carried out and the readings are checked with a meter level. The distance between them corresponds to the thickness of the sheets made from wood waste.
It is not recommended to lay sheets that are too thick to level an uneven wooden floor:
- they are heavy and inconvenient for do-it-yourself installation;
- create additional load on the floor and base.
Beams of different sections and sheet products are screwed to the wooden base of the floor with self-tapping screws. The fasteners should be of different lengths as the distance to the boards varies. Minilags are fixed across and along the boards. It is important to mark the sheets as accurately as possible according to the points of drilling holes.
Installation of leveling point supports (scabs)
If indoors uneven wood floor, you can eliminate the defect and align it with the help of point supports, which are called shabashi. They are installed under sheet products in the form of a grid. In this case, cells are obtained, the dimensions of which are determined by the thickness of the sheets.
Such dimensions of the cells will not allow sagging in subsequent operation.
Since the supporting "posts" are located pointwise, they make a careful marking on the sheets and screw in self-tapping screws at the points. Additionally, the sheets are fixed to the very base of the floor, choosing longer fasteners.
Methods for leveling uneven wood floors without screed are highly effective. After leveling work, the surface acquires an ideal shape and holds the topcoat well. 8-10 cm - a difference in height, at which it is better to dismantle the old floor and lay a new base with the replacement of the lag.
Wet screed method
For minor irregularities (up to 3mm), the wooden floor can be covered with acrylic putty or sealant. Before work, the boards are primed to protect the wood and ensure better adhesion with the leveling compound. The composition is applied in a thin layer, distributing it evenly along the pre-made marks on the walls, along the lighthouses.
It is important to know: the thickness of the layer determines the amount of time it takes to dry. To prevent the putty from cracking over time, PVA glue is added to it. After the mixture has dried, the surface is sanded.
If uneven wood floor has a slope of more than 3 mm, is used. This is not quite the right way for a wooden base. The screed creates a significant load on the base and floors. It is most possible when the boards are laid on concrete or brick posts, reinforced concrete supports. The need for it arises, for example, when using tiles as a topcoat.
To level an uneven wooden floor using the "wet" method, use dry mixtures with components that provide the screed with elasticity and special strength. These include various plasticizers and synthetic fillers.
- Before applying the leveling compound, check the wood floors for ventilation. If it is not there, then holes are drilled in certain places on the surface, and decorative grilles are installed over the topcoat.
- The boards are covered with plastic wrap, which performs the function of waterproofing. The tree is afraid of water. And with a wet screed, this liquid is used to dilute the dry mixture.
- The leveling compound is poured in portions onto the surface and evenly distributed using a special rule. You can work gradually, filling in small areas.
- After the screed has dried, it is sanded and primed.
A wet screed on a wooden base is rarely made. The main reason is the incompatibility between wood and leveling compound. Wood is mobile, and the cement mixture is static, therefore, over time, it can crack and crumble.
When choosing a method for leveling an uneven wooden floor, they are guided by the specific conditions of the room. It is important that in subsequent operation the surface does not deform, and the finish coat does not deteriorate.
Comfortable living in a house depends on many conditions. These include the quality of the finish and the general condition of the surfaces, including the leveling of uneven wood floors.
Plank floor leveling.
Some old houses from the times of Stalin's and Khrushchev's buildings still have rough wooden floors. Over time, the floorboards rot, loosen and begin to creak. And during the repair, in order to tear off the defects of the old uneven floor, they use a new coating in the form of a laminate or linolem.
But before laying a new floor, it is recommended to align the sub-floor with sheet material. You can do this procedure yourself without involving construction specialists and at minimal cost. For leveling the floor, it is best to use plywood, since the fiberboard sheets will eventually take the shape of an uneven floor and waves will appear again. Plywood is indispensable for the material used to level old wood floors.
It has a relatively low weight, is strong enough, resistant to stress and water, well polished, and has no unpleasant odor. The material does not change its properties with changes in temperature and humidity.
In order to carry out the procedure for leveling the wooden floor, it is necessary to prepare the tools and materials that will be needed in the process.
- plywood sheets;
- roll insulation;
- screwdriver and self-tapping screws;
- jigsaw;
Preparation for leveling the wooden floor in the apartment
- Initially, it is necessary to check the state of the communications that are laid under the floor, since after the completion of the work there will be no free access to them.
- Next, you need to get rid of various irregularities that are very characteristic of a wooden floor.
- Fasten, and, if necessary, replace old, rotten, squeaky boards.
- As additional insulation, if the floor is initially cold, you can use a roll of mineral wool insulation.
Prepared sheets of plywood are laid on the floor and in order to assess the strength and reliability of the coating, you should walk on it. In the course of such tests, additional defects may come to light that can be corrected at the moment without dismantling the floor. If it turns out that the floor is sagging, then it is necessary to additionally put pieces of fiberboard in these places.
The most optimal and reliable fastening of plywood sheets will be fastening with self-tapping screws, which at the initial stage of fastening do not need to be driven in to the end. In places where plywood sags, fastening is unacceptable. After fixing the sheets, you need to carefully walk through the made flooring again.
This is necessary in order to check how firmly and correctly the sheets fit together. If the result of the test is satisfactory and pleased, then all the screws will be driven to the end, tightly drowning the cap in the tree.
After fixing the sheet material, the caps of the screws and the seams are putty with acrylic sealant. The advantage of such a putty is that even if the boards and sheets bend a little, the sealant, due to its high plasticity, will not collapse and spill out.
After finishing the installation of plywood sheets, you can start laying another linoleum or laminate flooring.
Leveling an uneven wooden floor - video
Views count: 10 148
Do-it-yourself floor insulation - concrete and wood floors  Wooden floors in Khrushchev - repair and restoration
  How to lay linoleum on wood floors GVL (gypsum fiber sheets) on wooden floors How to make wooden floors in a private house
From the author: we welcome our readers interested in the question of how to level a wooden floor in a room, and what is needed for this. Those who live in houses of an old building are likely to encounter problems on which it is impossible to lay new flooring with high quality. It is not always necessary to completely dismantle the boards, since otherwise they do a good job with their functions. Today we will tell you more about how to do all the work with your own hands.
Benefits of wood floors
Wood is undoubtedly the most environmentally friendly material used in construction for a long time. The floors made from it are reliable, warm and attractive in appearance. Of course, all this is true only if they are properly laid and used carefully. For example, in some old houses, baths, wooden floors were initially laid out of level, respectively, there was no question of their perfectly flat surface. Knowing, you can eliminate such a defect and prepare the basis for future flooring.

Irregularities that appear on the surface of the boards can be of different types and origins - wormholes, chips, abrasion, subsidence. Depending on this, as well as on the material of the selected topcoat, it is determined what to level.
Alignment methods
There are several alignment methods. To consider them and choose the right option, we divide all the irregularities into 2 groups:
- Small - from 5 to 10 millimeters. Such defects are eliminated using the following methods:
- scraping;
- laying sheets of plywood, OSB or chipboard;
- putty.
- Significant - from 20 to 100 millimeters. In these cases, the floor can be leveled with a concrete screed or the sheets can be laid on the joists. The methods listed above will not be as effective as they should be.
I share a useful video:
Let us dwell on each of the methods in more detail in order to give the most comprehensive answers to possible questions. Small differences in the height of the floors, in some cases, are allowed when laying soft coatings (linoleum, carpet) on them. Rigid materials such as parquet and laminate can only be installed on a completely smooth surface.

If this requirement is not met, their design scheme will be violated, they will not be able to withstand the load being exerted and will quickly become unusable. Therefore, it is better to level the floor in advance than to re-pay for the installation of an expensive topcoat. For this we use:
- Looping. This is the cheapest way to eliminate unevenness, however, it is quite laborious if done manually using a cycle. Using a looping machine, the process can be accelerated, the work will consist of the following stages:
- hammer all the protruding nail heads into the boards to prevent damage to the sanding paper;
- before scrapping the floor in the apartment, you need to take out all the furniture from the room, and if this is not possible, cover it with a cloth and rewind it tightly to protect it from dust;
- you need to start work from the corner of the room, moving along the wall. You should move evenly and smoothly so that the machine cuts off a layer of the same thickness in all places;
- removing the first layer from all the boards, you need to sweep away the formed chip dust, mix it with PVA glue and fill in the cracks and potholes with the resulting slurry. When it dries, you need to install a fine-grain sanding paper in the scraper and walk around the room again;
- cleaning - the boards are vacuumed, after which they are treated with white spirit.
- Self-leveling compounds. This method allows you to get a flat surface even on a very worn floor subfloor. Modern manufacturers of building materials offer a large selection, therefore, the choice of a floor mixture depends only on your preferences. The sequence of actions is as follows:
- clean the floor surface from the remains of varnish, paint;
- "Drown" all screws and nails in the boards;
- fasten loose floorboards with screws;
- sand the boards and seal up all the gaps in them;
- apply a layer of primer with high water-repellent properties;
- fix the reinforcing frame to the floor with a stapler;
- prepare a self-leveling mixture according to the instructions on the package, apply to the surface and spread evenly with a mop.
- Leveling with a self-leveling screed means that it is ideally prepared for the subsequent installation of a hard topcoat.
- Puttying. It is carried out quickly and easily, does not require large investments. The putty can be made by yourself using sawdust and PVA glue. After hardening, such a mixture approaches the strength of a chipboard board.
Important! Any finish can be laid on the floor, leveled with putty, with the exception of ceramic tiles.
Work order:
- sawdust is soaked in water in advance, before mixing them with PVA glue, they are well wrung out by hand;
- boards are cleaned of the remnants of the previous coating, dust, dirt;
- the top layer of wood is sanded;
- before leveling the old floor with putty, you need to pre-attach the loosened floorboards to the logs with self-tapping screws;
- thin slats are nailed to the floor, which will act as beacons;
- the prepared mixture of sawdust and glue is applied, leveled with a spatula. You can apply the putty in several layers, waiting for the previous one to dry completely. The last layer is aligned only with the rule.
- Plywood alignment- a proven way to create a solid foundation with your own hands for the subsequent installation of the final floor covering. With this method, large differences in elevation are eliminated. The sheet materials used bend well, do not form cracks, and have uniform strength in all directions.

Before use, it is advisable to sprinkle the sheets with water from all sides and leave them in the room where the repair will take place for 48 hours. After that, they can be laid directly on the subfloor and fixed with countersunk screws. The slots at the joints are sealed with putty.
To eliminate significant unevenness of the wooden floor with sheet material, it is laid on logs. You must perform the actions in the following order:
- install beacons, which are used as self-tapping screws. It is necessary with their help to form squares of 30 × 30 centimeters. They are not screwed into the floorboards completely, the caps must be left at the level of the measured height difference;
- plywood strips up to 5 cm thick are attached to the old wooden surface with glue or self-tapping screws, which will be used as new logs. The gaps between the floorboards and new joists are sealed with pieces of plywood treated with glue.
- before laying plywood under laminate, parquet, linoleum, it must be cut into pieces that are convenient for installation (usually 60 × 60 centimeters). Laying begins only after the glue on the logs has completely dried;
- all openings, protrusions are carefully cut out;
- the laid sheets are fastened with countersunk head hardware.

Important! Professionals give this advice. If the topcoat is linoleum, it is recommended to grind the wooden base. Plywood sheets need to be treated with several layers of varnish if carpet is to be laid on them. In the case when the laminate is the final coating, a special substrate must be used under it.
Leveling using a wet concrete screed is used less often, since its mortar has a significant weight and can damage the boards.
We hope that today's information will help you complete your floor renovation at a decent level. We are waiting for your feedback and comments, we will be glad if you share the link with your friends! See you soon!
Various technologies are currently used to level wood floors.
What are the ways you can fix the surface of the plank floor?
| Alignment method | Brief description of technology |
|---|---|
| It is used as a base for finishing floor coverings. With slight irregularities, work can be done within one working day. If the difference in height is significant, then the repair time increases, additional special structures are required for leveling. |
| It is used in case of natural warping of boards due to violation of flooring technology. Allows you to completely restore the original appearance of the boards, does not require a topcoat. |
| It can be performed without removing the boards, it makes it possible to level the floor both for subsequent laying with plates, and for grinding and restoring the surface of the boards. |
| The most difficult process is used in case of significant damage to boards and logs. |


smallpox stove
Leveling wooden floors with slabs in the future involves the use of various topcoats. And this is not only additional financial costs, but also a waste of time. In addition, after leveling, instead of floors made of natural boards, coverings made of artificial materials appear in apartments.
Why does the floor get uneven?
During operation, all mistakes made during the laying of the floor appear.
- Incorrectly set lags. During flooring, the extreme logs are first installed, a rope is pulled between them, along which all the others are laid. If the extreme logs do not lie in the same plane, then the floor will have a slope.
- The distance between the lags and their dimensions do not correspond to the actual loads. During operation, the most loaded places bend, the deformation becomes irreversible, and large deflections appear on the floor plane.
- Very wet or very dry boards were used during the flooring. As the humidity rises, the floor swells in places, during drying, the boards warp, and large gaps appear between them.
- Insufficient natural ventilation or improper waterproofing. In such conditions, lumber is affected by rot, loses its original bearing capacity, the floor surface bends. The most unpleasant situation is that in order to eliminate the problems, it is necessary to completely change the floor covering.


In all the cases described, it is necessary to level the floor, but before starting work, it is imperative to determine the cause of the appearance of irregularities and their nature, this knowledge will help in choosing the right methods.
Determination of the size and nature of floor irregularities
The choice of leveling technology is greatly influenced by the actual condition of the wooden floor. We have already mentioned that rotten boards or logs must be replaced, in this case we are not talking about leveling, but about replacing the floor. The curvature of the floors must be determined by three parameters.
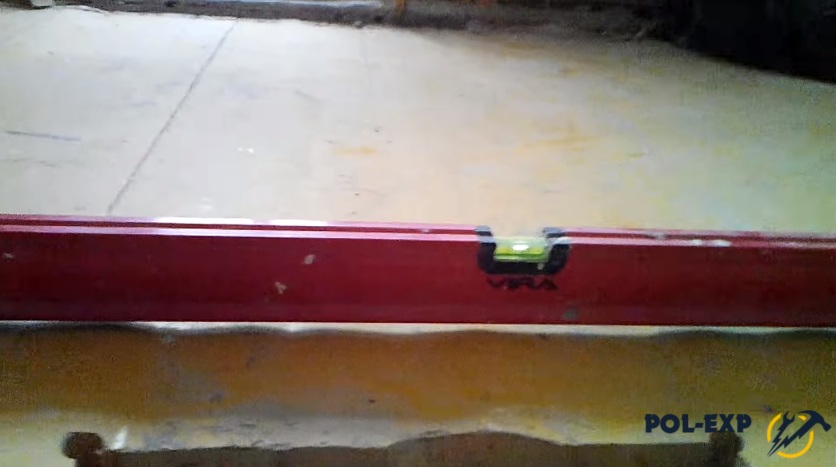
- Horizontal. To check it is better to use a laser level, if it is not there, then a water level will do, in extreme cases, deviations can be checked with an ordinary bubble. Place the laser level beam horizontally at a distance of about 10-15 cm from the floor. Using an ordinary wooden ruler or tape measure, measure the distance from the floor plane to the laser beam. Do this around the perimeter of the room and in several places in the center. If the slope of the floor is more than a centimeter, then it can be leveled only with the help of additional lags or special stops. It is long and difficult.
- By deflections. Attach a long rule to the floor in several places, deflections are detected in the light. They can only be in a few meta of the room, below we will talk about a possible option for eliminating such problems without tearing the boards off and without using sheets.
- By the curvature of the surfaces of the boards. If during the covering of the floor, too wet boards were used, then after drying, they will necessarily bend. Attach a rule or level to them and approximately find out the amount of deflection in the light, the method of alignment will depend on its value.


Practical advice. When choosing a technology, always choose the one that will preserve natural boards. Such floors are considered to be of the highest quality, constantly fashionable and environmentally friendly. Experienced builders recommend covering the natural floor with various modern materials only if the restoration of the original characteristics of the wooden floor is impossible for some reason.
We will consider several options for leveling wooden floors while preserving natural boards and restoring their original appearance. Technology for experienced builders is not difficult, but requires a certain skill and a set of special tools. The options for completely dismantling the boards for leveling or replacing them will not be considered, this is an extreme case, it must be used in exceptional situations.
Lag alignment
The method can be used when irregularities have appeared due to subsidence of fragile or installed at a long distance logs. At the same time, they are made of slats no more than 5 cm thick, laid on a solid concrete base. For work, you will need a screwdriver and a drill, large self-tapping screws with a diameter of 8 mm or more, a pen for drilling holes in a tree (the drill diameter must correspond to the dimensions of the screw heads) and a level. Logs and boards should be in good condition with no signs of putrefactive damage.
Step 1. Find a place with a deflection of the boards, determine the location of the lag. They are found by the heads of carnations or screws.
Step 2. Using a drill with a diameter of about 5 mm, drill a through hole in the boards and log until it stops in the concrete base. Measure the distance from the top of the floorboards to the concrete base. Find out the thickness of the boards and the log separately. This can be done after a careful examination of the hole.
Step 3. Prepare self-tapping screws of large diameter, decide on their length. The length of the self-tapping screws should exceed the sum of the deflection, the thickness of the log and its distance from the concrete base by 10–15 mm. Using a grinder with an abrasive disc, cut the tip of the self-tapping screw to the desired length. The flat, rather than sharp, end increases the area where the self-tapping screw rests on the concrete, which increases the stability of the floor after leveling. The fact that it has become blunt will not interfere with twisting, the hardware is installed in a prepared hole in the logs.
Step 4. Use the pen to drill a hole in the floorboard. It should be located strictly in the middle of the log.


Important. During drilling, make sure that the log remains intact. The fixing strength of the self-tapping screw depends on this.
Step 5. Insert a large self-tapping screw into the hole and screw it in until it stops against the concrete base of the floor. As soon as the end rested against the concrete, unscrew the self-tapping screw a little and screw it back in. After each re-screwing, the log will rise slightly, and the floor will be leveled.
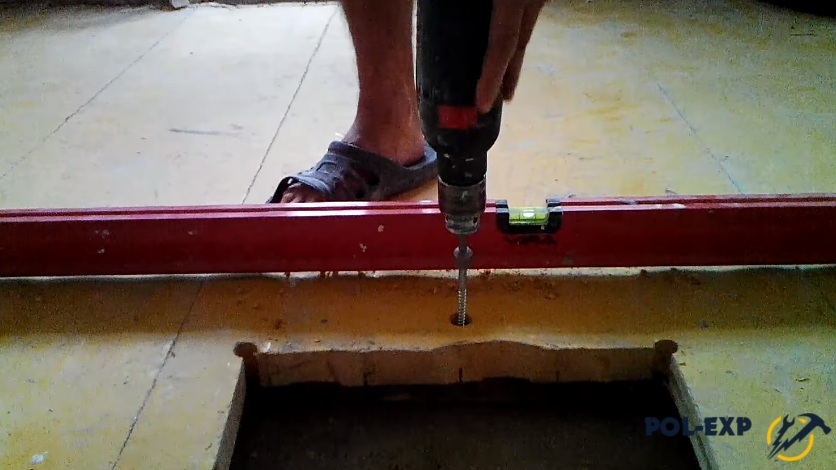

Constantly monitor the position of the boards with a level. The distance between the self-tapping screws on the log, depending on the expected loads on the floor, is within 50-60 cm. After alignment, the holes are sealed and sanded. This leveling method is also suitable for preparing subfloors for laminate or flexible topcoats.
Leveling a floor made of natural boards with grinders
For example, consider the most difficult option - the floor is old, the surface is painted with oil paints, the unevenness of the boards is up to 3 mm. Checking the condition of the surface is determined by the above method, the integrity of the lumber is beyond doubt. The floor is simultaneously renewed with leveling and becomes usable without new coatings.
Step 1. Remove old paint from the floor surface, this is one of the most difficult and unpleasant operations. Old paint can be removed in several ways:
- chemical. There are various specialty chemicals in the implementation. They cover old paint, to prevent too rapid evaporation, the floor should be covered with plastic wrap. After 10-15 minutes, the paint becomes soft and can be removed with a metal spatula. Disadvantages of this method: you need to work only in personal protective equipment for the respiratory organs and in non-residential premises, the paint is not all removed due to the difference in thickness. In addition, the floor should be treated in small areas, their size should be such that after one soak, you can have time to remove the soft coating. Otherwise, the paint becomes hard again, you have to start all over again;
- thermal. A layer of old paint is heated with a special powerful construction hair dryer and, while it is hot, is removed with a spatula. Quite difficult, long and smoky job. The method has more disadvantages than advantages;
- mechanical. To remove paint, special metal cutters with a particularly durable rough abrasive coating are used. The discs are fixed on electric circular grinders (grinders). To reduce the amount of dust, a cover is put on the grinder, the device is connected to a powerful industrial vacuum cleaner. The most optimal, according to professionals, method of removing old paint.

Step 2. After removing the paint, thoroughly vacuum the floor, do not leave even the slightest residue, they will clog the grinding wheels.

The floor is vacuumed after removing the paint
Step 3. Drown the nail heads in the boards. To do this, use a metal puncher and a hammer. If there is no special doboynik, then you can make it yourself from a piece of reinforcement or wire rod. The length of the doboin is about 10 cm, it is inconvenient to work too long. The punching depth depends on the level of unevenness in the floor and is determined by eye. If the nails are not pierced, their heads will damage the sandpaper and the impeller of the sander. As a result, the quality of surface treatment significantly deteriorates, in some cases it is necessary to change the drive shaft. In addition, a large number of metal caps cause rapid wear of the abrasive, which requires frequent replacement, which increases the estimated cost of the work.
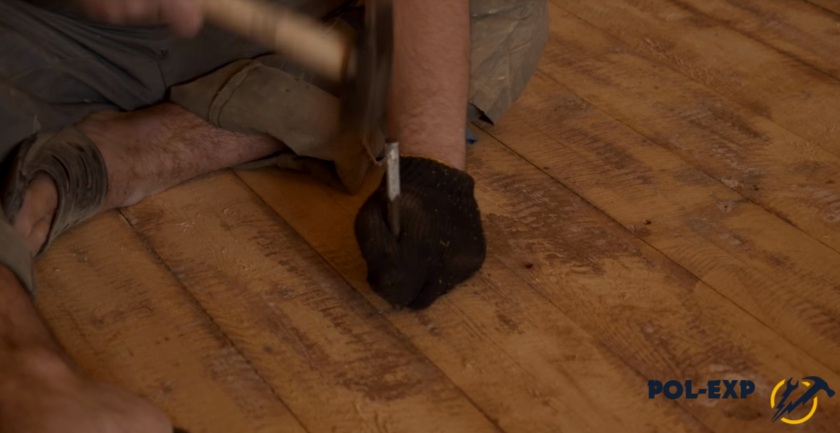
Another problem with protruding hats is that they cannot be putty, in any case, they will have to be sunk, and after sanding, the surface of the boards can be damaged.
Step 4. Start sanding the floor. This can be done with a grinder or grinder. In the first case, it is difficult to work, it will take a lot of time, the premises will become dusty. In addition, the small dimensions of the grinder disc cannot provide a flat surface. Inexperienced builders may have traces after each pass, which will take additional time to remove. We strongly recommend the use of grinders. There is no need to buy units for one room, you can borrow or rent them.
You need to process the floor with three types of sandpaper: large, medium and fine. The first is used for leveling the boards, the second is used for the final leveling and rough grinding, with the third one is used for the final finishing.


Step 5. Place coarse sandpaper on the machine. It is necessary to align the floor boards in a diagonal direction, while the machine must not be stopped in one place, it must constantly move.

Practical advice. Do not try to remove large irregularities from one pass, it is very dangerous, there may be visible grooves. If the floor is very uneven, then you need to go several times over its entire surface until the final leveling. Without diagonal sanding, waves will remain on the floor surface, remember this rule. As practice shows, alignment will require at least four machine passes over the entire area of the room.


Step 6. Remove dust from the surface with a powerful vacuum cleaner, pay special attention to the corners around the perimeter of the room and the gaps between the boards. Inspect all gaps, if you find solid dirt in them, remove it with a metal spatula or other flat object.
Step 7. Prepare a filler for filling genital gaps. You can buy it ready-made in a specialty store or make it yourself. The color of the putty can be matched to the tone of the wood or contrasting. The second solution is currently considered a fashionable style, this is the method used to make expensive deck floors. Decide which option to choose for yourself, the alignment technology does not change from this.

Step 8. Carefully putty all the gaps in the floor. Pack the material tightly with a small flat spatula. Do not smear the putty on the surface of the boards, but rather fill in the cracks. Remove excess and reuse.


Practical advice. There are several types of putty in the implementation: polymer, acrylic and oil. Polymer is the most expensive and high quality, acrylic is suitable in all respects, but less wear-resistant. Oil dries for a long time and gives great shrinkage. You will have to repeat the putty after the first drying.
In the absence of a factory putty, you can do it yourself. There are special liquids in stores for preparing a putty mass. Add to them sawdust collected after leveling the floor with the machine. Never use PVA for putty. The fact is that the glue heated during grinding becomes soft and stretches, hard-to-remove stripes appear on the floor. You can use varnishes for wood, only narrow gaps are sealed with such a putty. It is not recommended to make a putty based on drying oil or ordinary vegetable oil.

Step 9. When the putty is completely dry, start sanding the floor. Movements should be longitudinal, while alternately changing the sanding cloth to a finer-grained one. Due to this technology, the surface will be as smooth and even as possible.

Due to its large dimensions, the drum-type sander cannot get to places with limited access; areas along the walls will have to be sanded by hand. To facilitate the work, you can use a small surface grinder. Pay attention that the quality of leveling the floor is the same over the entire surface. Use the same sanding pad numbers as for the drum machine.
Important. Remember that without electric machines it is impossible to get a level floor of the required quality. Sanding the floor with a block of wood is not only very tedious but also ineffective.
Step 10. Use a vacuum cleaner to carefully remove the dust. If the room is large, it is recommended to repeat the cleaning the next day. During this time, dust will settle out of the air on the floor, repeated cleaning will exclude it from getting on paint and varnish materials.
Finishing
Then you can proceed to the finishing of the even and sanded floor. To improve the adhesion to lumber and to protect them from the negative effects of moisture, it is recommended to prime the surface. For these purposes, special formulations are used, the specific name of the materials does not matter, all have normal performance characteristics.

The primer has another very important function - it lifts the smallest pile on the wood. If not applied, the floor surface will become rough after varnishing. Apply the primer with a roller; use a paint brush in hard-to-reach places. After drying, you can continue working.

Step 1. Remove lint that has risen on the boards. To do this, you need to use sanding paper P120, larger grains will leave traces. It is recommended to grind the pile by hand, this will ensure the highest quality work performance. For control, you should periodically sweep the surface with your palm, the boards should be perfectly smooth. Start to work from the far site and move towards the exit from the room.
Step 2. Vacuum the dust, vacuum the room twice.
Step 3. Start varnishing the floor. To achieve high quality, you need at least two layers of varnish. The second is applied only after the first is completely dry.

Important. Close doors and windows while varnishing, do not allow drafts. They bring dust, it can be removed from the floor surface only by sanding. This means that all the work will have to be repeated, which is expensive and time-consuming.

If you do everything right, the old floor will not only become flat, but also look stylish, taking into account modern requirements for the interior of the premises. We will consider how to level a wooden floor with plywood or OSB in a separate article. We must say right away that such a repair does not allow, in the end, to have a finishing flooring made of natural boards, and this is a big drawback of technology.
Answers on questions
How to remove rotten boards?
If there are a lot of them, then everything is solved simply - use a crowbar and a nailer, try not to damage only the lags. And if there are only a few such boards, then you should be very careful to dismantle the leaky ones. In order not to damage nearby, rotten ones should be cut in several places and taken out in parts. Never place the tool against normal boards, do not leave marks on them. In extreme cases, you can use wooden spacers, but sometimes dents remain from them.


Can I use a scraper to level wood floors?
It is possible, but not necessary for several reasons. Firstly, it removes a very large thickness of the boards. Secondly, the machine leaves a wide and high untreated strip around the perimeter; it is very difficult to remove it manually. Thirdly, modern grinding machines using skins with different numbers perfectly perform two jobs at the same time. Fourthly, scraping machines are dangerous units, a metal knife flying off causes complex injuries. Fifth, knives are often damaged by metal objects.

The old floor can have nails driven in, not only over the logs, it is very difficult to notice them. Damaged knives must be sharpened or replaced with new ones. For turning, you will need a special machine, such work is not done manually. Looking for a sharpener or buying new knives is a waste of time and money.

Prices for popular looping machines
looping machine
Video - How to grind a wooden floor yourself
Living in your own home is a great success. At the same time, it is a great responsibility.
Your home must be constantly maintained in order. This is especially true for buildings made from natural materials.
Wood is an excellent building material in all respects, but it must be watched and looked after.
And from time to time comes the turn of restoration work.
Any floor, no matter how excellent the quality it was initially, has a tendency to dry out, rot or change the angle of inclination. Complete is a rather laborious and expensive undertaking. But even walking on creaky, uneven floorboards is a dubious pleasure.
To extend the life of a wooden floor, high-quality materials are selected for it, specially processed, and correctly laid. Those that have become uneven can be corrected and leveled. There are several different ways to do this.
Preliminary examination of the base
First of all, we need to assess the scale of the upcoming work.
To do this, we need to see the condition of the wooden floor. We tear off one of the boards and carefully examine it from the inside for cracks, defects, rot, traces of the vital activity of insects or even rodents. If all this is present, it is better to replace the flooring.
If the removed fragment turned out to be intact and dry enough, then it is quite suitable for restoration work.
Also, the floor is examined visually: how smooth it is. It will help to determine the degree of its deviation from the horizontal.
If its surface is sufficiently flat, has a small number of subtle defects, it is not difficult to level it with the help or scraping.
If there are more than enough flaws, then it is better to use a self-leveling mixture or plywood sheets.
Leveling the wood floor
Scraping a wooden floor in a private house
First, the sawdust is poured with water, then squeezed: after this simple procedure, they will absorb less moisture from the adhesive itself. When the glue hardens, it becomes unusually strong. The advantages of this method also lie in the fact that the solution penetrates into almost all cracks, while simultaneously insulating the floor.
Work order
To level the floor, the following is done:
- lighthouses are placed with the help of the building level; instead of special products, ordinary wooden planks can be used;
- the surface of the base is filled with the prepared mixture and carefully leveled. The layer is usually one to two centimeters thick. If there are large-scale defects, you will need not one layer, but two or more, each of which is applied only after the previous one has completely dried;
- using the level, we determine the degree of evenness of the resulting base. If noticeable irregularities still remain, they are sealed with the same working solution.
When the base alignment is completed, you can proceed to the installation of the decorative coating:
- etc.
How to level the floor with plywood
The wooden floor is also leveled with chipboard or plywood sheets.
Both materials are quite affordable at their cost, but the latter has the best strength indicators. Therefore, it is used for these purposes much more often.
The thickness of such material should be at least one centimeter.
How to properly level the floor with your own hands?
Work order
The order of work is as follows:

Next, the selected topcoat is laid on the plywood. It can be different -,. Often, a special substrate is laid under the plywood, which contributes to additional noise and heat insulation of the wooden floor.
Level the floor in an old house with self-leveling compound
Perfectly flat is one of the most original ones. A lot of effort is not required to complete such a task, and special skills are also required. But this method is mainly used in rooms with small differences in height. In new buildings, experts do not advise using it: shrinkage of a freshly made wooden coating may occur.
When choosing a mixture, be careful, pay attention to its purpose: for a wooden base!
Work order

This coating can dry up to two days. It is advisable to exclude the occurrence of drafts, and also to cover the applied composition with a polyethylene film. It is permissible to start the final finishing no earlier than a couple of weeks later.
Wooden house: how to level the floor joists
 The lag adjustment is good for eliminating maximum height differences. What is this method?
The wooden covering is completely removed from the base log.
The screws of a special device are inserted directly into the lags: they can be unscrewed and screwed in less or more.
By such manipulations, the position of the lags themselves is regulated, respectively, the position of the boards also changes.
The use of this method leaves the possibility of high-quality insulation. Insulating material is placed between the lags, after which the removed boards are returned to their place. The result is an absolutely flat floor, which is easy to adjust in the future. If suddenly, due to some unfavorable factors, it changes its slope, the lagged regulators will allow you to easily and quickly get rid of such a defect.
The disadvantage of this method is that the screws are quite expensive and will take time to install. If the house has low walls, then do not forget that when using this method, the floor will rise by about 10 cm, that is, it will seem even lower. But there are also undoubted advantages.
If there are screws
 Wooden structures are often negatively affected by changes in humidity and temperature, which can affect the angle of inclination of the boards.
If screws are installed in the logs, then with their help you can quickly and easily adjust the base.
Of course, you will have to work hard to pre-install the screws, but screwing in is not such a difficult process.
All of these methods are quite suitable for leveling the floor in a private house. In each case, the individual characteristics of a particular structure and its foundation are taken into account. Based on these data and the preferences of the owners, as well as on the intended topcoat, the most suitable method is selected.
Repair in an apartment or house is necessary to improve the quality of life and the appearance of the home. One of the main surfaces of the room is the floor. In order for it to harmoniously fit into the environment, it must not only have an attractive appearance, but also be even. Next, the question is considered, how is the easiest way to level a wooden floor.
Why alignment is necessary
The old floor has an unattractive appearance and a decision has been made to replace the floor covering. Before that, you need to level the wooden floor with your own hands, but is it really necessary?
Scheme of a flat wooden floor
Below are the reasons for holding such an event in a private house:
- aesthetic appearance of the floor covering;
- no drops when moving around the room;
- extending the service life of the clean floor by ensuring normal operating conditions.
Soft floor coverings such as linoleum or carpet allow slight differences in height but are best avoided. Rigid materials (bag, laminate) require the arrangement of an even base, since in the presence of irregularities and differences, their design scheme is violated. The structure does not work properly and cannot withstand the load applied. Because of this, a partial or complete replacement of floors may soon be required.
Methods of work
There are several options with which you can level the floor in a private house. Before leveling a wooden floor for laminate, parquet or linoleum, you need to familiarize yourself with each of them and choose the most suitable one.
- Leveling can be done with plywood.
- You can ensure the evenness of the base under the flooring by using a PVA-based putty.
- Self-leveling mixtures can be used for these purposes.
- To eliminate strong irregularities, you can use logs.


If removing old flooring boards in your home is difficult because they are firmly nailed to the subfloor, it is best to leave them as they are. In this case, the surface is leveled under the laminate, parquet or linoleum using a planer or grinder. The floor covering can be laid directly on the existing surface after it has been leveled.
Work in which the old floor is processed is called scraping.
It is quite difficult to carry out this stage manually using a planer. If possible, you should use a sander (sander). This unit generates a large amount of wood dust, which must be prevented from entering other living quarters.
Leveling the base with putty
 The scheme of filling the base with putty
 For slight irregularities, it is better to use a simple putty technology. The special putty consists of sawdust and PVA glue. This method does not require impressive cash costs and will provide a sufficiently flat and solid base for laminate, parquet or linoleum. In this case, no lags or other additional elements are required, so the work is done quite easily. It is best to follow the next steps:
- removal of existing coating;
- cleaning from dust and dirt;
- sanding the surface;
- it is necessary to fasten sagging and creaking boards and existing logs with self-tapping screws;
- nailing beacon rails;
- applying a layer of putty and leveling it using a rule.
Drying time of the mixture is on average two days. After gaining strength, you can proceed to further work (lay linoleum or other coating).
Self-leveling mixtures
 The process of leveling the base with a self-leveling mixture
 The method consists in using a screed of a special composition. Subject to the manufacturing technology, the mixture itself should spread over the floor in an even layer. In this case, all irregularities and pits are filled in.
It is rational to use this method with a height difference of up to 2 cm. With a larger amount of unevenness, it is better to use logs, since the screed will create too much load on the floor. The work is performed in the following order:
- cleaning and grinding the surface;
- applying a primer (moisture-resistant deep penetration solutions can be used);
- waterproofing with plastic wrap;
- laying the reinforcing mesh and fixing it;
- laying the mixture and leveling it.
Leveling and air removal is carried out using a special spiked roller. Drying time depends on the material of the mixture.
One of the indisputable advantages of using this type of floor leveling under linoleum or laminate is the absence of the need to use beacons. Also, the pouring process takes a little time.
But the employee conducting the alignment must have experience in construction work or study this issue in depth, since the proportions must be strictly observed when preparing the solution. If the ratio of ingredients is violated, the expensive composition will be unsuitable for styling.
Leveling the floor with plywood
The easiest way to use plywood is considered to be the option in which no lags are required. Before leveling the wooden floor with plywood for linoleum or other coating, you need to familiarize yourself with the sequence of actions:
 Leveling scheme for wooden floors with plywood
 - Bosses (small wooden planks) are laid along the perimeter of the walls, which will not allow the 2 cm indent from the walls to be disturbed (required).
- It is necessary to lay plywood with small gaps, the size of which is 3-8 mm. This indentation is necessary to prevent kinks with small movements or thermal expansion.
- Sheets are mounted with a gap. It is necessary to shift each subsequent one relative to the previous half.
- The last step is to fix the sheets with self-tapping screws. Holes in the plywood can be prepared in advance to facilitate work.
Also, plywood is laid, installing logs around the perimeter of the room to support the sheets. It turns out a strip support for plywood. Work on the preparation of the base for linoleum or laminate is carried out in the following order:
- Layout of plywood sheets without fixing. The installation scheme of the sheets (spacing, gaps) is the same as in the previous case. This step is necessary to check the conformity of the number and size of plywood sheets to the area of the room. The laid out sheets need to be numbered.
- Drawing the places where the lags will be located.
- Lags are mounted along the walls.
- Installation of transverse jumpers and their fastening with self-tapping screws. Next, you need to check whether the joists and transverse supports are evenly installed, and fix the entire frame to the base.
- Laying and fixing plywood.
Upon completion, you can lay linoleum or laminate.
In addition, plywood can be stacked on point supports. Such supports are called shabashki, their thickness is selected depending on the size of the unevenness of the floor. The pads are laid often enough, since this system cannot provide the same reliability as the previous one. For plywood with a thickness of 14 mm, the cell pitch of the supports is taken no more than 30 cm, and for sheets of greater thickness, the step can be up to 45 cm. The procedure for carrying out work is similar to the previous one, the only difference is the geometric scheme of the supports for plywood sheets.