Today's post will benefit people who are going to insulate the balcony from the inside.
My relatives decided to enlarge the living room area at the expense of the adjoining balcony. As the apartment has two balconies, so such a decision has long been asking.
There was no project, I myself had to understand all aspects of the work. And now I am publishing a comprehensive guide to insulating a balcony. The information provided in the article will play a good role for you when you decide to do the same.
How to quickly and correctly insulate a balcony?
How to insulate a balcony?
The overwhelming majority of owners of apartments with balconies sooner or later think about how to use this area more functionally, by insulating it.
Typically, such premises are used for one of the purposes:
- in the first case, perennial rubbish accumulates on them, all unnecessary is thrown off. A pantry extending to the outside is formed. It was this role that was assigned to balconies and loggias in most Soviet apartments;
- the second case is when apartment owners try to expand the often too cramped living space at the expense of the balcony, turning it into a room, office, winter garden.
But for the second solution, you need reliable insulation. According to the calculations of experts, in apartments located in old houses, significant heat losses occur through the balconies, if they are not insulated.
Therefore, one does not even need to ask the question: "Should the balcony be insulated?" Of course, this is necessary, even if a full-fledged heated room is not supposed to be arranged from it.
So how to insulate a balcony with your own hands and what nuances should be taken into account in this case (floor insulation, room insulation from the inside, etc.)?
The first steps
First of all, you need to glaze a balcony or loggia, otherwise the meaning of insulation is simply lost. With glazing, even a balcony that is open on all sides becomes more like a loggia.
Recently, people have increasingly begun to use wooden frames, but metal-plastic structures are also very popular. Wooden glazing can be no worse than the use of PVC structures, if the material is treated with the necessary materials - antiseptic compounds, paint in several layers, etc.
Departing from the topic: we hope that no one needs to talk about the differences between a loggia and a balcony.
But just in case, we will briefly note: the balcony is a platform protruding beyond the facade, fenced around the entire perimeter; The loggia does not protrude beyond the plane of the facade, it is built into the wall and is fenced with walls on the sides.
The insulation technology is practically the same in both cases.
Of course, the owner of the balcony would like to quickly finish all the work and move on to other pressing tasks. This is how the work gets done hastily. Slots are closed carelessly. And then heating devices are installed (heating radiator or underfloor heating system). After that, the owner believes that he can relax, he is reliably protected from the cold.
But in winter, all the shortcomings and haste will necessarily translate into very unpleasant discoveries. Even on an insulated balcony, it is difficult to maintain a comfortable temperature. The reason for this is that a hastily performed insulation does not provide a sufficient reduction in heat loss.
When deciding to heat the balcony, it must be borne in mind that using the central system for this is not allowed according to building codes. Therefore, it is necessary to insulate all surfaces with high quality - walls, floor, side and front sides.
For an example of insulating a loggia with joining a room, see the video:
We'll have to solve a number of tasks:
- seal cracks and seams with polyurethane foam and special sealants. If this is not done or done carelessly, there is simply no point in insulating the balcony further;
- install waterproofing, which will avoid the formation of mold, the development of pathogens that prefer to appear and grow in humid places. Waterproofing will be the first layer of the whole "pie" that we use to reliably protect the balcony. Among other things, the waterproofing layer will allow you to move the freezing point to the outside;
- installation of thermal insulation... In this case, it is necessary to install a heat-insulating layer, as in the previous case, on all concrete elements. This will eliminate the risk of cold bridges and maintain the optimal temperature in the room;
- followed by another waterproofing layer, with the help of which an additional heat-insulating layer is also provided;
- installation of the sheathing frame;
- finishing of a balcony or loggia outside.
How to insulate a loggia?
We have already found out that any insulation of a loggia or balcony begins with the correct glazing. Work is also required on floors, walls, etc.
Now you need to choose materials for insulation.
There is a huge amount of materials on the market to achieve this goal, and an inexperienced person should be confused in such a variety. But some materials are preferable to analogs, so we will consider their properties in more detail.
The final result depends on how correctly the choice of raw materials for hydro and thermal insulation of the balcony was made.
We will start from two factors. The first is the effectiveness of a particular material at a certain thickness. The second is the economic feasibility of acquiring just such a material.
Note that, despite the similar parameters of loggias and balconies, in the first case it is easier to perform reliable insulation than to create conditions close to living conditions on the balcony. This is not surprising, because in the case of a balcony, a large area will have to be glazed, and heat losses through the windows are the most significant.
First, we will consider materials for sealing gaps and seams on all structures and surfaces (frame, parapet, floors, etc.).
Materials for sealing gaps
In principle, you can choose almost any composition intended for sealing.
Usually rely on polyurethane sealants, foams and mastics, basing the choice on the flowability of the materials until the moment of curing.
You can choose other similar materials. To prevent the sealant from leaking out during use, large gaps are sealed with foam or other materials at hand.
Balcony / loggia waterproofing
In the process of waterproofing a balcony, it is necessary not only to process the internal surfaces. It is also required to mount an ebb, due to which the access of water under the frame is excluded, process the frame itself (if it is a wooden structure). All kinds of hydrophobic compounds are used for the frame - varnishes, oil paints, enamels, antiseptics, etc.
In other details, the balcony and loggia are insulated from the inside using a single technology.
For waterproofing concrete floors and a parapet, both penofol and the more traditional roofing felt can be used. You can also resort to the use of penetrating and coating compositions.
 Laying materials (roofing felt) must be overlapped, ensuring high-quality sealing of the seams, for which we can recommend the use of a burner. The burner will ensure reliable adhesion of the roofing material to the floor surface.
Other material also begins to gain popularity. This is foil-insol, which is only 4 mm thick. It is a good sealant and provides additional insulation.
The choice of materials is carried out taking into account the specifics of the work and the budget. Most often, roofing material is used for self-insulation. It has been tested for generations and is very affordable.
So how to insulate a balcony or loggia?
Now we turn to the choice of the insulation itself. In this case, you need to build on the most important characteristic of such a material - this is the thermal conductivity coefficient (delta). For thermal insulation compounds, this indicator usually ranges from 0.02 W / mS, the average value is 0.03-0.04 W / mS. The higher the value, the lower the insulating properties.
That is, you can go in two directions:
- selection of insulation with a minimum value of the thermal conductivity coefficient;
- increase the thickness of the thermal insulation layer.
In the first case, you will have to spend more on material. With an increase in the thermal insulation layer, the useful area of the room will decrease.
T How to insulate a balcony, what materials are optimal for this?
Today, extruded polystyrene foam used for thermal insulation has become very common.
This material has excellent performance characteristics. Among the popular materials of this type are Penoplex, Technolplex.
You can resort to another method. Buy mineral wool, remembering that when using it, the layer of insulation will be thicker in order to ensure the same result as when using expanded polystyrene. And to do everything quickly and inexpensively, you can use ordinary foam sheets - this material is also often used for self-insulation of a loggia or balcony.
As an example, let's talk about extruded polystyrene foam. URSA XPS. This is a practical, high-quality insulation, very beneficial for insulating a loggia. URSA XPS combines high thermal insulation performance and reduced heat loss.
URSA XPS can be used on floor and wall surfaces.
 Another characteristic of the URSA XPS is its small thickness, only 5 cm... So, if you are still wondering which material to choose for internal balcony insulation, pay attention to URSA XPS. It may be exactly the solution you've been looking for for so long. It is convenient to transport it, the material does not crumble, and you can cut it with an ordinary knife.
For the convenience of considering and comparing different solutions, we will compile a list with a description of thermal insulation materials that can be used for our purposes.
About the nuances of the balcony and loggia insulation in the video:
So, how can you insulate a balcony or loggia?
The modern building materials market provides us with a lot of options:
- materials based on mineral wool(basalt fiber). The fibrous structure makes this solution highly effective. Advantages of mineral wool: stability of shape and volume during operation, bio- and fire resistance, non-susceptibility to destruction under the influence of an aggressive environment, good sound and heat insulation characteristics;
- materials based on PPP(expanded polystyrene). The extruded material has the highest characteristics. Expanded polystyrene is very light, while it has a minimum coefficient of thermal conductivity. Other advantages of PPP: ease of installation, cost-effectiveness. Among the disadvantages - in the process of heating, harmful substances can be released into the environment;
- materials based on fiberglass. This very common option is rightfully considered traditional. Fiberglass is quite a budget solution, but its drawback is in the high value of the thermal conductivity coefficient (as it was found higher, the higher this indicator, the worse) compared to other heaters. Materials are produced in mats and slabs, which can be conveniently used in the internal insulation of the balcony;
- reflective heat insulators. This is an innovative solution for thermal insulation of various structures. Reflective insulation works like a thermos. An impermeable foil sheath is laid on top of foamy polyethylene. Such heaters are distinguished by a minimum coefficient of thermal conductivity and a sufficiently thin layer of such material for reliable insulation. As a result, the space occupied by the thermal insulation is significantly reduced.
How to fix materials
When using waterproofing flooring materials, they are glued to special compounds or (like roofing material) they are fastened with heating of the parts to be connected with a burner from the fastening side.
The choice of the method of fixing the thermal insulation depends on the material used.
Foam or polystyrene boards can be glued or mounted on plastic dowels. If glue is used, it is very important to choose the correct composition, excluding toluene, which is contraindicated for use with similar heaters.
The glue is applied to the mounting pad in a thin layer over the entire area. It is convenient to use a notched trowel for application. Additionally, you can apply the glue drip on the thermal insulation boards in several places.
When using dowels, they are installed along the perimeter of the slab at the rate of 8-10 points per square meter. For perfectionists, we recommend using both fasteners at the same time: the initially glued boards are additionally fixed on plastic dowels.
Toluene-free polyurethane foam is used to seal the joints between the insulation boards. The seams between the elements of the waterproofing layer are closed with a special self-adhesive sealant.
In most cases, mineral wool is attached only to dowels. Vapor barrier (inner layer of waterproofing) is installed together with heaters on dowels or glued directly to thermal insulation materials.
Finishing
 After installing the heat and waterproofing layers, proceed to the exterior decoration. To do this, it is necessary to install frames from the profile used for the installation of drywall sheets. Also, the frame can be mounted from wooden blocks.
The same actions are performed when decorating walls, ceilings, parapet. But in this case, thinner materials are also suitable for the frame. 25-30mm boards or plasterboard profiles can be used.
After installing the frame, it must be sheathed with plasterboard sheets or clapboard.
When using lining, the balcony in appearance and comfort resembles a veranda of a country house, gypsum boards allow you to embody any creative ideas on such a surface. Self-cladding of a loggia or balcony with plasterboard allows you to then glue wallpaper on it, paint, draw, etc.
Another, quite convenient and affordable option for interior decoration of the balcony is plastic panels. Manufacturers offer the widest range of such products, with different colors and textures of the material. You can implement any design depending on your taste and the style of the interior of the next room.
Algorithm of actions
The insulation of a balcony or loggia is carried out in stages as follows:
- glazing in progress, without which any insulation loses all meaning;
- floor insulation. At this stage, holes and slots are blown out with foam, after which waterproofing is applied to the surface of the lower part of the wall and slab;
- leveling the floor. For this, self-leveling building mixtures can be used;
- laying of URSA XPS boards. To seal the joints formed between the insulation plates and the walls, vapor barrier tape is used. If the joints are not repaired, during the operation of the room, moisture will collect on the walls, and this is a direct path to the development of mold and mildew;
- laying polymer concrete with a layer thickness of about 4 cm, on which you want to install a reinforcing wire mesh;
- insulation of walls and ceilings. These procedures are easier to perform than floor insulation. Simply lay the URSA XPS boards and cover them with moisture resistant drywall sheets. It is allowed to use suspended ceilings, in which the wiring can be reliably hidden from the eyes. This ensures the illumination of the balcony;
- vapor barrier- a moment that must not be forgotten. For its implementation, you can install a special vapor barrier in front of the insulation. Another option is that the vapor barrier is not used, but the insulation is installed with such a thickness that moisture does not form.
Having decided to insulate the balcony with your own hands and perform all the specified types of work, you will not only make the room warm and minimize heat loss from the apartment, but also protect your home from the penetration of noise from the outside.
Pay attention to the soundproofing characteristics of the glass unit you choose.
For an example of complex insulation of a balcony, see the video:
Foam insulation
So, you have already solved all the questions about glazing your balcony or loggia. Now it remains to insulate all surfaces (ceiling, floor, walls) with foam. It is advisable to use EPS.
Why is this particular option so popular?
It is EPPS that is the optimal solution to the problem of warming a balcony with your own hands at an affordable price. Let's get started!
Note that the further proposed instruction is recommended for the internal insulation of the balcony. It is undesirable to do external thermal insulation with your own hands. For obvious reasons, such work should be entrusted to industrial climbers with the necessary experience and equipment.
First of all, you need to prepare the work surfaces. Joints, cracks, holes are blown out with polyurethane foam. It is important to choose a material that does not contain toluene. Irregularities are smoothed out with cement mortar. After that, a 50-60 mm polystyrene sheet is attached to the surface with dowels.
To seal the joints formed between the plates, polyurethane foam is used.
This is how the walls and ceiling of the loggia or balcony are insulated with their own hands using polystyrene foam. Next, you need to install the finish or leave the surface for wallpapering, painting, etc.
It is very important to use paint on the balcony without organic solvent - such substances can destroy the EPS.
Work on the floor is carried out in the same way, with the exception of one moment. You need to apply a screed on the foam and then, if you wish, equip the underfloor heating system and finish the surface to your liking.
A few words about the warm field on the balcony (loggia)
Now let's talk about the underfloor heating system on the balcony. Whatever quality materials you use to insulate such premises, the most comfortable conditions even in the coldest season can be created only with the use of a heating system.
Compared to any other solutions, electric underfloor heating is the most profitable solution for this. The following is a briefly described technology for making such a floor with your own hands.
 So, on the slab of the balcony or loggia, we only have a screed, and now we need to insulate this surface well. For thermal insulation, we recommend choosing a convenient and reliable extruded polystyrene foam, the properties of which have already been described above.
The thickness of the EPSP board must be at least 10 cm... The boards are glued to the floor surface with glue, the joints between the individual elements are sealed with polyurethane foam. Now is the time to start laying the electrical cable for the underfloor heating system. The cable is bent by hand according to the shape that will cover the maximum area.
After laying the cable, a 4-5 cm tie is installed. The solution for it is prepared from cement grade m-400 and sand in a ratio of 1: 3. Tiles are laid on the screed - that's all, our “pie” is finished and a warm floor has been installed on the balcony!
Finally
You can take a fresh look at your usual balcony or loggia! All of the above will take a lot less effort than you might think. But the results will definitely please you: the apartment will be supplemented with a full-fledged, even habitable room, in which you can comfortably sit down with a cup of coffee even in the coldest cold.
Insulation of loggias step by step
Have you decided to insulate the loggia and don't know where to start? How to choose the best materials, how to do all the necessary work correctly? Our experts provide answers to these and other questions.
How to make a balcony warm?
First of all, you need to attend to reliable glazing of a balcony or loggia with metal-plastic profiles with two-chamber double-glazed windows. The thickness of the double-glazed windows is from 32 mm.
When ordering glazing from a specialized company, consider the need to install additional expansion profiles installed on the main structure from the top and sides. These elements are necessary for further work on the insulation and decoration of the balcony.
After glazing, the loggia will already acquire a more presentable look, it will become more comfortable. But she is still far from a warm room. In cold weather, the temperature in such a room is usually a couple of degrees higher than the outside, which is not enough at all.
If you want to turn the loggia into a real living room with a comfortable microclimate, you will need to carry out a number of works on its insulation. Among these works - insulation of walls, floors, ceilings and parapet.
Preliminary work
In addition to glazing, you need to perform a number of preparatory work before directly insulating the balcony.
Such works include laying the parapet, if necessary (if the existing parapet does not coincide with the upper ceilings in vertical level, or if it is a metal "leaky" structure). Side walls are erected from lightweight bricks or foam blocks. If you need to perform these works, they are carried out even before the installation of double-glazed windows.
What are the preferred materials?
 For high-quality thermal insulation of the balcony, it is recommended to use modern insulation - rolled or extruded.
These materials include PPE, Penoplex, Penofol, Izolon and so on. All of them have excellent heat-saving characteristics with a small thickness.
This combination of characteristics makes such solutions indispensable for insulating small areas, where every centimeter of space is very important.
So which is better - polystyrene or Penoplex?
Both materials can be used as insulation for the loggia. The difference between them lies in the installation technology and properties. Polyfoam has a high vapor permeability, which is not the best quality for our tasks.
The thickness of the layer is also different, Penoplex in this parameter is also a more profitable material, since it allows you to save more space.
Compared to polystyrene foam, penoplex retains useful heat-saving characteristics twice as long.
We must not forget about fire safety. Polyfoam is a combustible material, and during combustion it also emits substances hazardous to health. Penoplex is a self-extinguishing material.
Only one point in which Penoplex loses in this comparison is the higher price compared to foam.
How to decorate the walls insulated with Penoplex?
Finishing on penoplex can be done by VGKL, GKL, Knauf aquapanels. And all these materials on top can be finished at your own discretion - pep up with wallpaper, paint, putty, etc.
How to ensure not only reliable insulation, but also sound insulation of the balcony?
For high-quality sound insulation, you can use a special material of the ISOVER brand.
For high-quality sound insulation, you can use a special material of the ISOVER brand. This material has both heat and sound insulating properties. If thermal insulation is more important than noise protection, it is recommended to choose the material "ISOVER Extra". If it is more important to ensure the acoustic comfort in the room, it is better to choose "ISOVER Soundproofing".
The technology of insulation and decoration of the balcony in the video:
Is it possible to carry out double-sided insulation of the loggia?
The parapets of the loggia can be insulated not only from the inside, but also from the outside. But this solution is not always advisable, since it is difficult to carry out such work outside at a high altitude. It is recommended to resort to insulation on both sides, if necessary, at the same time to achieve a certain thickness of thermal insulation and to preserve the maximum usable space inside.
The effectiveness of thermal insulation does not depend on whether the insulation is installed only inside or on both sides, it is interrupted in thickness or not.
With double-sided insulation, an additional vapor barrier is needed inside.
Double-sided insulation is needed so that the space of the loggia is preserved as much as possible. So, a 5 cm thick concrete partition and external insulation with 10 cm foam. What is better to insulate?
For good thermal insulation, you can use stone wool in slabs (Light Butts). Their thickness is 5 cm, installation takes place in a frame mounted on the parapet. Then everything is closed with a vapor barrier and sheathed.
How to insulate the floor on the loggia?
 A common way is to arrange the floor along the logs.
First you need to install a waterproofing layer.
Excellent results are obtained by insulation with a special material "ISOVER Classic". After completing this work, you can carry out the finishing.
Will you need a heating system on an insulated loggia?
Unfortunately, even with very good thermal insulation of the loggia, heat simply will not come from anywhere in the absence of an appropriate source. Insulation allows you to keep warm, but insulation cannot generate it.
According to building codes, central heating on balconies and loggias is strictly prohibited, so alternative heat sources will have to be considered.
Is it necessary to install thermal insulation if the underfloor heating system is installed?
If you are installing underfloor heating, thermal insulation must be used without fail. This will ensure that heat loss is kept to a minimum. The exception is when heating mats are used.
Is it permissible to install a warm floor system on the walls of the loggia?
It is permissible to use heating mats on the walls. To do this, they are attached to the surface so that bends of the heating cable do not form in the corners (that is, you cannot bend the cable at right angles).
The tile mix is applied in an even layer without voids, otherwise overheating may occur.
Is it possible to insulate a part of the loggia?
Insulation of only part of the loggia can be used if the norms of thermal insulation are observed. For this case, it is recommended to use expanded polystyrene up to 50 mm thick. It is imperative to insulate not only the floor, but also the walls and ceiling. It is clear that double-glazed windows are also required.
Where does condensation form on the insulated loggia?
If you notice this negative phenomenon, most likely there is an unheated room under your loggia. Another option is insufficient thermal insulation of the outer walls.
Experts identify the concept of dew point - this is the temperature of air cooling, at which water vapor is boundary saturated. That is, at this temperature, the relative humidity of the gas reaches 100%.
Condensation is caused by air cooling or the inflow of water vapor.
 Let's explain with a practical example. If you bring something into the room from the cold, the air above it can cool down to a temperature below the dew point under conditions of a certain humidity and air temperature.
In this case, condensation forms on the surface.
For typical rooms, the dew point can be roughly calculated as follows.
If the temperature of the underfloor heating on the screed is 30 degrees, and the relative humidity is 60%, the dew point will be 21.4 degrees. That is, when the underfloor heating is turned off, condensation will appear when the cement is cooled to this value.
To solve the problem, you can use one of two options:
- to reduce air humidity, for which air dehumidifiers, electric convectors and similar equipment are used;
- keep the screed temperature above the dew point.
If the floor of the loggia is not insulated, will the tiles crack on it?
If you have chosen frost-resistant tiles intended for outdoor use, then this kind of trouble will not happen. It is also necessary to use a special frost-resistant glue.
But another problem may arise. If there is an uninsulated loggia below, and you have good glazing installed, then when heat escapes into the door open to the room, condensation may appear on the floor. In cold weather, it can even freeze.
Algorithm for warming and finishing the loggia in the video:
Insulation of the balcony and loggia from the inside of the room
In our country, you can observe a real boom in the insulation of balconies and loggias. This is due to the desire of people to increase the living space of cramped apartments at the expense of these premises. After all, balconies and loggias can be quite functional, instead of playing the role of cluttered outdoor storage rooms.
The role of the loggia can be anything, it all depends on your needs and imagination, you can equip a study or a gym, a winter garden or just a place to relax on it. Often, a balcony is combined with a room, making it much larger.
Repairs must be carried out thoughtfully, otherwise the result will be very sad!
Since the loggia and balcony are cold rooms according to the project, their ceilings and walls do not have thermal insulation. The thermal conductivity of such walls is too high; they transmit cold with very little resistance.
Warm vapors should not penetrate under the insulation, otherwise it will lead to the formation of condensation inside. As a result, the walls can freeze through, ice forms on them, mold appears on neighbors, and not the most comfortable environment is created in your apartment.
The way out of this situation will be practically hermetically sealed thermal insulation. A vapor barrier must be installed.
So how to properly insulate the balcony?
The transformation of cold rooms into warm ones begins with the treatment of the parapet. It should be made of foam blocks or concrete. Do not insulate metal parapets.
The glazing of the balcony must be warm, it is best to use metal-plastic profiles with double-glazed windows... More details about them can be found in the corresponding section on glazing.
After glazing, it is necessary to exclude drafts, due to which the wind can walk under the thermal insulation. Foam insulation is used to seal the cracks.
After this work, the surface is checked for leaks or mold. If such shortcomings are identified, they must be eliminated.
The insulation process is carried out in a circle at. All surfaces are insulated, except for the wall adjacent to the room (ceiling, side walls, floor).
It is best to use XPS extruded polystyrene foam for insulation on walls. Foamed polyethylene can be used for vapor barrier and as additional insulation.
 Extruded polystyrene foam XPS is a material in which polystyrene granules are mixed at high temperatures and pressure with a blowing agent, which is then extruded from the extruder.
The blowing agent in this process is usually a mixture of light freons, to which CO2 is added. After the production of the slab in the cells of the material, the residual freon is quickly replaced by air.
This material structure provides it with excellent thermal performance. long lasting and high compressive strength.
For the production of foamed polyethylene, high-pressure polyethylene is used, hydrocarbons are taken as a foaming agent.
The surface of the material is smooth, the structure is fine-pored, and there are no open-pored cells. This ensures low moisture absorption. The hardness of the material is similar to that of foamed polystyrene and foamed rubber.
Advantages of XPS extruded polystyrene foam: high resilience, flexibility, elasticity, excellent resistance to chemical and biological degradation. The material is distinguished by high shock-absorbing performance, it is durable and environmentally friendly, shock-resistant, hydrophobic, and has low water absorption.
Moving from theory to practice
Now we will put into practice the selected materials - extruded XPS expanded polystyrene and foamed polyethylene. They are offered by various manufacturers. When choosing a specific brand, it is best to familiarize yourself with the manufacturer's website, compare the characteristics of products from different brands.
Both materials can be of different thicknesses. With an increase in the thickness of the insulation layer, the thermal conductivity decreases, the warmer it becomes in the room. That is, a thicker layer resists heat loss to the outside better.
On the websites of manufacturing companies, there are usually tables indicating all the important characteristics of their products, so you can make the necessary calculations for a particular room.
However, such calculations are the prerogative of experienced engineers, and not people who first encountered such work.
Therefore, you can resort to a simpler solution, starting from the rules:
- on non-aligned balconies and loggias, it is necessary to install polystyrene with a thickness of 30 mm;
- on the balconies combined with the room, polystyrene with a thickness of 50 mm or more is used.
The vapor barrier layer in the first case should be from 3 mm, in the second - from 5 mm.
These simple rules almost always work. Of course, for this it is necessary that the apartment is well heated, the windows in it are installed in compliance with all GOST standards, and the balcony has its own heat source. The specified parameters are suitable for the climatic conditions of central Russia.
Polystyrene is produced in sheets of 1200x600 mm. At the edges of each slab, a step is provided to form a “warm seam” with the previous sheet, fastening takes place step by step.
Where it is impossible to install sheets with each other in this way, they are mounted end-to-end, and polyurethane foam is used to fill the seams. It is more convenient and economical to use a special pistol for this.
 The room is insulated in a circle according to the principle described above. First you need to drill the polystyrene and the wall to the required thickness, and then install a dowel in the hole. Two such fasteners are enough for each sheet.
After fixing the polystyrene plates between the wall and them, the formed seams must be foamed. In the same way, seams are processed, which turned out when joining sheets not step by step. Further, all the seams are glued with tape.
After passing this stage, you will notice that the room has become much warmer.
Now you need to protect the polystyrene from the penetration of wet vapors from the room. This step is mandatory! Foamed polyethylene provides not only vapor barrier. This material also reflects heat and sounds.
To install the vapor barrier, you need to roll out the roll and cut into pieces of the calculated size. On the reverse side of the material, double-sided tape is glued, then the vapor barrier is attached to polystyrene. When working, it is advisable to avoid overlapping joints.
Seams are sealed with foil tape. And so we got a room, which inside already works on the principle of a thermos and is reliably protected from external cold.
We have completed the warming phase! It's time to start decorating the room.
Pay attention to an important addition.
Insulation should not be laid between battens or laths.
The insulation must be complete, the heterogeneous structure of the insulation layer is not allowed. Otherwise, the resulting cold bridges will subsequently negatively affect the result.
And one more important digression. Do not forget that all balconies and loggias are different rooms, houses are built from different wall materials, and different heating systems are used in apartments. Accordingly, these individual characteristics must be taken into account. The use of the same materials and technologies on two completely different balconies does not guarantee an equal result.
Balconies and loggias are cold rooms from the beginning, respectively, it would be correct to simply finish them without changing the design functionality.
But if you decide to warm yourself in one way or another, then resort to the technology described by us. It has been tested over the years, on its own experience, for the optimal creation of comfort and coziness.
Is it possible to insulate the balcony with your own hands? Definitely you can! But you need to stock up on strength and patience.
For an example of insulating a loggia with P-44T penoplex, see the video:
Correct insulation of the balcony
Most of our apartments are too cramped for living and many people resort to connecting rooms with kitchens, balconies, loggias, trying to expand the living space in this way. Therefore, questions about the correct insulation of the balcony are always relevant.
If we start from the laws of physics, then the insulation of balconies must be performed from the cold side of the enclosing structure of any surface. In this case, the old fence turns out to be in a zone of positive temperatures, and moisture vapor from a warm room easily passes through the insulation, does not accumulate and does not linger, but penetrates outside.
The multi-layer construction together with the insulation works reliably, and the heat-insulating characteristics are not reduced. If all the work was done correctly, the best materials were chosen, it will be very comfortable in such an apartment, which has received additional usable space due to the balcony.
 But in many homes, outdoor insulation is often not possible. Therefore, we have to resort to internal insulation of balconies and loggias.
At first glance, this is the simplest task. It is enough to buy insulation, glue it to the wall, sheathe it with sheet materials, install a heat source - and that's it, for many years of comfort and warmth.
Everything is not as simple as it seems.
If you have already insulated your balcony or loggia in this way, you must have noticed that in cold weather condensation appears on the wall - water that comes from nowhere.
Condensation on the floor - where is it from?
Internal insulation of the heated balcony transfers the enclosing structure to the area of negative temperatures, which are always below the dew point. In this case, moisture vapor from a warm room (when moving from a high to a low partial pressure) passes through the installed heat-insulating layer as a looser one and stops at a dense cold fence. The vapor condenses on a cold surface. Further, after the transition of steam to a droplet-liquid state, depending on weather conditions and microclimatic indicators in the apartment, the process turns into wetting of the fence and insulation.
Insulation loses a significant part of its heat-saving characteristics; with increasing wetting, the material becomes unable to retain water and it flows out of the wall.
Even if water does not flow out of the wall, this is still not a reason to rejoice, because the thermal insulation still gets wet, its properties are lost. Favorable conditions are created for the development of mold fungus. Thus, the meaning of insulation is lost - it seems to be there, but at the same time it is not.
And what to do, how to avoid such troubles?
There is a way out of this situation. We will consider two solutions that allow you to insulate a balcony or loggia from the inside and at the same time avoid the described phenomenon
According to the first option, you will need to install a special vapor barrier in front of the heater. This will avoid the penetration of water vapor into the insulation. This is a reliable way even when using insulation with maximum vapor permeability (for example, if mineral wool is used for thermal insulation). For this option, a dry construction technology is recommended, which occurs according to the wall cladding method.
At the same time, instead of drywall and metal profiles, it is enough to use PVC or MDF bars and wall panels.
The vapor barrier is plastic sheeting, foil or membranes specially designed for these tasks. Internal insulation involves the installation of a "pie" structure with the same order of layers (the same for walls, floor and ceiling).
The advantage of the first method is practically absent wet processes during operation, with the exception of the stage of filling seams and joints between gypsum boards. The disadvantage of this method is the lack of the ability to “breathe” in such a system.
 According to the second option, the vapor barrier is not installed separately., but insulation is performed using certain materials with minimal vapor permeability. These materials include conventional and extruded polystyrene foam.
According to the second method, it is impossible to use mineral wool, which has too high vapor permeability.
In this case, you need to choose such a thickness of insulation, at which moisture will not accumulate - that is, at which the necessary resistance to vapor permeation is provided.
Let's give an example. When using ordinary expanded polystyrene with a density of 25 kg / m3, according to the standards given in SNiP, the thickness of the insulation should be from 80 mm. This thickness will provide good heat saving.
If extruded polystyrene foam is used, then the calculation is carried out taking into account the much lower vapor permeability of such a material (3-10 times, depending on the manufacturer, lower than that of usually expanded polystyrene). Accordingly, a 30 mm layer of such insulation is sufficient to achieve the same result.
But this thickness is insufficient when it comes to thermal protection of the room. For optimum performance, it is recommended to install 50-60 mm extruded polystyrene foam. In general, to determine the required thickness of the insulation, it is required to carry out a heat engineering calculation of the enclosing structure, which takes into account local norms and climatic features.
Both types of expanded polystyrene are attached to a brick or concrete base using special compounds. For example, you can use Knauf-Sevener or Ceresit CT85.
When the initial hardening of the glue has occurred, the plates are also fixed with mushroom dowels.
On the surface of the expanded polystyrene plates, it is necessary to equip a protective reinforced layer created from the same adhesive.
The glue is applied to a sheet of polystyrene foam, which must first be processed with coarse sandpaper. Layer thickness 2-3 mm. An alkali-resistant fiberglass mesh with a mesh size of 5x5 mm is embedded in this layer. Immediately on top of the mesh, you need to apply a second layer of adhesive.
The fiberglass mesh should be inside between the layers of glue, should not be applied directly to the insulation and applied to it with glue. In this case, it will not be able to perform the reinforcement function assigned to it.
When the reinforced layer hardens, you can proceed to puttying the surface, and then paint it, glue wallpaper, plaster it with decorative compounds with different textures, etc.
An example of insulation of a balcony with expanded polystyrene in the video:
Despite their small size, the complex modernization of these parts of the residential buildings is challenging. To find out how to do it yourself, step-by-step photos must be supplemented with detailed descriptions of working operations. Information about modern materials will come in handy,. It is necessary to find out how the new premises will be equipped. Finding the right answers to these and other practical questions will be easier after reading this article.
Read in the article
Do-it-yourself balcony insulation: step-by-step instructions for preparatory work
Open balconies in domestic climatic conditions can be fully operated no more than several months a year. They are blown by cold winds, covered with rain and covered with snow. After the implementation of the project, the necessary protection will be created. Even when choosing the most economical option, the insulating characteristics of the property will improve, and the costs for it will decrease. After a deep modernization, you can actually increase the living space at a relatively low cost.

Preventing erroneous actions
Some important details should be noted at the beginning to rule out incorrect decisions:
- Excessive "frugality" can subsequently be transformed into additional costs. If you install cheap frames without, use insufficient quality and finishing materials, the desired result will not be obtained. Subsequent alterations are additional costs.
- Wrong choice of technology also comes with troubles. It is necessary to carefully study the nuances of the techniques in order to make sure that they are realistic to reproduce on their own. Specialists can be invited to perform the most complex workflows.
- Standard cannot be installed on the balcony. Some municipal authorities prohibit discoloration of external surfaces, installation of frames and other visible changes from the outside.
| Image | Name | Advantages | disadvantages |
  | Expanded clay | Low cost; good filling with granules of complex volumes; maintaining integrity over a long service life; incombustibility. | High moisture permeability, which is accompanied by a loss of insulating properties. |
 | Mineral wool | The durability of products of a modern level; high temperature resistance; high quality butt joints. | Low strength; deterioration of the structure and an increase in thermal conductivity when water enters. These materials must be additionally protected from mechanical damage and increased. |
 | Styrofoam | Reasonable prices; ease of processing; smooth outer surface; light weight. | Low strength, flammability. To improve resistance to open flame, special additives are used, but the corresponding materials are more expensive. |
 | Expanded polystyrene boards | High strength of products with a sufficiently high density; ease of installation; moisture resistance; durability. | Relatively expensive factory-made materials from well-known manufacturers. Difficulty filling internal volumes without the formation of empty spaces. |
 | Polystyrene formed at a construction site from several liquid components | It has all the advantages of slabs, but additionally it fills all cavities of any shape. | The total cost is higher because special equipment has to be used. |
 | Foamed polyethylene with a layer of metal foil (penofol) | Small thickness; long-term preservation of good consumer characteristics; moisture resistance. | High price. |
For your information! The insulation system will be effective if you install insulating materials on the outer wall, floor, ceiling.


How to insulate a balcony with your own hands: a step-by-step photo, installation of windows
| Drawing | Description of actions |
By insulating the balcony, we create a buffer zone on the path of cold air to the living quarters, add a few square meters to create a pantry, or even a small room - but this is if you connect a heater. In our step-by-step instructions, we will tell you how to properly insulate a balcony with your own hands and what materials are used for this.
Balcony insulation begins with checking the supporting structures. To do this, it is advisable to look at the balcony slab from the balcony of the neighbors below: if the beginning destruction is visible with the naked eye, then you can strengthen the concrete and reinforcement layer as shown in the figure. If you doubt the strength of the slab and the ability to carry an increased load of glazing, insulation, floors, it is better to seek expertise. Although, as practice shows, balconies can easily withstand increased load and collapse - this, fortunately, is an extremely rare exception to the rule.
 a - concrete is knocked down in damaged places. b - the surface is cleaned and repair compounds are applied: 1 - contact layer; 2 - anti-corrosion protection; 3 - repair mortar; 4 - leveling putty
Before starting work, you need to remove the old finish and frames (if any), clean all surfaces from decaying elements, if necessary, make a small concrete screed or fill up the cracks in the slab with concrete mortar.
Insulation works can be divided into:
- outer skin;
- glazing;
- internal insulation;
- finishing.
Parapet siding outside
The easiest way to make the outer balcony cladding is vinyl siding.
Outside the parapet, a vertical crate is assembled in such a way that it forms a single flat area (check with a stretched thread). Bars or metal profile of the battens are fixed at a distance of about 40 cm from each other. Further, along the lower and upper perimeter, guides for siding (closing profile) are mounted, and the corners are made out with a special vinyl profile - "outer corner".

The siding starter bar is attached with the long side to the lower rail using self-tapping screws. Better to start from the side wall - and the panel is shorter and less visible from the street - you can practice. Soft mineral wool slabs can be placed between the siding and the balcony grating. At the top of the parapet, you need to mount a drainage system.

A very short video about the main stages of cladding:
Glazing is an obligatory stage of balcony insulation. In this case, you can independently make frames from wood, aluminum or steel profiles (corner, profile pipe) and glaze, or you can purchase ready-made double-glazed windows. The first option will be cheaper, but it is more time consuming and, most importantly, it will only slightly increase the temperature on the balcony in winter. You are unlikely to succeed in sealed windows without the use of double-glazed windows technology, they will have to be insulated for the winter or not, and leave the balcony, in principle, cold, which will only reduce the wind load. So it is better to order ready-made double-glazed windows for glazing.
If the balcony was not glazed, and you are not insulating the loggia, then the parapet for installing frames is most likely missing or insufficient. You can create a retaining wall in the form of a reinforcing cage with concreting or brick. To lighten the structure, expanded clay can be poured into concrete, reducing the overall load. The top of the parapet must also be reinforced with a metal profile.

If the protective grill of the balcony is strong enough, and the double-glazed windows are single-chamber, aluminum are very light, then wooden boards under the windowsill, which are attached to the upper part of the grill, can act as a support.
If the balcony has a small area, then you can weld a frame on brackets that protrudes beyond the concrete slab. At the same time, the window sill will not "eat" the valuable volume of the balcony. This arrangement of a balcony is called a take-out.

After that, the window sills and the frame of the future glazing are installed - without frames and sashes, which will be mounted later. For this, the metal structure is welded to the metal profile of the parapet and supports fixed to the neighbor's balcony slab from above. If you live on the upper floor, the structure will be more complicated, since you will have to make a canopy-roof, for example, from corrugated board, polycarbonate, etc. In this case, the racks must be more durable.

After the frame is fixed, the upper drainage systems (visor) are mounted and the double-glazed windows are installed according to the instructions.

For the glazing features of small balconies without increasing the area, see the video:
Insulation of the balcony from the inside
From the inside, the balcony is insulated from the walls, floor and ceiling. For this, you can use various thermal insulation materials.
Balcony insulation materials
Thermal conductivity of building heat-insulating materials differs within wide limits, therefore it is impossible to name the recommended thickness unambiguously. For information, see how the optimum thicknesses differ to achieve the same thermal resistance when using popular materials.

The basic requirements for materials also include:
- long-term strength;
- non-hygroscopicity;
- fire safety.
Most often used:
- mineral or stone wool - fiber insulation;
- lightweight polystyrene and "Penoplex" (different types of expanded polystyrene) - plate materials;
- polyurethane foam or "Penoflex" - polyurethane foam.

Sometimes a composition of these materials is used.
Fiber insulation is convenient to install when it is made in the form of soft slabs or blankets with a foil surface.

Polyurethane foam is applied using special, preferably professional equipment.

To compare the consumer properties of materials, we have summarized their main characteristics in a table.
Stages of insulating a balcony from the inside
Now that we know the main properties of heat-insulating building materials, we will consider the procedure for performing the work.
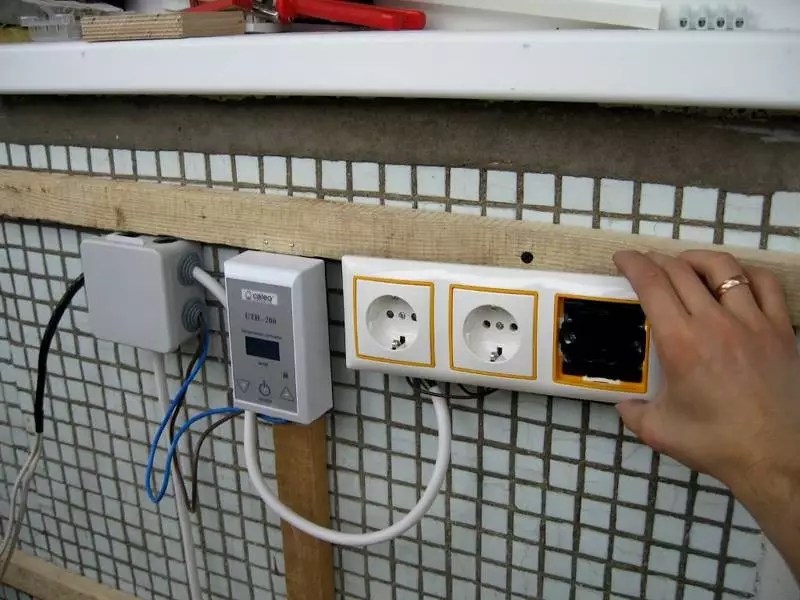
Advice! If lighting or connecting heating devices is supposed to be on the balcony, make the wiring to the lamp, switch and outlet in advance by placing the cables in plastic boxes. This will hide the wiring, which is much more attractive than open wiring.
Before work, make sure that dust, small particles of insulation or a solution do not pollute the apartment - cover the openings with foil.
Floor insulation
Insulation should start from the floor. First, a layer of waterproofing should be laid on the balcony slab. It can be ordinary polyethylene or foil insulation. At this stage, the waterproofing material can also be fixed to the walls.


To protect against condensation, a vapor barrier is laid on top. If you purchase an embossed film, then you need to lay it with the embossed side up.
The sub-floor is completed with 10 mm plywood in two layers. It is attached to the lags with self-tapping screws. Instead of plywood, you can use sheets of fiberboard or chipboard.
Ceiling insulation
Apply a layer of antiseptic to the cleaned ceiling. For thermal insulation, you can take foil mineral wool or foam. A good solution would be to use penofol - a foam material covered with aluminum foil, which is glued to PVA, and nailed on top with a crate for attaching the finishing layer of finishing - a type-setting ceiling, drywall or siding.

Styrofoam can be fixed to the ceiling using polyurethane foam.

Minvata is placed on a plasterboard false ceiling, which is fixed to a frame made of an aluminum profile or a wooden bar 40x40 mm.

If required, fix the fixtures.
Wall insulation
The waterproofing was already performed at the first stage, therefore, a vertical or horizontal lathing made of timber is immediately mounted on top of it. The distance between the bars is equal to the width of the insulating material. For walls, it is better to use expanded polystyrene or mineral wool plates.

PPP can be glued to special glue or foam, be sure to blow it out all the joints and cracks.
A vapor barrier film is fixed on top of the insulation.
Finishing work
There are many materials that can be used to decorate a balcony. This is drywall, which can be plastered or covered with wallpaper, and tiles, and vinyl siding, and lining.

Most balconies are equipped with stationary or mobile clothes dryers that can rise to the ceiling.

If the space allows, compact furniture or transforming furniture can be installed on the balcony: folding tables and seats, and some happy owners of wide balconies even equip a sleeping place. The window sill can be made wider and turned into a table top - for morning coffee or doing chores.
If you wish, you can install a fan heater on the balcony, which will allow you to use additional space in spring and autumn, or install an electric convector, which will make the balcony all-season for equipping an office or a winter garden there.

In conclusion, we suggest that you look at photos of the design finishes of the balcony space - for inspiration and a source of ideas.


Having carried out the insulation of the balcony, you can achieve 2 goals at once: to expand the living space and improve the degree of thermal insulation of the apartment. It is most correct to make external insulation, but here you cannot do without the services of industrial climbers and the corresponding costs. Insulating a balcony from the inside will be much cheaper, especially if you do it yourself.
How to insulate the balcony inside
An equally comfortable temperature inside the room and the adjacent balcony is considered a positive result of the work performed. It makes no sense to invest effort and money in insulation that does not protect against the penetration of cold onto the balcony and forcing you to tightly close the doors leading to the loggia in winter.
As a rule, for internal insulation of balconies it is used:
- foamed polystyrene with a density of 25-35 kg / m 3, otherwise - foam;
- based on basalt fiber 80-110 kg / m 3 density;
- extruded polystyrene foam (one of its varieties -).
Note! For additional thermal insulation, thin foil insulation made of polyethylene foam - Izolon or Penofol is often laid on the main layer.
In addition to the listed insulators, there is another insulating material - ecowool made from cellulose waste. Simply put - waste paper. The rules for handling it and the installation technology are the same as with basalt wool. Ecowool is not very popular due to its high cost.
Brief characteristics of heaters
Polyfoam is the cheapest material for insulation, produced in the form of plates of various thicknesses.
Like all foamed polymers, it repels moisture well and has sufficient strength (at a specified density). It is characterized by high resistance to heat transfer and flammability, which is why it requires protection from accidental sparks.
The thickness of the foam for insulation of the balcony in the northern regions should be at least 100 mm, in the southern regions 50 mm may be enough.
Unlike foam, mineral wool does not burn absolutely, but it is capable of absorbing moisture, after which its thermal conductivity rises sharply. The problem is solved with the help of protective layers made of special films, which will be discussed below.
The heat transfer resistance of the mineral wool is not too high, therefore it is pointless to use material less than 80 mm thick. Insulation is offered in rolls and plates, and at a price it will cost more than polystyrene.
Advice! Do not insulate the balcony with fiberglass wool (glass wool) intended for outdoor or roofing work. The use of such materials inside residential premises is unacceptable.
The best option for internal insulation of the balcony is extruded polystyrene foam, sold in slabs.

Expanded polystyrene is durable, lightweight and has the best thermal insulation properties.
Where you need to lay mineral wool 100 mm in thickness, 50 mm of foam is enough.
In addition, the polymer is absolutely impervious to moisture and is so durable that the plate can be screwed on with self-tapping screws if necessary. There is only one drawback - the high price of the material, which is compensated by the long service life of the material - up to 50 years.
Balcony insulation technology from the inside
It is necessary to carefully prepare for thermal insulation on the balcony. This includes not only the acquisition of materials and the preparation of tools, but also the implementation of a number of preliminary works:
- Reliable parapet device. There are 2 types of structures in practice: a welded metal frame with attachment to the wall or a masonry made of foam blocks. How to strengthen the parapet -.
- ... Sometimes the balcony is made panoramic by installing metal-plastic blocks to the full height, without a parapet. Then it will be necessary to insulate only the floors and the ceiling.
- Elimination of all cracks and leaks leading to the street, removal of excess polyurethane foam.
- pad electrical wiring for lighting, as well as drainage and highways with freon k (if any).
Before insulating the balcony inside, you need to level all surfaces by removing obvious influxes or filling up cavities and cracks with a solution.
Interior wall decoration
Do-it-yourself balcony wall insulation technology depends on the design of the parapet and the thermal insulation material used. A metal frame, finished with plastic on the outside, or, it is better to sheathe it with 2 layers of thermal insulation so that the second row of insulation overlaps all metal racks that are cold bridges. Moreover, from the outside, between the cladding and the insulation, a windproof film should be laid.
When insulating a balcony with mineral wool, it is necessary to use not an ordinary film, but a diffusion membrane as wind protection. It will let out moisture that occurs in the thickness of the cotton wool, but will not let it get wet from precipitation or fog outside. For polystyrene and polystyrene foam, the use of a membrane is not necessary, an ordinary film is also suitable.
To fasten the mineral wool, you will need to assemble an additional wooden frame made of beams with your own hands, whose width is equal to the thickness of the insulation. The step between the bars is selected according to the width of the material, the last one is inserted between them by a swath. At the last stage, the thermal insulation layer is covered with a vapor barrier film, after which the frame is sewn up with clapboard or drywall.
Ceiling sheathing
And the balcony ceiling can be insulated in 3 ways:
- If you plan to do at the end or wallpapering, then the method of gluing the slab insulation with a building mixture is suitable. Warming, accompanied by "wet" processes, is carried out only in the warm season at positive temperatures.
- For or a similar finish, you will have to attach wooden blocks to the walls and ceiling, and lay the roll or slab material between them.
- When insulating with expanded polystyrene, the plates can be directly attached to the walls and ceiling with dowels. After that, the surfaces are leveled with putty and painted, or a crate is placed by fixing the bars to the foam blocks or concrete through the insulation. Lining, plastic, drywall and other finishes to choose from are easily attached to the crate.
Note! For fastening the battens to the concrete ceiling through expanded polystyrene, it is necessary to use special screws for concrete - frame pins.
When insulating a balcony with mineral wool, a wooden frame is indispensable. Cotton wool can be glued, but it is quite difficult. The best option is to insert it between the beams attached to the wall and ceiling, protect it with a vapor barrier and revet it with a suitable material.
The method of gluing is convenient when working with polystyrene, but after 2 days it is necessary to additionally fix it with dowel-umbrellas and apply a plaster layer on the fiberglass mesh.
Video:
Floor insulation
The technology of thermal insulation of balcony floors differs from walls and ceilings, since the “cake” of insulation must bear certain dynamic loads and have a flat surface. Alignment is carried out by laying wooden logs, between which insulation is laid, and a finishing coating is laid on top. The sequence of actions is as follows:
- Cut the wooden beam into crossbars along the width of the balcony and fix them to the floor with anchors or self-tapping screws and dowels using steel corners.
- Fasten 3 longitudinal lugs to the crossbars with self-tapping screws. In the process, they must be aligned horizontally, starting from the highest point. Using the building level, the beams at the intersections with the crossbars should be raised and plastic or wooden wedges should be placed.
- Place the insulation tightly between the crossbars and the lag. In the case of mineral wool, laying a vapor barrier on top of it is mandatory.
- Install the floor covering with fixing to the joists.
It is characteristic that the length of the crossbars and the lag does not need to be adjusted to the dimensions of the balcony. It would be more correct to make them shorter by 10-20 mm, so that the ends do not rest against the walls. Wood tends to "breathe" and deform a little; with a tight fit, the floor surface can later bend into an arc.
Moreover, walking on such floors will be accompanied by an annoying creak. The resulting gaps near the walls will hide under the flooring and will not be visible.
When using slab insulation, it is worth choosing the right step of the crossbars so that you do not have to cut the slabs again. The standard width is 600 mm, and you need to be guided by it. After laying the polystyrene or expanded polystyrene, all joints and cracks must be filled with polyurethane foam.
Helpful instructional video:
Mineral wool is protected with a vapor barrier as tightly as possible so that moisture from inside the room cannot seep into it. Here, too, you can use polyethylene foam like Penofol, but pay special attention to gluing the joints.
If you seriously and scrupulously approach the procedure for the internal insulation of the balcony, then it is not at all necessary to hire craftsmen and pay them money, which is never superfluous. You will spend twice as much time to complete the work, but you will do everything efficiently and in accordance with your personal wishes. In addition, you will save money on your family budget.
Until recently, the balconies of city apartments served as a kind of storage room - there people kept preservation and various things. What is really there, on the balconies they carried out any unnecessary rubbish that it was a pity to throw away. However, today these premises are increasingly used as additional living space. And in order to realize such an idea, you need to take care of the insulation of the balcony.
If you insulate the balcony, then you will be able not only to expand the living area of the apartment relatively cheaply, but also significantly reduce the heat loss of housing. The fact is that it is through the balconies that most of the heat leaves. But for everything to be done efficiently, you need to know where to start. With a well-designed scheme, it will be much easier to turn a cold balcony into a small, but almost full-fledged room.

So, first, sketch out a rough work plan - it will include:

Important information! The balcony can be insulated both inside and outside. But in view of the fact that you will be doing the work on your own, that is, without the help of specialists, it is better to resort to internal insulation.
Stage 1. Choosing a heater
There are many thermal insulation materials on the modern construction market, but for a balcony it is more suitable:

As for the foam and EPS, the laying of these materials is carried out practically using the same technology (the only exception is the form of adhesion - in EPS it is better due to the use of grooves).
It is better not to use mineral wool for the balcony - the installation procedure will be more laborious, and condensation, which inevitably forms on the balcony, is undesirable for this material. Expanded clay, for obvious reasons, can only be used for floor insulation (insulation technology will be described in detail below).
And if to all of the above we add the fact that the balcony should in no case be overloaded, then it becomes obvious: the most suitable option is foam plastic 4-5 cm thick, which is cheaper than expanded polystyrene or mineral wool.


Stage 2. We carry out glazing
If your balcony is already glazed, you can skip this step. The glazing procedure itself largely depends on the parapet installed on the balcony. If we are talking about an iron crate, then you must build it up using foam blocks or ceramic bricks. It is important that the thickness of the walls as a result exceeds the 10 cm mark. And if you have a reinforced concrete parapet, you can immediately start installing windows.

Today, many (especially fans of environmentally friendly building materials) prefer double-glazed windows with wooden frames. It is worth remembering that such structures must be treated with an antiseptic and painted regularly. You can learn about the installation of insulating glass with wooden frames from the video below.
Video - How to install a wooden window with double-glazed windows
However, most of the consumers still buy PVC windows. When buying, choose a special plastic profile with increased rigidity and strength characteristics. In addition, the profile must have good thermal insulation properties.

Also, plastic windows should have:
- 5-chamber profile;
- 2-chamber (if you live in the middle lane) or 3-chamber (if in a more severe climate) double-glazed window;
- reinforced reinforcement.
After installation of the PVC structure ordered according to the size of the balcony (the work must be done by specialists), you can proceed directly to the insulation.
Stage 3. We insulate the floor
Consider how to insulate a balcony from the inside with your own hands using polystyrene foam (although the technology described below is also suitable for expanded polystyrene).
Table. Insulation of the floor on the balcony
| Steps, no. | Short description | Illustration |
|---|---|---|
| Step # 1 | First, prepare the work surfaces - seal all the cracks found in the concrete, as well as at the joints between the slabs and the wall, with polyurethane foam. |
|
| Step # 2 | Mark the floor for the subsequent construction of the lathing. In this case, it is important that the pitch of the lathing exceeds the width of the insulation sheets by about 10 mm. |
|
| Step # 3 | According to the previously made markings, lay the slats (the approximate size of the bars is 4x4 cm, however, it is necessary that their width corresponds to the thickness of the insulation material). The first and last slats should retreat from the walls by 50-100 mm. Connect the rails with self-tapping screws. |
|
| Step # 4 | Place foam sheets between the battens of the battens, gluing them to the floor with liquid nails or special glue. Blow out all the resulting voids with polyurethane foam. |
|
| Step # 5 | Lay on top of the insulation On top of the insulation, lay a vapor barrier layer (necessary to increase thermal insulation and prevent condensation). If you are using regular PET film, never place it on the “cold” side of the insulator. If you are installing foil insulation, use the foil to the foam. |
|
| Step 6 | Fasten plywood or chipboard on top, with the floor covering at least 20 mm thick. Attach the sheets to the slats with self-tapping screws. |
|
| Step 7 | It remains only to lay the topcoat, which you can use as carpet or linoleum. |
|


Important information! There is another way to insulate the floor on the balcony with foam: sheets of foam are attached to the leveled and cleaned surface, and a thin screed is poured from a previously prepared solution of a dry mixture on top. Ceramic tiles can be used here as a topcoat.
Alternative option. We use expanded clay
As noted earlier, the floor on the balcony can also be insulated with expanded clay. This material is also inexpensive, and its installation is not difficult. Let's get acquainted with the algorithm of actions.
Step # 1. First, lay a waterproofing film on the floor with an exit to the walls of 10 cm.

Step # 2. Place the beacons around the perimeter in increments of about 25 cm, while being careful not to lean them too much against the walls.
Step # 3. Fill the floor with a layer of expanded clay 15 cm thick, distribute the material evenly over the surface.


Step # 4. Moisten expanded clay with cement "milk" (this is a water solution of cement).


Step # 5. Pour the expanded clay with a layer of concrete or self-leveling mixture. This must be done carefully so as not to damage the structure of the insulator.

Step 6. Wait until the screed is completely dry. Then you can start laying the topcoat.

Stage 4. We insulate the walls
The technology here is practically the same as for floor insulation. Follow the steps below.
Step # 1. Mark the future location of the slats on the walls (as for the floor).
Step # 2. Attach the strips according to the given markings.

Step # 3. Apply polyurethane foam to the surface in a wave-like motion. At the same stage, holes for the dowels should be drilled.
Step # 4... Attach the Styrofoam sheets using plastic mushroom plugs.

Step # 5... Blow out all the cracks formed with polyurethane foam, and then glue it with polyurethane tape.
Step 6... Lay a waterproofing layer on top - for example, penofol, which will also serve as thermal insulation at the same time.


Step 7... Cover the seams at the joints with foil tape.
Step 8. Mount the counter grill over the foam foam and install the finishing material.

Stage 5. We insulate the ceiling
This procedure is also performed using a similar technology, however, some differences still take place.
- First, make the markings along which the hangers for attaching the guides will be installed.
- Install the hangers themselves, necessary for fixing the guides (in the role of the latter, use a galvanized profile or timber).


- In the appropriate places, cut out small holes in the insulator (foam or EPS) for the hangers.


- Next, fix the insulation plates using the same polyurethane foam.

If the insulation weighs too much, then you can use dowels for fastening. Blow out the cracks with foam. Otherwise, there are no significant differences.

Finishing features
In most cases, balconies are lined from the inside with clapboard or profile, but drywall is also used, followed by wallpapering. PVC panels are also used for cladding. As for the exterior decoration, it is better to entrust it to professionals, especially if your apartment is located higher than on the ground floor.


Important information! It is forbidden to carry out central heating there, so if additional heating is required, you can lay a film "warm floor" under the linoleum.
You can also install an outlet on the balcony to which an electric heater will be connected. The described room is small, so heating will take a minimum of time. Note also that a glass unit weighs a lot, so the rest of the materials (including the insulator itself) should be with a minimum weight. By the way, this is another reason why it is better to give preference to EPS or foam plates.

Video - Balcony Insulation Instructions
Now you know about the strengths and weaknesses of materials suitable for insulating a balcony, as well as about the technologies for laying foam and expanded clay. Therefore, it's time to start working directly! Moreover, there is nothing complicated here if you are armed with step-by-step instructions and all the necessary materials. If you do everything right, then turn the balcony into a full-fledged living room with all the ensuing advantages.