Barbecue - this word has many meanings: a leisure event, a recipe for cooking meat, a sauce for meat, the meat itself, cooked at a high temperature, but they all boil down to one thing - the result should be meat cooked over an open fire or hot coals. If there should be an open fire, it means that this meat will be cooked in nature, that is, the very name "barbecue" implies relaxation - in the country, in nature, in your own garden. Today we will talk about how to build a brick brazier with your own hands.
What is barbecue and its benefits
Such a furnace is a stationary device, since it is built of bricks. Although you can find portable options made of metal elements and parts, there is no doubt that a brick barbecue oven has many advantages, since:
- Externally, a brick barbecue grill looks impressive and complex, but in fact, the design is so simple that even a non-professional can make such a barbecue. And to make it clearer for you how to equip a barbecue oven with your own hands, we will give drawings and practical recommendations in the article below;
- The functionality of a stationary barbecue is much higher: you can cook barbecue meat, fry barbecue, cook grilled meat and steak, bake flour products, cook meat or fish on an open or closed fire (bake), you can dry fruits, bake vegetables, smoke and dry various products, including mushrooms, etc .;
- A brick brazier is built with a capital rear wall, its purpose is a uniform redistribution of temperature from burning coals throughout the chamber, as well as long-term preservation of heat in it;
- The presence of a chimney frees the cooking area from smoke;
- Since firewood or coal burns in a brick firebox, and not on a steel pallet, as in a portable grill, the combustion zone becomes safer, and the street stove itself lasts much longer;
- The brick structure retains heat for a very long time, which means that for one kindling and using a barbecue, you can cook several dishes according to different recipes $
- If you build a barbecue in a country or garden house, then it will be possible not only to cook food, but also to heat the room.

Options, schemes and projects of barbecue ovens exist in a huge number, but structurally they are divided into the following subgroups:
- Brazier with a grill or grill spit, with an enlarged open firebox, which can also serve as a fireplace in a gazebo or house;
- A brazier (oven or oven) similar to a Russian stove, in which you can bake meat, fish, vegetables, or bake bread and pies;
- Barbecue grill;
- Recessed niche for pots, cauldrons, boiler;
- Smoking smoke chamber;
- Standard hob;
- Various combinations of all these options.

The simplest barbecue oven
This is a U-shaped structure made of red refractory bricks with a height of at least 100 cm (see the figure below). Such an oven, like other stationary barbecue structures, is built on a strong concrete foundation.
At a height of 0.75 m from the level of the foundation, there are side brick steps - the bricks are laid perpendicular to the main masonry, and they are needed to install a pallet for igniting and burning fuel. Above, metal guide rods are inserted into the brick wall (into pre-drilled holes), which serve to change the height of the pallet in order to maintain a constant and optimal temperature regime for cooking meat or other products.
The combustion and cooking chamber is located in a kind of brick casing, which is formed by the side and rear walls of the barbecue, and serves to protect from the wind, as well as to accumulate and preserve heat. This barbecue scheme does not have a smoke channel and an upper closed roof, which in other schemes increase the furnace's economy and its efficiency. 
The fuel combustion zone must be equipped with refractory bricks and fire-resistant cement mortar mixed with cleaned sand in proportions of 1: 3. You can also use clay in proportions 1: 3: 3 (cement - sand - clay). The walls of a barbecue grill are laid out of ordinary red or facing bricks. By attaching additional work surfaces, shelves and niches to such a simple barbecue, you can significantly expand the functionality of the structure. 
Brick BBQ Drawings
Dimensions, construction and exterior of a brick barbecue depend mainly on the characteristics of the landscape of the site. Starting from the average height of a person during construction, the lattice and the work surface are equipped at a height of 9-10 bricks. All additional structures and devices must be made removable. A standard barbecue is shown in the drawing - its dimensions are 1500 x 7500 mm, the detailed ordering allows you to start construction immediately after the procurement of building materials. If this drawing is too large or small, you can scale it while maintaining proportions.

To build a brick barbecue, you need to prepare fireclay and facing bricks, as well as bulk materials for two types of mortar: clay mortar for the combustion chamber, and cement-sand mortar for the side and rear walls. You will also need:
- For the construction of the foundation - crushed stone, sand, cement, reinforcement, formwork material;
- Sheet metal for the combustion chamber and oven;
- Iron doors for the combustion chamber and ash chamber, chimney door (valve), cast iron grate or grate, cast iron hob;
- Metal corner or reinforcement rods for the construction of vault floors, hob and other horizontal floors;
- Multi-layer plywood for the arch, roofing felt or roofing felt;
- Concrete mixer or large container for mixing the solution by hand;
- Grinder and discs: for cutting bricks and metal;
- Furnace and rubber (wooden) hammer, trowel, trowel, spatulas of different sizes, level and plumb;
- Trench tool, wooden rammer, mortar buckets, construction cord and stakes for marking the foundation.

The construction of the foundation begins with digging a trench with a depth of 0.4-0.5 m with arrangement at the bottom of a sand-crushed stone pillow, which is moistened and tamped. A wooden removable formwork is mounted, into which the simplest reinforcing cage or mesh is laid: the rules for making the frame are the same as when building a foundation for a house.
Cement-sand mortar is prepared from bulk materials in proportions: 1 part of cement, three parts of sand, four parts of crushed stone or gravel and four parts of water. After pouring the solution, it must be covered with polyethylene or roofing felt, and left for a week until the strength gains. After 7 days, the foundation is opened, the surface is covered with a layer of waterproofing (or coated with hot tar) along the width of the tape, and the laying of the first row of bricks begins.
Hot zones are laid out of fireclay bricks on clay-sand mortar, the rest of the rows - with ordinary bricks and mortar. All bricks must be soaked in water for 24 hours before laying.
First, a niche for fuel is displayed with a shift of the next row relative to the previous one by half a brick. The height of the furnace is 28 bricks, the chimney goes above. According to the given order, the laying passes quickly and without delays, since the scheme for each row is fully operational. In order for the oven to give a minimum shrinkage, a 48-hour break is made every 6-8 rows.
From the first to the eighth row, a fuel compartment is built, in which you can also store kitchen utensils. 
Ceilings for niche vaults are built after the eighth row. After the ninth row, steel lintels are built in. 
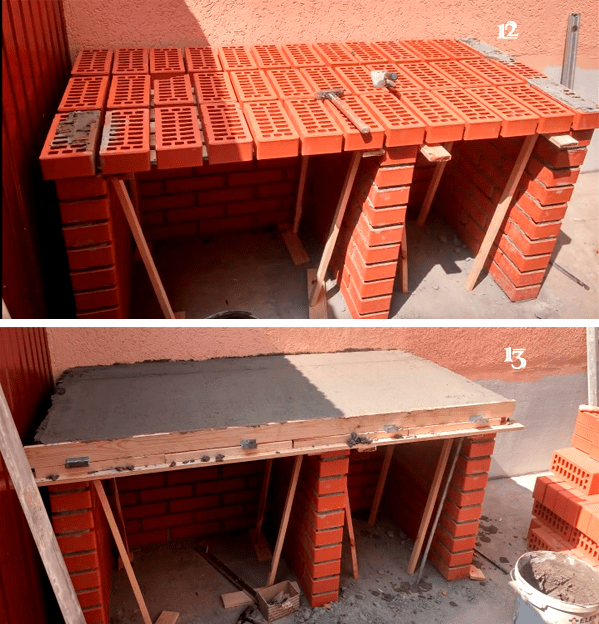
By laying out the next two rows (10 and 11), an overlap and a pedestal are formed, iron corners or channels are built in for mounting the table top. 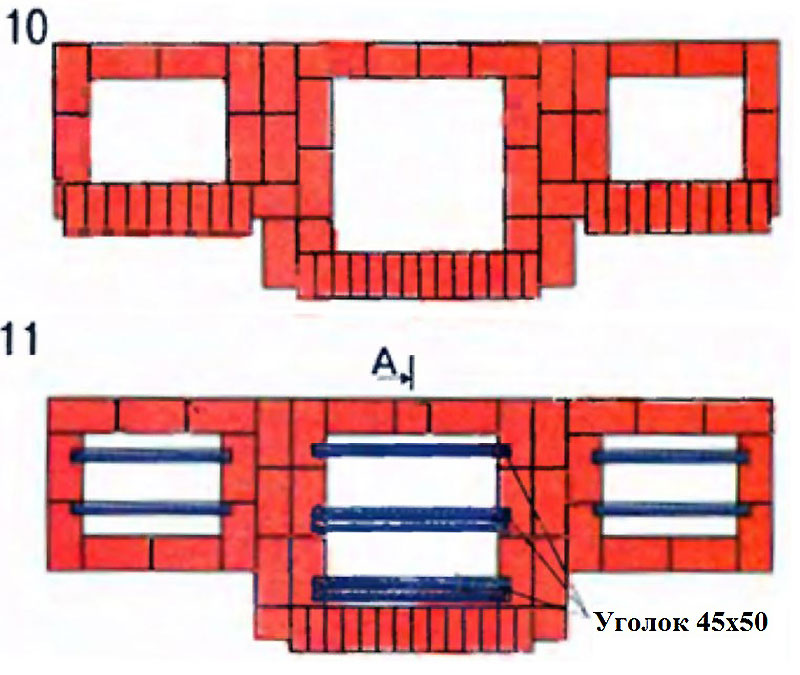 Firebox
For arranging a semicircular vault, a plywood template is used. 
The subsequent rows must be narrowed - from 15 to 24 rows to complete the volume of the combustion chamber. The twenty-fourth row is released by ¼ to separate the border of the firebox from the chimney. The same detail serves as a decoration, as well as the issue on the 12th row. 
The place on the site is of great importance - the smoking barbecue should not interfere with either the residents or the neighbors, the barbecue must be protected at least by trees from the wind, sun and rain, so the choice of building materials and, accordingly, construction tools depends on the place. Here are some simple rules:
- There should be an optimal minimum distance between the house and the barbecue, since you will have to walk a lot while cooking;
- There should be no tall vegetation around the barbecue;
- The smoke from the stove should leave the house, and not go to the house;
- It is advisable to select the exterior of the barbecue in accordance with the design of the housing and the site;
- It is recommended to build a small oven in a small area, and vice versa;
- A bulky brick brazier with several working areas is installed on a concrete foundation.
So, you want to make a brick barbecue on your site. Drawings and photographs of this device will help you choose your contractor, since you will imagine exactly what you need.
And they will certainly help you if you decide to make a brick barbecue with your own hands. In this case, drawings and photographs are simply necessary for you. Only they will give you the opportunity to see the end result of your actions.
How to choose a brick barbecue
Well, you decided that there should be a brick barbecue in your next to the house. To choose a master who will lay down this structure for you, you must imagine in advance the option that will stand for you.

After all, when ordering, you need to show the master at least a sketch / sketch so that he can imagine the amount of work. And accordingly I was able to assign you a price.
And for this, you just need photos and diagrams that you can use here.
How to make a brick barbecue with your own hands
Some of the brick barbecues, drawings and photographs of which are presented on this page, were made by their owners. In general, all these devices for frying meat and fish could have been made by their owners.

After all, laying out a stove / grill of this type is quite simple. It is enough to look at the barbecue orders for the simplest options, and you will understand what I mean.
The simplest options are laid out in half a brick and have a simple geometry. This means that even a beginner who has never held a trowel or spatula in his hands will be able to lay out such a barbecue from a brick.
Barbecue laying procedure
To lay out a normal oven for frying meat outdoors, you need to look at the orders and just follow the steps here in this instruction:
- We fill the foundation for the future oven. A thickness of 10-12 cm and the use of a reinforcing mesh is enough. The thickness depends, of course, on the size of the barbecue.
- We lay out sequentially, according to the order, the rows of bricks. Brick works best.
- We mount the work surface. It is better to choose a cast iron option for a garden barbecue, especially if the barbecue is under a roof.
- Next, lay out a brick chimney or use a metal version of the chimney.

Order number 1. Large barbecue.

Order number 2. Combined barbecue with a place for a cauldron.

Order number 3. The simplest barbecue.
After the solution has hardened, two preliminary heating should be done. Then you can use this wonderful outdoor oven for its intended purpose.
Brick BBQ - photo gallery
And here are some photos of how you can arrange a brick barbecue in the yard of your own house.


You have a summer residence. You want to make it not only beautiful, but also convenient and comfortable for your family and friends to relax. And so that everything is not very expensive. Not sure where to start? Braziers and barbecues for a summer cottage made of bricks made with your own hands from a photo are an ideal start for arranging a summer cottage. We assure you that after reading this article and looking at the drawings, you will build an ideal barbecue on your site, on which you will then cook delicious and healthy food.
Step-by-step guide to preparing and building a DIY brick barbecue
Preliminary work (layout and drawings)
Before you build a brick brazier, you need to carefully consider what it will be. We recommend paying attention to the following points:


When you decide what kind of barbecue you want to make, draw up detailed drawings with exact dimensions. Thanks to them, you will not only be able to correctly build the structure itself, but also calculate the amount of required materials.
Choosing a place for the barbecue
Brick barbecue grills can be located anywhere in the summer cottage - in the garden, in the gazebo, on the terrace - if only it is convenient. But we advise you to consider the following recommendations:
- The first and most important point is fire safety! Do not build garden barbecues near wooden buildings, dry trees and bushes.
- There should be no playground nearby.
- It is convenient if the stove and the brick wall of the summer kitchen are located nearby, so as not to run far for groceries and everything else.
If the project provides for a sink, build a water supply nearby.
In order for the future brazier to stand well and firmly for many years, make its base as reliable and stable as possible. The dimensions and strength of the foundation depend on the dimensions of the planned structure. In any case, the area of the foundation should be about 50 cm larger than the barbecue on each side.

After two weeks (if the heat is less possible), when everything has solidified well, you can start building a barbecue with your own hands.
Choosing a brick for a barbecue
Here again we should remember about fire safety. If the barbecue is indoors, you should take a special refractory fireclay brick, it contains a lot of clay, due to which it withstands high temperatures well and quickly warms up the room.

Types of bricks used to build a barbecue
If the future construction is planned for the street, then professionals do not recommend doing everything from fireclay bricks, since it does not like moisture. It is better to take solid ceramic brick M200 or facing. The inner part of the firebox itself will be laid out of fireclay bricks.
If desired, at the final stage of the construction of the barbecue, its decorative finish is made.
Preparing the solution
For cladding, a cement-sand mixture is needed, and for the masonry of the furnace itself, a clay-sand mixture with the addition of a small amount of cement for strength. You can take a ready-made oven mix and prepare it according to the instructions.
To make your own clay mortar, you will need:
- red clay;
- sand;
- cement;
- water.
The clay is filled with water and left for 5-6 days. Then it is thoroughly mixed, a little sand and cement are added (a glass of 400 cement per bucket) and mixed again. The mixture is ready to use.
After the foundation has hardened, before construction, you need to put two layers of roofing material on it for waterproofing. This is done so that the brick pulls less moisture from the base, this will extend its service life.
Then we determine the position of the wall, apply the mortar and begin to build a brazier out of bricks with our own hands.
Be sure to check everything with a level so that the masonry is even, as this will affect the quality of the stove in the future.
Bricklaying of a simple barbecue (ordering)
To build such a brazier, carefully consider the scheme according to which the step-by-step laying is done, the so-called order. 

The so-called masonry is carried out in a half-brick: each odd row (1,3, etc.) begins with a whole, and each even (2, 4, etc.) from a half. This is done for a bunch of bricks. 

On top of the 4th row we lay an overlap, on which you can then put the dishes. 

On the 8th row, you need to put 4 thick-walled corners, as shown in the figure. Lay the 9th row on the corners.
In the 10th row, all the beauty of this barbecue is “piano keys”. They can be cut with a grinder from white fireclay and red facing bricks.
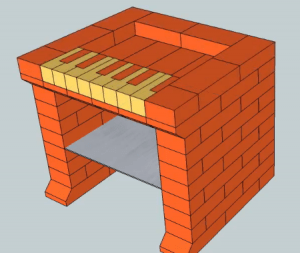
The last 2 rows - and the grill is ready. Please note that the 11th and 12th rows use longitudinal brick halves.


Skewers and a grate will then lay on them.

View from all sides
This is how our brick brazier-piano looks from different sides.

Option 1 - drawing with dimensions (click to enlarge)
The final result with dimensions.

Option 2, improved - dimensional drawing (click to enlarge)
Another option for a brazier is a piano. It is wider and the back wall is erected from the very bottom. Watch the video for the masonry process for this option.
This was the most, which is easy to build on your own, even without experience in this area.
DIY brick barbecue - step by step construction with real photos
Consider another, more complicated option - how to make a do-it-yourself barbecue out of bricks, which includes two lower compartments for firewood, dishes and other little things, a combustion chamber, a countertop and a chimney at the top.
For the construction of the structure itself, in this case, facing bricks were used, and refractory bricks for the inside of the furnace.
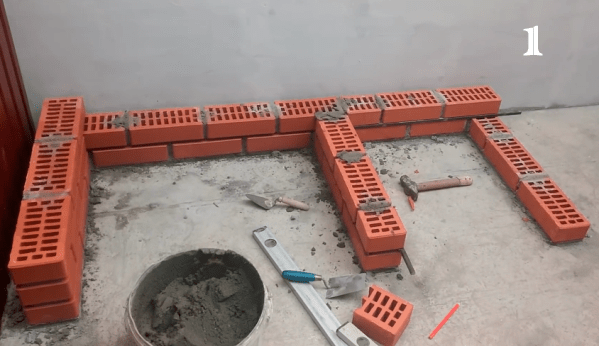
Initial stage of construction
We start laying in the same way as described above. The lower part will be in the form of the letter "W", only the compartments are different in width. What will be wider for firewood will have a firebox and chimney above it. The second is for dishes and other utensils, at the top there will be a countertop.

We make even seams between the rows
So that there is an identical and even seam everywhere between the bricks, a metal bar is used here when laying, in the section of which a square with a side of 12 mm. But we advise you to take thinner - 5-10 mm will be enough. Also, you constantly need to control the level of verticality and horizontality of the masonry.

Bricklaying process
The plank is placed on the edge, as shown in photo 4, then carefully covered with a solution. On the side where the plank was put, we put the mixture on a par with it, on the other a little more, with a slide. We lay the brick, from the side of the plank we hold it with our hand, and on the other, slightly tapping with a hammer, we level it under the level. When the solution dries up a little, we remove the bar.
In order for the masonry process to move faster, there should be several planks, as they are needed for each row.

Laying out the bottom - the first 10 rows
According to this principle, 10 rows are laid out.
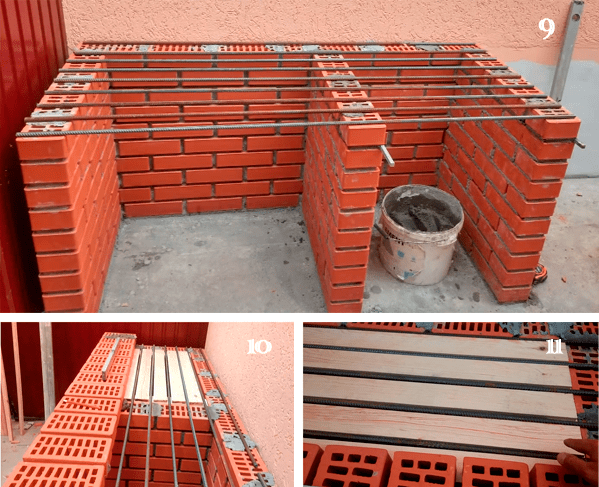
Preparing the base for the firebox and countertops
Next, there will be a firebox and a tabletop. On the 10th row we put reinforcement with a diameter of 12 mm. The distance between the rods is 70 mm. Formwork is placed between the reinforcement so that the mixture does not fall down when the joints between the bricks are filled.
Professional advice: it is better to take metal corners, since there is a possibility that the reinforcement will bend under the weight.
We spread the brick and fill it with mortar
Bricks are laid out at the same distance from each other over the entire area. Those that fall on the previously erected walls are put on the mortar, the rest are simply on the formwork. Then the gaps between the bricks and the surface are filled with mortar.

We form the combustion chamber and vault
After drying, the firebox is erected - 8 rows are laid out vertically. Further, the back part, which is located near the wall, is also being erected, and the other three sides taper upwards on a half-brick. So 9 more rows are laid out.

We build a chimney
The next stage is the chimney. In this case, 20 rows are lined with bricks, and at the top there is a stainless chimney. A high chimney is needed so that the smoke does not interfere with you or your neighbors, and the draft is better.
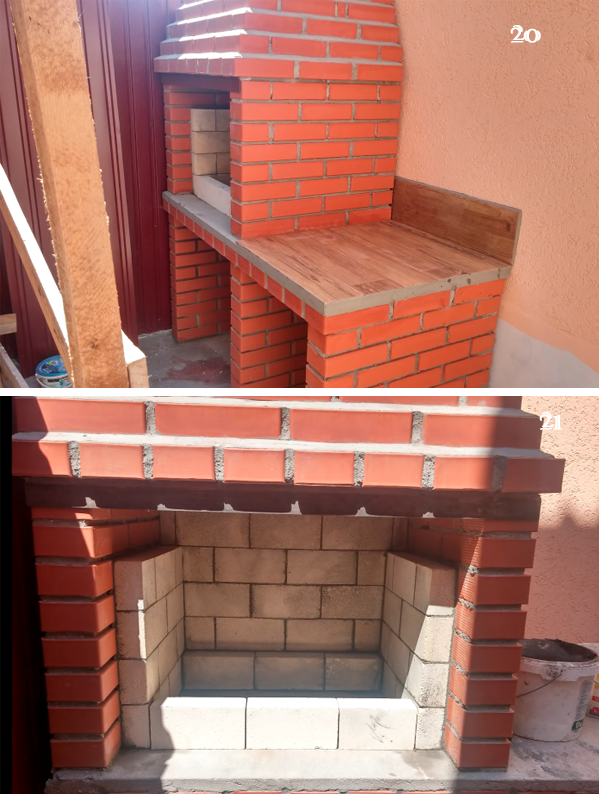
The last stage of construction - we finish the countertop and firebox
And the final touches - the table top is laid out with tiles, and the inside of the firebox - with refractory bricks.
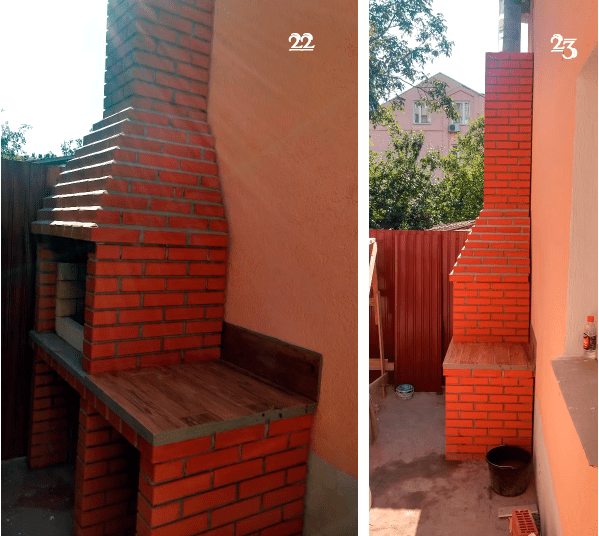
Final result
After a few days to dry completely, the barbecue is ready to use.
We recommend watching a video where there is the whole process of laying a garden brick oven.
Below in the gallery you can see more photos of barbecues and barbecues for a summer residence made of bricks with your own hands, and choose the one that is suitable in style, functionality and location for your site.

 In the gazebo
  On the terrace
  With hob
  Outside
  With built-in smokehouse
There is no fundamental difference between barbecues and barbecues, except that the first meal is cooked on skewers, and the second — on a wire rack. Both can be done on one structure, the construction of which will be discussed.
Often, a summer cottage barbecue is a simple outdoor building in the open air. A brick barbecue is a more sophisticated device that can be located in a summer kitchen, gazebo or outside, but it already has a chimney and in most cases a cover to protect it from rain and snow.
A temporary brick cooking device is a great summer option
If you do not plan to visit the country in winter, then a barbecue or grill made of bricks without mortar is perfect for this purpose. In the spring it can be folded quickly and easily, and dismantled for the winter.

Masonry scheme without mortar
Here is a diagram and step-by-step instructions that show how to make such barbecues and barbecues from bricks.
If the barbecue is planned to be small (9-10 rows of bricks), you can simply level and tamp the ground well. For a larger structure, it is better to fill the foundation.
We begin to lay out bricks according to the same principle as in the previous versions, but in a circle and with gaps of about 50 mm.
On top of the 5th row, we lay a steel sheet, which will serve as a pallet for coal.
Place 2 more rows and place the cooking grate. Then 2 more rows for wind protection.
To build such a round barbecue bricks, you need a little more than 100 pieces.
This is one example of a temporary barbecue, you can change it at your own discretion. Or choose yourself and build one of the options presented below in the photo.


Before proceeding with the construction of a brick barbecue with your own hands, you should make drawings and calculate with their help the amount of necessary building materials. In this case, the scheme must be created independently, since there are no universal barbecue designs.
Drawing up an action plan
During construction, you must follow the general guidelines that apply to all types of barbecue:
- the grill should be at least 70-80 cm, taking into account the growth of the owner;
- the stove is traditionally located 10 cm below the grill level;
- a niche for firewood and cabinets, a hook for tongs should be provided.
In this case, it is necessary to take into account all the small details so that later it is convenient to use the structure. When the drawings are ready, you should make a calculation, draw up an action plan and prepare a list of building materials (including for the foundation).
The list of materials for the main work should contain:
- fireclay and facing bricks;
- clay and ordinary mortar;
- metal bar d-30 mm;
- steel sheet 5 mm;
- doors for the firebox and blower;
- grate.
And for arranging the base:
- building mixture;
- reinforcing bars;
- boards for the construction of formwork;
- crushed stone and sand.
The construction of the furnace takes place on a slab base, the frame is erected from fireclay bricks. After which it is revetted with stone. Granite, sandstone, dolomite, rubble stone are suitable. You can show your imagination and give the fireplace any fancy shape.

Why brick?
Very often, barbecues and barbecues for a summer residence are created from scrap materials: barrels and, a little less often, you can see welded structures (from the simplest to artistic casting). Much less often they make a barbecue out of bricks with their own hands. Many are convinced that they are practically no different from portable designs.
But the heat distribution scheme in brick structures is completely different. The heat from the coals in open barbecues is directed upward, making only one side of the meat heat-treated. Therefore, during processing, it is necessary to periodically turn the product to the other side to ensure its even frying.
The brick structure of the barbecue acts like an oven, only without a door. Heat, reflected from its inner surface, acts simultaneously on the entire surface of the product, ensuring its uniform processing.
This significantly improves the taste of the dishes, making them more juicy and tender.
In this regard, the following advantages of a brick barbecue compared to a metal barbecue can be noted:
- uniform processing of food;
- the ability to build complex structures with an additional hob, smokehouse, grill and sink;
- barbecue can be made one of the most attractive parts of the site.
How to make a garden barbecue
Like any other structure, a barbecue for a summer cottage is being built on a foundation. The pavilion must harmoniously fit into the design of the site. Since such a pavilion is to be used all year round, it is better to build a garden type of hearth.

The device of the fireplace must comply with the basics of safety, a pipe should be brought out to the roof. The construction of such a structure has a rather complicated technology. Externally and functionally, it is a fireplace that is used to decorate the interior of a summer cottage.
Thematic material:
A gazebo or a pavilion with a fireplace can be stylized as a fabulous hut for receiving guests, or equipped as a summer house with kitchen utensils, dining furniture, a sofa and a TV. If the barbecue is located in a pavilion, it is better to entrust its construction to specialists, but if you have a little experience, you can try to build it yourself.
The basis of the elementary construction of a barbecue is a quadrangular frame, coal is placed in it, over which a grate is placed. It is advisable to make such a structure as a fireplace multifunctional: at the bottom, build a firebox, above it - a crockery shelf, above - the barbecue itself, and a smokehouse can be located above it.
In this case, the building will be multi-storey. It is necessary to decide what should be the design of the future fireplace for a summer residence, and then make drawings and outline a construction plan.
Barbecue options
Considering brick barbecue projects, sometimes there is a desire to supplement the drawings with their own elements in accordance with personal preferences. Some future owners, when building a brick barbecue with their own hands, equip it with an additional barbecue and stove.
Barbecues can be quite varied:
- barbecue fireplace;
- barbecue grill;
- multifunctional building;
- barbecue with one hearth;
- barbecue with barbecue and cauldron;
Additional accessories for such ovens are very diverse. For example, oven, spit, tandoor, cauldron and others. Among the complex structures are hand-made and prefabricated.

An interesting idea is the complex. Stationary structures can be built as a three-story structure. Semi-finished products are placed in the chamber on grates or suspended. For cold smoking, a brazier with coals and a baking sheet with chips are placed inside the chamber, and for hot smoking, logs of the corresponding types of wood are placed in the firebox.
Such a smokehouse has only one drawback: it strongly absorbs odors. Therefore, if you process the meat after the fish, then it will acquire a specific smell, and sometimes even a smack. In this case, it is better to make this device out of iron.
Building a brick barbecue
The positive aspects of installing a barbecue oven lie in its decorative appearance and functionality. It is better to install such a structure not outdoors, but in a pavilion or summer kitchen.

Consider a step-by-step plan for building a barbecue for a summer residence.
Step 1: Arrangement of the foundation
Initially, a place for the construction is selected. When placing a barbecue in a facility, it is necessary to prepare a foundation for it. Together with it, a base is made for a barbecue oven, it is similar to a slab foundation.
The pit is made 0.3 m larger than the dimensions of the structure, and about a meter deep. The formwork is installed and a sand-gravel "cushion" is laid on its bottom. It is covered with the first layer of mortar (0.2 m), and then steel rods are laid like a lattice. From the end of the pouring to the complete solidification of the solution, 1-3 weeks should pass.
Step 2: preparation
Before starting construction, you should choose building materials for construction. It should be remembered that for the construction of a furnace, two types of bricks are needed: the main refractory brick and for cladding. At the same time, in the area of the firebox, only fireclay bricks, resistant to high temperatures, are laid, which also has excellent heat-saving qualities and long-term heat transfer. And as an exterior finish, a standard refractory brick grade is permissible.
Step 3: erection
In the construction of the structure, an ordering scheme is used (see below). It takes into account the usual brick sizes - 230 * 114 * 65. For a firebox and a stove, laying bricks should be carried out only on clay mortar, and in places that are not in direct contact with fire, the usual one is allowed for use.
For pre-mixed fireclay mortar, red clay, cement, sand and water are required.
Step 4: Firing
After the construction of the stove, firewood or coal is laid in the firebox and brazier, and then set on fire. This is necessary for firing the inner surface of the furnace walls. The heat is brought to the maximum possible.
This is one of the most functional summer cottages. For small areas, a simplified scheme is suitable. When choosing the type of garden barbecue, one must take into account all its parameters: functionality, size, location in the summer cottage. For the convenience and durability of the structure, it will be advisable to build a gazebo or pavilion.
Step 5: drying
After heating the oven, drying is the next step. It should be carried out in the summer with clear weather - at least 5 days, and in the fall with cloudy weather - up to 20 days. In this case, it should be covered with a protective film against possible rain.
The final stage will be decorating the stove. It is necessary to free the bricks from excess mortar, apply paint in the right places to highlight the seams. After that, the barbecue oven is completely ready for use as intended.
A brick barbecue grill is a stationary building where barbecue, vegetables, fish and other food are prepared in the open air. Cooking takes place with hot smoke and heat from an open fire.
Unlike collapsible metal structures, brick brazier is a solid construction that has been used for years. It can serve as an alternative to the stove and smokehouse. On a suburban area, it can also be an original decoration of the territory.
We will tell you how do-it-yourself brick barbecues are built (drawings, photos, orders at the end of the article).
How to make a brazier out of bricks in the country

Have you decided to build an outdoor brick brazier with your own hands? Photos of barbecue designs, schemes, orders are huge. How to choose the right option?
There are home-made barbecues made of bricks with and without a roof. A garden brazier without a roof is a brazier of various heights.
A simple design that does not require special costs and efforts during construction, but in the rain it will not work to use the barbecue.
The presence of a roof implies the presence of a chimney, which is covered with a visor from precipitation. This grill looks like a fireplace.
Indoor barbecues are solid street structures, often they are completed additional elements. It could be grill grate, oven-oven, cauldron... A brazier with a place for a cauldron can be used for cooking pilaf or to reheat food. If the cauldron is removed, a full-fledged brazier remains. If the hole for the cauldron is closed with rings, you can put any dishes on them, like on a stove. The design can be supplemented niches for firewood, coal and utensils.
What elements will be included and how to make a summer cottage barbecue out of bricks so that it suits you are determined at the design stage, based on the planned dimensions, how much food will be cooked in the barbecue simultaneously, and what types of food will be cooked on it.
We design a brick brazier
Ordering a building is an expensive pleasure, but with minimal masonry skills, you can freely build a brazier out of bricks with your own hands. What elements are needed (cauldron, a place for heating food, a grill, a smokehouse) - should be thought out in advance. There are many drawings. Below is an example of building a simple closed barbecue with a pipe.
ATTENTION! We strongly recommend that you take your design seriously. Many summer residents build brick barbecues with their own hands, while they do not use drawings. As a result, the structure, at best, turns into a flower bed. Since it is impossible to use a homemade brick brazier for its intended purpose. Inconvenient.
When choosing or drawing up a project, one should proceed from the dimensions of the future building. They depend on plot size... It is worth remembering that the land occupied by barbecue for other purposes will no longer be used... The size of the firebox will depend on how much food is cooked in the grill at the same time.
Projects of brick braziers: drawings, photos
Peculiarities: the length of the firebox should not exceed 1 m - this is enough for 8-10 skewers at a time. The width should be consistent with the length of a standard skewer - 47-62 cm. Ideally, the height of the frying platform is just above the waist of the person who will be cooking.
Since a stationary barbecue often becomes the central decorative element of the site, this should be taken into account when designing and choosing a location. Its reverse side looks like a solid brick wall, so it is advisable to position the structure so that from the reverse side it was not visible... Or provide for its decoration taking into account fire safety.

Choosing a place for the barbecue
A place for a barbecue is also a place to rest. Nobody wants to build a stationary brick brazier with their own hands so that they are not convenient to use. When choosing where to place it, be sure to take into account a number of points:
- proximity to the resting place- not far from the gazebo, summer kitchen or shed with benches and a table;
- flat ground specially equipped;
- obligatory comfortable approach, ideally - several;
- proximity to water source(often a water supply is brought to the brazier and a sink is equipped. In this case, you will have to drain the water from the system for the winter to avoid cracking the pipes);
- protection from atmospheric precipitation(canopy), sometimes they equip a brazier and a resting place under one canopy;
- sufficient distance from trees, flower beds and beds- the plants will dry out from the high temperature and may die;
- sufficient distance from waste containers and toilets;
- Direction of the wind(if it is unchanged, place the brazier so that the smoke is blown away not towards the dwelling, but towards the wasteland).
Important! Brazier is a fire hazardous facility. It should be placed in the garden far enough away from the house, flammable wooden buildings, and the area for cars.
Tools and materials

Before you build a brick brazier in the country, you need to use a ready-made or pre-prepared project calculate yourself required amount of materials.
This is necessary in order not to face their shortage or, on the contrary, excessive remaining surpluses. Based on the quantities of material calculated for the project, an estimate is made.
The calculation is done so that the material is with a small margin. Of the tools you will need:
- shovel;
- trough or a concrete mixer;
- buckets for solution;
- Master OK;
- level, plumb line;
- circular saw but.
- fireclay (oven) brick that can withstand temperature changes without cracking;
Expendable materials:
- foundation material(rubble stone, cement, sand, crushed stone, boards or smooth plywood for formwork);
- reinforcement mesh;
- iron sheet;
- metal grilles, latches, corners, doors.
If the grill is designed with niches and a work area, you will additionally need stone countertop. As a masonry mortar, a mixture of clay and sand is usually taken, at least for the firebox.
The cement mortar will quickly collapse and crack when exposed to high temperatures (it can reach 1000 ° C in the furnace) and temperature extremes. soak for a few days. Clay and building mixtures with it are offered in hardware stores.
Reference: refractory material is required for laying out a firebox that is in direct contact with fire. In order to save money for the construction of a basement and elements that are not exposed to an open flame and high temperatures, you can take an ordinary brick - incl. remaining from the parsing of any structures, cleaned from the remnants of the solution.
You will also be interested in:
A simple brick brazier with your own hands: step by step instructions
As an example, step by step, in the "do it yourself" format, we will analyze how to build a brazier with your own hands from bricks, the simplest option. The only complication that our simple brick brazier will have (photo of the proposed option below) is a pipe. We consider pipe laying as necessary in Russian conditions. We are building! Further, the construction diagram.

The foundation for the barbecue
The first stage of construction is pouring the foundation. A hole is dug for him deep 30 cm and a size that is 20-30 cm exceeds the size of the future structure. The walls and the bottom are leveled, tamped. A sand and gravel pillow is laid on the bottom. Layers are laid in turn, each subsequent one must be moistened and compacted. Pillow thickness - 15 cm.
Before pouring, the formwork is installed, protruding above the ground by 10 cm... At the bottom of the pit is laid reinforcement mesh and poured with cement mortar. At the final stage, the foundation should be leveled with level... Complete hardening of concrete occurs 3-4 weeks, i.e. before further construction, you should wait 28 days... For uniform adhesion in hot dry weather, the concrete surface should be periodically moistened.
Clay is diluted with sand in the ratio 1:1 ... The consistency of the solution should be like thick sour cream. He should easily take it with his hands, without spreading. If a small amount of clay mortar with sand easily rolls into a rope with a diameter 1 cm, without cracking, not spreading and not losing shape, then the quality of the solution is good.
While the foundation is solidifying, you should take care of the clay solution in advance. G lina is soaked in water for a week and stir periodically, adding water if necessary. Clay and clay mortar are sold in hardware stores. We supply electricity still during pouring, before laying out the grill made of bricks. With our own hands we display contacts for connection.
Waterproofing is laid on a completely hardened foundation - polyethylene folded several times, a layer of roofing material or other bituminous material. Country barbecues are built in compliance with the standard brickwork rules. It is recommended to sprinkle the brick with water the day before laying, or immediately before laying it, lower it into it for 20-30 seconds. Then it will not pick up moisture from the clay, and the grip will be better.
Ordering: how to fold a brick brazier
Despite the fact that we disassemble a brick-built outdoor brazier, which is simple in construction, the brick laying order (diagram) is drawn up in advance, taking into account the selected dimensions and configuration. The most convenient way to do this is on a sheet of paper.
How to lay bricks? The easiest way to install is with an offset of each row by half a brick in relation to the previous one. The first two rows are laid out in solid. The very first row consists of solid bricks, no halves.


The lower part of the barbecue is the base. Masonry scheme - from the corners to the center along the lines outlined in advance. Every 3 rows it is necessary to check the correctness of laying with a level and a plumb line, lay out a mesh for reinforcement.
The height of the plinth depends on the project. It may contain one or more niches where firewood, coal and other utensils are stored. It is laid out in continuous masonry.
The central part of the structure is the firebox. The base for the brazier in advance cast from concrete with reinforcement or laid out of bricks. If arches for the firebox and niches are built according to the project, the circled... To distribute the bricks evenly, chips are inserted between them.
The gaps are the same, approximately 1 cm... Only after the arch is fully laid out, the space between the bricks is wetted and filled with mortar. The laid out arch is left with a circle on day or two.
If the grill will also be used as a barbecue, you should in advance attend to the opportunity grating installation... A small ledge is left for her, or several protrusions so that the grate can be placed at different levels. Install it on the reinforcement rods embedded in the walls of the barbecue.
Advice: if you leave small gaps between the bricks when laying the firebox, when using the barbecue in the future, thanks to the air penetrating into the cracks, combustion will be better.
The brazier is laid on metal corners, which are attached to the masonry with pins. Consider this when assembling a summer cottage brazier from a brick with your own hands (photo of a correctly folded firebox below).
Important! The ingress of atmospheric precipitation on unfinished brickwork is unacceptable. If it starts to rain, it must be carefully covered with polyethylene.
The last stage is the construction of the chimney. Its presence allows you to keep the heat in the grill longer and remove the smoke. For the chimney, the masonry continues to be laid out, gradually narrowing it upward. This is done by shifting the bricks in the rows. The offset is made no more than by a third of a brick- otherwise the structure may become unstable.
Peculiarity: the pipe is a heavy part and requires supporting columns to install it.
If laying out a brick pipe seems too complicated, you can install a metal one. At the end of the masonry, you need to burn the walls of the firebox. To do this, fire wood in the hearth and increase the heat to the maximum.
The construction of the brazier, the installation of a cauldron or pallet are carried out at the final stage. After that, decorate is carried out. If there is a countertop, it can be decorated with a slab of porcelain stoneware... The brazier itself is lined plaster, decorative stone, facing tiles, etc.