Hi Hi!
Today we'll talk a little about scrap!
I really love the jewelry codenamed "windmill".
They are very easy to do, you can do anything the right size, any color. Than convenient in scrap, you can take paper that is perfect for the product, from the same collection as the paper in the product itself, for example. And to make such a simple, but at the same time spectacular decoration 🙂 I most often do something babyish, and then this is a real find!
I want to tell you how I do them, maybe it will be useful to someone.
I also want to draw your attention to the fact that you can use them as you like. There is only one limitation - our fantasy 😉
For example can be used as decoration flower pots.
Or for example on children's day birth or party can make windmills different sizes large can serve decorative ornaments, decorate less cake or cocktails for example.
And once I made such windmills to decorate the windows of one of the MEGA Kazan stores 🙂 I used the squares 30 * 30 cm, quite large. In general, anywhere and as you like!
So let's get started. For clarity, I made a video, there I also showed how I decorated the sticks on which my mills were held for the showcase.
We need cardboard, two-sided or one-sided, I use designer paper for scrapbooking, the thickness is suitable.

The second side is visible here :) I chose the top paper.

I cut a square from my strip. The side of the square is 5 cm.

You need to draw invisible lines along the diagonals, I draw with a scoring stick. You can also use a knitting needle or crochet hook. Or ballpoint pen that has run out of ink. If you look closely, you can see the lines on my square.

Along the lines from the corners to the center, you need to cut, not reaching the center 1-1.5 cm.

Each corner is now split into two. You need to make holes in the center and in one of the halves of each corner.

Now we need to decide in which direction we will bend some of the corners with holes. Usually the color or pattern on the two sides of the paper is different, so you need to decide which direction to bend. To make the folds soft, without creases, I soften the paper with an awl.


We select a suitable color brother.

And we begin to thread the bratsik into every corner with a hole and, last of all, into the center. We fix the bratsik.
Despite the fact that the era of agriculture ended many years ago, many are still interested in the question of how to make a mill for a summer residence with their own hands without special efforts... Today we will reveal this topic in as much detail as possible.
First of all, it is worth talking about why a windmill is needed in the country today? After all, most likely no one decides to use it in order to grind prepared millet into flour on a daily basis.

In addition, today the cultivation of millet is already more of an occupation for professional farmers, because they have exclusively modern equipment responsible for production.

However, the decorative mill with their own hands, which will be installed in the future in the country, has not bothered anyone yet.
What is a windmill for today?
Before you decide to choose a place where a self-made windmill will be installed in the future, you should definitely keep in mind that the structure can have a different purpose.

Firstly, a DIY windmill can hide some of the least pretty places in your home, like a manhole.

Secondly, most mills, which, in principle, can be made without any problems by their own efforts, are quite simply made of lightweight materials, which makes it possible to significantly reduce their size.

For this reason, this type of structure in most cases is used as protective caps necessary for of various types engineering objects.

Third, many owners country houses decide to turn the mill blueprints into real life to the house for the games of their children. True, this requires a slightly enlarged structure, but there is definitely nothing possible.
The main thing that you should pay attention to is that it is as stable as possible and with an open entrance.

Of course, having decided to make a mill for the garden, you can later find for it great amount a wide variety of applications, as a component of modern landscape design.

Choosing and preparing a site for a new mill
The construction of a windmill is quite a crucial moment. It is important to pay attention to whole line enough important factors in order to achieve a really beautiful design.

Ideally, this should be an open space, since the blades will actively and non-stop rotating, and besides, it is much easier to assemble a massive structure in an open area, because there will be absolutely nothing in the way.
After completing the question with the choice of location, it is necessary to remove all hemp and bushes that may interfere. By the way, if the grass is tall enough, then it is advisable to even cut it off. The ground before starting the installation of the structure must be carefully leveled.

Create a plan
The easiest way to understand from the photo of the mill in the country is how exactly the structure should be built.

It is necessary to perform the following actions:
- Draw a sketch of the future layout;
- Using the drawing, calculate what size each of the parts will be for the future mill;
- Choose the material that is optimal for yourself, which will later be used to create all structural elements.
It is believed that one of the most profitable materials from a financial point of view is pine, since everyone can afford it, and at the same time it is endowed with fairly good performance characteristics.

Note!

After completing all the questions with the drawing and, accordingly, the plan, then you can proceed to the process of direct assembly. To make the mill look really beautiful, you can decorate it. This will give the object a complete look.

It is important to note that if wooden elements were not well processed, it is advisable to use paint for decoration.

Of course, anyone can make a mill on their own. The most important thing is to think over the first stage in detail and draw the correct markings, as well as choose the ideal place in your opinion in the future.

In addition, you need to decide in advance with what qualities you want to endow your structure.
Diy mill photo


Note!


Planning and creating landscape design territory, you need to think through everything to the smallest detail. Plants, shrubs and trees are the basics, but attention needs to be paid to the decor as well. You can choose from a variety of options, from clay figurines to wood crafts. The latter group includes many interesting things, but special attention should be paid to the small mill. Make a decorative mill for the garden with your own hands, it can complement any site and become its highlight. This article will give instructions on how to make it.
Preparation
It is not worth erecting a high structure, as it will be inappropriate. Therefore, we will opt for an average height of 1 m. Such a decorative mill can succinctly fit even into the landscape of a small garden plot... In order to figure out in all the details how to make a mill, you should start from the very beginning, that is, with the selection necessary tools and material.
List of materials:
- block house lining (30 × 90 × 2000 mm) - 5 pcs .;
- double-sided lining (8 cm) - 6 m;
- self-tapping screws (6-7 cm) - 100 pcs .;
- self-tapping screws (2–2.5 cm) - 100 pcs. (replacement with nails is allowed);
- rail (4 × 4 cm) - 9 m;
- rail (3 × 3 cm) - 2.6 m;
- plywood for a circle (18 × 36 cm);
- layout ( wooden slats 4.5 × 1.5 cm) - 8 m;
- calm with a thread for a nut (5–7 cm) - 50 cm;
- bearing ( inner diameter is 5-7 cm) - 2 pcs .;
- antiseptic;
- paint and varnish material (varnish or paint);
- wooden corner (3 × 3 cm) - 40 cm;
- nut (diameter 5–7 cm) - 5 pcs .;
- washer - 2 pcs.

Tool list:
- roulette;
- hand file (jigsaw);
- drill;
- feather drill;
- sandpaper;
- felt-tip pen;
- square (to create right angles).
Note! When choosing all lumber, pay attention to the available tree species. These include pine, which will go well with other materials.
Manufacturing of parts
In order not to get confused when performing all actions, you should adhere to a certain order. The algorithm is quite simple and consists of the following steps.
Blockhouse cut

The planned structure will consist of a main part. In turn, it is assembled from 4 equal trapezoids: the facade, the back and 2 lateral sides. Each element includes 6 blocks of house, which are placed from largest to smallest. So, on the bottom side, each element should be 2 cm larger, which will result in the desired trapezoid shape.
Thus, as a result, 4 elements of different lengths should come out with a step of 2 cm from 35 cm to 25 cm. It is also necessary to make a square base for the structure from the remainder. For this, the elements are cut clearly at right angles in the amount of 4 pieces.
Note! The base must be exactly the same size as the element of the shortest length. In this case, 25 cm.
Slicing other elements

Using a tape measure and a pencil, the slats are carefully marked out to get the bars as a result.
From a 4 × 4 cm rail:
- 54 cm - 8 pcs.;
- 38 cm - 8 pcs.;
- 35.5 cm - 4 pcs.
From a 3 × 3 cm rail:
- 54 cm - 4 pcs.;
- 10 cm - 4 pcs.
The length of the lining for the roof should be 36 cm. In total, you should get 10 identical elements. To obtain even and clear ends, a mold is used. An isosceles triangle is drawn on paper, the base is 38 cm and the height is 30 cm. According to the obtained scheme, 5 strips of lining are cut in 2 copies. As visual aid use the drawings below.


In addition, the cutting of the layout for the sail in the parameters of 4.5 × 1.5 cm is immediately performed.As a result, the following segments should come out:
- 91 cm - 1 piece;
- 45.5 cm - 2 pcs.;
- 19 cm - 20 pcs.;
- 26 cm - 4 pcs.;
- 17 cm - 4 pcs.;
- 8 cm - 4 pcs.
On plywood, we circle a circle with a diameter of 17 cm with a compass, and then cut it out with a jigsaw around the office.
Note! For the drawing, you can use any big leaf paper, such as wallpaper. But it is better if it is cardboard or whatman paper of high density.
Processing parts

After all the components are completely ready and laid out, do not rush to start assembling. An important stage here is the processing and preparation. So, with the help sandpaper all received elements are sanded. Special attention paid to the places of cut and ends. To avoid the possibility of injury, the parts must not be jagged.
To protect the future mill from moisture and sharp changes temperatures, it is recommended to treat wooden elements with special antiseptics. Many modern facilities will also minimize the chances of fungus formation.
Mill assembly

The assembly of the entire structure is also divided into three main stages: assembly of the mill, roof and windmill. Let's start with the most basic part:
- We lay out the segments of the house block in correct order from bottom to top: from 35 cm to 25 cm. To the resulting trapezoid on both sides, we apply strips of 4 × 4 cm with a length of 54 cm and fix it with self-tapping screws (6–7 cm) at the edges. We carry out similar actions for the remaining three sides. We get ready 4 sides.
- Now you need to assemble the mill box from the sides obtained using a 3 × 3 cm rail 54 cm long. We put them between the joints and fasten with self-tapping screws (6–7 cm) at the bottom and at the top.
- There are 4 elements left from the house block 25 cm long. We knock them together using a 3 × 3 cm rail 10 cm long. Please note that the height of the house block elements is 9 cm, so the slats should protrude slightly.
- The base is fixed to the bottom of the mill with long self-tapping screws. They must be screwed in with inside into protruding slats.
Note! When assembling the base of the mill, it is necessary to carefully check everything and lay out all the elements in the correct order on the table so as not to confuse them. Otherwise, you will have to redo the work.
 Assembling the roof is somewhat easier, since the whole process is broken down into only two stages. First, using the previously drawn pattern, the ends are knocked together from 4 × 4 cm bars into a triangle. You also need to make two triangles. For them, you will need 2 bars 38 cm long and 4 bars 35.5 cm long. The ends of the bars must be cut at an angle, secured with self-tapping screws, as a result, identical triangles will be obtained. They are connected using 38 cm bars from above and below.
The second stage involves fixing the lining to the prepared frame with self-tapping screws on both sides. For the roof slope, you will need 5 elements 36 cm long. It remains only to fix the decorative ridge from the 3 × 3 cm corner.
Note! For beauty, the roof slope should protrude slightly on the sides, so the excess is not cut off.
Assembling the wind turbine

In its shape, the windmill resembles a cross, therefore, the frame should also come out cruciform. To do this, the longest rail is taken as a basis - 91 cm.Then the strips of 45.5 cm are screwed on with self-tapping screws. The required shape is obtained. What follows is a step-by-step process.
- At each end of the 4 parts of the frame, strips are attached with a length of 17 cm, so that the result is a swastika shape. Now, to the added plank, you need to parallelly fix a 26 cm plank, and close the resulting rectangle with a piece of 8 cm. We sew the frame with 5 planks 19 cm long in 2 cm increments, nailing them with small nails. The blades are ready.
- For the axis of rotation in the center of the windmill, we fix two circles of plywood with 4 self-tapping screws. In the center we drill a through hole with a drill, the diameter of which must fully correspond to the pin. A hole is also drilled in the ends of the roof of the mill at a height of 9 cm in the center in accordance with the bearing diameter. We hammer the bearings with a hammer. We pass the spire, put on the washers and fix it with a lock nut (a simple nut is also suitable). We put on 2 nuts on top, then the windmill itself, again the nut.

It remains only to install the roof, which, together with the fixed windmill, is put on the frame of the mill and fixed from the inside with long self-tapping screws.
Note! A feather drill is used to drill a small bearing hole in the roof.
Finishing touches

At the final stage, the finished decorative mill is painted with varnish or paint. When the paint coat is dry, you can place the mill in the prepared spot in the garden. Provision should be made for the absence direct contact with the ground.
To do this, you can put it on a large flat stone or a prepared concrete pad... You can also attach durable plastic legs to the mill frame, which are immersed in the ground.
Note! The inside of the mill is hollow, so the air will circulate well, which means that the likelihood of mold and rot is reduced.
A self-made windmill will look appropriate in any part of the garden. Ideal if there is a beautiful and mowed lawn nearby, as well as several perennial plants... The decorative mill looks good at any time of the year: among lush greenery, fallen yellow foliage and also lightly dusted with snow. But if you want it to serve you for a long time, then it is better to hide it for the winter.
Video
With wheel


Beautification personal plot includes not only flower beds, vegetable gardens, greenhouses and paths, but also many other elements, including those that perform exclusively decorative function... An example of such an object is a miniature copy of a garden mill. Many of its varieties today can be purchased in stores or from individual craftsmen. But often the price for such decorative objects is overpriced, and if you know how to work with wood, then it makes sense to try to make a mill with your own hands for the garden. And this article will help you.


The main function of such a structure is, of course, decorative - the mill on the site pleases the eye and creates an atmosphere of comfort. It is also used to decorate gardens and flower beds in the Old Russian or European style (depending on appearance the object itself). Benches, miniature carts, wattle fence, fences or a small pond will be a good addition to the mill.
It can also be of practical use to you. With the help of a small mill, some gardeners "hide" not so attractive elements of communications - cranes, hatches, containers, etc. As a result, everything that the eye can catch on in a poor understanding of this word is hidden, harmony between trees, flowers, stones and decorative objects do not disturb anything. In addition, the gardener has the opportunity to combine a flower bed and a mill into one structure - you just need to supplement the base with boxes with earth.

And if you increase the size of the structure, then it can be turned into a gazebo or children's house... Or, if functionality is more important, make a shed out of the mill and a place to store garden tools.


Garden mill-gazebo

Garden mill device
Most of these decorative objects consist of the following parts:
- platform;
- base;
- frame;
- roof;
- rotation mechanism;
- blades.
Platform- this is the place where the garden mill will be installed. The structure can, of course, be simply put on the ground in a garden or in a flower bed, but then it will not last long - the dampness will do its job and render the decor object unusable. Therefore, it is advisable to build a platform of concrete or stone. The last option will be prettier.


Base – Bottom part the mill itself, usually wider for better stability... The most stringent requirements should be imposed on the quality of the base processing - this part of the structure is most in contact with damp earth and plants.
Frame- the main part of the decorative object, the walls of the mill. It is assembled from boards, plywood, slats, lining, small logs and many other materials. In addition, the frame has a decorative function and is often decorated with windows, doors, balconies and other small elements.

Important! When choosing a place for a mill, pay attention to the surrounding environment - the appearance of the structure should be in harmony with everything around.
Roof - the upper part of the structure. Usually assembled from slats, planks or lining. In some cases, plastic is used, especially for rounded roofs, which are difficult to make from wood. In its color, this part of the mill should stand out from the frame.
Inside the roof there is rotation mechanism- axle on two ball bearings... In most cases, it passes through the entire structure; this location option is reliable and stable. The mechanism can be supplemented by connecting the roof of the mill to the frame on a vertical axis and adding a sail - then the structure will not only turn the blades, but also turn in the direction of the wind.
![]()

Blades, also known as wings - second most important decorative element mills. Assembled from plywood, planks and thin bars. The main condition is that all blades must have the same mass and be balanced, then the mill will last a long time and without problems. Examples of various design options the wings of the mill are shown in the pictures below.


![]()
Table. Types of decorative mills for the garden.
| View | Description |
|---|---|
| Enough simple construction... The walls are rectangular, straight or inclined. Usually a mill like this ends gable roof, but there are other designs as well. Great option for those gardeners who do not have much experience with wood. |
| More complex construction... Requires enough high precision in cutting out parts of the desired size and giving them bevels. It is not uncommon for the walls of such a hexagonal mill to taper towards the top. It ends with a dome or polygonal roof. Compared to the previous version, other things being equal, it is more attractive. |
| The decorative windmill has the simplest design due to the absence of cladding and complex roof... In addition to decoration, it helps to determine the direction and strength of the wind on the site. In addition to wood, a windmill can be made of steel profiles, if it is easier and more convenient for you to work with them. |


There are many ways to ensure that the tree on the site dries quickly. However, the most common of them are those that involve the use of chemicals. preparations intended for the destruction of plants. Read more in.
Decorative plywood garden mill - instructions for creating
Introducing step by step instructions to create a hexagonal decorative mill for a garden made of plywood. With the right skills and the availability of woodworking tools, assembly will not take much of your time and effort.
Important! All details of decorative mills need careful and multi-layer treatment with antiseptics, protective compounds and varnishes. Only in this way they will not lose their attractive appearance over time and will be able to decorate the site or yard for many years. An example of a good protective coating for the mill - ship or yacht varnish.

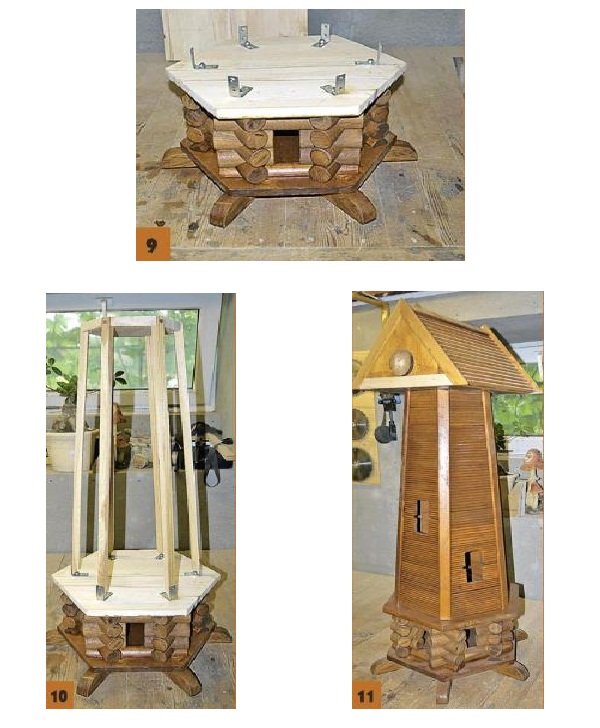
Start working from the middle part of the structure, called the frame in the picture above. It is a truncated hexagonal pyramid with a straight base. All parts are assembled from thick plywood.
Step 1. Prepare drawings and part templates. Given the complexity of the design, the dimensional accuracy of each element becomes very important.
Step 2. Using a pencil, mark the individual frame elements on the plywood sheets - elongated to the height of the trapezoid. Then cut them out electric jigsaw... Do not forget to cut the side ends at an angle of 45 ° to connect with the rest of the elements.


Step 3. Fold the finished plywood pieces together so that the cuts form grooves facing downward. Refer to the image below. Connect the parts together with tape.

Step 4. Turn the resulting structure over and apply glue to the grooves formed by the cuts. Act quickly, but be careful at the same time.

Step 5. Fold all the frame parts into a hexagon so that the glued ends fit snugly together. Use the tape again to keep the structure in shape for a while.

Step 6. Wait until the applied glue is dry, lay the walls on their side and remove any excess. Remove the tape from the structure.

Step 7. Saw out the hexagonal lid to the inside dimensions of the upper narrow part of the frame. Do not screw in the screw on one of the sides - it will play the role of a kind of handle for installation. Glue the edge of the upper narrow part of the frame, turn it over this side down and, using a screw, mount the hexagonal cover. Put some weight on top of it. Wait until the glue is dry, remove any remnants.


The truncated pyramid that makes up the walls of the mill is ready. Now start creating the base. It is a straight hexagonal prism. To connect to the base of the structure, a central vertical bar is used, which is fixed with a screw on the upper cover of the prism and passes through the corresponding hole in the lower one.
Step 1. Saw out the two hexagonal lids to fit the base of the truncated pyramid you made earlier. In the center of one of the parts, make a mark for the screw, in the other - a square hole along the section of the bar.

Step 2. Install both covers on one of the faces, cut out the vertical walls of the prism. Connect the first three of them to the lids with glue, use tape and clamps to hold the shape. Everything is shown in the image below.

Step 3. Repeat the previous operation with the three remaining prism faces.
Step 4. Insert the block into the hole in the bottom cover. Move it until the butt ends against the top hexagon. There, screw in the screw at the mark and fix the bar.

The bar must be screwed to the upper hexagon
Step 5. Work the bottom walls of the truncated pyramid and the top of the prism with glue, connect them to each other. Use scotch tape again to keep in shape.

Step 6. Once the glue is dry, remove adhesive tapes and process the resulting construction grinder or emery cloth.

The next part of the mill to be made is the base, which consists of three parts:
- the lower part is a large straight hexagonal prism with attachment for a vertical bar;
- middle - a truncated hexagonal pyramid;
- the upper one is a small straight hexagonal prism with grooves for a decorative observation deck.
As for the walls of the mill, we will present manufacturing in the form of step-by-step instructions.
Step 1. Prepare the fasteners for the timber mentioned above. In its capacity are a board fixed on the lower hexagonal prism, and a hollow box for the section of the bar.

Step 2. Saw six parts from plywood for the lower prism, make cuts in them on the side ends, as shown in the instructions for the walls of the mill. Connect with glue and tape together. Then secure the plank and timber box from the previous step. Make sure they are exactly in the drawing.

Finished bottom prism of the base with fasteners for the timber
Step 3. Now proceed to the truncated base pyramid. Saw out trapezoidal parts from plywood, use a jigsaw to make cuts on the side ends at an angle of 45 °. Then connect with outside the elements of the pyramid with tape, gluing the grooves and assemble the hexagonal structure. After drying, dispose of any glue residue.

Step 4. Complete a small top base prism. At the corners, saw through small grooves to attach an observation deck that will decorate your mill.

Step 5. Connect all three parts of the base to each other with glue. Attach a load to them from above, which can be a bucket of water. The weight is necessary for a better grip of the adhesive.

Important! Do not overdo it with the weight of the load, the structure of the base may not withstand unnecessary loads.
After completing the bottom of the mill, proceed to the observation deck. The latter consists of supports made of small bars, a track made of slats and railings. The platform is screwed to the bottom of the mill wall and installed with supports in the grooves of the base.
Step 1. Saw out the base pieces. Then make marks or small holes on them for fastening the observation deck to the walls of the mill with screws.


Step 2. Prepare a template to fit the observation deck floor slats. It should be a hexagon with pencil marks. It makes sense to glue it double-sided tape so that the floor slats do not move from the slightest movement or contact with the props during installation.

Step 3. Lay five rows of planks as shown in the photo below to form the deck floor. They are connected to each other with a small amount of glue. From above, with its help, fix the props to each of the corners of the hexagon. Use clamps for the clamp.

Step 4. Wait for the adhesive to dry and carefully peel the floor and viewing platform props from the template.

Step 5. Attach vertical bars to the outer edges of the struts - these will be the railing posts. Fastening is done with screws.

Step 6. Gently glue the rails to the uprights that will make up the railing walls. Use clamps or plastic clips to form.


Step 7. Turn the mill frame over and place it on the floor or workplace bar up. Also turn the viewing platform over and secure it to the lower hexagonal truncated pyramid cover with screws. Then glue the grooves in the upper part of the base and attach the mill frame together with the observation deck to it.

The creation of a decorative mill for the garden is coming to an end. The next stage is the dome and the inside of the "wings" rotation mechanism. The roof of the mill is made of a plastic hemisphere, to the bottom of which a plywood ring is attached. It, in turn, is connected to screws with a circle, which is mounted on the upper cover of the structure of the structure.
Step 1. Finish the canopy, saw out the ring and circle from the plywood to the correct sizes.

Dome and circle and ring cut from plywood
Step 2. Make holes or marks for them in the same places in the circle and the ring - this will be needed for subsequent assembly. Fit the circle on the top cover of the mill frame.

Step 3. Make fasteners for the wing rotation bearings of the mill. They represent wooden blocks with holes of the appropriate diameter. More details of their device and creation are shown in the images below.

Important! For many of your garden decorative mill assembly jobs irreplaceable assistant there will be a rack for vertical mount drill, which thus turns into a drilling machine.


Step 4. Connect the lower halves of the bearing fasteners by inserting horizontal bars between them and at the ends, as shown below.

Step 5. Install the bearings in the holes of the fasteners, mount the entire structure with screws, add a small support at the front to post some tilt.

Step 6. Now you need to connect the bearings to the axle from of stainless steel... To do this, use nuts with washers on all sides of both fastening bars.

Step 7. Place the bars with bearings and axle on the wheel previously mounted on the mill frame.

Step 8. Determine the point where the axle hole is to be made in the plastic dome.

Step 9. Drill a hole in the dome for the axle. Then glue the plywood ring to the underside. Use scotch tape as a clamp (crosswise).

Step 10. Carefully fit the canopy onto the plywood circle, threading the axle through the hole. Use the screws for fasteners in the marks or small holes you made in step 2.


After that, it is necessary to make the outer part of the mill mechanism - the blades and their attachment to the axis.
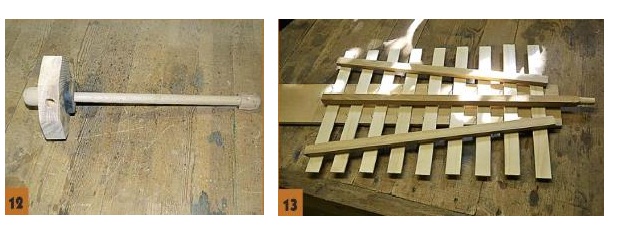
Step 1. Saw out the block to fasten the mill to the axle. Its production is shown in detail below.


Step 2. Cut four blades from relatively thin sheets of plywood using a pre-made template.


Step 3. Prepare four long sticks. With their help, the blades of the mill will be attached to the central block and axle.

Step 4. Drill a hole for the hairpin from one of the ends in each of the bars.

Step 5. Glue the sticks to the blades. Be especially careful and respect the dimensions.

Step 6. Prepare the pins with clips, put them on one side of the glue to the bars with blades.


Step 7. Insert the clips into the corresponding holes of the central block, then insert the blades with pins from the ends. Secure everything accurately and carefully.

Step 8. Install the center block and blades on the mill axle. Check if the mechanism works. If everything is in order, the decorative structure is ready! It remains only to paint it, treat it with varnish and put it in the garden or flower bed.

Advice! If you think that the above design of the decorative mill is too complicated, then it makes sense to try to create a more simplified version - with four walls and a frame made of ordinary boards or lining.

Video - Decorative mill
Do-it-yourself mill-blockhouse - instructions
By its design, it is a reduced copy of real log cabins. As "logs", you can use cuttings from shovels - cheap and available at any hardware or gardening store. The list of necessary tools is the same as in the instructions for the previous mill, only an annular drill bit is added to them, which is necessary for sawing out rounded grooves for a frame.
Step 1. Prepare the cuttings, remove the packaging from them, if any. Place the two handles together and secure with the clamps and screws. The parts of the blanks going beyond one of them should be slightly larger than the length of the walls of the future mill. Mark the places for cutting out the cups (this is how the grooves in the frame are called). This instruction shows how to create a mill with hexagonal walls, therefore the connection individual elements logs are not at right angles. Therefore, the cups in the cuttings should be "oblique", at an angle of 60 °. To do this, prepare a wedge, as in the image below.

1 - Shank and hole saw for wood. The diameter of the latter must be equal to that of the first; 2 - Fixing two cuttings together; 3 - Wedge
Step 2. Place the two cuttings connected together and clamped on the inclined surface of the wedge and fix. Hole saw attached to an electric drill, saw through in one operation in both blanks for the frame, as shown in the image below. Then flip the clipped cuttings 180 ° and make two more grooves, but from the other end of the cuttings. After that, use a jigsaw to cut off what is located behind the edge of the clamp. The logs for the base of the log mill are ready.

4 - Installation of cuttings on a wedge for sawing cups; 5 - Finished result, two logs with oblique grooves at an angle of 60 °
Step 3. Move the clamp up along the cuttings, mark the points for drilling the cups again and repeat the previous operations until the right amount the logs will not be ready.
Step 4. Carefully cut six of these logs lengthwise into two halves - one with cups, the other not. The first will go to the top of the base of the mill, the second to the bottom.
Step 5. In this case, the logs are connected to each other on pins inserted into the base, therefore, in the middle of the cups in each of them, drill a hole of the required diameter. An alternative connection method is wood glue.
Step 6. Prepare a hexagonal base. Assemble it from two glued trapezoidal planks, or saw out from a single piece of plywood. Insert the pins in the corners of the future log house.
Step 7. Place the first three log elements on the studs - the halves of the logs without cups, prepared in step 5.

6 - Sawing holes for pins in the logs; 7 - The beginning of the formation of a log house; 8 - Finished "log" walls of the mill base
Step 8. Sequentially push the logs onto the studs, forming a blockhouse, as in the image below. Inside, you can cut holes for decorative doors or windows.
Step 9. Treat the hexagonal base and sides of the log house with wood stain or varnish for a more attractive appearance and protection from damage. On top, attach another hexagon to the studs, made in the same way as the product from step 6. On it, in turn, fix the metal corners.
Important! For durability, equip the base of the mill with feet or struts made from impact resistant woods. It can be oak or larch.
Step 10. Attach long and thin bars to the corners, which will act as a frame for the walls of the mill. At the top, they are attached to a slightly smaller hexagonal plate of board or plywood to create a slight slope.
Step 11. Sheathe the frame of the mill with small strips, which are then treated with varnish or stain. At the same time, to improve the appearance, saw through holes in the walls for decorative windows and doors. Then make a rectangular base for the roof, assemble its frame from the same bars and sheathe the ends with slats, and the roof with glazing beads. Cover the fastening points here and on the walls of the mill with decorative strips.
9 - Processed base with corners for fixing the wall frame; 10 - Installation of the frame bars and the upper hexagonal plate; 11 - Finished walls and roof of the mill, sheathed with slats and decorative strips
Step 12. Prepare holes for the axle at the ends of the roof. It can be made from metal or wood. At the outer end of the axle, fasten an octagonal block, on which, at an equal distance, make four holes - for fastening the blades.
Step 13. Saw out three bars that will act as a "frame" of the blades - two lateral, angled, and one central. At the end of the latter, make a rounded stud for mounting the blade on the axle. Then nail the bars of the "frame" onto the slats and cut them into the desired shape, as in the image below.
12 - Axle with an octagon required for fixing the blades. The ends are closed with cuttings; 13 - Blade blank. Three bars - its frame, the slats have just to be cut to achieve the desired shape
Step 14. Process the blades and secure them on the axle. Balance them if necessary so that the weight is approximately the same and the mill is not overloaded. Install it in the right place in the garden, preferably on a support made of stones - this way the structure will last longer.

With the right attitude and some skill in working with wood, you will easily get an excellent mill that will decorate your garden, yard or flower beds for many years.
45380 5Did we answer your question?
And today we will learn how to make a toy mill with our own hands. Elder children preschool age already know how to take good care of their creations, so it is quite possible to entrust them with crafts made of paper and cardboard in the game. Our hand-made windmill is made from these materials.
For the manufacture of mill crafts we need:
Thick cardboard, paper (white, you can use printer paper);
A couple of unnecessary markers;
Kebab skewers (for making blades);
Watercolors (for coloring the details of the toy mill);
PVA glue;
Hot melt glue.
DIY mill description:
1. Our toy mill has the shape of a cylinder, so first of all we glue the cardboard cylinder using PVA glue.
2. We glue the cylinder with white paper and glue it to the "ground" (a sheet of very thick cardboard from some box).
3. Paint the base of our mill craft with brown paint. This can be trusted to do the child even himself early age... The paint that falls on the cardboard "ground" will then be covered with a white sheet. The child himself or with your help, after the brown paint has dried, draws the door and the window.
4. In the middle white sheet(it should be larger in area than cardboard ground) carefully cut out a circle, the diameter of which is equal to the diameter of the mill cylinder. Then we give this sheet to the child for coloring. He can, besides green grass, draw flowers, paths, etc.
5. After drying, we put our "lawn" on the cylinder and glue it to the ground-base, tucking the edges.
Now let's start making the roof of the mill with our own hands:
6. From cardboard we glue the truncated cone, glue it on top with a cone of white paper, wrap the tip of the cone inside the roof. Now we carefully make a through hole in the roof. We give the roof for painting.


You can simply close the top of the roof with a painted circle made of paper and cardboard, or you can arrange the roof as in the photo:

It remains to make the blades.
7. Cut the felt-tip pen to the desired length, closer to one of the ends we make two through holes, perpendicular to each other. We insert one skewer into each hole.

8. Cut a lot of short pieces of skewers and use a heat gun to attach them to the blades, as in the photo:


Pay attention to the slope of the blades, and also that one of the two guides of each blade does not pass through the felt-tip pen tube, is held in place by the glue.
9. So that the tube does not fall into the hole in the roof, and the blades can turn, in front of the hole in the roof, put on a cap (cut from the cap of the felt-tip pen) of a slightly larger diameter.

Everything! The mill is ready!

Thank you for the attention,
your Anastasia.