I really want to relax after the summer heat and physical labor near a picturesque place. Perhaps the first thing that comes to mind is water. Unfortunately, not all site owners are lucky enough to have a reservoir in the country. Therefore, many summer residents equip a mini pond in the country with their own hands. We will talk about this in this article.
Perhaps at first you will have questions: how to do it? what material? where to place? But believe me, you can build a pond with your own hands. Moreover, we are talking about a small pond in the country - mini copies of reservoirs from 0.5 to 1.5 m3.
Design of the future pond
Thanks to today's technology, the owner can build a pond of any complexity. For example, there are three possible options for a small pond: cover a recess in the ground with foil and fill it with water; use a ready-made container that may be right at hand; pour concrete into the walls of the recess in the ground and fill it with water.
Option 1
First, on paper, create a project for the future pond. Consider planting widths, depths, and sills. Start contouring on the ground. This can be done with paint or sand.
 If several tiers are planned in the pond, then mark them and dig them one by one
 Purchase a film for your reservoir with the calculation of +0.5 m on the sides on the sides of the pit bowl. You will also need purchases: geofabric - a material that is placed on the bottom and walls of the bowl to protect the film from damage. Although you can use something from the bins: unnecessary carpet, old linoleum.
 Geofabric for reservoirs
 You can fix the film with crushed stone, laying it in trenches dug along the edges of the thresholds. Fill the pond with water gradually, taking breaks. Line the shoreline with stones and cover the bottom of the pond with small pebbles.
Option 2
First, decide on the shape of the container in which the water will be. Then dig a pit for it, stepping back 30 cm from the sides. Tamp the bottom to keep it level. If you have chosen a multi-tiered plastic mold, then fill the water gradually, and fill the space between the mold and the pit bowl with sand.
There are many more options for a small pond in the country. Can be used:
- An unnecessary bath. Apply the dimensions of the bathroom to the area, adding 10 cm to the sides. Dig a pit 20 cm deeper. Under the bathtub drain, drain the drain stones. Pour crushed stone with sand at the bottom of the pit and tamp.
- The pelvis. We follow the path of least resistance and use the most budgetary option, because even a leaky basin can be used by covering the hole with a film. Leave the edges of the pelvis above the ground. Under the bottom and between the walls of the basin and the pit, lay a layer of clay and sand solution. Pour soil at the bottom of the basin to plant duckweed and urut or whatever you choose. Such a pond will be tiny and beautiful.
 Pond from the bathroom
 And more tires, a barrel, a boat, or even an old cabinet! Conveniently, some of these containers can be brought into the house for the winter. Indeed, making a pond with your own hands is not difficult!
How to make a pond from the bathroom (video tutorial)
Option 3
I think many will agree that building a pond according to the third option requires some, at least basic, builder skills. But at the same time, do not let this scare you, because any summer resident or owner of a plot in the private sector is already a little builder. And as a reward for your efforts, you will have an almost eternal paradise in your yard.
Stages of construction of a reservoir in the country (video)
Be serious about choosing the location of the pond, because it will no longer be possible to move it. Now you can start.
If you decide to make a reservoir without rapids, then this will greatly simplify the task. Dig a pit with slopes at 45 degrees. Tamp down the groove and cover it with sand.
Place PET or PVC film on the bottom without pulling it tight. Start pouring concrete from the walls, and then go to the bottom.
Try to do this part of the work in one day to avoid cracks at the joints.
Press in reinforced mesh. Pour the second layer of concrete as soon as the first dries. Constantly check the horizon with the level. Fill with water when the concrete is completely hardened.
 Concrete pond
 Before deciding on the option for building a pond, decide which design idea will look especially organic on your site. If the house, paths and flower beds are designed in a strict style, feel free to break a pond of clear forms. If you like everything natural, then any arbitrary shape will do.
Decide on a place
How to make all the inhabitants of the pond comfortable? If you have a large plot of land, then carefully study the area so as not to be mistaken with the choice. There are several secrets that we will share with you.
- The roots of old trees can interfere with work, and over time, even the walls of the reservoir. Falling leaves and fruits will also make you clean up your pond often.
- Choose a location with the expectation that the pond will be in the shade for some time so that algae and microorganisms do not develop too actively in it.
- At the same time, the sun is needed for the plants along the coast. So you will have to look for the best option, taking into account these nuances.
- If your body of water is small but deep, then make sure that it is always in sight when children are playing nearby. And why hide such beauty from sight?
- The body of water will look best in a depression. Almost always descend to the lake, river, sea.
 Mini pond for summer cottages
 We will think over a possible ecosystem
If you want fish to live in your pond and flowers to bloom, then a few rules from this section will help you.
Plant selection
Decorative flowers in the pond do not suffer from temperature changes and can even tolerate frost (of course, except for southern varieties of plants, which will need to be hidden for the winter). But still make sure that the water in the pond will be warmed by the sun for at least five hours during the day.
The less light, the faster the mini pond in the country will turn into a small swamp. Then it will look completely unattractive, a characteristic smell and flowering will appear.
In nature, an amazing self-cleaning process has been launched, and at home, the owner should take care of the purity of the reservoir.
As in a natural pond, plants in a home pond are divided into the following types:
- those that grow on the shore;
- those that grow in a humid zone on the border with water;
- floating on the surface;
- shallow and those that grow at depth.
Although the air humidity will be higher on the shore along the pond than in other places, simple garden plants will be able to take root there. But still, consider that they do not look ridiculous or accidentally next to other inhabitants of the pond. Begonias, aquilegia, balsam and many other perennial plants that are used to decorate landscapes will be harmoniously combined.
An area with constant humidity, but without stagnant water, is the best place for moisture-loving perennials. Among such stars are meadowsweet (meadowsweet), lisichiton, darmera, iris and many others.
 Irises also thrive in shallow waters. Susak, pontederia, tail are competing with them.
 The deep sea queen can rightfully be called a water lily. She copes with harsh winters calmly. Water lilies are not only beautiful but also useful. It is they who can create the shade necessary for the pond. Among other deep-sea beauties, the lotus (although it needs to be dug up for the winter, because in most of the territory of the former USSR, for almost 8 months, the water does not warm up as needed for the flowering of such varieties), vodokras, oronium, water walnut and many other bizarre inhabitants of the depths.
The rivals of deep-sea plants are algae, which saturate the pond water with oxygen and support the vital activity of other organisms. Among them are bog, hornwort, etc.
Animal inhabitants
Insects, microorganisms and the simplest plants will start in your pond on their own. You will have to take care of the fish yourself.
 Fish in a pond in the country
 But do not think that you cannot start them. In fact, there is nothing supernatural here. Check the depth of your pond - it should be at least 90 cm deep. This is necessary for the fish, because this way they can spend the winter. And in summer, the water will not get too warm. Shallower ponds are only suitable for growing ornamental plants.
By the way, in ponds with fish, a third of the water surface should be covered with greenery.
Water has always attracted man. That is why many are thinking about how to make a mini-pond in the country with their own hands, because then there will be a zest in landscape design. Being near water is natural for humans. You can relax on the shore, launch fish into the water, make a fountain or waterfall.
What are the ponds
The tradition of decorating areas near the house with reservoirs came to us from the East. But let's not consider the simple stone bowls in the courtyard. After all, we are interested in integrating the pond into the design of the site. So the East. There are 2 design options: Chinese and Japanese. In China, a mini-pond was a body of water richly decorated with lush plants. It resembled a corner of the wilderness. In Japan, ponds were designed differently - in the style of minimalism. Having adopted this tradition, European designers began to make ponds in their own way. They were often of the correct geometric shape. Which style to choose is a matter of taste for each owner.

There are no fundamental differences in the construction of reservoirs, so this material will be useful, no matter what style you choose for your structure. It can be a traditional Chinese or Japanese mini pond, or a high-tech creation. Building a pond is fun, and you can get everyone in your family involved. This is especially true for the design. Well, if you start the fish, then the children will be happy to feed them. The only thing that is not recommended to do in the pond is to swim. This is what the pool is for.
Pond construction
Just like in any other construction, you need to choose the right place. You should not build a reservoir where the water will be under the sun all day. Plants will wither from the excess of sunlight, and algae in the water will multiply vigorously, and the reservoir will overgrow. At the same time, if you make a pond on the shady side of the site, it will adversely affect the growth of plants. The best option is when the sun's rays illuminate the reservoir for at least 5 hours a day. Avoid placing the mini-pond near trees. When making a pond in the garden with your own hands, keep in mind that in the fall all fallen leaves will be in the water and rot. Plus, overgrown tree roots can damage the bowl, even if you make it out of concrete. Such a garden pond should be located at some distance from the trees. As a last resort, choose a spot where old trees are growing, chop them down, remove stumps and use that spot for a garden pond.
You should be able to admire your creation. What good will there be in a reservoir if it is located in the depths of the site and will not be visible? It is good to locate the pond near the garden gazebo or the terrace of the house. Or set up a comfortable bench on the shore so you can sit and enjoy the beauty.

You also need to choose the size of the reservoir. There are also recommendations here, according to which the pond occupies 3% of the site. This is the best option. However, not all people who want to decorate their site in this way follow it. They often make mini-ponds from old bathtubs or even basins. They also build a pond from a tire. Well, lovers of large reservoirs spend a lot of effort to dig the appropriate foundation pit. Or they make two ponds and a small river channel connecting two reservoirs. This is a personal matter for everyone. In any case, no matter what body of water you are planning to make, look at the different options for how you can make a pond in the country with your own hands, photos will help you with this.
Having chosen a place, proceed to digging a foundation pit. The markings can be done using a regular rope. If the volume of work is large, it will be more rational to use the labor of hired workers or an excavator. Well, you can dig a small pond yourself. But before you take out the earth, you need to decide in what way you will make a reservoir. There are different options. You can install the formwork and fill the walls and the bottom of the pit with concrete with the addition of liquid glass for waterproofing. Or buy an annual plastic pond container and dig a hole for it. And you can use the most budgetary option - PVC film, which will cover the bottom and walls of the pit.
The pit is dug in ledges (usually 2-3). Plants are then planted on them. It is not recommended to make the deepest part of the pit deeper than 1.5-1.8 m. The pond should not be made too shallow, as in this case the water will be very hot by the sun. Some owners drain it for the winter, while others do not. Usually the water is left if fish are brought into the pond. If the depth of the pit is normal, then they hibernate in the deepest place. Well, if the bowl is too shallow, then the water freezes in winter and the fish die.

So, a pit for a small pond has been dug. What's next? It is necessary to seal the walls and bottom. Consider the option with PVC film as the most budgetary one.
It is recommended to work with the film in the warm season, when it is most elastic. A thick layer of sand is poured onto the bottom of the pit and onto the terraces and compacted. The film is laid on it. Sand is needed in order not to accidentally damage the material with sharp stones or plant roots in the ground. The film will serve as an excellent waterproofing, preventing water from entering the soil. On the surface of the earth, around the pit, the film is bent and pressed down by large stones. By decorating this garden pond, you will arrange the stones more beautifully, but for now you need to finish with the bowl. When the film is laid, it is recommended to sprinkle a layer of sand on it. If the plants on the terraces will be planted in the ground, then you need to fill in the earth, but it is much easier to plant the plants in pots.
Another point that must be considered when building a mini-pond is that the water must be running. This way you will have to spend much less effort cleaning the bowl and changing the water. Making the water circulate is easy enough. You need to install a submersible pump in the pond. The water supplied through the hose will pass through the filter and again drain into the bowl. When making a reservoir in the country, you can choose any design of the drain. It can be a trickle flowing down from the nearby alpine slide (this is where you can put the earth from the pit), or you can make a fountain, which is also easy to build. You just need to beautifully design a pipe connected to the pump and towering above the surface of the water. Having built such a pond in the country with your own hands, take enough time to design it. You can use natural stones, paving slabs, decking and other materials. Your imagination is unlimited. You can also envisage multi-colored illumination, which will light up in the evening. Different options for the design of reservoirs in the country will help you in choosing.

When making a pond with your own hands, you need to strictly observe safety measures if lighting is planned, since water and electricity are a dangerous combination. Use only factory sealed luminaires that are specifically designed for underwater installations. If you do everything right, then such a pond for a summer residence with a fountain and lighting will become a real gem of your summer cottage.
DIY mini pond (video)
Mini ponds
As already mentioned, in addition to a large bowl, you can also make a pond from a tire. It will be very small, but beautiful in its own way. It is much easier to make it than a large body of water. You need to pick up an old large tire from a KamAZ or a tractor and dig it into the ground. The pond from the inside is also laid out with PVC foil. There will be 1 small terrace for planting plants. Small tires are not recommended. After all, the reservoir will turn out to be tiny. But tires from cars can be used when you want to make a cascade of small ponds, in which water will flow from one to another. Such a structure looks great too, especially if it is well decorated. For this purpose, you can also use basins or old baths. The tires can also be used to build flower beds around a large pond. In this case, they can be painted with bright colors.

Conclusion
As you can see, making a pond with your own hands is quite simple. You just need to fulfill the following requirements:
- choose the right place;
- make good waterproofing;
- provide for the circulation of water;
- beautifully arrange the space around the pond.
And then, having created a pond with your own hands, you can rightfully be proud of it. Creating a beautiful artificial pond is a creativity where you can use all your imagination to the fullest, keep in mind that it should harmonize well with the rest of the landscape design. Although the options for building on a summer cottage were considered here, a pond can also be built in the courtyard of a private house in the city. Beautifully designed small ponds can decorate any courtyard.
Mini pond on the balcony (video)
We will send the material to you by e-mail
O One of the best accents in landscape design can be an artificial reservoir. Such a structure will delight the owners of the site and will serve as an excellent place to relax. Many summer cottages are limited in size and are not suitable for large bodies of water, but with instructions and certain construction skills, you can make a small pond in the country with your own hands step by step. Photos of all stages of installation will allow you to determine the technical side of the issue. Before installing a reservoir, you will need to prepare certain materials, choose a suitable project and read the recommendations from specialists.
It is not necessary to spend a lot of money to build a beautiful pond in the country. From the available options, you can build a budget option
When deciding how to make a pond in the country with your own hands, you first need to decide on the size and shape of the structure. These parameters depend on the size of the site and the preferences of the owners. In this case, the reservoir can be either of a strict geometric shape or have the natural contours of a natural pond.
The following requirements are imposed on the place of the future location of the water structure:
- the pond should not be illuminated by the sun's rays all day, only 7-8 hours a day is enough. In intense light, water can bloom;
- the pond should not be located in a too shaded place;
- there should be no trees nearby, as foliage will pollute the water;
- the selected place should not be heavily blown by the wind.
When choosing a good place, the terrain and a good view of the structure from any place are important.

If you plan to install a fountain in the pond, then you should take care of convenient electrification. There are no special rules for choosing the configuration of a structure. The pond can be of any shape - asymmetric, meandering, oblong or square.

Useful information! The deeper the container, the lighter the place the pond should be. If a fish dwells in the water, then it should be borne in mind that the amount of oxygen decreases in highly heated water.
Do-it-yourself pond in the country step by step: photo and installation guide
There are several ways to build a pond in the country with your own hands. Landscape photo ideas will help you choose. For quick installation work, it is worth purchasing a ready-made form. On sale there are special containers made of rubber rubber and reinforced plastic. Insulating film is considered a budget option.

Installation using a prefabricated form
After choosing a suitable place, the finished form must be laid on the ground and a contour drawn. A trench is made according to the marks. After installing the tank, it must be filled by a third and sand must be poured into the resulting voids. Then the bowl is filled with water. After shrinkage, plants are planted around the resulting reservoir, and a stone is laid.

Useful information! Plastic containers are durable and easy to install, but such structures are destroyed over time under the influence of ultraviolet rays. The best option is a fiberglass tank that is reinforced with a rubber base.

Arrangement with film
With the right approach, you can make a pond out of a film in the country with your own hands. A step-by-step photo demonstrates how to perform such a job with high quality. You can choose the following film colors for installation:
- black reflects clouds well, the bottom looks like a mirror;
- brown material imitates soil at the bottom;
- the creamy and blue film will give the resemblance to the pool and at the same time, fish are remarkably visible against such a background.

When choosing a material, you should pay attention to the composition of the material, thickness and resistance to mechanical damage. The material is glued with a special glue. The use of the film can be accompanied by the preliminary arrangement of the sand cushion. The laid film should lie freely, without excessive tension. After laying the material, the pit can be filled with stones. After the water has settled in the container for several days, the film can be cut.
Useful information! The more complex the structure of the reservoir, the stronger the film should be.

Features of water filtration and planting
The installation of the filter system must necessarily accompany the design of the pond in the country with your own hands. In this case, a photo of the necessary work can be viewed on the website. This is especially important when launching fish into the water.

Filtration kits are available in stores. They are accompanied by instructions with which the equipment is installed. Planting is considered an important step. Arrowhead and tail are suitable for landing in water. You can pick up floating crops: hyacinths and lilies. Ferns, reeds and reeds will look good around the reservoir.
Useful information! The artificial reservoir must be cleaned periodically. In this case, the bottom should be cleaned of silt, leaves and other debris.

Related article:
Do-it-yourself pond in the country: landscape photo ideas and decoration
Do-it-yourself ponds in the country require special design. The photo reflects the very best design techniques. Figurines, stones and beautiful trees can be used as decoration. The drops and uneven terrain make it possible to build a reservoir with a cascade and a waterfall. An original solution will be a bridge or an artificial slide.

The finished building can be decorated with the following elements:
- underwater lighting looks mesmerizing, for this mini spotlights are mounted;


- for the installation of fountains, different types of pumps are required.

Vegetation is considered an important decoration. It can be planted in baskets filled with earth and installed on the surface of the reservoir. Tall varieties of plants will look good nearby.
Useful information! Before purchasing fish, you need to clarify the conditions for their maintenance. Some types of fish are at enmity with each other, so you need to choose those that get along with each other.
Useful tips: how to equip a pond in the country with your own hands, video
- it is better to decorate the pond with stones of different sizes. The harmonious combination of lumps with small stones will create a magnificent view;

- you should not use sheer surfaces when creating a reservoir, on which it is difficult to place plants;
- when landscaping, it is worth using containers that will prevent strong overgrowth of plants.

Useful information! For planting aquatic crops, special soil is required. In this case, plants should not occupy more than half of the area of the reservoir.
How to prepare a reservoir for winter
A pond made from a plastic bowl tolerates winter cold weather well. To prevent the bowl from deforming under the load of ice, several plastic bottles of sand can be lowered into the container.

In the case of film construction, a similar method can also be used. Cover equipment and plants during winter. At the first appearance of leaf fall, the pond should be covered with a fine mesh. Before frost, the reservoir is cleaned and water is pumped out. Plants and fish must be sent to winter in warm rooms. Pumps and filtering equipment should also be removed.

In spring, the reservoir can be launched when night temperatures rise above zero. Subject to all the installation rules and in the presence of high-quality material, you can build a beautiful pond in the shortest possible time. The use of stylish decor elements will create a wonderful central composition on the site.
It has long been customary that water soothes, but more and more people say that if it is near the house, it brings prosperity and money. Not always natural reservoirs can be located on the territory of the site, more often they are created artificially. That is why we decided to tell you how to create a corner of extraordinary beauty in your garden with our own hands using available tools for this.
A very important point in creating an artificial reservoir is the terrain that surrounds your house, and therefore you just need to pay attention to it. Look carefully over the entire available area, perhaps there are natural depressions or small pits on it, if any, then we advise you to use them.

Where to place an artificial pond in the country
It is better to place an artificial reservoir closer to the house, so it will have natural light. It is also important that if you have small children, you can always control their games near the water. From the point of view of Feng Shui, reservoirs must be located in the eastern or southern part of the site, then the water is beneficial, it is also not recommended to use areas planted with trees and shrubs, especially if they are fruit.


The fact is that any plant has roots that can adversely affect the condition of the walls of your reservoir, and fruits and leaves, falling into the water, will begin to rot over time, which will cause the water to deteriorate quickly enough. If you really want to have a small pond in the garden on your site, then make sure that it is always clean and well-groomed.


Artificial ponds do not need to be made deep, since they are not intended for swimming, but are part of the decor of your site, in addition, it is much easier to care for small lakes. It is also worth noting that it is necessary to change the water in them, and carry out cleaning, and therefore make sure that the water source is as close as possible, thereby it will be easier for you to fill it.


What to make a pond in the garden
It is possible to arrange a reservoir from ready-made containers in the form of fiberglass, insulating floors, flexible and rigid, polyethylene, PVC film, or butyl rubber. Moreover, if you want to achieve originality, then we advise you to carefully study your shed and see if there may be large containers or an old bathroom lying there, which is perfect for the foundation of your lake. It is better to start work in the summer, or closer to it, since at this time of the year the groundwater subsides, which will greatly facilitate the tasks.


Do-it-yourself pond in a finished container
The easiest way to make a pond in the country is from a ready-made container, which can be purchased at the store. It is done very simply - a pit is dug into a container, a container is put in and its edges are leveled. Cover the excess space with earth, the edges of the container can be masked with stones or left as it is. pour water, plant plants, decorate the pond itself. Here is a photo instruction:

Digging a hole
We put the capacity
Stoning
We decorate the pipe with water
Making a fountain
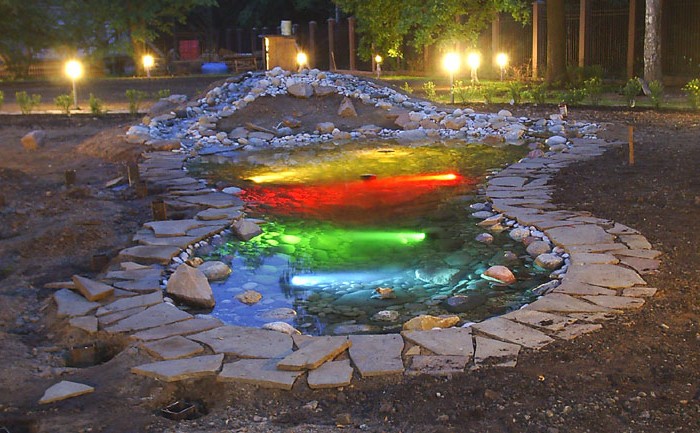
Night view
At the bottom of the backlight
Night pond
As you can see, work has been done for water here, in order to make two fountains. One is just a pipe with water disguised in an old clay pot, the other is a beautiful fountain in the center of the pond. Here are some more ponds with a fountain and a waterfall:


Also in the photo in the instructions for making a pond from a finished container with your own hands, you saw a beautiful backlight. You can do the same in your country house.
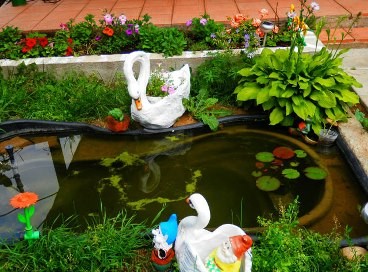
And of course, the pond needs to be decorated. You can plant plants both around the pond and inside it, you can use garden figurines - put something next to the pond or let the swan swim in the water. Here are a couple of ideas:

DIY polyethylene ponds and ponds
It is recommended to use polyethylene for the pond, the capacity of which is from 130 to 4200 liters of water. For its formation, the sides of the pit must have a stepped shape and gentle slopes. Look closely at the raging bottom. Free it from stones, roots and sharp objects. For polyethylene, it is recommended to use just sand, in the form of a mound with insulation of 10 cm, followed by impregnation with waterproofing. To do this, it is necessary to make a cement screed with a thickness of 3 to 5 cm and leave it for 7 days. Waterproofing will keep the sand bed from being washed away by groundwater.

After this time, fill in a layer of coarse grain sand from 5 to 10 cm and lay a polyethylene film. Instead of sand, you can easily use a layer of oily clay, glass wool, artificial wool, old newspapers. A dense modern material, a two-layer membrane, has a higher density and elasticity than polyethylene. It will last longer, use it if, after building, or repairing a house, you will have a suitable segment. When cutting materials, leave a margin of about 60 cm, this is necessary to ensure fixation. From the edge of the reservoir, make a small ditch around the perimeter, roll polyethylene into a tube and put it in it.

Sprinkle with earth and flat pebbles on top. Filling with water must be carried out evenly and make sure that there is no air left under the film. We recommend placing a layer of a mixture of clay and sand, or pebbles at the bottom of the reservoir.

It is better to plant water lilies or any other aquatic plants in pots, as this will allow you to quickly pull them out when you carry out the prevention of your small pond.


Plant any plants around the edges that are not afraid of water, and from the north, protect your pond from strong winds with shrubs.

Do-it-yourself pond with fish
Another idea is to launch real goldfish into the garden pond.


DIY raised pond
It is done in the same way as a polyethylene pond, only after you dig a hole for the pond - you need to lay a foundation of bricks - to the desired height of the pond. The foundation must stand for at least two days. The film, similar to the previous case, is laid on the bottom, the excess is cut off from above, and an additional layer of bricks is placed on the foundation to cover the edge of the film.


Diy ponds and ponds from the bath
If after the renovation you have an old and unnecessary bathroom, then do not rush to take it to the landfill, since in a private house it can be used for various purposes, including for creating a small decorative pond.
To place the bathtub like a reservoir for a pond, you need to make a recess. Fill the bottom of the bottom with river sand and make a cement screed. This will prevent groundwater from eroding it. Observe the ratio - sand 10 cm and clean cement for the screed 3 - 5 cm. After a week, add gravel 20-30 cm and lower the bath. Fill the side openings with gravel (at least 10 cm from the tub to the cut). The edges of the tub should not be higher than the shoreline, as this will look unnatural. Cover the pond around the perimeter with pebbles, preferably flat. A bathtub installed on a slope should be reinforced on one side with a large stone, making a tunnel for one side and partial, for the other, which will be free. Outwardly, the free side will resemble an alpine slide formed of stone.

Making a bath pond
Bath pond
Photo of the pond from the bath
Do-it-yourself ponds and ponds from a barrel
An excellent option for creating a small decorative pond is to use old barrels or tubs that were previously intended for pickling. These containers must be placed on their side. Make an oval hole and place it in the pre-prepared depression on the sand and gravel embankment.

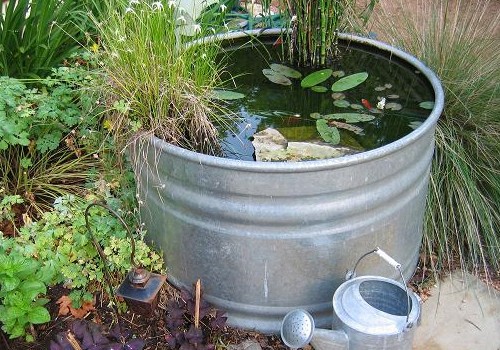
When the barrel is installed, fill the empty spaces with sand, or rubble. Put cellophane in it, you can dig in its free edges, and put pebbles on the bottom. Cover the approach to your pond or pond with rubble and pebbles. Decorate with low plants on one side and sides. You can install a backlight if necessary. You can also make a waterfall, fountain or some unusual composition.


DIY mini ponds in the garden
In addition to the above methods, you can also make your own small pond using a large basin, an old trough, or a tractor tire. Such bodies of water can be made slightly elevated or deepened. In order to decorate it, use decorative bricks, natural large stones, sand of different shades or gravel, it is also quite possible to decorate it with various kinds of plants, which will only complement your overall interior.

It is quite possible to create an artificial pond on your site, even if it is small for you, for this it is enough just to turn on your imagination and carefully look around.

Remember! In order for your artificial reservoir to last a year and not deteriorate, it must be freed from water in the winter season.
Photo gallery: pond in the country
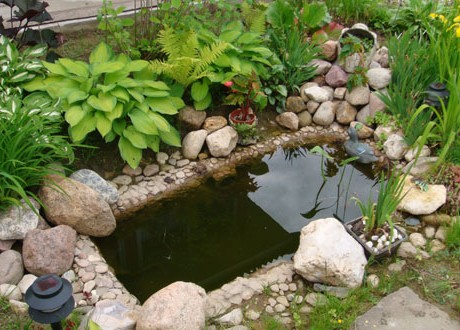
And now I propose to look at what pond in the country house has already been made with their own hands by those who decided to start creating decorative reservoirs on their site. Someone makes big ponds, someone small. Some people like strict shapes, and they make square, rectangular and round ponds, while others like natural spontaneity, and they try to make oval and elongated ponds of an uneven shape. Also, everyone decorates their pond in the way they can - they add a bridge or a bench, plants and flowers, fish and garden figurines, or come up with and implement their own ideas that no one else has. And we collected you photos of various ponds so that you choose the one that will decorate your own summer cottage.
Big pond in the country
Small pond in the country
Pond design options in the country
Aquatic plants in a pond in the country

One of the brightest tools in landscape design is the decorative pond. Of course, most of the suburban areas are limited to the traditional six hundred square meters, and the owners simply cannot build a large reservoir, but because of this, you should not give up the dream of acquiring an artificial pond. As for the technical part, it will not become an obstacle, but subject to the availability of good instructions and desire. So, today we will find out how to make a pond in the country with our own hands step by step.
First, you should find out what purpose the construction of a pond on the site will pursue. From this point of view, water bodies can be conditionally divided into four large groups.
Table # 1. Functionality classification of artificial reservoirs
| Group name | Short description |
|---|---|
| They are an element of the landscape composition and are intended primarily to decorate a particular area of the garden. Active rest is not provided near such reservoirs. |
| They are deeper and are often decorated with fountains, bridges, sometimes they are equipped with lighting. Such ponds are erected near a house or a gazebo, benches with awnings are placed next to it. Therefore, it is quite obvious that such reservoirs are the heart of the recreation area for residents of the house. |
| This option is suitable not only for avid fishermen, but also for families with children - the latter will enjoy watching bright fish while relaxing in nature. |
| They also belong to artificial summer cottages and not only perform an aesthetic function, but also provide an opportunity to freshen up or even swim (it all depends on the size). |


Then, based on the goal and our capabilities, we proceed to the choice of style, location, size and shape.
Second phase. Determining the style
An artificial pond can be made in one of two possible options, and each of them also has a great variety of modifications.
Table 2. Artificial reservoir styles
| Name | Short description |
|---|---|
| This name exactly reflects the essence - these are designs that differ in clearly defined outlines. The geometry of the pond, which is correct in terms of geometry, is suitable for those areas that are decorated in the style of minimalism, high-tech, modern or classic. But, which is characteristic, the shape can be not only rectangular, but also square, round, oval, broken. |
| They are more popular, because they are characterized by naturalness and irregular outlines of the banks, which means they seem to bring a person closer to nature. The shape of the reservoir here depends only on personal preference, but the more complex it is, the more difficult it will be to lay the film (more on this later). |


The relief of the site also plays an important role in choosing a style. So, if the surface is sufficiently flat, then the shape of the pond can be any. If there are irregularities and drops on the site, then they need to be given special attention, but they make it possible to additionally equip a cascade or a waterfall. In addition, against the background of all this, an artificial slide, for example, will look great.
Also, the reservoir can be raised somewhat above the ground. In this case, the construction technology will differ only in the arrangement of the foundation, which will prevent possible distortions of the bowl.

When creating such a reservoir, earthwork is minimized, and it will be much easier to care for it.

Note! If the reservoir is to be built with a fountain, then preference should be given to a high construction.
Stage three. Choosing a place
To begin with, we place the reservoir in the most convenient place so that you can admire your creation from anywhere on the site. That is why, when choosing, we take into account several important factors.
- Land area. Not only the size of the pond, but also its shape directly depends on it.
- Illumination... It is preferable to place an artificial reservoir in a shaded place, in which the exposure to direct rays of the sun does not exceed five to six hours a day, otherwise part of the water may simply evaporate. Moreover, in the sunlight, biological activity can develop, which is unlikely to decorate the pond. Therefore, having chosen a specific place on the site, we observe the solar regime for several days.
- Relief... The shape of the pond depends on it, and it also simplifies the arrangement of additional elements (for example, fountains).
- Groundwater level, soil composition. These indicators affect not only the depth of the reservoir, but also the complexity of the work and the need for additional consumables.
Note! The deeper the pond, the more illuminated it should be placed. If the reservoir is intended for fish, then we treat the location even more responsibly, since the oxygen content in highly heated water decreases.
- Expandability... We do not forget about the perspective, therefore, on the one hand, we leave free space.
- Visibility... It is advisable to arrange the reservoir so that it can be seen from home and recreation areas.
- Power supply... If a fountain or lighting is additionally equipped, then we will think over electrification in advance. It is better to lay the wires even during development, moreover, underground and in a reliable protective corrugation. There should be small access hatches at the connections.
- Reflection. The pond will look more attractive if the surface reflects the sky or beautiful buildings, and not some kind of utility structure.
- Landscaping. The vegetation near the pond is, of course, beautiful, but the leaves will pollute it and form silt. Moreover, the root systems of trees can damage the waterproofing layer.
- Compatible with general design and other objects.
We begin work in the spring - this way we will have enough time for the reservoir to "take root" on the site.

Stage four. Determine the size
It is difficult to say that a large pond will cost more than a small one, since there are many nuances here. Therefore, we will consider the key points.
1. Dimensions. They depend on the location of the reservoir. Many say that the pond should make up on average 3-10% of the total area of the site, although there can be no clear recommendations in this case. As for specifically the length and width, they depend not only on the area of the land plot, but also on our capabilities. After all, we will dig a hole under the reservoir by hand.

2. Depth. It depends on the purpose of creating a reservoir, as well as its size.
3. Difficulty of content. The larger the pond, the easier (no matter how paradoxical it may sound) to care for it.

4. Zoning. The reservoir is divided into the following zones:
- coastal (from 10 cm to 40 cm), which will serve as an entrance and for planting a plant;
- shallow water (from 40 cm to 100 cm), where crops that grow deeper will be planted (for example, a winter-hardy water lily);
- deep-sea (more than 100 cm) - it is required only in those reservoirs where fish farming is planned; the area of this zone depends, first of all, on the number of fish, but on average it should be more than 20% of the total area of the reservoir.

5. Biological balance. In any case, living creatures will settle in the pond, which means that it is necessary to provide such conditions so that it can self-clean. No oxygenation or chlorination of water is envisaged here. It is worth remembering: no more than ½ of the entire area can be allocated for plants.
Note! The lowest point should be lowered below the soil freezing line, especially if fish breeding is planned so that they can survive the winter in non-freezing water.
Fifth stage. Choosing materials
The next question that needs to be dealt with is the choice of consumables. There are many options on the market today that can be used to create an artificial reservoir. Let's consider them.
Concrete pond

The most expensive option, which, nevertheless, allows the reservoir to be exploited for a long time. Although the concrete fill is more suitable for the arrangement of the pool.
Finished plastic container

This option is more suitable. The form, made of fiberglass or PVC, allows you to build a pond in record time and use it for up to 30 years (the specific period depends on the quality of the container).
The procedure itself will consist of only four steps:
- digging a pit;
- set the form;
- fill the remaining voids with sand;
- we plant the plants, fill the reservoir with water.

The disadvantages of this method are the difficulty of transportation (if the volume is large) and the need for basic knowledge of installation (otherwise the bowl may be damaged). Moreover, plastic containers are destroyed over time by UV radiation.
Note! It is preferable to use a fiberglass bowl that is reinforced with rubber - this design is more reliable and repairable.

Polymer film
In terms of the shape of the pond, this option provides simply unlimited possibilities. The most affordable material is plastic wrap, although it will not last long.

A PVC film has a longer service life; with proper installation, it can last up to ten years.

Perhaps the most reliable option. For ponds with rocky bottom and great depths, it is recommended to use a butyl rubber membrane (EPDM) with a service life of up to 50 years. In addition, this material is able to withstand repeated frost.

There are several popular methods for making a reservoir, in which scrap materials are used. Let's take a look at the most popular of these methods.
Pond from the old bath

A great option, because a bathtub is a container that was originally intended to hold liquid. The bathtub can be painted in bright colors and placed in a picturesque corner of the site, or, alternatively, deepened into the ground.
Tire pond
A simple way to create a mini-reservoir on the site. The manufacturing procedure is shown in the photo below.

Basin pond
An even easier way. The basin is capable of holding water well, so it can be installed in the same way as a bath. With proper decoration, such a mini-pond will be an excellent decoration for the yard.

Note! The choice of material depends not only on the aesthetic characteristics of the pond, but also on its service life. It is desirable that the selected material is environmentally friendly.
Sixth stage. We prepare the equipment
To create a simple artificial reservoir, we need a level, a cart with a shovel, a cord, a hose that is used for watering, and pegs.
If the pond is more technologically advanced, then the following equipment will be needed:
- cleaning filter;
- a sterilizer (it will remove algae so that the water is clear);
- pump for pumping / pumping out water;
- aerator for oxygenation (especially important for fish breeding).

Seventh stage. Create an artificial reservoir
There are plenty of materials that can be used to create a reservoir, but we will focus on PVC film. The fact is that it is cheaper, it takes the desired shape better, it can be repaired, and it does not require specific knowledge or skills to work.
Step 1. First, select the color of the film. There are several possible options here.
- Black film - it will turn the bottom into a mirror (plants, clouds, etc. will be reflected).
- Cream, blue- so the pond will look more like a pool, and fish on a light background will be seen more clearly.
- Brown- will imitate the soil of natural reservoirs. A great option for a landscape pond.

Also, when choosing a film, pay attention to the composition (PVC is more durable than PE) and thickness (for a pond, you will need material thicker than 0.5 mm). Moreover, the greater the depth of the reservoir, the greater the thickness of the film should be. Equally important is resistance to UV radiation and mechanical damage.
Note! If the depth of the pond exceeds 1.5 m, then we use butyl rubber. Such a film is resistant to stretching, deformation and UV, moreover, it can withstand temperatures of 40-80 ° C.
- pond width + (depth x 2) + stock (55-60 cm) = material width;
- pond length + (depth x 2) + stock (55-60 cm) = material length.
For gluing we will use a special glue (for example, "Tagnit") or adhesive tape (Quick Seam 3).

Step 3. The next step is to create the schema.

First, we draw it on paper, and then we transfer it to the ground. We indicate the sizes of steps or "shelves" for plants - this will avoid possible problems. For marking we use sand or a flexible garden hose (preferably a bright color).

After that, we cover the marked area with a piece of light film and examine it from different angles. We make adjustments if necessary.
Step 4... We dig a foundation pit. To do this, we perform the following actions.
- First, remove the sod.
- Then we dig the foundation pit itself. At the same time, we move from the edges to the center, going deeper in the required places - it is more convenient this way. For laying out the stone and decorating, we equip a ledge with a depth of 60-70 cm.
- We remove the soil, and with it roots, stones, debris and everything that can damage the film. By the way, you can make an alpine slide from the excavated soil.

When carrying out earthworks, we pay attention to the fact that the shores of the future pond are located on the same line. If a waterfall is created, then we maintain the required height difference.
Note! If a large level is required, we can make it ourselves. To do this, we put the usual level on a long flat board.
Step 5. We lay the substrate. We carefully tamp the bottom of the finished pit, after which we proceed to the waterproofing layer, which will prevent the penetration of water into the ground.
The underlay can be done in several ways:
- we cover the bottom with stones and fill it with sand (this kind of waterproofing will lose its properties after a few years);
- we lay a layer of geotextile, which we cover with sand (it will cost a lot);
- we lay PVC film (the most reliable way, so we will dwell on it).
Step 6. Next, we lay the film, preferably on a sandy "pillow" (the latter will prevent damage from stones and other dangerous objects). It is advisable to do styling on a hot day - as it warms up, the film becomes more pliable.

In this case, it may be difficult to form folds. We try to make one large fold, and not a large number of small ones, and then glue it or press it down with stones. The film should be loose, loose.
To secure it, we dig an additional trench along the perimeter. We put the film there, after which we fill in the crushed stone. Next, fill the trench with large stones with a flat bottom (so that the film does not break). We lay the walls with round stones (flat ones will slide). At the end, we fill the pond with water - we serve it without pressure, directing it to the center of the pit. After two days, cut off the excess film.
Step 7... Strengthening the shores. Their slope depends on the type of soil: if it is sandy, then the walls should be sloped, if we are talking about clay or black soil, then vertical. The optimum slope angle should be approximately 45 °.
The fortification itself depends on the type of coast.
If they are shallow, then you can use:
- geomat;
- geogrid;
- polymer geogrid.

You can also use a regular mesh netting, clogging its cells with soil with seeds of perennial grass (for example, clover). There is another option - to strengthen the banks with shrubs or plants.
If the coast is steep, then we can use:
- piles;
- gabions;
- retaining walls.

Can be effectively strengthened using biological methods (planting). Ideally, biological enhancement methods should be combined with engineering ones.
Eighth stage. We design an artificial pond

There are several ways to decorate a pond. To make it a full-fledged design element, we use one or more of the methods below.

As a conclusion. Care features
As a result, a few words about the further care of the artificial reservoir.

Video - Creating a pond from film