Water has always attracted people. That is why many people are thinking about how to make a mini-pond in the country with their own hands, because then landscape design will have its own zest. Being near water is natural for a person. You can relax on the shore, run fish into the water, or a waterfall.
What are the ponds
The tradition of decorating areas near the house with ponds came to us from the East. But let's not consider simple stone bowls in the yard. After all, we are interested in the integration of the pond into the design of the site. So East. There are 2 design options: Chinese and Japanese. In China, a mini-pond was a pond richly decorated with lush plants. He looked like a corner wildlife. In Japan, ponds were decorated differently - in the style of minimalism. Having adopted this tradition, European designers began to make ponds in their own way. Often they were of the correct geometric shape. Which style to choose is a matter of taste for each owner.

There are no fundamental differences in the construction of reservoirs, so this material will be useful, no matter what style you choose for your structure. It can be a traditional Chinese or Japanese mini-pond or a high-tech creation. Creating a pond is fun and you can get all your family members involved in it. This is especially true for the design. Well, if you start the fish, then the children will be happy to feed them. The only thing not recommended to do in the pond is to swim. This is what the pool is for.
Pond construction
Just like in any other construction, you need to choose the right place. Do not build a reservoir where the water will be under the sun all day. Plants will wither from excess sunlight, and algae in the water will multiply intensively, and the pond will overgrow. At the same time, if you make a pond on the shady side of the site, this will adversely affect plant growth. The best option- this is when the sun's rays illuminate the pond for at least 5 hours a day. A mini-pond should not be located near trees. When making a pond in the garden with your own hands, keep in mind that in the fall all the fallen leaves will be in the water and rot. In addition, overgrown tree roots can damage the bowl, even if you make it out of concrete. Such a garden pond should be located at some distance from the trees. As a last resort, choose a place where old trees grow, cut them down, remove the stumps and use this place for a pond in the garden.
You should be able to admire your creation. What good will be in the reservoir if it is located in the depth of the site and it will not be visible? It is good to have a pond nearby garden gazebo or terraces of the house. Or set up a comfortable bench on the shore so that you can sit and enjoy the beauty.

You need to choose the size of the reservoir. There are also recommendations here, according to which the pond occupies 3% of the site. This the best option. However, not all people who want to decorate their site in this way follow it. Often they make mini-ponds from old bathtubs or even basins. They also construct a pond from a tire. Well, lovers of large reservoirs spend a lot of effort to dig the appropriate pit. Or they make two ponds and a small river channel connecting two reservoirs. This is a personal matter for everyone. In any case, whatever body of water you are planning to make, view different variants of how you can make a pond in the country with your own hands, photos will help you with this.
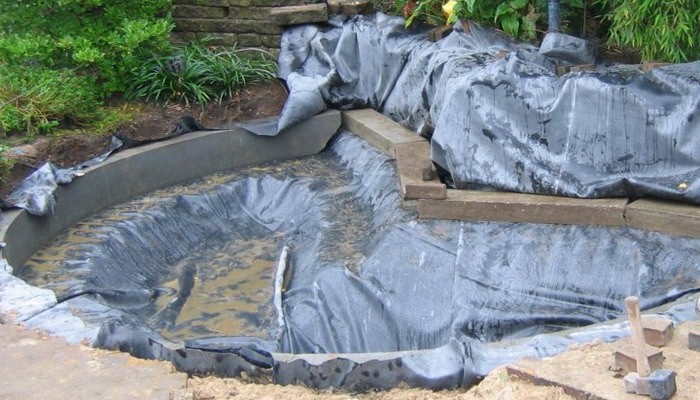
After choosing a place, start digging a pit. Marking can be done with a regular rope. If the volume of work is large, it will be more rational to use the labor of hired workers or an excavator. well and small pond you can dig yourself. But before you take out the ground, you need to decide how you will make a reservoir. There are different options. You can install formwork and fill the walls and bottom of the pit with concrete with the addition of liquid glass for waterproofing. Or buy an annual and dig a hole for it. And you can use the most a budget option — pvc film, which will cover the bottom and walls of the pit.
The pit is dug in ledges (usually 2-3). Plants are then planted on them. It is not recommended to make the deepest part of the pit deeper than 1.5-1.8 m. The pond should not be made too shallow, as in this case the water will be very warm by the sun. Some owners drain it for the winter, while others do not. Usually water is left if fish are released into the pond. If the depth of the pit is normal, then they hibernate in the deepest place. Well, if the bowl is too shallow, then the water freezes in winter and the fish die.

So, the pit not big pond dug up. What's next? It is necessary to seal the walls and bottom. Consider the option with PVC film as the most budgetary.
It is recommended to work with the film in the warm season, when it is most elastic. A thick layer of sand is poured on the bottom of the pit and on the terraces and compacted. A film is placed on it. Sand is needed in order not to accidentally damage the material with sharp stones or plant roots in the ground. The film will serve as an excellent waterproofing that does not allow water to go into the soil. On the surface of the earth, around the pit, the film is folded and pressed down with large stones. By decorating this garden pond, you will arrange the stones more beautifully, but for now, you need to finish with the bowl. When the film is laid, it is recommended to pour a layer of sand on it. If the plants on the terraces will be planted in the ground, then you need to fill in the ground, but it is much easier to plant plants in pots.
Another point that must be taken into account when building a mini-pond is that the water must be flowing. So you have to spend a lot less effort to clean the bowl and change the water. Making water circulate is easy enough. Must be installed in a pond submersible pump. The water supplied through the hose will pass through the filter and drain back into the bowl. When making a pond in the country, you can choose any design for the drain. It may be a stream flowing from a nearby Alpine slide(this is where you can put the earth from the pit), or you can make a fountain, which is also easy to build. It is only necessary to beautifully arrange the pipe connected to the pump and towering above the surface of the water. Having built such a pond in the country with your own hands, take enough time to design it. Can be used natural stones, paving slabs, terrace board and other materials. Your imagination is not limited by anything. You can also provide a multi-colored backlight, which will light up in the evening. Various design options for ponds in the country will help you choose.

When making a pond with your own hands, you must strictly observe safety measures if lighting is planned, since water and electricity are a dangerous combination. Use only factory sealed fixtures that are specifically designed for installation underwater. If you do everything right, then such a pond for giving with a fountain and lighting will become a real gem of your summer cottage.
DIY mini pond (video)
mini ponds
As already mentioned, in addition to a large bowl, you can also make a pond from a tire. It will be very small, but beautiful in its own way. It is much easier to make it than a large body of water. You need to pick up an old large tire from KamAZ or a tractor and dig it into the ground. The tire pond from the inside is also laid out with a PVC film. There is 1 small terrace for planting plants. Small tires are not recommended. After all, the reservoir will be tiny. But tires from cars can be used when you want to make a cascade of small ponds, the water in which will flow from one to another. Such a structure also looks great, especially if it is well decorated. For this purpose, you can use basins or old bathtubs. Tires can also be used to build flower beds around a large pond. In this case, they can be painted bright colors.

Conclusion
As you can see, making a pond with your own hands is quite simple. You only need to fulfill the following requirements:
- choose the right place;
- do good waterproofing;
- provide for water circulation;
- beautifully arrange the space around the pond.
And then, having created a pond with your own hands, you can rightfully be proud of it. Creating a beautiful artificial reservoir is creativity, where you can fully use all your imagination. Please note that it should be in good harmony with the rest of the elements. landscape design. Although here the options for building on suburban area, a pond can also be built in the courtyard of a private house in the city. Beautifully designed small ponds can decorate any courtyard.
Mini pond on the balcony (video)
Even the smallest and seemingly unremarkable personal plot can be made cozy and interesting if you equip an artificial reservoir on it. A decorative pond in the garden is not only able to harmoniously fit into the landscape of a personal plot, but also visually expand the space.
An artificial reservoir in the landscape of a personal plot

The presence of a pond or a small artificial waterfall on personal plot It is determined not only by aesthetic considerations, but also by the practical component. On a hot summer day, even from a small pond, it blows cool, the air seems much cleaner and fresher, and a calm smooth surface or measured murmur will help to remove nervous tension and fatigue.
The most popular types artificial reservoirs in landscape design:
- pond;
- stream;
- fountain;
- waterfall.
In terms of shape, reservoirs on personal plots can be either round, with an irregular coastline, or regular geometric shapes - square, rectangular and diamond-shaped. It all depends on the style of the site as a whole, its location, the features of the site and your imagination. The main rule in this case is that the reservoir should ideally fit into the surrounding landscape, become its integral element.

The most common shape for an artificial pond is round or oval. That's what they look like natural lakes, so if you want to create a corner of nature near the house or in the garden, then this option will be the most acceptable. In this case, the wrong coastline and asymmetric planting of the reservoir with plants may even appear.
If the reservoir is located on a site where everything is done in classical style, straight lines dominate and there is no place for natural forms, then they equip a pond correct form. Often, this is the basis for the fountain, which is the center of the exposition. Since such a pool does not have a natural barrier in the form of vegetation and stones, its sides must be placed higher to prevent falling into the water. As an option - to protect such a reservoir with a low forged grate.
It should be noted that the most common and least expensive in terms of labor and financial investments is the pond. But it is quite possible to equip one on your own site without the involvement of specialists.
The key here is experience. When it appears, the pond you created can become the first in the whole complex, connected by waterfalls, streams, decorative bridges.

DIY decorative pond - where to start?

If a wonderful idea came to your mind about how to equip an artificial reservoir on your personal plot, you should not rush headlong after a shovel. First of all, you need to choose a good place. In doing so, the following factors must be taken into account:
- plot size;
- illumination;
- relief;
- degree of landscaping;
- soil type.

It is best to equip the pond closer to home. At the same time, it should be positioned in such a way that the entire area of \u200b\u200bthe reservoir is illuminated by the sun for at least 5 hours a day. Otherwise there is no time beautiful pond over time, it can turn into just a fetid swamp.
The terrain is also of no small importance. Optimal location is a low-lying area where the water level in a well or in a well is closer to the surface of the earth.
In the selection process, you should also pay attention to the presence of vegetation - big trees located along the coasts will be in autumn time pollute the reservoir with fallen leaves, and the roots of trees can damage protective film at the bottom.
Soil type is important. For the arrangement of the reservoir, loamy and clay soils, as well as peat, chernozem is less preferable - it contributes to the formation of silt. On acidic soils, it is impractical to equip a reservoir without reliable protection side walls and bottom.
Once the site is selected, the shapes and sizes are determined - it's time to stock up necessary materials and tools. Most often, ready-made rigid containers are used to create a pond, which can be purchased at a specialized store or flexible waterproofing, much less often - concrete (the most costly and time-consuming process).

Types of waterproofing for an artificial reservoir:
- polyethylene film - inexpensive material, not resistant to ultraviolet;
- PVD - polyethylene high pressure. Visually, it practically does not differ from polyethylene, but it has greater flexibility and durability.
- PVC - polyvinyl chloride - strong and durable material, the edges of which are welded together.
- rubber and butyl sheets are the most optimal, but expensive option. The service life of this material is practically unlimited.

Experts recommend for arranging waterproofing to avoid polyethylene film. It copes with its function, but it lasts no more than 2 years. If you want the pond to please for a longer time, choose more durable materials.
Materials and tools:
- shovel;
- protective film or reservoir;
- pipes for supply and discharge of water;
- valve;
- geotextile or sand
It's better to see once. The whole process of arranging a pond in pictures looks like this:
Construction of a decorative reservoir

There is another way to equip the pond - a concrete bowl, but this method is laborious and costly, so it is not currently used. Construction begins with the fact that markings are made on the selected site and the turf layer is removed. After that, you can start digging a pit of the desired shape. At the same time, be sure to leave the edges slightly sloping (sloping, not steep). Further, if you plan to make a decorative pond using a PVC film, and not a finished tank, you need to lay out the bottom of the future reservoir with waterproof material. For these purposes, clay is quite suitable. You need to lay it in two layers - the second after the first has completely dried (between them you need to lay a waterproof film). After that, the bottom should be covered with gravel.
Important: if you plan to plant a pond with plants, special recesses should be made at the bottom and filled with fertile soil.
How to make a decorative reservoir in such a way that the water in it is always clean and fresh?

In order to appearance the reservoir located on your site has always pleased with its appearance and gave freshness and coolness, it is necessary to make sure that the water in it is running. For these purposes, two pipes must be laid: flow and waste. Through the flow pipe, water will flow into the reservoir, and through the waste pipe it will be discharged into the ditch. Please note: the level of the drainage ditch should be slightly lower than the level of the pond. For ease of use, you can install a valve on the sewer pipe or simply close the hole with a plug as needed. The first option is the most practical.
The device of a decorative reservoir with the use of "galoshes"
Labor costs will be much less if you purchase a special tank for an artificial reservoir. The people called these containers "galoshes". Why is that? Everything is very simple: they are made of black plastic, and the shape of such tanks resembles rubber shoes in its external outlines. But if you wish, you can always find and buy a bowl for a reservoir of a shape that suits you.

In order to equip a decorative pond in the country , you will need to purchase a special tank right size and forms: the cost of those is relatively low.
The main stages of arrangement of the reservoir:
- contour marking;
- digging pits;
- container installation.
In order to correctly mark the contour of the reservoir, it is necessary to install the tank on the ground and vertically install slats along its perimeter with an interval of 40-50 cm, then tie them with twine. Thus, you will get the outlines of the future pond.
The container must be installed strictly horizontally. The tank should be filled with water gradually, while the gaps between it and the walls of the pit should be carefully filled with sand.
Note: if you want to equip the fountain in artificial reservoir, it is important to purchase a special pump and nozzles in advance, which are installed during the installation of the reservoir.
The final stage is the design of the reservoir. In order for your man-made pond to look really stylish and beautiful, for example, just like the fancy decorative ponds, the photos of which we posted, you need to properly arrange its banks.
Decoration of the banks of an artificial reservoir
At this stage of work, you can not limit the flight of your imagination. To decorate an artificial reservoir, you can use ceramic tiles, marble, granite, fake diamond, pebbles, wood, etc. These materials need to mask the edges of the reservoir, in appearance close to natural. It is important to fix them with cement mortar. If you are planning to additionally equip your pond with a fountain, in the process of work, you need to make sure that the pump hoses are hidden under tiles or stones.

Then you can sprinkle the bottom of the reservoir with pre-washed sand, lay small pebbles and plant them in pots or baskets. aquatic plants. Can be bred around a pond ornamental shrub or just a flower bed.

Decorative inhabitants of ponds are always a joy. It can be both aquarium fish and dwarf turtles. And if you hold a backlight along the bottom of the pond or place floating lanterns on batteries on the surface, you can create a real extravaganza of light and water.

Pond Care
- To keep an artificial pond in good condition, it will need maintenance.
- First of all, you need to get a bottom vacuum cleaner for collecting garbage.
- During the period of leaf fall, you will need to cover the pond with a net so that the foliage does not fall into the water.
- If fish live in the pond, then they will need filtration and aeration of the water.
- To avoid greening of water, it is either filtered and purified (for this, the reservoir must be flowing), or planted with oxygen-producing plants: swamp, hornwort, elodea.
- If water lilies or capsules are planted in the pond, then with their wide leaves they will prevent the sun's rays and overheating of the water.

An artificial pond in your backyard is important element landscape design, the arrangement of which must be approached with sense, feeling, arrangement! And then the beauty created by your hands will delight both you and your guests!
In the process of creating a pond on own dacha many questions arise general recommendations not enough. Let's consider these questions.
How to make a natural pond?
First, let's define what is meant by this phrase:

How to choose a place and what to provide:
- distance from trees, tall shrubs. Water should not clog leaves, branches;
- good lighting, direct rays of the sun throughout the daylight hours are unacceptable;
- properly positioned at the bottom to rainwater did not spill over the territory, but flowed into the pond;
- the site is chosen flat, with a slight slope.
What to consider so that the reservoir is “alive” and does not rot:

Making a pond
A properly made pond occupies at least a 10th part of the site. Deep - weakly warms up and simply dangerous, shallow - blooms. On the forums of gardeners recommend optimal size reservoir 2.5 - 3 m in diameter, 1.5 depth. The pit is dug by hand or with the help of machinery. Next is waterproofing.
Ecopond - involves natural waterproofing, called clay castle. Only this natural material contributes to the life of a living ecological system. This good way make a pond without a film:

How to make a small pond?
There are several simple ways arrangement of miniature reservoirs on the site. 

Since the shape is a wave-like configuration, transitions are taken into account during instillation. Special steps are made, one wider than the other. After installation, the voids are filled with earth.
The form is set slightly above ground level, a layer of sand of about 20-30 cm is poured under it, but first they make markings on the ground. Then you can start digging a pit. How to do this is clearly visible in the figures below.

How to make a big pond
- First mark the contours. For irregular shape a regular rope will do; for a rectangle, square - pegs are hammered, a twine is pulled between them.
- Digging a pit with an excavator. You can calculate its dimensions using the formula for calculating the volume of a truncated cone. This can easily be done on a site like fxyz.ru. It is only necessary to substitute the numbers in the desired line.
- Farther - align the walls of the dug bowl and make them flat. Provide terraces around the perimeter of the reservoir. They do not allow the earth to crumble, they serve comfortable steps when laying waterproofing. In the future, they will be useful in the design of the pond.
Important! In the bowl of the pit, three zones are provided: deep, 1.8-2.0 meters, (below the freezing level of the earth). She is prepared so that she successfully winters. Medium - for plants. Small - in summer such places warm up well, fry, living creatures accumulate here, microflora multiplies.
If you are digging a swimming pond, you do not need to deepen the bottom, it is made even.
Next you need:
- remove stones, snags from the bottom;
- prepare waterproofing material.
The company "Landscape Constructions" recommends that you first fill the bottom with sand, lay it on top geotextile. 
Among existing options waterproof coatings, usually choose butyl rubber film. The main argument is durability. She serves up to 20 years.
Laying out the film
How else can you waterproof a pond?

For your information! In specialized stores you can buy ready-made plastic mold for a reservoir of 1000 liters or more.
How to build a dam?
A pit is not required for a pond, it is enough to make a dam using a stream or a catchment area where water flows. Running water fills the reservoir constantly. Block it in the narrowest place. First, a ditch is dug, the bottom is laid out with greasy clay, and it is rammed. Then they build a wall of clay, deepen into the bottom and edges of the ravine. The crest of the dam is raised a meter above the future water level, the rapids are made steep. 
Dams are built from natural materials: stone, gravel, logs, sometimes they are concreted. The base is supposed to be wide so that the structure can withstand water pressure.
When building such structures, remember about floods, consider water drainage in extreme situations.
The embankment is covered with a width of half a meter to 4, with a height of at least 0.5 m. The dam is filled only after the dam has settled.
Concrete dam. It is reinforced with rods, a corner, a steel mesh. For concreting use waterproof cement, add liquid glass, PVA glue. 
If there is a ravine
The ravine next to the site, along the bottom of which a stream flows and overflows in high water, can be turned from a potential enemy into a friend and helper. The ravine is blocked from coast to coast by an embankment. In front of it, rain, spring, or river water gradually accumulates, a water surface is formed.
Here is a similar positive experience step by step:
- Dig a bypass, temporarily direct a stream into it so as not to interfere with work.
- Make shields from boards, cover them with a film, on top - with roofing material.
- Make gaps in the ravine, insert shields into them, lay out a dam from stones.
- The bottom of the proposed pond cover with clay, compact, lay a layer of sand on top, level. At the end of the pond lay out with a film, the walls - with a stone.
- In order to keep the water at a certain level, set overflow pipe. excess water goes further along the diversion channel, into the ravine. To avoid silting, a sump is dug just above the course of a natural stream.
Such a water oasis practically does not require costs, it will avert the threat of flooding, decorate the place of rest. 
How to make sure that the pond does not freeze in winter?
In autumn, especially tender and valuable plants are removed from the pond, and ornamental fish are moved to the aquarium. Pond at low temperatures freezes, it is impossible to counteract nature, but it is possible to facilitate the wintering of fish in a reservoir, to ensure the flow of oxygen. 
- Reeds, cattail placed vertically. Oxygen through the hollow stems penetrates into the water.
- Styrofoam, bundles of straw on water will slow down freezing.
- Do products, pouring boiling water over ice.
- V very coldy cover insulation (straw, burlap, roofing material). Such flooring cannot be kept for a long time, natural light is needed. A wooden or foam box is placed above the hole, an incandescent lamp is hung, the hole does not freeze.
Used here floating aerator, however, its action is effective only at low sub-zero temperatures. 

Pond from a quarry
Such reservoirs are called quarry ponds or gravel pits. Usually these are old neglected quarries in which peat or stone was mined. The water in them stagnates, fish is found, mainly, a trifle. Used for breeding fish when it is possible to provide a constant flow of water. Specialized farms on quarry ponds produce up to 2 centners of fish per hectare. Such reservoirs are of interest to entrepreneurs. 
If there is a well
The easiest way is to feed the reservoir from the well. Here is such a scheme, with the help of which a good idea was realized, the owner of such a pond shared at the dacha forum. Water performs a cycle, its consumption is small.
- Water from the pond flows to the filter. In this case, it performs the function of a skimmer.
- The water cleared of debris falls into the waterfall that oxygenates the water. The pump in the well turns on only when there is a need to raise the water level.
- The relay works, turns on the pump in the well, water enters the pond, fills it up to the required level. Next comes the filter's turn. All mechanisms enter in turn. Such a scheme automatically maintains the water level necessary for the operation of the filter and waterfall.
How to make a flowing pond

The bridge as a decoration of the reservoir
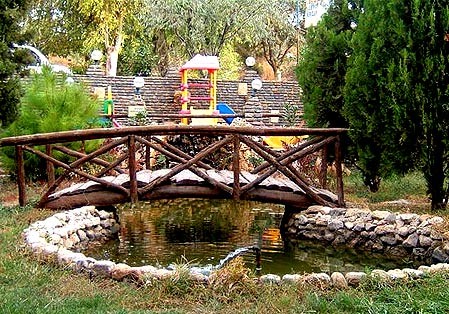
Straight, curved, hanging over the water surface - the bridge can be anything. Wood, concrete, stone, metal and their combinations are suitable for structures. Even the smallest bridge will enliven the site, become a continuation of the path, add an unusual line to the landscape. 
A simple bridge is easy to make:

pond filter
Alexander Pizanets tells how to make a filter for a pond in the video below.
The construction of a garden pond begins with the choice of a method for waterproofing it. Film insulation - modern material, which greatly simplifies the work and leaves the need for time-consuming concreting in the past. It is possible to build a pond from a film in just a couple of days, without special equipment at hand. Today is the most easy way available to every owner of a suburban area.

What you need to know before starting construction
Armed with the necessary knowledge and inspiring photos of film ponds, you can build a pond with your own hands no worse than those that cause delight and envy.
Is it possible to close the bottom of the pond
There are two opposite points of view on the waterproofing of a reservoir with a film:
- The film bottom should be organized in such a way that the coating remains as clean as possible. Any closure of the film with stone, silt or soil leads to the decay of organic particles with the release of methane and hydrogen sulfide.
- Gravel laid on top of the film membrane protects it from accidental punctures, for example, after a large branch falls or as a result of contact with a dog's claws.
How to calculate the required amount of film
The formula for budgeting for a future reservoir is as follows. To the length, and then to the width of the pond, add 2 depths and 1 meter of margin. For example, for a man-made dam with dimensions of 3 by 4 meters and a depth of 1.5 m, it is necessary to take a film measuring 7 by 8 m (3 + 1.5 x 2 + 1 = 7).
A piece of film membrane 6x7 meters (without a meter margin) will also be enough, however, in this case there is a danger of overtightening the material, which can lead to its damage. To bring to the coast, you will need from 20 to 50 cm of film coverage.

What material to choose for a reservoir
On sale there are several varieties of materials suitable for organizing the waterproofing of a reservoir:
- butyl rubber film (synthetic rubber) - has the highest wear resistance and strength, but differs by no means budget price;
- PVC film with a thickness of 0.5 mm - suitable for organizing a small decorative pond, it is desirable to choose a reinforced or reinforced material;
- material used to create advertising banners - if you wish, you can get it absolutely free.

The technology of organizing a man-made reservoir with a film
After the outlines of a do-it-yourself pond made of film have been outlined (it is desirable to have a photo of the desired result in front of your eyes), you can proceed to land works.
The stage of creating the bed of the dam
It is recommended to calculate the area of the reservoir in such a way that the slopes of the recess are at a slope of 20 to 45°. The maximum allowable slope angle is 60°, but the probability of shore slippage increases significantly.
For reliable fastening of the film membrane along the perimeter of the dam, it is recommended to dig a ditch-berm, 10 cm deep. The remains of the film should be placed under it, and the channel can be used as a kind of bioplateau that filters water. It is advisable to clean a functioning pond once a week with a mud pump immersed in the deepest mark of the bed.
For marsh plants, it is necessary to organize terraces at least 40 cm wide, which, along with the main function, will also play the role of steps. It is optimal to create two terraces - at a depth of 20-30 cm and 60 cm.

Terraces can cover only part of the dam perimeter
On a shallow plateau, later it will be possible to plant marsh irises in containers, the planting depth of which should not exceed 40 centimeters, and at the deepest stage - cattail and water lilies. Higher marsh plants-oxygenators maintain balance in the artificially created ecosystem of the dam, "taking away" food from unicellular algae, because of which the "bloom" of water occurs.
At this stage, a stream or ditch should also be provided to drain excess water from the reservoir. The exit from the pond should be lined with a film, and the main channel of the ditch should be left uninsulated so that moisture is absorbed into the ground.
Preparatory work before waterproofing
After the excavation is completed, it is necessary to carefully calibrate the level of the future reservoir and, if necessary, fill in the places of drops. The final stage of leveling the relief of the pond is the creation of a 10-centimeter sand cushion. It will act as a buffer, preventing film breaks during heaving of the underlying soils.

Before you make a pond out of a film with your own hands, the leveled area should be covered with geotextiles with a density of at least 300 g / m2. This will protect the material from tearing caused by mole digging and tree roots sprouting, and will also strengthen the banks. Strips of geotextile should be laid with an overlap of 20 cm, fixing them with adhesive tape, which will help prevent tearing of the edges due to gusts of wind and stretching of the film.
In addition, the lining material is a good heat insulator, it also helps the membrane to glide better, which makes it easier to install. Up to 50 cm of geotextile should be left on the banks of the reservoir in order to be able to correct the coastline and wrap the edges on the film in those places where sharp stones are planned.

Laying waterproofing on the bottom of the pond
A roll of membrane that acts as a waterproofing in a pond must be partially unrolled on a flat area and carefully rolled from the edges to the center, rolling evenly towards the middle. Thanks to this action, it will be more convenient to spread the film along the slopes from the depths. It is advisable to think over the nuances of how to properly make a pond from a film with your own hands before directly performing laying work.

By dragging the roll to the center of the recess, the waterproofing should be evenly distributed over the entire recess, leaving a margin of up to 50 cm on the shore. The folds on the membrane must be laid out in one direction - their presence will increase mobility insulating material under the influence of temperature differences. Upon completion of all work, unnecessary film residues can be cut off. For coastal zone It is appropriate to take a membrane covered with pebbles, or glue pebbles to it yourself for a more natural look of the pond.

An isolated reservoir should be filled with water gradually, giving the film the opportunity to stretch and checking the correct organization of the dam bed. Plants inside the pond should be placed in special containers lined with stone for a more aesthetic appearance, or in pocket bags sewn from geotextiles.
And a pond. Even a small body of water attracts others like a magnet. Water is mesmerizing even in small quantities ... Moreover, you can build a pond with your own hands in a few hours. But this is a small artificial reservoir. The construction of a large one will require both money and time.
Where to dig
Small artificial reservoirs are best viewed from above. Therefore, if there is a corresponding depression on the site, it is best to do it here. There is, however, in this negative side: you will have to raise the edges of the bowl higher so that rainwater does not get inside. The second option is to come up with a water drainage system (make a drainage system above the reservoir).
If there is a key somewhere on the site, it is logical to make a natural pond by digging or deepening the existing bowl, laying out its borders with cobblestones or stones, and planting plants. A stream, which is sure to exist in this case, can also be ennobled by laying out its edges with cobblestones, drowning them in soaked soil, you will give greater strength to the shore, and moisture-loving plants can be planted between them.
Even a small waterfall is a magical sight. How to dam a pond if there is a natural stream on your site - dig a ditch, line it with stone and direct the stream into it
Not everyone on the site has such a luxury as a stream or a key. We have to make artificial reservoirs. When properly designed, they look no worse than natural ones.
How to make an artificial pond with a bowl (without film)
The simplest and fast way make an artificial pond in the country - bury the finished bowl in the ground, decorating and decorating its edges. The bowls are plastic - ready different forms, sizes and colors (mainly blue, green and black).

The device of a plastic garden or country pond is a simple matter. Here step-by-step instruction:
- It is necessary to dig a pit in the shape of a bowl. If the shape is very non-standard, you can turn it upside down at the installation site, draw a contour with something (at least dig it with a shovel). The bowl is taken aside, a pit is dug. It should be a little larger in size - a little wider, but not deeper. The edges should either be flush with the ground, or protrude slightly. If you manage to raise the edges a little, it will be even better: during the rain, dirty water will not flow.
- After the desired depth is reached, the bottom is leveled into the horizon: it is first leveled with a shovel, then compacted and the excess is removed with an even bar. The surface should be flat and hard: the plastic should have good support. If the ground is poorly leveled (clay), you can pour 5-10 cm of sand, wet it and compact it.
- The next step is to install the bowl in the pit. If the bottom has been made even, the edges of the bowl will become level with respect to the horizon. Now the space that remains between the wall of the bowl and the pit must be covered with soil or sand and compacted well.
- Now it's up to the design: the installation is completed, you can fill in the water.
How this technology was used to build a pond in the yard with illumination, see this photo report (you can scroll through the photo gallery by clicking on the thumbnails below).
Digging a pit. We decided that the sides would be 1-2 cm higher than the level of the track - there would be less debris inside, and we would decorate the edges with stones. On this side, just below the maximum level, a pipe was cut into the bowl - so that excess water would drain. They took her down the drain
But not always and not everywhere there is an opportunity to constantly add and divert water to the pond. Then you will either have to plant such plants that will clean it, or change it periodically.
Pond from an old bathroom
It is not necessary to buy a bowl. Any container can be used. Even old bath. It turns out very well. All actions are the same, the foundation pit is first dug, a bath is placed in it, what goes on, see the next series of photos. On them a pond of old bath transforms into a truly delightful place.
The site was still entangled with wire - so that the clay does not float and the site does not sag. It’s already such a beauty in a month - a garden pond built by one’s own hands makes me happy
A pond from a car tire (with a film)
A mini-pond can be made from an old car tire, or rather from a tire. The larger it is, the larger the reservoir. The most difficult thing in this business is to cut off one side part. If the edges are sharp as a result, they need to be processed sandpaper. The second most difficult task is to dig a hole of a suitable size. This is where the difficulties ended. The rest is quite easy.
A cut tire is installed in the pit, covered with earth on the sides, well compacted. Also, earth or sand is poured inside, the bottom is leveled. Take a piece of dense plastic film, which can be folded twice and cover the resulting tank. Do not try hard: pour water, she will straighten the film herself.
Instead of polyethylene, you can take a banner film (available in advertising firms that produce outdoor advertising) or a piece special for swimming pools and ponds. They are much stronger (but more expensive).
The protruding ends of the film are tucked around the walls of your pond, decorated with stones. The device of the pond is over, then - decoration and planting of plants. See how to make a pond from a tire in the photo report.
The next stage in the manufacture of a mini-pond for a summer residence is decorating the edges with stones
There is certainly nothing complicated in such a device. Anyone can build such a reservoir in the country with their own hands, and the investment is minimal.
In general, mini-ponds are also made from tanks, barrels, pots, even flower pots. The main thing is to have a body, and it is not very difficult to arrange it: experience gradually comes. They put them in the garden, in the country, near the house. It is possible to bring water, make a stream, it can be bred under trees, for example, or shrubs. Both beauty and usefulness at the same time.
We make a pond with a film
By creating this artificial pond from a film, you almost exactly repeat the work described above, only without installing a bowl:
- mark out the shape of the future pond;
- dig a pit, forming, if necessary, ledges;
- clean the bottom of any sharp objects: roots, stones, etc.;
- level the banks of your pond;
- spread the waterproofing film;
- fill the pond with water;
- fix the edges of the film;
- decorate.
A country pond created using this technology may already be of a more respectable size. Important point: on loose soil, just making a pit and putting a film will not work. We will have to come up with some measures to strengthen the coast. In this case, you will either have to put up a bowl, or make a more serious structure - from brick or concrete. Next, consider examples of how to inexpensively make a pond out of film.
First project: sides flush with the ground
Eight simple steps and your pond in the country is built. How to dig and equip a pond in the country, to make it look like a natural one, see the photo report.
Second project: sides raised
Second option makeshift pond at the first stages, it is built in almost the same way as the first one. Only after the depth of the excavation reached the design one, the sides were raised, laid out along the edge with bricks and concreted. It turned out a reservoir with raised sides. There is also a water circulation system. It is shown in the figure below.

As you can see, this pond is more multi-layered and its volume is more serious. If you want to have a reservoir of at least a medium size and not build a serious bowl at the same time, you can do as shown in the figure: fill the created pit with sand, cover it, and only lay the film on top. Geotextile evenly distributes the load and does not allow plants to germinate. This is especially true if you are building a pond in your garden and there are bushes or trees nearby.
Serious projects: brick and concrete
If you want to have a large pond in the country, and you want to build it yourself, you will have to study the topic of building pools. Firstly, the construction of bowls - one to one repeats all the steps. Even forms are sometimes made stepped. True, the shores are not decorated with plants, and they are not planted in the pool itself ... But the construction process itself, with reinforcement, plaster, waterproofing, is the same. Moreover, the water supply and water treatment system is also similar. Except that they do not use in ponds chemical methods cleaning, but filters, skimmers and ultraviolet can be used.
In general, a large pond is not a cheap pleasure. Moreover, it requires expenses only for construction, but also for maintaining a large reservoir in good condition: filters need to be cleaned regularly and cartridges or backfill changed. But of course, it's a lot of fun...
Not the largest pond, but 10 bags of cement, 30 bags of sand (20 coarse and 10 fine), a hydrophobic additive - 5 bags went to it so that the concrete was water-repellent. Plastered on a grid fixed in the ground
Plants for the pond
When shaping or choosing a bowl, consider not only its shape and depth. If you want plants to grow in the pond, you need a swampy coastal area. If you form a reservoir using a film, you can make approximately the same profile as in the picture.

It is more convenient to do this if you fill the pit with a layer of sand at least 15 cm thick. With it, you can make the relief the way you like. To make it easier to work and the film does not tear, lay geotextiles on the sand. This thin membrane is very tear resistant. You can do whatever you want and don't break it. Having formed the desired bottom relief with its help, you can line the film and lay stones on it, fill it with water and plant plants for the pond at different levels.
In order to have enough oxygen in the water, you can plant Canadian elodea, hornwort and swamp. They are in the photo below. Planted in water - these are aquatic plants.
