The inhabitants of all cities and towns are surrounded great amount sculptures made of concrete. Probably, most of all the figures were made by V.I. Lenin. Of course, we are interested in something more fun and simpler. Let's get acquainted with the figures for the garden that people made with their own hands and choose the right one for ourselves.
"Grandfather and grandmother are singing this song next to us"Features and properties of concrete crafts for the garden
The main characteristic of concrete sculptures is strength. Moreover, art concrete is not afraid of frost, sun, or moisture.
This is what predetermined the popularity of using the material to create figures on city streets. Crafts from it can be painted, but even without painting, many creations look decent.
With your own hands from a mixture of sand and cement, often in a ratio of 2: 1, you can make funny figurines for the garden, flower pots, decor for a pond, and more. We devoted another separate material to concrete paths.
During operation, concrete dries for a long time, it can spread. Too thin a solution can crack during drying. But there is time to form the desired surface shape from the material. PVA glue or tile glue is added to the solution as a plasticizer.
To create a figurine from artistic concrete the easiest way is to pour the solution into the finished form. Another option is to sculpt the sculpture on a previously prepared frame. The original way - soak a cord or fabric with concrete and form a craft. Textured surface can be obtained by covering the mold with a corrugated material that will not stick to the workpiece.
Options for figurines from cement mortar
 The planter is cast in concrete and the hair is arranged by plants
 Artistic concrete is best suited for making flower pots, since ready product not afraid of moisture. The easiest way to cast a flower container is to use plastic planter as a mold, inside of which a plastic bottle is placed to form a void. A true masterpiece is a flower pot in the form of a woman's head, in which flowers that imitate a hairstyle grow.
The simplest option is to pour some mortar into an old rubber ball. You will get a ladybug, which remains to be painted. A dwarf fungus head can be crafted using a plate as a mold. The leg can be molded from a solution on a plastic bottle frame.
 Everything from cement: from simple to complex
 Sculptures of people are much more difficult to make, we will talk about them below. Fawns are a wonderful example to follow. For their manufacture on flat surface lined polyethylene film... It is convenient to lay out the contours of the figure using a flexible plastic border tape. Outside the mold, sand and stone are used to fix the tape. It is convenient to fix the tape inside by sticking pieces of wire into the ground. Immediately after pouring the solution, the wire is pulled out.
 Concrete crafts sleep constantly
 Complex shapes are made by pouring cement mortar into special forms, or molded onto a frame. The description of the manufacture of the following figures follows in the text.
 Masha and the bear are always together
  The wolf and the hare stay away
  Jack has ordinary sand in his chest
  Finally, Shrek used the donkey for its intended purpose
 Universal rules for cement mortar creativity
To ensure the strength of any product made on the basis of cement, when the latter solidifies, it is necessary to provide heat and moisture. Thus, it is necessary to observe the execution general rule: After the figure is made, it should be covered with plastic wrap.
Old rags, tights and cord turn into pots and gnomes
It is a good idea to saturate the fabric with a mixture of cement and sand. What will happen is eloquently told in the film "Gentlemen of Fortune".
To provide solid construction pieces of fabric soaked in solution are hung on a stand and covered with polyethylene. After the cement hardens, a flowerpot is obtained. It can be dyed.
 Old tights are no less functional. Take a tighter copy and cut off one stocking. Poured inside cement mortar... To organize the legs and nose of the gnome, parts of the fabric are tied with a cord. The top of the uncemented stocking can be tied as shown.
The second part of the tights, soaked in cement, is tied around the workpiece, forming the bottom of the cap. The tails of the knot form the gnome's mustache. The structure is hung on a rope. After the concrete has hardened, the figures can be colored to taste.
 It is possible to compose many compositions from the twine impregnated with cement mortar. The simplest thing is to wrap the usual one balloonhic. After the cement has set, remove the excess concrete with a sharp object. The structure can be painted. Turned out decorative ball for garden.
 Burdock leaf and balloon form the shape of a fountain and lamp
Using a balloon as a shape, you can make DIY garden lamps, balloon-shaped pots, or decorative concrete balls.
 A large burdock leaf is a wonderful form for DIY concrete crafts. Leaves made of concrete are suitable for creating a path, decorative waterfall or just decoration of the site.
Master class for making a decorative fountain from concrete leaves:

From the example of crafts using a plant leaf, it is obvious that the surface of art concrete can be very different. In the photo below you can see an example of the work of the crumpled film when filling the head of the fungus, thanks to which the figure acquired a more natural look. In the manufacture of pots, plastic or rubber inserts were used to form stars. The surface of the ladybug can be laid out in pieces ceramic tiles... The walls of the plant pots are covered with gravel chips. Thus, your craft can be decorated using different ways.
 Surface texture of cement crafts for every taste
 We sculpt from cement mortar any figure on a frame made of wire, plastic containers and an old toy
In this section, we will learn how to sculpt garden figurines from artistic concrete using a frame. In construction, it is believed that a new layer of material should not be laid on dried concrete. However, sculptors cannot sculpt a whole figure for a short time, and the material that cures for a long time will not allow this. For this reason, during sculpting from a cement mortar, a new layer is applied to an incompletely dried previous one. At the same time, they try to ensure sufficient thickness and continuity of the new layer of material.
An old doll can be used as a frame for a garden sculpture. To ensure adhesion of the solution to the workpiece, it must be primed, for example, with PVA glue. Then a thick solution is gradually applied. Work is carried out with gloves. To speed up the setting of the solution, add a little gypsum to each portion that you take in your hand and mix right in the palm of your hand. After the solution has completely solidified, the sculpture is primed and painted.

 In approximately the same way, you can make flower pots in the form of a cat from cement and plaster. Consider making a figurine step by step:

 Before you step by step photo making complex garden sculptures. The scheme for making stucco figures on the frame is still the same:
- first, a frame is made of reinforcement and metal mesh;
- then the cement mortar is applied in several stages;
- when drying, the figure is covered with polyethylene to ensure the necessary moisture;
- the dried sculpture is decorated.
 At the first stage, you can't guess that it will be Masha and the bear
  The solution and paints are applied in several stages. The scarecrow inevitably turned from a reinforcement with a bucket into Jack Sparrow
 Of course, to make complex artistic sculptures you need to be a sculptor at least a little. The very process of making crafts from cement mortar does not present any difficulty. Start simple and let the end result amaze others.
We advise you to watch the following video.
Cement is not only a material for the construction of buildings and structures. It can be used to create a very unusual and rather attractive garden decor. This article will be devoted to how to make a beautiful do-it-yourself cement craft.
What you need to know when working with cement
As decorative details and elements landscape design various figures of heroes of fairy tales, objects of flora and fauna, etc., can protrude from the cement. This material considered not picky. 
Cement crafts need a fairly long drying time. The cement mortar can harden for up to seven days. To avoid cracks, the finished object is wrapped in plastic wrap.

As you can see from the photo of cement crafts, their optimal location is considered to be a hill. It can be both natural and artificial.


Paint or varnish should be applied over the primer. And it, in turn, needs to be applied only after the cement has completely dried. For leveling the surface of the product, it is permissible to use sandpaper.

Analogs of cement can be concrete or gypsum. Craft ideas and instructions on how to make can be found on the Internet.

Original ideas for beginners
If you have little or no experience with cement mortar, it is preferable to choose a simple product as your first experience. These can be cute mushrooms, colored balls, or unusual pots.


Cement mushroom craft
Prepare following materials: an old rubber ball (for a hat), a plastic bottle (it will make a leg), a steel bar (fasteners will be made from it).

Cut the ball in half. Place one half in a bucket of sand and pour cement into it. Cut off the bottom and neck of the bottle. Insert the blank into the center of the cement-filled half of the ball. The immersion should be 1-2 cm.

Connect both parts of the mushroom with a steel rod and pour inside the bottle cement-sand mixture... Leave the product to harden completely. Then remove the bottle and ball. After a couple of days, the mushroom can be painted and decorated.

Such mushrooms will wonderfully decorate any garden meadow. Instead of a ball, you can use the most containers - bowls, cans, etc.


Other interesting idea is a light openwork ball. To create it, you need a regular balloon, rope and cement. The balloon must be inflated to the right size and wrap it with a rope dipped in a cement mixture. After the craft has dried, the ball must be removed by bursting it. Next is the decoration.

The same technology can be used to make graceful lanterns for a garden or containers for flowers. The rope is not needed in this case. You just need to add a little gypsum to the cement.

One of the most popular varieties of cement crafts for dacha and garden decor are garden gnomes. It is not difficult to make such objects of landscape architecture. You will need cement mortar, steel bar, old stockings and rope.

Need to fill cement mix into the stocking by inserting a metal rod into it. Use a rope to form a nose, beard and legs. Hang up by the cap and leave to dry.

After the workpiece is completely dry, cover it with cement-gypsum mortar. Once the polishing layer is dry, you can start decorating.


Most original craft do it yourself - this is a fountain of leaves. In order to make a sheet of cement, you need a fairly big leaf from any plant. We will use it to form a cement copy of it. We leave it to dry. Then we work it out in more detail and paint it. From sheets different sizes constructing beautiful fountain, which will become a decoration of your local area.


If you have any difficulties in making cement products yourself, then you can purchase ready-made cement crafts self made from a specialist store or order them from a workshop.

Photos of cement crafts


Cement is not at all suitable material for crafts, this opinion is quite common. But people who are selflessly in love with the construction site have proved the opposite! Looking at these things, one wants to buy a bag of cement immediately.
Now, not only men, but also women will be able to play the builder - cute things that will decorate the interior will not leave anyone indifferent.
Having received a functional cement item as a gift, your friend will understand that your friendship is the most durable in the world. Open your mouth in amazement, enjoy these ideas. I dream of concrete phone stand…
Cement crafts
Thanks to creative people work in different areas life, such wonderful, non-standard solutions appear.
Now you know how many incredible things can be made from ordinary cement. Yes, this is insanely inspiring! Share this inspiration with your friends, help them go beyond the ordinary.
This is a real creative laboratory! A team of true like-minded people, each of whom is an expert in his field, united by a common goal: to help people. We create content that is truly worth sharing, and our beloved readers serve as a source of inexhaustible inspiration!
Quite often, even with a successful arrangement of plants in the garden, there is a feeling of understatement and the general impression of incompleteness. This problem can be helped garden sculpturesby successfully placing them on the site, you can achieve an excellent effect.
A bit of history
Man has been decorating for more than the first millennium adjoining territory sculptures. But if in the past this was done mainly on the basis of practical considerations, for example, protection from evil spirits, now aesthetic considerations have come to the fore.
In Russia, the tradition of installing sculptures in gardens and parks owes its origin to Peter I. Then the works of Italian craftsmen were installed in Summer Garden... The novelty hit the taste of the broad masses, and the nobles gladly followed the example of Peter I.

Of course, those sculptures looked a little like DIY cement garden crafts. They used mainly images of Greek deities and statues of various emperors.
On the classification of sculptures
In general, all sculptures used to decorate gardens and parks can be divided into 4 types:
- classical type - most often these are images of deities, emperors, famous people etc. The main material is bronze and marble. Such sculptures look great on large areas, decorating, for example, the entrance to a luxurious mansion;

- art sculpture - this category includes everything that is incomprehensible that attracts the eye, and in some cases causes bewilderment. Such sculptures can be made from literally any material. In addition to the usual stone, concrete, metal, even hardened polyurethane foam, etc .;

Note!
Such decorations look somewhat defiant and special attention is needed when placing them in the garden.
There is a considerable risk that the author's intention will remain unclear.
- sculptural additions;
- small plastic - it is representatives of this group that can most often be found in the design of the garden. Wood, plastic and cement-concrete mixture are most often used as the main working material. Although, instead of self-made it is quite possible to buy a small beautiful one, their price is not so high.
Features of decorating a garden with sculptures
In this case, it is necessary to take into account not only the general design style, but also the nuances of the location of ready-made figures on the site. For example, a majestic human-sized sculpture will look ridiculous against the background of a small modest house.
You can highlight the following styles of gardening:
- formal style - suitable only for large areas, used when decorating the area around large mansions, etc. In this case, marble and bronze figures will be appropriate, they will look solemn, and expensive appearance will only intensify this feeling;
- registration in english style - in this case, the goal is to bring the environment as close as possible to natural. Use of small homemade figures, such as garden gnomes, is allowed;
- rock garden (decoration in japanese style) - boulders will be useful here, natural stones may not be at hand. Below is an option for creating a boulder from a cement concrete mixture with your own hands;
- rustic style - DIY cement crafts for the garden will be appropriate here.
Several original ideas
Of course, not even every sculptor will be able to make a sculpture to a human height, and even from marble or cast from bronze. Moreover, this task is too difficult. an ordinary person... But you can show quite a bit of imagination and independently make whatever your heart desires from an ordinary cement concrete mixture.
Using minimal set tools, you can make such garden decorations as:
- boulders, outwardly they will not differ from natural stones, will have a sufficiently high strength and low weight;
- bright, colorful stone flowers;
- unique;
- drinkers for birds in the form of, for example, a leaf of a tree;
- just do-it-yourself decorative garden figurines made of cement- it can be both images of animals and fabulous creatures.
It makes sense to consider several "recipes" for making such jewelry.
Homemade boulder for a Japanese rock garden
To make a hollow boulder, in addition to the cement concrete mortar itself, you will also need a plaster mesh - a frame will be formed from it.
The work is performed in the following sequence:
- first, a frame is formed from a light material. Anything that is lightweight (trimming polyurethane foam, crumpled paper or plastic bags);
- the core is wrapped with plaster mesh;
- after that, with a small spatula, the solution is applied to the frame;
Note!
For maximum similarity with natural stone the surface of the solution does not need to be leveled.
- after that, it remains only to cover the finished product with cellophane and wait until it dries. If you dry a boulder outdoors, it is more likely to crack.
In a similar way, you can make a perfectly round ball, such do-it-yourself cement figures for the garden, painted in bright colorswill liven up even the most dull atmosphere.
In this case, the role of the formwork will be played by an ordinary children's ball. A small hole is made in its wall and cement mortar is poured inside through it. After a couple of days, the "peel" can be removed, and the cement ball can be primed and painted in a bright color.
Leaf drinker
To make an original drinker, you will need an ordinary large leaf of burdock or any other, a little sand, a piece of polyethylene, cement concrete mortar and a piece of pipe with a diameter of about 10-15 cm.The main highlight is that all veins from a leaf of burdock will be printed on the surface of the cement mortar.
The instructions for making the figurine look like this:
- polyethylene is spread on a flat surface;
- a small sandy mound forms on it;
Note!
In order for the sand to keep its shape well, it can be moistened.
- another piece of cellophane is laid on top of the sand, stretched and fixed with stones at the corners;
- a sheet is spread and smoothed over it;
Note!
There will most likely be several small holes on the sheet.
So that the solution does not flow out through them, you can simply lay small pieces of sheet on top of them;
- the sheet is coated with a solution;
- in the central part, a pipe is placed on a layer of cement concrete and filled with mortar.
After that, it remains only to wait for the mixture to dry. Remnants of the sheet are removed, the concrete is primed and painted, it is possible to age its surface when painting, this will only enhance the aesthetic effect.
Homemade sculptures
If free time allows, then you can make more complex garden sculptures with your own hands from cement.
AT in general terms the same approach is used:
- it is undesirable to make massive parts of the sculpture solid. So the weight of the figure will be too heavy and the cement concrete will take too long to dry. It is best to use old containers for the frame;
- for elongated elements, the frame can be made from reinforcing rods or wire.
Those who wish to diversify the appearance of the garden can be advised a flowerbed-lake, on which figures of swans will be located average size... The swans themselves will be made from a cement-concrete mixture.
The work is performed in the following order:
- the frame of the body is an inverted old basin, and for the neck you will have to weave a frame from wire;
- the frame is coated with a layer of cement-concrete mixture, a head is formed;
- the necessary surface texture will be given by small pebbles pressed into the cement concrete and painting.
Flowerbed in the form of a hand
A mini-flower bed (or flower stand) can be made using a regular medical glove. To do this, just fill it with a solution and wait for the mixture to harden. Then you just need to delete thin layer rubber and original stone hand ready for use.
These are far from all sculptures for a garden with their own hands made of cement, in this matter, the only limiter is fantasy. FROM minimal cost time and effort, you can make cute boletus or bright fly agarics, they will look great in the back of the garden.
Another option for unpretentious figures is stone flowers (from the hemispheres), ladybugs and other creatures that do not require attention to detail.
In conclusion
Decorating gardens with sculptures is only gaining popularity. This is a great way to diversify the look of your favorite site that has become boring over the years. It is also important that most sculptures can be made independently, that is financial expenses for their production are minimal.
The video in this article shows cute examples of garden decoration figurines.


See what beautiful flower containers you can make with cement mortar and an old rag. That's really, really, crafts from scrap materials!
DIY crafts for the garden. Decorative openwork ball made of cement.

For work, we need a cement solution - we knead a thick solution 1 part of sand, 1 part of cement.

We immerse the rope in the solution, it can also be strips from an old T-shirt, etc. We inflate the balloon, prepare a stand for it, where it will dry. It can be a regular bucket.  We wrap the ball with a rope in a cement mortar.
 After the solution has dried, blow off the ball with a needle. All! Our garden art object is ready. Can be painted as desired.

Original crafts for the cement garden.
Agree, it looks like dragon eggs)) We will make this out of cement.

We take the same balloon and cover it with cement mortar. Here you can add a tablespoon of gypsum to the solution, only you need to work quickly.

After the solution has dried, remove the ball and paint the inside of the egg. You can use it as an Easter decor in the country - by making a floral arrangement of primroses in it.

Crafts for the garden. DIY cement garden gnomes.
These cute garden gnomes are made very easy too.

For the gnome, we need cement, a metal bar, a stocking and ropes. Pour the cement solution into the stocking, insert it into it for strength metal fittings... Twisting the rope, we form the noses, legs. Let's not forget about the beard - this is an additional piece of material under the gnome's nose. We hang the gnome by the top of the hat and leave it to dry.

When the cement dries, we remove the gnome and polish the top with a more liquid solution of cement and gypsum. We are waiting for the gnome to dry and can tint or paint. Handsome, aren't they?

DIY garden crafts. Garden fountain with leaves.
We will not talk about the principles of creating a fountain in the country. This topic is a separate article, and you can read it in detail. We will make the leaves from cement.

We need a sheet that is large enough, and with the help of cement, we create a copy of it.

After drying, the sheet can be worked out in more detail and painted.

And you will become, almost free of charge, the owner of such a beautiful fountain.

Crafts for the garden. Original flower beds with your own hands.
Are you not a sculptor at all? But believe me, you can make these original flower containers.

We need plastic container, polystyrene, reinforcing mesh. We make a cement mortar by adding a spoonful of gypsum directly to the palm with the mortar and this is how we form our "sculpture"

But not all of us are fans of modern abstract art. But you can quite make garden crafts in a classic style.

But since you are not a sculptor yet, you need a template - it could very well be an old doll.

Because it will be not just a decorative garden figurine, but a flower garden in the form of a girl's head, then upper part need to be cut.

Then the head is painted. In order to give the texture, the template is painted first with a dark gray paint. Allow to dry and apply a layer of lighter paint. After drying, a layer of even lighter paint is applied with light strokes.

This is a very simple process, and all the examples of this style that you see in the article were made by teenagers in a labor lesson.
Beautiful crafts for the garden. DIY garden figurines.
For those who liked the process of making concrete crafts, we will tell you another simply stunning technique for creating garden figurines.

Yes, we need the old doll again!

First, we strengthen the doll with hot glue and a bamboo sushi stick on a heavy stand. By the way, we can also make it from cement. cut the angel's wings out of foam, attach it to the doll with hot glue. Give the doll a new dress and, with the help of hot glue strokes, create more interesting texture on the wings and hair.

We coat our template with a solution of cement and plaster. We paint.

Now, with the help of old toys, you can make almost any garden figurine yourself.

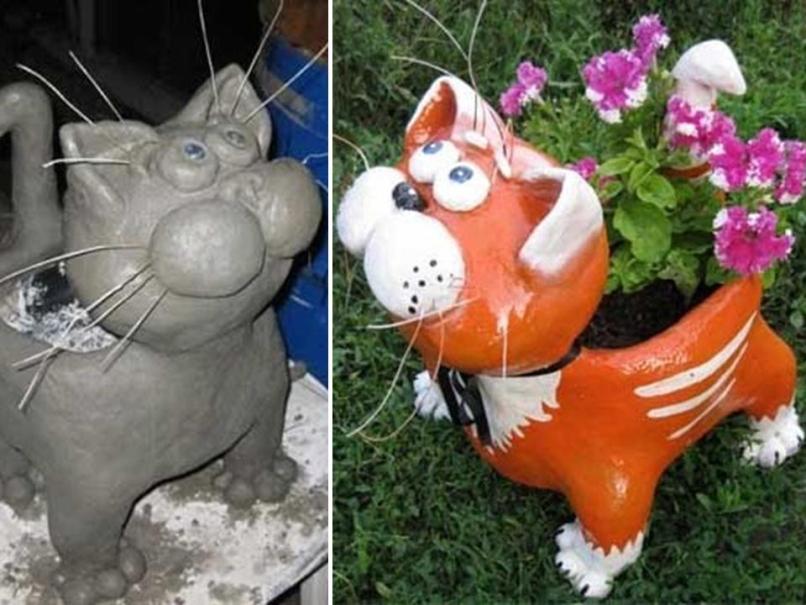
DIY crafts for the garden. Flowerbed cat.
This funny cat flower bed is made of a plastic bottle and cement.  We will need: cement, sand, plaster, water, a large plastic bottle, wire, paint, wooden slats, varnish.
The owner of this cat Natasha Koneva will tell us how to make such a funny figure with our own hands. We cut off the plastic bottle - it is this container that will be our flower garden. To prevent the cement from slipping off the plastic, we wrap it tightly with wire. We knock down from the racks wooden frame... We attach our plastic container to it. 
We mix the cement mortar with the consistency of thick sour cream at the rate of 1 part of sand, 1 part of cement. We will add gypsum only to the finished portion, which is in our hand, because the solution with plaster hardens instantly. We work in rubber gloves. 
We take a handful of solution in our hand and add a tablespoon of gypsum to it. Knead in hands, roll up with sausage and fasten to the frame. So step by step we put portions of the solution on top of each other, creating the necessary bulges and smoothing the surface. 
We sculpt the face of our cat from small balls of solution in much the same way as we sculpted from plasticine in childhood. In order to small parts held on better, before attaching them to the body, we lubricate the surface of the figure with water. 
With a damp hand, polish the surface of our garden figurine. To dry the figure, cover with cellophane for 3-4 days. On the first day, the figure must be periodically additionally moistened with water. After drying, sand the surface with sandpaper. 
You can paint such a figure water-based paint, enamel, car paints. After painting, we cover the surface with varnish. For the winter, the garden figurine must be removed from the street, because it can crack from frost. Perhaps you also want to get yourself such a wonderful cat. 
The great thing about cement figurines is that they are cheap to make compared to garden figurines made of metal or wood. You can start with simple crafts for a garden, which can be no less interesting than some particularly complex ones. You can combine cement with other materials. - for the face of this little garden fairy " ladybugTook the head of an old doll. 
How to use garden crafts effectively.

DIY garden crafts will add more interesting details to general view your garden. Place them thoughtfully, because you will have to admire them most of the year.