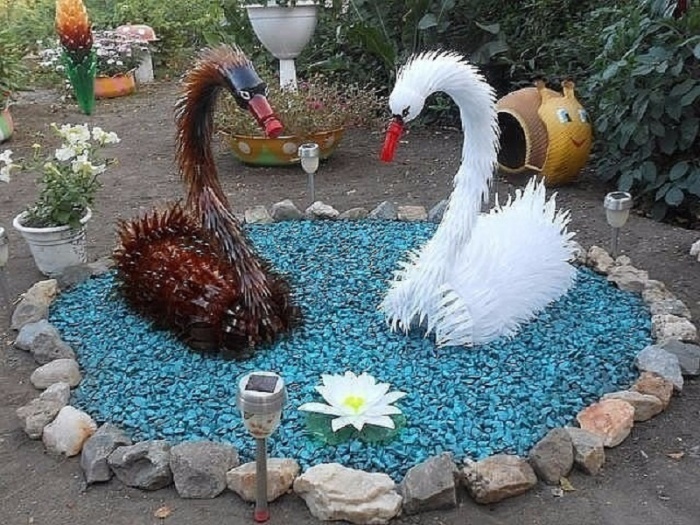
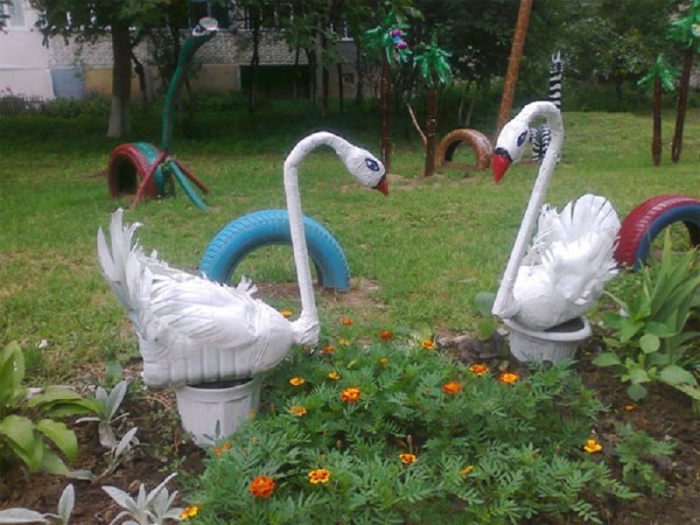
Use plastic bottles to make graceful swans floating on a scenic lake. Its surface reflects a palm tree, also made by hand.
The content of the article:
It is not difficult to make a summer cottage extraordinarily attractive. To do this, you do not have to spend a lot of money, it is enough to put empty plastic bottles in bags, and then select ideas from the proposed ones and bring them to life. Such work is inspiring, allows you to make the site well-groomed. Neighbors and guests will certainly pay attention to him, and the owners themselves are pleased to be in such an environment. Start your makeover with some simple work to create a fabulous corner of your backyard.
Lake or pond for bottle cottages

To make the reservoir itself, no special skill is required, depending on its size, you will need 30–250 bottles. First, outline the place of the future fairy pond with a shovel. Select the sod inside its outlines. It can be piled up, covered with a dark film, periodically sprinkled with water and kitchen waste, and you will have excellent compost next year.
If you are using a non-virgin plot of land, then simply loosen it with a shovel and, starting from the middle to the edges, lay the workpieces. To make them, cut off the neck at the shoulders of the plastic bottles, now press the blanks upside down into the ground so that the container looks 8 cm above the soil surface.You can use the lower halves of the bottles left over from creating other things for this type of site design. The main thing is that they are no shorter than 10 cm.
If you are using only the bottom of the plastic bottles, then fill it with soil, turn it upside down so that the blanks rise above the ground. Place containers close to each other to minimize gaps.
After completing several rows of inverted plastic bottles, paint them blue. It is better to do this right away, since if the lake is large, it is difficult to get into its center. If you do not have numerous containers available, make the lake gradually. The edging can be decorated with large stones. For a scenic pond, plant a few plants around the edges.
Decorate the lake with water lilies. How to make such crafts with your own hands was described in one of the previous articles, and from this one you will learn how to make a swan from improvised material. Such a bird looks great not only near the lake, but also in any other corner of the garden.

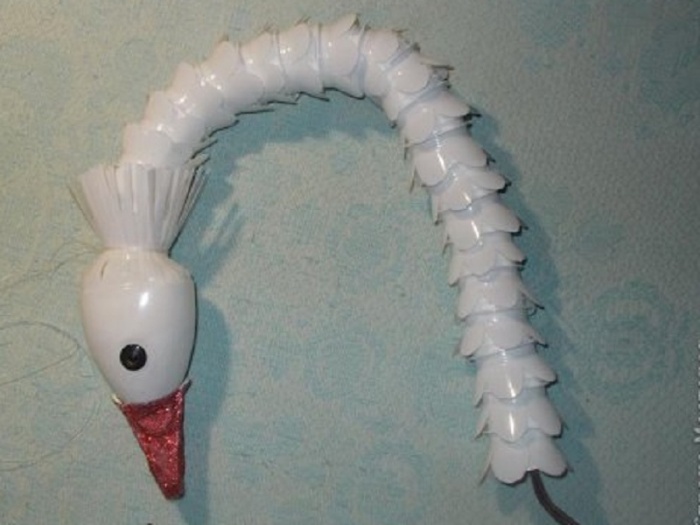
For this type of creativity, you will need a tire from a car wheel. Paint it white, attach a strong wire to the outside with iron staples. It should wrap the bottom of the tire, then bring it up and bend it in the shape of a swan's neck.
Now slide a plastic water hose over the wire, if you don't have one, a piece of watering rubber will do. Slightly cut its upper part on both sides, put the bird's head here. To craft it, cut the soft bottle below the shoulders, making a curly cut. Put the blank on the wire, make a beak from a small ketchup bottle. If you don't have one, then cut a triangle out of plastic, glue its two opposite sides. After placing the beak in place, paint over it with red paint. You can make a head from synthetic foam, and take a hose from an old vacuum cleaner for the neck.
Paint the head and neck white, and black mark the junction of the beak and face, so that the supra-forehead and eyes of the bird are clearly visible.
If you have extra time, then modify the tire a little before doing the swan. As you can see in the photo, on one side there are small cuts on it, on the other - solid, it is made so that the tail remains. The place of the cut is fastened with a bolt and a screw.
Bird with fluffy feathers from plastic bottles
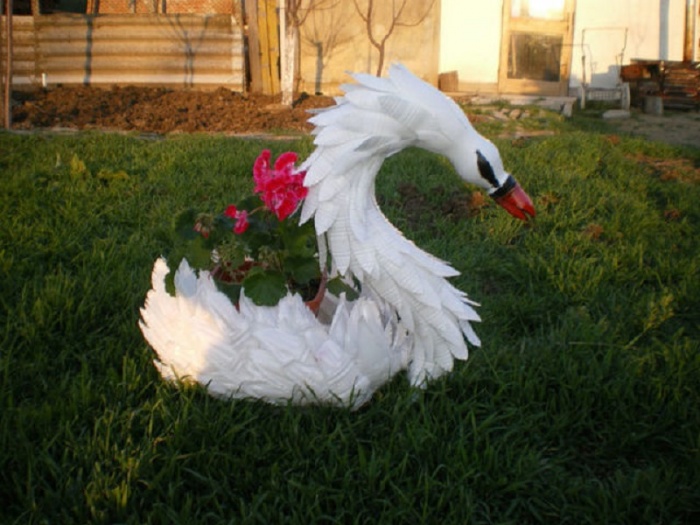
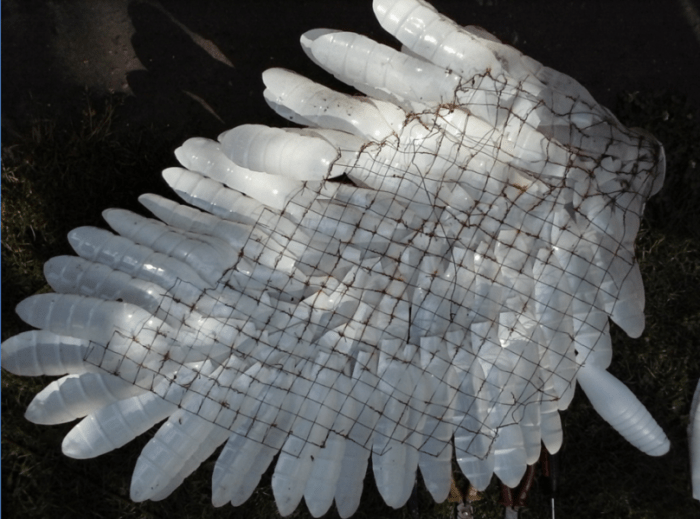
Do-it-yourself swans are graceful if they are beautifully feathered. To do this, you will need white plastic milk bottles.

In the next photo you can see how to make the wings. To do this, cut out their base from a metal mesh in the form of a triangle with beveled corners. For feathering, use white plastic milk bottles. Cut off the neck and bottom of each. Divide the resulting canvas into 6 parts, also round each of them with scissors. These are feathers. Use an awl and thin wire to attach them. Make punctures in the blanks and tie them to the mesh.
Cover it with feathers on both sides. Attach 2 fenders to the tire using self-tapping screws. You can do it differently by pulling the wings together with a wire through the tire.
How are graceful birds made from plastic bottles?
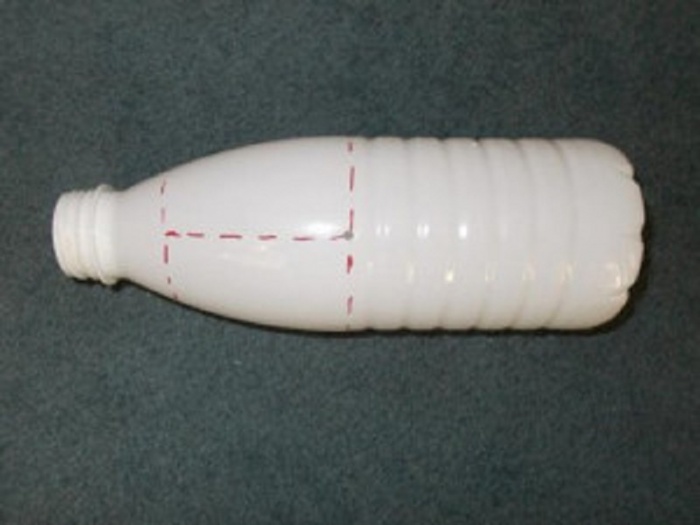
Another Graceful Swan can be crafted with the following materials. To work you will need:
- large plastic bottle of rectangular shape;
- putty;
- thick wire;
- bandage;
- sand.

Now grease the entire outside of the canister with a thick putty. Take the bandage, starting to wrap the wire with it from the bottom up, also generously coat it with this solution. As a result, you get the neck of a graceful bird. Where the head will be, the bandage will need to be wound even more, sandwich it with putty. Decorate this part of the blank.
Let's get down to the wings. As in the first case, they will need a coarse-mesh iron mesh. To attach it, first cover the bird's body with a primer, let it dry, then attach the mesh and secure it to the sides of the swan with putty.

You can leave the wings like this, or decorate them on the outside with feathers from plastic milk bottles, and hide the mesh on the back under a layer of putty.
You just need to let the product dry, then paint the eyes and beak of the bird in the desired colors. If you want to use a swan as an original flowerpot for a summer residence, then fill the canister with sand only a quarter, and pour fertile soil on top and plant your favorite flower. Or craft a second bird. As a result, you will get such beautiful do-it-yourself swans.

How to quickly make snow-white birds out of bottles?
If you have a little empty container, and you want to quickly decorate your site, then read how to make a swan quickly and from a small amount of materials. Also, he can not only decorate a summer cottage, but also become a beautiful and original flower bed. For this, transparent containers are quite suitable, they need to cut off the necks along the top of the shoulders.
Draw the shape of the future flower garden on the ground. Fill bottles with sand or unnecessary soil such as clay and paint them white. When the paint is dry, dig the bottles about a quarter into the ground according to the marked markings, turning them upside down. To keep them well, fasten them in a circle with 2-3 layers of wide tape. It also needs to be covered with white paint.
The swan's head and neck are made of plywood. First, draw this part of the bird on the blank, and then cut it out. As shown in the photo, paint this part with the appropriate paints. Pour fertile soil into the flower bed, plant flowers and you can admire the original creation.

Plastic swans can be made without much hassle. To make the following, you only need:
- 5 liter canister;
- milk bottles;
- scissors;
- glue;
- paints;
- wire.

Put the canister horizontally on a large part, cut off the upper side from it, pour on a third of the wet sand. Insert a wire into the hole in the cork made with a soldering iron, bend it in the form of a bird's neck and head.
Cut one off the milk bottle. Cut it from bottom to shoulder into 6 pieces, round off the resulting feathers with scissors. Decorate the entire container like this, and then put the blanks on the bird's neck in turn. In the neck of the last top, insert its beak. You can also make it from plastic or polymer clay.
Now you need a few more milk bottles. Cut 4 feathers out of each, stick them on the canister, starting from the bottom, so that the rounded part of the feathers looks up and slightly to the side. After the glue is dry, place the flower pot in the canister. The master class uploads a story about how to make graceful swans from plastic bottles.
We decorate a summer pond-lake with plastic bottles

If you imagine that a lake with swans swimming in it is located on an island, then why not place a palm tree on its shore? It is also made from plastic bottles. It is very interesting to make such products with your own hands. If you do this with your children, they, too, will certainly grow up to be creative people, capable of looking at any materials and finding craft ideas.
For a palm tree you will need:
- metal fittings of the required length;
- brown and green plastic bottles;
- scissors;
- candle or lighter.
First, the labels are torn off. If they are glued too well, then place them in hot water for 40 minutes, then remove, sometimes using a knife.
Now cut off the bottom of the bottles, make the place of the cut in a zigzag manner, slightly bend the resulting large notches outward. Stick the fittings in the intended place so that they hold tightly, start stringing the bottles with the neck down.
Such a technology of creation is suitable if you have little of the necessary containers. If there is more of it, then use only the bottom of the bottle. Drill each hole with a drill, and then string onto a metal rod as shown in the photo. And in the next photo you can see how you can make a trunk for a palm tree if you have an unnecessary log and bottoms from brown bottles. They are nailed or attached with self-tapping screws to a wooden base, but the bottom is left free so that the tree can be dug into the ground.

How to make palm leaves from bottles?
When you finish the trunk of a southern tree, proceed to its leaves. For them, you will need a green plastic container. A workshop on making bottle palms will detail this process.
There are also many options for obtaining this part of a tropical tree. If you liked the idea with a wooden base, then you can make the leaves in a simple way. This requires large plastic bottles with a pre-cut bottom. Cut them from the bottom to the shoulders, not reaching the neck, into many small ribbons.
Now drive metal rods into the upper part of a wooden palm tree, bend them slightly and string them with the neck down on each bottle. What you get is also seen in the photo.

And here is another way to make leaves from plastic bottles. A container of any size is suitable for this, you need to cut off the bottom from it and make 4 cuts on large bottles, and 3 cuts on small ones to the shoulders, round them off. These are blanks of leaves.
Now make a thin fringe around the edges of each sheet. In the center, leave a gap of 1–2 cm - this is the vein of the leaf.

On the top of the barrel, put a brown bottle without a bottom with the neck up. Make 6 holes on the cover crosswise with a soldering iron or a drill. Pass one rod or wire through the two opposite holes, one more rod through the other two, and a third wire through the third pair of holes. Now string the first blank of leaves on each rod, then the second, and so on. You should have 6 leaf pieces, each containing six bottles. For reliability, fasten them together on the covers with wire.
To prevent the bottles from jumping off the rod, just bend it on the back side. And this is what you get as a result.

If you want to visually see the process of making a palm tree, then watch the video:
Good afternoon, dear friends, today you will learn how you can make a flower pot for a garden in the form of swans with your own hands. Any site, garden or playground can be beautifully decorated, for this you need to apply only a little imagination. After all, you can not only decorate our site with flowers, but also crafts and garden sculptures. Due to the lack of space, it is not possible to put sculptures and plant flowers on every site, so for such purposes it is best to use a pots with your own hands. After all, you will have a craft and planted flowers. Planters are made different in shape and size, but most often they are created in the form of a swan. The swan is a very beautiful, graceful bird that leaves no one indifferent. This is probably why most often on the site you can meet this charming bird. A swan is made from different materials: tires, plastic bottles, cement, plaster, foam, etc. If you are interested in how to create, then on the site you can find crafts from these materials. Now let's get back to the topic and consider a detailed master class on making pots in the form of a swan, which will decorate your yard. The author of this master class is Alla Korobko... Alla showed and told in detail how you can create a swan with your own hands.
To make a swan you will need:
* Plastic 5 l. square bottle.
* Iron rod 0.6mm.
* Bandage.
* Starting putty.
* Small spatula.
* Brush.
* Capacity for mixing the solution.
* Water.
* Sand.
* Tile adhesive.
* Polyethylene film.
* Iron mesh.
* Sandpaper.
* Primer.
* Dye.
* Varnish.
How to make a swan with your own hands:
To make a swan, we need such a starting putty, Alla used this one.

Cut off the top of the plastic bottle as in the photo and pour sand there. But first, we take an iron rod and bend it in the form of a two. Make a hole in the cork for the wire and insert the curved iron pond into the hole. From the inside, you need to fix it somehow, for example, you can use broken brick or stones and seal it with tile glue.

Now we pour sand there. Alla moistened the sand so that it was wet and then put it into the bottle. Slightly expanding the sides of the bottle with sand to give a more natural shape to our planter.

We will prepare the workplace, take plastic wrap and cover it. Next, knead the putty solution very cool. We take a spatula and apply with it a layer of putty on the film, this will be the bottom for our planter.

When the layer is missed, we put a frame from a bottle on it. We continue to smear the putty, but from the bottom along the edges. Distribute the excess putty evenly and spread it along the edges from bottom to top. During work, the spatula must be moistened in water, this is done so that the putty does not stick and it is easy to work.

When all around completely missed we go to the neck. We wet our hands and take a putty solution from it, form a small ball and coat the base of the rod with the cork.

We wet the brush in water and use it to level the surface.


We start making wings. We take an iron mesh 15 cm by 30 cm and bend it slightly, give it a wing shape and slightly press it into the workpiece as if obliquely.

When the mesh is set, immediately fix it with a small amount of putty. When smeared, we leave it like this for 15 minutes, you need to wait for the putty to set for about 10-15 minutes. You can go while rest and drink tea. Under the rear part of the wing, you will need to make some kind of support.

When the wings grabbed, we proceed to manufacture further. We moisten our hands in water and take a little putty solution in them. We smear the putty with the hands on the outside of the wing, and with the other hand you need to hold it on the inside. We do the same with the second wing. If the putty does not stick very well, try to make the second wing for now, do not worry, you will definitely succeed. And we will fix all the shortcomings, flaws with you when the putty dries up a little.

When the wings are coated and it takes time for the putty to set, we will take care of the neck at this time. With wet hands, we form a small roller and fix it on the rod.

When the neck is smeared, we moisten the brush in water and use a wet brush to level the surface.

When we have leveled more or less the surface, we take a bandage, tear off small pieces and moisten them in water. Then we wrap it with a wet bandage around the neck, squeeze it a little with our hands. So we make the wire to the end, at the end we flatten it in the form of a beak and also wrap everything with a bandage. The neck is all for now, we go back to the wings, they dried up during this time and we can balance all the shortcomings.

Also unforgettable about the tail. Take a small piece of mesh and bend it with a cutout, about 40-45 degrees. With the help of putty and support, we fix the tail.


The head and neck also need to be fixed and given time for everything to grab, you can go for a walk for about 30 minutes.


We coat the very top of the tail in several approaches, alternating it with the manufacture of the second layer of the neck and head.

While the ponytail is drying, apply a second layer of putty to the neck using wet hands.


So we get to the head, we do the same thing. We only try to make the beak stand out and look like it.


Then use a wet brush to level the edges.

This is what the ponytail looks like from above.

And so from the side.

That's it, the swan flowerpot is almost ready. Let's examine it from all sides and if there are any flaws, we will smooth them out with a putty. Then find a place for him so that our planter dries well and he is not afraid of rain. After a few days, our pots should dry well and then, using sandpaper, we equal the swan. Next, we need to prime the craft with a primer, and only then we apply paint. If you do not apply a primer, the paint will roll off in lumps. When dry we paint with ordinary paint with enamel in two layers. Next, paint the beak, eyes. When the paint dries, apply the varnish in two layers too.

That's all, look what a beautiful swan it turned out. With the help of a drill we will make some holes for water drainage and then paint them to protect the planter from destruction.

It remains to plant flowers in it, I think that dwarf marigolds will look very beautiful in them, but what would you advise for planting?

Author's advice: Put putty in small portions and very thick. You can always get it wet.
DO WITH ME, DO LIKE ME, DO BETTER ME! And remember "Do not forbid yourself to create, even if it sometimes comes out crookedly, no one can repeat your ridiculous motives!" as M. Tsvetaeva said. Good luck everyone! With pleasure I will look at the swans-pots in your performance!

Swan planter for the garden

It did not take long for Alla's pots in the form of swans to gain popularity on the Internet and many creative people also began to create swans for this mk. So Lydia Tkachenko also decided to create these wonderful swans for her garden. This wonderful planter will also decorate your garden and put you in a mood. From the usual 5 liters. plastic bottle Lydia made a beautiful flowerpot in the form of a swan for her garden with her own hands. Let's take a look at it too.
To make a swan, we need:
* Plastic bottle 5 l.
* Bandage.
* Putty knife.
* Brush.
* Sand.
* Iron wire.
Method of making pots:
We take a plastic bottle and cut a hole along the entire length on one side. Then we take the wire and insert one end into the neck and fasten it. Give the shape to the neck. It is better to pour sand into the bottle so it will be more convenient to work. We put a film on the workplace and apply a putty solution on it and immediately install our planter on this layer of putty. We start from the bottom to coat our pots with putty, having smeared a little over the neck.

We also need to make wings, take a mesh or wire and fix them to the base.

Then we gradually make the neck, wrap it with a bandage to keep it better. When the planter is ready, paint it and varnish it.


You can plant flowers in a ready-made planter or simply decorate your garden.


Copyright © Attention !. Copying of text and photos can be used only with the permission of the site administration and indicating an active link to the site. 2019 All rights reserved.
The swan is a beautiful bird that adorns any pond. But not everyone can afford to buy and care for real swans. But you can make your own, artificial swan from improvised items.
This swan can be used to decorate a garden or playground.
You can also make a swan, in which you can pour earth and plant flowers. One way or another, both you and the children will heal aesthetic pleasure from such a craft.
How to make a swan out of a tire

1. Prepare old tires, preferably "bald" ones, and chalk out the cut lines.
2. Start cutting along the lines, then bend back to form the wings.

3. In order for the head and neck with the breast of the swans to keep their shape, it is advisable to use a stainless steel plate, which must be bent so as to give the shape of the head, neck and chest.

4. After that, you need to screw the plate to the rubber using inconspicuous small screws.
5. Also cut out the eyes from the rubber and, using all the same screws, attach them to the swan's head. After that, cover our swans with white water-based paint twice, only make the noses red.

6. It remains only to fix the swan in the halves of the caps, previously painted in the color of the water (blue, light blue, green), and your swan swims in the pond.
How to make a swan from a wheel

This is another option for making a swan with your own hands from a tire. To do it, prepare, as always, an old wheel, chalk, a sharp knife (just in case, prepare a hacksaw or jigsaw) and paint.
1. Using chalk, draw on both sides of the wheel all the details of the future swan, i.e. head, tail, wings, neck, beak.
2. Start with a sharp knife to cut out all the details along the contour lines.
* In case some details do not lend themselves, you can use a hacksaw or jigsaw.
3. Bend back the wings and neck. If the neck is difficult to bend, plywood will help you with which you can fix it.
4. It remains to paint the swan.
How to make a swan (video)
Watch a video tutorial on how to make a swan out of a tire if you want to understand some of the details. A jigsaw was used in this tutorial.
How to make a swan from a tire

1. The first thing to do is to mark with chalk the places on the tire that you will be cutting. The images show these lines.
* If your knife is sharp enough, then everything will take you no more than 20 minutes.
* It should be noted that it is very difficult to cut thick rubber, so use a sharp knife, which periodically moisten it in soapy water.


2. The hardest part of the tire must be knocked out with a chisel or grinder. This part will serve as the head and tail of your swan. Everything will take no more than five minutes.

3. It's time to turn the tire out.
4. It is advisable to properly handle the head and tail of the rubber swan, as it can be scratched due to the uneven edges.
5. It remains only to paint the swan - you can use white or a very unusual and beautiful bronze color.
How to make a swan from modules

Crafts from plastic bottles. Swan.

There is no need to dispose of plastic bottles if they have already been used for their intended purpose. There are many crafts that you can make from them.
For example, there are several ways to make a beautiful garden swan. Moreover, such a swan will not only decorate your garden, but will also be beneficial.
You will need:
Plastic bottle 5 l
Milk bottles 300 g
Rigid Wire Hose
Wire
Scissors
1. Using a marker, mark the lines on the 5 liter plastic bottle for the next cut.

2. Cut off the top of the bottle first and leave the neck you need to secure the swan's neck in the hole.

3. Use a stiff wire hose as the skeleton of the swan's neck. Insert it into the bottle through the neck and wire the neck to the lower torso. You have the swan frame ready.


4. Cooking feathers for the bird. Take a white plastic bottle (usually used for milk) and cut off the neck and bottom.

Start cutting the "feathers" - their width and shape depend only on your imagination.

It is advisable to cut the edges of the "feathers" with a fringe to achieve an even more realistic effect.

From the outside, heat each candle feather.

5. Start collecting two feathers and fixing and wire.

6. Use bottles without bottoms for the bird's neck. Depending on the number of them, you can choose the length of the neck. In this example, 16 bottles of 300g were used.
The part near the beak was made from the top of a bottle without a neck.
7. Where the beak is, the hose ends, and to fasten the structure, you need to make holes on both sides in the bottle and in the hose. Then secure it with wire.

8. Close the lid and take the chemical cap to prepare the beak base. This cap needs to be cut in half, similar to the letter M.
9. Take another such lid and insert the beak into it - there is a groove inside, so that everything comes out exactly.
10. Glue the first and second covers.
11. Paint the beak, and place your favorite plants in the flowerbed.
How to make a swan from plastic bottles

This is not just a swan - this is a swan princess who will decorate any garden. It should be noted right away that assembling this swan is a laborious and rather lengthy process, so be patient and let's get started.
You can call for help in creating the craft of one or more people to speed up the process.
Prepare:
Plastic bottles
Thick copper wire (if you have thin wire, fold it in half so it doesn't break)
Stationery knife
Pliers
White and yellow paint (can be regular or in aerosols)
1. You should start making a swan from plastic bottles from the head and neck. Then these parts of the swan pass into the body. First, cut the plastic bottle under your head.

2. Cut off the neck portions of the craft. It is advisable to make 18 such blanks in advance to make a neck.

3. Use an awl to pierce each piece.


4. Prepare the wire and thread it through the holes of the blanks, gradually stringing them together to form a neck (you need to thread the bottom to the head). Attach your wire to the tip of the beak.


5. When you have assembled all the blanks for the wire (1 blank for the head and 18 for the neck), start assembling the torso. Prepare 4 bottles and cut them as shown in the image:


6. Using the same pattern, start stringing the workpieces onto the wire. Insert a whole bottle into the outer blank.
7. Secure the other end of the wire.
8. To make the swan's neck stronger, you first need to give it the desired shape. To do this, simply adjust the depth of entry of one workpiece into another.
Use wire to secure all the parts of the swan together.
Begin to pierce the holes in the bottles that make up the neck so that the wire runs parallel to the floor (this should be done on the floor and preferably starting from the tail).


You should have a kind of "zigzag" of wire - it should "enter" and "exit" from the neck where the two blanks enter each other.
9. Bring out the uppermost end of the wire where the crown is attached.


10. Cut out a crown for the swan princess from a plastic bottle.
11. Take the crown and clip it onto your swan's head. To do this, you need to make 2 holes in the neck of the crown and thread a wire from the neck through them. Next, you need to wrap the wire around the neck and clamp it with pliers.

12. It's time to collect the torso. The first thing to do is the belly, which has two "sticks" and each of them is made up by connecting 4 large blanks (point 4) and 1 whole plastic bottle.

You need to "flash" these "sticks" using a wire. This should be done in a zigzag parallel to the floor. You need to get a solid foundation for the swan.
13. We continue to make the torso, namely its next row. The middle will be occupied by the neck of the swan, which means that you will need the help of another person - while you will be "stitching" the second row, your assistant needs to keep the neck constantly upright.

Still, first you need to prepare 2 "sticks", each of five large blanks and one whole bottle (for the tail) collected. After that, all 3 blanks need to be fastened with a wire, setting the neck between two "sticks".


14. Pay close attention to securing the bend of the neck at the front.

15. We are preparing the third row of the body. Start collecting another "stick" - use 4 large blanks and 1 whole bottle for the tail.


Thread your workpieces tightly into one another, and pour water into an untouched bottle to balance the neck and tail of the craft.
It should be noted that the stick does not need to be stitched separately. All you need to do is put it on top of the neck from the side of the body and attach it with a wire to the side "sticks" of the 2nd row of the swan body.
16. It's time to tinker your swan's wings. To do this, you need to collect 2 "sticks", each of which contains 4 large blanks and one whole bottle. Bend the workpieces as shown in the image and zigzag them again with wire.

To make the base of the wings, you need to make 2 short "sticks", each of which consists of one whole bottle and one large blank.
17. Begin attaching the base of the wings to the swan's torso. The image shows a top view and on the right side is a bird's tail. To attach everything, use a wire that needs to be passed through the bases of the wings and fastened to the already installed parts of the swan.

18. Attach the curved wings with wire.
This is how it looks from above.

Here is a side view - here you can see that there is a short "stick" attached under the swan's curved wing.

19. For the swan's neck, you need to do additional stretches.

20. The construction of the neck can be made stronger with additional wire stitches. You can also fix your neck in the desired position.


21. It's time to place the top of the bird on the belly that was assembled earlier. After that, fasten the structure with wire, threading it under the swan's belly. Next, thread the wire under the curved wings and secure it to your back with pliers.
22. It's time to paint. To do this, you can use both spray paint and regular paint (but it will take more time). If you decide to use an aerosol, then you need to paint outdoors, and not indoors.

In this master class, you will learn how to make a beautiful flower bed out of a swan you made earlier.
You will need:
Plastic bottles
Plastic bags (preferably thick, for example, from laundry detergent or dry pet food)
Stapler
Saw or knife
Pliers
Scissors
Soil (preferably special ready-made soil from packages).
1. First you need to firmly fix the swan in a place specially prepared for it. To do this, you need to dig a shallow hole.

To keep the swan straight, you need to hammer in 2 wooden pegs on both sides of it, in the upper part of which you need to make small cuts.
Pull a wire through the cuts, which will help the craft stay level.

The wire is threaded, tied, and secured under the curved portions of the wings.
2. Prepare one tight bag and cut it to form a large rectangle.

Use this plastic "blanket" to cover the inner space between the wings.
* The edges of your bag should protrude slightly above the wings.
3. You have got a kind of pot, in which you need to pour earth for flowers.

4. Use a stapler to staple the front and back of the flower bed.

* If you wish, you can cut off the extra edges of the polyethylene.

5. Now all that remains is to plant something in the finished flower bed.
How to make a paper swan
How to make origami a swan
The swan has always been a symbol of beauty, grace and grace. Making a swan from plastic bottles with your own hands is not difficult. Although you need to show perseverance, patience and spend a little time, then a beautiful swan made from simple used plastic bottles will be a great decoration for a garden or summer cottage.
In this article, a master class on crafts will be presented, two techniques for making a swan are described with detailed instructions, which are supported by photos and videos.
Here are some photos of how the swan should look like:

Composition creation stage
First, it is important to choose a place in the garden or in the country in which the swan will stand. This original bird is used as a tub for flowers or other plants. The name of this craft is a swan flower pot. A stunningly effective and functional thing.
First technique
For crafts, you will need materials such as:
- 5 liter large plastic bottles;
- 0.6 millimeters of iron wire;
- Metal mesh to make bird wings;
- Putty;
- Putty roller;
- White bandage;
- Brush.
It is necessary to cut the bottle in half, bend the wire and make it look like a number two, make a hole in the bottle cork and insert the wire. Strengthen the structure with a special glue for ceramics, and to make the product stronger inside, cover it with stones or broken bricks. Fill the hole with wet sand.

How it works? Under the pressure of the sand, the bottle should become more rounded and take the shape of the bird's body.

The workplace for working on the craft should be covered with cellophane. At the next stage of work, it is necessary to make a putty solution. To make the swan easier to sculpt, you need to make the solution thicker. In order to make the bottom of the product, the first layer of putty must be spread directly onto the cellophane.

Place the bottle on top of the solution and gently smooth out the layers with a spatula.
Related article: Mexican painting

The next step is to blind the bird's neck. To do this, you need to start coating the wire with putty. Start from the bottom and do it with wet hands.

In a similar way, coat the entire bottle with a spatula, with a thick layer of two centimeters.

To make the wings of a bird, you need to bend the net into the shape of a wing, attach the bottle to the side of the bottle and press down, fix it with putty. Wait for the solution to set.

When the putty has grabbed, smear the bird's wing with the solution with your hands.

While the wings are drying, you need to smear the bird's neck.

During the working process, wrap with a wet white bandage.

It is required to form the tail of the bird. To do this, bend a part of the mesh at an angle of 40 degrees and hold it with a solution. Then hold your head and leave the product to dry for 30 minutes.


From the bottom of the tail, make a roundness at the bottom of the tail.

Make the top of the tail in several steps.

Top view of the tail.

Side view of the ponytail.

When the swan blank is ready to dry, you need to plaster it, paint it with white paint and varnish it.

The beautiful swan is ready!

Second way

For crafts, you will need the following materials:
- White liter plastic bottles, exactly 25 pieces and one bottle of 500 milliliters;
- 5 liter transparent bottle;
- One flexible plastic bottle, volume five liters;
- Three meters of thick wire;
- Women's elastic tights;
- Sintepon and bottle caps;
- Fishing line and wire;
- Small stones;
- Red fabric for the beak;
- Scotch;
- Buttons for the eyes.
First you need to prepare the bottles. Remove the neck, plugs, rings, peel off the labels. Next, you need to cut the bottles, but before cutting, draw clear lines along which to cut.

Cut a half-liter bottle, remove the neck and cork. Make cuts to the cone of the bottle. Make the first cut along the molded seam. Next, make a beak, melt the ends of the clothespin and pin two holes with an awl. Tape together two halves of the clothespin. Make the body of a swan with a 5 liter bottle.