When selecting grooves on a circular saw, use a guide bar. This method is best for long longitudinal slots. In particular, in this way it is very convenient to make grooves for standard hollow holders. Once you have adjusted the guide bar and set the depth of cut, you can safely cut the grooves, making sure that everything longitudinal grooves will be at the same distance from the edges of the workpieces.
On a woodcutting machine, you can also select transverse grooves, but the longer the workpiece, the more inconvenient it is to work with it. It is usually more convenient to select the transverse grooves in long panels using a milling machine. Procedure:
| Selection of grooves without a special cutting disc. Select longitudinal andtransverse grooves can be done withoutspecial cutting disc. Install the standard cutting bladewoodworking to the desired height and make the first cut.Turning off machine, moveguide 3.5 mm from the blade, and then make a second cut.Keep going make consecutive cuts, each time pushing the guide back3.5 mm until you have the desired groove width. |
Selection of folds on a circular saw.
Selecting folds on a circular saw is similar to selecting grooves, but you will need to equip the machine with an auxiliary wooden guide so that the saw blade can move along it. Since a guide rail is used, this method is more suitable for picking folds in the long edges of workpieces than in the short edges of a long workpiece.Manufacturing and installation of an auxiliary guide.
Take 19 mm plywood as the material for the guide. The auxiliary guide must be the same length as the standard guide bar and 10 centimeters higher. Fasten both rails with screws (refer to the Operating Instructions for advice). Install the cutter head and lower it below the surface of the machine table.

The auxiliary cut.
To fine-tune the slotting blade, make a cut in the auxiliary guide. With the blade lowered under the table surface, move the guide so that it hangs over the head about 16 mm and fix the guide. On the left side of the auxiliary guide, make a pencil mark 25 mm above the work surface. Turn on the machine and slowly raise the cutting blade until it reaches the level of the pencil mark.

Installation and adjustment of the cutting disc.
With the slotting blade secured to the machine spindle, set it to the desired height and adjust the auxiliary guide to the required rebate width.

Selecting the rebate.
Select a trial fold on an unwanted piece of plywood to make sure your settings are correct. If everything is in order, place a workpiece on the work table and pass it over the cutting blade.

Selecting grooves with a hand mill.
When, in the manufacture of cabinet furniture, you select a groove in the panel, sometimes you need to select the corresponding groove in the opposite panel. To ensure that the opposite grooves match exactly, the easiest way is to select them in one pass. This can be done with a simple rectangular guide, but it’s worth taking the time to make a custom T-guide for the cutter yourself.
When selecting slots with a cutter, it is very difficult to maintain an exact distance between the cutting edge and the rectangular guide. Using the T-rail, you first select a groove in the rail crossmember, and then simply align that groove with the scribe line on the workpiece. In this case, the corners between the grooves and the edges of the workpiece are completely straight. If you select two slots on both sides of the cross member, then the guide can be used to select the slots in the workpieces different widths.
Manufacturing of a T-shaped guide.
To make the rail, two pieces of 19 mm plywood are needed. Make a cross member 80 x 40 mm. The longitudinal rail should be 80mm wide and 80mm longer than your desktop. Fasten both parts with three screws as shown.

When the glue is dry, stick in milling machine a straight cutter with a diameter that matches the desired slot width. While driving along the rail, select the groove on one side of the cross member. If you later need to select a different groove width, you can cut on the other side of the crossmember.
Choosing grooves.
Align the groove in the rail cross member with the markings on the workpiece. Secure the workpiece to a stable work surface. Press both ends of the rail against the work surface. If the workpiece is narrower than the work surface, you can only press one end of the rail against the work surface, as shown.

Move the milling machine from left to right when selecting a slot so that the machine is between you and the rail.
Selection of folds with a hand mill.
You can select folds with a hand router with a straight cutter using a guide. Another option is to purchase cutters that are specifically designed for picking folds. The best rebate cutters are equipped with lower support rollers that roll easily over the workpiece and prevent charring of the edges of the wood. Cutters are available for sale different sizesas well as kits containing a carbide-tipped cutter and replaceable inserts allowing you to select rebates of different sizes.


Regardless of the technology you use, remember to always move the milling machine in the direction opposite direction rotation of the cutter. This will prevent dangerous rolling of the cutting edge over the workpiece.
Having mastered the skills of carpentry, how pleasant it is to demonstrate to family and friends handmade furniture. What could be nicer than touching sharpened to razor sharp blade, inhale the scent of wood, feel its texture, and then make a clean fresh cut!
This article describes the basic techniques of joinery work. How to use carpentry tools to create different shapes, joints and wood textures. If you are unsure of a particular technique or type of wood, it is worth experimenting with wood scraps. Organize and maintain your workshop. Some craftsmen sharpen their hand tools, clean the workshop and clean all their tools and machines before starting a new project.
Wood preparation and marking
Once you decide what to do, divide the carefully selected and planed lumber into groups. Mark each workpiece according to its future position in the product, mark the top, bottom, faces and best edges. Using a pencil and tape measure, mark the segments of the desired length, and with a square - the cutting lines. Using a compass, draw arcs and circles. Transfer the dimensions from the drawing to the wood with a dividing compass.
If you need to make the board narrower or mark the connection, set the thicknessing tool to the desired division and scratch the mark by moving the thicknessing tool along the edge of the workpiece. With a small mark, mark the lines going at oblique angles. If you need paired pieces, mark them at the same time and remember that one piece should be a mirror image of the other. Use a knife to mark the connections.
Curved cuts
Can be done with an electric hover, jigsaw or band saw... The hacksaw is good for large radius cuts and thick wood where the cut line goes far from the edges.

The hacksaws are equipped with swivel bases that change the cutting angle, and depending on the type and thickness of the material, you should use different saw blades. For curved cuts with small radii and wood thicknesses of less than 50 mm, use jigsaw or jigsaw.

Install a new file and tighten it so that it jangles when you flick your finger on it. If you need to cut an opening, you can do two things: either start the cut from the edge, or, if you do not need to touch the edge, first drill a hole in the part to be removed, then release one end of the file, pass it through the hole made and re-clamp and tighten.
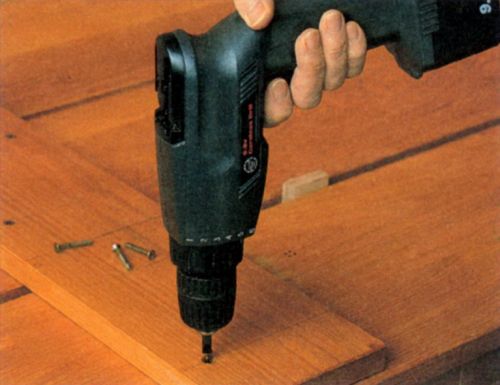
Use a drill press and Forstner drills to accurately and accurately drill large holes. Mark the center of the hole, attach the appropriate drill bit and set the depth gauge. Then press the workpiece with the clamps to the work table (this will take some time, but it will fully pay off). If the hole is deep, raise the drill several times while working to remove debris and keep overheating to a minimum. If you have to drill many holes in the same parts, it is useful to make a template from wood scraps, which is attached with clamps to the working table of the machine.

To drill holes for screws and mounting holes for nails, use a drill, and it is more convenient to use a cordless drill. If you have a lot of screws to drive, install the screwdriver supplied with this tool in the drill chuck.

Planing by hand
Planing is very fun when the blade is sharp and long enough. The jointer is ideal for planing along the grain. Remember to secure the workpiece to the workbench. Take a test pass, make sure the blade is set to the correct depth, and then get to work.

The butt planer is good for sharp edges and for deburring edges. Adjust the blade so that it cuts off the finest chips. When processing the end areas, try not to stray to the side and avoid chips.

Selecting grooves manually
Mark the groove with a pencil, ruler, square and possibly a knife edge, transfer the workpiece to the work table drilling machine and drill suitable size drill out the bulk of the waste wood.

Remove the shavings, grip the workpiece in a vise, and pick up any excess wood with a chisel while holding the tool vertically. By the way, there is an excellent one.

The groove can be selected with a cutter, while the working technique depends on the size and location of the groove. The router can be held in your hands and guided over the workpiece; when choosing an open groove, attach it to the work table and move the workpiece. In this case, the accuracy of work will depend on the position of the guide bar (stop) and the height of the cutter. Always make a test pass using a piece of wood. It is best to choose the groove in stages and make several passes. Remove sawdust after each pass to avoid overheating the cutter.

Cutting a thorn by hand
Mark the shoulder lines (thorn length) with a square and a knife, then use a thickness gauge to mark the thorn height and width. Remove unwanted wood with a tenon saw. First, cut along the grain to the shoulder line on all four sides of the tenon. Then trim the spike along the shoulder line across the grain. Use a chisel to clean the thorn.
If you have a lot of thorns to cut (or if you just love working with machines), then a router with a work table is the perfect tool. If big size the workpiece does not allow it to be placed on the router's desktop, it is better to press it with clamps to the workbench and process it, holding the router in your hands. Set the stop to the length of the tenon, and the cutter to the desired height, then, firmly pressing the workpiece against the fence, remove excess wood in several passes. When the end of the tenon rests against the stop, turn the workpiece over and repeat the procedure from the back side. If you stop before the cutter reaches the shoulder line, use a chisel to clean the tenon.

To select a groove 6 mm wide and 4 mm deep at a distance of 10 mm from the edge of the board, proceed as follows. Attach the router to your work table and install the 6mm router bit. Set the guide bar to 10 mm. Adjust the cutter height so that it is 2 mm above the table. Make a pass along the rail to create a 2mm deep groove. Switch off the router, raise the router another 2 mm and repeat the cut. You will get a groove 4 mm deep.

To select a rebate 10 mm wide and 4 mm deep, proceed as follows. You will need a cylindrical spur cutter that is smaller than the rebate width (eg 5 mm diameter). Set the stop 5 mm from the trailing edge of the cutter and the cutter 2 mm. Place the board against the guide and select a 5 mm rebate. Repeat the pass, still pushing the board against the stopper, to obtain a 10 mm fold. Turn off the router, set the router bit to a height of 4 mm and repeat the procedures to complete the fold.

Press the workpiece with the clamps to the workbench. Select a cutter with a slot width or smaller and set the depth gauge. Press the wooden plank parallel to the groove with the clamps to the workpiece, which will serve as a guide. Lower the router, press its base against the guide, turn it on, wait until the router reaches full speed, and make a pass. If the cutter is narrower than the slot, move the guide and repeat the procedure until you get the desired slot width and depth.

Milling shaped edges
Cutting shaped edges with a router is very easy. Attach the router to its table and insert the router bit of your choice - circular, radius or profiled. Use a support roller cutter.

Move the stop so that it does not interfere. Press the workpiece against the table and make several passes with the cutter from left to right. Continue milling until the workpiece is pressed against the platter roller - the cutter stops cutting. If the profiled edge looks burnt, then either the cutter is blunt or you have been pulling the workpiece too slowly.

Pattern milling
Use a template if you need to make multiple parts with the same edges. First, cut out roughly shaped pieces with a saw, leaving no more than 4-5 mm of excess wood on the edges to be milled. Install the idler roller on the router base. Cut a template out of the plywood with a flange allowance and nail it directly to the surface of the workpiece. Turn on the router and guide it along the edge of the template.
As a template, you can take an already made part and use a spur cylindrical cutter with support roller (it can be at the top or bottom of the cutter).
This saw allows you to easily make cuts at any angle. Place the cutting blade on the frame at the desired angle (90, 45, 36, 22.5 or 15 °) and fix it. Set the depth gauge to the desired mark. Place the workpiece on the saw table, press against the stopper, and then cut back and forth in smooth movements.

Examine the workpiece and decide exactly where you need to drive the nail. If this place is near the edge and there is a danger of splitting the wood, first drill the installation hole with an electric drill using a drill whose diameter is smaller than the diameter of the nail. Then, hit the nail in with a hammer of a suitable size. If the nail has gone crooked, pull it out with a nailer or pliers. If you are driving in very small nails that are difficult to hold with your fingers, use round nose pliers to hold them in place.

Driving in screws
You have the choice between mild steel screws, of stainless steel, brass or aluminum screws with straight or Phillips head and countersunk or semicircular heads. The semicircular heads are clearly visible on the surface of the wood, the countersunk heads are either flush with the surface, or edged with brass washers, or hidden by wooden plugs. The screws are screwed in with a manual screwdriver, a drill with an appropriate attachment or a screwdriver.
When using a drill, install the locking mechanism so that the screw is driven to the required depth. If the wood is soft, the installation hole can be made with an awl, if it is hard, it can be drilled with a smaller diameter drill.

To be able to hide the screws under the wooden plugs, you will have to drill a hole for the plug with a countersink drill and the plug with the appropriate cutter. Do not use steel oak screws - they react with wood and moisture and stains. Use plated steel, brass, or stainless steel screws instead.
If you want to make round parts (legs of chairs, bowls, plates), you cannot do without lathe... Get the most powerful and heavy machine your budget can handle - with an adjustable chuck and faceplate set. Fusiform and cylindrical parts grind, fixing the workpiece between the front and rear centers of the machine, a bowl or plate - on outside spindle.

The best lathes are equipped with a device that allows turning large workpieces on the outside of the spindle. You will need a variety of turning tools - a chisel, a cut-off tool, an oblique chisel, and a radius scraper.
To cut doorknob or a latch, you don't need anything but a good sharp knife (not stainless steel). Hold the workpiece in one hand, a knife in the other and cut the wood by pressing on the back of the blade with your thumb. The rest is a matter of skill. For practice, first experiment with for example soft wood linden.

Installation of hinges
The two most common types of hinges are decorative brass overhead hinges (fastened with countersunk screws, screwed in flush with the surface) and steel mortise hinges (fastened in sockets with steel screws with countersunk heads). In the latter case, circle the flap of the hinge with the edge of a knife, cut the outline with a chisel, and then select the wood with a chisel to the desired depth. The flap should fit snugly in the socket. Always buy suitable screws with the hinges.
Sanding wood
Numerous grades of abrasive paper are used to obtain smooth surfaces. You can use the skin on its own or wrap it around a block of wood. It is best to sand the wood several times - after sawing, after the glue has dried and after finishing.

For the first sanding, use ordinary sandpaper, for finishing - a thin sandpaper based on aluminum oxide (it is more expensive, but it lasts much longer). Use a cylindrical grinder to sand large flat surfaces. Work in a well-ventilated area and be sure to wear a dust mask.

Natural wood finish
Originally the term "natural finish" meant that the wood was sanded and left in in kind, now this concept also includes oil or wax treatment. Danish or teak oil is applied in a thin layer with a lint-free cotton cloth or brush.

Allow to dry and work with the finest sandpaper to remove the "ridges" (rough texture of raised wood fibers that occurs when the first layer of the coating is absorbed), then apply the second thin layer... If you want to soften the surface, rub it with wax mastic.
When finishing items that will come into contact with food, use vegetable oil, such as olive oil, instead of teak or Danish oil. Rub it with a cloth.
You have the choice between white spirit based oil paint and waterborne acrylic paint. Both types of paint are applied with a brush. The visual difference between surfaces painted with one or another paint is very small, but after working with oil paint, brushes should be washed with white spirit, and after acrylic paint with running water.

Couples oil paint can cause dizziness and nausea, and acrylic paint can cause dry throat. Regardless of the type of paint you use, wear a respirator and, if possible, work outdoors.
Special types of wood finishes
When working with American oak, you can get an interesting texture by wire brushing the wood. This texture is pleasant to the touch and the resulting roughened surface will allow you not to worry about being damaged by pets' claws.

The brush is driven along the fibers until there are no untreated spots on the surface, after which it is rubbed with oil.

The candle flame finish helps to hide the imperfections of low quality wood. Oil varnish is applied to the painted surface with a brush. After a while, it dries up and becomes sticky, and then a burning candle is led under the surface. Be sure to wait until the surface is tacky (there should be fingerprints on it), and keep the varnish can and brush away from the candle. It is better to do this work together somewhere away from the workshop. Practice trimming before starting any serious work.
SLOTS CAN BE MADE ANYWHERE
With a groove connection, the end of one part enters a small groove cut across the fibers of the other. This connection is an improved option. simple connection end-to-end. The groove shoulders provide decent strength. In fact, such a connection cannot be broken, for example, by pressing on a shelf. If it fits tightly, it can withstand oblique load well when the force is directed diagonally across the body. The installation of rear walls in cupboards or dressers and bottoms in drawers further strengthens the entire structure. Finally, the groove facilitates assembly by defining the position of the parts and keeping them from slipping.With just two types of groove joints, almost any body part can be made. The main joint, where the full thickness of the adjacent part fits into the groove, allows the assembly of bookcases, toy chests, wall shelves or any other enclosure in which the side walls extend beyond the adjacent parts (Figure 1).


Figure: one... The main connection is in the groove.
Figure: 2... Modified groove / tenon connection.
If these “flow” corners are unsuitable or unsightly, use a modified joint (Figure 2) called a groove / tenon.
Drawers are also boxes. They are easy to make using a basic groove connection and a groove / tenon connection (fig. 3). Example 3A is the strongest of them; in examples 3B and 3C, the front wall can be weakened. If you want to hide the ends of the side walls drawershown at 3A, cover them with a false front wall or use a quarter connection, as shown at 30, reinforced with nails or dowels.


Figure: 3... Slots in the drawers.
BASIC SLOT CONNECTION
Sawing grooves on a table circular with a set of groove discs is much faster than manually. But with long or wide pieces, it is difficult to maneuver around the table. The pendulum saw solves this problem, but it has a disadvantage - usually its console is not enough for cutting across wide parts.The milling cutter helps to cope with this trouble. But there are also disadvantages here.
First, if you choose more than one pair of grooves, it can take a long time to set up a ruler for each side. So use an insert width, equal to distance from the edge of the base of the router to the router. To position the ruler, slide the insert along the marked shoulder line on the work piece (Figure 4).

Figure: 4... Router insert.
Secondly, the thickness of the work piece is almost never matched to the cutter to ensure that a tight fit is obtained. Solid wood pieces can be stitched or trimmed, but plywood pieces are difficult to trim. Sawing a groove for a fit is clearer. But this requires two routing passes - one for each shoulder.
Faced with a selection of grooves, you can make a simple device (photo A).
DEVICE FOR SAMPLING SLOTS
The device consists of two rulers (one for each shoulder of the groove) and two strips that rest on the edges of the workpiece. One ruler and one T-bar are fastened at right angles. Clearances along the other plank and ruler allow you to install boards up to 300 mm wide and select slots up to 38 mm wide. Two clamps in the adjustable bar rest against the work piece and lock the fixture in place.To work requires a set of guide bushings for the router. With bushings, the rulers should be slightly offset to the side relative to the width of the groove itself.
The fixture is made of poplar, but Karelian birch or MDF plywood will do. T-nuts and MB screws are recessed, so the router can slide along the rulers unhindered.
Having finished manufacturing, you need to make inserts for installing the rulers. Sew a piece of trimming board approximately 450 mm long, 150 mm wide and 20 mm thick to the same thickness along the entire length. It all depends on the size of the sleeve and the cutter. Leave the fixture in place while making and adjusting four inserts, each about 50 mm long, about 25 mm wide, and the same thickness as the gaps. Ideally, the thickness of the inserts should be equal to half the difference between the diameters of the cutter and the sleeve.
The exact fit of the inserts is done by using them with the installed rulers when milling on a short cut that has been sawn off earlier. Loosen the adjustable ruler, place the trim between the rulers and two inserts on each side.
Tighten the screws. Remove the inserts and trim and mill the groove. If the trim does not fit into the groove, adjust the thickness of the inserts.
OPERATION WITH THE DEVICE
The marking of the grooves is very simple. Determine the shoulder line for each groove by making a pencil mark on front side workpiece. You can put the two side walls together and mark all the grooves at once, or mark the second side wall after milling the first one.When the fixture is exposed and the cuts are marked, align the fixed ruler with the mark (photo C), lightly tighten the clamps and make a cut with a router, then move the fixture to the next mark. A well-chosen groove should fit the cleat without gaps and backlash (photo D).
SLOT / SPIKE CONNECTION
Like the main groove, the groove / tenon connection (fig. 5) can be made in several ways: circular and milling. Regardless of the method, the proportions of the connection are as follows: a spike about 1 / 4-1 / 3 of the thickness of the part on which it is cut, and about 1 / 4-1 / 3 of the thickness of the part with a groove. To ensure a tight and good connection it is necessary to cut grooves slightly deeper than the length of the spikes.CUTTING OUT THE SLOT / SPIKE CONNECTION ON THE CIRCULAR
Since this is a very simple connection, it is easier and faster to combine layout and setup. Check the settings on the cut boards (fig. 6 and 7).It's easier to fit the cleat to the groove, so make the groove first. Set the depth of the cut by measuring or by eye, pressing the disc against the part in which the groove will be. Then set the ruler to cut the inner shoulder of the groove (Fig. 6, step 2), make a cut in all the parts with the grooves, rearrange the ruler and cut out the second shoulder.


Narrow parts such as the sides of bookcases can be sawed off with dividing headby keeping the end of the workpiece in contact with the ruler while working. You can also attach a limiter to the ruler in front of the disc so that the end of the part rests against it.
Most exact way choose a groove on the circular - put the workpiece on the table and, pressing it against the ruler, cut out the shoulder. Then put the part on the end and cut out the thickness of the spike. This method allows you to accurately control the thickness of the tenon, but it is inconvenient for long parts or those that are sawn across. Spikes on these parts are best done with several horizontal cuts. After sawing out the shoulder, press the part against the ruler and use the dividing head to cut the excess wood in several passes. Unlike the first method, here the thickness of the spike depends on the thickness of the workpiece.
Regardless of how accurate the tenons are, there is usually some variation in their size, especially when sawing in solid wood. Here the advice is to cut the spikes a little thicker and then trim them with a shoulder plane when fitting. The shoulder planer blade extends across its entire narrow sole so you can cut right into the corner of the stud shoulder.
MILLING SLOT / SPIKE JOINT
For large and wide body parts or long and narrow parts, slot milling is relatively simple and safe. Choose a cutter correct diameter, attach the ruler to the base of the router and make passes with it by moving the ruler along the end of the part(fig. 8). Many routers are sold with a ruler, but to improve the quality of work, it must be pressed to the base with a clamp or screws.


The most accurate way to mill the tenon is to clearly define its thickness between the ruler and the cutter (Fig. 9). To support the router base, use a clamp to press the thick board flush against the end of the work piece.
SELF-MADE DEVICE FOR SELECTING SLOTS
Although the fixture looks complicated, it is fairly easy to make (Figure 10). Saw the workpieces to size, and then gently stitch the planes and edges. Then, in a fixed bar for a fixed ruler, select a groove with several cuts on a circular saw. Then use a sharp chisel to trim the shoulders to ensure a snug fit and square edges. The half-tree connection on an adjustable ruler is made so that its upper surface is in the same plane as the fixed ruler.Mill all slots in the strips and rulers using a ruler pressed against the base of the router (Fig. 8). First, reaming the cutter approximately 3 mm in each pass, mill narrow through slots in several passes. Then mill the pockets for the screw heads and T-nuts.
Small clamps are used as clamps. The pressure pad is a T-nut at the end of the screw. The locknut prevents the pad from loosening when it presses the work piece. Select the grooves in the adjustable bar so that the clamps can hide behind its edge.
Figure: ten... Tool for grooving.
(clickable picture)

Along with the usual ones, PVC edging is used to frame the ends of the chipboard. As a rule, it is used in places of high humidity, high risk of mechanical damage, or based on design decisions.
Distinctive feature of PVC edging from is that it is made immediately for the specific thickness of the slab, where trimming of excess in width is not allowed. The most common widths are 16.18 and 32 mm.
Also, the mounting technology of this profile does not allow it to be joined at the corners. For example, to frame two adjacent ends, you need to round off the corner (at least along the smallest radius).
- Overhead (U-shaped)
- Hard
- Flexible
- Mortise (T-shaped)
- Without girth
- With girth
Applied U-shaped edging
Working with such PVC edging for furniture is not dusty at all, but you can even do it at home.

Hard click and done
It is used for edging the straight ends of the chipboard. It is also possible to trim the edges of the chipboard with a small rounding radius. Of the instruments, only the hands and the edge itself are needed. Just snap the profile to the end and you're done. And the side ends are closed with special plugs.
It is thanks to this method of installation that they love him. But it also has its drawbacks, which are manifested in the impossibility of edging rounded (radius) details.
Flexible
This edging can be used as an edging for furniture for facing the ends of chipboard, both straight and rounded. Installation requires a sharp knife and good glue... If there is concern about moisture penetration, use an excess of silicone sealant instead of glue.
To improve the adhesion between the edge and the end of the chipboard, the inner surface of the profile can be scratched in different directions with a sharp object (knife, screwdriver, scissors).
The hardness of this profile is also influenced by the room temperature. Therefore, it is recommended to fill it in a warm room, where it becomes softer and more "obedient".
The rest is simple. We apply glue or sealant to the inside of the edge and glue it to the end of the chipboard. We iron it well, and also remove excess glue. We trim the edges of the edging only after two hours of exposure, when the glue sets. Well, the glue will completely dry only after one day.

You can trim the excess profile to length with a sharp knife or garden pruner.
Cut-in T-shaped PVC profile

T-shaped edging is often used in the manufacture of modern furniture. There is nothing surprising in this, since it has a number of undeniable advantages:
- Chic appearance (structural, matte, glossy and reflective surfaces),
- Strong mount,
- Hides chips and irregularities at the ends of the slab,
- Ease of installation on complex parts with both outer and inner radius.
The only drawback of the PVC T-profile is the need for groove milling. For milling, we need a manual router with a 2.8-3 mm cutter, as well as a special room, since there will be a lot of dust, and we don't need it at home.
But still, this minus is not so terrible as to completely abandon this type of edging of the ends of the chipboard.
Types of T-shaped profile
The cut-in T-shaped profile is:
- Without girth,
- With girth.
It can also be:
- Solid,
- Soft.
Cut-in edging without a girth is used quite rarely, because it is not able to reliably hide the unevenness of the end and protect it from moisture and debris.
The cut-in T-shaped profile with a girth (with antennae) is quite popular. It is especially popular for edging curved and radius parts that were cut (in these cases, it is simply irreplaceable).
Usually, after cutting a part with a jigsaw with a low-quality cutting blade, chips form over the entire surface of the end, which are common furniture edge not able to hide. Therefore, only a T-shaped cut-in edging with antennae should be used here, and the larger they are, the better.
When choosing a cut-in edge, give preference to a rigid profile. Do not take a soft edging, you will suffer very much with it both during installation and when using the part itself.
The fact is that the soft cut-in edging is rather flimsy and when driven into the groove, its leg will bend and break very much. Even if you fill it up normally, it will constantly bend back, thereby trash will always be brought under it. All potholes and irregularities of the butt will also be visible under it. And this will negatively affect the general appearance of the product.
The ideal solution would be a cut-in T-shaped rigid edging with a large antenna.

For installation we need:
- Manual electric router,
- Edge mill with a tooth thickness of 2.8-3 mm and a depth of at least 10 mm,
- Rubber hammer.
The first step is to make a high-quality groove in the end of the chipboard. It should be located strictly in the center (in a 16 mm board - exactly 8 mm from the edge).
The groove is made with a cutter with a tooth thickness of 2.8-3 mm. For reliable fastening, the groove width should be 0.5-0.7 mm less than the thickness of the spike (T-leg) of the edging, and the depth should be from 10 mm.
If suddenly the groove turns out to be very wide, you will need to use glue or liquid nails. But here it will take additional time for it to dry.
Before stuffing the T-shaped PVC profile, the end must be cleared of chips and sanded with sandpaper.
When driving the edge into the groove, bend the profile towards you. This is done so that the antennae do not rest against the edges of the end, but immediately clasp it on both sides.
If you are going to stuff the edging on parts with a large outer radius, for example, on a rounded corner, then in order for the profile to lie normally and an "accordion" does not form in the leg, you need to make a cutout in it.
When stuffing, use only rubber mallet! With an ordinary hammer, you will simply ruin the edge.
If you are using PVC edging with a reflective surface, then the protective film should be removed after all installation works, only on the finished product.
The video below shows the work of the machine for milling the end for the installation of a mortise T-shaped edge:
And here is a semi-automatic machine for driving a T-shaped edge:
Beautiful, well-crafted furniture always has a visually complete, solid look. A professional designer always thinks through all the little things, right down to the shape of the legs, types of fasteners and refinement of the ends. Homemade cabinets, tables, cabinets and other chipboard joinery are no exception. To bring the manufactured items "to mind", such an interesting detail as an edge for the ends is simply necessary.
What is a chipboard edge
An edge is a special tape made from various materials that is glued or cut into the ends of laminated chipboard parts. Its main purpose is to protect the edges, decorate and give a spectacular look to the finished product. It greatly facilitates and speeds up the production process, at the same time it is a cheaper analogue of such production stages as:
- Postforming - wrapping a sheet of laminate or resin paper around the end. In this case, the edge of the product is given a rounded shape, then a polymer coating is applied. It is used for countertops, furniture parts for bathrooms and kitchens, molded products. Provides complete protection against the destructive effects of moisture on chipboard.
- Softforming - similar to the previous one, but it is used for products of complex shapes. Provides safety and tightness of furniture ends.
Types of edges
There are 4 types of end tape - melamine, PVC, metal and acrylic. They differ in their characteristics, used raw materials, decorative surface and methods of attachment to the base.
Melamine edging
Manufactured from thick paper, which is impregnated with thermosetting polymer resin - melamine. After drying, the semi-finished product is glued onto a papyrus substrate. On some types, an industrial adhesive mass is also applied to speed up the fastening process. Has a standard thickness from 0.2 to 0.4 mm, a smooth or embossed decorative surface, more than 140 shades and decors, including various types of wood.
The melamine tape is attached to the edge of the chipboard in two ways. The first of them is with the help of an iron (suitable for trimming with an adhesive base). Useful as auxiliary tools:
- a construction knife, drill or ESHM with a felt attachment for removing scraps;
- rubber spatula or thinner 646 to remove excess adhesive;
- a tube of instant glue (Bison, Moment) for gluing lagging areas;
- press, wooden block with felt, trowel-spatula or small roller for rolling wallpaper;
- stops for fixing the part;
- fine-grained sandpaper ("zero").
The part is fixed on U-shaped stops, a melamine edge is applied and smoothed with an iron heated to approximately 180 °. Next, press the still hot edging using a press, a bar with felt or a wallpaper roller.
The correct temperature must be selected empirically, that is, set the iron regulator to the maximum level and test it on a small section of the tape. If the edging material starts to "wrinkle" and folds, then it is necessary to reduce the heating.
Excess edge is carefully cut off with a knife or drill with a felt attachment at low speed. The protruding drops of glue can be easily removed with a solvent. At the end, be sure to go around the edges with a fine-grained sandpaper at an angle of 45 ° to even out the edges. For details of the process, watch the video:
The second method of fastening is with a heat gun (can be replaced with a hairdryer) and a glue stick. Apply the mass evenly to the end of the part and the trimming, carefully connect, roll in or press down with a press. Remove the protruding adhesive with a solvent, cut off the excess and sand it with sandpaper. To level the edge just glued, you can heat it up again and move it a little.
This method is considered more reliable, since the rough, uneven surface of the chipboard is better impregnated with glue, which improves the adhesion of the edge to the base.
If there are small chippings or defects on the end of the chipboard, they can be removed with acrylic universal putty, and after drying, gently sand with fine-grained sandpaper. Glue the construction bandage on top to avoid cracking of the putty, and you can attach the edge.
PVC edge
It is made from several types of thermoplastics, including ABC and PP. This type of end edge is highly resistant to water, household chemicals, mechanical and thermal influences. Standard thickness is 0.4–10 mm, width varies from 1–10 cm.
The decorative surface is of 2 types: smooth (glossy or semi-matte) or embossed (wood or pebbled leather). The choice of colors and designs is incredibly huge - about 5,000 variations, including neon patterns and fluorescent shades.
The difference between conventional PVC and ABC is that the latter has increased stiffness, impact resistance and heat resistance. This allows the use of high-temperature adhesives for complex parts.
There are several types of PVC edges available:
- Mortise edging T-shaped (with a thorn) , is fixed in the groove cut by the cutter. It is very difficult to do such work on your own, since you need a perfectly flat slot of the same depth. Cope with such a task under the power of milling machines;
- Bill of lading without girth - glued to the edge of chipboard with a construction hair dryer and glue. However, care must be taken or burns may occur;
- Bill of lading with girthU-shaped - fastened similarly to the previous one, thanks to the shape it grabs the edge of the product and perfectly masks minor defects (irregularities, chips);
- Bill of lading with a girth U-shaped - has rigid fixings, so it does not need to be glued. It is enough to preheat it with a hair dryer, and when the plastic edge softens - bend the "antennae" a little and attach it tightly to the end of the part. Can be adjusted with a rubber mallet.
Metal or aluminum edge
It is an aluminum finishing profile with a rich set of characteristics. Reliably protects the ends of the chipboard from shock, moisture, mechanical stress, temperature extremes. Thickness - 1-2 mm, width from 1.6 to 10 cm, some manufacturers have an artificial thickening for built-in furniture.

The decorative surface usually undergoes 3 types of processing:
- Shot blasted or colorless anodized... The result is a monochromatic silver shade with a mirrored or carved surface;
- Standard annoding, giving a rich selection of shades from semi-matte aged gold to black smooth surface with gloss. This transformation allows grouting small scratches and extends the service life of the material by 1.5 times;
- Coating with PVC filmimitating the structure and many shades of natural wood.
Like the plastic edging, the aluminum edging comes in several variations:
- Mortise edging T-shaped with P- orF -grip - cuts into the groove, is securely held due to the special design. Protects the ends and the seamy side of the chipboard product, hides minor defects. Applicable for kitchen and office furniture;
- Bill of lading without girth - inexpensive, glued with a special compound, however, many manufacturers are already removing it from the range, since it does not prevent chips on the product;
- Bill of lading with a girth C- or H-shaped - fastened with small screws, included are corners, connectors, plugs and slotted strips.
The advantage of this edgebanding is that it perfectly matches glass, plastic and wood products.
Acrylic or 3d edging
A colorful edge band playing with over 200 rich and pastel colors. It is produced using a special technology: a decorative finish is applied to the substrate, the top is covered with a layer of transparent acrylic polymer, due to which a spectacular three-dimensional pattern is created.

The advantage of acrylic is that it is quite tough and durable, does not fade, and if necessary, it can be easily polished with ordinary GOI paste. Thickness - 2 mm, standard width - up to 10 cm. It can be glued even at home.
The decors correspond to such interior styles as techno, avant-garde, modern, minimalism. Not suitable for kitchen facades and countertops, as it can withstand temperatures up to + 90 °.
It is produced in the form of a patch tape without a girth, less often with a U-shaped girth. It does not require additional heating, it is enough to use special glue (Homa Colloid, Acrifix or Plexiglas glue) and a press.
Finally, we note that the main enemies of the chipboard are moisture, mold, fungi. In order for the furniture to serve for more than one year, it is imperative to choose furniture with ends processed with edging tape, or to protect it yourself. The investment of money and time will pay off with a long and good service of the joinery.
The most common way of finishing the ends of cabinet furniture parts made of laminated chipboard is by gluing or another type of edge with subsequent processing. Along with this, there is another common way of finishing the ends - inserting or gluing PVC edging. Kant is used, as a rule, in places with a high probability of damage to furniture during its operation, high humidityas well as for design reasons.
Types of PVC edging.
Unlike the edge, in which the surplus is cut off during the edging process, the edging is produced immediately for the specific thickness of the slab (the most common are 16 and 32 mm), cutting the PVC edging along the length is not provided for by the technology. It is also not provided for joining the PVC edge at the corners. For edging of two adjacent ends, it is necessary to provide a smooth transition - to round the corner. The smallest possible radius of rounding is selected empirically for each edging individually, since it strongly depends on the rigidity of the edging, the size of the sides, and the features of the top (decorative) coating.
The edges of the edging can be either with sides (with girths, approaches to the material plane) or without them. Traditionally, edging with rims is used more widely for several reasons: it allows you to hide small laminate chips near the end of the part, to protect the end from direct moisture penetration, and is less demanding on the accuracy of the technological process and the stability of the material thickness.
Furniture edging can be divided into two groups: cut-in edging with a tenon (T-edging), an overhead edging without a tenon (C-edging). The cut-in edging is available with or without bumpers. There is no applied piping without collars. The technologies for finishing the end of the part with both types of edging differ radically, but (subject to the technology), the C- and T-edging practically do not differ in operational reliability and consumer qualities.


Examples of cut-in edge profiles: without sides for 32 mm chipboard (photo on the left), with sides for 16 mm chipboard (photo on the right).
Cut-in edging.
Cut-in piping is the most common type of PVC piping. Since the T-edging has a thorn, for this, a groove (groove) of a certain width and depth must be made in the end of the chipboard, strictly in the center of the end (with the central location of the edging spike). The main tool required for mounting the cutting edge is a hand-held router with edge cutter, or its stationary version - a milling machine. If no special requirements are imposed on the milling cutter, a device of low power from 1 KW is sufficient, then the milling cutter must be selected according to a number of parameters. Firstly, the cutter must leave behind a groove of a certain width, namely 0.5-0.7 mm less than the thickness of the edge spike. Since the thickness of the spike is different for different edging manufacturers, ideally, to insert the edging into a 16 mm chipboard, you need to have two cutters with tooth heights of 2.5 and 3.0 mm, and for inserting a 32 mm edging - a separate cutter. or even two. However, in practice, in order to save money, it is sufficient to have only one cutter with a tooth height of 2.6 to 2.8 mm. In the absence of beats of the cutter and the shaft (collet) of the milling cutter, this tooth height can be considered universal, suitable for inserting the vast majority of T-edges of 16 mm. To make a groove of a much wider width, milling is performed in several passes, with a change in the cutter overhang. If beating of the tooling and / or tool is detected, it is necessary to choose a cutter with a lower tooth height, since beating can lead to a significant increase in the width of the slot. Secondly, the cutter must leave a groove of a certain depth. The depth of the groove directly depends on the length of the edge spike, which can vary from 6 to almost 10 mm. Therefore, to be able to use the edge of any manufacturer (with any length of the tenon), a cutter is required that provides a groove depth of 10 mm. It is unreasonable to choose a cutter with an unreasonably high milling depth, as this reduces the resource of the cutter and leads to an increase in the load on the cutter. The sequence of operations when finishing the chipboard end face with a PVC cut-in edge is shown below.


An example of measuring the thickness of the edge for a chipboard of 32 mm.
Italian edging has a thicker spike and b aboutgreater rigidity (photo on the left) than Chinese (photo on the right).


An example of measuring the thickness of the edge of the spike for chipboard 16 mm.
Italian edging has a thicker thorn, b aboutgreater rigidity and height of the sides (photo on the left) than Chinese (photo on the right).


Examples of measurements of the inner edge width
for chipboard 16 mm (photo on the left) and 32 mm (photo on the right).
The dimensions are approximate, depending on the edge manufacturer.

Cut-in edge cutter.
Groove depth W depends on bearing diameter d1, cutter diameter D
and is found by the formula W \u003d (D-d1) / 2.


Step 1. Positions the cutter in the center of the end face with an accuracy of at least +/- 0.5 mm.


Step 2. We grind (grind) the edges of the chipboard so that when the edging is stuffed with the sides, the laminate does not chip.

Step 3. We mill the groove.


The edge groove is ready.


Step 4.


Step 4.Edge trimming (left photo), flush grinding (right photo).


Done.
The adjacent end can be pasted over with an edge by capturing the edging(photo on the right).
Garden pruner application.
It is convenient to cut the PVC edging with a garden pruner, which has one persistent (not sharp) cutter, the second is a working, sharpened one. The persistent cutter is thick and rounded enough so that, firstly, not to injure the decorative surface of the edging, and secondly, it is good to repeat its semicircular shape. The working cutter has a one-sided sharpening, that is, one side remains flat, this allows you to tightly press the cutter to the end of the chipboard and trim the edge flush in one motion, without subsequent sanding with sandpaper.

Small garden pruner for trimming the edge 16 mm. Choose a larger model for wider 32mm piping.


The persistent cutter is firmly pressed against the semicircular surface of the edging, the working blade is pressed with a finger to the end of the chipboard, and we trim.

High quality trimming in one motion. With a certain skill and a sharply sharpened blade, very narrow strips of edging can be cut with a pruner.
Applied piping.
Installation of an overhead edge does not require the use of an electric tool, the work is not dusty and can be done even at home, all you need is a knife and glue. It is necessary to prepare the inner surface of the edging, namely to apply deep multidirectional scratches in order to improve the adhesion of the glue. Any sharp object is suitable for this operation: a knife, scissors, a hacksaw blade, etc. After the surface is scratched, it is necessary to apply glue to the inner surface of the edging, for example, the well-proven "liquid nails". If there is a need for maximum protection against the penetration of water under the edging, then instead of glue, you need to use silicone sealant, applying it in excess.After applying glue, the edging is sequentially put on the end of the part, leaving small allowances at the ends. Any glue that has escaped must be removed immediately. If necessary, paper (masking) tape will help to temporarily fix the edging (for example, near curved sections). After the glue has dried (for "liquid nails" - a day), trim the edge allowances flush. The need to wait for the glue to dry is the main inconvenience of using an overhead edge, compared to a cut-in edge.


Step 1.Scratching the inside of the edging.

Step 2.Apply glue "liquid nails".

Step 3.We put the edging on the chipboard end, remove the squeezed out excess glue.

Done. The chipboard end is trimmed with an applied PVC piping.
The ends are trimmed after the glue has dried.
Some subtleties of working with edgingPVC.
- Priority in the choice should be given to edging, in which the color of the base is as close as possible to the color of the decor - the outer coating. This will make possible small damages (scratches) of the edge invisible.
- The size of the edges of the edging is different. Preference should be given to an edging with a higher side height, this will allow you to close very large laminate chips.
- The stiffer the edging, the stronger it is, the better it withstands impacts. As a rule, the more expensive edges are stiffer.
- The edge stiffness depends on the room temperature. It is recommended to stuff the piping at room temperature. Work at low temperatures requires special attention behind the edge of the edging, it becomes stiff and can lift (chip off) the edge of the laminate.
- Adhesives such as "Liquid nails" and some others are critical to storage and curing temperatures. The recommendations of the adhesive manufacturer must be strictly followed.
Piped PVC ends cabinet furniture acquire excellent performance, strength and decorative characteristics... The edging with sides, mounted using sealing compounds, is a reliable and, probably, the cheapest decorative means of protecting the ends of parts from water penetration, which avoids swelling of the chipboard.
For finishing the end face of laminated chipboard, MDF or plywood, a special melamine tape is used, which is sold in furniture fittings stores. Melamine edging is a tape on paper base, with the help of which the end of the furniture board is glued, such as chipboard and MDF, for example.
There are other materials for edge finishing: PVC edgebanding, PVC profile, natural veneer edgebanding, etc. But melamine edging tape is still the most popular for its ease of use.
Today we will look at how to edge furniture boards with this tape.
We recently talked about how and what you can do with a conventional circular saw. After cutting, for further use, the cut must be trimmed with an edging tape, which you can easily pick up in size, color and texture in any specialized store.
This is what a neat cut of plywood looks like, which we are going to use for the shelves in kitchen cabinets... But it has not yet been pasted over with an edge, so you can see all the layers of plywood on its cut.
And this is how the same end looks like, but after trimming:

Like? And it's pretty easy to do. And fast. And inexpensive.
We take the edge by the edge, leaving a small margin.

On the inside edging tape an adhesive is applied, which is activated when heated. A simple iron is ideal for this.

Lightly iron the butt with an iron, retreat 2.5 cm and cut it off from the roll.

Now we thoroughly iron the edge with an iron. If the melamine edge has slipped off, there is nothing to worry about. While hot, it peels off easily. So just peel it off, straighten it and iron it again with an iron.

When the edge lies flat, as it should, we take a smooth wooden block and, starting from the middle, pressing it tightly to the edge, we first draw it in one direction to the end, then in the second. But this must be done while the edge is still warm.
To extend the service life of the furniture, chipboard edging is carried out - applying the PVC edge to the ends of the parts. Our company offers you edging, additives and other services for the processing of particle boards at affordable prices.
Why is it necessary to process the edge of furniture parts made of chipboard and laminated chipboard?
Edging of chipboard and chipboard significantly increases the service life of furniture;
The PVC edge protects the wood-based material from the harmful effects of moisture;
Chipboard, protected by an edge, is not subject to the formation of chips and other mechanical damage;
Chipboard and chipboard edging plays an important decorative role - furniture decoration with PVC edge significantly increases its aesthetic properties.
Please contact us if you are interested in the processing of material with flagstone - edging, additives, etc. We will perform this work in as soon as possible, guaranteeing high quality parts, their durability and beautiful appearance.
Our production provides services for applying PVC edgebands with a thickness of 0.4-3 mm. This range allows you to create the ideal shapes and surfaces of furniture parts.
We offer high-quality laminated chipboard edging - the price is shown in the table. As you can see, we work not only with our own materials, but also with yours. You can buy PVC edgebands in any place convenient for you, and we pay only for the edgebanding service.
Cutting and edging of laminated chipboard is carried out on high-quality equipment. The application of a straight PVC edge is carried out on a CHEISA machine - premium equipment. The curved edge is applied using the Italian VITAR machine.
PVC edge Is a durable flexible tape made by extrusion from polyvinyl chloride granules and modifiers, and the share of the latter in high-quality edging material is no more than 5%.
Advantages of PVC edgebanding:
- Strength ... The PVC edging material is resistant to mechanical damage. The edge is also able to protect the chipboard or chipboard board from such damage.
- Moisture resistance ... The edge perfectly protects furniture parts from moisture penetration, which makes it indispensable in the manufacture of furniture for bathrooms and kitchens.
- Chemical resistance ... The PVC edge can be washed and cleaned with any chemical means... It is very convenient to use furniture parts framed with such an edge in laboratories and hospitals, catering facilities, etc.
- Heat resistance ... PVC edge is not afraid high temperatures or sudden changes.
- Reliability ... The edge is firmly glued to the end of the chipboard, forming an almost imperceptible seam.
- Durability ... Resistance to sunlight allows the edging material to retain its original appearance for many years - color, shade, brightness.
- Flexibility ... The edge is elastic, which allows it to be used for processing furniture of complex shapes.
- High aesthetic performance ... The edging is made in various textures and colors, it can imitate the surface of wood or stone. The PVC edge can be used in furniture processing for any interior style.
|
Name of service |
Price (rub./m.p.) |
||
|
Using customer materials |
Using our materials |
||
|
PVC edge 0.4 mm (8-18 mm) |
|||
|
PVC edge 0.4 mm (22-25 mm) |
|||
|
Egger PVC edge 0.4 mm (8-18 mm) |
|||
|
Egger PVC edge 0.4 mm (22-25 mm) |
|||
|
PVC edge 2.0 mm (8-18 mm) |
|||
|
PVC edge 2.0 mm (22 -25 mm) |
|||
|
Egger PVC edge 2.0 mm (8-18 mm) |
|||
|
Egger PVC edge 2.0 mm (22-25 mm) |
|||
|
PVC edge 2.0 mm 3D acrylic |
|||
|
PVC edge 2.0 mm (tamburat 40-60 mm) |
|||
Sawing and edging of laminated chipboard is carried out by our qualified craftsmen in the shortest possible time. Choosing our company, you will undoubtedly be satisfied with the quality of work and pricing policy. Especially for you, we offer packaging and delivery services for finished products.
To start cooperation, fill out the order form on the website or visit our office.
Contact us and get quality, reliable and beautiful furniture!
Sheet material based on chipboard and MDF, from which cabinet furniture is made, is faced only on two sides. The ends, after cutting the parts to size, remain unprocessed. The edge on chipboard is used not only to make furniture more aesthetic. But also protect chipboard, MDF from impact external environment, as a result - swelling or drying out. In the case of chipboard, the process of edging (facing, processing, pasting the ends) helps to make furniture safer - to create a reliable barrier to the emission of formaldehyde resins and other harmful fumes.
Melamine edging on chipboard: cheap and cheerful
The easiest way, which does not require special skills and specialized tools, is to glue a melamine edge made of chipboard made on a paper basis. In the question of how to glue the edge on the chipboard with an iron, there is no trick: the edge material itself already has a layer of glue applied evenly from the wrong side. All that is required is:
- Press the melamine edge firmly against the chipboard end.
- Carry out with a heated iron until the glue is completely melted and, accordingly, the edging material is glued.
- Cut off excess melamine and glue with a sharpened, wide, short knife (shaped like a shoe) or with an ordinary clerical knife.
- Sand the edges of the edge carefully with fine emery paper.
Melamine glued chipboard edge at home. The process itself does not take much time and is not too "garbage", in contrast to sawing and grinding. Waste will be only cut residues, which at the end can be easily swept away with a broom.
Plastic edging on chipboard: PVC and ABS
The main disadvantage of conventional melamine edgebands is their fragility. It shows itself well in operation on the inner ends of furniture, which are not subject to constant wear. On the visible ends (countertops, facades, open shelves) it is rubbed off, chipped off, and takes on an unpresentable look. Another thing is a plastic edge for a chipboard.
The most common two types: PVC edging (PVC) and ABS (ABS). Outwardly, they are practically indistinguishable, they are analogs, the differences are only in properties and composition. Both types are available in different widths and thicknesses of 0.4 mm, 1 mm and 2 mm, with and without glue. On the inner boxes of furniture, an edge with a thickness of 0.4 mm or "one" is "allowed", on countertops and facades - "two".
PVC furniture edge is made on the basis of polyvinyl chloride, and ABS is based on acrylonitrile butadiene styrene. ABS edging is considered environmentally friendly, since it does not contain chlorine and heavy metals, and does not emit harmful compounds when burning. Also, ABS as a material does not electrify, does not attract fine debris and dust, gives less heat shrink when gluing and looks neater, smoother (without punching) at the ends (if it comes about a thickness of 0.4-1 mm). But it also costs more than PVC.
If you are interested in the process of how to stick an edge on a chipboard, then it is much more complicated, requires additional skills and specialized equipment. In the conditions of furniture production, plastic is shredded on special edge banding machines, using high-temperature hot melt adhesives. There are manual edgebanding machines for small industries.

At home pVC conditions it is possible to stick the edge on the chipboard, but it will take more time. Step by step:
- It is important to very carefully prepare the end of the furniture part for the sticker, especially if you use a thick edge, 1-2mm thick. When the PVC or ABS edging is adhered to the base, the glue can "pull out" the chips and the end will take on an untidy bumpy appearance.
- If the PVC edge has an adhesive base, then it is heated with a construction hairdryer until the adhesive melts. If not, coat the end face of the part with Moment glue, wait a little for drying for better adhesion.
- Then the PVC edging (ABS) is pressed against the end (manually or rolled several times) and the glue base is waiting for the glue to solidify.
- Next, you need to carefully cut off the excess edges of the edging and grind, give a uniformly rounded shape along the entire length of the part. Usually a router is used for these purposes. With a certain skill, you can get by and hand tool - with a knife, file and sanding paper.
Decorative plastic edging: super glossy, metallic and 3D effect
Both PVC and ABS edgebands are available in attractive glossy and metallic finishes that not only make furniture more practical and durable, but also significantly improve it from an aesthetic point of view.

If you decide to choose exactly this type of edging for countertops and furniture facades with your own hands, then it is better to entrust the solution to the question of how to stick the PVC edge on the chipboard to a workshop that has the appropriate equipment. When gluing a glossy or metallized edging, the risks of accidentally scratching the surface of the end are too great and thereby spoil the whole effect. On the other hand, the decorative edging has a protective film-like layer that can only be removed after the entire gluing, rolling and processing process has been completed.

Special attention should be paid to the acrylic 3D edge (PMMA) made on the basis of polymethyl methacrylate. The decorative base is covered with a thick layer of transparent polymer, which protects the base from damage and abrasion. And also gives the edging an attractive 3D effect of a kind of solidity, in which the edging does not look like a simple framing of the table top.
Applied and cut-in edges
This type of edging is more decorative. It does not protect furniture parts from swelling and drying out, but only gives an attractive volumetric shape to the ends. It is used only for decoration of visible ends - facades, cornices, countertops, open shelves etc.

As the name implies, the invoice (U-shaped) and cut-in edge does not require a sticker (in rare cases, only additional fixation, support), is attached by protruding parts, clasping the end of the part or cutting into a specially prepared groove in the center of the end. They make flexible overhead and cut-in PVC edges, used to decorate tabletops in office and student furniture.

Particularly noteworthy is the aluminum end, which is used to frame the facades and countertops of kitchens, premium-segment office furniture, reception desks, etc. Since the aluminum end is not able to bend around corners, additional accessories are required for its installation - internal and outer corners... Sometimes craftsmen do without them, sawing and butting the butt at the right angle.