Decorative plaster, the technology of applying it on the surface of the walls is of great interest to the owners of their homes. This is one of the most fashionable wall coverings for renovating premises.
If earlier plaster was a finishing material that is applied to the surface under final cover, now she herself is used for topcoat... The technique of applying decorative plaster, a video of the process, this article will show.
The material includes:
- Watery base.
- Bonding polymers.
- Filler, which can be:
- sand;
- lime mixture;
- marble chips (see Plaster with marble chips: types, features, methods of application).
Decorative plaster perfectly levels the surface and can be applied to many building materials.
In this case, the walls can be:
- Brick.
- Plasterboard.
- Wooden and others.

The peculiarity of the material is its high plasticity, which makes it possible to obtain various images from it. By adding small stones and shells, you can create a panoramic pattern.
Tip: Doughy or dry decorative plaster is on sale. Specifications she has different, which should be borne in mind when purchasing material for wall decoration indoors.
The material, by the type of binding element and by the composition of the filler, can be:
- Mineral plaster. Consists of lime or cement, water based. Its price is the lowest, but there are a number of disadvantages, of which the main one is low vibration resistance. Such material can begin to crack even with a slight vibration in houses located next to the railway track, which must be taken into account.
- Silicate plaster... Has great resistance to vibrating movements, however, not the highest. In this case, the binding element is liquid potassium glass. The main advantage of the material is its low tendency to contamination.
- Acrylic plaster... Better coverage than the previous two. The decorative plaster technology is based on an aqueous dispersion of acrylic resins. Such material are made out interior walls premises and facades of houses. Its main advantages:
- moisture resistance;
- heat resistance.
In addition, it is very easy to clean. This type of coating for the bathroom and kitchen is beyond competition.
- Silicone plaster... Exactly this expensive coverage... The binding element here are polymers. When applying such decorative coating do it yourself on the wall, it is easy to understand what excellent plastic properties the material has, which makes it possible to apply it even to a non-professional worker. In addition, the surface is easy to clean.

Different fillers determine the type of plaster.
She may be:
- Textured (see Textured plaster: features of wall decoration)... This is an inexpensive and fairly popular type of coating. As a filler, it contains:
- wood fibers;
- mica;
- small stones;
- mineral crumb.
With such fillers, you can get a volumetric drawing of the effect, and the walls, under such plaster, take on the appearance of a real work of art.
- Structural. Here, stone and mineral chips are used as filler. Elements of quartz are also used in the coating.
Tip: Before applying this coating, you need to familiarize yourself with its structural homogeneity. In this case, the wall will look like the bark of a tree.
- Venetian (see Venetian plaster with your own hands: features of the work)... The filler in this material is marble chips. This is a very beautiful decorative plaster, the technology of its application is rather complicated. The material is used most often in antique or classic interiors.
- Facade. It is mainly used for finishing facades. However, when using small granules, it can also be used indoors. Fillers in the material can be very different. Its advantages:
- moisture resistance;
- good soundproofing;
- resistance to temperature fluctuations.
- Gypsum... In this case, gypsum is taken as a filler. Material advantages:
- high environmental friendliness;
- high-quality leveling properties;
- strength;
- increased plasticity.
What tools are needed to work
The type of material, the technology for applying decorative plaster, a video on creating a unique ornament or a kind of texture shows the whole process in detail.

To apply the coating, you will need special tools:
- Steel trowel. It is a special spatula, which is mainly intended for applying the Venetian type of mixture. Coating metal elements special agents, prevents the formation of rust. Patterns on structural and textured views can be very different, which allows you to make tools of different standard sizes.
- A plastic trowel is used to create a relief for structural compounds such as:
- "Bark beetle";
- "fur coat".
- The decorative brush allows the surface to be roughened. The surface is "combed" with a brush, leaving furrows. The result depends on the direction of movement of the tool along the wall. Movements can be:
- vertical stripes;
- arcs.
It all depends on what kind of fantasy the owner of the premises has.
- Applicator. Designed to give a comfortable texture to wood.
- Sea sponge. With its help paint is applied, which gives the coating an interesting effect.
- The marbled finish roller is available for use on Venetian surfaces. Helps imitate natural stone.
- A porous roller is needed to create a surface with an unusual texture. It is used not only for painting with decorative paints.
- Textured roller (see Rollers for decorative plaster and embossed surface creation). These tools are made on different dies. They are convenient for applying repeating patterns, like on wallpaper. When carrying out work, it is necessary to move from bottom to top, it is necessary to carry it along the surface with a roller in one motion, imprinting the ornament onto the wall.
- Stamp for "Safari". They can make the surface under the skin of a crocodile, using a special mixture "Safari" for this, which will give the surface a very expensive and respectable look.
Methods for covering decorative plaster
The technology of applying the material depends on its type, which determines the consistency of the material.
Before the decorative plaster is coated, the technology takes into account the following factors:
- It is not very convenient to work with a liquid mass, it cannot be additionally diluted with water.
- If there is coarse aggregate or chips in the material, the coating can only be applied manually.
- Compositions in which crumb of different fractions are applied manually is quite difficult.
- Water-soluble materials are slightly toxic, but they are more susceptible to negative environmental influences.
Several important points about applying decorative plaster:
- On plastic, oil paint, polyurethane foam, the material dries much longer than on concrete with pores or plaster.
- When working on OSB, chipboard, plywood, wood, the surface can be deformed from the application of a decorative coating made on a water basis.
- In case of defects on the base of the surface, it will be necessary to cover the material with a thicker layer, which will increase the consumption of material.
- When water-based compounds are coated on ferrous metals, rust spots may appear.
Tip: Almost all types of decorative plaster have the same hardening period. The setting of the material takes about 4 hours, it will take up to 36 hours for drying, and up to 9 days for complete hardening. For the first two days, the surface must be protected from changes in humidity and air temperature.
How to prepare the surface
To prepare the walls of the room for decorative plaster, you must:
- Clear the walls.
- Dry surfaces well.
- Remove dust.
- Fill cracks and large defects.
Tip: Walls must be primed with a special compound that creates a layer between the base of the wall and the coating.
The primer softens the negative effects of air changes, which deform stresses and reinforce the load-bearing layer.
Under different types plasters are made special types primers. Crumbling, weak substrates should be treated with a strengthening compound. Before applying decorative plaster, drywall should be treated with a special primer deep penetration.
When making a primer, there are several things to consider:
- It must be over 20 millimeters thick.
- Smoothing the soil should be done with a strong compaction, so that the uniformity of the texture is not subsequently disturbed.
- The surface is kept damp for about 10 days. To do this, it is moistened with water up to three times in 24 hours.
Application technology

What is the technology for applying decorative plaster, the video will tell you in detail. Different types of coatings are done with different tools.
It can be:
- Brushes.
- Embossed roller.
- Master OK.
- Putty knife.
- Spatulas.
The most common way to level a wall with plaster is to stretch it.
Wherein:
- Use a trowel or steel float.
- The operation is performed from bottom to top.
- The grater is placed to the wall surface at an angle of 60 °. The thickness of the coating layer must correspond to the fractional content of the filler.
- The final texture and pattern of the coating is formed with a plastic float after the end of the adhesion of the solution to the instrument.
Instructions for applying various types of decorative plaster:
- A coating with a uniform rough texture, which looks like pebbles of the same size and densely packed, is formed by small movements in a circle directed in one direction.

- A coating with a bark beetle structure may have grooves:
- horizontal;
- vertical;
- cross;
- circular.
It depends on the path and amplitude of the tool movement.
- Sand and lime cover helps to create various types of textures. It is carried out with molding tools.
How decorative plaster is carried out, application technology - the video will tell you how to apply it efficiently and beautifully.
Examples of applying different textured patterns:
- Wave. For this:
- notches are made on a previously rubbed, fresh surface;
- the area is wetted with water;
- a layer of solution is applied in strips. Stripes are made straight or zigzag. By smoothing the surface with a spatula, waviness is imparted.
- Boulders. In this case:
- a sufficiently plastic colored solution is applied to the soil layer;
- leveled with a polisher;
- with a hard brush, which is located at an angle of 90 ° to the wall, the surface is trimmed. The harder the brush, the more contrasting the boulders will appear.
- Travertine. The multi-colored solution is applied to the surface with a thin layer of casts and smoothed with a slicker or spatula.
- Furrows. To complete this texture, you will need a small semicircular shape, sharply sharpened, teeth, their width is three centimeters, and the gaps between them are 1.5 centimeters. Further:
- a small amount of mobile plaster is applied to the primed surface;
- smoothed with a polisher;
- the rule is applied and at an angle of 45 °, grooves are formed with the sharpened part of the bevel, the shape of which depends on the configuration of the denticles.
- Fur coat. Usually created by spraying or brushing through a mesh, brushing off. Wherein:
- the mesh is selected with a cross section of the cells of about one centimeter;
- stretched over a frame, the dimensions of which are 1 × 1 meter;
- the frame is leaning against the ground;
- the mixture is poured onto it with a spatula through the mesh.
The application of the mortar must be carried out with equal force in order to obtain a fairly uniform coating.
- Related technology. In this case, the solution is drawn up with a broom, the broom hits the stick so that the plaster is sprayed on the wall.
- Flakes. The spray is carried out with a plastic and liquid mass, the texture after that resembles flakes of different sizes and shapes.
- Sponge. The solution has the consistency of sour cream, is applied to the primer and carefully leveled. A sponge soaked in soapy water is pressed against it at regular intervals to prevent the mixture from sticking.
- The texture of the strokes can be given to terrazzite plaster. To obtain it, a fine-grained set solution is used. Material processing can begin after an interval that ranges from one to five hours. The comb forms the texture. For this, notches are made on the surface.
- Shattered Stone. This texture is obtained by hammering the tongue into the hardened solution. In this case, pieces of the coating will break off, and the resulting indentations will create graininess in the coating.
The video in this article shows in detail the application of decorative plaster.
How to spray decorative plaster
This method allows the composition to be applied to slopes, decorative details or complex geometric surfaces. With the help of spraying, the aesthetic effect of applying artistic plasters of various factions is increased.
This could be:
- Composition with a thickness of three millimeters, selected for covering basic surfaces.
- A layer of one millimeter is sprayed onto the slopes and decorative elements.
To apply decorative plaster using this method, you need to purchase a special apparatus.
On one wall, spraying should be carried out continuously, starting from the top and following the rule that the work is done "wet on wet". If it is necessary to interrupt the work, masking tape is glued along the line of the end of the decorative layer. After applying the plaster, its structure is formed and only then the adhesive tape is removed.
These are the most common methods for applying decorative plasters.
The work associated with the application of decorative plaster provides the surface with an original embossed coating that can adequately decorate any interior.
The technology of applying decorative plaster has come to us since ancient times, since then the method has been improved, and due to modern developments, it has received new opportunities.
The existing options for finishing with decorative plaster allow you to create with your own hands luxury design premises in Venetian, Moroccan, Provencal styles.
Choice of decorative plaster
Types of decorative plaster, depending on the composition of the finishing material, are divided into classes.
Usually, crushed quartz, marble or granite is used as the main filler material, possibly a combination of both.


Also, decorative plaster by types is divided according to the size of the filler fractions.
Based on this, finishing material with large fractions of minerals is usually used for decorating outdoor concrete surfaces buildings, with small grains - for application on walls indoors, where the basis is drywall.
In addition, there is decorative plaster with synthetic filler.
In this case, nylon or cellulose fibers are used.
This technique of applying decorative plaster makes it possible to create volumetric relief patterns on any wall surfaces.

In addition to polymer and mineral species decorative finishing, silicate and silicone coatings have become widespread.
Based on the above, you can consider what types of decorative material are best suited for application to the ceiling, walls or facade surfaces.
Mineral
Decorative plaster based on crushed minerals, due to high level vapor permeability and ecological cleanliness, used for application on walls inside buildings.
Decorating with such plaster is especially important in rooms with high humidity, on moisture resistant drywall.
Polymer
In decorative finishes based on synthetic materials, acrylic resins are added as a binder.
The finishing material is equally suitable for application to the external walls of the premises and the internal ones.
Due to the elasticity of the material, the use of decorative synthetic plaster is appropriate on the facades of buildings that have not yet undergone shrinkage.
Silicone
Silicone decorative plaster consists of silicone resins, due to which the finish becomes durable and UV-resistant.
It is advisable to use silicone plaster for facing the outer walls of buildings, near highways, since the applied material tends to repel water and dirt.
Silicate
Silicate plaster is made on the basis of liquid potash glass.
The coating is durable, resistant to high temperatures and the property of passing steam.
Most often, silicate material is used for application on the facades of buildings, since the surface treated with it does not lend itself to moisture, mold and mildew.
Tool kit and preparation for plastering
Deciding to apply to the wall decorative material with your own hands, you should not only get acquainted with the technology, how to apply decorative plaster correctly, but also start preparing the walls.
And also stock up on certain tools.


Perhaps any tool in the following list will be superfluous, since it all depends on the methods of applying decorative finishes:
- capacity for plaster mix;
- spatulas ( different sizes and forms);
- scraper, trowel and scraper;
- drill with a nozzle for mixing the mixture;
- brushes, brushes, combs of different sizes;
- trays and rollers.
Metal tools should be free of rust, so it is best to use stainless steel tools.
Regardless of what options, methods or types of work for applying decorative plaster and types of materials will be used, the work process should begin with preparatory work.
The ceiling and walls to be decorated with their own hands get rid of pieces of the old coating and leveled.
If the finishing material is to be applied to drywall, then all joints and cracks must be smeared and sanded, and the surface itself must be primed.
Preparing the outer walls of a building for decoration is no different from preparing the inner walls.
Is that the process will turn out to be more laborious, since the basis should not be old paint, traces of greasy stains and dirt.
Worn out facades are subjected to mechanical stress in order to remove mold, crumbling parts of the base or peeling reinforcement.
Then, with their own hands, they carry out work on leveling and priming the walls of the facade.
If moisture-resistant drywall was used to level the walls of the facade, then it is primed with a bonding compound with deep penetration, which has good adhesion properties.
All surfaces are treated with a similar primer, not only drywall, in addition to foam concrete and concrete bases, the structure of which is classified as weakly absorbent.
The concrete base is primed with concrete contact, or other types of agents are used that can provide the surfaces with a rough layer for its subsequent adhesion to decorative plaster.
Methods for obtaining decorative surfaces
Various methods of applying decorative plaster have several important advantages. Freedom among them design solutions and a huge selection of colors, reliefs and textures.
Having a tool at hand, having an artistic taste and knowledge of how to properly apply decorative plaster, you can create luxurious masterpieces with your own hands.

Decorate in the chosen style not only the walls, but also the ceiling.
To obtain beautiful ceiling or pretty walls, you don't have to be a professional or use a special tool.
It is better for craftsmen who are still inexperienced in this area to use more simple methods decorating walls, this is considered the application of decorative plaster bark beetle.
Bark beetle decorative trim can be used to improve the appearance of both interior and exterior walls of buildings. This method is suitable to decorate the ceiling.
Application decorative plaster-bark beetle possible on any putty surface: drywall, wood, concrete or brick.

What kind of tool is needed, as well as the preparation of surfaces, was mentioned above, so you can immediately go to the topic of how to apply decorative plaster bark beetle.
A tool such as a plastic scraper allows you to achieve a texture with the name bark beetle.
Carrying out movements on the wall in the chosen direction with your own hands, you can get a surface with an individual pattern. such a ceiling looks especially beautiful in a private house.
In this case, the texture, depending on the size of the filler grains, will have a distinct or slightly blurred appearance.
The work is done as follows: they apply the plaster mixture to the ceiling or section of the wall, when it grabs slightly, they begin to rub it with a plastic float.
With this movement of your hand, you can create circular, vertical or horizontal strokes.
The plaster will get an individual look regardless of the chosen direction, since the grains of minerals moving, will leave strokes behind them.
After complete drying of the coating, the surface is painted with silicate or acrylic paints. The choice depends on whether the ceiling or wall was tidied up.
Hatching - bouffant
This method of decorative plaster provides for the use of a steel brush-comb for work, with a wire length of 10 cm, with a cross section of 0.1 mm.
On drywall or cement flat surface inflict plaster mortar, until he grabbed, begin to work through the surface with a metal brush.

Movements can be carried out under different angles and in various directions. As a result, you get wavy or perpendicular strokes to each other.
After firm adhesion of the decorated surface, using a soft brush, loose plaster grains are removed from it.
Decorative plaster of walls with rollers
Before taking on the tool for work necessary for applying decorative plaster, you should pay attention to the unevenness of the walls or the worn-out ceiling.
It is good if the putty drywall acts as the supporting base. Otherwise, the differences in the surface will have to be leveled using a putty tool.

The base for applying the decorative layer with a roller must be even and clean.
The technology of applying decorative plaster with a roller is carried out with sliding smooth strokes, evenly distributing the solution over the surface of the walls.
In order not to stain the ceiling and flooring, indent from adjacent squares.
Decorating with a woolen roller
A layer of plaster in a couple of millimeters is applied to the putty drywall or cement even base with your own hands.
Movements are carried out with a woolen roller in the selected direction. The tool will make grooves behind itself, thereby forming a pattern. By creating a relief, you can freely change the direction of the hand while working.

If you are doing kitchen renovation on your own and at the same time approach the process creatively, you will definitely want to add something original to the interior. For example, to decorate the walls in some unusual way. If your choice is do-it-yourself decorative plaster, you will not only decorate your kitchen, but also hide all the unevenness of the walls, if any.
Unique patterns on plaster can be made with your own hands, having received an expressive decorative effect
What is decorative plaster
A mixture for decorative plaster is a granular mass with various fillers - wood fibers or stone chips. Structural mineral plasters are based on lime and cement, latex - on synthetic latex, silicate - on potassium silicate.
The indisputable advantage of decorative plaster as a finishing material for the kitchen is vapor permeability. The surface is easy to clean and retains its color and texture for a long time. In addition, the plaster is applied quite quickly, helping to hide the unevenness of the surfaces. A creative person can use this material to create a panel for decorating a room or ornamental decoration. Textured plaster goes well with other types of finishing materials: various wallpapers, panels for walls, ceramic tiles.

"Bark beetle" - this is the name of this pattern, which really resembles a damaged wooden surface
How to choose the right material
The cheapest material for the kitchen is considered to be lime-sand plasters, which are used both for decoration and for insulation of building facades.
Stone plaster consists of a binder (actually plaster) and natural stone chips. It is applied by hand; even a novice home repair master can do the work. When the stone plaster dries, it forms a stylish wall covering. Durability is the main advantage of this type of plaster.
Latex plasters are made from artificial latex. They are so durable that they are not at all afraid of mechanical stress.

Plaster Orange peel»Suitable as a basis for rooms that are planned to be decorated in one of the oriental styles
Silicate plasters hardly get dirty or swell. But they have one drawback: they should be applied only to a previously prepared surface that contains quartz (simply sand). To prepare the surface for applying decorative silicate plaster, simply plaster the wall with any mineral-based plaster. Remember, it is not recommended to apply silicate decorative plaster on a water-based or dispersion primer - in this case it simply will not stick.
There is ready-made plaster "Avangard F" on sale. It is a mixture that dissolves in water. With its help, you can give the surface the desired texture and color. When the plaster dries, it will be vapor permeable, but waterproof and durable. It is suitable for use as a decorative plaster for both interior and exterior walls.
Colored stone chips are also referred to decorative plasters, which are sold in buckets of 14-20 kg and looks like a thick mass. This material does not belong to the category of light coatings. On square meter walls leave 2.5-5 kg of small stones, which are part of the plaster.
Methods for applying decorative plaster
According to the researchers, the technique has been known for over four centuries. In those early days, decorative plastering work was done by rustication or stamping. In the first case, the pattern was applied to the hardening cement. The second used various stencils... Both methods require rather high qualifications from the master. Craftsmen, on the other hand, could only dream of extremely technological compositions of decorative plaster. Now everyone has the opportunity to create unique interior or decorate the exterior walls of your home with modern decorative plasters.

"Wave" - a pattern reminiscent of fabulous flowers painted by frost on glass - looks very impressive, especially with well-chosen wall paint
As soon as the trade workers do not call decorative plaster! This is structural, textural, textured, and relief plaster. Are there any differences? Structural plasters form a relief only after special operations have been performed by the master. Textured plasters include materials that are simple in application technology, in which the decorative effect manifests itself instantly. This includes plaster with colored stone chips and "silk" coatings (the latter is also called liquid wallpaper).
How to apply lime-sand plasters
Whichever plaster mix you choose, it will give your walls an attractive and unique look. The cheapest coating is considered to be lime-sand plasters. You can achieve a decorative effect in different ways.
Before starting work on applying decorative plaster with your own hands, prepare the surface. Clean it from the old coating and prime it. If you are renovating your kitchen, be sure to clean the walls of dirt and grease. You may have to use special products, because you can only prime a clean surface. It is advisable to use a deep penetration primer. When it is completely dry, start applying the plaster.

Textured plaster is one of the most popular ways to decorate walls indoors.
The plaster is applied in one layer or in two layers. The substance is applied the usual way, as when plastering walls, but you need to work from the corner and try to make sure that all the joints of the coating fall on the most inconspicuous parts of the wall.
Any lime-sand mortar is applied with a spatula. But if it contains small grains, you can use a pneumatic sprayer to work. Use a trowel and trowel to seal the mortar on the wall. It is imperative to seal, because after drying, cracks will appear on the surface, which will spoil the appearance of the wall.

These original swirls, reminiscent of prehistoric clam prints, were made with a regular grater.
You can add texture to the surface in several ways: by processing with a plastic solution, processing by a semi-plastic solution, using a spray.
Works on plastic and semi-plastic mortar
The texture is given after leveling the plaster layer. Rubbing should be done in acceleration (long sweeping movements of the tool) or in a circular motion (movement of the tool in a circle). After this, the work is suspended for one and a half to two hours for the solution to set.
The relief is given using special rules and a cycle, while the pattern will change depending on the location of the rules and the direction of the cycle. To add texture, you can also use plaster blades, rollers, stamps and even an ordinary broom - it all depends on your imagination and desire to experiment.

Designers today offer many ways unusual decor plastered walls
Surface patterns can be created by applying a new compound or by cutting out existing plaster. If you are drawing by cutting, remember not to cut the surface more than 5 mm.
Spray method
This is the easiest way to emboss a plastered wall. Spraying is the application of a new layer of plaster after the previous layer has dried. Depending on the desired texture, you can use different tools... Looking for a fine-grained relief? Use an ordinary broom for spraying. Need a coarse texture? Spray through the mesh. The larger the cell size, the coarser the plaster layer will be.

Spray is the easiest way to decorate walls, available even to a novice plasterer.
Application of decorative plaster with fillers
If you purchased a plaster with a filler, it will give the surface the necessary texture by itself. "Lamb", "bark beetle", "orange peel" - this is not a complete list of conventional names for decorative plasters with various fillers. Apply the mixture in an even layer 2-5 mm thick in a criss-cross motion. It is advisable to do this continuously. If there is a need to remove plaster residues, it is best to do this immediately, when the plaster has not hardened. You can remove uncured residues with water, and if the composition has already hardened, this can only be done mechanically.

You can apply the plaster in an even layer using simple tools, the main thing is to be careful
If you apply decorative plaster with a fine filler with your own hands, after applying an even layer, add texture with a spatula or float, making wave-like movements, rounded movements or strokes.
It is better to carry out work on applying decorative plaster together: one person applies an even layer of material, the second makes a drawing. After the plaster has dried, you can start painting it. The plastered surface dries from 2 to 8 days.
How to paint decorative plaster
Coloring is done with a special brush, roller or mitten. Want to achieve a scuffed effect? After staining with glaze, wipe the surface with a damp sponge. A wall looks good, on the protruding surfaces of which gold or silver azure is applied. If necessary, the plastered wall can be repainted in a different color without changing the texture. Want to extend the life of your plaster and give it a shine? Buy a special wax and apply it to the wall surface.

Plaster can be painted and painted on it, however, to be sure of the result, you should contact professional craftsman
The simplest tools for a decorative effect
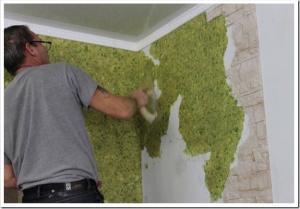
If you want to transfer images of wildlife to the wall of your kitchen, this can be easily done using the simplest tools for applying decorative plaster. The grass on the wall is made with a rubber roller, on which a rope is wound in a spiral. After applying evenly, roll over the surface of the wall with this roller, and then paint the wall in green color, and textured elements - in silver. For "flowers" you need such a tool: several sheets of newspaper are wrapped in a piece of polyethylene, and the polyethylene is twisted in the form of a handle. With this tool, after applying an even layer, it is necessary to make circular movements. The resulting flowers are very reminiscent of roses. You need to paint the surface in any color, but be sure to finish the textured elements with silver, gold or white paint. You can see everything with your own eyes on videos.

Various unusual effects can be obtained using familiar objects, for example, a kitchen sponge

Artistic chaos on the wall surface can be obtained with plastic bag
DIY decorative plaster: video tutorials
Flower pattern
Grass effect
There are many ways to apply decorative plaster so that the apartment looks stylish, individual and modern. The richest selection of imported and domestic mixtures with various additives gives the designer the opportunity to imitate reptile skin, silk fabrics, and different types of finishing stones.
Some methods of applying decorative plaster with your own hands are so simple to perform that they may even be available to a person who has the most general ideas about working with such mixtures.
Regardless of what technique of applying decorative plaster will be used to decorate the room, the whole process is divided into several main parts. Each stage is important to obtain the perfect result at the end of the repair, so you need to take a very responsible attitude to the work.
When carrying out decorative finishing, the following steps are taken:
- Before working with decorative plaster, the walls must be leveled. Putty for compositions with a fine-grained structure (liquid wallpaper, Venetian plaster, etc.) must be carried out painstakingly, destroying the slightest potholes and irregularities. Under textured mixtures with large inclusions (bark beetle, rain, travertino, etc.) and under plaster with a relief surface (leather, Versailles, floral, etc.), you can perform the usual leveling with a finishing plaster putty.
- The application of primers strengthens the leveling layer and increases the adhesion of the decorative mixture. This makes the coating durable and resistant to external factors.
- Working with decorative plaster consists of 1-3 independent steps. It depends on the technique chosen. In some cases, it is required to apply a base coat, dry it and only then make a texture. Sometimes it is necessary to apply 2 textured layers to create the effect of volumetricness and transparency of the decorative coating. In the simplest versions, the plaster solution is applied only once, and then decorated.
- Glazing is giving the finished surface smoothness and shine. For this stage, varnishes or special wax are used. Sometimes, before glazing, the surface is painted, glitters are added, silvering or gilding is performed.
After coating with varnish or wax, the walls acquire moisture-resistant properties. But some types of decorative plaster (gypsum plaster, Venetian, liquid wallpaper) are not suitable for use in damp rooms even after application protective coating... Cement-based compositions can also be used for finishing bathrooms or toilets with any type of textured coating.
What will it take to work?

The main thing that allows you to create amazingly beautiful options for wall decoration is a plaster mixture. Depending on the brand and manufacturer, it may contain large or tiny inclusions: marble chips and powder, quartz sand different fractions, silk fibers, sparkles, gold grains. Thus, the texture of the finished coating can be very different.
Binders that make it possible to form a continuous thin layer plaster and hold it on the wall are less plentiful. Most types of textured mixtures are made on the basis of gypsum or lime, for outdoor use and wet rooms apply white cement... One of modern materials for the base of decorative plaster mix - acrylic. In addition to binders, the composition may include additional additives for plasticizing the solution.
It is quite simple to choose textured plaster for your home. It is advisable to know the name of the technique that will be used for finishing. Consultants trade organizations will help you choose a dry or ready mix in a suitable price range. The simplest finishes can be done using conventional plaster putty.
Choosing decorative textured plaster in the store, you need to take care of purchasing a working tool. You may need:
- construction spatula, metal;
- trowel;
- sandpaper;
- paint rollers (with nap and foam rubber);
- textured rollers (if necessary);
- small brush.
If you want the wall covering to be colored, you need to purchase a color scheme for decorative plaster. All mixtures are produced without coloring and turn white when applied. In a hardware store, you need to purchase both primer and varnishes or wax. To simulate reptile skin, you will need special stamps or roller attachments.
For surface decoration, you can use the most common materials. To create a beautiful texture, you can use a wet cloth and polyethylene, a foam rubber sponge and a round plastic washcloth, a thick rope or cord. The decor can even be applied with your own hands, wearing rubber gloves.
How to make a textured coating from a putty?

Among the variety of decorative plaster, the types and methods of application of which differ depending on the desired effect, the simplest option is gypsum putty textures. Affordable material allows you to simulate finishing stone and skin, create a relief pattern of any degree of complexity. For work it is better to use finishing mixtures, but in some cases you can combine them with the starting ones in a 1: 1 ratio. Mix the solution by adding the dry mass to the water according to the manufacturer's instructions.
To create a base, a thin layer of putty should be placed on a leveled and primed wall. Coating thickness for embossed plaster - 2-5 mm. Work should be started from the bottom, stretching the solution along the wall with long strokes. Covering a small area with a putty (1-2 m²), apply a relief without waiting for the mixture to set.
The simplest working tool is a wad of rags wrapped in plastic wrap, - will allow you to create a decorative floral texture of the coating. For cutting, you need to press the tool to the surface and make a rotational movement with your hand, tearing the polyethylene from the plaster. The result is a complex spiral curl that rises above general level... Placing the same prints randomly or in a randomly selected order, you need to cover the entire square with relief patterns similar to roses or peonies.
Repeat the process on the adjacent section of the wall. When joining the edges of the squares, you need to make a small overlap (5 cm) on the already formed surface. When applying the texture, the joint will be naturally masked. When the entire wall is plastered and finished, it must be allowed to set within 24 hours.
It is necessary to cover the wall with a layer of paint (acrylic, water-based emulsion), carefully rolling it out with a roller. Let dry for 2-3 hours. After that, polish the surface with a metal spatula, smoothing too much protruding peaks remaining on the coating. This removes some of the paint, revealing a light base layer. As a result, the floral pattern appears brighter on the wall.
Putty texture options
As a variation of the technique, you can make a wavy pattern from the lines left on the wet plaster with your own fingers. The use of a round plastic washcloth will leave ring-shaped marks, and a sponge with large holes will create a pebbled leather-like surface. The relief can also be applied with a roller on which the cord is wound. In this case, a pattern similar to intertwining grass stalks will remain on the wall.

To imitate reptile skin, use commercially available stamps or roller nozzles. It is quite easy to make a pattern for crocodile skin or snake scales, but after the plaster dries, it will have to be painted twice to highlight the depth of the pattern. The layers of paint should be slightly different in shade, and the top layer will have to be applied very carefully, trying to shade only the protruding parts of the "scales". In addition, you can add gilding or glitters by applying them in fragments with a soft sponge.
How is Versailles plaster made?
The luxury of the palace halls of Paris can be enjoyed even by a novice master. The technology of applying Versailles decorative plaster is very simple in execution. For these purposes, use an ordinary plaster putty, mixing starting and finishing grades 1: 1.

Cover the prepared wall with soil and let it dry. Step-by-step master class for applying decorative plaster with your own hands it looks like this:
- Sketch the mortar on the wall, making short, chaotic strokes. In this case, the plaster layer can be about 3 mm. It is better to start from the corners and joints of the wall and ceiling or floor, and then cover the free space on an area of 1-2 m². The base can be leveled slightly.
- With a large trowel or trowel, apply the relief with undulating movements, with the entire plane of the tool. When moving the trowel and tearing it off, you will get chaotic stains. Moving on to the next section, overlap the finished plaster, and for the continuity of the drawing, stretch the solution slightly over the existing one. With the acquisition of the skill, the master will be able to see for himself where the pattern needs to be corrected.
- Dry the wall for about 2 days.
- Draw a metal spatula over the surface, slightly pressing the tool. When polishing, the sharp parts of the relief are removed, the texture becomes smoother. Finally, polish with medium emery cloth.
- Remove dust and prime the wall with a compound suitable for acrylic paints.
- Paint the entire surface with a medium-bristled roller, being careful not to leave light spots. Dry for several hours.
- Dilute gilding or silvering powder in acrylic lacquer or primer. Apply the composition with a foam roller. The gilding should only be applied to the convex parts, so the tool should be rolled out well before use. After this layer has dried, apply glitter varnish to give a special shine and protect against moisture.
A wall finished in this way can withstand damp cleaning with a soft cloth.
Decorative limestone from putty
A variant of the Versailles technology can be called an imitation of limestone slabs. For finishing after applying the base coat wet plaster numerous small peaks must be made to form. This is done by pressing the trowel with the entire plane against the model mass, and then tearing it off perpendicular to the wall. Without waiting for the composition to set, you need to smooth out the peaks, leaving the texture in the depth in the form of depressions and grooves.
The plastic composition allows you to redo unsuccessful areas. An ugly piece can be smoothed out, new peaks can be made and their tops can be processed again. Applying texture is a creative activity in which what the master likes can be considered correct.
Paint the dried wall by hand, rubbing with a sponge acrylic paint, tinted in the desired shade. The dye will be darker in the recesses and lighter on the surface. To enhance the effect, you can use a lighter shade composition applied only to the convex areas.
How to work with textured plasters?
This type of mixtures includes those that contain inclusions of different fractions. The decorative effect of techniques such as bark beetle or rain is based on the effect of scratching the binder with hard grains of marble or quartz.
A very beautiful texture - a grotto - can be made from a fine-grained mixture. To make it, you will need ready-made plaster paste with marble or dolomite chips with a fraction of about 1-2 mm and a little Venetian mixture for applying a decorative layer. It is best to glaze such a coating with a special wax, which gives the decor transparency and a slight sheen of polished stone.
There is nothing inaccessible in the technology of decorative plastering using the grotto method. The algorithm of actions is as follows:
- Apply pre-painted paste to the primed wall. textured plaster... The layer should be very thin, in the thickness of the filler fraction. When throwing, it must be stretched very well with a trowel.
- After the wall has dried, apply 2 layer within 24 hours. For this, a certain amount of model mass is applied to the trowel. Pressing the tool to the surface, make a kind of islands from the protruding particles of the mixture. Their arrangement can be chaotic; you can add a little paste in the right places. Facing needs to be done small plots without allowing the mixture to dry out too much.
- Smooth out protruding areas with a wide spatula or trowel to form even islands. When smoothing, you need to lightly press on the tool. Movements should be performed in different directions, in waves.
- Dry the surface for 5 minutes and smooth again with a wide trowel or trowel. Polishing should be done until the raised areas acquire a light gloss.
- Apply a thin layer of Venetian mixture (1 mm) with a roller. The tool must be rolled out well before plastering so that excess mortar does not fall into the grooves of the pattern. The shade of this layer may differ slightly from the color of the textured surface.
- Lightly dry the thin top layer and polish with a trowel or trowel to a high gloss.
- Dry the wall for 24 hours and proceed to glaze. Spread the wax with a sponge, rubbing it into the recesses. After 5-15 minutes after applying the substance, it is polished with a dry cloth. You need to rub the wall in a circular motion, without removing the rags from the surface and moving it in different directions.
The resulting coating resembles polished quartzite or granite, depending on the color of the plaster paste.
If you choose a paste with a filler of a larger fraction for the coating, you can make an imitation of travertine. The version of the grotto technology differs in the way it is dyed. After the 2nd layer of the model mass has been laid and leveled, the wall is ironed with a trowel to shine. If the paste is colored, then a thin layer of acrylic paint of a lighter shade is applied to the protruding parts. With white mass, you can proceed as indicated for limestone plaster.
The thickness of the finished decorative coating, according to the standards of the builders, should not exceed 6 mm. But thin layers of textured mass or embossed surfaces acquire their charm through tinting and polishing, applying varnish or wax. Creativity in the manufacture of textured coating always bears fruit, and the finish, done with care and soul, will always be successful.
In addition to the usual, classic plaster, there is decorative plaster. It is applied in a variety of ways. You can even create original backgrounds and elements on the wall using this type of plaster yourself. To do this, you can use different rollers, brushes, brushes, spatula, gloves.
Decorative plaster comes in different colors and is applied with a trowel. On the wall, it can be smoothed out with an even layer or a corrugated coating is created in the form of decorative forms.
Plaster can not only look like an ordinary cement-sand or lime screed, but also be beautiful and have an aesthetic character. This mixture was called decorative plaster and acquired the purpose of making the premises original.
Decorative plaster is created from various mineral rocks, as well as from synthetic material... It is used to decorate interiors. different premises, even with high humidity(pool, bathroom, kitchen). Even the owners can create original surfaces with their own hands.
This does not require special knowledge or skills. All that is needed is imagination and experimentation. You can create a variety of smooth and three-dimensional shapes.
Decorative plasters are also used for leveling walls, or when it is necessary to hide surface defects. It cannot be used over the entire surface.
In places where walls are damaged, when it is not possible to carry out a full-scale repair, you can create textured drawing... So the interior of the apartment will acquire a beautiful, aesthetic appearance, and the goal of redecorating will be achieved.
How to make decorative plaster?

In case of implementation renovation works do it yourself, there is a need to create something special and original, not like classic, traditional materials (wallpaper, painting).
In this case, you need to create the decorative layer yourself. At first glance, this may seem unrealistic, because the craftsmen take a decent fee for this, and decorative plasters are sold in stores at high prices.
Do-it-yourself decorative plaster. For this you need to stock up necessary material(plaster, pigments) and tools (wide and narrow spatula, roller, special foam-based trowels).
Before covering the walls with decorative plaster, it is necessary to determine which type of plaster is most suitable for taste. In stores, the choice of ready-made mixtures is quite diverse. You can make the same mixture at home. To do this you need to buy ordinary plaster with a 10% margin.
DIY decorative plaster can be done by following these steps:
- The first step is to stir the plaster in a container that would hold a certain amount of the finished mixture (for example, a whole bag or half a bag);
- Then dye must be added to the mixed plaster. It is necessary to add in accordance with the proportions to the mixture for further mixing of the same tone composition (one bag / can of dye);
- After that, you need to thoroughly mix the mixture with a mixer so that there are no gaps.
How to apply decorative plaster correctly?
Decorative plaster is absolutely the new kind finishing material that originates from modern Italy. It has the appearance of a viscous substance, which is created by mixing a dry mixture with pigments of different tones.
Immediately, before applying decorative plaster to the wall, it is necessary to prepare the surface, which must be primed and dry.
Plastering is carried out according to the following principle:
- We prepare a clean container for mixing the mixture, the necessary tools and materials;
- Pour a bag of putty into the container and pour in water. After mixing the mixture, you need to add the dye and mix the mixture with a mixer again;
- The first layer of decorative plaster should not exceed 3 mm .;
- It is necessary to apply the finished plaster with a spatula and rollers with a special texture, you can also use foam sponges for a more original drawing;
- Using a sponge, you need to make circular pressing movements with its rough surface against the wall;
- If you use a roller, you need to choose the orientation of the movement along, across or diagonally and continue in the same direction to stretch the plaster along the wall. This will create an even distribution of the pattern;
- If the plaster is smooth, you need to use a spatula, which is moistened with water before each contact with the surface. In this way, smooth decorative plasters (bark beetle, pebble) are created;
- After applying the main image, the surface is treated with a special wax in order to preserve the shade and pattern for a long time.