Very easy-to-manufacture organizer for small hardware(screws, nails, washers, nuts, etc.), which can be made in just a few minutes from cardboard box and plastic yogurt jars.
As you know, home-made people who actively use various small hardware (nails, screws, nuts, washers, etc.) in their work, constantly have to solve the problem of their placement and storage.
So at the present time, I have a rather acute problem of placing such small fasteners. Moreover, this is largely due to the fact that there have been decent frosts on the street for the third week so that there is no way to work in the workshop. Therefore, inevitably, you have to relocate home and already at home and work on homemade products, at least those that can be made at home.
And so, in order to solve the problem of placing small fasteners at home, I decided to make a rather simple organizer, and literally from rubbish.
For this I needed the following accessories:
Materials:
Milk carton;
- Plastic jars of yoghurt.
Tools:
Pencil;
- Strong scissors;
- Construction or office knife;
- Stationery stapler.

Organizer manufacturing
First, use scissors to cut off the upper part of the box from the milk bags, focusing on the side edges.

Then we strengthen the places where the sides of the box are glued, additionally fastening them with staples using a stationery stapler, just in case, so that they do not disperse.

Now, with a pencil, mark in the bottom of the box, the places of the cutouts for the jars of yogurt and cut them out with a clerical knife.

In this case, you can cut out one slot, use the cut out part as a template for marking subsequent slots.

You don't have to worry about the accuracy and evenness of the edges of the slots, since they will not be visible anyway.
I made seven slots in the bottom of the box, four for small yogurt jars and three for larger jars.
Now you can insert empty jars themselves into the slots made, which will serve as containers for storing our hardware.

And now our organizer is ready!

And so, it looks from below!

Now, you can fill the jars with hardware.
As a result, it turned out to be a pretty good organizer!
To be honest, I was afraid that because of the slots, the bottom of the box might lose its rigidity and become not very strong. But it turned out that the bottom retained its strength and rigidity quite well and, in principle, can easily withstand an even greater load (if, for example, all the jars are filled with hardware to the top).
Another convenience of this organizer is that each jar can be easily removed from its slot. So, if necessary, any jar can be removed from the slot to be replaced or moved to another place.
In addition, you can make several such organizers and put them one on top of the other.
A good owner will always have a whole arsenal of tools at hand: from nails and screws to pliers, a level and a set of screwdrivers, not to mention a drill, a hammer drill and a screwdriver. Very often, simple household repairs do not begin in any way due to the fact that the master cannot find all the tools he needs in the apartment or garage. To prevent this from happening, all working tools should be stored in a specially designated place - a tool box.
What are the toolboxes, what requirements they must meet, and how to make a toolbox with your own hands - this is the article about this.
Varieties of tool boxes
Basically, a toolbox is a box with or without a lid, divided into several compartments of various sizes and shapes. Small drawers are for storing fasteners and can hold drills, tips, or other small parts. As a rule, such boxes are divided into several compartments, each of which has a separate lid. These boxes are easy to carry, because they weigh a little.

Larger cases are necessary for storing and transporting large tools such as hammers, saws, drills or jigsaws. Quite huge boxes will be needed to keep punchers, levels or mallets in them. These tool boxes are often made on wheels so that they can be moved and transported.
Professional toolboxes can vary depending on the skill of the craftsman: so a plumber needs one set of equipment, but an auto mechanic needs a completely different set. You can find similar boxes in building supermarkets or in specialized stores; they are often sold complete with the tools themselves.

Cases are divided into several categories. This takes into account not only their size, but also the design, as well as the material of manufacture. Structurally, it can be:
- Open boxes with handle for large instruments and for easy transport from one place to another.
- Multi-storey boxes with many small and large compartments for complex storage of working parts and their easy transportation. Such a box can be thrown into the trunk of a car or carried by hand.
- Compact cases with an ergonomic handle containing all the tools you need to minor repairs or a trip to the country.
- Chests of drawers consisting of several pull-out compartments, as a rule, are used permanently at the place of work.
- Tool belts are needed for those who work at heights or in hard-to-reach places.
- Carts are a kind of toolboxes on wheels that are large in size. On such devices, very large equipment is moved, such as welding machines, boers.

Important! When choosing a box for your tools, it is better to give preference to multifunctional boxes, where each part has its own place, and small compartments are closed with lids. Otherwise, all tools run the risk of mixing in one pile during transport.
What tool boxes are made of
Cases and boxes can be made from various materials, but the main requirement for them is one - the boxes should be light, since the tools themselves weigh quite a lot. There are a few more nuances that you need to know about those who buy a case for their arsenal of tools:
- The bottom of the box should be as thick as possible, since it is on it that the entire mass of contents presses.
- A full box should not deform when lifted - the walls remain perpendicular to the lid and bottom. If the walls bend, this indicates that the strength of the case is insufficient for such a set of components.
- Well, if the material of the box is fire-resistant, then expensive tools will survive even during a fire.
- If there are gaps in the box, dust and debris typical of the construction site will penetrate into the box and contaminate the tools. And even in this case, the contents are threatened with oxidation and rust due to high humidity.
- Durability is an important factor, because professional boxing costs quite a lot, and the load on it from metal components will be significant.

Today the most popular materials for such boxes, the following are considered:


Attention! All materials must comply with special standards, because if the box breaks at the most inopportune moment, all heavy tools will fall on the feet (or on the head) of the unfortunate owner.
If you can still make a metal or wooden toolbox with your own hands, then you can really only buy plastic boxes.
How to make a tool box with your own hands
If the owner decided to make a box for his inventory on his own, first of all, he needs to decide on the dimensions and choose the design of the box.

To do this, you need to inspect all your tools, measuring the most overall elements and taking into account the small things (bolts, nuts, washers, etc.). These parameters are used to calculate the dimensions of the container itself and internal compartments.
Tool box design
Speaking about the design of the boxes, they do not mean their shape, but the way of opening and the presence of additional sections. The following constructions are considered standard:
- Case - portable box rectangular shape with a handle. As a rule, cases are divided into many departments, have removable partitions that allow you to independently divide the space inside the box. The weight and dimensions of such cases are usually small.
- A container is a larger box for a variety of tools. As a rule, it has the shape of a trapezoid with a rectangular bottom. Inside this box there are also partitions, or there may be separate smaller boxes (folded like a nesting doll). The sections of such a container can be pulled up and to the sides, forming a whole "trellis" with tools and fasteners. Large tool boxes of this type can be equipped with wheels, which is very convenient and practical.
- Multiboxes are arranged vertically and drawers in them slide out along the guides, as in a regular chest of drawers.
It will be easiest to make a case for tools with your own hands, because in this design there are no complex mechanisms and hinges with the help of which additional sections move out.
Important! Although it is quite possible to build a container with boxes that fold into several floors with your own hands. To do this, each pair of "floors" should be fastened metal staples, providing the elements with mobility (as in the picture below).

Bringing the idea to life
If we talk about the material for self-made box, then, of course, the easiest way to work with a tree. For the first experience, it is better to choose inexpensive wood - a planed board is quite suitable for boxing. conifers.

The whole process of making a tool box consists of several stages:
- Draw up a blueprint for the future of boxing. To do this, use a regular Whatman paper and a ruler or professional program type "AutoCAD".
- The resulting drawing is transferred to the wood using a simple pencil or marker.
- Cut parts along the contour using a jigsaw or saw.
- The tree is treated with antiseptic agents or stains to prevent rotting and make it "inedible" for insects and rodents.
- The box is being assembled. Now all the parts need to be connected into a single structure, according to the drawing. To do this, it is best to use wood glue, which is applied to the ends of the parts and press them together for a few seconds.
- It is better to additionally fix the elements of the box with self-tapping screws, making sure that the tree does not crack when screwing in the fasteners.
- Install the lid using conventional hinges or other device appropriate for the type of box opening.
- The lid is equipped with a handle for carrying and transporting the tool box.
- Inside, the box is marked into sectors, taking into account the diagram and drawing. Cut out additional partitions from the board and fix them in place with glue and self-tapping screws.
- The walls, bottom and lid of the box are sanded with several types of sanding paper, then painted or covered with several layers of varnish.
The box is ready to use, all that remains is to fill all its compartments with the appropriate tools and fasteners.
The easiest tool box
Joinery beginners are offered more simple construction tool box - a regular box with a handle, but without a lid. The advantage of such a box is that it is suitable for tools of various sizes, if desired, even a water level or a perforator can be placed here, or you can make a miniature box for an "apartment" master.
Such a box consists of only six parts:
- two long side elements;
- two short sides, the height of which should exceed the height of the long sides, since the handle will be attached here;
- the bottom, which should be made from a single piece of wood, since it is the bottom that takes the load from the weight of the tools;
- handles, the role of which can be played by a bar, bar or piece of circular cross-section - the choice depends on the size of the box and the estimated mass of its contents.
If desired, the design can be supplemented internal partitions or complicate it with compartments with lids or doors.

All elements are assembled into one structure, fixed with wood glue, then additionally fastened with self-tapping screws. Particular attention should be paid to the handle fastener - it must be strong and reliable.
You can independently assemble a toolbox not only from boards, depending on the arsenal of tools, plywood, chipboard, OSB, galvanized metal or sheet aluminum can be used.

There is nothing difficult in the manufacture of such a box, and the advantages of the product are obvious: the tools and fasteners will be in a certain place, at any time it is enough to get the box out of the closet or garage and carry out the necessary repairs.
When you have a workshop or garage, then nothing stops us from acquiring all sorts of little things: nuts, washers, screws, bolts, small nails, staples and so on. But sooner or later the day comes and you begin to understand - there is not enough space. In fact, there is a lot of space, only you need to be able to store it correctly. Let's take a look at some options for storing small items in your workshop, garage or apartment.
Washers, self-tapping screws, dowels - yes, a lot of things will be collected on the farm
Buy or make your own box
There is no definite answer, as you might guess. Someone just likes to do everything with their own hands, while others are lazy. Someone thinks that a few rubles, hryvnia, dollars or zlotys for a simple box is inexpensive and, most importantly, without wasting precious time. Well, someone better tinker Nth number time at the workbench to make a one-of-a-kind box for small change.
We have no right to advise you on how to proceed in this situation. Choose for yourself, buy or make your own, waste money or waste time, enjoy manual labor or a hike around construction stores... But we know one thing for sure: a box, box, organizer, or whatever you want to call it - it must have several characteristics:

Purchased options
There are plenty of organizers now in the markets or in stores. It remains only to choose the right one. What troubles can we expect when buying and what places in such organizers are considered weak:

Homemade gadgets
These include those that are completely made by hand, and those that are designed to store other things, but were purchased by you specifically for hardware. These can be coffee cans or storage boxes. food products maybe it's a plywood box or a converted kitchen wall cabinet... Let's give some recommendations:

Instead of a conclusion
Proper storage in a workshop is not only a convenience for the owner, but also maintaining order, and this is sometimes even more important. Then, to the envy of your neighbor, you can demonstrate your beloved workplace, and reproach my wife that the garage is cleaner than the house. Jokes as a joke, but an organizer, even a purchased one, even with your own hands, is very necessary thing, which should be in every master.
Hello everybody!
A tool box today is a very indispensable thing for every owner. Most of us have a lot of various tools that we may not use very often, but nevertheless, we store it, since more than one repair is not complete without it. In order for the tool to be in one place and to be conveniently transported, we use special boxes. Often we just buy them at the nearest store, the assortment and variety allows us to do this. But why not make it yourself? The manufacturing process is not too complicated, anyone should cope, especially with a hand-made thing, which is much more pleasant to use than the purchased option. This article will describe 4 different ways manufacture of boxes, photo report is attached.
Let's start making!
Manufacturing method No. 1

We need:
Material
Plywood;
- pine board;
- nails;
- joiner's glue.
Tool
- drill;
- hammer;
- chisel;
- manual frezer;
- ruler;
- pencil;
- roulette.
The first step is to find required material, for this, plywood or board trimming is suitable. Further, according to the presented drawing, you need to make a markup, then cut out all the parts of the body. It is necessary to make special grooves in which the partition will be placed, for this we use a hand-held router, or another available tool.

The diagram shows the following body parts:
1 - wall (2 pcs.);
2 - sidewall (2 pcs.);
3 - bottom;
4 - groove along the thickness of the partition and a depth of 1 / 2–1 / 3 of the thickness of the material
When everything is ready, all elements of the box body should be sanded. Next, we assemble the body together, fix the parts with wood glue, and then additionally fasten them with small nails.
Now we make a partition for the box, cut out a special handle, for this we use a jigsaw.

When the partition is ready, grease the grooves with wood glue and install it in its place.

Next, we make overhead handles from the planks, use a planer to round the corners. Then we make tool holders from the rails, use a jigsaw, and a drill. The holes will be used for screwdrivers, and pliers, etc. will be installed in the square cutouts. tool.

So that the box does not get dirty, and there is protection against environment, cover the surface with varnish. As a result of the work done, we get such a homemade box.

Manufacturing method No. 2
Drawer stool

Material
Plywood or OSB;
- wooden bar;
- self-tapping screws;
- joiner's glue.
Tool
Cutting tool available;
- screwdriver;
- ruler;
- pencil;
- roulette.
We take the existing plywood sheet, mark it on it, and according to the presented dimensions we cut out the cover (Fig. 1), then the longitudinal sidewalls (Fig. 2) and the sidewalls (Fig. 3).

Then we take a wooden beam with a section of 40x50 mm, cut out the handle, and 4 legs with bevels at the ends at an angle of 15 °.

Next, we assemble the structure together, use self-tapping screws as fixing elements.


Parts layout:
1 - cover;
2 - king;
3 - handle;
4 - leg;
5 - sidewall.
When everything is ready, with the help sandpaper or grinder round off sharp corners and clean up the surface. Next, you can apply a protective coating.
The end result should look like this unusual box for tools, which, if necessary, can transform into a regular stool, for this it is enough to turn it over and put it on its legs, with the help of it it will be convenient to reach the place we need, at a time when growth does not allow us to do this.
Manufacturing method No. 3.
Box for the young master.

Does your child love tinkering? We offer together with him to make a small box where he will keep his favorite instrument.
To make a box with our own hands, we need the following
Material
16 mm boards;
- round wooden beam;
- self-tapping screws;
- joiner's glue.
Tool
Cutting tool available;
- screwdriver;
- ruler;
- pencil;
- roulette;
- clamps.
First you need to take the existing boards with a section of 16 mm, then we make the markings according to the dimensions provided, after which we cut the wood into the components we need.

The drawing shows the following details:
1 - sidewall;
2 - bottom;
3 - handle;
4 - handle stand;
5 - holder.

Using sandpaper, we grind the surface and remove sharp corners. When everything is ready, we begin to connect all the parts to each other, first you need to connect the bottom and sidewalls, then set along the marked lines vertical posts and at the same time we put the horizontal handle.
We fix everything with glue and self-tapping screws. Then we install special screwdriver holders.

Now you can paint, choose the color and coating at your discretion.
The toolbox is ready.
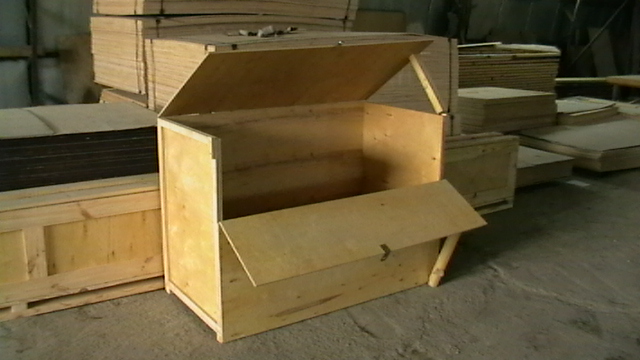
Manufacturing method No. 4

The next version of the toolbox is well suited for carrying various equipment that we need, it appearance will be distinguished by solidity and reliability.
To make a box with our own hands, we need the following
Material
The board is not thicker than 12 mm;
- self-tapping screws;
- joiner's glue;
- pen;
- corners 8 pcs.;
- latch 2 pcs.;
- loop 2 pcs.

Tool
Cutting tool available;
- screwdriver;
- ruler;
- pencil;
- roulette;
- clamps.
For the manufacture of the box we use such wood as: pine, linden or poplar. Most optimal thickness the boards will be 12 mm thick.

Next, we make the markup, according to the indicated dimensions in the drawings, and then saw it into its component parts, as shown in the photo.

The entire list of required parts.

In order to make sure that the wood was cut correctly, you need to put all the parts into a single box.
First we collect lower part and a box lid, for convenience we use clamps and corner clamps. We fix the details with each other with wood glue.

Then, using a drill, we drill a hole for self-tapping screws, we make holes countersinking.

Now we fasten the case of the portable part, put in partitions, fix it with self-tapping screws.

Next, we install the handle, which we need to carry.
A large and convenient box for tools is the dream of any craftsman. This is understandable, because in such a repository you can compactly pack all your tools. They are not so expensive today, so one of the options is to purchase in a store or create a similar masterpiece yourself. Which option would be acceptable for you? Of course, the purchased one has a certain size, but there may be much more tools than can fit into it. But one way or another, you have to put up with it or again run to the store and buy a new one. It is quite another matter to do it yourself: I picked up required material and calculated for all available tools and even with a perspective. Conveniently? You will most likely agree with this argument. Therefore, in this article, let's talk about how to make such a box yourself at home.
What should HE be?

If this is a home box, then it can be a regular box with a handle. Well, if you are, for example, a plumber, then it is clear that you need a box that is more functional, spacious and durable. This role will be successfully performed by the organizer. However, in this article, as an example, consider a simple home option- a box with a handle. So, we will assume that we have decided on the type of box where we will keep all the tools we need, or almost everything.
Where do we start? First, we will select the material. It can be plywood, wood or even metal, then we will make calculations. Only then can you start drawing up a detailed drawing. It can be done in the classic way, that is, on a Whatman paper using a well-sharpened pencil, ruler, compass, square, etc.


The non-classical way is with the help of a special computer program. "AutoCAD" and "Compass" are just "sharpened" to make a professional accurate drawing. The advantage of such programs is that they will help to avoid errors in the calculation and, moreover, it is possible to see in advance what you will get out of all this.
These programs will only serve you well if you have the skills to use them.
The material was selected, and now for manufacturing it remains to collect all the tools that we will need. Of course, the types of tools are individual. It all depends on what kind of box you want. They are also different. But, one way or another, there are universal tools. They are always needed. This is a measuring tool:
- fasteners;
- hammer;
- screwdriver.
We start manufacturing

We take traditional material - edged board conifers. As for processing, this is the most simple and available material, which also has good strength properties.
As planned, it will be wooden box, and our task now is to materialize the drawing itself into a material. For this business we need a ruler and a pencil. After that, we carry out the markings on the material and cut out the component parts of the product with a hacksaw or jigsaw. If we have planned a conventional non-closing option, then we need to make five planes: four walls and a bottom.

When assembling, it is generally best to use wood glue. The joints must be cleaned, and only then apply glue, after which we firmly squeeze the parts together. Be sure to let the glue dry completely.
After this operation, we can additionally strengthen the box with fasteners - self-tapping screws. They fixed it. Now you need to make a handle. It could be normal wooden lath, which we need to nail or screw to the top edges of the side elements.


Organizer
Following the principle "from simple to complex", now let's talk about the organizer. It is clear that in the open-top box, which was described above, you can put a large tool: hand hacksaw, hammer, mallet and much, much more.
And what to do with small things? All sorts of screws, bolts, nuts, etc. This small fastener tends to get lost or not be at the very moment when it is especially needed. This is where we need an organizer.

As already noted, this type of boxes by their design is the most functional in operation. What is he like? It's kind of like a box on a box, or rather, a lot of drawers in one section for storing not only medium-sized tools, but also every little thing. Of course, at first glance, it may seem that it will not be easy to manufacture such a structure. But it only seems to be. Basically, difficulties arise in the manufacture of a sliding mechanism. Everything else is much easier to do. Now in more detail about the manufacturing technology.
- We start by making the main body. It must be open and deep so that we can put in it various instrument medium-sized (hammers, spanners etc.). We can say that the design of this main body is quite simple, but in essence it is an ordinary box, which can be divided into several sections using vertical planes.
- The next stage is the production of 4 smaller boxes. You have probably noticed that the number of these sections is even, and we mentally divide them into pairs, trying to adhere to the size of their lower big brother when manufacturing. They will be stacked on top of each other. One pair of boxes (top) will be with lids. They will be either folding on piano hinges, or retractable like a Soviet school pencil case.
- Now it remains to connect these boxes together. We will do this using metal connecting strips. We need 6 pieces. On the one hand, as well as on the other, we hook on one plate (short) to connect the two lower boxes - small and large. Two more plates (long) will connect all the boxes to each other. And finally, the longest bar will act as a handle, and at the same time connect the two upper floors of the organizer. As you can see, there is nothing complicated here, and sliding mechanism simplified to the utmost, as it is presented on the example of a metal organizer - the principle is the same.
Making a metal case for tools

Let's talk now about the metal case homemade... Don't immediately jump to the conclusion that this is impossible. Of course, only an experienced locksmith can make an organizer out of metal on his own, and if there is special tools and related material. Factory-made metal boxes are usually made of light metals such as aluminum so that the box itself is not heavy. It is difficult to work with aluminum at home.

In principle, a metal box for - it says loudly. More likely, an ordinary box will be made of metal. The material that will be needed to make such a box is ordinary soft zinc plating (about 0.3 mm thick). From the tools we need:
- square;
- caliper (marking);
- sharpened small core or marker;
- ruler;
- hammer;
- anvil (wide metal bar);
- file;
- pliers.
Then everything follows the same scenario: drawing, markup. The most interesting thing is that all this can be done right on the galvanized sheet using a sharply sharpened core (or marker), whatever you like. We then mark with a marker on the metal those places that we will have to delete.

After that, we start trimming using metal scissors.

After trimming all the excess, we get such a complex geometric figure("Winged rectangle").

Now let's do a little blacksmithing. For this case, we have an anvil, and, tapping with a hammer, we will neatly bend the edges of our workpiece. It is better to do this not chaotically, but in a certain order.

First, bend one side, and then bend the other.

Now the sides are in turn.

After that, we will bend the protruding petals. They will make the structure itself more rigid, and it will not "play".

Pliers can be used to wrap protruding parts on top of the box.
After such manipulations, you should thoroughly walk around the entire product with a hammer, aligning it.
In this case, it turned out to be a small box. But after all, according to this principle, you can make a similar one - more, and in the end you will get such a metal box for a tool.

So, if you wish, anything is possible.
We hope that this article will be useful for you, dear readers. If your instruments are in order, then supplement it with manufacturing ordinary box for tools. If your tools do not have a permanent "place of residence", then consider building a two- or even three-story "transforming house" for it. Try to do this, and your tool will always be in place, and you yourself will be pleased to use a product made by yourself in your household.
Video
This video shows how you can make a toolbox from scrap materials:
See how you can make organizer cases for the tool yourself: