Thanks to the availability of options with different textures and the possibility of choosing any shade, decorating a room with decorative plaster on the ceiling is an easy, fast and even interesting process. It can be used in any room, and high quality material will ensure the durability of the finish even in conditions of high humidity or constant temperature fluctuations.
Positive properties
Due to its special composition, decorative plaster has a number of positive properties that provide practicality of such material... For example, depending on the room in which you plan to decorate the ceiling, you can choose a plaster with water-repellent and antiseptic properties, the possibility of thermal insulation and many other features.
In addition to these characteristics, the advantages of using decorative plaster when decorating the ceiling include the following:
- high material strength ensuring the durability of using decorative plaster;
- easy application process on the surface of the ceiling, which does not require significant effort;
- the ability to decorate absolutely any surface, thanks to which the structure of your ceiling does not matter;
- no need for careful preparation of the ceiling for subsequent finishing with plaster;
- the ability to mask minor irregularities on a surface;
- decorative plaster is an environmentally friendly material that does not harm human health.

Attention! Despite the lightness and versatility of such a material, in the absence of experience with plaster, it is advisable to entrust it to specialists.
One of the advantages of decorative plaster is variety of textures, nevertheless, a wide assortment also requires a strict approach to the choice, since depending on the selected texture, the main stages of finishing work may differ.
For example, plaster with small particles is unable to perform reinforcing functions, since a thin layer of material will repeat all the unevenness of the ceiling. Therefore, in the case of working with such plaster, it is necessary to level the surface.
It is imperative to think in advance on what type of surface such plaster will be applied... Some types of plaster can damage the base material, for example, water-based decorative plaster is unacceptable for finishing surfaces that can lose their shape or appearance when in contact with water (these include wood, drywall and other materials).

Another positive property of such plaster is the possibility of a quick and original transformation of the interior... Using this material, you can create any pattern or pattern on the ceiling, paint it in the desired shade, and when combined with additional decorative materials, you can emphasize the unusual style of the room.
Find out the main advantages of a modern soundproofing floor material. Details about the properties, as well as instructions for easy and quick installation.
Due to their ease of use, useful properties and a wide variety of textures, such materials are very popular, as evidenced by numerous reviews of decorative plaster on the ceiling.
Andrey, Krasnoarmeysk: I thought for a long time how to transform the ceiling in the corridor: I wanted to pick up something original, but not complicated. I stopped at decorative plaster and was pleased with the result. Very easy to apply to surfaces, even uneven ones. I was worried that the patterns and bends made with my own hand would shift and lose shape when dry, but everything turned out fine.
Of the other advantages, I can single out durability and high quality... I applied bright paint on top of the plaster - as a result, the shade turned out to be saturated, and there were no streaks on the ceiling at all. As for me - great material, I plan to use it in other rooms too!

Svetlana, Saratov: I have only positive impressions of the decorative plaster. I decorated the ceiling in the nursery for my daughter, I wanted to create a semblance of flowers on the surface - it turned out great! I chose the plaster myself, relying on my intuition, and it did not let me down: the material is excellent, durable, environmentally friendly and looks great in any interior.
To decorate the ceiling, I invited specialists who, by the way, coped with their task very quickly. It turned out to be a spring decoration, soon I plan to paint the ceiling in bright colors. I advise everyone: this is what you need for a quick finish!

Oksana, Odintsovo: At one time, I was very worn out with the design of the bathroom: plastic panels, tiles and other materials did not confirm their quality, but I tried a lot of options. I stumbled upon an article about decorative plaster and after reading the reviews, I decided to give it a try. For the ceiling, I chose structural plaster, since I did not plan to decorate the surface, and the embossed material looks simple and original.
The husband was engaged in applying plaster to the ceiling, everything turned out very easily and quickly, the ceiling took on a new look and has not spoiled our impression so far. The only question I'm worried about. - this is the possibility of the appearance of mold and mildew, but, judging by the reviews, they will not be on such material. Over time, I will check the quality of the plaster, but so far I do not see any drawbacks.

Sergey, Nizhny Novgorod: The more friends used plaster to decorate the ceiling, the more I realized that it was time for me to try this material. I decided to redo the ceiling in the kitchen, chose textured white plaster. I applied it to the surface myself, created a semblance of waves - it turned out very stylish and unusual. By the way, I was pleasantly surprised by the cost: I thought it would be more expensive.
For the best effect, I leveled the ceiling in advance, but I can say with confidence that such plaster does not require surface preparation: thanks to the relief, no one will notice the imperfections. I applied two coats of blue paint to the plaster to create a sea wave. The wife is still delighted, and I can confidently say that this is a great way to decorate a room.

Marina, Yekaterinburg: I have always been demanding of materials, as I try to take care of the health of my family. I chose plaster for the ceiling in the bedroom, starting from her ecological properties... Already from the specialists who applied decorative plaster to my ceiling, I learned that such a material has many more useful qualities.
About six months have passed since the decoration: the plaster is still did not collapse, retained its color and continues to delight me with its quality... A great option for the ceiling at the best price!

Making the right choice is not enough to ensure that decorative plaster meets your expectations. It is necessary to observe all the features of its application to the ceiling, and also not to forget about the proper care of the surface.
A video about decorative plaster on the ceiling will help you understand the details of these processes:
The ceiling plays an important role in the interior of the apartment. You don't have to use expensive materials to get a beautiful design. To create an atmosphere, designers often use various finishing mixtures in their work. These include decorative plaster on the ceiling.
Options for finishing the ceiling with decorative plaster
Decorative plaster is a finishing textured coating. It consists mainly of sand and cement, but various components are added to it, which are completely capable of changing the appearance and structure, allowing the coating to become voluminous. Marble, quartz, granite chips are used as additional components. Depending on these additives, plaster is divided into several types. It happens:
- textured - in this version, all the ingredients have already been added to its composition, and its texture is due to its composition;
- structural - here the finish is a white mixture, which in the process of work can be supplemented with any color, and thanks to the tools, the specialist is able to give it any look;
- Venetian;
- flock.

This finish has several advantages:
- masking defects on the main surface;
- you can apply it to any building material, be it wood, concrete, drywall, brick;
- large range of colors;
- long service life;
- resistance to mechanical stress;
- the material is safe for the environment.
Among the options for finishing the ceiling with decorative plaster, Venetian plaster and sgraffito are distinguished.
Venetian plaster on the ceiling
The main difference of this mixture is its exclusive appearance. The master creates a unique drawing directly on the spot. Acrylic is used as the basis of the material for Venetian plaster, and various pigments are added to obtain the desired color shade. You can also use marble dust in the decoration. Thanks to this, an imitation of natural marble is obtained. Wax is applied on top of the plaster layer at the very end of the work. It protects against unwanted influences on the surface and gives shine. You can appreciate the beauty of such a coating by looking at the photo of the Venetian ceiling.

Important! The technology of applying Venetian plaster to the ceiling requires the workers to have certain qualifications, since the process is very complex. Without experience in this matter, you can spoil the coating.
Before applying the finishing material, the ceiling surface should be carefully sanded, leveled, and then apply a primer solution. Next, layer by layer, apply the decorative mixture itself. Basically, you need to apply 3 to 10 layers of different shades. Each row of plaster must be made as smooth as possible. Thanks to translucency in the final work, a visual effect of the depth of the ceiling space is obtained.
Finishing strokes are applied in different sizes, thereby creating a chaotic pattern. Specialists in their work can use the technique of applying dry strokes on a wet surface and apply different pressure on the instrument. These techniques help create the desired effect.
At the end of the finishing work, wax is applied to the surface, and then the ceiling is carefully sanded with a soft cloth, creating a mirror shine. And even a photo will not be able to convey all the beauty of the Venetian plaster on the ceiling.
Textured plaster for the ceiling
This type of finishing material has a lot of advantages:
- low cost;
- ease of use;
- there is no need to very carefully align the original ceiling before work;
- durability of the coating.

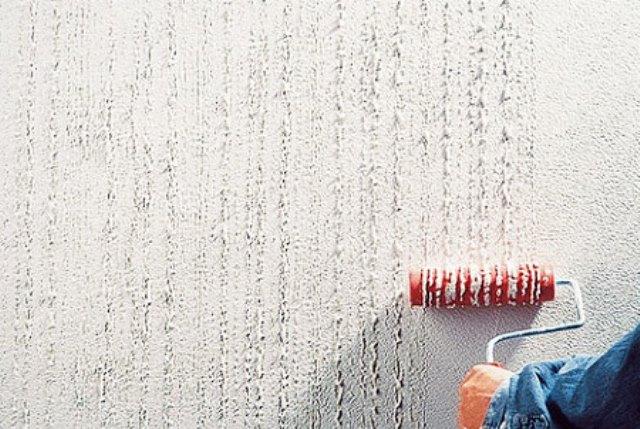
Before applying decorative plaster, thoroughly clean the work surface from the old material and carry out priming so that the material adheres better to the ceiling. Then plaster is applied, creating the desired relief. To obtain the original design of the ceiling, it is worth observing some nuances. For example, to get a plane that is evenly covered with small bumps, you need to apply the mixture, and then use a regular rolling roller. To change the pattern, you can wind a cord around the roller. In places where it will push through the layer, you will get a noticeable and non-standard version of the picture.

Important! For creative purposes, you can even use a regular plastic bag by winding it on a roller and pressing it against a layer of decorative mixture. Also, to create a certain texture, special tools are used, as well as ordinary improvised materials, such as a foam sponge, fabric rags.

After creating the necessary texture, the finishing material should dry well. After that, you can leave the original design option or add paints, glitter or glaze to it. All this will give the ceiling a unique look.
There are several types of textured plasters, but for the ceiling it is advisable to use a mixture with binders such as polyvinyl acetate or acrylic. They are the most flexible, due to which they are easy to apply to the original surface. They are moisture resistant and not affected by ultraviolet rays.
Structural plaster on the ceiling
Structural decorative plaster can be used to create a designer ceiling. Some consumers often confuse it with a textured blend. They have a similar composition, but the method of embossing is different. In the case of using textured decorative plaster, the drawing is created on a not dried layer of the mixture, and when using a structural mixture, the texture is obtained immediately in the process of its application. The composition of this plaster includes a base and filler, on which the effects depend.
The original ceiling is leveled and primed before application. Then, using tools, apply the mixture, rubbing it over the surface. The structure of the future drawing appears already in the process of the work itself. After the starting material has dried, the surface can be painted over.

Flock ceiling plaster
Flocks are small particles that are used as an addition to the mixture. They can be of different shapes and colors, they can be covered with glitter or simply remain matte. By mixing different types of flocks, you can get a unique shade and texture of the ceiling. Flock decorative plaster fits perfectly into any interior style.

This type of decorative finish is durable, waterproof and highly moisture resistant. The material is completely non-toxic, it can be used to decorate children's rooms and public spaces. Plaster retains its appearance unchanged over the years. Wet cleaning of such a surface is very simple. To do this, you only need to use a damp sponge with detergent. Flock decorative plaster meets all fire safety standards, as it does not support the combustion process.
At the beginning of the finish, a layer of adhesive is applied, and then flocks are sprayed onto the base with a spray gun. After complete drying, the surface is swept with a stiff brush to remove particles that have not adhered. At the end, the ceiling is covered with acrylic varnish.
Decorative plaster on the ceiling: photo in the interior
It is believed that finishing with decorative plaster is no longer modern. Looking at the photo of ceilings with such a finish, the opinion of most people changes. Many people dream of a beautiful stylish ceiling. And to make it is not as expensive and difficult as it seems at the very beginning.

If you use such a material for decoration, you can get an imitation of marble or any other stone. This texture gives a certain zest to the apartment. And if the room is dominated by the Gothic or antique style, then you can use stucco molding made of a polyurethane base for decoration. Seeing the beauty of decorative plaster in the photo, no one can resist the desire to create such beauty in the room.


DIY decorative plaster on the ceiling
It is not necessary to hire specialists to create a decorative ceiling. If you have a lot of experience in such work, then you can independently finish the ceiling surface in the room.
Preparatory work
To decorate a house with decorative plaster, you need to be very responsible in choosing a mixture. The dry composition of the finish requires preparation, and this requires some experience in order to correctly create the desired consistency. Mixtures are produced in only one white color, in order to get a different shade, you need to additionally paint the composition during work.
Important! When finishing with this type of material, it should be borne in mind that for complete drying you will need to wait a week.
In addition to such mixtures, there is also a finishing material on sale that is immediately ready for use. And this finish dries one day.
After the material has been selected, you need to pick up a special tool. It is chosen depending on the type of material and the method of applying the plaster. The main tool when working with decorative finishing is a trowel. And for structural plaster, a plastic float is also used. It is also very common to use a regular or curly roller.
Before you start decorating the ceiling with plaster, it must be leveled using a finishing putty. And then treat the surface with a primer. It is necessary for better adhesion of the finish to the ceiling.

Applying decorative plaster to the ceiling
If a dry mix is used, then it must be prepared using a construction mixer.

After laying the plaster, they are taken to create the texture. For this purpose, use a grater. Moving it along the ceiling surface, the master creates an artistic pattern.

It is necessary to paint the ceiling only after the finishing layer has dried. The paint is applied in at least two layers, with a break after each painting. When working with textured plaster, various devices are used to create patterns to create the intended texture.
The Venetian plaster is applied with a trowel, and using a straight trowel, level and form a layer. The thickness of the layer should be up to 5 mm. The number of layers depends on the design idea. Each subsequent layer is applied to the previous one after 12 hours. After complete laying with a trowel, the surface is carefully rubbed and covered with wax.

Conclusion
Decorative plaster on the ceiling is one of the inexpensive materials that allow you to create an original design and style of an apartment. Photos of ceilings decorated with decorative plaster are striking in their beauty. This design is an ideal solution for finishing the ceiling in the bedroom, living room, children's room.
Tinted composition in the decoration of walls and ceilings
Finishing the ceiling with decorative plaster allows you to create a texture or relief on its surface that cannot be obtained using other materials. That is why the interest in this type of finish only increases over time.
We will talk about what types of structural plasters are used today in interior design, how they differ, and how to use them to create a beautiful composition on the ceiling with your own hands.
Modern finishing material

Before talking about the process of decorating the ceiling, let's clarify what is specialized plaster? Note that the terms "embossed", "textured", "structural", "decorative", applied to plaster, define the name of the same material.
Types and effects obtained

Venetian plaster stands apart in the class of decorative coatings, since both its composition and the technology of application to the surface are different. If textured mixtures are made on the basis of acrylic resins, due to which they acquire such plasticity, then in the composition of Venetian plaster flour from valuable stone species, plus gypsum as a binder.

For ceiling
- There is no such thing as "decorative plaster for the ceiling". There are compositions for facades, for interiors, and universal options that can be used in both cases. Universal compositions are made not on a gypsum basis, but on a cement basis, and one of these options is micro-cement plaster.
- This is a kind of analogue of "Venetian", but instead of marble flour, polymers are used in its production. Both options allow you to recreate the natural beauty of marble, malachite, onyx, but you can hardly do it yourself.
- This requires special qualifications, the composition of the drawing completely depends on the hand of the master, and is never repeated twice. As for acrylic mixtures, the version of the texture that imitates this or that natural material is often laid down by the manufacturer already in the process of making the composition.
- In such cases, the instructions on the packaging indicate exactly what effect you will get when applied to the wall. It is easiest to use such compositions for independent work, and there are much more variations in their textures than you see in the photo below.

Formation of texture

Using a ready-made pigmented composition, you don't need to strain your imagination too much. The main thing is to choose the right color that will most harmoniously fit into the interior.
The price varies between 1450-1600 rubles for a can weighing 2.5 kg. By the way, this is half the cost of packaging Venetian plaster of the same volume.

- But most often, textured plasters are sold in the form of a dry or ready-made mixture of white color, and fillers and colors for them are offered separately.
- Such division makes it possible to create any reliefs and color compositions on the surface of the ceiling or walls. These decorative plaster options are just made for creativity.
- The process of applying such a composition to the wall, in fact, does not differ from ordinary plastering. The only difference is that this coating does not require finishing.
- Due to the plasticity of the mixture, it is possible to make a relief on the surface not only with a special tool, but also with any improvised object: a sponge, ruler, comb.

- From textured plaster, you can, like from plasticine, sculpt volumetric figures, placing them around the perimeter, ceiling, or around the chandelier. Without a certain skill, it is quite difficult to do this, especially on the ceiling.
- Craftsmen often use these decors when decorating wall niches. It looks very nice, especially if the panel is backlit. After watching the corresponding video, you can get a master class from professionals of arts and crafts.
- The uniqueness of structural plaster, as a finishing material, consists in an extraordinary variety of textures and effects to satisfy the most sophisticated taste. In addition, it has a good soundproofing effect.
Such coatings are durable, retain their original color for a long time, are practical, since they do not require additional maintenance. Decorative plaster of the ceiling is performed on any base: concrete, wood, insulation. If necessary, it can be repainted in a different color, or simply pasted over with wallpaper.
The nuances of creating a textured coating

If you decide to use textured plaster in the interior decoration of your home, and even do it yourself, first of all, you should adhere to the recommendations of the material manufacturer. Otherwise, the result may not be at all what you expected.
- And yet, you need to keep in mind that with the help of a decorative coating, you can hide only small grooves and cracks on the surface.
- If there are differences on the ceiling between adjacent ceilings, bare joints, traces of rust, or dampness - before proceeding with the application of decorative plaster, the base must be prepared.
- In principle, this process is no different from preparing the ceiling for conventional plastering. All existing ceiling coverings must be removed.
- Rusty streaks, if any, must be washed off with the appropriate composition - modern household chemicals offer many options.

- Dampness can be eliminated with a crystallizing concrete primer. Seal the joints with modified cement mortar and cover with reinforcing tape. Differences in height will have to be eliminated using the usual leveling with a gypsum mixture, preferably universal. The finished base is treated with a primer, and you can start applying the decorative coating.
- All these recommendations apply not only to the finishing of the ceiling, but also to the walls, especially since they are often made out at the same time, and even using the same type of plaster. This is not done, of course, in the form of a solid carpet, but combined with the usual smooth dyed areas.
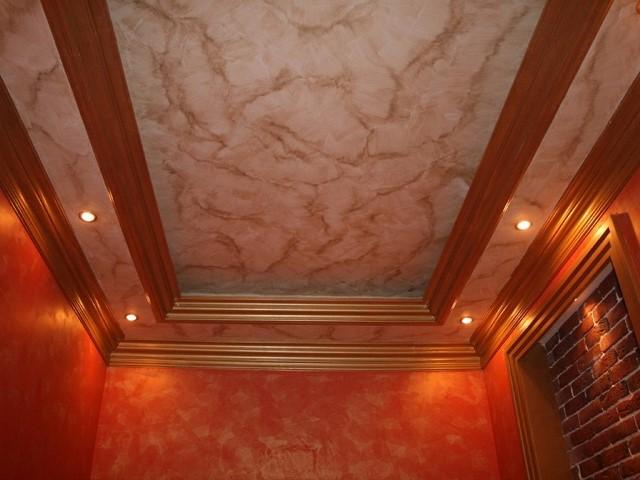
- If you look closely at the photo below as an example, you will see that the walls and ceiling of the living room are partially sheathed with plasterboard. As you can see, the plasterboard sheathing is painted white, and the base bases that remain in plain sight are finished with decorative plaster. By the way, this technique is used most often in ceiling decoration.
- A plasterboard box is installed along the perimeter of the ceiling, forming a caisson. The deepening can follow the shape of the ceiling, or vice versa, change it. In this case, the caisson is round. The darker shade of its coating solves the problem of visual perception of the space, making it compact.
- By the way, the color of cocoa with milk, in combination with white, is very pleasing to the eye, and the texture of the "antique" plaster makes the interior simply irresistible. Keep in mind that everything is important for such a design: shape, color, and lighting.
The last point is especially important, since in semi-darkness, the texture and color of the decorative coating is perceived in a completely different way than in bright light. Even on the wall and ceiling, the same color appears to be different.
To work with decorative plaster, you need to stock up on the necessary tools. Their set, as well as the technology for performing the work, depends on what kind of composition you prefer. This is especially true for rollers and other devices for making a relief.

- Before starting work on the ceiling, try to create a piece of the covering, if possible, on the wall. You can also use a piece of plywood or drywall for this purpose. If you are completely satisfied with the resulting texture, you can start decorating the ceiling surface.
- Ceiling plaster should not have a too liquid consistency - this is important. The amount of solution should be such that you have time to work it out in the time that the manufacturer takes for hardening. If the mixture starts to set, the “just add water” principle no longer works.
- The application of the composition to the surface of the ceiling, as well as its smoothing, practically does not differ from the implementation of a conventional screed. As a rule, you need to apply the plaster in two layers, and they may well have a different shade. Craftsmen often make the bottom layer darker, and the top one lighter. Then the drawing, due to the shade, will look voluminous.

DIY multicolor relief options
- Professionals know how to make interesting textures, just using a spatula or grater, but in order to get a complex ornament, a special tool is still needed. To apply the relief, you can use a figured roller or make a wooden stamp. Buy a silicone pad, as in the picture above, glue it to the working surface of the stamp - and you can use it. For those who have no experience in this work, such a tool will be of great help.
It takes about 24 hours to fully harden decorative plaster, and it sets after 20-30 minutes. Therefore, the relief on the finished screed must be done quickly. When dry, decorative plaster for the ceiling loses its elasticity, and it becomes impossible to correct the failed drawing.
Stone texture is always in fashion
One of the advantages of this surface finish is the durability of the coating. And if you decide to do without the help of specialists, and do the work with your own hands, the question of choosing a material arises.
What to look for when selecting
Reading the various names on the labels, an ignorant person does not always understand that they are often the same thing: decorative, structural, textured, plaster, stuko. It's just that each manufacturer has its own name.
 Various types of decorative plaster
- The difference between these compositions lies not in this. The instructions on the package must contain information about the binding base, the minimum thickness of the texture layer, the filler fractions and the final appearance of the plastered surface.
- The structure of the plaster layer is formed due to a coarse special filler in its composition. The layer thickness also fluctuates from its fraction - from one to six millimeters.
- The creation of a certain texture is achieved by multi-layer application of the material. At the same time, the surface of the plaster is smooth to the touch, and can have a thickness of no more than one and a half millimeters.
- But the relief on the surface is created by mechanical processing of the applied composition with special tools. This is clearly seen in the photos presented in the gallery. In this case, the thickness of the applied layer can vary, reaching six to seven millimeters.


There is also this type of decorative plaster - variation. Base mix and fillers sold separately. Flops, chips, quartz or marble chips can be used as fillers. Thanks to them, such different and incredibly beautiful textures are obtained.
Types of compositions and their use
Mineral-based plaster options have the lowest price. The binder here is lime, cement or gypsum. These mixes adhere well and each has its own application.
- For example, cement plaster tolerates moisture better, but has a coarser texture. It will not look good in every interior, therefore it is more often used for walls and ceilings in rooms with high humidity.
Cement-based plasters are used to create a "concrete-like" effect
- Gypsum textured plaster on the ceiling is more appropriate due to the natural whiteness of this material. As for the lime mixture for decorative plastering, it is mainly used for wall decoration.
- There are combined options. For example: a lime-cement mixture called terrazite plaster. It contains white Portland cement, fluff lime, sand, mica, various pigments. This composition is usually used for finishing the facades of buildings.
- The most resistant and durable are epoxy and polyurethane compounds. They are not afraid of any effects of chemicals and high temperatures. Their main disadvantage is a specific smell.
- With strong heating, a surface plastered with such a composition releases toxic substances. It is clear that these mixtures are not used for residential premises. But for outdoor decoration, these are excellent options, despite their high cost.
Styling the texture of travertine on the kitchen ceiling using acrylic putties and paints
The best option is considered to be textured plaster for the ceiling, the binding base of which is acrylic or polyvinyl acetate. Such plasters have the best plasticity. They are resistant to moisture and ultraviolet radiation and do not pose any danger to human health.
How to work with decorative plaster
Zoned coating in golden tones
No special surface preparation is required before finishing. Everything is as usual - a thorough cleaning is carried out to the floor slab, and the coating is covered with concrete contact. Only if there are drops on the base ceiling, potholes and seams between the slabs are visible - they need to be putty or leveled. How to do it, watch the video.
- To mix the solution, you need a twenty-liter container; construction mixer, or drill with attachment. To work with the ready-made solution, various tools are used - depending on what texture you want to get:
A set of tools for shaping relief
- First of all, this is a set of spatulas: you will need both narrow and wide made of stainless steel, and certainly rubber. The application of textured plaster to the ceiling, and its leveling is carried out with a spatula.
- A trowel is also used for this purpose, and also to create a relief when forming patterns. In fact, each type of plaster requires its own tool.
- There is a popular texture "bark beetle". They create it with a grater, which must be moved over the plaster layer in a certain direction. There are many types of patterns that you can use to create a different pattern.


- The same can be said for the rollers. Surfaces are primed with an ordinary fur roller. There is a technology for applying textured plaster with such a roller. A pattern roller can be used to apply a pattern even to simple plaster, not just decorative.
- If a continuous pattern is applied with a pattern roller, then a stamp is used to create a separately located image. It turns out neatly and fairly quickly.
- An interesting pattern on the surface can be obtained by winding a crumpled plastic wrap or rope around a roller. Original reliefs and drawings can be created using a stencil.
- To form the relief using the spray method, you need a special gun. The solution is supplied to it by a compressor with a capacity of up to four atmospheres. This method is used by specialists. It is unlikely that someone will purchase such equipment for self-plastering.
- Textured plaster ceiling with quartz filler requires a tool called a comb. It is used to create line drawings on thick layers of applied compound.
Types of textured tension structures
Speaking about textured ceilings, we mean some features of the surface of a film or fabric canvas, which make up their texture:
- relief pattern (grooves, stripes, waves, protrusions);
- the degree of smoothness-roughness;
- the level of light reflection.
 Textured stretch fabric looks great in combination with matte suspended structures
For example, matte films have minimal reflective characteristics. The drawing most often imitates one of the natural surfaces - wood, stone, bamboo or natural fabric. Satin reflects the light rays a little more, especially light, and the maximum reflective properties are in gloss, the specularity of which serves as an excellent method for increasing the space.
To emphasize the peculiarities of the interior style, we choose one of the popular types of stretch textured ceiling:
- silk - has a slight sheen, pastel shades and softness;
- marble - perfectly copies the cold and smooth surface with a natural pattern;
- metallic - has a wide palette of shades with a slight flicker, changes color under varying degrees of illumination;
- mother-of-pearl - conveys a luxurious pearl shine, looks great in any interior;
- suede is an unusual solution for the ceiling, perfect for eclectic decoration.
 Noble glossy marble visually increases the height of the room
Combinations of various textures look original. For example, alternating gloss and matte dark tones serve to create an imitation of a layered design.
Features of textured paints
If you first decided to conduct an experiment and create a textured ceiling with your own hands, use special paints. Volume and relief arise from the addition of fillers to the usual composition. The base consists of acrylic resins, water is used as a diluent. Due to its thick consistency, the paint is applied not with a brush or roller, but with a spatula, like plaster. Traditional tools are more often used to create a drawing or ornament.
 With decorative plaster, you can create an unusual stylized surface
Pay attention to the benefits of paint:
- profitability (especially in comparison with tension structures);
- the ability to hide small irregularities in the slabs;
- maintaining the height of the room;
- prompt and inexpensive repair.
It is fair to note the disadvantages: textured ceiling paint does not adhere well to wooden surfaces, has a high consumption and does not cover large defects - protrusions and cracks.
 Using decorative paints is the easiest way to make the surface textured
How to choose decorative plaster
With a little practice in the application technique, you can use textured plaster for the ceiling, which is sometimes found in building supermarkets under other names - decorative plaster, plaster, stukko.
Ready formulations
Thanks to new technological developments in the field of modern decorative plasters, there are several types of creating a relief structure of the material, as well as several methods of applying it:
- the volume is created by adding a coarse filler, the size of which determines the thickness of the layer - 2-5 mm;
- the visual effect of unevenness occurs in the process of applying several layers, although in fact the treated surface remains smooth;
- the structure is built under the influence of special tools.
 Decorative plaster is most often applied with an ordinary trowel.
We obtain a variation plaster by mixing two components: a base and one of the fillers, which are chips, quartz chips, flops.
Composition and structure of decorative plaster
Depending on the use, the compositions of decorative plaster may differ in fillers and additives that give the finishing material certain additional properties. Decorative plaster for the ceiling is not only a stylish element of interior decor, but also a durable coating that protects the ceiling from excess moisture, dampness and other adverse effects.
In hardware stores, you can purchase both structural and textured plaster for ceilings.
Structural plaster

Ceiling decoration with structural plaster of different textures
Structural plaster mix is a white mass, which can be painted in any color during the finishing process. These mixtures allow, using specialized plastering tools, to give the ceiling surface any texture required by the interior design of the room.
Decorative plastering of the ceiling using a structural plaster mixture requires certain skills in carrying out construction and finishing work.
Textured plaster

Textured plaster with marble chips
This type of decorative plaster is very convenient to use, as it is completely ready to use.
All the necessary components have already been added to the textured plasters, and the surface texture during application is already determined by the composition of the building and finishing mixture.
By the size of the filler grains, decorative plasters are divided into the following types:
- Large textured decorative plaster has a granule size of three to five millimeters;
- Medium textured - the size of the granules is from one and a half to two and a half millimeters;
- Fine textured plaster - granule size from 0.5 to 1 millimeter;
- Finely textured decorative plaster has a granule size of less than 0.5 millimeters.
Advice. When deciding on the choice of material for finishing the ceiling, it should be borne in mind that for the application of finishing plaster with a fine or fine texture, the ceiling must be perfectly flat, since this material does not hide surface defects.
Composition of decorative plaster
Decorative plaster on the ceiling has several compositions of the working mixture:
- Plasters, which include acrylic or polymer dissolved in water as a binder, are environmentally friendly, but their wear resistance leaves much to be desired;
- If epoxy resins or polyurethane are used as a binder in the composition of decorative plaster, then such a material is more durable, but when heated, it can emit fumes that are unsafe for human health.
Advice. These coatings are not used for finishing ceilings in bedrooms and children's rooms.
- When used as a filler for a plaster mixture of granite or quartz chips, an abrasion-resistant surface of a smooth or rough texture is obtained;
- If marble chips are chosen as the filler, then the treated surface will have a rough texture that is unstable to abrasion;
- To give the plaster mixture waterproofing and antiseptic properties, special thickeners, preservatives and antiseptics are introduced into the composition, which should be indicated on the finished package.
Options for finishing ceilings with decorative plaster
Depending on the style of the design of the room and its features, the option of decorative plaster for the ceilings is also selected.
For example, finishing the ceiling with decorative plaster in a bathroom or hallway will differ in composition and texture from finishing a bedroom or dining room.
Decorating bedrooms and children's rooms

Application of mineral plaster to the ceiling, a wide range of options and textures
As a finishing material for bedrooms and children's rooms, it is better to choose plaster mixes based on mineral lime - this is the safest environmentally friendly material that allows the ceiling surface to "breathe".
Thanks to the huge selection of colors and textures of mineral decorative plasters, you can decorate the ceiling in a variety of styles and color combinations.
Advice. Do not apply water-based plasters to surfaces that swell under the influence of moisture - fiberboard, drywall and wood.
Decoration of rooms with high humidity

Option of finishing the ceiling in the bathroom "marbled"
To decorate rooms with high humidity - bathrooms, toilets and kitchens, decorative acrylic-based ceiling plasters with water-repellent properties are used.
There is a number of plaster mixes for ceilings that have a water-repellent effect, which is also necessarily indicated on the package with the mix. The application of decorative plaster to the ceiling does not require preliminary leveling of the ceiling, since the mixture is applied in a layer of at least five millimeters.
But nevertheless, preliminary preparation of the ceiling and the elimination of large surface defects, before applying the plaster mixture, is necessary.
Advantages and disadvantages of plaster mixes for ceilings
The advantages of decorative plaster include the following factors:
- Lightness and ease of use;
- Decorative plaster can be applied to almost any surface;
- Decorative plaster for the ceiling does not require careful preparation of the surface, but it is still advisable to eliminate large surface defects;
- Decorative plaster perfectly masks small irregularities in the ceiling surface;
- Decorative plaster is a resistant, environmentally friendly and durable coating.
The disadvantages of this building and finishing material include the following:
- Finishing work must be carried out by a specialist;
- Finely textured plaster requires a perfectly flat ceiling surface;
- Water-based plasters should not be applied to surfaces that are not resistant to moisture - drywall, chipboard and wood.
Correctly selected decorative plaster on the ceiling will help to give the interior of the room a unique style and grace. The main thing is that the material of the plaster mixture is selected taking into account all technological requirements.
Features and installation sequence
To begin with, it is necessary to say that it is rather difficult to produce work of this nature. It is necessary not only to stand on a certain height, but also to constantly keep your hands up in order to perform certain actions. Given this, most people prefer to hire workers for this operation, so as not to carry out it themselves.

It is quite difficult to carry out work on the ceiling, since you have to constantly work with your hands up
Peculiarities
- First of all, you need to understand that when working with a ceiling, every little thing is important. In such work, mistakes must not be made, since this can not only worsen the quality of the structure, but also significantly reduce the service life.
- Special attention is paid to lighting in such work. Usually, the installation instructions recommend the use of additional lamps, which should be installed in a special way, to identify irregularities.

Incorrect selection of the mixture can lead not only to difficulties during installation, but also to shorten the service life.
- The choice of mixtures for work must also be approached responsibly. The fact is that coarse-grained materials should be used for leveling, and finishing is done with compositions with small particles and even on a different basis.
- It is worth mentioning that some of the compositions for working with the ceiling are often called putty, although in fact they are plaster mixtures. Accordingly, the decorative plaster on the ceiling is the very mixture, although it is performed with special compounds. In this case, special technologies that differ from each other can be used.

Correctly installed lighting can greatly facilitate work and reveal installation defects.
Preparation and beacons
- First of all, it is necessary to completely remove the old covering from the ceiling. A sharpened spatula is ideal for this. It is also recommended to use a metal bristle brush.
- After that, the surface is treated with a primer. Professional craftsmen recommend applying several coats at intervals of 4 hours. The fact is that this will not only increase the level of adhesion, but also significantly reduce the absorbency.

Each individual operation requires the use of certain materials that perform strictly specified functions
- If you plan to create a ceiling from decorative plaster, then it is best to use the type of primer that is recommended along with the main material. (See also the article Do-it-yourself primer for putty.)
- The next step is to level the surfaces. For this, first of all, markings are applied. It is best done with a laser level and threads that stretch over the area.

Installation diagram of beacons and markings
- Based on the markings and cords, you need to make beacons. At the same time, professional craftsmen recommend reducing the planned level of the plaster layer to a minimum. That is why they try to take as a basis the place on the surface, which is closest to the floor.
- For the manufacture of lighthouses, it is best to use a planting plaster. The fact is that this substance solidifies very quickly and it will be much easier to work with it. It should be noted that the beacons are made at a distance of 20 cm from the walls and a gap is left between them equal to the length of the rule minus 20 cm.

Installation of plaster beacons for subsequent pulling along them
- After the structure hardens, the entire surface is once again treated with a primer.
Advice!
If you make too large beacons, then the thickness of the plaster layer will also be significant.
However, it must be remembered that this will take up space and lower the ceiling.

Some craftsmen use a tool with a water level when working to facilitate the process of taking measurements.
Casting and pulling
- At this stage, you need to use a mixture designed to level the surface. Nobody has been using ordinary cement mortars for a long time, although the price of plaster compositions is much higher. This is due to the fact that it is much easier and faster to work with them, and the resulting surface will have very good quality indicators.
- It must be said that the mixture must be prepared very carefully, using a special drill attachment for this. The consistency of the resulting mixture should be quite thick so that it can hold on a vertical plane.

Aligning ceilings using a rule
- Apply the mixture to the surface with a spatula, trying to rub it in with pressure. After that, the alignment process begins, pulling out the composition with a rule or another long and even tool. If the solution turns out to be too dry, then it can be additionally moistened.
- At the next stage, the mixture is allowed to solidify completely and then it is treated with a primer to strengthen the bond with the surface.

Some experts also advise using a notch to increase the level of adhesion to the surface.
- Next, do-it-yourself decorative plastering of the ceiling is made, taking into account the characteristics of the selected material. Usually, a metal spatula or a slicker is used for this. However, there are also such formulations that involve the use of special tools.
- Taking into account such features of the finishing coating, professional craftsmen strongly recommend studying in detail the technological processes for working with specific types of material. At the same time, it is advised to listen to the manufacturers of mixtures, who advise using additional components of the same series and even a batch.

Compulsory priming before each application of the material to the surface will increase the strength of the connection between the layers of the mixture and will allow you to create an almost monolithic structure
- The final leveling, if there is no pattern or relief on the surface, is done with a polyurethane float. In this case, the surface can be moistened to create a polishing effect.
Advice!
When working with the ceiling, mortar residues often fall on the floor.
That is why, before starting installation, it must be covered with a film so as not to spoil it.

Application of the simplest finishing layer on the surface, which can later be painted or used as a basis for decorative design
The versatility of this material captivates, which is used not only inside the home, but also for the design of facades. This process is more complicated and requires more skill than in the case of walls. And the point here is not in different work technologies (they are just the same), but rather in the inconvenience of carrying out wet processes on a horizontal base. But if you tried your hand at wall decoration, then decorative plaster on the ceiling with your own hands won't seem like a difficult task .
Material features: design photo
This type of finish is a heterogeneous mass with various inclusions present in it. Thanks to this, the finished surface can imitate natural marble, silk fabric, granite, metal and other additives. The material is varied in texture and shades. At the same time, it does not pose any danger to the environment, and the surface created with its help is capable of serving for a long time.


Types of finishing with decorative plaster
Astringent components play a decisive role in shaping the characteristics of the finish.
The most famous of them:
- polymers;
- silicone;
- silicate;
- minerals.

Polymer plaster is made on the basis of acrylic resin, which increases its resistance to moisture and temperature fluctuations. As a result of applying a polymer mass, the base looks like a leather or marble surface. Silicone finish, which contains silicone resins, is very similar in its characteristics to polymer. Additional advantages of this material are the finishing layer and significant color variety. The only drawback of silicone mixes is their high cost.
Silicate materials, due to the presence of liquid glass with a high alkali content in their composition, acquire good antiseptic properties. In addition, elasticity, good resistance to pollution and the ability to conduct steam can be distinguished. The choice of color is somewhat limited here.
Mineral finishes are made on the basis of lime or cement. Colored clay and crushed minerals are also added to their composition. This type of ceiling design is characterized by a gradual increase in its strength during operation.
Types of finishes by composition
In addition to the binders, the finishing characteristics also depend on additional components:
- Acrylic. Increases the environmental safety of the finish;
- Polyurethane and epoxy resins. Increase the service life of decorative coatings (due to toxicity, they can only be used outdoors);
- Crushed quartz or granite. Increase resistance to mechanical stress;
- Other substances. Due to the introduction of preservatives, thickeners and antiseptics into the mixture, it acquires additional characteristics.
Some decorative mixtures have more complex compositions. First of all, we are talking about Venetian plaster, which is made on the basis of marble lime powder. The specificity of the material is the ability to create a very believable imitation of marble, for which a special application technique is used.
By the type of texture, decorative plaster is:
- Structural. It is characterized by a non-uniform granular appearance ("bark beetle", "fur coat");
- Textured. Plastic material that allows you to create interesting bas-reliefs and panels when applied;
- Venetian. This decorative plaster on the ceiling is distinguished by a rather complex technology of application in several layers.

The main stages of work
Before applying decorative plaster to the ceiling, you should acquire the following tools:
- a container for preparing a solution;
- a perforator with a mixing nozzle;
- a set of spatulas;
- scraper;
- trowel, float;
- roller, brush, sponge.

Preparation of the base
Old finishes must be cleaned down to the floor slab using a scraper. If we are talking about wallpaper and putty, then it is recommended to pre-moisten them with water. All protruding areas are knocked down, and the cracks found are repaired. A layer of deep penetration primer is then applied to ensure good adhesion for subsequent finishing. It is necessary to treat the base with a special antiseptic liquid that will prevent mold.

Leveling layer


Decorative plaster for the ceiling is able to hide only minor irregularities in the base. In the presence of noticeable differences, an alignment procedure will be required: a starting putty based on gypsum (Rotband, Izogypsum) is well suited for this. Before applying it, beacons are installed on alabaster. The first plank is mounted at a distance of 20 cm from the wall, the distance between the remaining elements is determined by the length of the rule.
Having prepared a solution in a container using a construction mixer, the ceiling is screed. To do this, with a trowel or spatula, throw the mixture into the gaps between the beacon strips, then pull it together with the rule (it should move strictly perpendicular to the guides).
To speed up the process, an uneven base can be closed. In this case, the preparation of the ceiling surface will be reduced to the application of a primer layer.
Preparation of the mixture


Decorating with decorative plaster begins with the correct preparation of the solution. It goes on sale in the form. The cooking technology consists in diluting the material with warm water, the proportions may be different depending on the type of finish. As a result, an elastic solution should be obtained, resembling thick sour cream in its consistency. In any case, the package contains detailed instructions.
Solution laying technology


To apply the composition to the ceiling surface, a wide spatula is used, the optimal place to start finishing is any corner of the room, with the strip moving parallel to the wall. In order to avoid falling, the laid fragment of mortar must be immediately stretched along the base. This uses the cross-stroke technique. To level the surface, you will need a special roller. The thickness of the decorative layer is taken such that it overlaps the textured grains.
Methods for applying decorative plaster may differ - it all depends on the material used. For example, standard modeling compounds (we are talking primarily about the decorative plaster "bark beetle") require an instant design of the pattern, for which a notched trowel is used. Patterns of textured mixtures are formed independently. After the entire area of the base has been plastered, take a break from work to dry (about 12 hours).


Depending on the type of decorative plaster used, painting or waxing can be used as the final decoration. Staining is necessary in cases where the base material does not contain colored enzymes. The paint is usually applied in two layers, taking a break to dry. Waxing is recommended to be carried out one week after the end of the plastering work. Thanks to the wax, the finished finish will acquire its characteristic shine and additional protection.
For the finishing decoration of textured surfaces, it is more convenient to use varnish instead of wax.
Summing up, it should be noted that do-it-yourself decorative plaster on the ceiling is laid using almost the same technology as on. The only difference is the requirement for a higher application speed and compliance with safety rules when working at height. In the presence of uncertainty in their abilities or lack of the necessary time, professional craftsmen can be hired to carry out this work.