Houses are the finishing of the lower part of the building, the foundation. It is important not only to decorate this part, but also to insulate it and protect it from moisture.
Cladding materials must be durable and lightweight so as not to create additional stress on the house. Suitable for such a case following materials:
- siding;
- brick;
- fake diamond;
- natural stone.
Before you start working with any of the listed products, the foundation must be prepared. If the house is wooden, then it should be treated with an antiseptic to avoid rotting. Also for this case, an air space (pillows) of 75 cm per 20 m2 of area is left.
Foundation preparation
In some cases, the foundation may need to be strengthened. To do this, drill a hole at an angle of 20 degrees at a distance of 10 cm from the top of the existing foundation. The hole should be approximately 10 cm deep and 1 cm in diameter. Reinforcement is driven into it, the free end of which should be about 15 cm. Then the foundation is poured with a layer of 30 cm, so as to cover all the reinforcement, and covered with two layers of roofing material.
Between the foundation and the facing material, be sure to leave a space of about three centimeters for natural ventilation and insulation using an air cushion.
When making a building mixture, you should not use additives or sand with salt, as there is a high probability of whitish spots appearing on the facing material.
Brick cladding of the base
There are several types of bricks.
Clinker brick- improved form of the simple. It is made from a mixture of several types of clays, so it is resistant to very low temperatures and moisture. It is usually used in places with heavy loads (cladding the base, finishing door and window openings, sidewalks, etc.).
Ceramic brick- can be hollow or full-bodied. The best option is hollow brick, since it does not create a strong load on the foundation of the house. But its disadvantage is the high consumption of the building mixture, because the solution fills the cavities. Therefore, you should choose a brick with a small diameter of the cavities.
Plastered brick- made using special technology under high press pressure. Thanks to its even, smooth appearance, it perfectly decorates the lower part of the house.
You should decide on the material in advance and purchase the entire required batch of bricks. This is necessary to avoid color discrepancies.
Cladding the basement of a house with brick is used in buildings made of any material (wooden, brick, block, etc.).
Bricklaying
The base is leveled horizontally using a level. The first layer of masonry is placed on it.
To obtain smooth, beautiful seams, use templates made of a metal rod, which are placed on the last laid row. Just above it, building mixture and brick are placed. It is tapped with a trowel until it fits tightly onto the template.

The width of the masonry depends on the size of the brick and the building. Usually this is 1.5-2 bricks. And the height of the base should be at least 30 cm. It is also advisable to fasten the masonry with reinforcing mesh on every fourth row.
To prevent stagnation, holes are left in the cladding no higher than 15 cm from the ground, at a distance of 3 meters from each other. Later, you can put a grill on them to prevent animals from entering.
After the masonry is ready, waterproofing is done. To do this, you can use two layers of the same roofing felt.
Siding
Covering the basement of a house with siding does not take much time and effort. Special panels are made of vinyl and look like stone or brickwork. Resistant to temperature changes.
Before installing the panels, a metal sheathing is made from the profile. It is better not to use wood materials, as they are short-lived even after treatment. The sheathing itself is attached to metal stakes. The installation level of the structure directly depends on weather conditions. If the winter in a given area is severe, then you should retreat about 15 cm from the ground.

The first step is to install the starting rail. It is done in a horizontal position strictly according to the level. Corners from the profile are installed in the corners of the house. Install panels from left to right. If it becomes necessary to cut the panel, use a circular saw.
The first panel is attached to the starting rail and corner profile, secured with self-tapping screws or nails. The second to the same starting rail and to the last installed panel. The remaining siding is attached in the same way. After all the panels are installed, a plinth strip is installed, and it is also secured with self-tapping screws.
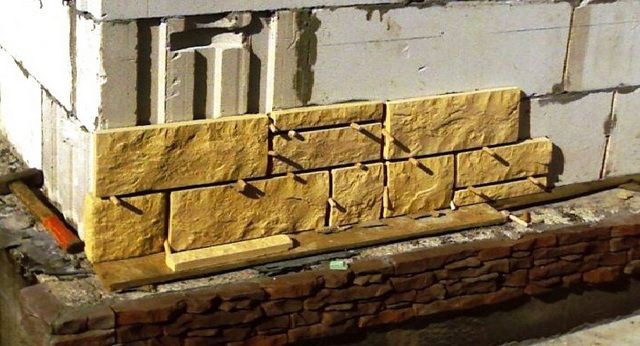
Fake diamond
Cladding the base of a house with artificial stone is ideal for an unsupported foundation. The material is very light and will not create a large load.
There are a wide variety of shapes and colors, usually close to natural stones. They are made from materials that are safe for health and can withstand high and low temperatures.
The foundation may not require strengthening, but it is worth preparing. All excess protruding parts are cut off and leveled. The seams are deepened in the brickwork, and notches are made in the concrete for better bonding of materials. If the wall is too flat, it is better to attach a construction mesh.
Using a level, notches are made in the corners and a rope is pulled to see the masonry line. For the construction mixture, it is better to use cement and sand. Only for laying artificial stones, the amount of cement should be slightly larger than with the usual calculation of 3 to 1. It is better to immediately purchase a little more material than necessary.
Artificial stones can be laid in two ways - without seams and with seams. The difficulty of the first method lies in the selection of the necessary material parameters.
Laying artificial stone with seams

Before thoroughly laying stones, you must first lay them out without mortar, otherwise difficulties may arise in the future with the selection of material.
Start laying from the corners. Apply the solution and secure the stone, leveling it with rotational movements. Excess mixture that has come out of the seams must be removed immediately before it dries out.
After the masonry is completed, the canopy is installed. This is to prevent the cladding from being washed away by rain.
Natural stone
Cladding the basement of the house natural stone It can be expensive or, conversely, economical. It all depends on financial capabilities and imagination. You can choose expensive stones like granite, you can look for cheaper options, or you can find them in the forest, on the banks of reservoirs, or on your property.
Cement and sand, plasticizer or special glue are used as mortar. To trim stone, it is best to have a grinder on hand. You can use a hammer with preliminary notches, but this takes too long and there is a possibility that the stone will not crumble as planned.
Preparing the foundation before facing the house with natural stone
Before starting work, first make a blind area and install

metal corner. This is so that the stone laying is supported not only by the building mixture and does not fall off when the soil shrinks. The corner can be secured with a mounting gun or dowels. In some cases, insulation is done with polystyrene foam.
It is worth considering that natural stone for cladding the base of a house is heavier than artificial stone, and therefore creates additional load on house. You may have to strengthen the foundation. How to do it is written above.
Prepare the surface and lay natural stones, just as when facing artificial ones. For better bonding, they are beaten with a hammer. Finally, polyurethane or polymer varnish is applied to protect the stones from moisture. In order for the plinth cladding to last longer, you should wipe the stones from dust and renew the varnish layer.
There are a lot of materials for cladding the base. A huge variety of shapes, colors and textures allows you to give an almost unique look to your home. It all depends on available funds for repairs and opportunities.
Cladding design
You can choose several color options for stones and create a unique pattern. You can also use mortar unusual shade, then the cladding of the basement of the house will look much brighter, the photo demonstrates this perfectly. For

In order to change the color of the building mixture, an appropriate pigment is added to it.
Also, after completing the masonry work, you can apply a drawing or pattern with paints. But then you will have to renew the paint layer every year.
Make the right choice
The cheapest and lightest materials are siding and artificial stone. The cladding of the base of the house will look more impressive from brick or natural stone. The price will depend on the material chosen.
For fastening use cement mortar or special glue. The most proven and frequently used, of course, is the cement-sand construction mixture.
You can contact an organization engaged in cladding the basement of a house. The guys will do the work quickly and efficiently, help you select materials, and also choose interesting design. Sometimes people don't trust their home to someone else's hands. Cladding the basement of a house with your own hands is done without much difficulty. In principle, in order to do it yourself, the article contains enough tips and recommendations.
To prevent the lining of the base from being washed away by rainwater, a canopy is made. It can be made from two layers of roofing felt. Sometimes metal canopies are installed, but it is advisable to treat them with a coating to prevent rust.
If you need the easiest and fastest option for cladding the base, then it is better to use siding. As mentioned above, thanks to the locking fastening, the panels are easily attached to each other. Due to the lightness of the material, there is no load on the house, so there is no need to strengthen the foundation. For reliability, only fastening with self-tapping screws is necessary, and not a building mixture (like cladding the base of a house with artificial stone).
Examples of stones for cladding a plinth

Here are the most common types of stones. They are sold in different sizes and shapes. If cladding the base of a house with stone should be more economical, then it is better to use sandstone or limestone. Like other stones in stores, they come in different colors. By the way, its price depends on the color of the stone.
How to save on expenses?
In order for the plinth cladding to last a long time and not have a big impact on the budget, it is worth considering all factors in advance. The area of the cladding, the characteristics of the soil, weather conditions, the time of construction and the material of the building itself - these factors determine whether it is worth treating the building with an antiseptic, whether it is necessary to strengthen the foundation, at what height the plinth is to be faced, whether a construction mesh is needed, etc.

You also need to decide what color and design the cladding should be, and whether you need to purchase glue, cement or screws. If you decide on brickwork, then decide what type of brick you will use. A brick with a small diameter of voids will consume less building mixture, and a solid brick does not guarantee good adhesion in the masonry.
Ask for product certificates
Be sure to ask stores for product certificates. This will help avoid unexpected troubles in the future. If you decide to cover the base with stones you found yourself, then be prepared for the fact that their quality can be very poor. Before you start facing with such a stone, test it physical strength, for example, hit with a hammer. If it crumbles into small pieces, then you should not use it; the lining made of such material will quickly crack and crumble.
Remember: the cladding of the basement of a house should not only look harmonious with the entire building and site, but also serve you for decades.
Whatever house is built, its entire structure is always based on on a solid foundation of one type or another. The importance of this structural element simply cannot be overestimated - it is it that takes on and distributes all the main weight loads. As a rule, the foundation always protrudes somewhat above the surface of the earth, forming the so-called basement part. And so the owner of the house inevitably faces the question - how to finish the base?
There are many options for solving this problem. But first of all, it’s worth figuring out - is finishing the base really necessary?
Why is the base covered?
Many home owners consider finishing the basement only as a special design touch in the overall exterior design of the house. The desire to make your home as beautiful as possible in appearance is quite understandable and justified, but it turns out that decorativeness in this case, although important, is still secondary. The main purpose of the plinth cladding is still different:
- Even such a seemingly indestructible element of a building as the foundation needs protection from external influences. The cladding minimizes the impact of precipitation on the plinth material, high humidity, temperature changes, direct sunlight.
- The walls of the house at the basement level are most susceptible to contamination. The liquid dirt that falls on them always contains a lot of chemically aggressive substances that can cause erosion processes even in monolithic concrete.
- The base should also be protected from the development of biological life forms on its surface - mold stains, fungal colonies, insect nests.
- If possible, it is necessary to provide buildings. At first glance, it’s a paradox: why insulate it if all the living spaces are located higher. However, this opinion is wrong:
— The base array itself becomes a very capacious cold accumulator, forming not even a “bridge”, but an entire “highway” of penetration low temperatures into the premises, from which even a conscientiously insulated floor on the first floor may not be able to save you. A significant part of the energy resources spent on heating will simply be wasted.
— The material from which the foundation is made, be it concrete, brick or stone, under the influence of low winter temperatures can freeze through, which will activate erosion processes and reduce its strength.
So, the conclusion is categorical - the base needs high-quality finishing for both operational and decorative reasons. What type of finish should I choose? This will depend on the design features of the building, the preferences of the homeowner, and his financial capabilities.
Types of materials used for finishing the base
Plastering and painting
One of the simplest finishing methods is to apply a layer of durable plaster to the surface of the base.
 One of the simplest options is plastering the base
 This finish will create a good sewn layer, characterized by high vapor permeability. The main advantage of this method is its low cost and availability of materials. Carrying out such work yourself or finding a master plasterer is usually not a big problem. And options giving There is a lot of decorative value for such a base.

- Firstly, it can simply be painted with special durable facade paints. There is a wide range of shades on sale, and there is always the opportunity to choose the one most suitable for the intended exterior design of the building.
- Secondly, great solution the finishing layer will be applied. A wide palette of colors and “rich” textures should satisfy any homeowner’s needs.

- But that's not all. If you show your imagination, you can give even a simply plastered surface a very original look.
 Stone? No, this is a plastered base...
 In the photograph the base appears to be trimmed with stone. In fact, each “cobblestone” is nothing more than a pile of ordinary concrete mortar, molded by hand directly on the surface of the base.
 …the “cobblestones” of which are sculpted by hand...
 To sculpt such “stones” you don’t need any special skill - the main thing is to make a high-quality dense solution. Everything else is the imagination and efforts of the home craftsman. After hardening, all that remains is to decorate with dyes - and the plastered base will become indistinguishable from a stone one.
 ...and tinted with paint
 The disadvantages of the technology for finishing the base with plaster include the comparative fragility of the coating - you will have to constantly monitor the condition of the applied layer and timely repair or update damaged, cracked areas.
Finishing the base with DSP panels with real stone and granite chips
Of course, stone is the best option for cladding the base. But the question of price stops many. Eskosell panels from the Komak Plat brand were developed especially for those who want to get a reliable and “expensive” plinth for many years.
 DSP panels
 You get natural stone for the price of plastic. How does this happen? The basis of the panels is rigid DSP board, on which crumbs of stone and granite are applied. The large size of the crumbs (5-6mm) qualitatively distinguishes the panel from plaster and analogues. Eskosell can provide your home with high-quality protection from mechanical damage and vandalism; they can easily withstand changes in temperature and humidity. A layer of epoxy adhesive compound and natural stone chips is not only home decor, but also a protective waterproof layer. It should also be taken into account that Eskosell is made from natural ingredients and does not emit various harmful substances even in case of fire.
 Types of panels
 Prices for cement bonded particle boards (CPB)
Cement particle boards (CSP)
Advantages of Eskosell round stone chip panels:
- ECOLOGY: does not contain substances such as formaldehyde, asbestos, phenol, etc.
- FIRE RESISTANT (G1): in case of fire they do not melt and do not release harmful components into the air;
- FROST RESISTANT: installation can be carried out at any time of the year; they will not crack from frost or temperature changes;
- MOISTURE RESISTANT: the front surface of the slab is moisture resistant;
- BIORESISTANT: Eskosell prevents the appearance of fungus and mold;
- RELIABILITY: will serve you and your home for more than 50 years;
- VANDAL-RESISTANT: hard, hard, anti-vandal material;
- EASY INSTALLATION: can be mounted without additional elements, using self-tapping screws or glue.
 Eskosell chip panels
 You can simply cover the base with panels using screws. Or glue it with foam glue. Unlike other Eskosell panels, they do not require additional elements for installation.
Finishing the base with natural stone
This type of finishing can certainly be called “elite”. A building with such a base always looks very advantageous, has excellent performance characteristics and will last a very long time.
 Base with natural stone cladding - looks very rich
 For cladding, specially prepared stone slabs are used - slabs, usually 20 ÷ 30 mm thick, which can have either a regular geometric shape or uneven edges, which gives a special decorative effect.

The surface of the stone can also be chosen to suit your taste - from polished to mirror shine to rough chips.
For all the beauty and practicality of this type of base finishing, it also has many disadvantages:
- Such cladding has a very significant weight, therefore it puts additional load on the foundation of the building, especially in cases where the base has a large surface area. If finishing with natural stone is planned, this is usually calculated at the building design stage.
- Large mass of stone slabs predetermines the increased complexity of their installation. Thus, very often even the highest quality adhesive solution is not enough, so there is a need for additional reinforcement and the use of special stops.
- Another significant drawback is, of course, the price of the material and the cost of installation work, which are not always available for independent execution.
Even the most inexpensive types of natural stone - shell rock or limestone, cost more than 1200 - 1500 rubles per m². More expensive types include granite and marble, with a polished or chipped surface.

Well, if there is a desire to achieve complete exclusivity, then wealthy homeowners sometimes resort to cladding with materials such as gabbro or even labradorite, the price of which is generally “exorbitant”.
Video: facing the base with sandstone
Cladding with artificial stone
In the case when you really want to use stone cladding for the base, but the material capabilities or design features of the building make this impossible, you can resort to another option - purchase artificial stone.

The cost of the artificial analogue is much less, the mass of the material is not so significant, and the illusion of naturalness is almost complete.
Such material is made on the basis cement-containing mixtures, often with the addition of light fractions (for example, expanded clay crushed stone), special polymer plasticizers and micro-reinforcing components. Tiles are produced using vibration casting technology in special silicone molds that exactly replicate the natural texture of the stone, or by hyper-pressing.
 Laying hyper-pressed tiles “under the stone”
 The release form may vary. Thus, piece tiles with standardized correct sizes are widely used. No less popular are sets that are assembled per unit area, the individual tiles of which can have different linear dimensions. This type of finishing of the base is carried out in the usual way - by laying it on construction tile adhesive for external work.
 Artificial stone panels of the “Canyon” type
 To facilitate the installation of the plinth cladding, you can purchase ready-made artificial stone panels, for example, the “Canyon” type. At the production stage, metal mounting brackets with a precise geometric arrangement are embedded into their concrete structure. These parts allow you to mount ready-made panels on the surface of the plinth not with mortar, but with fasteners - an indisputable advantage, especially when cladding along subsystem guides.
Find out how to do it with detailed instructions from our new article.
If desired, such panels can also be installed on an adhesive solution - brackets bent inward will only increase the reliability of adhesion to the surface.
Another option - artificial stone tiles are attached with reliable polyurethane adhesive to a rigid base, with or without insulation - this can be a board made of OSB, fiber cement or glass magnesite. Such a substrate greatly simplifies the installation of the cladding and gives it additional thermal insulation qualities.

The well-thought-out locking part of the panels completely hides the joints between them, creating the effect of natural stonework. The texture of the outer surface can be chosen to suit your taste - rocks, crushed stone, tuff, slate, etc. Mosaic solutions with the inclusion of artificial mini-slabs different texture or color.
Prices for the range of plinth panels
Plinth panels
Finishing the base with brick or “brick-like”
Strictness always gives the building a special respectability and is in perfect harmony with any possible type of decoration of the rest of the façade area. To achieve this effect, you can use one of the existing options:
- Cladding the base with natural brick. This approach has the advantage that it is possible to create a ventilated gap between the base itself and the cladding, or to fill this space insulation material. In addition, the brick itself will also serve as additional thermal insulation, especially if hollow varieties are used. However, it must be remembered that the brickwork itself will need a strip foundation - this issue should be taken into account when planning construction. Although they do it differently - they create their own support for the masonry, which will subsequently be combined with concrete blind area around the foundation.

Various types of bricks are used for cladding the base.
— The heaviest is hyper-pressed, very different high strength and extremely low water absorption - something that is especially necessary for the base. You can purchase bricks of various sizes - from the “Russian” standard 250 × 120 × 60 mm to the elongated “American” one.
- Most economical option is sand-lime brick, but especially popular for similar finishing works he doesn't use it.
— Ceramic bricks, including clinker bricks, usually have a hollow internal structure, which significantly reduces the weight of the cladding itself and provides a pronounced thermal insulation effect.
- However, it is not always possible to make real brickwork and, to be honest, it is not always advisable, because such a decorative effect can be completely achieved by using cladding.
 Simpler and affordable option- clinker tiles
 The material used to make it is in no way inferior in its performance characteristics to brick, and correctly laid tiles give an absolutely reliable appearance of full-fledged brickwork. A variety of sizes, colors, external textures, special methods of surface decoration (according to technologies artificial aging, uneven firing, inclusion of additional fragments) allows you to give the building a plinth absolutely unique view.

As a rule, collections of clinker facing tiles also include corner elements, which make it possible to simplify the masonry as much as possible without disturbing its overall pattern.
- It will be even easier to veneer the protruding part of the foundation “like a brick” if you use plinth panels.
They can be produced on a thermal insulating polyurethane foam or polystyrene base. The tiles (clinker or artificial stone) are located and fixed on it with precise adherence to the rows of “brickwork”, locking grooveridge connections will not allow mistakes during installation. Spaces are provided for placing fasteners for mounting panels to the wall or subsystem guides. There are definitely elements for design external corners without breaking the linearity and “spacing” of the rows.
 Base thermal panels - and decorative finishing, and reliable insulation
 In this case, it is preferable - the panels are more durable, the tiles are glued into them especially reliably, and they have higher thermal insulation qualities. If you have to purchase polystyrene foam panels, then preference should be given to high-density extruded polystyrene foam.
Video: installation of base thermal panels
- If there is no need to insulate the base, then it is worth purchasing similar panels without a thermal insulation layer. In this case, the basis for rows of clinker tiles can be glass-magnesite, OSB or fiber cement panels.
— Fiber cement – durable, environmentally friendly, high-strength shock load. However, they are quite heavy, which makes installation difficult. In addition, such panels do not like fracture loads, that is, they require special care during transportation and temporary storage.
— Panels based on OSB have practically no disadvantages - they are light, environmentally friendly, not afraid of external influences, of course, with the proper quality of the base.
— Glass magnesite is the most modern solution, since the material does not burn, can withstand heating to very high temperatures, is not afraid of frost, and is resistant to ultraviolet radiation. A particular advantage is flexibility, which allows do work on walls, even those with slight curvature, which could not be eliminated by other methods.

Regular thickness glass-magnesite the base is 8 mm, and this does not reduce the strength of the products and does not make them heavier general design cladding
Finishing with basement siding
The design features of the plinth or the entire façade cladding system do not always allow the use of natural or artificial stone (brick). It’s okay, very high-quality finishing can be done using basement siding, which will give full visibility of the natural material.
 Base finished with polymer panels - siding
 The term “basement siding” covers a huge variety of finishes. Panels can differ significantly in size, design, and material of their manufacture.
Base siding is made from polyvinyl chloride, polymer sand mixtures, fiber cement, others composite materials. As a rule, the panels are mounted on subsystem guides (in rare cases, directly on the wall), which makes it possible to place the insulation layer of the required thickness.
The sizes of the panels and their shape can also be very diverse. Most often, the panels have a locking part and specially provided areas for attaching them to the guides.

There are so many options for surface texture, imitation of this or that material, and colors that it is difficult to even roughly describe them.

In addition to the traditional structure, basement siding panels can also take the form of rounded wooden beams (block house), shipboard or roughly chopped shingles.
 An original solution - basement siding imitating wooden shingles
 The main advantage of this approach to finishing the base is the light weight of the material, ease of installation, relative durability of the resulting cladding and ease of maintenance.
Video: polymer base siding “under the stone”
A necessary element for finishing the plinth is ebb and flow
The basement of the building may have different location. So, it can be slightly “recessed” relative to the surface of the walls. Sometimes the base is flush with the rest of the facade, although this option is considered the most unsuccessful - it does not provide adequate protection of the base from precipitation. Most often, the base protrudes outward in the form of a kind of step. It is in this case that its finishing will lose its meaning if it is not accompanied by the installation of ebb tides.
 A mandatory element with a protruding base is ebb tides
 These structural finishing elements will reliably protect the protruding part of the foundation from direct precipitation, remove water from the surface of the base, and prevent moisture from penetrating into the cracks between the wall and the cladding materials
The ebb tides can be made from different materials.
- In most cases, metal castings are used, which produce galvanized sheet steel with applied polymer coating, which becomes additional protection against corrosion and gives the required decorative effect.
 The most common are steel with polymer coating
 You can find flashings made of aluminum, and as the most expensive option - even from sheet copper: they will harmonize especially well with the copper roof of the building.
 Exclusive option - copper sheet ebbs
 Video: installing metal ebbs on the plinth
- Plastic moldings will cost slightly less, but this material does not have the same durability as sheet metal, simply for reasons of lower mechanical strength. To protect the base, this option is rarely used. Although, if the walls of the house are decorated with PVC siding, then the polymer cast will look very advantageous.
- If the plinth ledge is large enough and its cladding is made of brick or clinker tiles, then excellent option laying out ebbs from profile ceramic (clinker) blocks.

They can be in the form of a brick with edges beveled in one direction, or in the form of rectangular tiles with a plane inclined to the horizon to ensure water drainage. The surface can be ordinary or with a glazed layer applied (smalt tiles).
 Profile clinker panels with smalt coating - beautiful, but expensive
 This low tide belt looks very impressive. But, however, its arrangement will require large material costs and labor-intensive installation process that can only be performed by a very highly qualified master.
So, there are a great many options for finishing the base. You should evaluate your financial resources, the fundamental possibility, feasibility, decorativeness and performance qualities of the selected cladding, the availability of its independent implementation. Ideally, all these issues need to be thought through at the stage of drawing up the design of the future structure.
The basement is one of the most important parts of the building. This is a kind of support that is subject to constant negative influence environment. Finishing the basement of a private house not only gives it an aesthetic appearance, but also protects it from unfavorable factors. That's why Decoration Materials must be moisture-resistant, frost-resistant, reliable and durable.
Most of the building's foundation is below ground level and hidden from view. The protruding part above ground level is called the plinth. According to standards, the height of the plinth from the ground must be at least 20 cm. It is usually made of brick, stone or concrete slabs.

The construction of a stone plinth is the most practical solution, since the structure does not require additional finishing. However, it is worth considering that this is the most expensive method. Laying a brick plinth is more affordable. This material is environmentally friendly, has low and good characteristics strength.
Cladding the basement of a house is not only aesthetic. This is reliable protection of the building from external influences. Finishing materials that will be used to cover the base must have a high level of strength. Together with the plinth, its cladding will absorb the load created by the wall structures of the building and distribute it evenly over the foundation of the building. It must withstand pressure and protect the base from impact external factors, such as precipitation, sunlight, humidity, temperature fluctuations.
Finishing material protects the foundation of the building from damage by mold, mildew and various types insects The cladding of the base is carried out to insulate the building. This is also necessary to protect the foundation from severe frosts, under the influence of which its strength decreases and the process of erosion develops.

If you leave the surface of the base without covering, this will contribute to its slow destruction as a result of constant exposure to dry or liquid dirt containing aggressive chemicals and minerals.
Various options for finishing the basement of a private house, photos clearly confirm this, transform the building into a masterpiece of design art, making its appearance complete and unique.
Types of basement structures
There are main variations of designs that are used for house projects with a basement:
- protruding beyond the surface of the walls;
- flush with the building;
- sinking, relative to the wall.

Most often, when building a private house, a photo of the base of the house clearly confirms this; the first two options are used. A protruding base is recommended for use when a house is being built with thin external walls, a warm underground is used, or the building has a basement. In these cases, this type of plinth will provide the building with additional thermal insulation.
If you make the basement part flush with the building, when you use it for its construction thin walls, the occurrence of dampness and condensation in the interior is inevitable. Here the most problematic thing is to install thermal insulation and finish.
Important! When choosing these types of plinth, you should take care in advance about the arrangement of ebb tides.
The sunken base is less damaged by precipitation. Here you can easily hide waterproofing, install insulation and perform cladding necessary materials, which contributes to a longer service life. This type of plinth is recommended for buildings without a basement. Finishing materials for the plinth will absorb soil pressure, performing a supporting function, thereby maintaining the safety of the entire structure.

The procedure for finishing the basement of a house
All work on the cladding of the basement structure is carried out at the final stage of production - the exterior finishing of the building. It is better to carry out work in warm, dry weather. Sheathing the base consists of the following actions, which are performed in a certain sequence:
- A trench 20 cm deep and 50 cm wide is dug around the entire perimeter of the building.
- Fill the space with gravel to provide drainage. Additionally, the trench can be strengthened using reinforcing mesh.
- The surface of the wall, 50-70 cm high for the future plinth, is cleaned of dirt and processed. If necessary, all irregularities are eliminated.
- Arrangement of thermal insulation.
- Decorative cladding of the base.
The choice of facing material and the method of its installation depends on the design of the base and the method of casting it.

Arrangement of ebb tides for the foundation plinth
To protect the plinth from the negative effects of precipitation, you should install a flashing, which is fixed above the protruding part of the plinth, and is a kind of delimiter between the base of the building and the wall structure. One part is in contact with the wall at a certain angle, and the other hangs over the foundation, covering it, collecting rain and melt water.
The flashings for the plinth are strips measuring 50-400 mm. The color, size and shape of the ebb should be selected depending on the finishing material of the foundation. You can make a water-repellent structure yourself using waterproof materials, or you can buy ready-made flashings for the foundation plinth at any hardware store.
Today the industry produces several types of ebb tides:
- plastic;
- metal;
- concrete;
- clinker

The type of tide is selected based on the finishing material for the facade of the building. Most successful plastic castings combined with vinyl siding, which is used for cladding the building. Thanks to a wide range of colors, you can choose the most suitable option. The use of concrete or clinker flashings for the plinth is preferable for buildings that are lined with natural stone or brick. Metal canopies can be used with any type of finishing material.
Types of tides
The most budget option is the use of plastic moldings made of polyvinyl chloride. The cost of the product is 50 rubles. for 1 p.m. Despite the high level of water resistance, ebb tides show increased sensitivity to physical impact, especially in winter period, when the slightest blow can cause them to crack and split.
Helpful advice! Due to the fact that plastic castings have increased fragility, preference should be given to more durable and expensive products.
The most durable and durable are ebbs made of metal: steel, copper or aluminum. Installation of the products is convenient and simple, and involves attaching metal strips to the walls of the building using self-tapping screws and dowels. When choosing this material from a wide range of types, special attention should be paid to the aesthetic appearance of the product so that it completes the overall design of the building. The price of the product starts from 100 rubles/rm.

Helpful advice! When installing base flashings, the planks should overlap each other by at least 30 mm. To avoid damage to the protective layer of the product, which will lead to corrosion and destruction of the material, do not cut the strips.
Metal castings are made from high-quality and frost-resistant cement M450 with the addition of river sand, granite crushed stone and plasticizers. The solution is poured into silicone molds of various geometric parameters. The result is an even and smooth product. These tides are attached to a special solution.
Flashings for the foundation plinth, the price of which is the highest and starts from 200 rubles. for 1 linear meter - these are products made from clinker tiles. This material has high strength properties, reliably protects the building from the negative influence of the environment and successfully emphasizes the design of the cladding.

Low tide installation technology
After selecting the low tide, you can begin its installation. Here it is necessary to take into account not only the material from which the ebbs are made, but also the design features of the building. So, for a wooden house, elements that will be fastened with self-tapping screws or other fasteners are suitable. Since wood has low adhesion and is susceptible to dampness, the use of adhesives is not advisable.
For buildings made of brick or facing stone, you can use flashings that will be fixed using polymer or cement-adhesive mortars.
Helpful advice! When using concrete or ceramic sills, their installation should be carried out simultaneously with the cladding of the base and walls.
If it is necessary to install flashings on a building already finished with facing material, then it is better to use metal or vinyl elements.

Before installing the drip sills, it is necessary to seal the joints between the walls and the plinth. All cracks and crevices should be treated with a water-repellent mixture or sealed with sealant. Next, you need to use a level to mark the wall. The highest point of the base is determined and a horizontal line is drawn along which it will be mounted. top part low tide The part of the foundation that protrudes must be compared with a horizontal plane using a cement screed. The lower part of the ebb will rest on it.
Important! The ebb plane relative to the wall should be located with a slope of 10-15%.
Installation of metal and plastic ebbs
Installation of drip linings should begin from the corner, using special corner elements, which can be purchased together with planks of the same width and color. Next, you need to finish all the protruding parts of the building structure: columns, pilasters and others.
Related article:
What materials are used for low tides. Which of them is better to choose and in what case. Installation of ebb tides.
In the upper part of the ebb, holes are drilled using a drill at a distance of 40-50 cm from each other. Next, the element is applied to the previously marked line on the wall of the house and is attached to it with dowels and self-tapping screws. The lower part of the ebb is attached to the concrete base of the plinth with dowel nails in increments of 40-50 cm. The joint between the ebb and the wall should be sealed with putty or silicone compound.

Important! During installation of the ebb, it should be taken into account that it should protrude 2-3 cm beyond the edge of the base, which will ensure better protection during precipitation.
After covering all the corners and protruding elements, you should begin installing the drip linings in straight sections. You need to start from one of the corners. Each subsequent element should be overlapped with the previous one by at least 3 cm. All joints should be treated with sealant to prevent moisture from entering.
Installation of concrete and clinker slabs
Flashings made of clinker and concrete should be installed at the stage of facing the facade of the building, since adjusting them to size during the installation process is a labor-intensive process.
These types of tides are better combined with facing materials such as brick, clinker tiles, natural or. To attach them, you should use a special adhesive composition for ceramics and stone, which is intended for outdoor use. It is purchased in the form of a dry mixture created on a cement or polymer base, and with the help of water it is brought to the state of thick sour cream. The solution can be made independently using cement and construction sand in a ratio of 1:3 or 1:4.

Installation of concrete and clinker ebbs also starts from the corner. To avoid complex processing concrete castings, they should be placed in advance in such a way as to minimize their cutting. This can be achieved by using the correct size of the seam between the elements. You can adjust the dimensions of clinker products by using a tile cutter or grinder with a diamond cutting wheel.
On the back side of each element is applied glue mixture. The ebb tide is attached strictly along the previously outlined line. After waiting some time for the solution to set, putty or silicone sealant is applied to the joints between the casting elements. After the glue has completely set, you can cladding the walls of the building.
Waterproofing the foundation plinth
The basement of the building is constantly in difficult conditions. It takes a significant load from the above-ground part of the building and comes into contact with the external environment, being exposed to moisture. In order to protect an important part of the house from destruction, it is necessary to take a number of measures, one of which is the arrangement of waterproofing of the foundation base.

Waterproofing can be horizontal or vertical. Usually a set of works is performed that includes both methods. Horizontal waterproofing is carried out before the construction of walls and is aimed at protecting them from moisture. However, in order to ensure a complete protective set of measures, it is also necessary to carry out waterproofing between the foundation and the base.
Vertical waterproof protection is aimed at preventing the negative effects of surface and ground water on brick or concrete. Such insulation can be external or internal. The best effect is provided by double-sided moisture protection.
Today, pile foundations are predominantly used in the construction of buildings. Here the base plays not only a decorative role, but also protects the house from heat loss. Despite the fact that this element is not load-bearing and does not directly affect the durability of the structure, waterproofing the base is mandatory.
Materials for waterproofing the base from the outside
Coating, roll and injection compounds with penetrating action are widely used as materials used for waterproofing the foundation plinth.

It is often used to protect the foundation from the effects of groundwater. roll waterproofing, which can be fused or pasted over. Fused insulation consists of a base in the form of fiberglass, polyester or fiberglass and applied mastic. The adhesive waterproofing is laid on the surface of the foundation using bitumen mastic, which is first applied to the rolled material and to the monolith, then the element is glued, pressed and smoothed.
The main advantage of rolled material for the plinth slab is its low cost and high installation speed. However, this type of waterproofing has poor resistance to mechanical stress and has a short service life. It cannot be used in places where communications pass or connect. Before installation, the surface should be cleaned of dust and dirt and dried thoroughly.
As coating waterproofing materials bitumen, polymer, bitumen-polymer mastics, astringent plasters and cement coatings are used, which are applied to the surface of the foundation using a brush or roller. This type of insulation is used for water pressure up to 2.6 kgf/cm².

Helpful advice! To ensure increased strength of waterproofing after the first layer of mastic, it is recommended to reinforce the surface with fiberglass and apply subsequent layers on top of it.
The material is low cost and can be applied to a surface of any configuration. However, it is not durable and requires preparatory work and additional protection from mechanical stress.
The use of injection and penetrating compounds is the latest technology for waterproofing structures. Penetrating material is applied to a wet surface concrete base. Reacting with water, the composition turns into crystals that penetrate the pores of concrete, making it waterproof. The penetration depth reaches 150-250 mm.
Injection waterproofing is carried out using a liquid solution, which is injected under pressure into the cracks, pores and seams of the structure. This method can be used for waterproofing buildings made of rubble and brick. The use of this waterproofing is a very labor-intensive process that requires cleaning the structure down to concrete or brick, and the complexity of the work itself requires the involvement of experienced craftsman. In addition, such insulation is the most expensive.

Features of waterproofing a brick plinth
Ceramic brick is most often used to build a basement. Its waterproofing can be carried out using various methods.
Solid red brick can be used to build walls. This building material has already undergone factory processing, where a layer of waterproofing was previously applied to it. Therefore, using this brick for the construction of a building, external waterproofing may not be arranged. Even though the cost of this material relatively high, these costs are compensated by the fact that after laying the brick, no other work is required.
The next way to waterproof a brick plinth is to use bitumen lubricant, which is applied in several layers, cold or hot.

Spraying polyurethane foam is rarely used to insulate the base. This is due to the fact that to carry out this type of thermal protection it is necessary to use special equipment, certain chemical components and the involvement of highly qualified workers. The essence of the method is that polyurethane foam is sprayed onto any surface. Expanding, it penetrates into all voids and reliably adheres to the base, forming a dense coating. This material can be used not only for spraying, but also for filling individual voids and areas.
Do-it-yourself technology for insulating the foundation plinth from the outside with penoplex
At the preparatory stage, it is necessary to prepare the foundation surface by cleaning it from old insulation, dirt and dust. Next, you should install a layer of waterproofing to protect the structure from rain, groundwater and snow water. Any type of waterproofing is suitable for penoplex, with the exception of compositions with organic components.
Work begins with insulation of the underground part of the foundation. For this purpose, PPS boards are attached using specialized contact adhesive, which is applied around the perimeter of the product and in the center. The second level should be laid with the joints between the slabs staggered in relation to the lower level. After installation, all cracks are filled with polyurethane foam.

The base insulation layer with penoplex requires additional protection from mechanical damage. To do this, an alkali-resistant reinforcing mesh is fixed to the slabs, which is subsequently plastered with a solution containing hydrophobic additives. Also, as protection, you can use wooden pinches, which are attached to the slabs using dowel nails. Wood must first be subjected to antiseptic, anti-foam and hydrophobic treatment.
The final stage is finishing the base with facing materials.
Cladding the basement of a house: which material is better to choose
Do-it-yourself finishing of the base various materials, which reliably protect and decorate its surface. This process must be performed before wall cladding in order to be able to hide the ebb under the finishing material for the walls.

The material for cladding the plinth must have the following performance characteristics:
- have low thermal conductivity to avoid heat loss from the building;
- provide reliable and strong adhesion to the base;
- have a high level of strength and wear resistance to mechanical damage;
- have low hygroscopicity and vapor permeability to avoid moisture penetration into the foundation and wall panels.
Today, when the question is raised about how to decorate the basement of a house, the following materials are used that fully meet the above requirements:
- clinker or porcelain tiles;
- natural or artificial stone;
- brick;
- PVC panels or basement siding;
- profiled sheet;
- decorative or mosaic plaster.

Any finishing material can be used to cover the base of a strip foundation. But when the question arises of how to cover the base of a house on screw piles, you should give preference to brickwork, siding or corrugated sheets.
Before deciding how to decorate the outside of the house’s basement, you need to take into account some nuances:
- when covering the base with thick material, it is necessary to install an ebb above the protruding part;
- If you want to expand the foundation, it is better to use brickwork;
- When installing or corrugated sheeting, you should first install a frame, the space of which can be filled with a heat insulator for additional insulation foundation;
- Frame-cladding technology allows work to be carried out at any time of the year.
Using plaster to cover the base
When the question is: how to inexpensively decorate the basement of a house, the answer is obvious - use plaster. However, this option is the least durable and also has an unaesthetic appearance. Such cladding is easily damaged by any mechanical influences and does not provide adequate protection of the base from external factors. However, this method is widely popular due to its low cost. It is also acceptable in the case of erecting a brick plinth on a strip foundation.

Plastering itself is not the final stage. To protect the layer from moisture and environmental influences, acrylic, alkyd, silicone paint, water-based or oil composition, which in turn decorates the base. The photo of the house decoration clearly demonstrates the various options for using plaster.
Helpful advice! It is not recommended to use enamel paints to paint the base. They do not allow air to pass through and are environmentally unsafe.
Decorative plaster is often used, which creates the effect of a fur coat and can be colored using dye. The use of mosaic plaster allows you to create a multi-colored mosaic on the surface, which occurs due to the presence of fine chips in the composition of the original mixture. The presence of resin as a binder gives the composition increased water resistance.
Using a special silicone stamp, which is used to make impressions on the plastered surface, will help you solve the question of how to make a plinth around the house with your own hands with the effect of natural stone.

In private homes, finishing the base with corrugated sheets is widely used. The material has a high moisture resistance, is resistant to temperature fluctuations, durable, easy to process and can be easily mounted on a wooden sheathing. However, corrugated sheeting is not suitable as a finishing material for wooden buildings due to the fact that it is susceptible to corrosion under the influence of high humidity, which can lead to wood rotting.
Profiled sheets are often used to finish the base of a pile-screw foundation, where it must be covered for reliable protection from atmospheric influences.
Features of using bricks for finishing the base
One of the most expensive finishing materials is brick. However, having high strength and performance characteristics, it allows you to create strong, reliable and durable protection. This material is suitable for any type of foundation. For brickwork, slotted, hollow, hyper-pressed or ceramic brick. Work begins with arranging the foundation for the masonry.

If the brick is used to build the base itself, it does not need additional finishing. However, here you should choose quality material, in order to immediately solve two problems: utilitarian, by protecting the walls of the house from external influences, and aesthetic, by giving the building decorative look. When deciding which brick is better for the foundation plinth, you need to give preference to red baked brick, which is resistant to aggressive environments.
In the case of finishing the base of a pile-screw foundation using brickwork, it is necessary to install a base in the form of a strip of reinforced concrete or a metal profile. Brick laying occurs with bandaging. Used to connect elements cement-sand mortar. The thickness of the seams is 10-12 mm.
Cladding the basement of a private house is important, so you should carefully consider the choice of material for the work. It acts not only as a decorative element, but also provides reliable protection for the entire building from the effects of atmospheric and mechanical factors.
The plinth is part of the foundation, which is located above ground level and prevents moisture and cold from entering the building, protects the facade from various damages and pollution. Also the plinth is load-bearing structure building the entire structure, thus there is a lot of pressure on it.
Why is it necessary to finish the basement of a house?
To protect the base from the negative influence of natural phenomena and various mechanical damage, it is necessary to pay attention to its finishing. Without finishing, it will not perform its main protective function. Since the plinth is integral with the facade of the building, it provides not only protective, but also decorative function.
The plinth cladding is an excellent decorative material. A building with an uncovered base looks unkempt and unfinished. The finishing will give the entire façade of the building a finished and attractive look. The entire appearance of the house will depend on how the base is finished.
Thanks to modern finishing materials and construction technologies it is possible to ensure that the base of the house is protected and does not require overhaul, for a long time.
Cladding materials
There are a lot of design options for the base. They differ from each other in texture and in the properties of the materials used. Each material has its own characteristics, advantages and disadvantages.
Plastering and painting
This finish is one of the inexpensive and affordable options for most consumers. The main ingredients of the plaster mixture are cement and sand, thanks to which the plaster acquires strength and chemical inertness. The plaster may contain various dyes and additives, thanks to which the plaster acquires decorative colors and texture.
Therefore, there is a wide selection of colors of decorative plaster on sale to suit every taste. Various modern technologies for applying plaster make it possible to create various relief and textured surfaces.
The advantages of this type of plinth finishing include the affordable cost of the material, since the ingredients are not expensive materials. The reliability and strength of plaster is the advantage of this material. At the same time, any scratches or chips can be easily reconstructed.
Plaster is also good because it can hide all the unevenness of the base. In addition, the plastered plinth tolerates high moisture, drying out and other environmental influences well. All these factors will not affect the structure of the coating in any way. The disadvantages of plastering include an unattractive appearance and the need for additional coating.
Also, an obvious disadvantage of plaster is that it does not have any thermal insulation characteristics and does not insulate the surface in any way. In addition, plaster is not durable. Cracks need to be sealed and repainted.

A natural stone
One of the practical and durable finishing materials. The most commonly used stones are sandstone, small cobblestones, granite or marble. If the installation process was carried out in compliance with the technology, then this finish can last forever.
In addition, it is an environmentally friendly natural material. The unique structure of the stone, variety of colors and natural shades allows you to choose the finishing material to suit any color scheme Houses. For this type of cladding, specially prepared stone slabs are used, which can have different shapes.
The disadvantages of this material include the rather high cost and the rather difficult installation process.
A base of this type will look impressive and expensive.
Fake diamond
It is an alternative replacement for natural, but less durable type of material. He has the same beautiful view, strength and reliability. Resistant to negative environmental conditions and mechanical damage. However, it is much cheaper and facing works easier to carry out. In addition, thanks to fillers and special additives, artificial material can be any shade.
Porcelain tiles
This is an environmentally friendly material that consists of clay, sand and mineral components. The material is wear-resistant, high density and durability, and also has a pleasant appearance.
Using it as a plinth cladding will provide high level fire safety structures, since this material contains fireproof clay. In addition, porcelain stoneware has good thermal insulation properties.
Another important advantage of porcelain stoneware is its high resistance to moisture. The material is not afraid of continuous wetting and perfectly protects the building from exposure to water. This type finishing will not only protect, but also decorate the entire structure.

Clinker tiles
The raw material for clinker tiles is slate clay.
A plinth lined with clinker tiles will look expensive and beautiful. The appearance will resemble a brick wall. However, clinker tiles are lighter and thinner than bricks. Finishing the base with tiles will not only give an attractive look to the whole house, but will help protect it from the influences of nature.
Laying tiles is quite simple. The tile material is attached to the facade using a special moisture-resistant adhesive mortar, cement glue.
Available in various colors, it can be either smooth or textured. Fairly reasonable price. The disadvantages include a short service life. The winter period has a particularly negative impact; defects on the tiles can appear as a result of severe frosts.
Siding
Siding is a fairly inexpensive material, and also a quick and easy option for exterior finishing work. It has durability and high quality. The advantages also include the moisture resistance of the material. Modern technologies allow you to create facade siding panels of various shapes and colors. The disadvantage of this finish is flammability and deformation in size due to temperature changes.
What type of plinth finish should I choose?
All finishing materials for plinth cladding have their advantages and disadvantages. When choosing a facing material, remember that when interacting with precipitation, it must retain its durable and aesthetic qualities.
First of all, the material must be reliable in order to last a long time. In addition, it is frost-resistant - it can withstand freezing and thawing processes without cracking. Also important indicators is water absorption.
Do not forget that the texture of the basement of the building must be combined with the walls and the entire structure as a whole. The choice depends, first of all, on the design features of the building, personal preferences and financial capabilities.
Since it is available big choice materials, this allows you to create exactly the home decor that meets the personal preferences and plans of the designer.

Base finishing technology
The technology for finishing the base will depend on the chosen finishing material. As a rule, the finishing technology takes place in three stages: installation of the frame, laying of insulation, fastening of the finishing material.
Of course, one of the simplest finishing options is plastering. It is required to apply a layer of durable plaster to the surface of the base. You can do this work yourself.
The most difficult one. For finishing work made of natural stone, you will have to invite specialists. You must have certain knowledge and skills. In addition, additional reinforcement of the frame will be required due to the large weight of the material, and the stone processing itself requires special equipment.
It is easier to cladding with artificial stone, since the material is light in weight and additional reinforcement of the base of the building is not required. Therefore, the cladding process is significantly simplified, and the time required to prepare and complete the work is reduced.
Properly executed plinth cladding using good materials will provide the necessary microclimate inside the house and extend the life of the building.
Main stages
The entire process of facing the plinth can be divided into the preparatory stage and the actual installation of the finish:
- Preparatory stage. Before installation, the surface of the plinth must be prepared for further finishing. To do this, the base must be cleaned of accumulated dust and dirt, any cracks and defects that have appeared must be filled with putty, and the surface must be leveled.
- A layer of waterproofing and installation of a thermal insulation layer are required.
- Then you need to prime the surface of the base.
- When all preparatory work will be completed, you can begin the procedure of finishing the base with facing materials. In most cases, it will be necessary to install an additional frame that will support the structure and give it strength.

- After finishing is completed, it should be coated with water-repellent protective impregnations to extend its service life.
- It is advisable to finish the basement of the house in the warm season, when the weather is dry and sunny.
The basement of the house performs not so much a decorative function as a practical one. In many cases, it serves to reduce heat loss (it is specially insulated), and also prevents the spread of atmospheric and underground moisture to the walls of the house. It also transfers the load from the walls to the foundation - if the foundation is strip or slab. Therefore, the cladding of the basement of a house should be not only beautiful, but also functional. The finishing material is also selected in accordance with this task.
When to start finishing the basement
It is best to finish the base after it is done. In this case, the finishing material will hang over the path. As a result, even the most slanting rain or streams of water flowing down the walls will not be able to get between the wall and the blind area - the water hits the path at a distance of several centimeters from the joint. It is through this joint that water penetrates to the foundation, bringing dampness and other problems.
You need to start cladding the basement of the house after the blind area around the house has been made
One more thing. Many people are thinking about whether to insulate the basement or not. If you want to save on heating, the answer is to insulate it, just like the blind area. The unit for insulation and cladding of the base - one of the options - is shown in the photo below.

When using the basement as a residential floor, there are no questions regarding insulation, since the answer is clear - insulate it, of course. But even if you don’t have a subfloor, heating costs will be much lower, and the floor in the house will be much warmer.
How to cover the basement of a house
There are a lot of materials for finishing the base. Main requirements: moisture resistance, frost resistance, strength. The following materials satisfy these requirements:
- Natural stones (flagstone) sawn into plates or chipped, so-called “torn stone”:
- sandstone (plastic);
- granite;
- marble;
- slate;
- dolomite;
- shugnit.
- Small cobblestone.
- Large river pebbles.
- Clinker tiles (clinker bricks).
- Paving slabs.
- Porcelain tiles.
- Finishing brick.
- Facade panels, basement siding, PVC panels (these are all names of the same material).
- Plaster (decorative and “under a fur coat”).
- Profiled sheeting.
Some of them cost a lot, some are insignificant, but all of them can be used. The material is chosen based on financial capabilities and previously used finishing materials - the aesthetic component also plays an important role. The technologies for finishing plinths with different materials will be discussed.
Preparation and insulation
First of all, if the existing base is uneven, its surface is leveled with plaster. The solution for plastering the plinth is cement-sand: for 1 part of cement (Portland cement M 400) take 4 parts of pure construction sand, preferably river. For greater plasticity, you can add a little lime or liquid soap(per bucket of solution 50-80 g). The solution should be of medium thickness so that it does not creep off the wall. There is another option - to use a special composition. For example, like the one in the video.
If tiles, stone or other similar material are then laid, after leveling the mortar, notches are made on its surface with the tip of a trowel (trowel). They are applied in the form of a grid over the entire surface. These shallow grooves will give necessary support for finishing.
If the base is insulated, notches are not needed. EPS (extruded polystyrene foam) or polystyrene boards are glued directly onto the plastered surface. They are light and adhere well to glue. Their surface is coated with diluted tile adhesive and pressed against the plaster. Finishing materials are then attached to the surface prepared in this way.
Painting, plastering and “fur coat”
In principle, if the plaster is well leveled, after the solution has dried, the surface can be painted and stop there. This is an inexpensive but viable option. If you used façade paint that is intended for outdoor use, the base will look good for a couple of years. Then you will have to remove the old paint and paint it again to maintain the appearance.
The next method is on top ordinary plaster apply a layer of decorative. And again, choose those formulations that are intended for external use. They can be tinted in the desired color or taken colored ones. The only negative is that plasters are often porous and splashes of dirt that fall on the walls during bad weather have to be cleaned off with a brush and sometimes with detergent.

The method of finishing the base “like a fur coat” is still popular in some areas. This is when the solution is not applied in an even layer, but in small fragments. Previously, they did this with a broom made of twigs. They dipped it into a liquid solution and hit the stick with the handle so that the splashes flew onto the wall. This is how they made “fur coat” - a finish with a torn surface. Today there are special devices for applying plaster, powered by a compressor. With their help, it is easier to do such finishing.
Finishing the basement of a house using materials in the form of slabs or tiles is technologically more difficult. To prevent it from falling off, you need to know some subtleties.
How to fix porcelain tiles or clinker tiles
If heavy materials such as porcelain tiles or clinker bricks are simply placed on glue, on a plastered surface with grooves, perhaps they will stick normally. And they can even stand for some time. Even several years. But then they will begin to fall off along with the solution. Especially in places where there are no grooves or they are of insufficient depth. To improve adhesion, you can apply a layer of impregnation that improves adhesion (grip), but this is not a guarantee, especially if the material is heavy.
The same picture will happen if you glue the materials directly onto the insulation. The surface is smooth, easy to glue. But after a while the finish will fall off. Faster than with a plastered surface. There is a video about this.
To prevent this from happening, it is necessary to secure a metal painting mesh, preferably galvanized. It is secured with dowels, placing a piece of galvanized steel on the dowel-nail, the size of which is larger than the size of the cell. They are attached at the top, bottom and in a checkerboard pattern in the middle. It turns out solid foundation for material of any gravity.
Glue is applied to the base and to the tiles. On the tile, remove it with a notched trowel, put it in place, tap the trowel handle and put it in place, leveling the plane. The distance between the tiles is maintained using crosses, only their thickness is taken to be significant 3-5 mm.
In general, the installation technology is similar to. The only difference is that the glue must be special for outdoor use. The second difference: finishing materials for the plinth begin to be laid from below: they are heavy and need support. You rest the bottom row on the blind area, the second row on it, etc.
Finishing the base of the house with natural stone (shell rock, granite, dolomite, slate)
No matter how attractive artificial shiny surfaces may seem, rough stone for some reason evokes great sympathy. But laying a rubble foundation is difficult and not everyone can do it well enough for a house to stand on it. But anyone can decorate a finished monolithic or natural stone with their own hands, especially if at least part of the work on building a house is done personally.
It is clear that no one will attach whole stones: the finish will be too heavy, and very voluminous. That’s why they came up with the idea to slab or chop stones. Depending on the technology, the result is either a smooth “flagstone” - with almost smooth surfaces, or a “torn stone” with an uneven front part. Sometimes these materials are cut into identical rectangles, sometimes they are left in the form of uneven plates, but in any case it is natural stone and the decoration of the base of the house from it turns out to be beautiful and waterproof.
There is this material made from expensive stones, for example - marble, there is cheaper - slate, dolomite, shugnit, lemezite, granite, etc. They look very impressive. Especially if it is torn stone, although flagstone sometimes looks no worse.

The preparation of the surface will be exactly the same: it is best to fill the plastered plinth with a painting mesh, and then lay the stone plates on it with glue. If they are smooth - natural stone with processed edges - the laying technology will be exactly the same as described above.
If the stone has torn edges, finishing the base of the house becomes more difficult: it is necessary to select plates of such a shape that the seams are not too large. When using this option finishing stone you will need a grinder with a disc for stone: most likely you will have to file the plates of the lower and top row. Correction will also be needed when decorating the corners. See the video for an example of this technology.
There is a second way. The plastered surface of the base is first coated with a compound to improve adhesion (adhesion), then fragments of finishing are installed on it with glue. They are fixed in a given position using scraps of the same stone or pieces of materials of the required size. The seams remain unfilled. After the glue has “set,” the seams are filled with a thin solution from a construction syringe, rubbing and tearing out as necessary.
In any case, any glue that gets on the finish must be removed in a timely manner. It will be very difficult to do this with a frozen one, and the appearance of the glue is far from attractive.
Sometimes, for a clearer pattern, the seams between the stone plates are painted with dark paint. Then the surface is coated with protective impregnation. It gives the stone a slight shine and also often increases its water-repellent properties.
For an example of cladding a plinth with natural stone using the second technology, see the following video.
Facing with boulders or small cobblestones
It is not necessary to buy a boulder or cobblestone. You can collect it on a river or on a pebble beach at sea. Rolled stones are chosen to be flatter - round ones are more difficult to “mount”. The procedure and all other subtleties are almost the same as in the case of finishing with natural stone. The only difference is that these stones must be washed in water and detergent before use. Firstly, the water in our ponds may have oils in it and need to be removed, and secondly, there may be clay or algae in it which can cause the finish to fall off.
To make everything look organic, you can first lay out a “picture” of cobblestone cladding on the path next to the place where you will cladding the base. They have different shades and their random combinations are not always attractive. By laying everything out side by side you will have an idea of what the result will be.
Watch the video about the features of finishing the base with cobblestones.
How to install plastic (PVC) plinth panels
This type of finishing is called differently: basement or facade panels, basement siding. They have a varied appearance: under different types stone, tile, brick.
To install PVC panels on the base, you need to assemble a frame. It is made from wooden beams 50*50 mm. Since the finishing will be outdoors, the wood must be protected with impregnations that prevent rotting and protect against pests.
The sequence of actions is as follows:

Assembly is easy. Only after fastening will it be necessary to make ebbs on top: the sheathing and panels have a fairly decent volume and a gap remains at the top. You can cover it with roofing iron, as in this video. Immediately look at the technology of finishing the base with plastic panels.
In the same way, the base can be finished with corrugated board. There is only one note: it is advisable to lay insulation in the voids between the sheathing. The house will be much warmer.
Finishing the base of a pile foundation
As you know, there is no base. But if you don’t block off the space, there will be drafts under the house, the floor will always be cold, and all kinds of living creatures like to live under the house. Therefore, the base, although decorative, is necessary. It can be done in two ways.

There is one subtlety if the house is installed on screw piles or. Such foundations are often placed on highly heaving soils. To prevent the finishing from being destroyed when the soil is raised, it is not brought to a certain distance to the ground. To prevent animals from crawling into the gap, a metal mesh is fixed at the bottom.