The furniture stapler has successfully replaced the usual hammer and nails in many fields of activity. Its use allows you to connect materials of the same or different hardness to each other, for example, wood, plywood, plastic, plastic wrap, the cloth. With regular use, the tool may start to work poorly or even break down altogether, but many breakdowns are easy to fix. with my own hands... To do this, you need to familiarize yourself with the design of the staple gun, its frequent malfunctions with ways to eliminate them, and also stock up on plumbing tools. Only in rare enough cases, repairs will require the involvement of service center specialists.
Stapling guns by the type of energy, with the help of which fasteners are hammered into the surface of the material, are divided into the following types:
- mechanical;
- pneumatic;
- electrical.
In everyday life, mechanical and electrical models of tackers are mainly used. Pneumatic tools belong to the professional category.
Mechanical models
Any furniture stapler has in its design store for fasteners, inside which there is a clip with guides. A consumable is inserted into it when performing work operations.
Stores of some models have a transparent insert. This is convenient during work, because it allows you to control the remaining amount of fasteners.
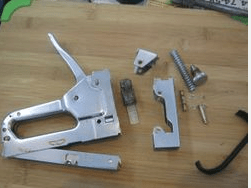
The mechanical staple device is shown in detail in the photo below.
Shock-return mechanism(striker) is a plate. Its size corresponds to the geometric parameters of the consumables used. The striker is attached to the striker - its shape is determined by the tacker design. In this case, the other side of the striker comes into contact with the spring, the compression of which is regulated by means of a screw. Shock damping is provided by a polyurethane shock absorber located inside the housing.
Manual staplers can be equipped with springs of two types:
- twisted (shown in the photo above), installed on inexpensive models;
- plate (spring type, photo below), more powerful and expensive compared to the first.

Mechanical staple gun operated by a lever(handle). He cocks the shock-return mechanism. A safety clip protects against accidental activation during transport or storage.
Electric and pneumatic models
The device of an electric tacker connected to a 220 V network is shown in the photo below.
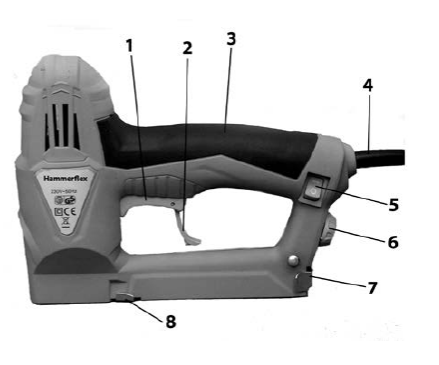
The following structural elements are designated by numbers:
- trigger trigger;
- fuse;
- handle for holding the tool;
- power cable;
- on / off button;
- the mechanism for regulating the force of the shot;
- store pusher;
- store retainer.
Inside the tool body there are also:
- an electric motor that charges the spring;
- electric motor operation control board;
- impact mechanism.

Battery products do not have a power cord. The power tool is powered by batteries.
The individual structural elements of pneumatic staple guns are shown in the photo below.

Inside the pneumatic tool is cylinder with piston, as well as an air distribution unit. Compressed air for the operation of the construction stapler is supplied through a hose that can withstand high pressure from a compressor unit or a cylinder. Therefore, if there are problems with the operation of the pneumatic tacker, first you need to check the serviceability of the compressor with the air line.
Common malfunctions of a construction stapler and their causes
Any kind of construction stapler can start to work poorly. At the same time, common malfunctions for the considered varieties of staple pistols are the same. Only the reasons why a breakdown occurred can be very different - this is due to design differences. different types takers. Let's consider what to do in each case.
The tool does not work - the staples do not fly out
So, if an electric or mechanical staple gun does not fire staples or nails, then the reasons may be as follows:
- the spring has broken;
- drummer problems.
Mechanical devices can also wear out the mechanism for engaging the cocking lever with a spring.
Have power tool there are still such possible reasons the reason why the fasteners do not fire:
- the instrument is not included in the 220 V network;
- a cord with a defect (its integrity is violated);
- the electric motor is burnt out;
- the board that controls the operation of the electric motor is out of order.

Novus J-165-EAD Electric Stapler Board
Pneumatic tool does not fire a consumable in such cases:
- the compressor is broken or not connected to the mains;
- the hose is punctured;
- the compressed air in the cylinder has run out;
- problems with the cylinder, piston or air distribution system.
Fasteners get stuck
Consumables in all models get stuck for common reasons:
- when it does not match in size for the exploited taker;
- the inside of the fasteners or magazine is dirty;
- used consumable with defects, for example, bent.
The staples are not completely driven or, conversely, too deep
Any staple gun will not drive staples, nails, or pins completely if depth control incorrectly set... In such cases, it is sufficient to adjust it correctly. Tame and electrical devices the problem is also often associated with wear of the spring, and in pneumatic ones - with the clamping mechanism or insufficient working pressure.

If the fastener is driven in too deep, the cause may be compressed spring or high pressure compressed air.
Important! When using a pneumatic tool, the compressed air pressure can be increased no more than up to the value specified in the operating instructions.
During the shot, 2 staples fly out
When the stapler knocks out two staples during the shot, the simplest reason the problem is the use of dirty consumable or staples that do not match in size. With pneumatic staples, the problem may be due to a lack of compressed air supply. In electrical and mechanical models, the problem is also often caused by the wear of the striker or deformation of the striker (or its guides).
It also happens that the equipment bends the staples. This is also due to their poor quality or the inadequacy of the consumable in terms of strength to the material of the connected elements.
Algorithm for disassembling the stapler and troubleshooting
To independently repair a broken mechanical stapler for furniture, you will need the following tools:
- screwdrivers;
- vice;
- a file or a small file for metal;
- hammer;
- pliers.
In some cases, you may also need hand saw for metal or a grinder, when repairing power tools - a multimeter and a soldering iron with a soldering kit.
To check the freedom of movement of consumables inside the store, simply open it or pull out the pusher.
Replacing the spring or repair of a worn out striking mechanism perform in the following sequence:
- take out the remaining consumables from the store;
- unscrew the screw that regulates the force of the impact;
- take out the spring;
- disassemble the tool body, for this remove the washers and pull the pins;

- take out the percussion mechanism;
- if the malfunction is associated with the spring, then replace it;
- when the striker is worn out (there is a working out in the striker or at the point of contact with the rocker of the starting lever), it is clamped in a vice and the original shape is given to the parts using a file or file;

- assemble the tool in reverse order, lubricating the impact mechanism.
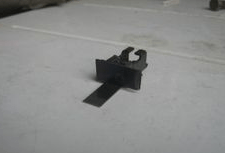
On the striking mechanism, the spring support may also be broken (photo below), and because of this, the staple does not work well. In this case, in order to eliminate the malfunction, you will need weld an emphasis using welding.
Repair activities do not take much time and often do not require financial costs, but they extend the life of the staple gun.
How to disassemble and repair a pneumatic staple gun is shown in the video below.
Disassembly and preventive Maintenance electric model staple is shown in the video below.
To maximize the useful life, it is necessary to store construction stapler under the following conditions:
- the value of the relative humidity of the air does not exceed 70%;
- the temperature must be above +5 degrees Celsius;
- the air of the storage place should not contain vapors of alkalis or acids, as well as dust-abrasive inclusions.
In order to repair the stapler, in many cases, you just need to correctly adjust the depth of shots, adjusting it to a certain material, and also use high-quality, suitable fasteners. When the staple does not work at all, more extensive repairs will be required, often accompanied by replacement of broken or worn parts. When carrying out repair operations, be sure to remember about personal safety: remove the consumables, put the device on a fuse and de-energize the electrical and pneumatic models.
What did you do more recently, when you needed to change the upholstery upholstered furniture or attach glassine to the frame of a house under construction? They took a hammer in one hand, nails in the other, and then long and tediously "baled" over them, and sometimes over the fingers.
Today, few people want to perform such simple operations in an antediluvian way, especially with a large amount of work. After all, for this there is a stapler - a mechanical staple gun of spring action.
Well, if the tool suddenly fails, do not rush to throw it away - the repair can be quite simple.
It is a pleasure to work with a stapler - I loaded a block of staples into the store, put the gun to the right place, pressed the lever - in a moment the material is securely attached to the base. When I needed to insulate attic room country house Izolon (polyethylene foam) 10 mm thick, I could not get enough of it - the stapler made my task so easy. I attached about 70 m 2 of the material to the roof slopes in a matter of hours. However, when there was very little left before the completion of the work, the instrument began to "play the fool" - I press the lever, and instead of the bracket, only the imprint of the drummer plate. I checked the charger - the store is full.
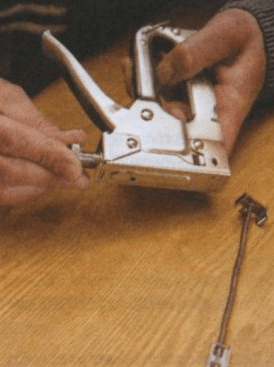
Began to understand what was the matter (photo 1. 6).
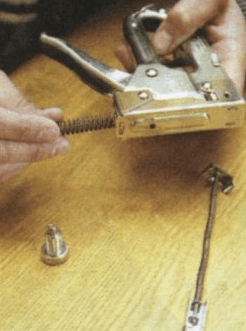
Discharged the magazine, unscrewed the adjusting screw, and then removed the percussion spring. After that, he removed the protective covers of the pistol body, first freeing the pins from the locking split washers, and crept up to the drummer. The cause of the malfunction immediately became clear - a stubborn platform of the drummer's body was developed, which ensures the interaction of the percussion mechanism with the rocker of the trigger.
To make this more clear to those readers who have encountered a similar problem, but have not yet figured out its reasons, I will try to explain in a nutshell the principle of operation of the staple gun (see fig.).
Typical design of a stapler - staple gun
The main actuator of the stapler is the drummer. It is driven by a powerful spring, the compression ratio of which is adjusted by means of a corresponding screw.
Perpendicular shock mechanism there is a charger (magazine) in which the staples are located under the action of the spring. In the inoperative position, they are locked with a "striker" (a plate riveted to the drummer's body).
The interaction of the striker with the charger is provided by a trigger device consisting of a cocking lever, a rocker arm and two return springs.
When you need to drive in a bracket, you push the lever. In this case, the rocker with its "beak" grabs the striker by the protrusion in the body and raises it, compressing the spring until the next bracket is in alignment with the striker. After that, the striker, which is under the action of a compressed spring, breaks off the beak of the rocker arm, which continues to move along the arc, and the “striker” forcibly drives the bracket into the base.
Thus, the main condition correct work pistol - the consistency of the two processes - the supply of staples and the cocking of the striker. The drummer should not come off the rocker ahead of time. If this happens, the pistol “shoots empty”, i.e. the trigger is cocked and triggered, but the striker does not capture the bracket. This is the situation that arises when the thrust platform of the projection of the drummer body is developed.
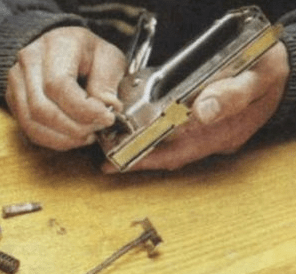
It will take a few minutes to repair this problem. It is enough to clamp the drummer in a vice and, armed with a file, restore the original shape of the protrusion (photo 7).
In the same way, you can increase the resource of the pistol several times - it is enough to repeat such an operation every time, as soon as the pistol starts "firing idle" again. At the same time, you will have to grind (shorten) the striker plate.
So do not rush to part with your instrument - it will still serve if you don’t regret a little time to repair it.


How to adjust a mechanical, manual stapler (staple gun) to finish off the staples?
I have come across two versions of adjustment staplers, both had to be adjusted.
I must say right away that all these instructions did not help much, I had to lime about a dozen staples in order to achieve the best result, and then readjust it every 15-20 strokes in the course of work. Therefore, the adjustment process is a constant action during use.
Another point - one builder advised to relax the spring after work, so that there are no springs on it during storage, this is the reason that before each work it needs to be adjusted.
The adjusting screw is located on top of the stapler; inside, along the entire length, there is a straight spring pressing on the firing pin. If the screw is tightened clockwise, the impact will be stronger and, accordingly, the clip will go deeper. By unscrewing the adjusting screw counterclockwise, the impact is weakened.

In this version, the stapler is made by means of a leaf spring, it is she who presses on the firing pin and regulates the impact force. The adjusting screw is located under the handle. I don’t remember exactly in which direction you need to turn this screw, try it yourself. When you turn it, the plate bends and presses on the firing pin, or the opposite effect occurs.

the system chose this answer as the best
If the stapler (staple gun) does not finish off the staples, then you need to tighten the adjusting stop screw, which will compress the shock spring more and the force during operation will be greater, the adjustment is designed so that the stapler (staple gun) can use smaller staples in length and not damage (damage) surface.
So turn the adjusting screw all the way in and everything will be fine!

But only if the stapler (staple gun) is not designed for the length of the staples and cannot finish them off due to its design features or, to put it bluntly, of significant wear (subsidence of the spring or loosening of the mechanism), then there is nothing to fix, it needs to be thrown into the junk, since one punishment will work for them!
Here is a diagram of a mechanical (hand) stapler.

In order for him to finish off the staples, it is necessary to compress the spring.
The spring is compressed by a screw, which is most often located at the top of the product itself, that is, in an accessible place.
And it is regulated by a simple twist, tighten the screw, the staples are clogged harder, unscrew, the impact is weaker.
It is necessary to regulate based on what material you are working with, you can first practice somewhere on an unnecessary piece.
There may, of course, be its own nuances, one thing, for example, to nail the fabric to wooden frame and another thing is PVC lining.
If you pinch the adjusting bolt, the bracket can pierce the PVC lining through and through (the staples are attached to the lining spike).
If you constantly work with a stapler with one material, then it makes no sense to constantly twist this bolt, set it up and work, you need to replace the staples, we change and do not touch the screw.
If the adjustment is from scratch (new stapler), then we adjust from minimum to maximum, working with the same, but rough material (for example, a piece of the same PVC lining), as soon as visually, the depth of the staple entry suits, and stop the adjustment.
Construction stapler won't shoot staples
People are doing home renovations or woodworking activities using heavy-duty construction staplers to attach pieces of wood and other materials. They can shoot nails and staples when the handle is pressed. When using construction staplers, you must use right size and the number of staples. If the construction stapler does not fire the staples, study it to find out.
The stapler does not fire the staples: instructions
1. Check the number of staples in the stapler if none comes out. Look through the side observation window stapler. Refill the stapler if you don't see any staples inside.
2. Turn the stapler upside down. Press down on the latch. Pull it to open and see how many staples are available.
3. Check the size of the staples to determine if they are suitable for the stapler. Replace with new staples if you are not using the correct size. Place them in the stapler with the pointed ends facing the container.
4. Pull the bracket out if it is stuck in the opening it should exit from. Pry curved and angled staples with the tip of a knife until easy to remove.
Friday, August 8, 2014
How to choose, operate and repair a furniture stapler
Types of furniture staplers
Varieties of staplers according to the type of force applied:

- rechargeable. Convenient in that they are more powerful than mechanical ones and are not needed electrical cable... But the presence of the battery increases the weight and cost. And the battery life is limited by the number of rigging to be hammered;
- with network connection. There is no discharging battery, but there is a cable to carry around. Or connect to an extension cord;
Mechanical staplers are:
- with a coil spring. Has a weak shot. Allows you to work only with soft wood... Gives a tangible return to the hand. Resource up to 12000 shots;
 Coil Spring Stapler
 Spring stapler
- household. These are mechanical and cheap low-power models of electric staplers;
- professional. These include more powerful electric and pneumatic tools.
Types of staplers by type of equipment:
- staples. Used for household work;
- nailing. They are used for professional and household activities. They work with large staples and nails. Tool length over 12 mm;
- universal. Can work with flat and parentheses, nails and hairpins.
For optimal choice stapler you need to solve the following tasks for yourself:
- frequency of use of the tool: every day or from time to time;
- places of use: premises, street. Is there electricity;
- do you need the accuracy of hammering the rig;
- materials you plan to work with.
Select the type of stapler depending on the purpose and working conditions:
- suitable for infrequent work with non-solid materials mechanical stapler;
- if you do not need precision in stapling and you have the opportunity to swing, then consider choosing an impact stapler. It is lightweight. Attaches to the mounting belt;
- for a large amount of work in places where mobility is needed, take a closer look at the cordless tool;
- if you work in a room with an outlet and do not want to overpay for the battery, buy a stapler with a mains connection;
- if you need a stationary powerful device, take a pneumatic tool without hesitation.
What characteristics to look for when choosing a stapler:
- the presence of an impact force regulator. Have mechanical tool two types of regulation: minimum and maximum or smooth adjustment. Electric has up to 6 modes. The setting is done with the program switch. How thinner material, the less the impact force, otherwise dents will form;
- Double punch. Only electric staplers have it. For solid materials large rigs are used that will not clog right away. Mechanism double blow he himself determines it and works a second time. If there is no such mechanism, then you will not immediately see that the nail heads are not completely hammered;
- removing fasteners with a stapler. If there is this function, then to remove a poorly hammered rig you will not have to do it manually or with a nail puller;
- body material. Structural steel staplers weigh more than plastic staplers;
- rubber inserts on the handle. Their presence reduces the recoil of the instrument, and the hand gets tired less;
- battery type:
- nickel cadmium are suitable for low temperatures... But they have a memory effect, so they are quickly discharged. They are used in inexpensive models;
- lithium-ion. They hold the charge for a longer time, but they tolerate mechanical stress worse;
- nickel metal hydride. Lightweight and have a large charge resource;
- number of beats. The operating time of rechargeable staplers depends on this characteristic;
- power of the tool. The number of beats per minute depends on it. With an increase in power, the speed of the device increases;
- type of fasteners. Choose a stapler with fasteners that suit your application.
Choosing staples for a stapler
When buying staples, you need to know which staples fit your stapler. The type of equipment is indicated on the packaging, in the instructions and on the body of the tool. The staples have characteristics that must be considered when choosing:
- form. It can be U-shaped or semicircular. The latter is used for cable installation;
- sharpened. Less effort is required to drive such staples;
- unsharpened. More often jammed and not always hammered to the end;
- height H;
- width L;
- thickness W.
The most common consumable is U-shaped staples marked "Type 53". They have found their application in the hauling of furniture with textile materials and in the combination of wood products, plywood, chipboard and hardboard. Type 140 staples are in second place in terms of demand. They are shorter and thicker. Due to the increased area of contact with the material to be joined, the likelihood of material tearing at the point of attachment to the base is reduced. Therefore, they are convenient when working with delicate details: fabrics, PVC foil, as well as with wood, plywood, chipboard and hardboard. The semicircular staples are of two types.
Types of semicircular staples
How to use a hand stapler to drive staples into plywood? Is there a kick adjustment?
T-34 wrote.
Good advice one in a hundred chatter.There could be only one good advice - to buy the right tool + the right brackets or take it to a furniture repair workshop - there would be with you in 5 minutes and for 100 rubles one seat was made. But you wanted to get out with what you are, without investing either money or labor. That's why they screwed up. Once upon a time, through misunderstanding, I undertook to drill with a cheap drill and a percussion drill in concrete - I also screwed up - a complete analogy with you. Then I discovered that there are hammer drills with drills that drill the same concrete without problems.
T-34 wrote.
I climbed everything - I could not find decent brackets "
Market analysis Kashirskiy Dvor showed that manual mechanical staplers are basically all the same.Reminds me of an anecdote: "No matter how long I go to our pub, I still won't meet a decent girl." What are those cheap staplers on the market for? To nail a polyethylene film to a greenhouse, or a film for vapor barrier during construction, no more.
I think your main problem is that the stapler does not rest on a hard base, the blow is soft and the staple does not enter to the end. From my own experience, I will say that 10 mm. plywood stapler from Center Tool, Bosch, and some Novus are driven in almost the same way. Of about 10 staples, one bends. Now, by the way, I have brackets Bison, Staer, Novus and strong like.
sanya1965 wrote.
super hard staples are suitable for plywood and dense materials.By the way, even the shitty Staer has Super hard staples. Quite good.
T-34 wrote.
I did not understand the adjustment. Either he will hit one up to the ears, then a dozen will stick in a little. Then on a new one, on one driven in - five stuckDid you just try to hammer in one plywood? If so, then just a stapler is worthless.
The furniture stapler is widely used in the household, with its help you can easily nail down the greenhouse film, cover the furniture with fabric, and it will also come in handy in other situations. The variety of models will baffle the uninformed person, so in this article you will find useful tips by choice, how to use it, which brackets are suitable for which models.
Home staplers on sale are presented extensively, the first thing you need to pay attention to is the type of staple. The most popular and commonly used type of staple is type 53. Most models use type 53. This type has the following dimensions: staple width 11.4 mm, thickness - 0.7 mm. Of course, you don't need to know these sizes, you just need to know on which brackets your "pigal" works, their type.
The second is how deep the staples can be driven.
Furniture pistols are simple (staples 4-8 mm deep, inexpensive). Most often made of plastic, intended for infrequent use. Only small staples are used, so they can only nail fabric or paper. Cheap and unpretentious, the price is about 100 rubles. Like these ones.

There are also options 4-10 (staples from 4 to 10 mm inclusive). Such pistols are already made of metal, although there is no adjusting screw. Yes, however, and to nothing, staples of 10 mm can be hammered in without maximum adjustment. Typically type 53 staples are used.
Staplers 4-14 mm (the very first photo in the article). Most popular and best selling. Made of metal, solid, high quality.
Use staples 4-14 mm deep with 53 types. The main difference from others is the presence of an adjusting screw, with which you can increase or decrease the impact force. As a rule, if the bracket is more than 10 mm deep, then the screw must be tightened in the direction of increasing the impact force, otherwise the bracket will not completely enter the tree. A wide range of staple sizes (4,6,8,10,12,14 mm) will allow you to choose optimal depth to get the job done. Of the good models, one can single out the firm "Zubr" - reliable and high-quality, the price is 330 rubles.
Also from household models it is necessary to single out a model with a staple type 140. It is thicker, has dimensions: width 10.6 mm and thickness 1.2 mm. If you load Type 53 staples into a Type 140 stapler, it will shoot 2 staples at once. Therefore, it is so necessary to know the type on which the "pigal" works. Most often, pistols with type 140 support several types of staples, these are small nails and semicircular staples for driving a cable. We can say that it is universal option, which is a pleasure to work with. However, it does not support the most popular type 53 bracket. The Stayer stapler shown in the photo below supports 4 types of staples: type 140, type 300, type 500 and type 36. Its price is 650 rubles. 
Staple type 53
Most used, used in most staplers. 
Rectangular
Staple width 11.4 mm
Thickness 0.7 mm.
Dimensions (depth) 4-14 mm.
Sold in packs of 1000
There are 2 types: hardened (hard) and simple. Hardened are used for sturdy or glued wood (chipboard). Conventional staples are 2 times cheaper, they are designed for soft wood.
Type 140

Powerful, thick staples are also used to attach material to wood, plywood, chipboard.
Rectangular bracket.
Width - 10.6 mm
Thickness - 1.2 mm
Dimensions 4-14 mm
Packs of 1000 pieces.
The cost is higher than 53 types of staples.
Type 36

Semicircular cable fixing brackets.
Bracket width - 7.6 mm (you can pin a cable with a diameter of no more than 6.4 mm)
Thickness - 1.2 mm
Sizes - 10, 12.14 mm
Type 300

Small carnations with a T-shaped head. They are used for fastening to wood, duner, chipboard.
Nail thickness - 1.2 mm
Sizes - 10, 12 and 14 mm.
Type 500
Carnations without a cap (like finishing ones). Generally similar to Type 300, only the cap is missing.
Dimensions - 10.12, 14 mm.
If you are doing furniture production and use the corresponding tool constantly in hard mode, then the usual household models will not last long. Therefore, there are professional options for such purposes. The RAPID tool has proven itself very well. This company specializes in the production of only furniture pistols, so they excellent quality... However, their cost is rather big, for example. A standard pistol for type 53 staples costs 2,200 rubles. However, according to the reviews of buyers who bought a couple of such models from us, they are very strong. Before that, they bought ordinary household appliances, but they often failed. Therefore, it was decided to buy 1 professional for a trial - he survived 10 conventional staplers. As you can see, the difference is huge. For home use the usual inexpensive one, for example, the firm "Zubr", is quite enough.
How to insert staples
For those who have picked up a stapler for the first time, this can be a problem. But after the first time, learn right away, nothing complicated. Here's a photo.

First, take out the "staple pusher" with a spring from the pistol, then insert the staples with the tip down and push them with the "springy piece" all the way until it snaps into place.
Preparing the stapler for work
Pull out the latch located at the back of the stapler.
Insert the staples into the groove. The staples must be inserted with the tips down. (P)
Reinstall the spring gate valve.
The stapler is ready to use.
How to use a stapler
Place the stapler firmly on the surface where you want to drive the staple.
Without lifting the stapler from the surface, press the lever until you hear a characteristic sound. This action will require mechanical effort.
If the staple does not fly out, then it is stuck and you need to get it out by following the 4 steps of preparing the stapler for work.
Ready. The staple is successfully driven.
In order not to be injured by a furniture stapler, it is important to thoroughly understand how to use such a tool. If you are using a mechanical stapler, first adjust screw adjuster... Adjustment must be made on rough material by rotating the knob from minimum to maximum. If the fasteners are not included in the material from the first blow, then you will need to adjust your furniture stapler again, and if it does, then you start working on the "clean copy".
To hammer the staples at the desired distance, it is best to mark such places in advance with a pen or pencil. You can also use a lock, which must maintain the same distance when driving in fasteners without preliminary marking.
Do not forget to also hold the material when making shots, so that the material cannot move out when driving the staple. Do not forget to also monitor the presence of braces so as not to be left without them at the most inopportune moment for you.
Secure the handle with a safety catch when not in use. This is due to safety precautions. In carrying out these simple recommendations, you can easily cope with the upholstery of a sofa or other necessary task related to a furniture stapler, the price always depends on the type of tool and its manufacturer.
Repair of a construction stapler.
The first staplers appeared in France in the 18th century, they were specially invented for King Louis XV. But at that time this device was unique - each staple for it was made by hand, it had a coat of arms. It was possible to make the stapler available to most people only at the beginning of the 20th century in the States.
Types of staplers
In stores that specialize in the sale of office supplies, you can find various devices for binding papers. There are so-called pocket options. This category includes any stationery stapler that can be safely placed in the palm of your hand. The body of such devices is usually made of plastic. They can sew a small number of sheets at a time. Their main advantage is their low price. But it is worth remembering that they are not suitable for intensive work. At active use they will have to find a replacement very soon.
Desktop staplers are most often bought in offices. It is undesirable to use them to fasten papers by weight. The devices are designed to operate on a firm, level surface. At the bottom they usually have a special anti-slip coating that prevents them from moving on the table, even under load.
The large stationery stapler is different even in its own way outward appearance... It is equipped with a special lever, which must be pressed in order to hold the sheets of paper together. The most powerful models are capable of stapling up to 260 sheets at a time. They are often equipped with special tools designed to remove bent staples. Some devices have a special locking bar. It is designed to adjust the bond depth.
Stitching types

Not everyone knows that stationery staplers differ depending on how they hold the sheets together. Most office workers are familiar with conventional options closed type stitching. This stationery stapler folds the edges of the staples inward. This is considered to be the most reliable way to hold paper together. It is also the most common.
There is also open type... In this case, the staples are bent outward. This method is preferable to use in cases where only temporary stitching of sheets is needed. The papers fastened in this way are easy to separate, while the traces are practically invisible.
Sometimes in offices they use a special stationery stapler with straight staples. It is necessary in those situations when it is necessary to attach paper (some kind of announcement or document) to special board with a soft surface. It can be made, for example, from cork.
Important nuances

When purchasing a paper joining device, it is important to consider how actively you will use it. If you plan to use it often, then pay attention to metal options... They are considered more reliable and will last longer. Otherwise, conventional plastic devices will do. The principle of their work is absolutely the same.
It is also important to consider that staplers vary in power. This indicator determines how many sheets your device can hold at one time. By the way, it is also important to choose the right staples for your office stapler. It is advisable to know not only their size, but also the manufacturer. It should be borne in mind that for more powerful devices thick staples are required. Otherwise, they will bend and break when trying to stitch a stack of papers with them.
In addition, you need to know that there are devices that work only when resting on a table or other flat surface... If you try to hold the papers together with such a stapler, the staples will fall out or deform.
Additional options
It seems to many that a stationery stapler is a fairly simple device that cannot be improved in any way. But manufacturers are making it more convenient to use. So, when buying, pay attention to the fact that there is a plastic footboard or rubberized inserts at the bottom. They will protect your desk from scratches.
Another important and convenient addition is the presence of a built-in destepler. This is a special device with which you can quickly unbend the staples. It will come in handy in situations where you need to separate previously bonded sheets. Picking out the staples with scissors, and even more so with nails, is inconvenient, and it looks unsightly.
Principle of operation

If you are serious about choosing a tool for stapling papers, then you will be interested in the device of a stationery stapler. Staples are inserted into a special metal groove. They are moved forward by means of a spring or a special plate.
It should be noted that the second option is considered more practical. This is due to the fact that springs tend to stretch over time, they can slide off the hooks on which they are attached. The plate is capable of providing a smoother operation of the moving tongue. It ensures that the clip of the staples is always fixed at the edge. The push tab can be made of metal or plastic. In the first case, it will be more reliable.
Loading the stapler

In internal mechanism staples are inserted, which, when pressed sharply on the device, shoot and fasten the sheets. When the clip runs out, it just needs to be replaced with a new one.
If you have a full load model of the stapler, then you need to insert 1 new plate of clenched staples into it. But there are other options - they put ½ of the clip. The usual pocket and office options are easy to figure out. To change a plate of staples, you do not need to look for what the scheme of a clerical stapler looks like. Simply lift the top cover and insert the sleeve into the groove.
There are special models with front loading... They have a button on the case, by pressing which you release the spring of the mechanism. At the same time, the chute moves forward.
It's a little more difficult to deal with professional devices. Some of them can even load 7 types of staples. At the same time, users have the ability to adjust the depth of attachment.
Repair of devices

If you had a regular pocket or small desktop stapler, it is best to buy a new one if it breaks down. But there are some problems that everyone can fix on their own.
First of all, it is necessary to remove the body and remove the clip from the chute. This way you can see that there are staples stuck on the way out of it, which interfere with its normal functioning. This is usually the main cause of the breakdown.
Any jammed staples must be removed for the stapler to function properly. This can be done with tweezers or a thin screwdriver. The main thing is not to damage the chute itself, the spring and the pusher. After that, you can remember how to assemble a stationery stapler. It is necessary to insert the spring into place, if you removed it, install the case and press down upper part to the bottom so that they lock into place.
I met two versions of the adjustment staplers, both had to be adjusted ...
I must say right away that all these instructions did not help much, I had to lime about a dozen staples in order to achieve the best result, and then readjust it every 15-20 strokes in the course of work. Therefore, the adjustment process is a constant action during use.
Another point - one builder advised to relax the spring after work, so that there are no springs on it during storage, this is the reason that before each work it needs to be adjusted.
Option 1
The adjusting screw is located on top of the stapler; inside, along the entire length, there is a straight spring pressing on the firing pin. If the screw is tightened clockwise, the impact will be stronger and, accordingly, the clip will go deeper. By unscrewing the adjusting screw counterclockwise, the impact is weakened.
Option 2
In this version, the stapler is made by means of a leaf spring, it is she who presses on the firing pin and regulates the impact force. The adjusting screw is located under the handle. I don’t remember exactly in which direction you need to turn this screw, try it yourself. When you turn it, the plate bends and presses on the firing pin, or the opposite effect occurs.