So, all you need to prepare it acute knife, isolate, unnecessary USB cord and, in fact, the executive body of the self-class. As for the latter, it is customary to use one of two options: the old cooler from the computer is either a motor from the machine. Next, we will consider two instructions that are intelligible to explain how to make USB fan At home, your own hands!
Idea number 1 - We use cooler
In order to assemble a USB fan from a cooler, usually not more than 15 minutes. First you need to prepare a cooler. Two wires come from the device - black and red. Clean the insulation by 10 mm and postpone the prepared element aside.
Next, you need to prepare USB wire. Cut one half of it and in the location of the cut is insulated. Under it, you will see four contacts from which two are necessary: \u200b\u200bred and black. They are also cleaned, while the remaining two (as a rule, green and white) is better to cut, so as not to be disturbed at hand. 
Now, as you understand, it is necessary to pairwise connect the prepared contacts, according to: Red with red, black with black. After that, it is necessary to carefully insulate the location of the cable connection and make a stand. As for the stand, there is already the case of your imagination. Some successfully apply the wire, some very interestingly cut the landing socket in a cardboard box.

In the end, a homemade mini fan connects to a computer, and you can enjoy the work of your own electrical appliance.
Idea with cooler
Idea number 2 - We use the Motor
In order to make a USB fan from a motor and a CD disc, it will take a little longer, but still in an hour you can easily make such an electrical appliance with your own hands. 
First you prepare all the elements of the device. In this case, you will also need an impeller (blades) too. 
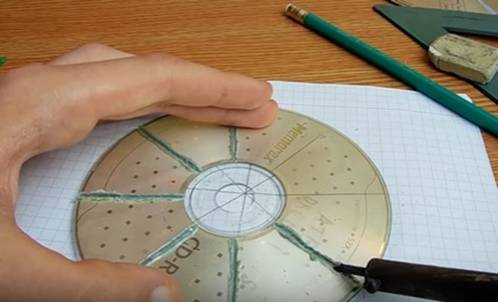
To make the impeller, we recommend using an ordinary CD. Cutting it on 8 equal parts and gently cut through the center. Next, hear the disk (you can lighter), and when the plastic becomes more elastic, wound up the blades (as shown in the photo).
If the impeller does not exit, the air flow will not be created during the rotation of the disk. Here you need to feel the measure to and not overdo it too.
When the blades are ready, go to the creation of the main mechanism. We recommend inserting inside the disk plastic corkwhere it is necessary to make a hole under the barrel of the motor. Carefully fix the core and go to the creation of a USB fan support for a laptop. 
Here, as in the previous version, it all depends on your fantasy. Of all the remedies, the option with the most suitable wire. When homemade USB The fan will be ready, connect the wires of the motor to the cord wires, carefully insulated the twist and go to testing work.

Visual video instructions:
Idea with disk
Idea with CD №2
As you see, in order to make a fan from a cooler or a motor from the machine, it takes not so much time and skills in working with electrical appliances. Even a novice can cope with such a task!
August 6, 2018
Sitting at the computer in summer time Many people begin to choke from the heat, well, if there is air conditioning, but after all, it is not always convenient to include it. In this article we will tell you how to make a USB fan with your own hands, from the motor, cooler and a small engine. Let us show the manufacturing process and step-by-step instructions, select the two most simple and efficient ways. 
Make a fan using a computer cooler
To make a fan at home and not strain at all, we found this way on the network. It will take no more than 20 minutes to make the entire manufacturing process, you can use old coolers or just buy a new one, the price of them is now kopeck.
First, begin to prepare the cooler, it has two wires: red and black. With each wire, removal isolation by 10 mm, there is even a device for removing isolation. The size of the cooler does not play a special role, of course, better if he is big size, the wind stream will eventually get stronger. 
We begin the preparation of Yusb wires, for this cut off one half at the site of the main cut and remove all the insulation. We will have four wires: two black and two red, they are also cleaned. If there are other green wires on the cooler or white color Cut them, they only interfere. Learn how to make a thermoelectric generator with your own hands.
Ultimately need to connect wires among themselves, there may be several ways, the main thing is remember color marking. Do not forget to isolate everything, the more isolation, the better. For convenience, the finished cooler can be installed in the usual box of their shoes, so it will be more stable. 
So we are offered to make a fan from the cooler guys in the video. The method is actually a simple, strong blowing we do not promise, but it will be much more pleasant to work at the computer.
How to make a USB fan with your own hands using a motor
So, to make a fan from a disk motor and USB we will need more time, but the fan of this type will look better. Each person can make such a device, the main thing to show a little desire and patience. 
First of all, we must make a blade for our fan, we recommend using the usual CD disc, it looks great, and make it quite simple. Also read an interesting article where we make a laser level.
- On the disk we do 8 identical marks, and cut everything on them.

- Then heat the disk and wipe all the blades in the right direction. To warm up the disk enough to use the usual lighter, the blades bent carefully, do something wrong - you have to buy a new disk.

- Now we go to the base of the fan itself, it is best to take the cardboard and bend it into three parts, or a cardboard base, for example, the food film is wrapped up.

- To the disc glue special fastening.
- The base of the case is making more stable, you can attach a regular disk.
- I hide all the wires, one withdraw (for connecting to the network).

- Fresh a motor into a paper tube and immediately brapping it to the base.

- Fresh blade to the engine.

- Now connect the wires from the motor with the Yusb cable, as described above.
- This is the result as a result, if desired, the cardboard base can be painted or somehow decorate.

Here are the guys with a video show really cool way. You can make a similar way from paper, but remember, the paper should be thick, optimally use the cardboard.
Yusb Cooler is the most ordinary fan, however, smaller that connects to the corresponding computer connector. You can purchase already ready device Or make it with your own hands, which is simple enough, most importantly, to clearly follow the instructions.
How to make a fan
It is worth noting that this kind of technique is not considered particularly powerful, however, practice and numerous positive feedback are convinced in the opposite. Like any other device, such a fan has certain advantages and cons.
The main advantages include what:
- It is compact;
- Multifunctional:
- It is easy to use;
- Can be made yourself.
Among the main types of such fans you can find desktop and compact models. Desktop options Well coped with their main task and can cool the parts of the computer qualitatively even subject to long use. Mini fans YUSB are characterized by their compact sizes. Their design can be completely any, but in power they are somewhat inferior to desktop models. Compact options We are intended only for easy cooling machinery, and desktop models are designed for high-quality cooling of the room and space near the computer.

The disadvantages of such a type of technology are completely a bit, however, if a person does not even have the slightest idea of \u200b\u200bthe work of technology and electronics, he does not even need to try to make a fan at home.
In addition, it is worth considering the fact that mini-models cannot adjust the direction of the air flow, and to solve this problem, it will have to make enough effort. Working at the computer in the summer, many people suffer from severe heat, even if there is air conditioning, as it is not always convenient to include it.
To solve this problem, you can do small fan of:
- Cooler;
- Motor;
- Small engine.
The homemade fan can also be connected to the machine using the YUSB cable. Such homemakes can be very useful and make them quite possible from unnecessary parts.
Initially, you need to take the old cooler and prepare it. It has two wires: black and red. From each wire you need to remove the insulation by about 10 mm.
Important! The larger the size of the cooler, the greater the wind stream will turn out as a result.
You also need to prepare the USB wire, shining insulation on it. As a result, it should turn out 2 red and black wires. Then combine these wires with each other, taking into account the color marking. Everything is good to exhibit. It is worth remembering that the more isolation, the better. Then attach to the resulting device additional elementsthat will act as a means for greater cooling or just decor. For convenience, you can install the finished cooler in the box from under the shoes so that it is more stable, and connect the wire to the computer. You can also make a fan using a motor from a toy or engine as the base. This will allow to achieve a better cooling of the room.
There are many options independent manufacture Fan, which will work in no worse than the purchase product.
Homemade fan can be made of:
- Disk;
- Thick paper;
- Plastic bottle.
Very easy to make a small fan from ordinary computer discs. It can be used to cool the computer or laptop, as well as a user who works much time with appliances.
To do this, it is initially necessary to prepare such materials as:
- CD discs;
- Motor;
- Cork from under wine;
- USB wire with plug;
- Cardboard.
Motor can be taken from the old toy, for example, the machine. The assembly process is quite simple. To do this, take one disk and with the help of a marker to divide it into 8 identical parts. Then spend on these lines a soldering iron from a transparent part to the edge and cutting the knife heated on the stove.
Above the flame of a burning candle, a slightly heat the surface of the disk so that you can turn the blade slightly. Insert into the hole wine plug, fix and process edges with thermoclaim.
Attach the Wire of Yusb to the Motor. From the cardboard to make the tube to which to glue the motor, as well as another whole disk that will play the role of the stand. When everything is ready, attach the propeller on the engine shaft and fan rod. Secure it with thermoclarage. Despite the fact that the process of its manufacture is quite a long time, however, the result will definitely please. The blades of the disk will rotate, as a result of which you can get good cooling. If necessary, you can install a mini flash drive and attach the clock. You can also make a fan on the battery or power to connect it by attaching the generator. It all depends on their own preferences and knowledge in the technique and electronics. Such crafts simply simply embody into reality, the most important thing is to do everything step by step and clearly follow the instructions.
Simple fan do it yourself
You can make an independently fair original and stylish ceiling paper fan. This boxless model is somewhat similar to his view of the snail, which attracts buyers to itself. At the same time, it works very well and can be easily done independently. The principle of operation of such a fan is quite simple, since at the base of the device there is a small turbine that helps create air flows passing through the side openings.
To create such a device will be required:
- Cooler from the computer;
- Old case Computer with power and yusb connector;
- Switch;
- Dense paper;
- Thermopystole glue.
Initially, you need to make the base of the device. This uses a dense cardboard or paper. Parameters must be taken into account, based on the size of the cooler. In the case, build a switch and power connector.

Then cut two circles from paper, which will act as the main part of the fan. To attach them to the body of the product. Collect the device, fastening all parts by a thermoclaim so that the cooler is located in the central part of the case. Wires remove into the angle of construction. Then attach the switch and make a trial connection to the network. If everything works, you need to attach to the part of the part, cut out of paper so that the device becomes safe. Thus, the impeller will be inside the device itself, which is completely safe during its operation. In addition, in almost the same way, you can make an exhaust, however, it is worth using a powerful working compressor.
Ways: How to connect a cooler to usb
It is enough just to connect the cooler to the YUSB and for this you absolutely do not need to have specific knowledge and skills.
This will require:
- Computer cooler;
- Wire with USB;
- Insulating tape.
Initially, you need to thoroughly clean the wires on the cooler and the USB cable of about 1 cm each. Connect them between themselves in colors and if there is a soldering iron, then it is best to secure. Then you need to wind the isolate so that it is necessary to completely isolate the wires, since otherwise the USB port can burn when the contacts are closed. After that, check the cooler performance. Just a few minutes you can get a very good cooling agent.
How to make a fan with your own hands (video)
Make the fan will not be completely difficult. The most important thing is to correctly pick up materials and components, as well as step by step to perform all actions.
All the long winter we are looking forward to pleasant summer days, and with the onset of hot pores for some reason begin to dream about coolness. How delightfully helps to restore strength and relieve a light breeze from fatigue, created by a small homemade fan. In addition, its production is incredible interesting activity, right?
We invite you to familiarize yourself with step by step instructions By assembling simplest effective devices Of the literally retractable source materials. In the article presented to your attention, it is described in detail how to make a fan with your own hands and that it will be necessary for this to make a home master.
At your disposal detailed description Manufacturing options whose action is tested in practice. You can make such devices: you can, without having any experience at all. For full perception of information attached step-by-step photos and video instructions.
The most simple fan can be made of CDs. It can be used, for example, for local exposure to a user who for a long time Holds at the computer.
Prepare source materials To perform work:
- CD discs - 2 pcs.;
- low-power motor;
- cork from the bottle of wine;
- wire with a USB plug;
- tube or a rectangle of dense cardboard;
- soldering iron;
- candle or lighter, thermoclay;
- pencil, line, paper in a cell.
For our purposes, you can use the Motor from the old toy, for example, from the machine. As a cardboard tube, a slightly refined decorative finishing paper sleeve from roll toilet paper.
The main advantage of this model is that all materials that are necessary for its manufacture will have almost any amateur to do everything with their own hands.
The process of assembling mini fan is quite simple.
Take one of the CDs of the disks and with the help of the marker we divide its surface to eight identical sections. Make it the easiest way, using a sheet of paper into a cell.
Feature the cross from the horizontal and vertical line on it. Each of the four times in this way of direct corners divide in half. Using cells, make it quite easy.

Using a very simple method using a leaflet into a cell, we can achieve the perfect disc mark on eight equal sectors.
We impose on our drawing disk so that the intersecting lines are in the very center of its opening. Alternately applying the line to the lines divergent from the center, we make the markup on the disk. So the sections will turn out the same.
To split the disk on the blade, it follows on the lines of markup to spend the soldering iron from the transparent part to the edge.
For cutting, it is possible to use scissors, but there is a danger that in the process of work the billet will crack. If there is no soldering iron, you need to use the knife, previously heated on the stove. When working with a soldering iron, a filth plastic is formed along the edges of the cut, which is easily removed by the knife.

Cutting disk using a soldering iron is the most effective methodin which the workpiece does not crack and is not deformed, and the remains of the weld plastic can be easily removed with a knife
Over the flame of a burning candle heats the surface of the disk so that you can slightly deploy the blades. If there are no candles, a lighter is suitable or soldering hair dryer.
It follows the central part of the disk, and all the blades turn in one direction. In the hole of the disk placed a wine cork. To better fix it, you need the edges of the hole to be treated with thermoclaim.
The USB wire must be connected to the motor. If we do not guess with the direction of rotation of the propeller, it will be possible to change the reasons for some places, that is, change polarity.
The motor must be glued to the cardboard tube, and the tube itself - to the second CD disc, which will play the role of the base of the stand.

When the plug is installed in the hole, the stand from the second CD of the disk and the cardboard tube, as well as the plug-in already collected, it is very important to properly put the propeller on the motor shaft
Now the propeller needs to "plant" on the rod of the future fan. We will try to make it so that it is installed strictly in the center. Consign it in this position with the help of a thermoclaus.
After completing all the works, the fan is ready for use.

Although the construction of this device does not take you a lot of time, but the result of the work performed will undoubtedly please you
How to make a similar, but a little more complex designBy including a regulator in the circuit, look at the video posted at the end of this article.
Does this instruction for the manufacture of homemade seems complicated? Then you may be interested in information about and the rules of their choice to purchase a finished device offered by household appliances manufacturers.
Plastic bottle-based fan
What do not make our craftsmen from plastic bottles! It is time to say that the fan of them is also very good. Perhaps he does not fight all your room, but someone who is forced to work at the computer will help for sure.
We offer two options for creating such a fan model.
Option # 1 - model of hard plastic
To fulfill work, we will need:
- plastic bottle with a capacity of 1.5 liters;
- motor from the old toy;
- small switch;
- duracell battery;
- marker;
- scissors;
- candle;
- hammer and nail;
- styrofoam;
- thermoclaid gun.
So, take an ordinary plastic bottle of 1.5 liters with a plug. At the level of the label line cut it off top. It is for us that we will need to manufacture a propeller. We divide the surface of a plastic blank for six parts.
We try to place it so that we have equal sectors: the quality of the future device depends on this.
Cut the blank on the markup almost to the neck. Filing the blade of the future propeller and cut off every second of them. We have a blank with three stras equidistant from each other. The edges of each of the blades must be rounded. We do it carefully.

To remove those parts of the blades that are closer to the billet neck, it is better to use a household knife; Do not forget to round the edges of the blades
Now we need a small candle. We light it. Heat on it every blade at the base to turn it in the direction you need. All blades must be rotated in one direction. We remove the cover from the workpiece and in its very center they pierce the hole with the help of a nail and hammer.
Place the plug on the rod of a small motor. Such motors can remain from old children's toys. As a rule, it is not difficult to get them. Fix the plug with glue.
Now you need to do the base on which the motor will hold. For this purpose, take, for example, a piece of foam. I fix the rectangle on it, which can also be cut out of foam packaging.
On the upper surface of this rectangle, our engine will be recorded, to which the propeller is attached. To do this, in the foam you need to make a recess corresponding to the parameters of the motor.
To fix the items of the product use thermoclauses. In the case of its absence, other adhesive compositions can be used. It is important that the fastening itself is as reliable as possible.


We made items designed to enhance the air flow. They will provide an accelerated cooling of the space around.
Now you need to make the basis for fixing them:
Gallery of images


After preparing a device designed to strengthen the fan performance, proceed to the assembly and commissioning:
Gallery of images


Stylish product without blades
We are accustomed to the fact that the main part of the fan is a propeller. This design detail rotates, creating the necessary air flow.
But exist. They firmly entered the fashion, first of all, due to their safety for the younger family members and for domestic pets. In addition, these products stylishly look: they are able to enter in any interior and decorate it.

Ready silent fan not at all like the device that we used to see, nevertheless, it works fine
Like most other things consisting of a person in a person, a blindfold can also be made with their own hands.
The principle of his work is simple: at the base of the device there is a small turbine, which allows you to create air flows passing through the side openings.
To work, we will need:
- cooler from the computer;
- block and power connector;
- small switch;
- thermoclaysheaver pistol;
- cardboard or tight paper;
- scissors, pencil, line, circulat and calipers.
In principle, we need a caliper crystal in order not to make a mistake in the size of the product. If it is not available, it is quite possible to do by a conventional ruler, tape measure or a centimeter ribbon.
Getting to work.
To begin with, make the body - the base of the product. To do this cut four rectangular pieces of cardboard. To determine the base parameters, measured the width of the cooler. The resulting size will match the rectangle width.
For convenience, we will operate with specific sizes. The width of our cooler is 120 mm. And this means that the width of the rectangle is also 120 mm.
A small switch and power connector will be built into the housing of our product. So that they continue to keep tight enough, you need to remove the dimensions from them.
Holes in the case must match the values \u200b\u200bobtained. It is necessary to make holes until the moment when the rectangles become part of the case: cut them in flat objects is always easier.
We need a twelmanic power supply unit and the corresponding cooler, which consumes only 0.25a. Taking into account the fact that we have a block on 2a, we can assume that we are quite well prepared for the further operation of the future instrument.
Now we take the sheets of cardboard, of which we have to cut the elements of the main part of the fan. First draw two circles. The radius of each of them is 15 cm. Cut with both circles.
In one of them, we call it a, we draw an inner circle with a radius of 11 cm. In the second, which we call b, the radius of the inner circle will be 12 cm. Gently cut out the internal circles. Received rings A and B.
The resulting rings will be attached to the body of the product. In order for them to be better adjacent to the surface of the housing, we will make one of the rectangular blanks to each of the rings and cut the segment, the flat side of which corresponds to the width of the rectangle.

So that you can securely glue the rings to the base to which they will be installed, you need to provide the maximum contact area: for this, the sector is cut into the lower part of the product
The main part of the superbat fan has a cylindrical shape. To make it, we need strips from cardboard with next parameters: The first - 12x74cm, the second - 12x82cm, the third -15x86cm. In the assembly process, it will become clear what to do with each of these three strips.
Before collecting the housing, in the lower part of each of the rectangles cut out the recess. So we not only make legs for the future fan, but also create channels for incoming air.

Receptions at the bottom of the base can be made of rectangular shape, but it is better to add an arc to the original rectangle, drawing it out using a CD disk
Corps we will collect using thermocons. The cooler should be approximately in the central part of the case surrounded by four rectangles forming the walls of the structure. Lubricate the cooler glue around the perimeter and surround it with the walls.
Do not forget that recesses in the walls that we have just cut out should be at the bottom of the case.
The wires from the cooler can be removed into the angle of construction, consolidating them in this position with glue.
At this stage, it is best to mount and connect. As we use the switch, we need to divide one of the wires and form a chain.
Wires should be connected to the power connector (red - plus, black - minus). If we are mistaken in polarity, you just need to change the wires in some places. With the help of a thermoclaus, fix the connector and switch on places intended for them.
We connect the power and check whether the turbine works. If everything is in order, continue the assembly of our superbate model.
Take the ring A, which will be located in the front of the device, and the first strip (12x74cm). We clicze the strip in the circle and glue it into the inner circle of the ring A. It turned out the likeness of a cylinder hats without top, but with fields. The same must be done with the ring b and the second strip (12x82cm).

Here is such a semblance of a hat from the ring A and the first strip, which we pasted on the inner circle of the ring
We glue the first "cylinder" to the front side of the case the place where we cut off the segment. The second "cylinder" also glue to the back of the body cut surface. At the same time, the smaller "cylinder" turns out inside more.
The stability of the design can be given using five strength partitions fixed between rings with the help of all the same glue. They need to be cut out of cardboard. The length of the partition should be slightly less than 12 cm.
Now side surface The main design should close the remaining third cardboard strip (15x86cm).

This photo is clear enough. interior design Fan, which will be hidden from us last (third) stripe
In principle, the fan is ready. It remains to give him an external gloss. To do this, remove the extra glue and cover the paint or salary decorative paper Its external surfaces.
You can also come in handy information about outlined in another article.
So that you can make sure how much everything understood and did, look at the video dedicated to the independent creation of a boxless fan, which we placed at the end of this article.
If you are interested in assembling interesting and useful devices, then you may be interested in the production of air conditioner at home, considered in another article
The green plastic fan, which is devoted to the video, not only working efficiently, but also looks great.
It will become a real desktop decoration of your workplace:
A feature of a superbat fan that you can easily collect, following instructions and videos, is that the air flow appears, as if from nowhere. The model attracts with its originality.
Spend a little time on her decorative decorationAnd you will see how flawlessly it will fit into your interior:
We presented to you the best of self-made fans models. And the best because they do not need special mechanisms for their construction, complex tools, expensive materials and special skills. They can create absolutely any house masterEven newcomer.
We hope that the success you will definitely achieve, making a fan, will awaken your taste for independent creativity.
Do you use a homemade fan made of girlfriend? Or did you take advantage of the assembly of the device of one of the instructions given in our article? Maybe you have improved the existing technique? We tell us about your experience - leave your comments.
Periodically, the need for a kind of fan occurs, but small models are relatively many. Do not hurry to get up, because a small fan can be safely done own hands. In efficiency, it is not inferior to purchased counterparts, and it will be necessary for its creation. minimal amount Materials.
Creating a fan from a cooler
The most simplest way to make a fan will make an unnecessary cooler (such are used in the computer as a cooling system of components).
It is not surprising that this method is the easiest, because the cooler is a small fan. It remains only to make several simple stepsTo give it the final form and efficiency.
The cooler itself is fully operational, but you need to prepare it non-standard method Use:
- Wires.
If the fan is located next to the computer, the usual unnecessary USB wire is suitable. It must be trimmed and remove the insulation (the same with the wires of the cooler):

We are only interested in two wires: red (plus) and black (minus). If there are other colors in the cooler or USB cord, we boldly cut them off and insulated, since they are absolutely not needed and will only interfere.
- Compound.
After cleaning, the wires need to be combined with each other (it is enough to twist them with each other). Do not confuse colors. It threatens serious complications in the process of creating a fan.
For twisting, 10 mm length is enough. If necessary, it is possible to clean most Wires, it is not scary, however, it will have much more to isolate.
- Safety.
remember, that proper insulation - The key to success and the guarantee that the computer or the outlet does not burst. It is necessary to glue the bare wires with a tape (exclusively in the absence of nutrition), and the thicker it will be, the better.
There is no particular sense to explain than it threatens the fall of "minus" to "plus". If the red and black wires come into contact during electricity transmission, not only the USB wire / port, but also components of the computer can burn.
In principle, computers are not afraid of such moments, if they are equipped with protection against voltage drops. But when the socket is used in the wall, then repair the wiring in the apartment will be much more complicated to create a small fan.
Therefore, seriously take care of the insulation of the cereal parts of the wires. Extra complexity is rarely needed.
- Latest strokes.
Do not forget that the computer cooler is very easy, but at the same time very fast. Even at a voltage of 5 volts, the speed of its revolutions will be quite high. This voltage we consider no reason: the cooler will be perfectly cope with its task, and the work will be as silent as possible.
Because of the insignificant dimensions of the device from oscillations and vibration, it can fall. To allow for this not worth such reasons:
- there is no way to cause lethal cuts such a cooler even during work, but there is no guarantee that the device does not jump and will not fly away, for example, in the face;
- having not fallen onto a flat surface (on a pencil, pen, lighter) its blades may be damaged: fragments that broke down at such a velocity can cause irreparable damage;
- other unforeseen circumstances.

Therefore, it is important to fix the cooler (tape, glue) on some more stable surface: a box, wooden barber, table.
- Additional functions.
Optionally, a ready-made fan can be updated externally, add a switch (so as not to pull out the cord each time), etc. It is worth the way that the method relatively well increasing the efficiency of the device is.
Just just cut up the top plastic bottle And glue it (a wide hole) to the frame of the cooler. Thus, the air flow will be more accurate and directed: the power of air movement will become stronger by about 20%, which is a fairly good indicator.
On this, the creation of the fan is completed, and it is ready for full work.
Fan from disk
If the previous version does not suit you, and I want something more difficult, then consider independent creation Fan from computer discs:
- Engine.
T. K. We do not use the cooler, you need to get a motor that leads the blades of our future device in motion. In fact, you can use the motor of the already mentioned cooler of the cooling system, but it is too simple.
You should find or buy a motor with a moving defined part (for example, a sticking iron rod). Once we make a fan from the disks, then the presence of such a rod will be best option. Motors from the old video recorder or player are also perfect, because they spin discs and cassettes - what is needed for a knife propeller in our fan.
Do not use the engine from washing machine Or even the past fan - they are extremely strong. In terms of self-harvesting, it will be very harp. A strong motor in the first seconds will split fragments of the blades on the room and flies from the base.
In the presence of a working motor, it must be copped with wires on the previously mentioned form.
Having an engine on the hands, you need to concentrate on the disks that are the main components of our fan. First of all, cut one on 8 equal parts:
In order not to be mistaken during the procedure, you can pre-mark the disk with a pencil. It is best to use a soldering iron (there will be no sharp edge, so safer), but conventional scissors are suitable.
After the disk, he should be slightly heated with a lighter so that the material becomes militant, and to bring the wings on the manner of the blades, like the conventional fans:

Exactly so you can go and with the usual plastic bottle:

In the center of our propeller you need to shove a wooden tube from the bottle. If the size is large - it can be overtaken.
- Other parts.
As a center holding the entire design, you can use the usual toilet roll sleeve:

It should be fixed in the center of the second disk, which will be the foundation for the fan. From above, you can arrange half the second sleeve, as you can see in the photo so that the motor inside it is. On it and you need to hang blades from the disk / bottle.
The fan is ready to work. Optionally, you can add decor elements so that the device looks presentable.
And see clearly how such a fan makes from the bottle, you can in this video.
Additionally, it should be reminded of extremely important moments while creating homemade fan:
- To fasten the parts with each other you need to use high-quality "superciles".
It is the same, to rejuvenate which will not work even if desired. The whole design should be maximum sustainable and not to succumb to vibrations and vibrations. Delivered with responsibility and fill with glue all that you will see except the blades and inner parts of the engine.
- Do not hurry.
You risk skipping important detailAnd this significantly increases the chances that during the work of the finished fan something will go wrong. The consequences can be very serious.
- Do not use bad components.
If the motor that is used to create the engine, you do not need - it is possible its performance in doubt. Make sure it will still serve some time and will be effective.
Creating an engine from scratch is a very highly specialized process and requires good knowledge. Take care so that the motherboard boards are in order, all necessary compounds They were rude well, etc. It is better to check more than once again than to do another fan.
- Insulation.
Once again we remind: Do not forget about the high-quality winding of the wires with a tape. It is not worth saving it, because short circuits and their repair will be forced to sacrifice large spending. Perhaps even in a monetary sense.
The personnel fan is quite compact, efficient and well copes with its task. It is not difficult to make it if the procedure is responsible and follow the instructions. There are no restrictions and on dimensions: if you feel strength, boldly start assembling the larger fan.
In contact with