The imagination of folk craftsmen knows no boundaries, the results of needlework amaze the imagination with a variety of forms and methods. Recently, there has been a tendency to make crafts from plastic covers, since there is always enough material at hand. Consider the most popular uses and schemes for plastic bottle caps.
Children's crafts
Even children can create interesting crafts from plastic bottle caps. The simplest option is original magnets.
For work, you need to take care of the availability of the following materials:
- multi-colored plugs;
- small magnets that can be found in handicraft departments;
- double-sided tape or glue;
- colored paper;
- alcohol;
- felt-tip pens, pencils and paints.
Alphabet
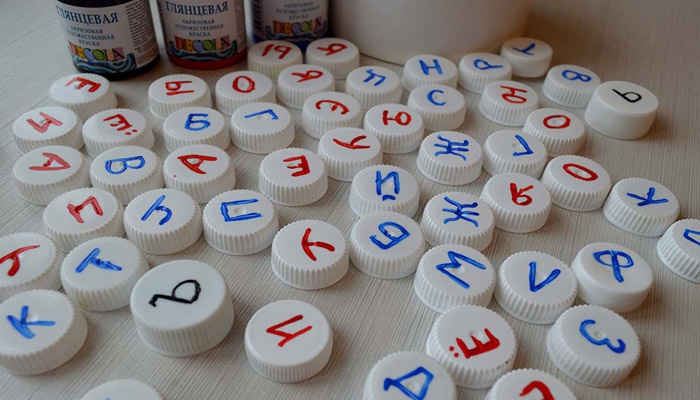
Crafts in the form of an alphabet set based on plastic caps will be a useful tool when teaching children the alphabet. Basic manufacturing steps:
- The bottle cap is degreased with alcohol.
- The magnet is fixed to the plastic stopper with tape or glue.
- Circles with a diameter corresponding to the size of the lid are cut out of colored paper.
- Letters are written on the blanks.
- The parts are glued to the inside of the cover.
Advice! The craft is very convenient to use on a magnetic board.
In a similar way, a craft is created in the form of an arithmetic set.

Aquarium
An aquarium made of fish based on plastic covers looks original. Depending on the child's age, parental assistance may also be required. The process of creating an attractive craft involves the following steps:
- Small colored paper triangles will serve as tails.
- They are randomly glued onto a sheet of blue cardboard.
- The tails are supplemented with plastic plugs, which are fixed with glue or double-sided tape.
- The eyes of the fish are designed in various ways: they glue plastic blanks, draw with a marker, or cut out and glue parts made of colored paper.
- A variety of algae are based on green paper.
- Bubbles with a stroke will add more realism to the aquarium craft.
At the final stage, the craft can be supplemented with an applique in the form of a fairytale castle or sea stones.

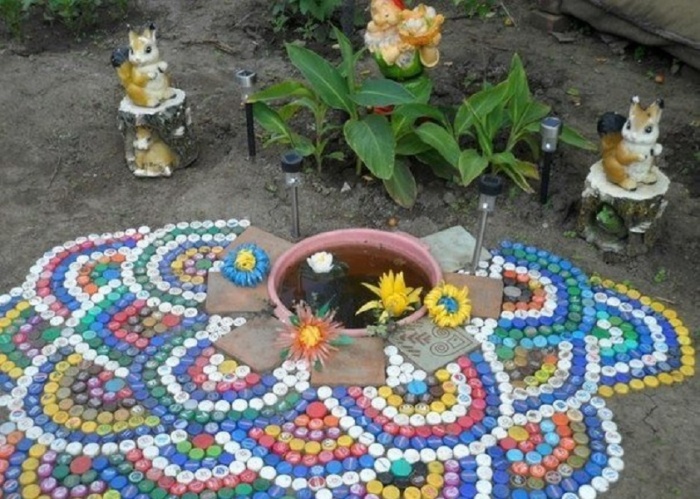
Mosaic
The mosaic made of plastic bottle caps is another version of the original craft. An obstacle can be the need for a large number of traffic jams, so friends and neighbors are often involved in the collection. There are several options for making crafts in the form of a mosaic, the main difference lies in the surface on which it will be located.
Independent unit
This type of craft made from bottle caps is rare. The design principle is quite simple. Initially, a sketch of the future craft is created on a sheet of cardboard, drawing all the multi-colored elements. Based on the sketch, the plugs are held together with plastic glue.
Comment! Mosaic designs are chosen to be simple, without a lot of ornate details.
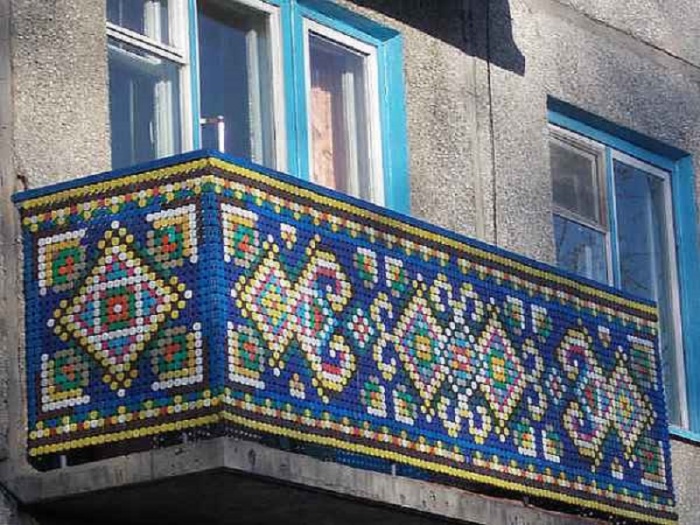
Pictures on houses and fences
Much more often, mosaic decorated with covers are found on wooden fences. There are several options for creating. As in the previous case, you should worry in advance about the presence of a sketch with drawn color markings. An excellent assistant in this matter can be blanks for cross stitching.
The first way is to glue the plastic bottle caps onto the plywood in accordance with the selected image. Then the whole part is fixed on the fence or wall of a wooden house.
The second method - holes are initially prepared on all plastic covers. This work is quite laborious, it is better to perform it with a red-hot awl. Then the plugs are strung in rows on the wire. When all the elements are assembled, each row is fixed on the wall or fence with studs. Vivid examples of paintings from bottle corks are presented in the photo:
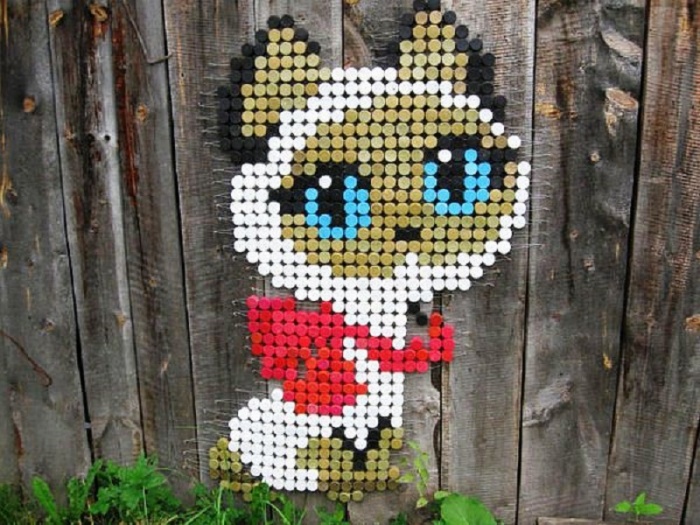
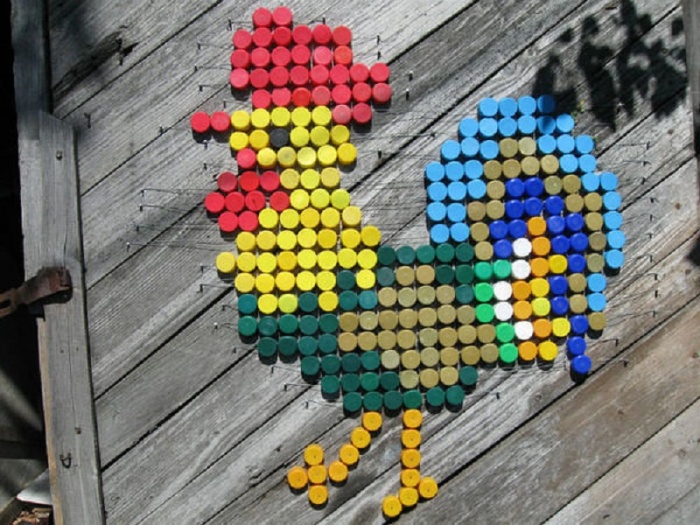
Another popular way to make mosaic-shaped crafts is to attach plastic covers to a wooden surface with nails. Naturally, the presence of a pre-drawn image is necessary. Nails are selected with a small head along the length corresponding to the thickness of the wooden base. You can nail bottle caps from the inside and outside.
Comment! The second option is preferable, since fastening from the inside causes a lot of inconvenience at the stage of fixation. In the future, the lids quickly become clogged, and the craft loses its original attractive appearance.

A concrete or brick wall requires a different approach when creating a craft in the form of a picture based on plastic bottle caps. Here you will need a special solution designed for laying ceramic tiles. In order to save money, you can independently prepare a cement mixture. Bottle caps are fixed gradually, treating a small section of the wall with a solution. It is important to choose the desired consistency of the adhesive, otherwise the plastic covers will move downward, and the craft will turn out to be sloppy.
Subsequently, the gaps between the plugs can be repaired with mortar, this will extend the service life of the craft and give it more aesthetics. Do-it-yourself masterful work from bottle caps is presented in the photo below:
A few more original ideas
Corks are a versatile material. They even learned how to make massage rugs and decorative paths for the garden.
Massage mats
A mat made of plastic bottle caps perfectly relieves muscle tension after a hard day. The craft is useful both for the back and for massaging the feet. Here you need to be patient. The principle of creation is similar to the design of an independent mosaic:
- A geometric pattern is often chosen for the rug, although this is not at all necessary.
- The image is drawn on paper with the reflection of all the colored lines.
- Each bottle cap is pierced with an awl at four cross-shaped points.
- Next, the selected pattern is formed from the plastic corks.
- The details are alternately strung on the line in rows.
- The lid mat can be assembled all at once according to the principle of a snake or strung on separate rows, and then fix them together.
- The ends of the line are bitten or gently set on fire.
This method is suitable for creating various crafts from bottle corks: holders for cold dishes, rugs for the hallway or shower.

Garden paths
Another area of \u200b\u200bapplication of the free material is the tracks from the caps from plastic bottles.
Attention! Experienced users warn about the sliding of the surface from the covers during the frosty period, so the paths are located in that part of the garden that is not used for walking in winter.
To work you need to prepare:
- A large number of plastic bottle caps.
- Sand with cement for mortar.
- Construction glue.
- Wooden elements for formwork.
Registration process:
- In the ass, the outline of the future track is marked.
- In the presence of grass, the top layer of sod is removed, a trench 10 cm deep is dug.
- Formwork is formed from wooden elements, fastened with nails.
- When preparing the mortar, glue is added to the mixture of cement and sand.
- The composition is distributed over the surface in a small area, after which the bottle caps are gently pressed into the uncured mixture. The plugs go deep to the base.
The basic rule of laborious crafts is to achieve the same level of plastic lids. When the mortar dries, the remaining cement is removed with a stiff brush. At the end of the work, the formwork is being dismantled.
The following photo will help you enjoy the beauty of the tracks made of plastic bottles:
In addition to the proposed options for crafts, curtains for a country house are often made from covers.

The main thing is to show your imagination, and a fun process will lead to the creation of individual masterpieces from bottle caps.
Many owners of summer cottages and private buildings are fans of various beautiful handicrafts made from lids from ordinary plastic bottles. Some owners seem to have an unspoken competition for the most interesting idea. Craftsmen make truly amazing things, but they complain about the lack of material. Collecting the right amount of traffic jams is sometimes very difficult, and this process takes a lot of time.
However, when the caps accumulate enough, real works of art come out from under the hands of the masters. In addition, plastic lids are an excellent material for children's creativity. Crafts from them will appeal to any child.

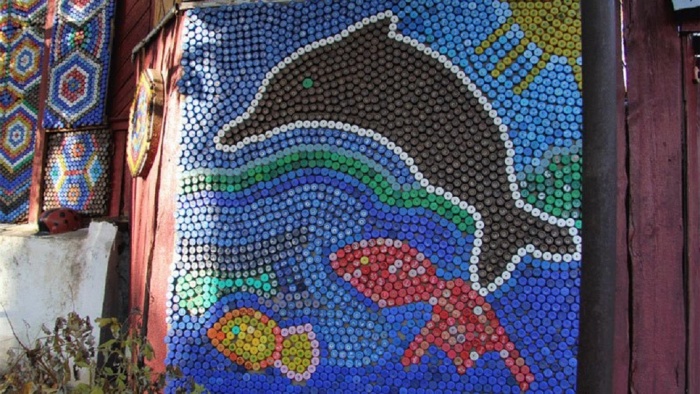
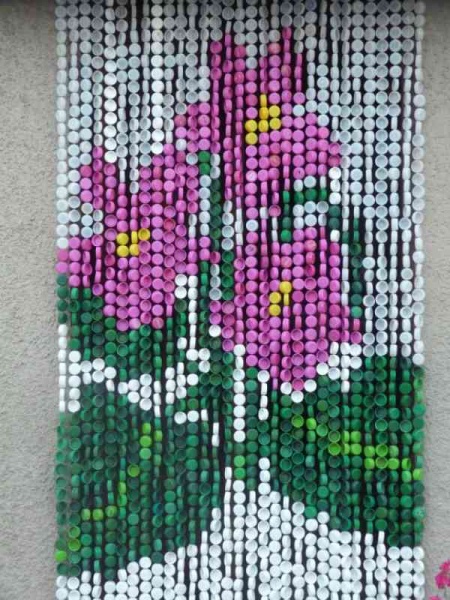
Mosaic technique
The photo of crafts made of plastic corks shows that the most popular of them are mosaic panels. They can be seen even in the city. Such compositions are performed with the aim of a kind of appeal to protect nature.

To create mosaic canvases, it is necessary to collect a large number of corks of different tones and shades. The job itself is to glue the lids together. The elements are fixed to the base. In case you have chosen the method of mounting with the back side, it is better to screw them to the base with self-tapping screws.


One of the best DIY ideas and instructions is to choose an image theme based on how many and what color you have accumulated plastic caps. For example, you have a lot of yellow and orange lids - it is optimal to use them to create a drawing of the sun. The panel will look as impressive as possible if the corks of different sizes are folded one into one.

If you have the talent of an artist and the ability to large-scale vision, then you can make quite realistic paintings. They will take significantly longer to complete, but the results are usually worth it.

Plastic lids and children's creativity
The advantage of lids as a material for children's homemade products is that they can be glued to absolutely any surface.

How can a child make a craft from plastic corks with his own hands? First of all, it can be:
- application;
- toy;
- figurine.

The easiest way to make a caterpillar using the applique technique. Its size and color can be anything. To decorate the image, you can use an interesting background and various small elements.

Birds are considered another original applique. This requires two plugs (for the head and body) and cardboard for the wings. An alternative to cardboard can be fabric or real bird feathers.

Fridge magnets
One of the new directions for crafts from plastic corks is the creation of magnets. It is very easy to make them. Looking for: caps of various colors, magnets, glue, alcohol, colored paper, paints, markers. We use alcohol to degrease corks. Next, we glue a magnet inside each of them.

Cut out circles from multi-colored paper, with a diameter equal to the size of the cork. We write letters of the alphabet or numbers (optional) on them and fix them on the bottom of the covers. Fridge magnets are ready!

Massage Mat
It is needed to massage the feet. It is quite simple to make such a craft yourself, but it looks original and interesting, especially if you use corks of different colors in the manufacture. Walking on a carpet like this every day for 15 minutes is extremely beneficial for your health.

Even doctors agree with this statement. Since walking on it activates the nerve endings located on the feet and are responsible for certain organs, this massage serves as a kind of charging for the whole body.

A detailed master class on similar crafts from plastic corks can be found on the Internet at specialized sites.

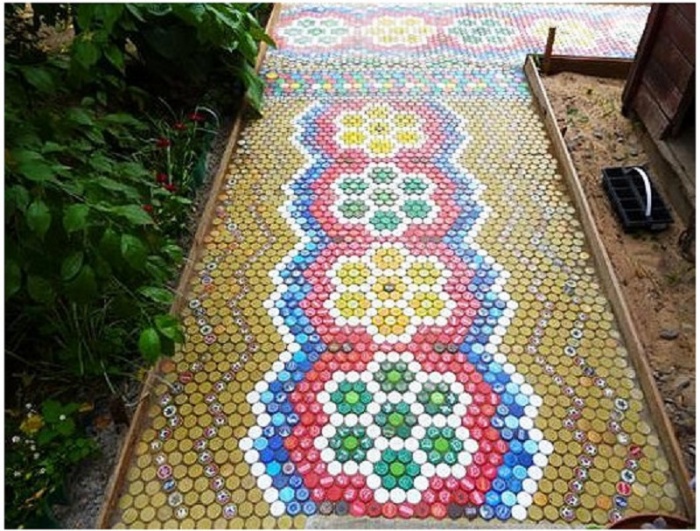
garden path
Bottle caps can also be used to decorate the local area. Most often they are used as a basis for tracks. Bright paths with intricate ornaments will be a real boon for your site.
Note! 

In conclusion, we note that there are a lot of variations in the use of plastic stoppers. Therefore, if you quickly accumulate these details for hand-made creativity, try to extract as much benefit from them as possible. Creating masterpieces from ordinary objects - what could be more wonderful!

Photo of crafts from plastic corks


Note! 


Note! 


Not only in dachas, but also on city streets, you can see panels made of plastic covers - often made to appeal to protect the environment.

A variety of crafts from plastic bottle corks are liked by many owners of suburban areas. If you look at their work from the outside, it may seem that there is an unspoken competition for the most original idea. Craftsmen from the people create amazing things, but they complain that, although the material is cheap, it takes a long time to collect it. But when there are enough traffic jams, real masterpieces come out from under the hands of craftsmen.
Vernissage made of plastic corks
Let's walk around the dachas and see what our neighbors have done there.
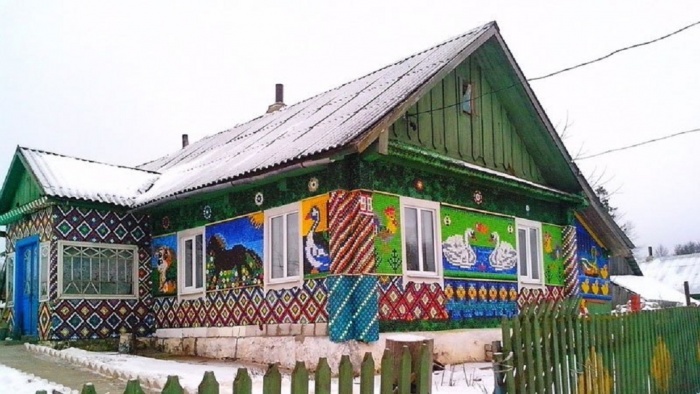
A fence made of boards is boring. Why not decorate it with cork mosaics? Conceived, done. A garden decoration made of plastic bottle caps in the form of a multi-colored panel along the fence clearly requires a lot of patience both in collecting and applying corks to a wooden base. Particularly stubborn owners paint the walls of the houses with corks from plastic bottles, turning them into fabulous mansions.
Another popular product is summer cork curtains. They can be monochrome and colored, with floral or geometric patterns.
White corks can be used to assemble a shade for a lamp on the veranda, and colored corks are suitable for finishing a garden table.
In the subject and crafts in the form of animals and flowers. Butterflies, dragonflies, caterpillars inhabit benches and trees, chamomiles and seven-flowered flowers complement the compositions of fresh flowers and serve as a decoration for playgrounds.
To decorate the garden and the interior of the house, cork mosaics are used. Garden paths are also laid out from them.
As you can see, in most cases, corks are used as a finishing material, but their capabilities do not end there. Armed with a fishing line and an awl, people sew door and massage rugs from them. Let's try and make such a rug.
Mastery lessons
Realizing that right now you do not have 2-3 bags of corks at home, we will only tell you how and what kind of garden crafts from bottle corks you can make with your own hands. You just have to choose the idea you like and start collecting material.
Massage Mat
At the dacha we not only have a rest, but also work hard. By the end of the day, the legs get tired and require rest. To help them bounce back faster, we will make a massage mat from corks from plastic bottles for a summer residence, and consider two options.
The first way
We will need:
- sheet of cardboard (arbitrary size)
- glue "Moment"
- corks (the quantity is determined by the size of the cardboard in order to completely fill it with corks)
On the prepared cardboard, row by row, glue the corks with the inner side up. We are waiting for the glue to dry and the rug is ready. Its only drawback is that it is afraid of moisture.
Diagram for making a small massage mat.
Take 19 caps (colors optional), burn 6 holes in each and fasten with fishing line in four steps (shown by lines of 4 colors)
To create a more reliable design, you need to take:
- traffic jams
- line
- awl (you can use a nail or knitting needle)
Let's start weaving:
- In each lid, we make 6 holes with a heated awl or nail, placing them evenly around the entire circumference.
- The shape of the rug is a hexagon. The length of one side is 10 caps. This means that the extreme side of our rug will consist of 54 covers.
- We carry out the assembly from the edge to the center of the rug, passing the fishing line, as shown in the figure.
- The weaving pattern is shown in a small fragment, but it is not difficult to transfer it to the full size of the product. For clarity, each stage of weaving is shown with colored parts of the fishing line, it is clear that there is only one fishing line in operation.
- Having finished weaving, we fix the end of the fishing line by melting it.
Advice! The mat can be used both as a massage mat and as a door mat, just turn it over.
The same weaving method can be used to make a bag and a mug stand.
Funny crafts
Various cork figures are suitable for decorating a summer cottage. We don't need robots, but flowers and insects will organically fit into the countryside. We will make them.
Dragonfly
Let's take for work:
- 4 blue caps and 2 green
- one colorless plastic bottle
Garden decoration made of plastic lids "dragonfly" - step by step instructions.
Glue the body of the dragonfly from the four covers, glue two eyes of a different color. We cut out the wings of a dragonfly from a plastic bottle and paint with acrylic paint
We glue the plugs together, giving them the shape of a dragonfly's body. Cut out the wings from a plastic bottle. They can be left transparent or streaked with acrylic paint. In the central part of the wings, we make two holes, thread the fishing line through them and attach the dragonfly to the branch of a tree or bush.
Flower
For a flower we need:
- 7 caps (color to suit your taste)
- a branch, 20-30 cm long (to guess with its diameter, we try on a lid on the branch cut, it should sit tightly)
- waterproof glue
Plastic bright flowers for the garden can be made using the technique quilling (by cutting the base petal strips from the bottles) or as indicated in the step by step guide below
Let's start assembling the flower. We glue the corks, forming a chamomile-shaped inflorescence. We are waiting for the covers to grip well, turn them over with the inside side up. Apply glue to the central cork and press the branch cut to it. Let the glue dry and "plant" our flower on a flower bed, under a tree or along a path.
Panel or mosaic
Thinking about how to decorate the dacha with corks from plastic bottles, you can swing at a large-scale project and lay out the fence with lids. It is difficult to give step-by-step instructions in this matter, but general recommendations will be useful.
First of all, it is necessary to resolve the issue with the future drawing. Make a rough outline on paper. You can build a panel by repeating the same fragments, or you can paint the whole picture with corks.
The main problem in such a project is collecting the required number of traffic jams.
Advice! Connect your loved ones and friends to the collection of covers. You can even divide the cork colors between them. Some will collect green, others yellow, others red.
If everything goes well, and you become the owner of a large supply of covers, draw the contours and details of the picture on the fence with colored paint.
You can lay out the covers in two ways: with glue or with screws. Note that if you choose screws, then you will need as many of them as plugs. Accordingly, we glue the corks to the fence with the lower side, fasten them through the upper side.
A working clockwork can be put into action by making a dial for it from covers, it can be of different sizes - this will give a greater decorative effect
Options for decorating a summer cottage with bottle corks can be viewed here:
- Flowers
Such flowers will become a highlight of any garden or even interior, regardless of the season. You will need: 7 lids, a branch and waterproof glue.Fasten them together, forming an inflorescence in the form of a chamomile, connect with a branch and "plant" a flower on a flower bed, under a tree or along a path. For beauty, you can paint with acrylic paints.
- Hanging bell
Having collected a collection of bottle caps, you can create such a colorful bell that will create interesting melodies, depending on the direction of the wind.
- Creative tray
A great way to decorate a tray with your own hands. It will become not only a useful household item, but also an original gift for a lover of beer and football.
- Kitchen apron
I especially liked this idea. I didn't expect to see such a solution at all! Originally, functional, and most importantly, it can give the working area a touch of retro style.
- Lamp shade
White plastic plugs can be used to assemble a shade for a lamp, for example, for a veranda. Colored ones are suitable for finishing a garden table.
- Candles
These cute little candles will add beauty to a romantic dinner, wedding or coffee table.
- Decorative wreath
If you already have an impressive collection of lids, you can select them by color and create a cute accessory for your front door.
- Earrings
Bottle cap earrings will be a great addition to your jewelry collection, as well as an interesting gift for friends!
- Necklace
I was inspired by this idea! Using a chain, five iron caps, glue and acrylic paints, you can create an original necklace. In the summer, with a denim outfit and sneakers will look very stylish.
- Garden chair
Strong enough garden furniture will be obtained from caps strung on thick fishing line. The basis of such furniture is, for example, a metal frame from a leaky folding chair.
- Bench
Ornament from multi-colored covers can be used to decorate a garden table or bench.
- Hot coasters
Decorate and protect your countertop at the same time with these unique coasters. Ideal as a gift for friends who like to drink tea and coffee.
- Organizer
Do you like to create beaded jewelry with your own hands? Make your job easier by making a handy organizer. It's so easy!
Well, isn't this the cutest addition to your Christmas tree collection?
- Bookmark
Are you an avid reader? Then this idea is for you! With this bookmark, you will never forget where you stopped reading.
- Bright decor
You can easily do this craft with your children. Just paint the caps with bright colors, choose an interesting motif and decorate with such decorative icons: a tabletop, a postcard or a gift box. It all depends on the approach and imagination!
Plastic or tin covers are a super versatile material for making home decorations, children's crafts and even garden furniture.
In this article, we have presented 120 inspiring photos and 12 cool deco-recycling ideas for plastic and glass bottle caps with tips and workshops.
Idea 1. Coasters for dishes (+ master class)
Let's start with practice and tell you how to make such nice coasters for glasses from ordinary plastic lids.
Materials and tools:
Plastic bottle lids (7 lids are needed for one cup holder, and 28 lids are needed to make a large stand); Fabric in two shades of pink, as well as a piece of orange or coral fabric; Any glass, jar or lid, about 7 mm in diameter; Pencil; Needle and thread; Scissors. 
Instructions:
Step 1. On the existing pieces of fabric, draw 7 circles, tracing the outline of the tin cover, and then cut them out. 
Step 2. Now we need to cover each cap with fabric. This is done simply: walk in large stitches around the entire circumference of the patch, put the cover in the center of the workpiece, then pull the thread and fix the resulting "cover" with a couple of seams. 
Step 3. Now connect all the caps one by one to form a chain. Please note that connecting seams should be as inconspicuous as possible. Next, roll the resulting chain into a flower (pictured) and fix it, sweeping all the details with each other. Hooray, the first cup holder is ready! 
Step 4. If you want to make a stand for a kettle, then you just need to connect 4 cup holders to each other. 
This collection presents other ideas for coasters made of plastic and tin lids. 


Coasters for glasses made of beer corks and epoxy resin poured into a mold 
Idea 2. Children's toys (+ master class) Both plastic and tin lids from bottles make cool children's toys - robots, transformers, astronauts, iron men and animal figures.
Here is a selection of photo ideas for crafts from plastic bottle caps. 


In this photo you can see the construction of an astronaut.
Here are examples of crafts made from metal lids. 


And now we will tell you how to make such a rattlesnake from plastic covers with your own hands, which will rattle in the literal sense of the word!  Craft from bottle caps
Materials and tools:
Caps for bottles of different sizes (in this master class, it took 33 caps to create a snake); Soldering iron or awl; Gold spray paint or ordinary acrylic paint (it takes a little longer to work with it, but you can take a child with painting); Twine; Hot glue gun; 2 dark beads (for eyes); Brown permanent marker (optional) How to make a rattlesnake from plastic caps:
Step 1. Collect bottle caps of different sizes and sort by size.
Step 2. Using an awl or a soldering iron, make a hole in the center of each cover. Of course, this stage of work must be done by the parent. 
Step 3. Spray paint on the covers or paint them with a brush. 
Step 4. Start stringing the lids on the twine in pairs and open side to each other (see photo below) starting with pairs of large lids and ending with pairs of small lids. Finally, when all the pairs of caps have been strung, make a snake face - put the smallest cap on the beginning of the workpiece (i.e. the first pair of large caps). Note that the inside of the muzzle cap should face the outside of the first large cap. By the way, this stage can and should be performed with children.
Step 5. Line up the snake and tie the knots tightly at both ends. On the tail, the tip of the twine must be completely cut off and filled in with hot glue (see photo below), and the tip of about 1.5 cm should be left on the muzzle.
Step 6. Now we need to make the tongue of the snake. To do this, cut out two identical small and narrow strips of black felt, then cut a sharp triangle at one end of each of the strips. This stage of work can be entrusted to the child.
Step 7. Glue two parts of the tongue around the tip of the twine left on the muzzle cover (it is advisable to hide the knot between the felt strips).
Step 8. Glue two eyelet beads.
Step 9. The craft is ready, it remains only to bring it to perfection by drawing small spots on the snake's body with a marker or paint. 
Idea 3. Wall panels and pictures Since tin and plastic caps from bottles and cans look like mosaic details, they can be used to make wall panels and even completely decorate the walls. The principle of making wall panels is simple: first, a color scheme of the drawing is drawn up on checkered paper, then the covers are sorted and painted in the right colors and in the right amount. Next, markings are applied to the base and then the lids are glued to hot glue or superglue according to the scheme.
As a pattern for a panel of covers, you can use a pattern for beading, embroidery or mosaics. 
Below are photo ideas for craft beer lids.
Panel of caps from glass bottles 
Panel with insert beer lids
When composing a panel, plastic covers allow you to play not only with their color, but also with sizes, as well as combinations of covers stacked on top of each other (see photo). 


Picture of plastic lids  New Year's panel made of plastic bottle caps
And here are examples of outdoor decoration and wall decor made of plastic bottle caps.
And finally, examples of children's crafts made from plastic lids. 


Idea 4. New Year's crafts (+ master class) Tin and plastic bottle caps make beautiful New Year's crafts: wreaths, mini-trees, garlands, gift tags and, of course, Christmas decorations. 
Christmas crafts from plastic covers 
Christmas tree toy-snowman made of plastic lids 

Christmas Crafts from Lids
Christmas tree decorations from lids Label for a gift from a beer lid Now we propose to go to practice and make crafts with your own hands from lids from glass bottles in the form of such pasta. 
Crafts from glass bottle caps in the form of pasta 
Materials and tools:
Spray cans of pastel paint (you can also use paint in cans); Gold cord or braid; Hot glue gun; Tin lids (flat lids are best, but slightly bent ones will also work); Sequins. 
Step 1. The first thing you need to do is divide the caps into groups with an even number of corks, and then paint each group in the desired colors. 
Step 2. Once all the plugs are dry, start making your first pendant. To do this, tie a small piece of cord into a loop, then glue its base to the inside of the lid, and finally glue the second lid on top (see photo). Be careful not to put too much glue to avoid excess glue between the lids. 
Step 3. This step will require hand speed and accuracy, as hot glue hardens very quickly. Take your blank and dab some glue on the seam of the lids, then quickly dip it into a jar of glitter. Continue covering the center of the pasta with glue and glitter gradually until you're done. Voila! The first pasta is ready, now you just have to finish the rest of the cakes, and then hang them on the tree. However, these crafts are quite versatile. For example, they can be used to make a garland or fridge magnets, or they can be packed in a box like real pasta and presented to a lover of sweets. 

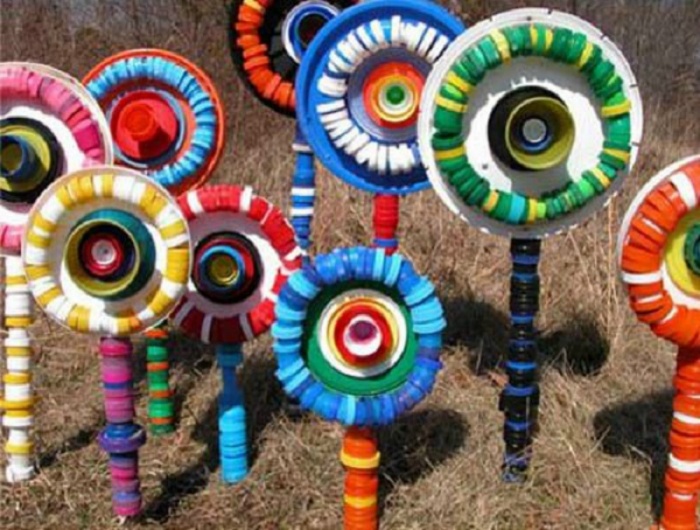
Idea 5. Decorations for the garden and garden By adding a stick to the craft from the lids, you will get a cool garden and park decor for a summer cottage or just a decoration for a flower pot. 
Crafts from garden covers 
Crafts from garden covers 
Crafts from garden covers
The metal lids make great flowers. 


It is very easy to make such flowers with your own hands: the lids are clamped with pliers, then they are glued to the base (for example, to the lid from under the tin can) and finally the stem is glued to the craft (a wooden skewer or other stick). If desired, you can glue a couple of petals from the green lids to the stem.
Idea 6. Magnets To learn how to make fridge magnets out of lids with your own hands, see the article with detailed instructions.  These photo frame magnets are made from caps from Nutella

These crafts are made from baby food jar lids


Idea 7. Jewelry and accessories You can make beautiful necklaces and brooches from plastic covers upholstered with soft but dense fabric.
Necklace made of plastic bottle caps 
The reverse side of the cap necklace
Tin lids make beautiful earrings, medallions, necklaces, key rings, brooches and even rings.
Have you noticed that in some photos the covers look a little different - they do not have a sharp "crown", but they have a depression inside? Modifying the covers in this way is very easy with just a rubber mallet and a solid platform. Place the cover face up on the platform, now hit the center of the cover firmly with a hammer. 
Then continue hammering in the center of the plug, turning it periodically to bend the metal evenly. Finally flip the cork over and see what happens. 

Idea 8. Furniture Items Almost any piece of furniture can be covered with tin covers. 


Plastic covers can make excellent garden chairs, tables, benches. 


And even storage boxes can be made from plastic lids. 
Idea 9. Serving Tray Decorating a boring serving tray with lids is very simple: carefully place all the corks on the bottom, then fill them with a layer of epoxy and let the craft dry for at least a day. The main thing here is to mix the resin with the hardener according to the manufacturer's instructions (to the nearest gram!) And pour it slowly, avoiding the formation of bubbles. If you want a perfectly clear resin layer, use liquid epoxy for decorative rather than construction work. 


Idea 10. Door curtain If you have a lot of plastic covers, you can “sew” a door curtain from them for a summer residence. The easiest way is to string caps of different sizes and colors on threads in a chaotic manner (see photo). 
If you want the curtain to have a pattern, then you need to search the Internet for schemes for making curtains from beads. 
 Idea 11. Wall clock Both tin and plastic covers can replace the numbers on wall clocks. All you need is a clockwork (you can remove it from an old watch), a base, 12 covers and our step-by-step instructions on how to make a watch with your own hands.
Here are some photo examples of how a homemade watch from a lid can look like. 


Idea 12. Frames for photos or mirrors Beer caps are best for decorating mirrors and photo frames.
If the mirror does not have a frame, then it can be decorated with assorted beer corks. 
