In the hot summer, many residents of the city try to spend all their free time outdoors, preferably away from home. But in order to fully interact with nature, enjoy a country trip or a picnic, everything should take place in comfortable conditions. That is why tourists take with them not only tents, but also furniture, which is sold today in any specialized salon or on the market. In the presented variety of shapes, materials and designs, you can get confused without having special knowledge of the choice of such products. Why not try making a DIY camping table to fit all your needs? In addition, you can still save a lot. In this article, we'll show you how to make a picnic table.
Making a small suitcase table with your own hands
Consider the simplest outdoor furniture design. Its production does not require large financial costs and the availability of a specialized tool. When assembled, this table will look like a small suitcase.
Prepare the following blanks for work:
- 10mm plywood.
- Sliced \u200b\u200bbirch bar measuring 30 x 30 mm.
- 4 self-tapping screws 50 mm for fixing frame beams.
- 4 self-tapping screws 25 mm for fastening plywood and fittings to the frame.
- 2 hinges with a plate width of not more than 30 mm.
- 4 furniture screws 70 mm long, nuts and 8 washers for them.
Important! How to make a camping table yourself? It is not necessary to equip a suitcase with locks and a carrying handle. But if you think they are necessary, then use the parts from an old suitcase or case. Small hooks can be used as a lock. It is more convenient to use a belt for carrying.
Follow these steps to make a DIY camping table:
- Cut two pieces of 500 x 580 mm plywood for the countertop.
- To make a frame, saw off 8 bars: 4 - 520 mm each, 4 - 500 mm each.
- Saw off 4 pieces of 500 mm long timber for the legs so that they will fit when folded into the box.
- Drill holes in the wood to prevent the bars from splitting when screwing in the screws. Then pull off the frame, attach the plywood of the countertop to it.
- Attach the table legs to the 500 mm bars on the frame. Step 15 mm from each inner corner of the frame, then 15 mm from the tabletop, mark the centers of future holes for screwing in the screws. Also measure on bars 15 mm from each end and one of the four sides. Make holes with a drill.
- Screw the hinges to the frame. They need to be deepened a little so that when closed, there are no gaps between the halves of the table.
- Additionally, you can make plastic or rubber legs for the suitcase. In length, they should coincide with the diameters of the hinges of the hinges, so that when the table is closed, it does not fall and opens freely.
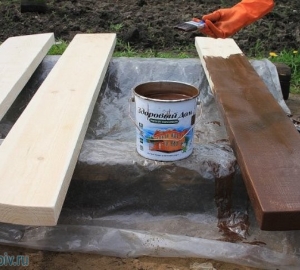
- Sand the wood pieces with sandpaper.
- Treat the product with an antiseptic.
- Cover the top of the table with varnish or paint.
Using this scheme, you will make a wonderful and comfortable do-it-yourself suitcase table. Thanks to its special design, it will fit even in the smallest trunk, or it can be easily carried over the shoulder.
Self-production of a roll-up table
There is an even simpler option to make a travel table with your own hands. You can use old cuttings from garden tools or wooden rods with a round cross section for work. You will also need fasteners and a few meters of wooden planks.
Here is the exact list of materials required:
- 10 pieces of wooden 600 mm strips 45 x 15 mm.
- 4 rods made of wood 400 mm long, 30 mm in diameter.
- 2 540 mm 15 x 45 mm wood planks.
- 2 x 54 cm canvas, leather or nylon belts.
- 4 bolts 70 mm long.
- 4 x female thread inserts.
Important! If you decide to buy the material in a store, then pay attention to birch rods or cuttings, because the appearance of the product largely depends on this. In addition, birch wood is considered the best choice for countertop slats.

You will need to perform a number of actions in the following sequence:
- Cut 10 strips of 600 mm, two strips of 540 mm, and 4 rods of 400 mm.
- Sand the surface of the workpieces.
- Take a construction stapler and fasten 10 slats of the future tabletop with a strap to each other. Leave a gap between the planks, but it is important that it is the same along the entire length. Insert a 15 mm block into each gap between the planks. Use a square to create a rectangular countertop.
- Fold the finished tabletop in an accordion or in a roll.
- Clamp the table leg in a vice, use sandpaper, wood or rubber as a lining so that the sponges do not damage its surface. At the end of each leg, drill a hole 40 mm deep, insert a threaded insert into it. Do this for all the rods. The drill should enter the leg strictly perpendicularly in relation to its end.
- The base of the tabletop, which will give it rigidity, will be 540 mm strips. Drill two bolt holes near the edges. Attach the slats at the same distance from the edges of the tabletop across the slats, mark the centers of the holes on the extreme slats. Drill 4 holes in the countertop with a drill.
As a result, you will have a universal folding table with your own hands, all that remains is to treat it with an antiseptic composition, paint and varnish.
Features of finishing camp tables
Well, if everything worked out for you, all the details coincided, the table folds and unfolds freely. But you can enjoy this process only at home, where it is always dry and warm, the room is constantly ventilated. The product in this form will withstand no more than three out-of-town picnics. After all, water is everywhere, and it is friends with wood until the time when the tree is rooted to the ground. Blackening and swelling are dangerous for such structures. Therefore, you need to be able to properly handle wooden tables.
Professional tips for finishing and strengthening outdoor furniture:
- Parts do not need to be sanded in order to achieve perfect smoothness, because it is paramount to remove potential splinters.
- It is recommended to paint over and coat all the constituent elements carefully so that they serve regularly and for a long time.
- It is imperative to carry out an antiseptic treatment to protect the plywood and wood, or to give the product the chosen color.
- Before varnishing, plywood countertops and bars must be impregnated with drying oil. It is enough to heat it in a water bath to achieve maximum fluidity, rub it into the edges with a hard brush.
- It is not necessary to cover the entire surface with varnish - it is better to rub it. Apply two to three coats.
For modern city apartments, folding furniture is very relevant, because it allows you to save free space and at the same time does not lose its functionality. The dining table is an essential attribute of any home. It should be large enough to accommodate the entire family and host. In the case of the dining room, the option of a sliding table will come in handy. When folded, it can be a small table for everyday use or just a sideboard.
Of course, a folding table can be purchased in furniture stores or ordered, but it is quite expensive and can cause serious damage to the family budget. Why not make your own folding table? Despite the fact that its mechanism is not easy, any man can still make such a piece of furniture. The main thing is desire and a little patience.

Have you decided to make your own kitchen table? We advise you to take a closer look at the option like a clamshell. Such a dining table will perfectly fit into the interior of a city apartment and will not take up much space. Its mechanism, despite its apparent complexity, is very simple. The only thing really worth paying attention to is the manufacture of parts.
Before making a table with a book with your own hands, as in any other case of creating homemade furniture, prepare a drawing.

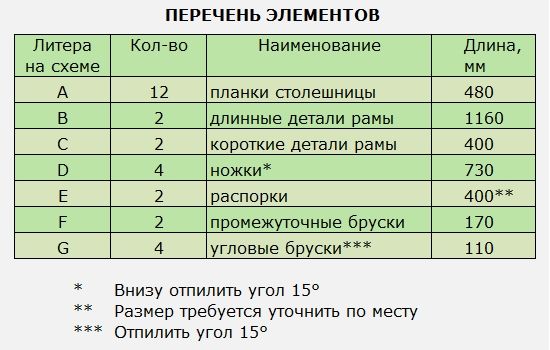
Homemade folding table consists of the following parts:
- A - table top, 700x670 mm (recommended material thickness - 20 mm, it can be MDF,
- Chipboard or hollow panels, at your discretion), 2 pcs .;
- B - cover, 700x200 mm (the material used for the countertops), 1 pc .;
- В - leg, 720x200 mm (table-tops material), 2 pcs .;
- G - drawer side, 638x190 mm (worktop material), 1 pc .;
- D - bottom shelf, 628x190 (worktop material), 1 pc .;
- E, F - horizontal and vertical bars, 500x40x25 mm, E - 4 pcs., F - 2 pcs.;
- З - movable leg, 720x40x25 mm, 2 pcs .;
- I - piano hinges, 4 pcs.

Scheme of work:
- After the drawing of the book table has been prepared and all the necessary parts have been cut out, do not forget to process them with melamine film. This will protect the cuts from moisture and protect you from material toxicity.
- Start the assembly by joining parts H, F and E (movable leg and bars). For this, it is best to use a blind straight spike connection. This design is supplied with an elastic band or a metal button from the end.
- Connect parts C, D and D. This is a table top, leg, drawer side and bottom shelf.
- Fasten the cover to the legs (parts B and C). We recommend using round pins here.
Attach the piano hinges to the movable leg structure, then connect everything to the table leg. - Using the picture, carry out all the work from both sides.
- Now you can paint or varnish your dining table.
A table-book of the size "the size of a very serious banquet table" is made. As you can see, it really isn't difficult.
Folding table transformer
The previous option, of course, is not the only possible mechanism. The kitchen table can also be sliding. When a small table is expanded to a large size by simple manipulations.

Do-it-yourself sliding table is ideal for zealous owners
To make a sliding kitchen table with your own hands, you will definitely need drawings. They can be found on the Internet or in magazines (those who are used to paper sources). Those that we offer will allow you to create a table with a tabletop assembled 700x1200 mm, and disassembled 700x1670 mm.
DIY table materials and tools:
- Chipboard;
- corner 50x50 (aluminum) 4 pcs .;
- guides 2 pcs.;
- legs (metal) 4 pcs, strong enough to support a large dining table;
- 6 locks (will be described later);
- screw (10 mm);
- self-tapping screws 20x4 and 16x3.
- a heat gun for gluing the edge, but you can also use an iron;
- drill;
- jigsaw;
- milling cutter;
- level, tape measure and more.
Operating procedure:
- Before making a folding table, prepare the necessary parts in accordance with the prepared drawings. The workpieces should be cut and trimmed.
Nuance! A cut made with a milling cutter is better than a jigsaw or a saw, however, in this case, it is necessary to increase the required dimensions by a couple of millimeters.
- The next step is to prepare the movable mechanism. To begin with, from the outside of the corner, draw a line dividing its side exactly in half. This line will be needed at all corners.
- Using the guide, mark the places where the corners and guide join.

- Drill the required holes.

- We fasten the structure of two corners and a guide with bolts.

- Lay the resulting structures in front of you with the moving parts of the guides inward. Now you need to drill 4 holes each, in the moving parts of the guide from the outside, and in the fixed parts from the inside.

- Place the worktop blanks on the table with the front side away from you, carefully aligning the edges. Place the resulting mechanisms on top with the movable part inward and aligning their centers with the junction of the tabletops of the transformer table.

- Fasten the mechanism with self-tapping screws as follows: the movable part to one part of the tabletop, and the fixed part to the other.

- Screw on the clasps, joining the edges of the countertops.


- Separate the countertops, place an insert between them and screw the missing parts of the locks to it. It should turn out so that the locks are closed without an insert and with an insert.
- It remains to screw the legs and the transformer table is ready with your own hands.

Advice! It is recommended to cut sharp corners of metal corners for safety reasons.
Probably, you will be interested in the question of how to make a rounded transformer table. It all depends on the prepared drawings and your wishes. For example, you can make a round sliding table based on the same mechanism as in the previous version.


But there may be other more complex options.
In general, a round transformer table will ideally fit into the interior of a city apartment, and such a wooden table will be an ideal addition to the living room of a country house.
Pull-out table, option for compact kitchen
How to make a sliding table for the kitchen with your own hands is no secret. But what if there is no possibility or no need to place such a table in the kitchen. In such cases, you can make a sliding table. It can be removed completely after it has fulfilled its role. Thus, huge kitchen space can be saved. This option is simply irreplaceable for small kitchens.

However, the pull-out table can be used not only for eating. This is a great option for a secondary desktop surface (this option is widely used for computer desks).
Folding picnic table
The tables presented before are complete pieces of furniture. However, compact tables are also needed in the country. Such a table should be easy to transport in order to easily fit in the trunk of a car along with the rest of the picnic accessories. Let's consider how to make a folding table - a suitcase.

Materials:
- plywood 50x60 cm;
- timber 30x30 cm, 44 cm long (4 pcs.);
- timber 30x30 cm 60 cm long (2 pcs.);
- timber 30x30 cm, length 52 cm (4 pcs.) for legs;
- self-tapping screws, nails and furniture screws;
- a handle (you can use a handle from an old suitcase or purchase a similar one), and
- suitcase latches (2 pcs.);
- hinges 60 mm (2 pcs.).
Operating procedure:
- Collect 2 frames from plywood sheets and blocks. Secure all parts with self-tapping screws. Connect the frames together with loops.
- Drill the holes for the feet at the same distance. Do the same on the legs. Considering that they will be mounted on screws, the diameter of the holes should be slightly less than the size of the screws.
- Attach the handle and latches. The do-it-yourself folding table will be ready when you screw the legs. To expand it, you need to unscrew the latter.
As you can imagine, this is a rough draft. It needs to be refined. First, sand all the details, and then paint in the desired color and varnish.
A complicated version is also possible. When the table legs are attached to the folding structure. In addition, the table top is made of slats, and its edges are upholstered with aluminum corners.

Of course, making such a folding table with your own hands is somewhat more difficult, and its weight will be greater.
We examined how to make a table - a book, a sliding table and a folding table with our own hands, table options for the kitchen and picnic. Which of our tips will you follow to choose you.
The main thing is to carefully read the drawings and our instructions.
A table is an essential attribute of every home, allowing you to create comfortable living conditions. But many residential apartments cannot fit a full-fledged structure inside, since this piece of furniture takes up a lot of space. Transforming tables, which can be disassembled or converted into another product, if necessary, will help to correct the situation. Before making a folding table with your own hands, it is important to choose the optimal design and functionality of such a structure. This will allow you to optimally fit it into the interior, making it as useful and in demand as possible.


Features and benefits of a folding table
A folding table is a structure that consists of several independent elements. All elements of the system are interconnected with special fasteners, which allows, if necessary, to disassemble it into separate parts. The classic representative is a table in which the table top moves apart, and another part is inserted into the freed space.


Tables of this type have several positive aspects:
- Functionality. The table can change its dimensions, which allows you to increase them if necessary (arrival of guests and so on). Moreover, such a system is very easy to supplement with drawers, which will be used as additional storage space.
- Small size. The structure is completely disassembled, which allows you to keep it in the closet or on the balcony. The dimensions of the table itself are compact and practical.

- Originality. Almost all handcrafted tables have no analogues on the market and differ in many details.
- Practicality. The table can be installed both in the kitchen and in the living room, transforming its size. This approach also saves a lot of space, which is important for small apartments.
- Reliability. The service life of a structure can be very long if the drawings are followed during manufacture and high-quality fittings are used.

Materials
The quality of transforming tables depends largely on the material from which they are made. Today, to design such systems, they use:
- Chipboard. The stove is durable and low in price, therefore it is very often used in the manufacture of such furniture. To give the table an attractive design, you can make it from chipboard.
- Fiberboard. This material is very similar to the previous type of product. The stove is perfectly processed and is practically harmless to humans.
- Tree. Solid wood tables are the most durable and expensive. The material is easy to use and has a unique texture that can be matched to any style of home.
- Plywood. This product is not used as the main product. Auxiliary elements (shelves, back walls, boxes, etc.) are made from it.
- Metal. This material is one of the strongest and most durable. It is used for the construction of parts that are subjected to significant loads (metal legs, and so on). Profile pipes of different sections and shapes are often used here.

It should be noted that today many parts for tables can also be made from polypropylene pipes, glass and other similar materials.
How to make a folding transforming table yourself?
There are several types of transforming tables, as they are used to solve various tasks. The algorithm for creating such structures consists of several sequential actions:
- Initially, you need to decide on the type of product. Today, tables-beds or tables-sofas are very popular. The next step is to create drawings with all structural elements. The best option would be to use ready-made plans.
- At this stage, the selection of materials and accessories is performed. Transformer mechanisms are of several types. They differ in the method of fastening and parameters of spatial movement. For example, a bench-table should have not only sliding but also lifting mechanisms.


- When all the materials are collected, they begin to manufacture the structural elements of the table (tabletops, legs, and so on). It is important here to carefully adjust all dimensions so that the future system can move without effort or disruption.
- The procedure ends with the assembly of the table. It all starts with small elements that do not transform minimally. After that, they move on to large systems, where swing-sliding mechanisms are already installed. At the same time, careful measurements are taken before fixing each element.

The process of building transforming tables can be both easy and difficult. It all depends on your imagination and desire. Sometimes you can simply attach wheels to the transformer to change its purpose and functionality.


Making a swing-out model
Swivel and extendable tables are systems in which the table top can be moved to the side parallel to the floor. This design is much more complex than the conventional folding model. It uses special hinges and mechanisms that provide this functionality.
The construction algorithm of such a structure can be divided into several successive stages:
- First of all, you need to carry out careful calculations of the book-table. It is advisable to use ready-made drawings, on which all the main dimensions are applied.
- After that, a material is selected that can withstand many turning cycles. The best options are metal and natural wood.
- When everything is ready, the frame and countertops under the table are made. The top must be completely covered by one piece. The second countertop will be hidden under the table. After careful measurements, the cover is screwed to the frame using special transforming mechanisms. It is important to control the location of all structural elements.

Please note that the second cover can be attached to the first element, forming a kind of book. A similar table with a folding top is much more convenient and practical.

Homemade folding wooden table against the wall
Wall mounted tables are one of the best solutions for small kitchens. These designs do not take up much space, which makes them very functional. The construction of such a structure involves the implementation of the following operations:
- Initially you need select material for the countertop.Many today use chipboard sheets for this, but wood is best, since it is durable and beautiful. The shield can be knocked down or glued from several polished planks, after which the height of the table must be determined. Based on these values, 2 support legs are made. In theory, they can be adjusted to the height after fixing the cover to the wall.
- At the very end of the countertop screwed to the wall.For this, special turning mechanisms are used. Please note that the product should not be close to the support, as it will not be possible to close it. When the blade is screwed on, you should take care of the fixing system in the vertical position. The process ends with the installation of the legs. They are attached to two corners using pivot systems.

If you wish, you can make the legs removable.

Making a coffee table in the hall
A special feature of this table is its small size. Outwardly, a similar design may resemble a coffee table. Today there are many options for such products, which differ in design and technical equipment.


Consider how to build a table for the living room with your own hands. This procedure consists of several sequential stages:
- Initially, you need to pick up materials. The best option would be a wooden board and timber. From them, you should create a frame for the countertop. Outwardly, it resembles an ordinary square or rectangular table, only without a lid.
- After that, cut from the boards and form two tabletops. One of them should be smaller and fit inside the frame (it will be hidden). The second cover is made as for a regular table.

- The assembly of the structure begins with the installation of a small table top inside the table (between the legs). For this, a special mechanism is used, which is capable of moving the system upward if necessary. The tabletop should, as it were, rise and move simultaneously to one side.
- When the lower canvas is fixed, the upper tabletop is mounted in a similar way. It is mounted on special levers that also allow you to lift and slide the system.


Please note that the upper part should be displaced in such a way as to make it possible to reach the lower shelf and place it side by side.
Features of creating a round product
Round folding tables are very popular today, as they are distinguished by originality. Technically, this design can be supplemented with an insert in the middle, which will increase its size.


The creation of a semicircular table involves the manufacture of a round tabletop. This process is quite simple and consists of the following steps:
- Initially, a layout of the future structure is drawn on paper. This can be done in different ways, but often they use a thread and a pencil, which is fixed at one of its ends. The other end is simply positioned in the center and held, and the pencil is pulled at a stretch.
- After that, with the help of the blank, the circle is transferred to the boards folded together. Some experts cut the pieces one by one, applying the dimensions of the board to a specific part of the circle.
- When the tabletop is cut, it is glued together or knocked down using transverse bars. After that, you need to cut it strictly in the center of the circle to form two even halves. The procedure is completed by installing these elements on the table frame using movement mechanisms.

Traveling table-suitcase
Such a design combines not only a surface for food, but also a container for storing certain things that are useful in nature. It is relatively simple to build such a table and it can be done in several stages:
- Initially, you need to pick up the bars for the frame. The capacity of the suitcase will also depend on their thickness. The best option would be a rectangular bar, about 4-5 cm thick.
- At this stage, the sides of the suitcase are being constructed. To do this, rectangles of a certain size are knocked down from the bars. It is important here to carefully fit all ends to get straight and not skewed parts. Then a sheet of plywood is nailed to one side of the frame, which will act as a tabletop. The result should be two small boxes with a closed bottom.

- To turn these elements into a suitcase, you need to fasten them with two loops so that they can be closed. It is advisable to cut the fittings into the wood in order to exclude the appearance of large gaps.
- The process ends with the manufacture of legs. They are also cut from bars of a certain thickness. After that, fastening systems are formed at each corner of the future table. The easiest way is to use special bolted connections, for which you need to drill holes in the tree.
A folding table is a very convenient and useful item in everyday life. Many owners complain about the small area of \u200b\u200btheir apartments, therefore, they do not have the opportunity to put a large table in the kitchen. This problem is effectively solved by purchasing folding models. It is worth noting that they are ideal for trips and picnics in nature.
The folding table is lightweight and compact, which allows it to be easily folded into the trunk of a car.

Varieties
This furniture comes in various shapes and sizes. They differ in the shape of the table top (round, square, oval, rectangular), material (wood, metal and their combination), as well as the way they are folded.


The most popular type of folding tables is wooden. If you want to make it as light and easy to transport as possible, then install an inexpensive chipboard tabletop.

The easiest way to fold at tables with a cruciform foot. When folded, the dimensions of the structure change, but it itself cannot be disassembled. In addition, there are completely collapsible products. To create them, threaded fasteners are used.

If you want to make a round table with your own hands, then you need to shape the tabletop before fastening. This will greatly simplify the assembly process.

Preparatory work
If you decide to figure out how to make a folding table with your own hands, then first assess your capabilities. Craftsmen who do not have impressive experience should give preference to the simplest models with cruciform legs.

Table sizes are selected depending on your own needs. It is important to consider the maximum possible load and operating conditions.

At home, it is easier to create a table made of wood. For the countertop, chipboard will be the best option. You will also need tools for work:
- Electric jigsaw;
- Level;
- Paint brushes;
- Ruler / tape measure;
- Hammer, screwdriver;
- Grinder (sandpaper).

The latter is recommended for use only by experienced craftsmen. Everyone else should give preference to regular sandpaper. Of course, using it will slow down the process of creating a table a little. But the product will turn out to be of high quality and beautiful.

For work, you need wooden blocks measuring 2 x 4.5 centimeters. If you plan to make a large table, you can order 3 x 5 centimeters parts. As for the length, it ranges from one to five meters.


The material is cut into pieces of the desired size in accordance with the drawings of the folding table. It is advisable to use boards for countertops that are thick (at least 4 centimeters) and durable.


Assembly
To connect the bars, you need bolts and screws. Their length is selected in accordance with the thickness of the selected materials. Bolts are used to unite the legs, self-tapping screws are used to secure the footrests.

First, you need to cut out the required number of bars. It is advisable to make them slightly larger in size than originally planned. The hole must also be larger than the fastener. For example, for M4 bolts, the hole diameter must be at least five millimeters.

After cutting, each part must be processed with a grinder or sandpaper. To extend the period of operation, they are covered with a protective compound (paint or varnish).

It is important to securely fasten the foot supports (four pieces). They are at an angle of 90 degrees in relation to the "goats" (folding legs with crossbars at the bottom). For this, ordinary screws are used.

Three pieces are required for each support. The distance between them should correspond to the dimensions of the bar from which the "goats" are made.

To understand what the finished structure looks like, find on the Internet a photo of a folding table with your own hands. So you will understand what result you should get in the end.

All parts are connected with bolts. They are placed in the through central holes of the bars. It is not recommended to overtighten them. Let the axle rotate freely. "Goats" are fixed to the table top by means of bolted connections. Foot supports must be attached to them in advance.

If you are worried that the axle mount will loosen over time and fail due to constant folding / unfolding, then use locknuts.


If you want to make a compact table, then remove the bolts that connect the "trestle" and the footrests. One or two bolts are allowed to be picked up. Practice shows that it is not worth tightening the fasteners in these areas too much.

Reliable fastening and tightening of the bolts requires only the foot supports. This is due to the fact that it is they who guarantee the normal installation of the legs.


Diy folding table photo


Who among us does not like to go fishing with family or friends, on a picnic, barbecue or just to relax in nature.
However, in addition to fishing rods, food, barbecue and tents, at least some kind of camping furniture is needed - it is inconvenient to cook and sit on bare ground.
And the main item needed for a picnic outside the city is a folding table.
Now it can be purchased at any travel or fishing store, but why spend money if you can make a folding table yourself. Let's find out how to do this and what is needed for this.
Design features
If you do not go into details, then there are two types of camping tables - a table with folding legs and a suitcase table.
In the first version, when transporting or carrying, the legs are retracted under the tabletop. Upon arrival, it is enough just to spread the legs of the table to place it.
In the second version, the tabletop looks like a suitcase or a chessboard - in the stowed position, the legs lie inside it, in place they must be taken out of the “suitcase”, connected to it and put the table in the right place.
Both types have their advantages. The folding table is easier to make and takes just a few seconds to set up. At the same time, the suitcase table is more convenient to carry, takes up less space, and, in addition, you can put dishes, skewers and other necessary things in it during transportation.
Wood, plastic or metal?
What is the best material for making your own camping folding table?
If ease of creation is most important to you and you do not have a lot of tools or skills in working with plastics and metals, choose wood.
Beams, boards, chipboard, plywood - all this can be used to create a fairly simple folding table.
But a table made of wood, if you do not protect its surface with varnishes and special coatings, will warp under the influence of dampness, sunlight and temperature changes and will lose its attractive appearance.
You can use both plastic and even metal as a material for legs and countertops. But here you may need those tools that can not be found in every home. In addition, working with such materials is more difficult than with the same wood. But tables made of plastic are not subject to corrosion, and those made of metal are very strong and durable.
 In order to make a collapsible or folding table, you need a set of fairly simple tools that can be found in any home or garage:
- Jigsaw (can be replaced with a circular saw or a hacksaw for wood);
- Electric drill for preparing screw holes;
- Hammer and Phillips screwdriver;
- Roulette, square, ruler, pencil and level.
Attention! Remember that cutting tools such as a circular saw or jigsaw are hazardous! Observe all necessary safety measures when working.
Folding picnic table
 To make a simple and strong enough, you need the very minimum of materials and fasteners:
- wooden boards, 20-40 mm thick. For the countertop, instead of boards, you can use a sheet of chipboard or plywood, about 10 millimeters thick;
- self-tapping screws, furniture bolts, and for each pair of legs the bolts must be of different lengths, wing nuts for bolts;
- door handles for carrying the table and hooks.
First, cut a tabletop of the required size from boards or a sheet of chipboard. If the tabletop is assembled from several boards - gather them together, lay them down and measure the length and width.

Work stages
Step 1. Making the frame
Lay the frame boards on the table top, with the frame on each side extending 2–3 centimeters from the edge of the table top. Using a jigsaw, cut the boards to the required size, then re-lay them on the tabletop, check the length and width of the frame according to the drawing. Outline the contours of the frame - use them to make holes in the tabletop for the screws.

Important! In order to accurately maintain the dimensions of the paired parts, connect the boards together with clamps and cut them together with a jigsaw or hacksaw.
Step 2. Intermediate bars
Cut out the stop bars on which the unfolded table legs will rest, make four holes in them for the screws. To prevent the table legs from colliding with each other when folding, make wooden supports for the second pair of legs, which will be located between the frame and the stop bars.

Step 3. Assembling the frame and table top
Gather the frame elements together, fix the stop bars and wooden substrates, make four holes for the bolts with an electric drill. Use screws to secure the tabletop and frame together. 
Step 4. Table legs
Trace and saw out the table legs with a jigsaw. In the upper part, where they are fixed to the frame, the legs should be rounded, in the lower part there should be a cut at a slight angle (15–20 degrees). Make holes for the bolts.

Step 5. Assembling the table
Connect the first pair of legs with a crossbar and secure to the frame with a bolt and wing nut. Repeat with the second pair. Check to see if the legs are catching on each other when unfolding and folding the table. If they get stuck, sand the legs in the place of friction with sandpaper.
The folding table is ready. Additionally, you can attach a handle for easy carrying and hooks to hang towels or accessories for barbecue and barbecue.
Table-suitcase
 To make a travel suitcase table, you will need more materials and fasteners:
- plywood sheet or chipboard for the cover. If they are absent, boards can be used;
- wooden beam for legs and a box of a table top;
- hinges, door or suitcase handle, two latches;
- furniture bolts and wing nuts;
- self-drilling screws.
Work stages
Step 1. Take the chipboard sheets, cut out the half of the countertop. Then saw off the required lengths of the frame bars, connect them to the halves of the tabletop with screws on all sides. Fasten the halves of the countertop together with hinges.

Step 2. Cut off four beams, which will be the legs of our table, make holes in them and in the frame for bolts, while making an indent so that the legs of the table are freely connected to the frame.


Step 3. Connect the legs and frame with furniture bolts and wing nuts.

Step 4. Attach the carrying handle to the frame. Don't forget to make two latches ,
so that the suitcase does not open during transportation.

Note! Before starting work, draw up a drawing of your table in several projections, calculate the dimensions of all parts and how much material you need. This will save yourself from mistakes, and you will not have to redo all the work again.
Protecting the camping table
 An unprotected tree is aging quickly enough: dampness, temperature changes that are inevitable in nature, sunlight and many other factors have a bad effect on the material and reduce the durability of the folding table.
Therefore, do not forget to treat all its surfaces, especially the countertop, which is most susceptible to harmful influences.
For use special antiseptic compounds, stain.
A lacquer or paint finish will enhance the look of the plywood or chipboard and make your travel table look prettier.
How to make another version of a light folding table, see the video: