For each dacha causes soy associations. For example, for some it is work, for others it is outdoor recreation. In any case, in the fresh air after working in the garden, any food will taste better. And for whatever you have to eat, as they say, on your knee, you can equip a special place, the center of which will, of course, be a table. And such a piece of furniture, made by hand, will not only express the care and skill of the master, but will also serve as his pride.
How to make a table for a summer house with your own hands - instructions
To make a table in the country, you do not need special skills or tools, because its main function is to stand. Therefore, even a beginner will be able to make such furniture. When choosing a material for a country table, it is worth considering the nature of the operation: the furniture will be outdoors in any weather, so it is important to choose a durable material.
How to make a wooden table for a summer residence
For the table, it is necessary to carefully choose wood, because each type of wood is good in the area in which it is used. For example, to use conifers, you will have to impregnate them with a special solution, protect them from fire, but even all these actions will not help get rid of resin stains on the tablecloth. But hardwoods, on the contrary, are great for these purposes.
Wooden table
The tabletop should consist of boards, at least three to five centimeters wide. For greater stability, they need to be nailed to the frame. The legs are usually made straight or crossed. To avoid the danger of getting a splinter during lunch, you need to carefully treat all surfaces. In addition, the finished table must be protected with special compounds. You can cover the table with varnish, for greater strength. As a rule, the varnish is applied in three layers, heating it before that in a water bath.
Logs can also be used to make a wooden table, they are also perfect for creating benches. You can also use narrow slats in combination with a metal frame.
In fact, the manufacture of a table made of wood comes down to two technologies: saw cuts are interconnected and form a dining plane; saw cuts are fixed on a solid base.
How to make a stone table for a summer residence
The stone table impresses with its inaccessibility and strength. It will definitely withstand all the tests of nature and will lay down the family and the dacha for many years.
You can reduce the cost of construction by laying out the base yourself and buying only the countertop. For the bases, you can use rubble, flagstone, cobblestone, brick. These materials fit perfectly into the interior of the garden and the dining group will look very original.
How to make a metal table for a summer residence
If the house has a welding machine and a person who knows how to operate it, you can make metal furniture. Such lunch groups are original and interesting. To extend the life of such furniture, the metal must be protected from rust and exposure to aggressive environments. The easiest way to do this is using a special primer, which serves as the basis for the paint.
Table for giving from another material
For an inventive person with imagination, there are no boundaries. For country furniture, you can use any material at hand, from old tires to wooden pallets.
Original table ideas for a summer residence
from pallets
The loft style, which has been gaining popularity lately, encourages the use of atypical materials for the interior. For example, pallets. It is comfortable, environmentally friendly, and most importantly, cheap material is used to build benches, tables, sofas, even beds. For furniture, it is better to take new pallets, you can choose the size, there are euros or Russian ones. In addition, the size of the pallets can be adjusted independently. To equip the table, you will need from one to three pallets, depending on the design. You can put glass or plywood on the lid. Before use, you need to carefully check the pallet for the presence of unnecessary nails, then sand it. When the product is ready, it needs to be painted or varnished.
 Pallet outdoor table and benches
  Outdoor table and cable reels
  Outdoor table and chairs from old tires


Everyone associates the word dacha with a small garden, a vegetable garden and a comfortable seating area. After all, after working in the garden, you really want to relax in nature, fry a barbecue and just relax with your family.
To equip a recreation area, you need to build a gazebo or make a canopy and install it with a bench or chairs.
Such a piece of furniture does not have to be bought in a store ready-made. You can do it yourself if you stock up on free time, drawings, tools.
The feature of tables for outdoor use is their:

A table in the country can be made from different materials:
- tree;
- vines;
- metal;
- natural or artificial stone.
Each individual option has its own advantages. But most wooden models are in great demand. Since it is pleasant and convenient to work with a tree, and you can make a product of any complexity on your own, without making much effort.
What type of wood to make?
Before you start building a country table, carefully select the wood. Since the service life of the product, its wear resistance and appearance will depend on its technical characteristics. Most often, outdoor furniture is made from:

Concerning benefits wooden outdoor furniture from any type of wood, then these include:

To shortcomings wood products include:
- the likelihood of ignition;
- insect damage;
- the likelihood of decay.

Advice: to increase the resistance of the tree to all negative factors, it must be treated with special means.
Also, most people refer to the disadvantages of country tables made of wood. big weight. But such products are installed on the street once a year. At the request of the owners, for the winter they can be removed to the summer kitchen or any household. building.
Attention: when placing a wooden table in the open air, it is necessary to think over the space for water drainage.
Dimensional drawing

To make a table with your own hands, you will need to draw up a drawing. So you prevent mistakes during the workflow, and make furniture much faster. This drawing should have the following symbols:
- length of the product;
- width;
- depth;
- height.
Also in the drawing, the materials of their manufacture should be noted. For furniture designed for 8-10 people, the optimal size of the tabletop will be 80 by 120 cm.
Important: the dimensions of the table for giving are calculated based on the needs of users and the availability of free space in the summer cottage.
If there is a lot of free space, you can assemble a spacious country house. table with benches. The advantages of this design include:
- capacity;
- stability;
- ease of use.

Some people prefer tables with ice box. Such designs are convenient. In the summer heat, they can cool drinks. This model is practically no different from a product with benches. Only in the middle of the tabletop is an ice box made. Instead of an ice box, you can build a table with flowers. In the middle of the tabletop you will have a beautiful flower bed.
If there is not much free space on the plot, you should opt for folding model furniture. It differs:
- compact size and ergonomics;
- light weight;
- different transformation options.
Important: for the manufacture of countertops, it is worth choosing a board with a thickness of 3-5 cm.
Tools and Consumables
From the tools for making a wooden table, you need to prepare:

From the materials we need:
- lumber;
- furniture glue.
Manufacturing and assembly
Main components tables are:
- load-bearing frame;
- countertop;
- support bars.
The process of assembling the table is carried out in the following sequence:

A round table will look very attractive at their summer cottage. For him, you need to prepare:
- base;
- racks;
- countertop;
- tabletop base.
The assembly stage will consist in the following sequence:

How to paint garden furniture
 Since the garden table will be located in the open air, it will be affected by increased moisture and sudden changes in temperature. Also, the tree will be attacked by pests.
You can extend the life of the country table with the help of different impregnation, paint, varnish.
To do this, use a special outdoor paint.
A photo
Real craftsmen can make works of art out of simple outdoor furniture:


Useful video
All steps are shown in detail in the following video:
Conclusion
In conclusion, it is worth noting that you can make a country table with your own hands in a fairly short time. To do this, a drawing of the future product is created, consumables and tools are selected. With a competent approach to assembling a table for a summer residence, you will build an attractive and practical product, behind which your friendly family will gather every weekend for a summer and pleasant vacation.
In contact with
A table is a necessary attribute of comfort, without which a modern person cannot do without. As soon as the conversation turns to eating away from home, a person begins to think of what to build a table from. In nature, they find a convenient stump, at a construction site they lay boards between stools. Well, what about the dacha? For a comfortable snack in a summer cottage in the open air, you can build a wooden garden table with your own hands. This does not require extensive knowledge or special skills.
The main criterion for a country table is durability and convenience.
There are several options for making a wooden garden table. Let's consider both the simplest and more complex ones, but first, let's find out what tools may be needed for this job.
List of required tools
- Wood - the choice of material should be approached very carefully, we will dwell on this point in more detail, the main thing when preparing it is to take into account that its rigidity and weight will depend on the thickness of the working surface of the garden table;
- Planer - perhaps it will not be needed, but if the countertop is type-setting (consists of several boards), then with its help they can be fitted closer to each other;
- A hacksaw for wood - it is much faster and more comfortable to work with an electric jigsaw, but not everyone has it, and electricity is not always available in the country, so we will strive for minimalism;
- Chisel - no carpenter can do without it, making a table is no exception. A chisel is needed for cutting patai;
- Nails and hammer;
- Roulette and level;
- Screwdriver - some elements of the garden table are best fastened with screws or studs;
- Sandpaper - needed for the final grinding of the garden table;
- Lacquer - After the garden table is assembled and sanded, it will need to be protected from the environment if you do not want to hide it under a canopy before it starts to rain.
How to determine the size of the outdoor table
In this matter, one should proceed from the number of family members and guests who regularly take part in feasts and add a couple more places to them just in case.

When deciding on the size of the table, take into account how many people you need to place at it.
For a company of 4-6 people, the size of the outdoor table for giving will be 1200x800 mm. If the company gathers up to 10 people, then it will fit at the garden table from 1600 mm in length, and the width can be left the same.
It should be borne in mind that too large a wooden outdoor table will be difficult to bring into the room for the winter. To avoid inconvenience, its design can be collapsible.
The second important parameter is the height of the garden table. But everything is standard here, the countertop from the floor should be at the level of 70-90 cm, for people of average height.
Drawing preparation
If you have never made a table for a summer residence with your own hands before, then it is better to download the necessary drawing from the Internet. The abundance of simple and complex wood designs will give you wiggle room.
A couple of tips for those who want to make a drawing with their own hands or make changes to the finished scheme:
- Take dimensions not from the ceiling, but focusing on a table of suitable dimensions in a store or at home;
- If the dimensions are already set, then it is easiest to make changes to them by multiplying or dividing all the parameters horizontally and vertically by a constant factor.
Example: if you need to slightly increase the table in height and length, then you can take the indicator “1.2” as a coefficient. Multiply the height and length by it, and do not touch the width. You can do the same with any parameter.
We assemble an outdoor table for a summer residence in size
The easiest way to show the assembly process of the most common design of a country table is with an example with specific dimensions, in which you can make changes based on your preferences. First, let's designate all the details and their dimensions.
Tabletop for country table
We will take its size based on a large family of eight people. Length 1800 mm, standard width 700 mm. The thickness should be chosen based on the type of wood, but even from the most durable wood, the thickness should not be less than 20 mm.

The scheme of the country table.
legs
The legs of the table will be at a slight angle for better stability, their length will be 750 mm. The bar itself for the legs should be 100x50 mm in width and thickness.
Bottom rails
If it is assumed that the lower crossbars will serve as a support for stationary benches, then their length should be 1500 mm, the width and thickness are similar to the legs. If the benches for giving will stand separately from the table, then you can limit yourself to a crossbar length of 1000 mm. There should be 2 such elements in total.
Top rails
There should also be two of them, according to the cross section, the beam for them can be taken, as well as for the bottom one, but it can also be reduced, because there will not be a large load on these elements, they should be the width of the table top, that is, 700 mm long.
stiffener
This element is attached in the middle of the tabletop to its lower part, spacers will rest against it, in terms of dimensions it must be completely identical to the upper crossbars.
Spacers
Their manufacture takes place last, and the dimensions are selected upon the fact of measuring the structure. Initially, only their cross section is known - 50x100 mm.
Fixed benches for wooden garden table
If you decide to combine a table and benches in one design, then the length of the lower crossbars should be 1500 mm, as mentioned above. Two boards on each side are laid on the edges of these crossbars, the length is equal to the length of the garden table, and the width is 125 mm each.

A variant of a country table combined with benches.
In the case of a smaller width of the existing boards, they can be slightly moved apart, leaving a gap. The thickness of each board must be at least 30 mm, so that they do not break under a person.
In order to avoid sagging of benches for summer cottages during long-term operation, the boards in the middle must be reinforced with a stiffener.
Table assembly process
Knots of supports of a wooden garden table
- Make cuts on the leg blanks at the top and bottom at an angle of 22 degrees.
- Place the legs at an angle so that one of their sides overlaps with the upper crossbar, and the distance along the centers of the other ends is 1400 mm.
- The lower crossbar must be placed at a distance of 300 mm from their lower part.
- Both supports must be completely identical. It is necessary to drill two holes at each junction of the legs with the crossbars.
- After that, you can completely fasten them with bolts or studs.
Assembling the countertop for the country table
- Having previously processed the ends of the boards with a planer, number them with a pencil on the reverse side. Lay out all the boards on a flat surface according to the affixed numbering. Find the center of the future countertop and use self-tapping screws to fix the stiffener to it.
- The length of the screws must be sufficient for secure fixation to the table surface. But screws that are too long can pierce through it, so measure the thickness in advance and select the optimal self-tapping screws.
- Turn the tabletop over and, with the help of a partner, hoist it onto the installed supports. Temporarily fasten it to the supports using nails or self-tapping screws.
- Then, when the structure is rigidly connected, you can drill holes for the bolts after the fact. Each board should have one hole connecting it and the top rails on both sides. In the countertop, make patai under the bolt heads, using a larger diameter drill. Insert metal washers into them to prevent the board from being squeezed by the bolt during fixation with a wrench.
Installation of spacers for an outdoor table for a summer residence
After the table is assembled, measurements should be made with a tape measure between the edge of the stiffener of the table top on each side, to the bottom crossbar, and sawed off with a small margin of workpiece from a 100x50 mm beam.

An example of using spacers as a footstool.
The stock is needed to wash down the corners of the struts. Saw off one side of the spacer at the desired angle and, after attaching it, measure the second angle. Do the same with the second spacer.
They are fastened with nails or self-tapping screws, but you can try and make a bolted connection, in which case you will get a completely collapsible outdoor table for a summer residence. It remains to sand it with sandpaper and open it with varnish.
Other options for country tables
Garden table on a stump
You can do it even easier and assemble a country table with your own hands from improvised materials. Many people in the garden have unuprooted stumps from cut trees. The tabletop can be adapted just to such a stump. And put small logs around, using them instead of garden benches.
Country table made of pallets
After construction work on the garden plot, pallets from brought materials (brick or tiles) often remain, they can be used as material for a country table. You can build it with your own hands in 20 minutes. To do this, in addition to pallets, you will need 4 more bars.

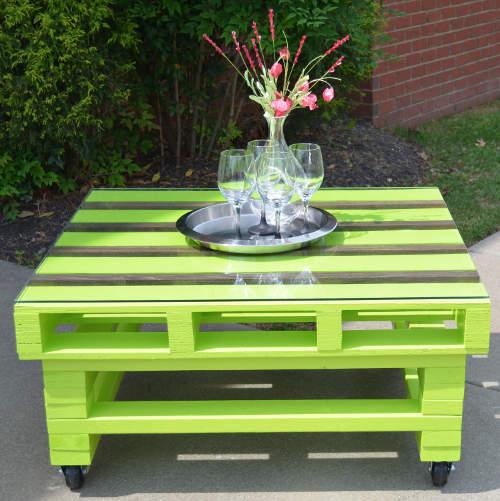
Variant of a country table from pallets.
Fix them on the first pallet, and put the second one on top, and fix it too. The table is ready, to give it a more presentable look, you can process the burrs with sandpaper and varnish or soak with oil. Instead of legs, screw on the wheels from old chairs and a comfortable mobile garden table is ready.
The garden table is an integral part of any country interior. On the modern market, this product is presented in a wide range - these are products made of metal, plastic, natural stone and, of course, the classic version, garden tables made of wood. In this article, we will talk about the positive qualities of common options and give accessible instructions for assembling a table with your own hands.
The tree is always relevant
Most garden furniture has always been made of wood. Almost every person who at least superficially owns a hacksaw and planer can make a table for the garden with their own hands. The whole process comes down to connecting a small number of planed planks and giving the furniture a marketable appearance.
A few words about the choice of material
If you want your product to serve you faithfully for many years, then it is better to make a garden table from strong hardwood. Of course, oak is the best option, but the price here, even at cost, will be considerable. Therefore, as a rule, more affordable larch, aspen, birch, linden or acacia wood is used.

Tip: conifers can be used for manufacturing, but they should be well prepared and covered with protective compounds. Otherwise, the abundance of resin can adversely affect the quality of the coating and your clothes.
For countertops, the quality and type of wood is especially important, so experts recommend not saving and buying a good grooved board, the increase in costs will be minimal, but the appearance will please you. It is advisable to assemble a wooden garden table from a well-dried forest, so that later the details do not lead.
In addition, the tabletop and some individual parts can be made of thick waterproof plywood or USB board. Chipboard (chipboard) is less suitable, as this material is afraid of high humidity and will not last long in the garden.

Self assembly
Assembly instructions can be very diverse, everyone chooses what he likes best.
In the photo and video in this article, several interesting and affordable technologies are presented, but we will tell you about the simplest, in our opinion, installation option.
- As mentioned earlier, it is better to assemble the countertop from a grooved board, so it will be completely monolithic.. In this case, the joints should be glued with ordinary furniture glue for wood. In this case, we will talk about a solid product, designed for a family of 6 - 8 people.
- Comfortable design height for a standard dining table is 700 - 750 mm. We will make the dimensions of the top plate 930x1450 mm. For a tabletop, a board thickness of 20 mm is sufficient, but a tabletop with a thickness of 40 mm will look more solid and solid.
- The boards are joined on a flat, horizontal surface and knocked down with nails or self-tapping screws, two or three perpendicularly located bars 50x50 mm. The bars are fixed at a distance of 300 mm from the edge.

Tip: since the wood is quite dense and thick, it is better to grease the self-tapping screws with soap before screwing in. Then they will enter the array much easier.
- Next, we move on to the arrangement of the legs. Boards with a section of 50x150 mm and a length of 650 mm will be used as legs. They will be joined at the ends, therefore, in order to reduce the length of the fixing bolts or self-tapping screws, 1 sample is made in the middle on each leg about 70 mm deep and about 150 - 200 mm long.
- The legs are joined at the ends, and the selected grooves should be on the outside at the same level. A stiffening rib is inserted between two pairs of legs, the function of which is performed by a board 50x150 mm, about 1 m long.
- From above, the legs are attached to the planks that fix the tabletop boards.. In the lower part, to increase the area of \u200b\u200bsupport, two boards are knocked to the legs, all of the same section 50x150 mm. Long slightly less than the width of the countertop.

Important: the entire structure, with the exception of the tabletop, can be made collapsible; for this, furniture bolts with a diameter of 6 mm are used. Or collect everything on long self-tapping screws, but then the table will not be disassembled.
Do not forget that wooden garden tables will be used outdoors, so all wood should be covered with protective compounds. Often one coat of stain is used to bring out the beauty of the texture and two coats of waterproof varnish.

Important: all wood, even before assembly, must be planed and cleaned with a grinder or sandpaper. From sharp corners, a chamfer should be removed so as not to subsequently drive a splinter.
Alternative designs
It is quite possible to assemble a light coffee table from wooden pallets. For this you will need 2 pallets. The top row of boards should be torn off, supplemented with the missing ones and knocked down end-to-end, more tightly.
Thus, you will get a monolithic countertop. To increase the height, 4 bars from the same pallets are inserted between the pallets. It is advisable to install furniture wheels from below.


Plastic garden tables are used everywhere, their price is quite affordable. They are durable, have a neat appearance and are usually quickly disassembled. But plastic rarely fits into the natural interior of a country cottage. Artificial materials, for the most part, have already become boring in the city, in addition, such products cannot boast of durability.

Quite another matter garden forged tables, often they are true masterpieces of furniture art. Of course, only a narrow circle of true specialists can make such beauty with their own hands, which is why the price of such products, frankly, bites.
Do-it-yourself stone garden tables are quite problematic to make. Alternatively, you can fold the brick cabinets and install a countertop purchased in advance on top. You can also use a large piece of slate as a countertop, but such installation will require remarkable physical effort.

Table option.
Conclusion

Often it is not so important that you have a wooden stone or metal garden table installed. Any design can be successfully entered into the landscape design of the cottage, the main thing is to do it with love, because you are doing it for yourself.


In the country there are very important items, but which you can do on your own, so as not to overpay too much, so our today's topic is do-it-yourself table for giving. You are free to make it of any size you want to get both a small headset table and a large one so that the whole family can fit behind it with guests, as well as folding models, functional, original, which are used as decor, and so on. Below we will give you examples of each of the above groups, as well as see how difficult or easy it is to make this important item.
Do-it-yourself wooden table for giving
Wood is relatively affordable and inexpensive, depending on what kind of material you want to use to create do-it-yourself wooden table for giving. In the vast majority of examples, we are talking about wooden planks of varying thickness that make up the table top, and wooden beams are used for the legs and supporting structural elements, an ideal material for this task.
We can talk about the advantages of boards for a very long time, but, first of all, this is the availability of the material, its cheapness, and, which is very important for home craftsmen and those for whom even simple responsible tasks - woodworking does not require many complex, expensive tools and no technical knowledge is required. In principle, assembling a stool has been a mandatory program for boys since school days and we assure you that assembling do-it-yourself wood table not much more difficult.

But before choosing among models do-it-yourself table for giving, drawings and schemes, you will need to decide which one you need, for what purposes. The degree of success of the design can greatly depend on this, since the table itself will be good, but it will not be suitable for the task at hand. So, if you need a portable model, then you should not make it with logs or similar heavy material, since it will not be easy to move such a colossus. Round varieties look very interesting, but they are best used for filling, the same round shapes. After all, although the circumference allows you to seat guests, all the same, on the surface of such a countertop there will be significantly less space than on a round one. It is also important what the legs will stand on, if it is an absolutely flat concreted area, then you can choose models with four even legs. They look very elegant and are quite easy to make. But if you want to arrange a feast on the lawn or you do not have confidence in the absolute evenness of the floor surface, then it is better to choose more stable options for the legs, for example, oblique ones, which will also allow maintaining the stability of the structure in this situation.
Do-it-yourself street table
Is wood the ideal material? do-it-yourself street table? Many doubt this, because in this case, water will constantly drip onto its wooden surface, both from rain and, for example, from watering, and this can adversely affect the wood. But, since all the positive aspects of just such a design are already very numerous, it is worth thinking about the special compositions with which the tree is painted. They do not change its structure, on the contrary, they can emphasize it, make it even brighter, even “more expensive”, but at the same time, they prevent the absorption of water into the surface and the appearance of all the negative phenomena that are associated with it. Therefore, just after the end of production, do not be lazy and do not save money - cover the finished product with a high-quality paint and varnish composition.

There may be several zones on the street where it would be appropriate do-it-yourself wooden table for giving, drawings which you can see above. First of all, it is a summer terrace or a place for eating, located near the summer kitchen. There you will need a large, wide tabletop, which, ideally, is completed with benches or chairs of exactly the same design, so that it all looks like a single set. But not only for eating, we may need a table, but also for gardening and gardening. For example, in a garden, it is best to install it in some picturesque clearing, fit it into landscape design. He is also needed on the made one, because behind him it will be possible to draw, and sculpt, and play board games.
We want to talk a little about special tables, which are gaining more and more popularity among the owners of suburban areas. The fact is that a new variety has been added to the traditional set - a bar counter. This is a countertop of an unusual shape - it is located on very high legs so that the person who sits behind it and who stands behind it are of the same height. Such entertainment as a country bar, decorated, for example, in a beach style, decorates the site very much. In the photo you can see what it might look like. do-it-yourself wooden street table.

In that, in the bar counter format, there are no particular difficulties, you will only need to understand what its size, height and width will be most comfortable for you. Another essential element of the design will be the presence of a large number of shelves and drawers where you can put dishes and all other devices for creating cocktails. The material for the construction can be both boards and pallets - boxes that are in great demand today, although you will have to work with it no less than when knocking down do-it-yourself table boards for giving. The fact is that in these boxes there is not only their expiration date, but also the initially good or poor quality of wood, therefore, chasing ease of assembly, you can get a product of poor quality, crooked and with an uneven table top. And all because after one season of use, the boards begin to “lead” in different directions, so you should not only buy high-quality pallets initially, but also let them stand for some time before work.

Continuing the theme of the bar counter, we want to show you a few more high varieties. These are auxiliary cart tables, mobile and convenient for moving within the entire site. They come with small wheels to make them easy to carry, but think about the material you're making them from to make them as light as possible. In addition, developing the idea of a bar counter, you can do something much larger by making a circular tabletop, for example, on a fence framing a barbecue area. And the idea with the design of a round stand that goes around a tree is not only practical, but also very beautiful. Previously, we could only see benches that were placed in a similar way, but it turned out that they would cope with this task no worse.
How to make a table for a summer residence with your own hands
To develop the theme of useful furniture, we will briefly show you the process of creating an auxiliary table. In this case, when solving the problem, how to make a garden table with your own hands, two main stages are used - this is the creation of the frame and the design of the countertop.

To create a frame, an appropriate drawing is selected, the length of all the boards and timber that are part of it is marked, and then they are successively knocked together. You see a ready-made, assembled frame, decorated with a pergola element on a high back. This will not only decorate the craft, but such a perforated plane can be used to store kitchen utensils. From above, on the recess, you need to lay a countertop made of even material, for example, a laminated wide board, so that there are no gaps between the boards in the surface, since dirt will easily clog there. A technical hole is cut for a metal sink purchased at a plumbing store, as well as all the holes for communications, taps, pipes that you will need. When installing the sink, the edges of the hole are carefully sealed, this will fix the element in the countertop and prevent water from penetrating inside. It remains only to connect the structure to the country water supply system, and bring the drain into a septic tank or into a cesspool.

If you want to do everything yourself, a traditionally shaped table, this will give you some advantages, as you can provide a table top with very useful features. For example, make a small hole inside, in the center, where you can insert a large umbrella if necessary, protecting everyone who will sit around it from the scorching sun.

And in the case when there are special requirements for the functionality, you can go even further towards creativity. For example, make a recess in the middle of the table, inside which there is a cooler bag. Ice is poured inside it and bottles of beer are installed - for a long summer feast. For those who do not like beer creativity, moss or unpretentious garden plants can be placed in such a niche, which will simply decorate the appearance with their presence.
Do-it-yourself table for giving a photo
When we are using pallets, as we have already mentioned, it is best to use a combination of them with other materials, or a non-standard form for the finished product. How beautiful it can look to improve your country life, you can look at the example of creating do-it-yourself tables for giving, photo which is located below.

And also examples of more traditional tables with a "zest" - a folding element that makes such furniture extremely convenient to use. If they are not needed, then you can easily halve their overall size or, in general, remove them away until the moment when they are needed.

DIY table and bench
The ideal option, if you feel a sufficient degree of skill in yourself, is a whole set consisting of do-it-yourself tables and benches for summer cottages.


The examples above show that these sets can be of different shapes and sizes, but at the same time they look very stylish and expensive, precisely because they are made in the same style and their designs overlap with each other.