Sometimes there is a need for cheap temporary housing. Change houses are inexpensive compared to permanent structures, so their use has become widespread in construction site, and on personal plot, and the rational distribution of space inside the mobile home made the temporary shelter a convenient and comfortable place to live.
What attracts us to cabins?
Cabin trailers are made of wood (cheaper) and metal (more expensive), but each type of structure can be made independently, although to produce a container you will need special knowledge and tools, and a prepared room. The welded frame of the metal cabin allows it to withstand the load of the second floor of the mobile building. If you need a high-quality trailer for a construction site, then you should purchase a reliable design.
The benefits of change houses are not fully realized until temporary housing is purchased. But if you already have a change house, then your workers will be grateful to you for comfortable conditions accommodation.
Advantages of cabins:
- A quick process of manufacturing in production or installation on site, which cannot be approached by a handling crane.
- The construction of a permanent foundation is not necessary. It is enough to level the site for the structure and lay the foundation blocks.
- Change houses will cost you little, since their cost starts from 25 thousand rubles. Modern materials allow the construction of cheap but warm cabins. Once there is no need for use, more expensive structures are rented out or sold. But, most likely, you will need the change house more than once.
- The mobility of a temporary home is the main advantage of a cabin, because a mobile home can be transported from site to site, no transportation permits are required. And if there is a chassis with wheels at the bottom of the cabin, this will greatly facilitate unloading or loading the structure. Trailer trailer more convenient option cabins.
- Ready for use immediately after unloading.
- Re-equipment of a change house is an easy task, due to which the intended purpose of the product changes.
- When purchasing prefabricated cabins, you save storage space.
The area of use of temporary housing does not end at a construction site or a summer cottage, because the change house is useful in conditions of remote work in field conditions, as a warehouse, security point, mobile office or as another housing near your home, the so-called. guest house.

Sometimes temporary shelters are needed only for the construction season, and in this case it is worth buying wooden cabins inexpensively. A clapboard façade does not require special insulation if the structure is needed for the summer. But, more often, it is better to sheathe the change house with mineral wool, which will not only make the room warm, but also protect wood cladding from rotting.

How to make a wooden shed on your own?
If you do not want to overpay for production services for assembling a change house or simply need to be confident in high-quality installation makeshift, then you should do it yourself. The manufacturing process takes 10 hours, provided you work with electric tools together with a partner. In addition to the materials presented in the table, you will also need self-tapping screws, staples with a stapler, and fiberboard panels for the interior cladding.

| Material | Characteristic | Quantity |
| 10*10cm length 6m | 10 units | |
| Board | 5*10 cm | 12 units |
| Board | 2.5*15 cm | 1.5 m3 |
| Polyester | Thickness 150 micron | 6*8 m |
| Polyester | Thickness 100 micron | 3*10 m |
| Vapor barrier | In rolls | 2 units |
| Mineral wool | Thickness from 50 to 100 mm | 8 m3 |
The end result should be a wooden shed on a timber frame coniferous species, covered with lumber natural humidity. For interior decoration, lining is also used, but when installing a change house inexpensively, opt for hardboard or fiberboard. Wood moisture content should not exceed 12%, which minimizes the risk of cracks due to shrinkage of the structure.

The dimensions of a standard cabin are no more than 2.5 * 6 m and a height of 2.5 m. Standard dimensions facilitate quick transportation of the structure on the body truck. The wood should be treated in advance with an antiseptic compound, and the floor, walls and even the roof should be insulated with mineral wool, which is attached to the frame along the edges with staples.

Windows and doors are made of wood, but for greater thermal insulation they are made of metal-plastic. If you want to make a roof from ondulin or metal tiles, this will increase the cost of the change house by 8 thousand rubles, installation of electrical wiring - plus another 7-8 thousand rubles, sheathing the facade with siding, imitation timber or block house - plus 10 to 15 thousand rubles to the project.
Arrangement of a foundation for a change house is desirable, since if it is present, the change house will not be destroyed from the bottom. You can choose either a pile or block foundation installation option, which depends on the service life of the temporary building.
If you are the lucky owner summer cottage, but the construction of the house is still ahead, it is necessary to take care of a small utility room - a change house. The change house is useful for storing tools, building materials, work clothes and just for relaxing after a hard day. working day. Of course, you can purchase a ready-made structure and place it on the site, but building a shed with your own hands will cost much less, and besides, a wise owner of a suburban area will never miss the opportunity to get useful experience and skills. In this article you will find step-by-step instructions for making cabins.
A change house is a utility room in the form of a small house where you can store all kinds of garden tools and construction supplies. But there are no clear rules for using a shed - you can turn it into a shed for storing unnecessary things or turn it into a cozy guest house. Depending on the future purpose of the cabin, the features of its construction also differ. So, if this is a tool shed, then there is no need to insulate it too thoroughly. And, on the contrary, if you plan to accommodate guests or relatives in the cabin, isolation and improvement should be approached in a special way.
In some cases, you can make it out of a change house small garage For garden equipment or a motorcycle. With the onset of cold weather, many people move there poultry, bees or rabbits, placing the animals for the winter. However, regardless of how you use the change house, it will come in handy in any case.
Types of cabins
There are several design options for cabins depending on the construction technology. This, in turn, determines the cost of the work and performance characteristics building.
There are the following types of cabins:

To save time, you can purchase a used cabin, but in this case, pay attention to the degree of wear. Carefully inspect the structure outside and inside. Keep in mind that the cost of transportation and crane rental will be added to its cost. Before you decide to buy even an old cabin, add up all the amounts of upcoming costs and compare them with the cost of building materials - perhaps it will be cheaper and easier to build a cabin with your own hands.
Construction technology
Despite the fact that the change house is considered a secondary utility room, its construction should be approached responsibly. And the best place to start is with a drawing. The layout of the change house should include the dimensions of the walls, the area of the roof, floor, insulating layers and points of attachment of elements. With the help of a sketch, you can imagine how the structure will look on the site and how it can fit into the landscape. Only after creating a detailed drawing of the cabin (or even several) can you calculate the required amount of materials (add 15% of the stock to the received amount) and go to the store.

If you plan to store gardening tools in the shed or Building tools, there is no need for windows there. In the event that it will serve as a guest house or a summer kitchen, it is better to take care of full natural lighting (this will help save on electricity).
Speaking of electrification of cabins. Electrical wiring should also be shown on the drawing (preferably on a separate one). You will find more information on this topic in the articles and.
Where to put the change house?
When all the building materials have been purchased, you need to choose a place to install the change house. First of all, you should take into account the duration of use of the building and the possibility of moving it to another location if necessary. For example, if you are going to build summer house for a couple of seasons, and then transport it to another site or sell it. In this case, it is better to locate the change house closer to the entrance to the site or provide vehicle access to it.
It is also necessary to think through all options for using the structure. If gardening equipment and tools will be stored in the shed, it is better to place it closer to the center of the site and create easy access from all sides. If you make a bathhouse out of a cabin, you can “hide” it in a secluded corner of the garden behind the trees. The farther the cabin-sauna is from a residential building, the better in terms of fire safety.
If the change house is planned to be used as a greenhouse, it is better to choose the highest and sunny place Location on. However, regardless of the purpose of the building, a site should be prepared for it.
How to install a change house:
- The selected area must be cleared of weed and any vegetation.
- Next, you should remove the fertile layer of soil. Depending on the characteristics of the soil, the thickness of the turf can range from 15 to 30 cm.
- Having leveled the site, you need to cover it with construction polyethylene (a film 200 microns thick is quite suitable). Greenhouse film It is not recommended to use because it is not strong enough. The film layer should cover the entire area under the future cabin and extend to the edges by 20 cm on each side. Film is the simplest waterproofing for the foundation. You shouldn’t feel sorry for it, much less neglect this step, otherwise in 2-3 years you will notice signs of destruction of the foundation.
- The mixture should be poured over the film river sand and crushed stones in a layer of 20 cm. This will fix the waterproofing and at the same time level the surface.
- To ensure that sedimentary water moves farther away from the cabin without hindrance and does not linger near it, you can make a slight slope around the building of 2 cm per meter.
Cabin foundation
A change house is not a very heavy structure, no matter what materials are used, so there is no point in pouring a powerful, expensive foundation under it. The best option is a columnar base. It's inexpensive, fast and quite simple. Plus, columnar foundation leaves a ventilation gap in the underground, which extends the life of the building.
Helpful advice: If you think that a cabin on such a foundation will not be warm enough, there is perfect solution– create formwork around the perimeter, pour the solution over the entire area to create a border 7-10 cm high. It is quite enough to properly insulate the floor. Use expanded clay as floor insulation.
In our case, the pillars are concrete blocks, but they can be made from brick, reinforced concrete and other materials. You will find more information on this topic in the article.
Progress:
- Install concrete pillar blocks in accordance with the shed plan.
- Cover the top ends of the posts roll waterproofing(regular roofing material will do).
- Using a timber for the base and a building level, adjust the horizontal position of the pillars so that they are strictly in the same plane.

Cabin frame
As you already understand, we are building a frame shed, the base material for which was a timber with a cross-section of 100x150 mm. You can take a little thinner - 100x100 mm or 100x120 mm.

How to make a change house:

Roof of the cabin
How to make a roof for a shed:

Roofing material can be anything you like. In our case, this is ondulin - practical and inexpensive. If the change house is residential, the roof should be carefully insulated, since it is through it that the most of heat. To do this, first attach a vapor barrier to the sheathing, then insulation, waterproofing film and only after that - finishing coat(corrugated sheeting, ondulin, metal tiles, etc.).

House windows and doors
As for windows and doors, they should be installed in the same way, focusing on the functionality of the structure. Even if you are going to store shovels and rakes in the shed, you should make at least one ventilation window for ventilation, otherwise mold will very quickly grow inside.

The location of windows and doors should be established at the time of design, so that during the construction of the frame, additional reinforcing racks can be installed in the openings. If you forgot to include them in the project, then you can organize the openings after the construction of the frame. During work, be sure to use a laser level or water level to avoid distortions.
Cabin floor
With an uninsulated floor in a change house, everything is clear - make a plank flooring and you're done. Another thing is to make the floor so that you can walk on it without shoes in winter and not be afraid of getting sick. To do this, you must first lay the subfloor, then the insulation and the finishing coating.
Expanded clay, vermiculite, polystyrene foam boards or mineral wool. To eliminate drafts from under the door, it is better to make a threshold at the entrance. It can be cut into the base beam itself or attached separately by nailing a strip.

How to build a floor in a shed:


Insulation and finishing
To make the change house warm and cozy, the walls need to be properly insulated. To do this, first cover the entire surface with thick plastic film- she will protect interior space from wind and moisture.

Then you can lay the insulation and cover it again with film for additional protection. In principle, this process is no different from insulating a roof or floor. For exterior wall cladding, you can choose siding or other weather-resistant material. The widest range allows you to choose an option exterior finishing, which will fit into any landscape.

The inside of the change house can be lined with clapboard or the interior can be made more comfortable by upholstering the walls with wooden panels. All those finishing options that are used in ordinary residential premises are acceptable here: wallpaper, paint, plaster, tiles, etc.
As for household amenities (lighting, water supply, sewerage), they must be taken into account when creating a drawing. The articles “” and “” will help you understand these questions.
The construction of cabins in practice is not so difficult. And if you are planning to build a residential building with your own hands, then a change house will be an excellent training before a large-scale undertaking.
Change houses: photo


A utility shed is a completely universal structure. It can be used not only for temporary residence of builders during the construction of buildings, but also used after completion of work as a place to store various equipment. This design will be very useful in a dacha and adjacent area - it is easy to build, and the benefits from it are obvious. Now we will tell you how to make a change house with your own hands for your home or cottage.
There are several options for making household sheds and each has both advantages and disadvantages. At the same time, the main part of the criticism falls precisely on the price/quality ratio, but if we set ourselves the task of doing the work ourselves, then we will immediately refuse ready-made structures, which are mostly presented on the market in the form of containers.
Panel cabins, that is, those made from solid panels, are often not very High Quality, as a rule, are short-lived, if not disposable. This option does not withstand atmospheric influences, especially strong gusts of wind. We will focus on a simple, affordable, and most importantly, durable version of the change house - we will build it from wooden beams.

Preparation
If you are planning to build such a structure with your own hands at your dacha or local area, start by marking the territory. Please note that if you are planning to build a change house not for a certain period, but for a long time, then carefully select a place for it, taking into account convenience and the presence of other buildings. We will be building a structure with a foundation, so carefully select and designate the location in which it will be located.

Thoroughly clear the area of debris and stones. If you are constructing a house or cottage, and the change house is temporarily needed for workers to live and store things, choose a place not next to the main one construction site, but away from it. It is recommended to locate the building at the far end of the yard, near the fence. This will not interfere with the visual beauty of the site and will not be noticeable to guests.
Foundation
Check out the sizes future design. If you need a kind of “pantry” for storing tools, this is one thing, but if you are planning to build a good-quality shed with windows and the prospect of turning it, for example, into a summer kitchen, these are more serious dimensions. We will focus on the conditional average dimensions of 3x4 meters, which, in most cases, is quite enough. You can calculate the dimensions at your own discretion.
So, in the marked area we tear off a layer of soil about 20 cm deep. We get rid of the stones and level the resulting depression. Covering the surface of the earth moisture-resistant material, for which it is recommended to use geotextiles. Pour a layer of sand on top of it (about 10 cm) and compact it thoroughly.

Next, we take cinder blocks and install them in a symmetrical order along the entire perimeter of the sand base. Adjust the number of cinder blocks taking into account the area of the change house, but take into account a step of approximately 80-100 cm between the supports (less is possible). After installing the blocks, fill the foundation with sand to the ground level on the site, level the blocks using a level and compact the sand. If you are going to build a porch for the cabin, install additional cinder blocks according to similar technology. As a rule, you can get by with two or three, taking into account the emphasis of the porch on the common foundation.
Important: Plan your work in such a way that after installing the cinder blocks, their top level is approximately 15-20 cm above the ground level. The bottom surface of the change house will not come into contact with the ground, which will save you from problems with rotting floors.

As you can see, a do-it-yourself change house does not require complex manipulations with concrete mortar to lay the foundation. This option is great even for heavy structures, and you can move it if the need arises. Although, of course, you will have to try for this.
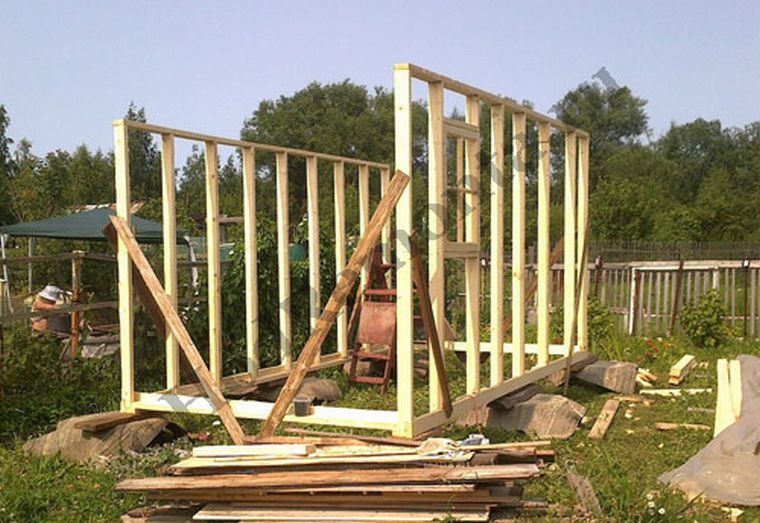
Frame
Before installing the frame for construction, we process the cinder blocks bitumen mastic and wrap it with roofing felt. This is necessary to ensure waterproofing. Next we take the prepared wooden beams and lay them on top of the cinder block base. The beams must be fixed with anchor bolts. Select the cross-section of the material to match the weight of the future structure, but not less than 100 mm.
Make sure that the horizontal frame is correctly maintained. To do this, use building level. After laying the beams around the perimeter, do not forget to lay them in the center. Beams can be connected in the manner shown in the figure.

The second layer of beams with the obligatory transverse joists is laid on top of the first. Connections are provided with angles and self-tapping screws. Do not forget to securely fasten all the parts and check the strength, since the overall stability of the cabin structure depends on this.
After you are convinced of the reliability of the structure, you can proceed to securing the vertical posts. We take the beams and fasten them in the corners of our future shed, using metal corners. To further create strength, the vertical posts are secured with plates that secure the two parts of the structure. Erect such racks in each corner of the shed, and then proceed to installing intermediate ones. Choose the height of the racks according to your taste, but it is not recommended to make them higher than 2.5 meters, in order to avoid unnecessary load on the components of the building.

Important: The roof of the cabin should be sloping to avoid accumulation of precipitation on it. Therefore, you need to provide different heights for the racks on the front and rear parts of the cabin. Aim for approximately 20-30 cm difference.
You should have a strong structure with a strut pitch of approximately 1 meter. For reliability, the racks can be temporarily secured with light strips, which can later be easily dismantled. This will save you from accidental breakdowns. We draw attention to the need to check the verticals and horizontals with a building level after each installation of beams.
Don't forget to provide doorway when installing vertical racks on the front side of the cabin. It can be done either in the center or closer to the edges. Also, if you have included a porch in the project, do not forget to install joists for this purpose.
When the installation of the vertical posts is completed, we secure them on top with beams that will act as a base. future roof our cabin.
Roof
As already noted, the roof of the cabin should be sloping so that precipitation does not linger on it. To do this, we made the front racks higher than the racks of the rear wall of the structure. We make sure that the angle of inclination is the same along the entire perimeter of the structure.

Now we move on to the installation of rafters. For the rafters, we choose the most durable and straight boards, taking into account that the edges of the roof should protrude above the facade and rear of the building by about 30-40 cm, providing protection from rain and snow. We monitor the reliability of the fastening of the rafters - for this we use metal corners with screws and nails. The pitch of laying the rafters should be about 50 cm.

Now we install the sheathing - a set of boards laid on top of the rafters in the transverse direction. As a covering for the roof, we can recommend a material such as ondulin (bitumen slate) - it is quite light, so there is no need to use too thick boards for sheathing.
Having mounted the sheathing, we lay ondulin, starting from the bottom and working overlapping. The roof will be quite strong, but at the same time quite light.

Floor
For the floor we will use a base of logs laid across the structure; two or three will be enough, after which we can proceed to covering the floor with boards. We securely fasten all elements with nails.

Be sure to treat the floor boards with a special antiseptic, which will help prevent the development of harmful microorganisms. Fix the film over the boards, lay a layer of mineral wool for thermal insulation and cover with film again. Now it’s the turn of the second skin, which, in fact, will play the role of the floor in the change house.
Walls
Walls are very easy to build: you can attach them to vertical posts horizontal boards, or use ready-made wooden panels. Boards or panels are fastened with ordinary nails. Do not forget to monitor the reliability of the fastening and the overall evenness of the fasteners. Check horizontal and vertical lines with a building level. There is no fundamental benefit from this, but the change house will not look “skewed”.
Windows and doors
Door and window openings, which must be assembled from timber of suitable size. The structure is attached to the walls with corners, and the cracks are blown in polyurethane foam. Which window or door to choose is up to you.

Finishing work
Do not forget to ensure thermal insulation of the roof and walls - use mineral wool and film. The interior lining of the cabin can be made from inexpensive chipboard/fibreboard. Open the wood with a varnish mixture suitable for your type of wood and let it dry thoroughly. The outer walls of the building can be painted in the desired color.
The change house is ready. If necessary, it can be moved to another location using a truck crane and having previously prepared a new foundation according to the instructions provided. Happy construction!
Construction work is a complex and multifaceted process, for which it is necessary to provide for literally every little detail, including temporary housing for a team of workers. Great option in this case, it can become a household construction trailer. It can be used in many ways, including a kiosk, a small cafe or even a mobile office in the future. Moreover, small trailers converted into houses are often found on suburban areas. They are transported several times a year, and this is the main advantage of temporary housing.
By building a household trailer for yourself, you can turn it into a real home with everything you need: a kitchen, a bedroom, a bathroom. And if you still doubt whether it’s worth investing in a change house, then make up your mind - there’s nothing to think about here. If the design is made with sufficient quality, it will pay for itself very quickly. Moreover, in the future it can even be rented out.

For the manufacture of cabin cars, only two materials are used:
- metal;
- wood.
Of course wooden structures They are cheaper, and if you properly treat the cladding (this is often lining), then the change house will last at least ten years. If we talk about metal, it looks more modern, is characterized by strength and the ability to withstand heavy loads, but compared to wood, this material is significantly more expensive.

Often trailers are produced at metal frame, so installation on a pre-built foundation is not required - any leveled surface or special blocks. The trailer can perform one of three functions:
- be temporary housing for construction workers;
- to be a guard post;
- serve as a warehouse for building materials.
The rooms inside the car can be separated or combined, but in both cases it is desirable to have a vestibule - it is necessary to protect against cold air from outside.

Entirely wooden trailers are found less frequently, and then mainly on sea coasts or suburban areas. A wooden cabin is an excellent conductor of heat, so it can be heated quickly. In addition, the weight of such a structure is much less than that of a metal one. But regardless of the frame you choose, you can equip your trailer with wheels and an axle at any time, “taking” some living space with you on the road.

Using modular structures, you can create an entire town of cabins in the immediate vicinity of construction site. You only need to take care of water supply and electricity. If there is not enough space in the building area, then you can resort to vertical installation - the main thing is that the structure can withstand.
Pros and cons of cabin cars
When compared with a household container or a rented apartment, a camp trailer costs much less and has smaller dimensions. Here are the main advantages of trailers:
- acceptable quality;
- multifunctionality;
- no need for assembly;
- low cost;
- possibility of multiple transportation.
And now the disadvantages:
- limited equipment;
- the need for permanent storage space;
- a large number of cracks and connections (increased heating costs);
- low fire safety.

Buying, renting or building?
Having decided on a trailer, you will probably ask yourself this question. Let's look at the strengths and weak sides each of the options.
Buying a trailer
The cost in this case depends on the size and whether the car is new or used. Here standard sizes: 250x250x600 cm. This design can accommodate from six to eight people, and the cost will vary from 40,000 to 60,000 rubles.
Smaller cabins are cheaper, but their comfort level is quite low. For example, in a carriage measuring 230x240x400 cm, no more than four people can fit, but it will be cramped for them. Such designs will cost from 24,000 to 32,000 rubles.
Rent a cabin

If construction works will take no more than six months, then you can settle on the option of renting such a cabin. This option has some advantages:
- you will not waste precious time searching for a suitable product;
- the trailer will be delivered and installed at the construction site by employees of the company leasing it;
- the cabin will already have everything you need for living;
- At the end of the agreed period, the trailer will be dismantled and taken away, also without your participation.
If the site has already been prepared and a place for installing the trailer has been selected, then do not forget about one thing important point: after assembly, the change house also needs to be raised. To do this, take care in advance foundation blocks size 20x30x30 cm.
First stage. First, decide which frame will be used. The best option is a ready-made frame, which can be a metal container.
If you don’t have this opportunity, start building the structure yourself. To do this, take wooden beams 5x5 cm 6 m long and build a frame from them (its dimensions depend on your needs).

Note! If the size of the cabin exceeds the average (we talked about average above), then take care of auxiliary fastening with runners - this will make the structure more reliable.
Second phase. Next, mark the windows and doors on the wall blanks, build a roof (it is better to use metal tiles or galvanized steel for the covering). On the lower part, install runners made of beams measuring 20x20 cm or 15x15 cm and lay the subfloor. It is very important to check it diagonally after this.
For the floor you can use any available material, but a 5 cm thick board is best. Insulate with mineral wool.

Third stage.

Then lay out the outer cladding using sandwich panels, clapboard or corrugated sheets. At the same stage, you will have to lay the finished floor (it can be laminate, plywood or the same board). Fourth stage. The next stage of work is
interior lining
trailer

Note! In parallel with the sheathing, insulate the walls, waterproof the floor and roof. Although you can refuse to carry out this procedure if your plans do not include operating the cabin in the winter. Cover the inside of the trailer in stages, do not try to take over the entire area of the room at once. Do it this way: first choose one wall, cover it completely, and only then proceed to the next one. Fifth stage. The final stage

installation work is the installation of windows and doors, power supply. Then, if everything is done correctly, you can start operating the construction trailer. To use the shed

all year round , you should definitely insulate it. To do this, build a sheathing and insert insulation boards into the openings of the structure. This material, as already mentioned, can be mineral wool (it is laid in a 5-centimeter layer), but you can also use polystyrene foam, fiberglass, etc. Cover the insulation boards with special insulating material. Pay special attention to your purchase finishing materials, inquire whether the seller has a quality certificate. If you decide to trim the car with wood, you can additionally purchase paints and varnishes. To finish smooth plasterboard surfaces, use wallpaper. When laying

wooden floor
First, install logs of appropriate sizes (pre-treated with tar), lay insulation and a layer of waterproofing, and then lay the boards. You can cover the boards with linoleum. If desired, a household trailer can easily be turned into a cozy bathhouse. To do this, insulate the entire room and decorate it with linden lining, then treat the surfaces with antiseptic and moisture-repellent agents. A standard trailer can easily accommodate both a steam room and a dressing room - you just need to build partitions with a door between them. Note! Be sure to take care of
drain hole
next to such a bathhouse!
The stove can be either a regular heater or an electric model. As a conclusion not only for temporary housing, but also for such architectural forms, as a medical center or a bathhouse (this use of carriages was successfully practiced back in Soviet times). Today, in such structures you can not only sleep, but also quietly spend your leisure time or even cook food.
Video - Do-it-yourself household construction trailers
Currently, the acquisition of suburban plots is becoming increasingly popular.
Many people build houses and cottages in the country for year-round living. After purchased land plot, its owners are faced with several questions: where to store it?
Where can you hide from the sudden rain or relax on a hot day, hiding in the shade? After all, the construction of the house is still ahead, but utility room on the territory is necessary now.
An excellent solution to this problem would be a small shed that you can buy or build with your own hands.
Why do you need a utility room in a country house?
The country house is small room or a house that is used for household needs on a country plot.
Very often, a good change house is used as a temporary home or an economical option for a country house.
In the future, after the construction of the main house or cottage, this room is suitable for storing workers and gardening tools, unnecessary toys, cots, work clothes, various items, which are temporarily not used for economic needs.
This room is perfect for storing fishing rods and equipment: lawn mowers, electric or gasoline trimmers.
And if you connect a water supply to the change house and make a sewer system, then it will be quite suitable as a sanitary unit or even a bathhouse.
Economic owners of summer cottages can use the building as a mini-garage, a winter shed for rabbits, birds or hives with bees. In general, depending on the activities of the owner of the dacha, this premises can be used for various purposes.
A change house is a multifunctional room, which in any case will become indispensable in a summer cottage.
A change house at the dacha is a multifunctional room
Change house as an element of the overall design of the site
Due to the fact that the change house is a room that performs various functions, it is necessary, before starting construction, to decide how the owner plans to operate it and its location on the territory of the dacha.
You should also consider some nuances:
- Firstly, it is necessary to determine the period of use of the premises and the possibility of moving it to another location. For example, if on one summer cottage you build a cabin for temporary use for one or two years, and subsequently you plan to transport it to another place (another plot or village) or simply sell it, then it is recommended to locate the building as close as possible to the entrance. Otherwise, evacuating the assembled cabin will be extremely difficult, and it is not advisable to disassemble the building, since some of the materials may become unsuitable for further use.
- Secondly, placement of the room depends on its purpose. If the building will be used purely for economic purposes, storage of tools, equipment or garden furniture, then it is advisable to locate the building approximately in the middle of the long side of the site. This will provide free access to the change house from any corner of the dacha. If in the future it is planned to use the building as a bathroom, shower or bathhouse, then it is necessary to build it in the farthest corner, which will fully comply with the rules and regulations of fire safety.
- drawings, step-by-step instructions with photos and video materials, and tips for constructing a building in our article.
Medicinal and colorful sage: planting and care different types plants. that the plant brought joy to the soul and body?
Main types of structure
Several options are used for constructing a building on a summer cottage. The choice of construction technology also depends on the expected period and purpose of operation of the premises.
It is easiest and cheapest to build a panel shed with your own hands. This is the most economical option buildings.
To make the base of the building (frame), beams are used, the outer cladding is made of clapboard, and the inside is chipboard sheets or MDF.
Polystyrene foam or glass wool are the most common insulation materials for panel cabins. To cover the floor surface you can use unedged board, which is covered with inexpensive tiles.
The roof can be made either single-pitch or gable. The roofing material can be used quite thin; profiled sheets are quite suitable.
The main and, perhaps, the only advantage of this type of cabins is their low cost and quick installation. They also have quite attractive appearance.

The negative side is short term operation - the premises are suitable for use only for one season and summer period, since there are no stiffening ribs in the building, the walls are subject to deformation under the influence of the wind, and the insulation settles, and as a result the building freezes heavily.
Most often, cabins of this type are used as temporary structures in which you can cook food in the summer, change clothes and store some tools during the construction of the main house.
Frame building
This construction option is more expensive, but it is also much stronger and lasts longer.
A beam measuring at least 10x10 cm is used as a base, which ensures stability and prevents deformation of the structure. The inside of the room is lined with clapboard, since plywood or fiberboard is not recommended due to their strong hygroscopicity.
To insulate the room, mineral wool is used, and vapor barrier is also ensured by using special materials, for example, glassine.

In addition, the ceiling and floor are made in two layers. Thanks to these techniques, the inside of the house is warm and dry. And the appearance will be given by cladding under the timber. Frame houses they can be used for several seasons, which makes them stand out in comparison with panel cabins and is an undoubted advantage.
The only one The downside is that the interior is quite small, but this does not prevent the cabin from being fully exploited as summer kitchen, storage of work clothes and tools.
In the video, a frame cabin built with your own hands - making the base:
Manufacturing and installation of frame walls:
Change houses made of timber and logs
This type of building is distinguished by its high cost, because beams and logs with a cross-section of more than 100x150 cm are used for its construction.
Building from logs has many advantages - long service life, beautiful view, warm inside. The disadvantage is the high cost.

Container as a base
Often, temporary container cabins are installed in summer cottages during the construction of a cottage or house.
Such buildings can be made from a metal channel welded into a frame, the gaps of which are filled with sandwich panels.
The huge advantages of such cabins, including durability, reliability, strength, and warmth, still do not contribute to their widespread demand and long-term use in dachas.
Due to the fact that the building is metal, and most often all the buildings on the site are wooden, it is very difficult to fit it into overall design. Therefore, as a rule, containers are purchased for the construction period and sold upon completion.

Container cabin
Independent construction of a building: plan and stages of work
When the decision to build a change house with your own hands has been made, the location and intended purpose have been determined, you need to make a small drawing of the future structure. This could be the simplest room, or a more complex building:

Drawing for building a cabin
More drawings according to which you can build a change house with your own hands in the photo selection:
Only after this can you begin work.
Preparing the area
First of all, it is necessary to prepare the site on the site.
To do this, the top fertile layer of soil is removed, the earth is compacted tightly and covered with waterproofing material.
Laying the foundation and assembling the frame
After this, the area where the cabin will be located is filled with sand and compacted again. Now you need to arrange the cinder blocks symmetrically at a distance of no more than one and a half meters from each other.

Laying blocks for the foundation
They will serve as the foundation. In order to prevent the destruction of the blocks, they must be wrapped in rubyroid.

After Bottom part The cabin is assembled, you can begin installing the support posts at the corners of the structure. For fastening, metal corners are used, which are fixed with self-tapping screws.
It is very important that the base of the cabin is strong and the beams are securely connected to each other. After all, the durability of the building primarily depends on this.

Fixing racks using corners
Vertical posts on the front and back sides of the building need to be made different heights, since in case of using pitched roof there must be a sufficient slope for precipitation to drain.
Roof installation
The installation of the roof begins with attaching the rafters, which are then covered with sheathing. Various roofing materials can be used.
This can be a profiled sheet, slate or ondulin; vapor barrier and insulation materials must be laid under the roof.

Roof of the cabin
Double-layer floor and sheathed walls are the best choice
It is advisable to make the floor from two layers: rough and finishing, between which mineral wool is laid as insulation.
The walls of the change house are mounted in a similar way, which can be lined from the outside various materials: siding, clapboard, block house. All that remains is to carry out the internal Finishing work and build a beautiful porch.

Ready change house
Watch the video on how to make a change house with your own hands for 54,000 rubles:
A change house is a multifunctional utility room, which is quite difficult to do without in a dacha.
Depending on the use of the dacha plot itself, you can make both a place for storing equipment and small house. And build it with my own hands within the power of every person who knows how to hold a hammer in his hands.