The attic roof will expand the living space of the house. You will not only save space, but also spend less money on building a house. total area the building becomes much larger, but the dimensions of the foundation and roof remain the same. Gable installation technology sloping roof It is not particularly complex and only requires careful calculation and design. IN this material We will look step by step at how to make an attic on the roof.
The attic area can be increased by correctly bending the slopes under different angles at one or more levels. It should be taken into account that the broken structure of the attic roof will be much heavier than a conventional gable roof. If you are building new house, when designing, it is necessary to lay a stronger foundation and walls of the house. When reconstructing an old building, you need to carefully examine the foundation and condition of the load-bearing walls.
Note! Errors must not be allowed when selecting the parameters that make up the rafter system and carrying out calculations in order to avoid destruction of the walls of the house and the roof structure itself during the operation of the house. Trust this preparatory stage work for professionals.

Calculations of the attic roof are carried out taking into account the SNiP section “Loads and impacts”. The dimensions of the room depend on the selected angle of inclination of the roof slopes. To arrange a living room, it is necessary to maintain a ceiling height of at least 220 cm. Broken design roof allows for maximum use ceiling with the required room height.
The lower rafters are installed at an angle of 60 degrees or more. The choice of tilt angle is influenced by the preferences of the home owners, the location of the building in a certain seismic zone and other factors.
Roof elements

When designing the attic roof of a house, the materials chosen for construction are taken into account. The cross-section of the roof structure resembles a multi-layer pie with fillings for different purposes. Let's see what the roofing system consists of:
- A layer of waterproofing material is laid on the rafter system.
- The second layer is vapor barrier material.
- For residential premises it is necessary to lay a layer of insulation.
- The roofing material completes the structure.
The pitch of the rafters depends on which insulation is chosen for the attic. To avoid scraps and waste of material, the rafters are installed at a distance equal to the width or length of the material slabs.
The design of the lathing is influenced by the choice of roofing material. It can be sparse lathing with different pitches or continuous.

The materials used to construct the attic roof must be treated with anti-rotting agents, for moisture resistance and against fire.
The wood and other materials used must be suitable sanitary requirements and be environmentally friendly.
To build a mansard roof truss system you will need:
- Hammers and axes.
- Carpenter's scissors and hacksaws.
- Plumb and level.
- Tape measure and annealed wire.
- Fasteners.
- Unedged board.
- The board measures 159 by 50 mm.
- Beam with a cross section of 100 by 50 mm.
Choose a high-quality tool and then the installation of the rafter system will be carried out much faster and with better quality.

The basis of any rafter system is the mauerlat. A thick board or good quality timber When designing a gable sloping roof, the mauerlat is installed on larger walls of the building. With the help of timber laid on top of the wall, the entire load of the rafter system with roofing material is evenly transferred to the walls and base of the building. In addition to this function, the Mauerlat serves as a strong fastening for the entire rafter system.
In the upper zone of the wall, a monolithic reinforced concrete belt is specially made of stone or blocks with embedded vertical metal studs designed for a strong fit of the Mauerlat. Annealed wire is embedded into the brickwork of the wall. To install the Mauerlat in the upper crown wooden structure use dowels made of wood. It is also necessary to lay a reliable waterproofing layer on the top beam of the load-bearing wall.

If the rafter legs of the designed roof rest against upper belt bearing wall with a specially made cutout or an end beveled at a certain angle, it is necessary to install a Mauerlat. In the case where the width of the room is almost equal to the size of the wall, the rafter legs will rest against support beams placed outside the building. Such support beams are laid along the entire perimeter of the building across the long side of the building. They must be durable and well-made by special means protection. Typically, the number of support beams is equal to the number of assembled rafters. To attach the beams to the wall, use the same fasteners as for the Mauerlat. A waterproofing layer must be laid.
Note! The fastening of the support beams and the mauerlat to the wall must be done with special care to avoid displacement of the entire roofing system during strong gusts of wind and heavy rainfall.

Installation of a sloping attic roof begins with the installation of support posts. The supports are installed parallel to the axis of the building and opposite each other. The distance between opposite supports should be the same as the designed width of the attic.
First, U-shaped arches are installed on the gables. The arched system consists of two supports, which are connected by a horizontal lintel. In order for the arched structure to be strong, for supports and lintels you need to choose a beam with a cross-section equal to the width of the support beam laid on the ceiling. You can view the connection nodes in the diagram below. (structure fastening diagram).
Note! All racks are attached strictly vertically, and the jumpers must be positioned horizontally. For check correct installation a plumb line and a level are used.
The installation of the next arch on the opposite pediment is done in the same way. Be sure to level the installed elements of the rafter system. A rope is stretched from the U-shaped arch on one pediment to the structure on the other pediment. Check the location of the cord, it should only be horizontal. If an error is detected, one of the arches is removed and adjusted to the right size. The check is done again.
The cord is left and intermediate structures are installed along it. The number of U-shaped arches is equal to the number of rafters calculated in the project. The distance between two support posts is equal to the pitch rafter legs. All installed rafters top part must be attached to the top of the support post. It is this type of fastening that makes it possible to achieve the designed rigidity of the entire roof rafter system used to construct the attic.
To fasten the posts of a U-shaped arch to the beam, tenon joints, large nails or staples made of metal are used. The video presented at the end of the article will help you better understand the mount individual elements rafter system of the attic roof. The braces installed on the racks will help them maintain a vertical position during the operation of the building.
Note! U-shaped arches are connected to each other in the horizontal plane by jumpers, placing them parallel to the laid mauerlat.
Lifting and securing rafter legs
The time has come to talk about installing the rafter legs of the future rafter system. The broken structure is made of rafter legs located on different levels and bearing different loads.
The rafters of the first level are attached below to a transverse support beam or mauerlat. The upper end of the leg is attached to the support posts of the installed arch. The mounting angle depends on the placement of the posts. The closer the rack is to the central axis of the building, the smaller the rafter attachment angle. When the size of the attic is almost equal to the width of the house, the mounting angle approaches 90 degrees. Installation of rafters begins on the sides of both gables.
Trimming the structural element on both sides is done at such an angle as to achieve a tight fit of the edge to the rack and the lower support. In cases where the design of the roof of a house provides for an overhang of the roof slopes, the cut at the bottom of the element has a slightly different shape. See how the cut is made and how the leg is installed on the Mauerlat in the picture below. Staples or nails are used for fastening.
Note! To make the connection of the first level rafters and the support more durable, burnt wire should be used as an additional fastening.
Complete the installation of all elements of the first level of the structure and continue installing the system by moving to the front of the second level of work. If the width of the ceiling is more than 8 meters, you need to install a ridge beam. It will help distribute all types of loads on the roof frame evenly. To install the ridge on the gables, large posts are attached strictly vertically at the point where the axis of the building passes. A ridge beam is laid horizontally between two large supports. Be sure to check the correct installation with a level.
The slope of the upper rafter legs of the structure depends on how correctly the height of the ridge is installed. The second level of system elements is attached with the upper part to the ridge beam, and the base of the leg is connected to the top of the arched structure. For high-quality fastening the ends of the rafter legs are cut at an angle.
The upper part of the rafter system of a sloping mansard roof may look like the letter L. In this case, the paired rafter legs at the top are connected to each other end-to-end or by cutting into half a tree. For butt joints, metal or wooden overlays are used. For cutting you will need bolted connections.
The first pair of rafter legs is adjusted at the top. Then it is removed downwards and the remaining rafter legs are attached to it. Ready-made designs rise up and fasten. Installation of the upper level begins with the outer rafters. After installing each pair, leveling is done.
The time has come for the last stage of installing the attic sloping roof. A sheathing is installed on the finished rafter system and a layer of waterproofing material is laid. Then a ventilation gap is made and the prepared roofing is laid.
Inside the rafter system, a layer is first laid thermal insulation material, and then the entire system is covered with a layer of vapor barrier material. There comes a time when you can do the interior lining of the attic. The material for the cladding is selected according to personal preference or according to the drawn up design project for the design of the entire building.
During construction work Additional questions may arise. You can find out the answers by reading other articles on our website.
Video


Greetings, comrades! We have to figure out how it works rafter system mansard roof. I will introduce you to its main elements, their functions and share my own experience in building an attic floor. But first, a few definitions to help us avoid confusion.
Attic roofs are traditionally called a very specific type of roof - broken, that is, with two slopes with a variable slope. However, the traditional definition is incomplete. In fact, this can be called any roof that allows you to place an attic underneath it - a living space limited by the roof slopes.
A semi-mansard roof differs from a mansard roof in that it rests on solid side walls at least one and a half meters high. The semi-attic uses space more profitably: it does not have areas with low ceilings that are unsuitable for use as living space.
Here are the main types of attic roofs:
| Image | Type and Brief Description |
 |
Single-pitch: the only roof slope rests on the main walls different heights. To effectively use the entire attic area, the smaller wall must have a height of at least 1.5 meters, which implies an increase in construction costs. |
 |
Gable: in cross-section, it is an isosceles or (less commonly) asymmetrical triangle. Uses usable area less effective than a broken line. |
 |
hip: a four-slope option with two pairs of slopes of different sizes. |
 |
Half-hip The roof differs from the hip roof by the presence of shortened vertical gables. |
 |
Broken has two slopes with variable slope. It is most profitable rational use area of the attic room: areas with low ceilings near the side walls have minimal dimensions. |
Elements
In order not to make the reader confused in terms, I will give a few more definitions. Here are the main elements of the rafter system:
| Image | Element truss structure |
 |
Mauerlat: laid on a main wall or monolithic ceiling a beam that serves as a support for the rafters. |
 |
Rafter legs: inclined beams that serve as support for the roof. Hanging rafters (that is, resting only on the walls of the building) allow you to build a roof up to 6-6.5 meters wide. Layered rafters (with intermediate supports) allow you to increase the span up to 12 meters with one support and up to 15 meters with two supports. |
 |
Crossbar or tightening: a beam that holds together the rafters of a gable roof. Its task is to prevent deformation of the rafter system in the event of heavy snow loads. |
 |
Rack: a vertical support under the rafter leg, ensuring its stability in strong side winds. In addition, studs usually serve as the basis for the frame of the side walls of the attic. |
 |
Sill: horizontal beam, on which the racks rest. |
Scheme
Now it's time for drawings and diagrams.
Gable roof

The large span of the roof forces the use of a central post on which the layered rafters rest. The side posts give the slopes additional rigidity and serve as a frame for the attic walls.
Resistance to snow loads is provided by a pair of crossbars: the first serves as the basis for a horizontal insulated ceiling, the second is hidden in a cold attic.

Another, simpler rafter system for a gable roof with an attic. There is no central pillar. A shortened crossbar makes the ceiling broken: the horizontal central part is adjacent to sloping areas.
broken roof

For a broken mansard roof, the racks are always installed exactly under the break. The crossbar, which tightens the kinks together, ensures maximum rigidity of the structure. Alas, this scheme has a serious drawback: the ceiling remains relatively low even in the center of the attic, although the height of the ridge allows it to be raised another few tens of centimeters.
A shortened crossbar connecting the upper rafters approximately in the middle of their length allows you to raise the ceiling with virtually no damage to the strength of the rafter system.
Hip roof

Here, rigidity is provided by slanted (corner) rafters with posts in the middle of their length. The racks are connected to each other horizontal connections. External rafters rest on the rafters and form a solid foundation for the roof.
A feature of the hip roof is the absence of vertical gables, so natural lighting is provided by skylights embedded in the roof.
Shed roof

With a single slope, the primary problem is ensuring resistance to snow loads, therefore, when spanning over 4.5 meters, the rafters need additional supports.
The diagram shows their installation options:
- When spanning up to 6 meters, sufficient rigidity will be ensured by installing an oblique rafter leg;
- The central post with a pair of rafter legs allows you to increase the span to 12 meters;
- Two intermediate posts with oblique legs and a tie between them make it possible to make a 16-meter span.
Half hip roof

The height of the gables allows the main load to be transferred to them. A prefabricated truss rests on the gables, which serves as a support for the side rafters. For greater rigidity, the rafter legs are connected to each other by crossbars and longitudinal girders.
Nodes
How to install rafter system connections with your own hands? At your service is a description of how to install the main components.
Attaching the Mauerlat to the walls
Mauelllat is made from timber with a section of 100x100 - 150x150 mm. The timber must be treated with an antiseptic. The walls underneath are waterproofed to prevent capillary suction of water from the wood; Usually the role of waterproofing is performed by a couple of layers of roofing material.
To fasten the Mauerlat, anchor pins are usually used, installed when pouring the armored belt around the perimeter of the wall. Holes are drilled in the beam for them, and after laying, the beam is attracted to the reinforced belt with nuts and wide washers.


Attaching the rafters to the mauerlat
To maximize the rigidity of the connection between the rafter legs and the Mauerlat, a cutout is usually made in them by a third of the rafter width. For fastening the following can be used:
- Steel staples. They are driven into both beams on both sides;

- Galvanized corners. They are attached to both beams with several self-tapping screws with a length of at least 2/3 of the rafter thickness.

Galvanized corners and overlays are used to connect rafter legs to each other, to racks, to horizontal purlins and floor beams. The overlays can be replaced with thick (at least 15 mm) plywood, oiled to protect against moisture.

Attaching the crossbar to the rafters
The connection of the crossbar with the rafters of a gable or sloping roof experiences the heaviest loads in winter, when there is snow on the roof. It will help to make it as durable as possible simple instructions: the crossbar is connected to the rafter with an overlay and attached to it with a pair of bolts with nuts and wide caps through pre-drilled holes.

Materials
The best material for a rafter system is cedar, which is lightweight, durable and rot-resistant. However, in practice, cheaper ones are used much more often: spruce, fir and pine. All loaded elements of the rafter system (rafter legs, crossbars and racks) must be free of wood defects that affect strength:
- Large falling knots;
- Cross-layer (deviation of the direction of the fibers from the longitudinal axis of the beam);
- Oblique cracks;
- Rot.
The typical cross-section of the beds and uprights is 100x50 mm. The cross-section of the rafters is determined by their length and the pitch between the rafter legs: the larger it is, the greater the load falls on separate beam. Pick up optimal cross section rafters can be found in the table below.

My experience
When building the attic, I chose a sloping roof. For the installation of the rafter system, pine beams with a section of 50x100 mm were purchased. The step between the rafter legs is 90 cm, greatest length span - 3 meters. The roof slope angle is 30 degrees for the upper slopes and 60 for the lower ones.

The sheathing for the roofing material (corrugated sheet) is assembled from unedged boards 25 mm thick. Precisely from unedged - simply because its price is lower, and the appearance when laid under the roof does not matter at all. The sheathing pitch is 25 cm.
The crossbar tightens the upper rafters approximately in the middle of their length. The suspended ceiling made of gypsum plasterboard is assembled on ceiling profiles, attached to the rafters and crossbars with direct hangers.

The design of the rafter system has proven its strength: for four seasons it successfully withstands the strongest winds typical of Sevastopol winters.
Conclusion
I hope that I was able to answer all the reader’s questions. As always, Additional materials The attached video will be presented to your attention. I look forward to your comments and additions. Good luck, comrades!
During the operation of a private house, country cottage or country house, the question of increasing living space often arises. It is usually solved through an extension or superstructure.
Adding an extension to a house is a troublesome task. Besides, residential extension has one significant drawback - it “steals” the usable area of the site.
Therefore, a popular way to expand living space individual house is the construction of a second floor or attic, i.e. attic roof. The design of the attic roof allows you to use the resulting space as a living space.
What is better: attic or second floor
The following facts speak in favor of the attic: lower construction costs, better insulation living space, less load on the foundation. In general, the attic is the highlight of the house and gives it a certain flavor.
Essentially, a full 2nd floor is more practical and easier to implement than an attic floor. It all depends on the situation; if a house is being designed, then it is better to immediately provide a second floor, because... installing an attic is a more troublesome task. What if the house is residential and has a roof? mansard type, then it would be reasonable to equip it living room instead of an attic “for necessary things.”
Types of attic roof
 The optimal tilt angle is 40°. The ramp should be located on the leeward side. Allows you to equip a small attic above the attic. Due to only one acute angle, the usable area of the room increases.
Gable mansard roof
 A simple gable (pitched or gable) consists of two slopes connected at a certain angle. The advantage of a gable roof is the ease of manufacturing the rafters and finishing. The disadvantage is the appearance of a “blank” area (at the junction of the roof and the wall), which is usually not used. Often, attics with a gable roof are erected along with walls. A roof with a 45° pitch is ideal for houses no more than 6 m wide.
 Asymmetrical gable mansard roof. A private house with such a roof it will be distinguished by originality and functionality at the same time.
The difficulty in building a roof with asymmetrical slopes lies in the calculations.
 Broken mansard roof. Its difference is that each slope has two components. The device of a sloping roof allows you to get a higher attic space. And also reduce unused area. Such roofs are the most common due to the possibility of attaching a garage or summer kitchen under one roof.
Hip mansard roof
 Hip mansard roof. In this design, the roof slopes play the role of walls.
 One of the varieties of hip mansard roofing is Danish hip roof. Its construction is distinguished by the presence of pediments, which allow the installation of ordinary, rather than roof windows (dormers).
 Semi-hipped mansard roof (gable, hipped). Complex design, low slopes protect the gables of the house from precipitation.
 Pitched roofs can be single or multi-level.
 Non-standard solutions are also quite possible for an attic roof. Their design requires careful calculation of loads, stability, etc. It is difficult to carry out installation without special education, so the cost of the work is higher compared to classical structures.
Some examples of the original mansard roof are in the photo.
The species have been decided, it remains open question How to make a mansard roof with your own hands.
The brief instructions contain the main stages of work and will draw your attention to some of the nuances of their implementation.
Stage 1 - Design and calculation
Choice appearance mansard roof, and its parameters are calculated taking into account factors such as:
SNiP 2.01.07-85 “Loads and impacts” will be a reliable assistant in calculations.
Nuance. The greater the angle of inclination, the smaller the height of the attic space will be ( minimum height the ceiling of the room on the attic floor is 2.2 m). Accordingly, the smaller the angle of inclination of the attic roof, the larger the area of the room. If the slope is insufficient, precipitation can accumulate on the roof, which will lead to additional loads on it.
More careful attention is paid to calculations if a non-standard mansard roof is being erected. For example, an asymmetrical gable mansard roof has a shifted center of gravity. This affects the uniformity of load transfer to load-bearing walls and foundations.
At this stage, the issue of how to access the attic floor is also resolved. Choosing where to install the stairs to the attic is an important decision. The internal location allows it to be used at any time of the year. The exterior allows you to save useful space on the lower floor.
Advice. Ceiling folding staircase for the attic floor is the most economical option, but the least practical.
Mansard roof rafter system
The choice of rafter system is influenced by:
- attic dimensions;
- parameters of the overlapped span;
- roof shape;
- first floor design;
- location of load-bearing walls and additional supports;
- weight of roofing material.
The design of the attic roof truss system
There are two types of roof truss system with attic:
- hanging rafters. The walls of the house serve as the basis for the rafter legs. When constructing hanging trusses, a Mauerlat is not always installed (depending on the wall material);
- layered rafters. In this case, it is necessary to construct additional support. For which they are used ridge run or attic wall reinforced with reinforced concrete. The installation of a layered rafter system is allowed at a distance between load-bearing walls of up to 7 meters.
The structural difference between a roof structure with hanging and layered rafters is shown in the diagram.

When building an attic roof, they are often used combined type- there are hanging rafters on top of the system, and layered rafters on the sides.

In this case, drawings must be made indicating the location of individual elements and the distance between them. An example is shown in the figure.

Material prepared for the website www.site
Calculation of rafter legs for an attic roof
Choosing the type of wood and justifying its optimal thickness.
The amount of material required for the rafter system depends on its type and all the factors listed above.
Nuance. The gap between the rafter legs depends on the lumber used.
The pitch of the rafter legs under the attic roof will be 60-90 cm.
The material can be laminated timber (80x80, 100x100 mm), board (section 50x150 for slate and metal tiles, section 50-200 for ondulin).
Nuance. The length of the spans increases the diameter (section) of the rafters or reduces the gap between them.
As for the species, it is recommended to use pine. Its wood is characterized high strength, flexibility, ease of processing, absence of knots. Industrial wood must be at least grade 2. Solid beams can be replaced with glued beams; it has higher quality characteristics.
The thickness of the board for making rafters (section of the rafter leg) must be at least 50 mm. The width of the board for the rafter leg is from 150 mm (if the length of the rafters is up to 6 meters, if more, then 180-200 mm). On the one hand, this requirement is due to the fact that the load bears on it, on the other hand, insulation is placed between the rafter legs.
Advice - any construction or reconstruction must be legalized by the relevant authorities.
Stage 2 - Installation of the Mauerlat
Mauerlat is an additional wooden frame along the upper perimeter of the building.
The purpose of the Mauerlat is to create conditions for reliable fastening of the lower part of the rafters. As well as the redistribution of the load that is created from the pressure of the roof on the load-bearing walls and foundation of the building.
Installation of a simple gable mansard roof requires installation of a mauerlat only on those walls on which the rafter legs will rest. A hip roof requires its installation along the entire perimeter of the building.
Advice. IN wooden log house The role of the Mauerlat is played by the upper crown. This can be done, but only if the rafter legs are installed on sliding fasteners. Because Due to the load on the rafter system (wind, snow), horizontal pressure is created and the upper logs can move outward. In addition, if the material for the rafter system is not dried properly, then over time, if it is rigidly fastened, the roof will become deformed.
Nuance. A stone cottage and house requires the installation of a mauerlat along the entire perimeter of the external walls. In brick, you can install its links only under the rafters.
The parameters of the Mauerlat for logs are diameter 150 mm, for timber - 100x100 mm.
The species is pine, but larch is better.
The fastening of the Mauerlat must be reliable, because this is the basis for the entire rafter system.
There are several ways to fasten the Mauerlat: with anchor bolts, studs or reinforcement (fixed to the base of the load-bearing wall);
Advice. If the structure is built from foam concrete or other porous material, you can use only long bolts or reinforcement, the length of which is 3 times the width of the mauerlat beam. This is due to the fact that any other fasteners are pulled out very easily from a porous material.
- annealed wire (embedded in brickwork);
- wooden dowel (used when installing a mauerlat in a log house).
Nuance. To prevent the destruction of the Mauerlat, it is necessary to ensure proper waterproofing, for example, put roofing felt, and treat the timber itself with antiseptic solutions.
If the width of the attic matches the width of the house, the rafter legs rest on the base of the load-bearing wall. But, it’s better to install a Mauerlat.
Stage 3 - Construction of the attic roof
Construction of the attic roof frame
Floor beams. Installed on the Mauerlat. In the future, they will serve as the basis for installing the floor in the attic.
Arrangement of the rafter system of the attic roof
For a simple roof, making rafter legs involves forming simple triangles. They can be assembled on the ground and installed in the form of ready-made triangles.
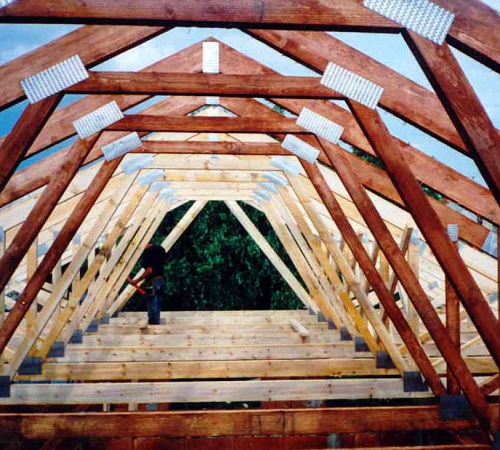
For a gable sloping roof, first attach a U-shaped frame, and then fix it on it rafter part hanging (for the top) and inclined (for the sides) method. The diagrams below show this more clearly.
The lower ends of the rafter leg must be sawed down and attached to the mauerlat using nails or metal brackets (movable fastening).
Nuance. The filing of the leg must be very precise to ensure a tight fit to the Mauerlat.
The rafter legs are installed at the same distance from each other. Otherwise, the load on the system will be distributed unevenly.
Installation begins with the outer legs. Then you need to stretch the rope between them. This way the horizontal position will be maintained when installing the intermediate legs.
After all the rafters are installed, they are connected to each other. The sheathing pitch depends on the selected roofing material.
Advice. Places intended for installation skylights, reinforced with transverse beams. This way the window will be securely fixed.
If the attic roof is significantly wide, you need to install a ridge beam. It will serve as additional support. And part of the load (from the weight of the roof and snow) will be redistributed onto it.
With a significant length, the ridge beam is supplemented with support.
Waterproofing attic roof
A hydrobarrier film is attached to the sheathing. The peculiarity of its fastening is to make an overlap of 100 mm. Most manufacturers mark the overlap location with a bright stripe.
The waterproofing film is fastened with a construction stapler. And in case of rain, it will reliably protect the structure even in the absence of roofing material.
Insulation of the attic roof
The insulation is laid under the waterproofing. Professionals recommend using flexible insulation for these purposes - mineral and basalt wool. Their advantage is flexibility, the ability to fill any voids.
Laying a vapor barrier
The vapor barrier film protects the roof insulation from steam penetrating into it from the attic living space.
Advice. It is important to provide the necessary gaps between the roofing material and the insulation. Their presence and parameters are determined by the type of insulation, the class of films used and the roofing material.
Construction of an attic roof - video
Stage 4 - Installation of roof windows
Window area for sufficient entry daylight, must be at least 12.5%.
Due to the design features of the mansard-type roof, special roof windows are used for glazing. The installation technology involves installing windows before completing finishing works. In this case, the windows must open to provide access fresh air. In bad weather, they should naturally be closed.

Stage 5 - Roofing the attic roof
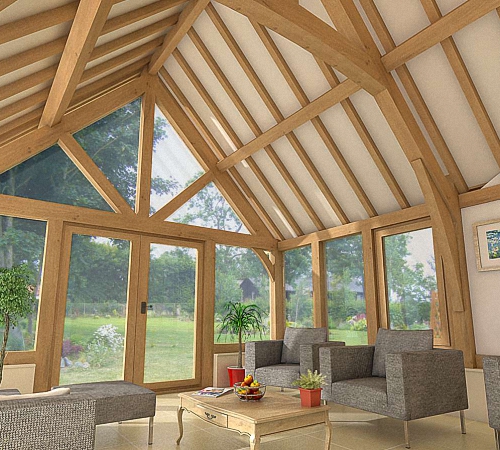
In modern private construction, the rafter system of the mansard roof makes it possible to increase living space and create an additional half-floor. This design is distinguished by the variety of design options, their reliability and versatility. It is convenient for installing attic and dormer windows and accessing a small balcony on the roof. Such a constructive completion of the building makes it possible to organize additional living space instead of a conventional attic. The attic level is formed thanks to a specific rafter system and a large angle of inclination.
What type of attic space should I choose?
For the first time, attics began to be inhabited in Europe after the Second World War, when there was not enough full-fledged housing for everyone. However, in our time, the attic, as luxury housing under a roof, has become very fashionable. The construction of mansard roofs began in the dacha sector, in country cottages, and in new houses in order to add usable space.
Today, installation of the attic roof rafter system has become much easier and more affordable, thanks to the offer the latest developments and availability of building materials. High-quality insulation and new methods of sealing the attic roof have turned an ordinary attic into a cozy room. This made it possible to protect the living space under the cold roof from the cold and negative weather factors. And the rafter system of the attic roof allows you to vary the configuration, size and shape of the under-roof space. Options for building an attic:
- cold summer - country;
- insulated - for full year-round living.
Mansard roof rafter system - photo:

The side walls of the attic inside have different shapes walls:
- symmetrical and asymmetrical;
- single-level and two-level;
- vertical (with additional storage on the sides);
- partially vertical (the bevel for the ridge starts approximately from the middle of the wall);
- inclined;
- beveled triangular (in the shape of the slopes of the attic roof);
- broken (attics of complex shape).
The total volume depends on the bevel angle attic space, which is provided by a tetrahedral (hip) or gable roof. With proper finishing of the interior and thoughtful design, the room can be aesthetically pleasing and complete for habitation, even with strongly sloping walls.
When the under-roof space should be designed for housing, it is important:
- bring down all communications;
- determine the layout and functionality of 1 or more compartments;
- provide ventilation, heat and waterproofing;
- take care of additional insulation for winter time;
- let down all the amenities if it is an isolated room for one person.

Architect's advice: The living space inside the attic is planned to be convenient for movement and comfortable for life support. Therefore, the room dimensions should be at least 3 m wide, and there should be enough space above the head to move freely with raised arms.
Preliminary calculation of the rafter system of the attic roof is very important. All points must be thought out in advance when entering into the preliminary design of the attic. Sometimes it is necessary to replace the roof, and the decision to add an attic comes in the process of choosing the roof configuration.
Attention: The construction of the attic roof structure of the rafter system must be carried out taking into account the fact that it will create additional load on the foundation and walls, which is harmful for a house that is not new. And although this will not destroy the main structure, it can cause additional shrinkage.
It is not too late to abandon the idea of arranging an additional residential floor if the building is dilapidated and the soil is not suitable for multi-story buildings. Only specialists from a construction organization or an architect can correctly calculate the total load; he will also suggest the optimal configuration (geometry) of the attic space, so as not to spoil the appearance of the house. The angle of inclination of a new building is determined at the design stage. It depends on the following factors:
- climatic conditions of the region;
- roofing materials;
- functionality of interior spaces.

Mansard roof rafter system - drawings
It is impossible to plan an attic room without special windows. It is important to consider their location at the design stage, that is, before installing the rafter system. From a competent bookmark window openings influencing the step between the supports will ultimately determine not only the appearance of the house, but also the reliability of the entire structure. It is also necessary to consider the method of fastening the frame of the attic windows, and their height is dictated by the ease of maintenance inside the attic.
Where to start building the attic rafter system:
The rafter frame is the base or skeleton of the attic. And if you are interested in how to make a rafter system for an attic roof, you should start by studying existing experience so as not to invent anything and avoid any annoying mistakes. If the rafter “cap” is installed and mounted correctly, then sheathing it from the outside and inside will not be difficult.
The rafter system of the attic roof is assembled with your own hands in order:
- Mauerlat;
- beam base;
- frame racks;
- runs;
- hanging rafters of the upper slopes.
Advice: When constructing an attic, all wood must be dry and seasoned, treated with a special antiseptic or antifungal aerosol. Logs and dry timber should have a moisture content of about 18-20%, no more.

Let's consider the next stage of work - a diagram of the rafter system of the attic roof. Design basis:
- main racks,
- floor beam,
- side rafter,
- ridge rafter,
- top harness,
- brackets for fastening.
How to make a mansard roof for a small cottage?
All work on the construction of the rafter system of a gable mansard roof can be done with a small team of improvised workers.
If you want to build a cold summer attic above small dacha It’s not difficult, it’s important to think about how you can get to the upper room:
- along external attached steps;
- from the inside, like an attic staircase.
Light boards, timber and small diameter logs are suitable for the prepared perimeter of a country house. However, the integrity and reliability of the lightweight attic structure will depend on the reliability of the connections between the rafter system and the floor beams. You can use strapping, screws, nails, bolts, etc.
The racks are laid in order, supported by the base and ceiling beams, then the rafter legs of the first level of the slopes are attached to them. The main components of the attic rafter system are fastened with either construction staples or strapping made of hardened wire. Sometimes an additional connection with reinforcement with staples or wire is required.

The upper beam of the attic floor is attached to these supports - this is a ridge post that “assembles” the rafters under the upper slope. Next, the rafter legs for the upper level of the slopes are secured, after which the rafter legs are connected to the main floor beams.
When the base is ready, all the supports are fastened with strapping and lathing, for additional reliability, so that the rafter system is strong and convenient for laying insulation, waterproofing and roofing material. The simplest design country attic covered with waterproofing and covered with slate. And don't forget about the sediment drainage system.
An attic from layered rafters is made in approximately the same way, but the tops are reinforced with thicker timber - for sufficient structural strength. Such a system will functionally replace support beam upper slopes. They will become the supporting frame of the attic roof and the basis for cladding the walls and ceilings indoors - photo:

The lower level has options for attaching the support to the upper points of the rafters - on the side girder of the racks, on the gables, or only on the racks, that is, without installing the side girders. And the lower points of the rafters of both lower slopes should rest on the floor beams, and preferably without insertion.
Under a roof made of heavy piece materials, it will be necessary to reduce the interval between the rafters, and also add sheathing to their cross beams. This scheme is often used for the construction of mansard roofs of complex configurations.
It is important to build a rafter attic, knowing some design features. Therefore, experts recommend learning a few lessons on how to properly make a rafter system for an attic roof. We start with the Mauerlat.
1. Mauerlat is the foundation around the perimeter of the house on which the entire rafter system is attached. Therefore, the reliability of fastening the lower beams to this perimeter will literally determine whether “the roof will be torn off” due to unfavorable weather and climatic phenomena. A high-quality Mauerlat will not allow the attic roof to come off during a tornado or tip over during powerful hurricane winds. Reliable fastening of the truss structure to the perimeter of the building evenly distributes the load of the roof on the walls and foundation of the house.

2. It is better to choose boards and beams that are strong, not knotty, and at least 40 mm thick. It is better to use dry treated wood for the Mauerlat, optimally timber with a cross section of 150x100mm. After preparing the perimeter of the walls for laying the rafters, the timber or board must be laid horizontally, checking the level along the entire perimeter of the walls.
3. On the crowns of walls or columns of a building frame type or brickwork Be sure to lay a layer of waterproofing recommended for the type of building material. This is necessary so that the moisture in the walls and base of the rafter system does not transfer to them. For waterproofing, bitumen, roofing felt or roofing felt, and other modern waterproofing materials are suitable.
4. We fasten the beam at the base to the walls with bolts or staples; additionally, the fastening can be strengthened with wire strapping. The studs for the Mauerlat are mounted into the wall during masonry. The Mauerlat beam is treated with an antifungal agent so that it is not susceptible to destruction.
5. When everything is ready to install the rafter legs, it is important to mark the base where they will be attached. Ready-made rafter legs can be ordered from a workshop and then assembled yourself, rather than spending a lot of time making them. For convenience, they can be laid out on those sides of the house where they will be laid around the perimeter of the attic.
6. Check the racks for loosening and vertical shift. If this is the case, then do not think that the problem will go away with the installation of roofing materials. The additional weight of the structure will only increase its instability. Therefore, all flaws should be eliminated at this stage - reinforce the fastening with braces and ties.
7. Experts recommend maintaining an equal interval (step) between the rafters - about 80-120 cm. The easiest way is to stretch twine between the outer rafters to use it as a marking and level for the rest rafter beams. The racks are made not only in one horizontal plane, but also aligned exactly vertically - check the plumb line.

8. Vertical racks are good basis for future walls of the attic living space, so they must be perfectly smooth. The interior will be lined with wood or plywood panels, drywall, fiberboard or chipboard. Do not forget to lay the appropriate insulation between them, which is intended for the roof and attic.
9. To secure the racks to the drains upper beam, use metal staples or nails. With the completion of this stage of work, the installation of the rafter frame is completed. At the last stage, the rafters are connected in pairs and attached to the ridge beam.
10. Don't forget to leave gaps for skylights or doorways for stairs. Installation of dormer windows is carried out after the walls of the internal cladding are equipped.
11. You can do without a ridge beam, but it is necessary if the attic roof is long - more than 7 m. But it increases the total mass of the rafter system. It is enough to fasten the tops of the rafters with ties. The final stage is lathing for thermal and waterproofing and roofing materials. When the roof is almost ready, proceed to the installation of roof windows and interior decoration premises.
12. Quantity Supplies and wooden beams, it is better to calculate in advance using tables and drawings, but it is better to take into account the minimum and maximum consumption - with different spacing between the racks. Ideally, the design is expected to be lightweight and reliable, at low cost. Important points We suggest studying the arrangement of the rafter system of the attic roof in the video at the end of the article.
Structurally complex attic under aesthetic roofing materials it looks much more interesting than a regular hip roof, but only specialists can make it. When the decision is made to change old roof for more modern roofing, take the opportunity to build an attic. Although the more complex structure of the mansard roof rafter system is a little burdensome in terms of the amount of work, the additional living space and the unique appearance of the house will delight your children and grandchildren for many years.
As experienced builders say, an attic can be installed in a house if there is a roof. The type of roof affects how much this measure will increase the usable area, whether it is comfortable to use this room and how complex the work will be required. The most common types of roofs for arranging a residential under-roof space are considered to be gable roofs with straight and broken slopes.
The rafter system of the attic roof is designed in such a way as to free up space in the center, where the height of the ceilings reaches an acceptable height, placing the bulk of the supporting elements at the edges. This article will tell you what the roof frame consists of and how to choose best option design and perform installation correctly.
Types of rafter systems
When starting to design a rafter system for an attic roof, pay attention to the layout of the house. Based on the types of supports, choose the appropriate device option:
- Layered. This type of rafter frame is suitable for houses in which a load-bearing partition runs in the middle. Then the weight of the roof structure is distributed between it and external walls structures. This is an easy and rational way to organize the frame, but it is suitable if the distance between the external walls and the internal support does not exceed 7 m.
- Hanging. This type is used when there are no load-bearing partitions or columns inside that are used to transfer the weight of the roof to them. Hanging rafters rest on the mauerlat and ridge girder. For roofs up to 50 sq.m. m, with a low roof weight, the simplest configuration is used, consisting of rafter legs and a horizontal tie. To cover a large structure, this structure is reinforced with racks, braces, and struts. These elements increase the stability of the roof, but “eat up” the usable area of the attic. The permissible distance between the walls of the structure for hanging rafters is 14 m.
- Combined. A mixed type of rafter system is used when the house instead load-bearing partition installed in the middle support columns. It turns out that some of the rafters can be leaned on the columns, and the rest can be mounted as hanging ones. This method is quite often used for arranging attic roofs, since it allows the use of fewer auxiliary elements, reducing the load on the foundation and without cluttering the roof space.
Please note that the installation of the attic must be planned at the project creation stage, because the type, weight and design of the rafter system are necessary for calculating the foundation. If the decision to erect an attic roof arose at the final stage of construction, it is necessary to recalculate the weight of the house taking into account new data in order to check whether the foundation can withstand the additional load, especially if the site has complex soil and a small distance between the surface and groundwater.
Calculation of rafter system elements
By building regulations a room is called residential if the height from the floor to the ridge is at least 2.5 m and there are sources natural light, that is, windows. Therefore, the main parameter of the attic roof that needs to be calculated is the angle of inclination of its slopes. The catch is that if you lay down a slight slope, the height of the ceilings in the attic will be lower than allowed by the rules. And, if you make covered slopes, the roof will turn out to be very heavy, expensive and unstable. Therefore, it is used whose slopes change slope, its upper rafters have sharp corner 30 degrees, and the lower ones - 60 degrees.


Ceiling angle and height
An important stage in the design of an attic roof is the calculation of the cross-sectional size of the elements of the rafter system. The easiest way to find out the recommended size is in a reference table with calculated values that take into account the length, distance between adjacent elements, type and quality of the material. However, if the roof is of non-standard size, it is necessary to perform a calculation based on calculating the total load from the weight of the roof that falls on the rafter system. The calculation scheme also takes into account temporary loads in the form of the mass of fallen snow, which are reflected in the climate coefficient, which characterizes the weather at the construction site.

To create the rafter system of an attic roof, wood is used, but this is not advisable in all cases, since in order for the rafters to cope with the load, it is necessary to increase the cross-section of the lumber used, which further increases the weight of the structure. To break out of this vicious cycle, it is necessary to abandon wood in favor of stronger metal rafters.
Rafter system design
The components of the rafter frame of an attic roof are no different from the design of other types pitched roofs. It includes:


In most cases, the elements of the rafter system are made of wood High Quality. To avoid deformation during operation, it must be dried to a humidity of 15-18% and treated with antiseptic impregnation. deep penetration and fire retardant if you plan to bring the chimney to the roof.
Assembly sequence
It is best to assemble the rafter system using experienced craftsman, since even lifting heavy, long bars is problematic. It is not recommended to carry out installation in rain and snow, as the moisture content of the wood will increase during operation. Typically the build process looks like this:


The reliability of the attic roof truss system depends, first of all, on the correctness of the calculations, therefore, if you are not confident in your engineering abilities, it is better to use a standard project created by a professional architect.
Video instruction