The need for drainage of the site arises in the area where groundwater is close and there is a significant amount of precipitation. To avoid leaching and waterlogging of the soil, as well as undermining of foundations and flooding of basements, one should professionally approach the organization of the drainage system.
For the first time, a system for collecting and removing water outside the land plots was created back in Ancient Babylon, and, despite the fact that after centuries technology has advanced significantly, today the drainage of the site is carried out according to the same principle.
Varieties of drainage systems
By purpose, drainage systems are divided into the following types:
- superficial (open type),
- deep (closed type).

Surface drainage of the site, in turn, is subdivided into:
- point... In the organization of the point system, storm water inlets, sedimentation tanks ( drainage systems), storm dampers and ladders. Storm water inlets are installed directly under drain roof drains, in doorways, under irrigation pipes and taps, as well as in places where local collection of water is required. A point catchment effectively complements linear drainage where an efficient and fast drainage from the site is required. The water collectors are connected by underground pipes through which water enters the well storm sewer... Point drainage of the site allows you to effectively remove excess moisture that has fallen in the form of precipitation. Mandatory conditions quality work of this system is its regular cleaning and professional maintenance.
- linear... It can be either wall-mounted or remote from buildings. The linear system is represented by trays with gratings designed to receive rainfall that did not fall into the point sewage system. The catchment point is a stormwater well. This option is most relevant for areas where groundwater is not too close to the surface. The storm drainage device does not provide for serious surface preparation. All that is required is to create flat slopes on both sides of the gutter line. This will help reduce the risk of soil shrinkage, reduce the length of storm channels, and increase the catchment area. The drainage system is connected to the stormwater through horizontal and vertical branches. To increase the efficiency of the system, experts recommend equipping it with sand traps;
- ... The construction of the deep system is carried out in areas where groundwater is located at a distance of up to 2.5 meters, and provides for a significant amount of earthworks. Therefore, experts recommend starting its arrangement before starting the construction of a house.

Deep drainage of the site can be:
- trumpet... It is used if the groundwater at the site is deep. To create it, you will need perforated pipes (drains). The pipes are laid underground at a certain slope, moisture enters them through the holes and is transported to the collection points (storage well, drainage tunnel, storm sewer well);
- stratal... One of the most common types of deep drainage system. It is laid at the base of the building and provides for the organization of a filtering crushed stone cushion.

If heavy rain is possible in your area, it is worth choosing a hybrid system that provides for the organization deep drainage plot and storm sewer... The storm drain can be either point or linear.
Preparation for the construction of drainage
There are several types of sites that are guaranteed to require a drainage system. These include:
- located on lands with a high clay content - even with light rain, puddles will constantly stand on the site;
- high threshold groundwater;
- with a flat surface, as a result of which water does not have the ability to drain anywhere;
- located at the bottom of the slopes - in case of floods or melting snow, they instantly flood.

The choice of the type of drainage of the garden plot should be carried out based on the territorial relief. However, before thinking about which type of soil drainage to give preference to, you need to know that there are two types of system:
- open;
- closed.
Open system
The easiest way to do it with your own hands in the country is to make an open drainage. It is suitable for those areas where water drainage is needed after precipitation or melting snow. The advantages of this system are the simplicity of the device and the low price. For its implementation, it is required to dig drainage ditches around the residential building, the depth of which should be 0.5 m.

On the side where the water comes from, the trench should have a slope of about 30 degrees in order for the water flow to pass as actively as possible. Thus it is dug the right amount ditches, which are connected into one, ending with a well. Next, you need to check if the slope is sufficient, since if it turns out to be too small, then water stagnation will occur in this place. V a similar situation you just need to change the slope of the sewer ditches so that the moisture can quickly go away even with heavy precipitation.
There is one significant drawback in an open drainage system - an unpresentable look. To compensate for this, the ditches are covered with gravel: a larger fraction is placed at the bottom, and a smaller fraction at the top. The material should be large enough, but for the top layer it is permissible to use smaller crushed stone or pebbles.
Closed system
Drainage of a suburban area of a closed (deep) type is used for areas where groundwater is located very high. It will keep you from flooding basements at home. This method requires more effort and financial costs, in comparison with an open drainage system, since it cannot do without laying pipes.

The depth of pipe laying depends on the type of soil - 60 cm for clay and 100 cm for sandy. The diameter of the main pipes is 100 mm, and the diameter of the additional pipes is slightly less - 75 mm.
The drainage scheme of a closed-type section is called "herringbone", according to the method of pipe laying. Such a system implies an obligatory element: a ditch or a well for drainage. The device of this design will require a lot of effort, but it will pay off in dry times, since the water from the gutter can be used when watering the garden.
For the drainage system, corrugated perforated plastic pipes are used. They are environmentally friendly, easy to install, and inexpensive. The process of their installation directly depends on the type of soil on the site.

A high clay content will require the use of a special filter material. If the soil is of crushed stone type, it is necessary to put crushed stone under the pipe (layer, about 20 cm thick). If the soil on the site is loamy, the pipes are wrapped with geotextiles. V recent times you can purchase ready-made wrapped pipes and immediately start self-assembly drainage on summer cottage.
Tips to help you get the right drainage:
- Decide on type of drainage system
- If there is heavy rainfall on your site, it will take surface drainage... But to lower the groundwater level, a deep drainage system should be organized. In order to determine if a drainage system is needed in your area, a simple test should be performed. Dig a hole 0.6 m deep on the site and fill it with water. If the water is gone during the day, there is no need for drainage, but if water remains in the pit, this means that the soil on the site is quite dense and you cannot do without a drainage system.
- Calculate correctly during the design process system load
- Load degree on the system depends on the characteristics of the soil on the site, the filtration coefficient in different time years, saturation of the soil with moisture, the volume of water inflow. If you are installing a household drainage system, the load on which will be low, you can use polymer drains, plastic trays and grates. If serious loads are foreseen on the system, it is better to refuse plastic elements. Proper drainage in this case will involve the use of channels, gutters and concrete wells.
- Use quality materials.
The efficiency of the drainage system directly depends on the quality of the materials that were used in its installation. Therefore, do not try to create drainage pipes or any other elements of the system yourself. These dubious savings can be a significant waste for you. It is also not recommended to use regular plastic pipes... Drainage pipes are not much more expensive than usual PVC pipes... But at the same time, the latter work less efficiently, but they clog up quickly. The best option use of rigid corrugated drainage pipes with a smooth inner surface.
- Take care of your filters

Proper drainage of the site involves the use of geotextiles. By wrapping perforated pipes in geotextile, you eliminate the risk of sand getting into them. Also, do not forget about sand traps. These are special devices that are able to trap small debris (sand, plant seeds, leaves, anything that can clog the stormwater). The drainage system, equipped with sand traps, will operate as efficiently as possible, quickly handling significant volumes of liquid.
Drainage of areas on slopes
If your area is on a slope, the first ditch should be dug at the very top of the area. This will prevent waterlogging of the soil in the area below. The second ditch should be parallel to the first and located at the very bottom of the homestead. You can connect the two ditches with a trench, into which an underground pipe will be laid in the future. All water from the site will be collected in the lower ditch and drain into a reservoir or drainage well. In order for the walls of the ditch not to crumble over time, they should be performed at an angle 20-30 °. In a similar way, trenches for deep drainage are made using pipes.

It is quite possible to do the correct drainage of an open type with your own hands, and quite quickly. But the installation of deep systems will require certain knowledge and skills, significant labor and time costs.
Construction works
After the materials have been purchased and the place for the future gutter has been determined, the installation of the structure can begin. First, ditches are dug, the bottom of which is lined with geotextiles (it must be laid with a margin). If you do not want to use geotextiles, then sand should be laid on the bottom, in a layer of about 10 cm or a little more. From above, the pipes are covered with expanded clay or very large crushed stone. The topmost layer is the soil removed when digging trenches.

It is necessary to monitor the angle of inclination of the pipes. The correct figure is 7 cm per 10 m of pipe. Parts of pipes are connected with tees or crosses.
The drainage of wastewater usually takes place using a specially made well. The easiest way to assemble it is from reinforced concrete rings, which can be bought ready-made. Another, less expensive option is to use a plastic container.
Pipes are supplied to the installed well. In order for the accumulated liquid to drain freely, a pipe is mounted in the upper part of the well. If this is not possible, then the resulting water is pumped out with a pump.
If you are determined to drain your site, our tips and tricks will help you do it in short time and with cost savings. It will take several days to complete the entire complex of works.
author Vyskubova L.V., photo by the authorDrainage of the garden area is a prerequisite for the well-being of plants and the convenience of gardeners. Therefore, when creating or renovating a garden, one of required types of work is the construction of an effective drainage system, which is carried out immediately after measuring the site and it.
In the old days, elegant gardens and immaculate lawns were designed exclusively by landscape architects, specialists in this field. Gardeners and cleaners were involved in the maintenance of these gardens.
Over the centuries, vast experience has been accumulated in landscape principles and methods of creating and decorating gardens and parks.
Currently, this experience is successfully used not only by professionals. Often, amateur gardeners, without professional help and at very low costs, turn their plots of land into gardens of paradise, into attractive and comfortable seats for outdoor activities.
The need for drainage in the garden
The past summer of 2008 brought a lot of trouble to the owners of gardens and vegetable gardens in our Leningrad region(however, as in some other areas) due to excess rains by the end of the season. This led to the flooding of many garden plots, to the loss of the harvest of vegetables, to the invasion and others, to the death of many ornamental plants.
Such dire consequences of prolonged rains confirm the importance of good drainage in the developed garden plot and the need to rebuild ineffective drainage systems in previously developed areas.
The presence of drainage in the garden is very important for areas with a high level of groundwater occurrence, as well as for areas with very dense soil.
The word "" has two meanings:
- water absorption into the soil;
- branch excess water from a specific piece of land.
Too porous soil does not retain water long enough for the plants to absorb it. And too dense soil retains water on the surface, depriving the roots of plants of the periodic moisture they need.
You can determine the porosity of the soil in the garden as follows. You need to dig a hole 60 cm deep and fill it with water. If the water leaves in a day or earlier, then the soil is too porous. If after 48 hours the water has not completely disappeared, then the soil is too dense.
Drainage system
In areas with heavy clay or wet peat soils, as well as in low-lying areas, the most effective method the removal of excess water is a subsoil tubular drainage system.
For device tubular drainage system perforated plastic pipes are used in the garden. They are installed in V-shaped trenches:
- at a depth of 60-75 cm for clay soil;
- 75-90 cm for loam;
- 90-100 cm for sandy soil.
For most garden plots, the herringbone pattern of drainage pipes is suitable - with one main drain pipe and side pipes branching off from it. The main pipe should be 10 cm in diameter and at a constant slope. The diameter of the side drainage pipes should be chosen equal to 7.5 cm.
When installing a drainage system Special attention you need to pay to the location outlet, which should be directed into a bypass ditch or a nearby stream. In the absence of such, it is necessary to build a absorption well at the lowest point of the garden or plot. Usually, a well with a depth of 1 m with a surface area of 1 m 2 is sufficient for servicing the drainage system.
Ways to solve the problem of drainage in the garden
on the website
|
|
Weekly Free Site Digest Site
Every week, for 10 years, for our 100,000 subscribers, excellent selection relevant materials about flowers and a garden, as well as other useful information.
Subscribe and receive!
The lucky ones are summer residents who have a flat area with fertile permeable soils, which does not require significant work to improve it.
Just do that, break up flower beds, a vegetable garden and plant beautiful trees and shrubs. However, do not be discouraged if your piece of land is in the water every year in spring or autumn.
A drainage device at a summer cottage will solve this problem, and you will also join the ranks of happy summer residents who do not know the problems of swampy gardens and vegetable gardens. To do this, consider how to do the work with your own hands, having previously selected a suitable drainage scheme.
The main types of drainage
Seeing water on the site, do not immediately rush into a panic and do drainage throughout the site. First, you need to determine whether it is so necessary and if it is still needed, then in what volumes.
The correct solution would be to determine the type of soil (geology of the site), and it is also worth observing how quickly the water leaves during the spring melting of snow and autumn showers.
If the soil is heavy clay, the site is located in a lowland, then drainage is necessary not only around the house, but throughout the site.
Having completed the drainage in the country with your own hands, you will only spend money on materials, but doing the work yourself requires some knowledge.
There are the following types of drainage:
- The drainage system is deep - horizontal, consists of drains that bury the earth in previously dug trenches (ditches) on a base prepared in advance. They converge to the collector pipe, and then the water enters the wells, the number of which depends on the configuration and size of the site.
- Wells form the following type - vertical, or wall drainage... With its construction, there will be a lot of excavated soil, the distribution of which over the site should be thought about in advance. Water from the system of wells is pumped out by a pump outside the suburban area.
- Surface, or storm - a horizontal drainage system at a summer cottage that collects surface runoff (precipitation). It is subdivided into point and linear drainage systems.
Point involves the use of storm water inlets and wells. They are installed in places where water accumulates (drains, court pits, etc.).
With the linear principle of drainage, a system of trays and sand traps is used. They are laid in such a way that they do not intersect.

When digging a trench for laying the structure, a gravel pad is made. The channels themselves are covered with storm grates, which can be removed if necessary.

Competent drainage of the garden area will help solve drainage problems for many years. If available garden paths will not collapse from moisture, the foundation will not be exposed to the harmful effects of water, as it will be protected from destruction from moisture, and garden plants will not rot and will delight with their fresh greens, healthy look and lush bloom.
How to make drainage at the site?
It is necessary to approach the performance of work with responsibility, since the structure will serve for more than one year, and the frequency of repairs will be proportional to how correctly the system is laid.
In order to properly make drainage, you first need to draw up a site plan with elevation marks applied to it, by which you will determine the highest and lowest places.
You also need to know the level of groundwater. Typically, surveyors and hydrogeologists are hired to do this for you. topographic plan and take appropriate measurements. As a result, if the groundwater level is less than 2.5 m, then drainage is definitely necessary. A plan is being made for laying the drainage system at the summer cottage.

First, you need to purchase the appropriate materials: drainage pipes (plastic, polyethylene or PVC). They are corrugated, have holes (perforated) and stiffeners.
Polyethylene pipes are laid to a depth of no more than 3 m, and from PVC - up to 10 m. The service life of such pipes is more than 50 years, their diameter is 50-200 mm (100 mm are popular).
Pipes are laid before backfilling the foundation of the house with outside, and it is necessary to make it waterproof. According to the scheme, we drip trenches, the bottom of which is rammed and leveled with a mixture of coarse sand and gravel (layer 5 cm), then we put pipes with a minimum slope in clay soils –2 mm per 1 lm, in sandy soils –3 mm.
However, it is better to take 5-10 mm per 1 rm. Then we fill the pipes with water-permeable material (layer 10-30 cm): first with crushed stone or gravel, then we lay geotextiles and put sand on it.

For observation and cleaning of pipes, we install inspection wells (diameter 400 mm and 700 mm, height - 0.5-2 m) made of reinforced concrete, but you can buy ready-made ones made of plastic. From the pipes, water will flow into the well, so it is installed at the lowest point of the site. This water can be used for irrigation or discharged off-site (for example, into a ditch).
To flush the pipes from sand and other inclusions, water is supplied through rotary wells under pressure, it is carried out every 5-10 years. The hatches can be decorated with sculptures, special stone-shaped covers, etc.
Useful video for creating drainage on the site:
When you constantly encounter the problem of the appearance of excess water on the site, it is imperative to take measures to drain it. Otherwise, you will not only get in trouble in the cultivation of the site, but also endanger the foundation of the house or nearby household buildings. The manufacture of drainage, or rather a drainage structure in this situation is the only acceptable way out.
In this article, we will look at an easy and economical way to create drainage on personal plot.
Preparatory actions
Before you begin the process of assembling and installing the drainage structure, you need to decide what result you would like to achieve. Based on your decision, you need, at least at a primitive level, to create for yourself a project of the future system: to determine the location of its location, possible consequences contact of the system and surrounding objects, dimensions, dimensions. Based on the generalization of all these data, it is already possible to calculate the material costs for the acquisition of the entire volume Supplies... It is useful, by the way, to understand that the depth of drainage directly depends on the height of the well intended for drainage. It is customary to place the well a little higher than the elements of the entire structure. 
Now about the structure itself: traditional (or "French") drainage is a trench filled with gravel, separated from the ground by geotextiles (geotextile is used to prevent mixing of soil and gravel, it also allows water to pass through itself and prevents weeds from growing). Gravel, together with geotextile, help water to quickly be absorbed into the soil, evenly distributing moisture along its location, thus preventing the collection and stagnation of water in one particular place.
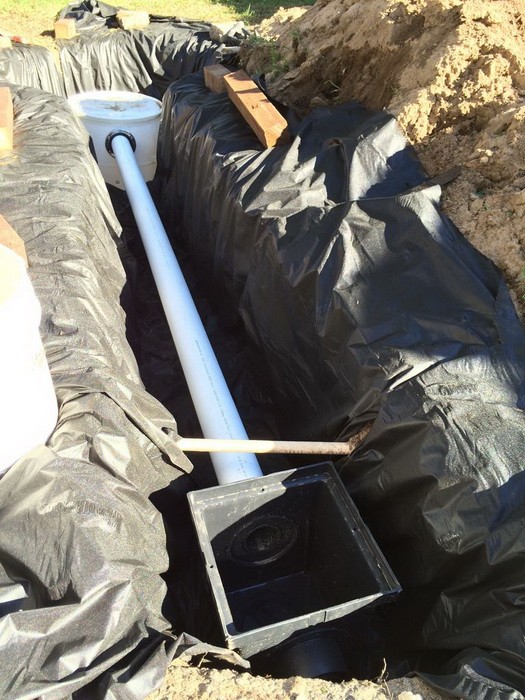
When creating drainage of this type, they usually use corrugated pipes equipped with longitudinal holes on one side, usually made of PVC. At the end of the entire system, a drainage tank should be located, the task of which is to evenly distribute the accumulated water into the ground around itself. To create this well, a two-hundred-liter plastic keg in the form of a drum (the rounded shape of the container is more preferable in this case) with multiple holes in the bottom and walls. This well should be placed on a special gravel "cushion" (about 10 cm), the space between the pit walls and the tank is also filled with gravel (layer thickness 15 cm). Holes are made in the upper part of the barrel to receive incoming water, and one of the holes is for the installation of a special drainage grid. It is not necessary to make many holes, two or three are enough, 5 cm each.In the upper part of the wall of the well, one is made big hole designed for the entry of the drainage pipe.
The second major element of such a system is a drainage tank, the width of which should be approximately 30x30 cm. The tank must be equipped with a drain grate. This is mandatory if drainage is provided with a downpipe, which, when connected to the reservoir, provides an inflow of clean water into the system. a personal plot is not a very expensive operation. Affordable materials are used in the manufacture of the system and only a few are needed. The most expensive part you will need may be the catchment tank. A PVC pipe will be much cheaper. Gravel will need about two cubic meters. It will also be necessary to purchase a special fabric - geotextile.
Digging a drainage trench
Next, you need to dig a trench from the catchment point to the drainage point and a hole to install a well on the one side and a reservoir on the other. In the place for the drainage well, the pit will need to be deepened by 15 cm compared to the depth of the rest of the trench, the depth of which, in turn, you will need to calculate yourself based on the size of the drainage tank. 


Manufacturing of a drainage well
Using a drill with a diameter of 2-3 cm, you can easily turn the walls of the tank into a sieve. Through these holes, if possible made at equal intervals, entered the barrel waste water must evenly go into the surrounding ground. On the wall of the barrel, at the top, make a hole in the diameter of the drain pipe and prepare a fastener for the pipe. 


Filling the trench
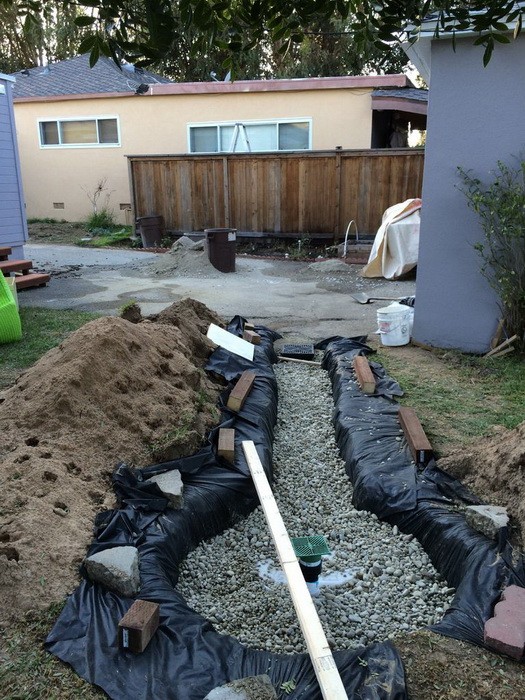
Then the dug trench must be covered with geotextile. This will prevent silt and dirt particles from mixing with the gravel. Also, geotextiles will provide better moisture absorption by the earth. Next, place an already prepared 200-liter barrel on the 8-10 cm gravel bed. Place a small amount of gravel around the barrel and make sure that the tank does not "move" from side to side. The same should be done with the sump, which must be made so that its upper edge is at the edge of the earth's surface. The height of the sump can also be adjusted with a gravel bed. 


Make sure the water tank is also immobilized, then connect both tanks to the drain pipe. It is important to know that the holes in the drainage pipe should be located on its lower side, while the pipe itself is laid down a slope. Fill the trench with gravel. Make it so that the surface of the ground and gravel remains 15 cm. Next, mount the drain grate on the tank. Then it is necessary to tuck the geotextile, making sure that the edges of the textiles on both sides of the trench overlap, while covering each other. 


Now you know how you can build a drain on your own in just a couple of days without significant costs. The main thing in this matter, as, indeed, in all others, is thorough preparation.
Video How to make drainage on a site with your own hands
In some regions, groundwater is very close to the surface. So close that they threaten the integrity of buildings (their foundations) and prevent plantings from growing. All these problems are solved by the drainage of the site. In general, this event is costly both in terms of the amount of funds required and the necessary time costs. Much of the time is spent on planning. If you do everything according to your mind, then you need data from a hydrogeological study and a project drawn up by a specialist. But, as usual, only a few do this, most make a drainage system with their own hands.
What kind of water is drained away
Drainage of the site is a costly and time-consuming activity that requires a large amount land works. The best time for construction - the process of planning and arrangement of the site. Later deadlines lead to a lot of confusion, which is not everyone's joy. Nevertheless, if there is water on the site, you have to go for it.
There are several types of water on the site that bothers us and that needs to be diverted. They are of a different nature and require different measures.
Surface water
They are formed during snowmelt and heavy precipitation, during work on the site (watering, washing paths), water discharge from a reservoir, etc. What all phenomena have in common is their singularity: surface waters appear after certain events. A more sensible way to divert them is by means of a device. She copes with the task perfectly, and the cost of the arrangement is much lower.

Mainly open canals are installed to drain surface water, water intake - point under storm pipes or linear along the entire roof overhang. From these receivers, water is taken with solid plastic (asbestos-cement) pipes into a sewer or a river or lake is dumped into a ravine. Sometimes it is possible to withdraw to the ground.
Ground water
Those groundwaters that have a seasonal level (higher in spring after a flood, lower in winter) have a feeding zone (where they come from) and an outflow zone (where they leave) are called groundwater. Usually, groundwater is present on sandy, sandy loam soils, less often in loams with a small amount of clay.
The presence of groundwater can be determined using self-dug pits or several wells drilled with a hand drill. During drilling, a dynamic level is noted (when water appeared during drilling) and a steady level (some time after its appearance, its level stabilizes).

If we talk about the drainage of water from the building, then the drainage system is arranged if the groundwater level (GWL) is only 0.5 m below the foundation.If the groundwater level is high - above the freezing depth - then it is recommended with the measures taken to drain water. At a lower level, other options are possible, but a thorough and multi-layer waterproofing is required. The need for foundation drainage should be assessed by a specialist.
If high-standing groundwater (groundwater level above 2.5 meters) interferes with the growth of plants, drainage of the site is required. This is a system of canals or special drainage pipes laid in the ground at a certain level (below the hot water level by 20-30 cm). The depth of the pipes or ditches is below the ground level so that the water flows to lower places. Thus, the adjacent soil areas are drained.
Verkhovodka
This groundwater is found on soils in high-lying water-resistant strata, but often its appearance is the result of construction errors. Usually this is water, which, being absorbed into the soil, meets strata with a low ability to absorb moisture on its way. Most often it is clay.
If, after the rain, puddles stand on the site and do not leave for a long time, this is a breeder. If water accumulates in the dug ditches, this is also a top water. If a few years after the construction of a house on clay soils or loam in the basement the walls begin to "cry" - this is also a top water. Water accumulated in crushed stone pockets under the foundation, in the blind area, etc.

The easiest way to remove the top water is with the help of ditches, but it is better to prevent its appearance - to backfill the foundation not with crushed stone and sand, but with clay or native soil, carefully tamping it in layers. The main task is to exclude the presence of pockets in which water will accumulate. After such a backfill, it is required to make a blind area, which is wider than the backfill in width and an obligatory stroke is the drainage of storm water.
If the site has a slope, consider arranging terraces and retaining walls, with the obligatory arrangement of drainage ditches along the retaining wall. The most difficult thing is to deal with verkhvodka in low areas, which are lower in level than the neighboring ones. Here rational decision- adding earth, since there is usually nowhere to dump water. Another possible option is the output of the drain through neighboring areas or along the road to the point of possible discharge. It is necessary to decide on the spot, based on the existing conditions.
In order not to drain
A drainage system is an expensive undertaking. If it is possible to get by with other measures, it is worth doing it. Other measures include the following:

If, after all these activities, the situation does not suit you, it makes sense to make a drainage system.
Drainage types
Site drainage - a complex system with many nuances and features. By structure, it can be local (local) - to solve a problem at a specific site. Most often it is drainage of the foundation, basement and semi-basement (basement) floors. Also, water drainage systems at the site are common - to drain the entire site or a significant part of it.

By installation method
By the way of installation, the drainage system can be:
- Open. Concrete or stone trays are used, ditches are dug around the site. They remain open but can close. decorative grilles to protect the system from large debris. If you need a simple diversion solution surface water in the country - these are ditches around the perimeter of the site or in the lowest zone. Their depth should be sufficient so that the water does not overflow at maximum flow. So that the unreinforced walls of the drainage ditches do not collapse, they are made at an angle of 30 °,
- Closed. The water is captured by the installed special water-permeable - drainage - pipes. The pipes are discharged into a storage well, into a drain, a ravine, a nearby reservoir. This type of site drainage is good for permeable soils (sandy).
- Backfill. Drainage of the site of this type usually used on clayey soils or loams. In this case, the pipes are also laid in ditches, but a layer-by-layer sand and gravel backfill is arranged in them, which collects water from the surrounding soils. The worse the soil conducts moisture, the more powerful backfill is required.

Drainage option for a summer cottage - cheap and cheerful
The specific type of site drainage is selected based on the site conditions. On clays and loams, an extensive gravel-sand zone is required, into which water from the surrounding soil areas will flow. On sands and sandy loams, there is no need for such a pillow - the soils themselves drain water quite well, but only a specialist can say specifically based on the results of geological research.
By type of implementation
There are several types (schemes) of drainage devices on the site:

When draining a site, a central drain or a collector is made of pipes of a larger diameter (130-150 mm versus 90-100 mm for ordinary drains) - the volume of water here is usually larger. The specific type of drainage system is selected based on the tasks that need to be solved. Sometimes you have to use combinations of different schemes.
Site drainage - device
The drainage system consists of a network of interconnected pipes that are located around the perimeter (or area) of the area protected from water. Drainage wells are placed at intersections or turns. They are necessary to monitor the state of the system and clean up silted pipes. From all drained areas, water enters the collector well, where it accumulates to a certain level. It can then be discarded or used for irrigation and other technical needs. Discharge can go by gravity (if there is any), and submersible are used for supplying irrigation and other technical needs.

Drainage pipes and wells
Special drainage pipes are used - with holes ranging in size from 1.5 to 5 mm. Water from the surrounding soil flows through them. Holes are located along the entire surface of the pipe. They are of different diameters, for private houses and plots the most used size is 100 mm, for the removal of large volumes of water, you can take a cross section of up to 150 mm.
They are now made mainly from polymers - HDPE, LDPE (low polyethylene and high pressure) and PVC (polyvinyl chloride). They are used for laying to a depth of 2 meters. There are also two and three-layer combined ones, which are made from combinations of these materials, they are buried to a depth of 5 meters.
Pipes for drainage are selected taking into account the depth of occurrence. It is required to select according to the ring stiffness. It is denoted by the Latin letters SN followed by numbers that represent the ring stiffness (resistance to loads). For laying to a depth of 4 meters, the rigidity should be SN4, up to 6 meters - SN6.
The surface of the drain pipe is wrapped in filter materials. There can be from one to three filter layers. The number of layers is selected based on the composition of the soil - the finer the particles, the more layers are required. For example, on clays and loams, pipes with three filter layers are used.

At the turning points and in the places where several pipes are connected, revision wells are placed. They are needed for easier cleaning in the event of a blockage, as well as for the ability to monitor the condition of the pipes. As a rule, all pipes converge into one collector well, from where water is either sent by gravity to the discharge point, or is pumped out forcibly.

There are special wells - for drainage systems, but it is quite possible to bury concrete ring with a bottom and a cover of small diameter (70-80 cm) and bring pipes into it. Depending on the depth of insertion of the drainage of the rings, several may be required. Another option is to do inspection well and drain pipe big size, but in this case you will have to come up with something with the bottom. For example, you can fill the bottom with concrete.
Slope

In order for the collected water to drain off on its own, it is necessary to observe a certain slope in the direction of the direction of travel. Minimum slope is 0.002 - 2 mm per meter, the main one is 0.005 (5 mm per 1 meter of pipe). If drainage shallow, the slope of the pipe can increase up to 1-3 cm per 1 meter, but it should be made as low as possible. At a flow rate of more than 1 m / s, small soil particles are "sucked in", which contributes to a faster siltation of the system.
The slope is changed (in relation to the "duty" in 5 mm per 1 meter) in two cases:
- If it is necessary to drain more water per unit of time without increasing the diameter of the drain. In this case, the slope is increased.
- If it is required to get away from the backwater (when the pipe laid with a given slope is lower than the GWL, i.e. the water simply will not drain). In this case, the slope is reduced.
In the practical design of the system, questions may arise about how to ensure the given slope. This can be done using a water level (not very convenient) or a flat board paired with a regular building bubble level... Having leveled the bottom of the trench, lay a board, on it - a level. Moving it along the board, they check and correct the slope of the bottom of the trench in a certain area.
Drain installation technology
Trenches of a given width and depth are pre-dug. The bottom of the trench is leveled and compacted. Do not forget about the bias, but at this stage there is no point in keeping it exactly. Next, about 100 mm of coarse-grained washed river sand, it is also tamped (spilled, then tamped), leveled. Sand, preferably fraction Dsr 1.5-2.5 mm.

The sand is laid with a density of no more than 200 g / m2. The edges of the canvas are lined along the walls of the trench. A layer is poured on top crushed granite... The size of the crushed stone fraction is selected depending on the size of the holes in the drainage pipe. For the smallest holes, crushed stone with a grain of 6-8 mm is required, for the rest - larger. Crushed stone layer thickness - 150-250 mm - depending on the type of soil. On clays and loams, 250 mm are required, on soils that drain water better - sands and sandy loams - about 150 mm.
Crushed stone is tamped, leveling in a given slope. The compacted rubble is laid drain pipe... Next, the pipe is sprinkled with gravel in layers, each layer is rammed. There should be at least 100 mm of gravel on top of the drain. After that, the ends of the geotextile are wrapped, their overlap should be 15-20 cm. A layer of sand with grains of 0.5-1 mm is poured on top. The thickness of the sand layer is 100-300 mm, also depending on the permeability of the soil: the worse the water is discharged, the thicker the sand layer. The "native" soil is laid on the compacted sand, and then plants can be planted.
A little about backfill materials
Crushed stone should be granite or other hard lime-free rocks. Dolomite (limestone) or marble are not suitable. Testing the existing one is simple: drip vinegar on it. If there is a reaction, it doesn't fit.
Once again, we draw your attention: the crushed stone is laid washed - so that the new pipes do not immediately silt up.

Coarse sand is required. Grain size from 0.5 mm to 1 mm. The sand should also be clean. Some of the sand is poured clean water, chatter, wait until the sand settles and evaluate the purity of the water. If the water is cloudy, big amount suspended particles, sand requires washing.
Some of the nuances of construction
When draining a site, a central drain or a collector is made of pipes of a larger diameter (130-150 mm versus 90-100 mm for ordinary drains) - the volume of water here is usually larger.

The drainage device at the site starts from the lowest point and moves gradually upward. First, a collector well is installed. At high level groundwater or if the water has not yet come down, water can accumulate in the ditches. This muddy slurry will run down the well, clogging it up. In addition, the presence of water in the ditch greatly interferes with the work: drains must be laid in dry ditches. To drain them along the ditch, side pits (sump) are made greater depth... Crushed stone is poured at the bottom. The accumulated water is pumped out of these pits.