For withdrawal excess water from a summer cottage or personal plot it is necessary to create drainage system. With its help, you can protect the territory from waterlogging and buildings from destruction. One of the components of such a system are ditches. They can have different sizes (depth, width and length), but in any case their walls must be strengthened. Otherwise, the water will turn ditches into real ravines, which will reduce usable area plot. How to strengthen a ditch at the dacha? This is exactly what the article will discuss.
Methods of strengthening
Drainage systems have existed for a long time and people have learned to strengthen their walls. There are several ways to do this. They can be divided into two types:
- using scrap materials and plants;
- using structures and devices made in the factory.
The walls of the ditch are strengthened using improvised means with slate, car tires, stones, and also by planting plants. This method is suitable for small ditches or low slope angles.
The geogrid is covered with crushed stone
Various biomats, gabions, geogrids and geogrids are used for slope angles of more than 8-15 degrees. Also, such devices are used when arranging large-width ditches.
Each strengthening method has its pros and cons. This will be discussed later.
Available means
 Slate reinforcement
One of the simplest and most accessible ways to strengthen the walls of a drainage ditch is to use slate. In this case, you can also use used material. The main thing is that there are no large holes or cracks in it.
The technology using slate is quite simple. Sheets (whole or cut, depending on the size of the ditch) are laid on the slopes of the ditch close to each other. This can be done either strictly vertically or at a slight slope. Then pieces of reinforcement or thin pipes are driven in on both sides of the sheets, in a checkerboard pattern.
This method has both its advantages and disadvantages. The first include the following:
- low financial costs, and if used materials are used, then you can do without investments at all;
- ease of installation. All work can be done by one person.
The disadvantages of this design are its fragility. The appearance of the site itself may also suffer.
 Strengthening ditch with tires scheme
Strengthening slopes using old car tires looks more aesthetically pleasing. In addition, this method allows you to make a structure that will last much longer than the slate version (up to several decades).
Here you can resort to two methods, depending on the available space. One involves stacking tires along the edges of a ditch. Soil is poured inside, but sand is better or gravel. For greater reliability, you can drive in metal pipes.
If space allows, it is better to lay the tires offset. Every top row fits halfway down. The result is a kind of ladder. Soil is poured inside and plants can be planted. This creates a beautiful slope.
 Slope improvement
If the ditch is small and the slope angle is less than 8 degrees, then its walls can be strengthened with the help of plants. Small bushes or perennial herbs are planted along the edges. Their roots will reliably strengthen the walls and prevent water from washing them away and turning the ditch into a large ravine.
Special devices
For more reliable and durable strengthening of the walls of the drainage ditch, you can use special designs and devices. These include:
- geo- and biomats;
- geogrids;
- geogrids;
- gabions.
 Ditch reinforced with geomats
Geomats and biomats are made in the form of a polymer sponge. With help high temperature Several polymer meshes are soldered together. This structure is impermeable to water, but at the same time allows plant germination.
 Geomats
To install such structures, it is necessary to perform the following work:
- The slope is being prepared. All debris is removed from its surface and leveled. Then it is advisable to compact the surface. This is especially important if the site has sandy soil.
- The material is supplied in rolls, so installation begins from the top. The geomat (or biomat) is laid at the top of the slope, the edge is secured;
- Then the roll is rolled out to the base of the ditch and the excess is cut off.
- The next row is laid in the same way and overlaps with the one already laid. The tolerance can be up to 15 cm.
- Now the entire surface is covered with a small layer of soil and seeds of perennial grasses are added (if necessary or desired).
Strengthening the ditch with geogrid
Another type of material for strengthening the slopes of ditches is geogrid. It is a network of polymer material with polyester base. The geogrid is cut into the required pieces and laid on a pre-prepared slope (the surface must be cleaned, level and compacted using hand roller). The grids are laid close to each other and fastened with anchor brackets.
 Geogrid
The mesh can be covered with a layer of soil on top and plants can be planted. Herbs such as mint, periwinkle and bryozoan work well for these purposes. These grasses will use their roots to firmly hold the coating in place.
Geogrids and gabions
 Laying geogrid
More powerful structures for strengthening not only the slopes, but also the bottom of the ditch are geogrids. They are made from polypropylene and polyethylene. Such products are not afraid of corrosion, they are quite durable and can last for many decades.
Before installing them, it is necessary that the drainage ditch is dry. You also need to prepare anchor fasteners, a hammer, and fine gravel.
 Geogrid installation diagram
After draining the ditch, all debris (large branches, stones, etc.) and large vegetation are removed from the surface. In this case, small grass can be left in place. Then the geogrid is laid out. This must be done over the entire area of the canal; it is advisable to cut off the excess pieces immediately.
 Strengthening structure with geogrid
For long service life of the geogrid, it must be properly and securely fastened. This is done using anchor brackets or hooks. They can be purchased together with the grille or made with your own hands from reinforcing bars with a diameter of 15 mm and a length of 50 to 110 cm. The fasteners are placed in a checkerboard pattern at a distance of at least 30 cm from each other.
The next step will be backfilling the geogrid. You can place sand at the bottom of the ditch (if it will rarely fill with water) or crushed stone (if drains will constantly flow in the ditch). On slopes it is better to use soil sown with grass. This way the grille will stay in place more securely.
A more expensive, but also more reliable, way to strengthen the slopes of a drainage ditch is to install gabions. In addition, such designs will look more aesthetically pleasing and respectable.
 Gabions in action
A gabion is a factory product made in the form of a parallelepiped (box). The material used is double twisted metal wire. Large stones or pebbles are placed in such “boxes”.
In the production of gabions they do not use simple wire. It has a polymer coating. This protection extends the service life of the product to 70 years. At the same time, the product is not afraid of aggressive influences environment and can withstand heavy overloads.
 Gabion installation diagram
Before installing the gabion, it is necessary to prepare the slope. Since the product is quite large, excess soil is deleted. The gabion is placed in place and filled with large stones or crushed stone. For greater reliability, you can attach a chain-link mesh to the top; it is advisable to choose it also with a polymer coating. For improvement decorative look You can place stones or pebbles on top of the mesh.
 Strengthening ditch walls with gabions scheme
If you have welding skills and the necessary equipment, then you can try to make a gabion with your own hands. Pieces of reinforcement are suitable for this. They are welded together to make a lattice. For long service life, all parts can be coated with an anti-corrosion compound.
When strengthening the slopes of drainage ditches, do not forget about the base. Here you can use sand or crushed stone, depending on the frequency of filling with water. If the ditch is small and located in a visible place, then the bottom lined with natural stones. A particularly beautiful effect will be achieved in combination with gabions.
Video
Another interesting way to strengthen:
kakpravilnosdelat.ru
Strengthening the ditch: what and how to strengthen it
Quite often, drainage or ordinary ditches are located in dacha or garden plots. Their slopes can be mobile and gradually move towards the bottom. In this case, the question arises of how to strengthen the ditch. A variety of strengthening methods are discussed in our article. In addition, they can be used to strengthen the slopes of ravines or the banks of ponds and other bodies of water.

Driven stones are very famous, but not the most reliable way fortifications
How to choose a strengthening method depending on the angle of the slope
Deciding how to strengthen a ditch is based on the angle of inclination of the ditch slope:
- Often, slopes with an angle higher than 8% require serious strengthening. It is enough to plant them with plants of horizontal and vertical action.
- Slopes with a steepness of 8 to 15% are strengthened with biomats (geomat) or geogrids.
- Significant slope steepness (over 15%) can only be supported by internal reinforcement methods - geogrids and gabions.
Geomats
Geomats are a polymer material with a waterproof structure. It is created by superimposing polypropylene lattices on top of each other under high temperature.
The structure of the resulting product resembles the structure of a washcloth. Thus, geomats protect the soil, and on the other hand, do not prevent plants from growing through them. Over time, plant roots intertwine with the lattice material and strengthen its structure.

Geomat structure
Laying geomats is carried out as follows:
- Before strengthening the bank of the ditch, the surface of its slope is leveled and cleared of debris.
- the upper edge of the first geomat is secured in the upper part of the ditch using anchor bolts.
- The roll is rolled out and cut to the desired length.
- Straighten the folds of the material and fasten its lower part using anchor bolts.
Geomat laying scheme
- The following rolls are laid alternately. In this case, it is necessary to create a longitudinal overlap of one roll on another by approximately 15 cm.
- The resulting surface is covered with a 3-5 cm layer of soil and sown with plant seeds.
Geogrids

Appearance of geogrid
Geogrids are made from glass or polyester threads. The product is a mesh with square cells that reinforces the surface of slopes.
The geogrid installation process looks like this:
- The surface is leveled and compacted with hand rollers.
- Rolls of geogrids are distributed along the ditch at a distance corresponding to the width of one mesh web.
- The rolls are rolled out manually almost end to end.
- The unfolded mesh is secured with metal anchors - rods 3-5 mm in diameter, 150-200 mm long with bent upper ends every 1-1.5 m.
Drainage ditch: how to strengthen the walls with geogrid
- The laid out geogrids are covered with the selected material (soil, crushed stone or stone) in small piles, which are then leveled by hand.
- If the mesh is covered with soil, soil-covering plants are sown on top.
Strengthening with geogrid
What is a geogrid
Geogrid is a mesh of cells made of polyethylene and high-strength polypropylene. The principle of its operation is based on the adhesion force of its cells with the granular material with which it is subsequently filled. Such materials are crushed stone and, less commonly, plant soil. Strengthening the ditch at a summer cottage is enhanced by sowing perennial grasses on the slopes.
It is worth noting that when using ground-covering plants, the geogrid ceases to be visible over time and does not disturb the naturalness of the landscape.

Geogrid fastening process
Strengthening technology
To strengthen the drainage ditch, you need to purchase:
- fine gravel or sand;
- special geogrid;
- fasteners for it:
- special plastic device;
- or ordinary reinforcement, bent in such a way that it resembles one-sided hooks.

The strengthening scheme can be supplemented with geotextiles
You can strengthen the banks of a drainage ditch with geotextiles as follows:
- Preparation for strengthening. The process begins with pumping out water, if the ditch is filled with it, in order to gain access to strengthening its lower parts. There are three possible ways to implement pumping:
- using natural drainage (an inclined pipe through which the drains will drain by gravity);
- pumping;
- self-scooping.
- Next, they move on to clearing the banks of the ditch or drainage, which will be strengthened. It is enough to remove large clutter - massive branches and plants, large stones, but small grass and minor debris (of plant origin) can be left.
- The geogrid is spread along the entire slope of the ditch.
- Then it is strengthened using the chosen fastening method (purchased fasteners or made by hand).

Mounting diagram and mounting anchor diagram
- The geogrid cells are filled with reinforcing material. You should not use regular soil for this, as it will simply be washed away over time. Depending on the degree of moisture in the ditch, the following is used:
- Crushed stone if the depression is filled with water. Moreover, to increase aesthetic properties crushed stone can be replaced with any similar material, for example, river pebbles.
- Sand if the ditch is dry.

Cells filled with gravel
In addition to its aesthetic function, decoration also provides additional strengthening of the banks. You can use small shrubs or seeds of special ground cover plants with abundant roots. In addition, plants will protect the soil from corrosive processes.
DIY gabions
What are gabions
Gabion: diagram, type of double torsion mesh, table of standard sizes
Maccaferri gabions are often used to strengthen open drainage ditches. They are a factory product made of metal mesh, made in the form of a parallelepiped, and then filled with large stone or crushed stone.
Gabions are made from galvanized wire coated with PVC to protect against chemical, corrosive and mechanical influences. The structure is able to withstand significant loads due to the use of a double-torsion mesh.
The drainage properties of the product are ensured due to its porous structure. It also eliminates hydrological loads on the slope and the removal of soil particles from it.
Gabions are a perennial structure. They have a beneficial effect on the natural ecosystem, and due to its action, their effectiveness only increases over the years. The manufacturers themselves promise a service life of up to 100 years.

Appearance of factory gabions
How to make a gabion with your own hands
The only drawback of factory gabions is their high cost. Additionally, finding a company that does retail manufacturing can also be challenging. For this reason, we suggest making them yourself:
- You will need reinforcing bars with a diameter of 6 mm. The rods are welded into a rectangular structure of a suitable size.

Structural welding process
- The size of the cage cells from the reinforcement is selected according to the diameter of the purchased stones, so they must be purchased in advance. So, if the average diameter of the fraction is 150 mm, then cells of 100 * 100 mm are suitable for you.
- After the structure is welded, it is installed on the banks of the ditch.
- The cells are then filled with purchased cobblestones.
- For reliability, the homemade gabion is covered with a chain-link mesh on top.

Homemade gabions stacked on top of each other
Regular mesh netting is susceptible to rusting. This problem can be solved in one of two ways:
- purchase galvanized chain-link, coated with PVC and free from such drawbacks;
- fasten the chain-link in such a way that after a few years it can be replaced with a new mesh.
kanalizaciya-prosto.ru
Strengthening the walls of drainage ditches: a review of the best methods

The site on which the house is built most often needs a drainage system. This is a rather complex and by no means cheap design. The most expensive option is to install a closed system, so many people choose an open one. It consists of several drainage ditches connected to each other. The main problem with this design is the gradual crumbling of the slopes, which eventually “slide” to the bottom. There are many ways to strengthen the walls of drainage ditches. Let's look at them in more detail.
When choosing a method for strengthening the slopes of a ditch, you should be guided, first of all, by the angle of inclination of its walls:
- Slopes with an inclination angle of less than 8° do not need strengthening. For them, planting vertical and horizontal plants will be sufficient.
- Walls, the steepness of which varies from 8 to 15°, must be reinforced with geogrids or geomats.
- Slopes of significant steepness with an inclination angle of more than 15° must be strengthened using methods that involve internal reinforcement. Gabions and geogrids are well suited for these purposes.
In addition to the angle of inclination of the wall, the depth of the ditch is also of great importance. If it is small, you can strengthen the slopes by driving stones into them.

The slopes of drainage ditches need strengthening. If their depth is small, you can strengthen the slopes by driving stones into them
Option #1 - 3D geogrid
Geogrid is widely used to reinforce slopes. It is produced from polymer fibers with a reinforced monofilament intertwined structure and stitched cell nodes. To increase strength, the material is additionally impregnated polymer compounds. The root system of plants easily penetrates through the cellular covering and forms a turf layer, which allows the soil cover to be securely fixed on the slope, strengthens the slopes and increases their stability.
Geogrid installation is carried out as follows:
- We level and compact the walls of the ditch using a hand roller.
- We lay rolls of material along the trench at a distance that corresponds to the width of the panel.
- We roll out the mesh, laying the strips almost end to end.
- We secure the laid material every meter and a half with anchors with bent upper ends. If strong winds are common in this area, then it is best to use U-shaped fastenings. metal staples.
- We fill the fixed geogrids with soil or decorative material. It could be stone, crushed stone, etc. Suitable plants are sown on top of the soil.
Anti-erosion geogrid is resistant to rotting, corrosion, high and low temperatures. The material is not afraid of aggressive environments, withstands high stress and does not deform. Over time it performance characteristics don't change. The geogrid limits slope deformation and soil movement. The material becomes the basis for a strong mass that can withstand heavy loads. Including frost heaving, subsidence and soil displacement. Flexible coating can be used on surfaces of any configuration.

The geogrid limits slope deformation and ground movement. It is durable, resistant to aggressive environments and rotting
Option #2 - anti-erosion geomats
Geomats are structures formed by three layers of double-oriented polypropylene lattices. The meshes are superimposed on each other and fastened together with polypropylene thread. The structure of the resulting product resembles a washcloth, which allows it to fix the soil without interfering with plant growth. Over time, the roots of vegetation entwine the grids of geomats, which makes their structure even more durable.

Geomat has a porous structure that allows the root system of plants to easily pass through the material
Material properties:
- resistance to UV radiation;
- complete preservation of its properties in marine and fresh water;
- resistance to aggressive environments;
- non-toxic;
- resistance to a wide range of temperatures;
- low level of smoke generation and flammability;
- resistance to microorganisms.
The use of geomats allows you to preserve the natural appearance and character of the landscape. The material is quite easy to install and, if necessary, can even be installed in winter period. The process of strengthening slopes is carried out in several stages:
- We level and clear the walls of the ditch from debris.
- The upper edge of the first roll is secured with anchor bolts at the top of the slope.
- Roll out the roll to the bottom and cut off the required length.
- We carefully straighten the material and secure its lower part.
- We lay the next strip of covering on top of the first with an overlap of about 15 cm.
A layer of soil 3-5 cm high is poured on top of the laid geomats, into which plant seeds are sown. Professionals recommend using this sowing scheme. Sow two thirds of the seeds on the open surface of the material, and a third on the backfilled soil. Seed consumption is about 40 g per square meter. meter.

After laying the geomats and filling them with soil, you need to sow the plants, root system which will strengthen the slopes of the trench
Option #3 - homemade gabions
Gabions are a frame made of metal mesh with hexagon-shaped cells. The structure is filled with crushed stone, pebbles or stones. This system perfectly protects the slopes from crumbling. Gabions are made from a double-twisted metal mesh coated with zinc, galfan or polyvinyl chloride. The contents of the structure are selected in such a way that the filler fraction is smaller size cells. To facilitate installation, gabions are first installed, and then filler is poured into them.
There are two types of structures: mattress-mattress and box-shaped. The former are used to cover surfaces and give them shape. Retaining structures are made from box-shaped ones. They are used to strengthen the slopes of trenches. The porous structure of the product provides the necessary drainage properties, eliminates hydrological loads on the walls of the ditch and the removal of soil from the slope. The manufacturer guarantees a long service life of the structure, it can reach one hundred years. Gabions have a beneficial effect on the natural ecosystem, and their effectiveness only increases over time.

Gabions are very aesthetic structures. They not only strengthen, but also decorate drainage structures
The disadvantage of factory designs is considered to be their high cost. However, gabions can be made independently, choosing the most suitable sizes for specific conditions. The work is carried out in several stages:
- Determining the dimensions future design. For small areas, it is optimal to choose gabions with dimensions of 800*400*400 mm. We select the cell sizes, which should be larger than the diameter of the filler. Therefore, the latter must already be purchased.
- We weld rectangular structures of the required size from rods with a diameter of 6 mm.
- We install the finished frames on the slopes of the drainage ditch.
- We fill the gabions with pre-prepared filler.
- We cover the top of the homemade gabion with a chain-link mesh. This way the structure will become more durable.
Chain-link mesh is susceptible to corrosion. The problem is solved in two ways. You can purchase a mesh with protection, PVC coated or galvanized. Or do the following: secure the regular mesh so that it can be easily replaced with a new one after a while.
Option #4 - volumetric geogrid
Geogrid or geocells, geocells are a geosynthetic coating, which is a three-dimensional structure made of tapes that are fastened together. During the manufacturing process of the geogrid, polyethylene tapes are welded to each other in a checkerboard pattern. The result is a reliable frame with cells of equal size.

Various fillers can be filled into geogrid cells. For “wet” ditches, pebbles or crushed stone are preferable; for dry ditches, sand is suitable
There are two types of geogrids available: with and without perforation. The first is characterized by better drainage ability. It is this material that is recommended to be used to strengthen the walls of drainage trenches. Covering without perforation is allowed to be laid on slopes only if there is an intermediate layer of geotextile. Installation of the geogrid is carried out as follows:
- We level the slopes of the trench, give them the desired shape and compact the soil. If necessary, we lay geotextiles on the base.
- We lay the material from top to bottom.
- We stretch the geogrid and fix it with L-shaped anchors. The service life of the structure depends on the correct execution of this operation.
- We fill the coating with bulk material. If the recess is filled with water, crushed stone, pebbles or any similar filler are laid. Sand is suitable for dry trenches.
Geocells differ in cell sizes and edge heights. The choice of material depends on the type of bulk material and the steepness of the slope. The product has good flexibility and high strength. It is resistant to various aggressive environments, does not rot or deteriorate, is non-toxic and has a long service life.
Option #5 - budget methods
The options described above are quite expensive. If you want to strengthen the walls of the drainage ditch according to the “cheap and cheerful” principle, you can use the following methods.
Using old tires
This cheap method involves using used tires, which in most cases can be obtained for free. For backfilling you will need regular soil or sand. Tires are laid in rows, with each next one moving by half the diameter of the tire. The parts are tightly connected to each other and reinforced with stakes that are driven into the center of each tire. The laid parts are covered with soil or sand. The gaps between the tires are also filled. The structure is ready.
Reinforcement with slate sheets
An even simpler option involves using slate sheets. You can use flat or wavy material. The sheets are secured with metal posts. The main advantages of this method can be considered low labor costs and low cost. Unfortunately, such a system will not last too long. However, it performs its function quite well and saves the slopes from sliding.

Strengthening the walls of a drainage ditch with slate sheets is one of the simplest budget options
The drainage system is a necessary attribute of most sites. You can arrange it in different ways. The simplest of them is open drainage ditches. Various methods can be chosen to protect trench slopes from collapse. You can decide on an option only after analyzing specific conditions, including the type of soil, the angle of the ditch and, of course, the financial capabilities of the owner. Experts recommend using modern reinforcing materials, which may be more expensive than “ budget resources" But such systems will last a long time and will not cause trouble to the owner.
aqua-rmnt.com
How to strengthen a ditch at the dacha

Many summer residents face this problem when arranging their territory. Availability groundwater, the swampy soil is led to the creation of a drainage system. Moreover, flooding of the site occurs for other reasons. Stormy rains or heavy melting of snow in the spring lead to flooding of the house, basement or other utility rooms.
But before you strengthen the ditch in your dacha, you need to carefully familiarize yourself with its structure and choose the most suitable one. suitable option wall fastenings.
Ditch construction
 Gutter shape
 Creating an effective drainage system requires the presence of at least two independent networks.
- Linear is designed to drain the area itself. Usually it is erected when constant flooding occurs. The branches of closed ditches should be spread from the top topographic point, while ensuring a slope of 5–10 mm per meter. All water goes into the open drainage system.
- A second independent network should protect the foundation and basement of the house. Here the reference point is the far corner of the building. The drainage ditch along the perimeter should also have a slight drop in level of 0.5 percent. To cover it, use turf or concrete paving slabs.
- Any trench in this system must be at least 50 cm deep and wide. Near the foundation this figure may be higher. To construct drains, a simple method is used: fascines (these are bundles of twigs and branches) or wooden boxes.
- To strengthen the bottom, gravel, crushed stone or simply sand of different fractions are often used. But at the same time, the walls of the ditch periodically settle and crumble. Today there are several effective ways that will allow you to avoid this.
Basic methods of strengthening
Before choosing a reliable method, you should carefully measure the angle of inclination of the ditch walls.
 Use of plants
 - If the slope angle does not exceed 8%, then it will be quite enough to strengthen it with the help of various plants.
- Biomats or geogrids are used at a steepness of 8 to 15%.
- If the angle exceeds 15%, then you cannot do without geogrids and gabions. True, at shallow depths, you can simply use stones and drive them into the slope.
Use of slate and tires
 Slate reinforcement
 One of the easiest ways to strengthen the wall of a ditch can be ordinary slate.
- In addition to sheets, you will need metal pipes or fittings, a shovel and a crowbar, as well as an angle grinder and a respirator.
- Using a grinder, the sheets are cut into equal pieces. They are placed directly into the ground to a depth of 25–30 cm straight or with a slight slope. The sheets should fit snugly against each other.
- Reinforcing bars are driven in on both sides in a checkerboard pattern. It is best if they are treated with an anti-corrosion compound or paint beforehand.
- Western builders have come up with another inexpensive way to strengthen it using car tires. Old tires can be laid in rows and secured together. The stakes hammered into the middle will give additional strength. The space inside can be filled with soil, but it is better to use sand or fine gravel. It is also useful for voids between tires.
- There is another way. Tires can be stacked in several rows. In this case, each overlying one shifts by half the diameter. Then the tires are also covered. Using tires is very cheap, especially if you can get them for free or for next to nothing.
 Tire stacking
 Of course, you can’t count on a too long service life, so it’s worth taking a closer look at more expensive but reliable materials.
 Strengthening the slopes of the site with tires
 Installation of geomats and geogrids
 Biomat structure
 Geo- and biomats are nothing more than polymers with a waterproof structure. Polypropylene gratings are superimposed on each other under the influence of high temperature. This structure is more reminiscent of a washcloth, but this is done so that they can grow through the holes. various plants.
 Geomats
 - The first step is to prepare the slope itself. It is necessary not only to level it, but also to clear it of any debris.
- Geomats are sold in rolls, so the top edge is aligned with top part ditch and secured there with anchor bolts.
- The roll is rolled out to the bottom, and then cut and secured with anchors.
- The next roll should overlap with a tolerance of about 15 cm.
- Then you will need to cover everything with a small layer of soil and use the seeds for sowing. Usually 40 grams per m² is enough.
- Geogrid is also available in rolls. It has a polyester base and square cells. For installation you will need a tape measure, a marker, scissors, a hammer, as well as a rake and a hand roller.
- It is with the help of a roller that the slope surfaces are well compacted and leveled.
- Each roll must be cut into a certain number of pieces, and then laid tightly on the slope directly next to each other. For fastening, metal anchor rods or staples are used. They are especially needed in places where there is a high probability of strong winds.
- The geogrid is also covered with a layer of soil and plants such as periwinkle, mint or bryozoan are planted. True, you can simply use small crushed stones or pebbles.
 Geogrid
 But for stronger strengthening, the use of geogrid will be required.
Geogrid installation

Its basis is polypropylene and polyethylene. This alone suggests that this is a very highly durable and durable product. In addition, the geogrid is not afraid of corrosion and can last for many years.
- Since geogrid cells can be stretched both in length and width, they adhere tightly to the soil or crushed stone. In addition to the rolls, you will need anchors, scissors, a hammer, as well as fine gravel and sand. A pump may be needed.
- Installation work can only be carried out when the drainage ditch is not filled with water and all slopes are completely dry. Therefore, you will have to not only pump out the water, but also prepare the surface. It is necessary to remove all debris, large stones and branches. In this case, small grass can be left untouched.
- The geogrid is spread along the entire length of the ditch. In this case, the unnecessary piece must be cut off immediately.
 Scheme of soil strengthening with geogrid
 - The most important stage is considered correct fastening. After all, then the service life will be at least twenty years. You can buy fasteners or make them yourself. To do this, use hooks from ordinary reinforcement. The thickness should be 1.5 cm, and the length should be 50–110 cm. Such hooks are placed at a distance of 30 cm from each other in a checkerboard pattern.
- All that remains is to secure all the cells well. Sand is suitable for a dry ditch. If it is often filled with water, then it is better to use crushed stone or river pebbles. It is even better if the slopes are sown with ground cover plants. Over time, this will create even greater adhesion to the geogrid.
 Filling with crushed stone and sand
 The most expensive, but the most a good decision can be strengthening the slopes of the ditch with the help of gabion.
Advantages of gabion
Typical design dimensionsThis factory product is a product made in the form of a parallelepiped from a double-torsion metal mesh and filled with large stone or crushed stone.
- To make the gabion, the factory uses special galvanized wire, which also has a PVC coating. It is this that reliably protects this structure from corrosion, aggressive chemical environment and mechanical damage. Even heavy loads are not scary. Average term operation can be more than 70 years. But this affects the cost.
- Therefore, you can make a gabion on your own. To do this, you will need reinforcement rods with a diameter of 6 mm, as well as electric welding. In addition, you need to stock up on a tape measure, a marker, an angle grinder, a chain-link mesh, a shovel and a wheelbarrow. Cobblestones will also be required.
- A design with dimensions of 80x40x80 cm is suitable for a small area. The reinforcing bars are welded together to form a rectangular structure. The width of the cells will depend on the diameter of the selected stones.
 Application of gabions
 - Using a shovel, it is necessary to prepare and widen the slopes of the ditch. Only then can cages be placed along the entire shore.
- Each cell is filled with large cobblestones and, if necessary, several rows are installed at once.
- A chain-link mesh is attached on top for better fastening. To avoid the need to change it frequently, it is better to choose a mesh that also has a PVC coating. It can be easily reinforced from above with cobblestones. In addition, this gives the entire structure a good decorative look.
 Gabions
 Gabions can last the longest, while they fit well into the ecosystem. Manufacturers guarantee at least one hundred years of service.
Arrangement of the drainage system
Before you start strengthening the walls of the ditch, you need to properly equip the drainage system itself.
 You can use large pebbles
 In addition to creating the desired slope, you need to correctly make the bottom of the trench. For this, sand and fine gravel are used. With their help, the necessary pillow for drainage pipe.
It is protected by a volumetric crushed stone filter, as well as geotextiles, which protect against the ingress of excess debris and soil.
Most often, ceramic or perforated asbestos-cement pipes are used for drainage. But recently, plastic gutters have also begun to be used.
Note! Do not forget about the drainage well, where excess water will drain. After all, a ditch that constantly contains water begins to collapse the fastest.
Modern materials will allow all the walls of the ditch to be well strengthened, and then the threat of flooding will be reduced to almost zero.
After rain, do your gardens and gardens turn into lakes? The easiest way to get rid of dirt and puddles is to make drainage in your summer cottage. Moisture that accumulates in depressions and flows down slopes, eroding the soil, is not only an aesthetic problem. Over time, a constant excess of water will lead to depletion of the fertile layer, damage to the root system of trees, erosion of the foundation of the house and constant flooding of the basement and outbuildings.
- The site is located on a slope - in this case it is necessary to drain all the water flowing from the neighbors' dachas.
- The terrain is uneven, with depressions and rises.
- The soil is oversaturated with moisture, and there is a constant high level of groundwater.
- Dense hard soil predominates, poorly absorbing water after heavy rainfall and snow melting.
Types and methods of drainage in the country
Depending on the reasons for the swampiness, the type of drainage arrangement for the dacha site is chosen. There are two ways to drain soil:
- Disposal of surface water.
- Deep drainage– correction of groundwater level.

Benefits of performing complete drainage
The surface method is used when flooding occurs in the area only after heavy rainfall, during the thaw season and melting of the snow cover. There are several options for arranging wastewater disposal. If there are no plans to build a house at the dacha, and the land is used only for seasonal work, you can do without complex drainage systems and large investments. Making the simplest channels for drainage is not difficult if you take into account the basic rules: choosing the direction and depth of the trenches, the laying trajectory.

Flooded area after the thaw
Deep drainage of groundwater is necessary to protect buildings - if water is not drained from the outer perimeter of the foundation, then during the season of rising groundwater levels, flooding of basement and basement premises. The soil eroded around the house will weaken the foundation structure. In addition, in an area with marshy rocks, difficulties will arise with the arrangement of landscape structures. To drain the deep layers, a closed drainage technique is used to remove the runoff outside the dacha area.

An area with difficult terrain and the need for a combined drainage system
To ensure complete protection of the house and garden plot, combined projects are being developed with the simultaneous installation of a deep drainage network and surface drainage ditches connecting at water collection points.
Surface option: construction features
To determine which surface drainage method at the dacha will allow you to get rid of dirt on the site, you must:
- Analyze the number of places where water accumulates after heavy rain - perhaps it is enough to make just a few drainage points.
- Determine the direction of natural flows so as not to make a mistake with the trajectory of the ditches.
- Find a place where you can drain excess water. If there is no pond nearby, a drainage ditch between plots or a deep ditch, you will have to equip a drainage receiver.

Surface channels on the site
Types of surface drainage systems
It is advisable to equip only the surface with your own hands. country drainage point or linear type - these systems do not require the use of equipment, and you can plan the locations for laying ditches yourself:
- Point outlet. Local collection system excess moisture- this is the installation of receivers or arrangement of drainage ditches directly in places where liquid accumulates: in recesses, under drainage pipes, in the lowest places of the site, points of height difference. Several rainwater collection points can solve the problem if the main area does not flood after rain.

- Linear system. This method involves covering the entire area of the summer cottage with a system of connected trenches to drain liquid. Linear diagram implemented with the construction of a closed or open trench system. The advantage of this method is uniform drainage of the soil throughout the entire area.

Installation of a linear drainage system in the garden
Open system for removing moisture from the ground
The easiest and cheapest way to make drainage in a summer cottage is to equip an open linear surface drainage system. Drainage ditches are dug at an angle to a relatively small depth - up to 50 - 70 cm. The width of the trenches varies: from the narrowest at the beginning of the branch, to widening by several tens of centimeters in the direction from the beginning of the ditch to the connecting highway. The greatest width is dug at the drainage site. The walls of the trenches are formed at an angle to the bottom - the angle of inclination should be up to 30 - 35 degrees.
To strengthen the walls use:
- Remains of building materials: slate, brick, concrete slabs.

Reinforced with slate sheets to prevent walls from collapsing
- Perforated textiles – agro- and geotextiles. Special material, which does not rot. Plants grow through small holes, which with their root system are able to strengthen the soil on the walls and protect the ditch from crumbling.

Gutter protection soft material
- Concrete gutters, metal mesh stone laid on mortar.

Gutter lined with river stones: this gutter is easy to clean
How to make the most economical drainage in your dacha? Leave the channels completely open, filling them with crushed stone, gravel or mixed gravel-sand mixture. This budget solution is perfect for areas where problems with soil erosion occur infrequently.

Surface drainage groove with backfill
There are many design options for open channels: ready-made trays made of plastic, metal, concrete with decorative gratings.
Closed drainage network
It is much more difficult to make closed drainage on a summer cottage without the involvement of specialists. A closed system is a network of perforated pipes laid with mandatory observance of technology and slope along the entire perimeter of the site.

System diagram closed type
To carry out the work, it is necessary to accurately plan the installation locations of the pipes - in case of an error, the entire branch will have to be redone. Therefore, craftsmen use laser rangefinders and special equipment to calculate with millimeter accuracy the required depth and slope of the pipeline.

Execution of work: selection of installation direction
Before installing the perforated pipes, the dug trenches are strengthened and a gravel bed is created. Textiles must be installed under the backfill. For different sections of the system, pipes of different diameters are selected.

Installation of perforated pipeline
In addition to the costs of pipes and excavation work, it is necessary to calculate the number of inspection tanks. Perforated pipes will have to be washed, and in order to get to the junction, wells with access to the surface are installed along the main line.

Wells are an essential part of a closed system
The advantage of a closed discharge system is absolute invisibility. The pipes are dug into the ground, and after the work is completed, there are no open ditches left on the surface. It is advisable to install closed drainage during the construction of a house. On a summer cottage, which is used only for seasonal growing of vegetables, it is enough to make a simple, economical open system.
The simplest way to drain the soil at your dacha: do-it-yourself surface drainage
How to make drainage in a wet area? Draw simple diagram and dig open channels connected to the drainage area. The following can be used as a receiver for water drained from the site:
- Roadside ditch or ditch.
- An artificial or natural reservoir located below the dacha.

Output of the open branch into the receiving pit
- A well with a gravel bottom, dug at the lowest point of the site.
- A plastic tank dug into the ground.
Preparation of materials and marking of the site
The materials and tools needed to make drainage in your dacha with your own hands are available in every home:
- Shovels, picks - in case you have to dig through hard rocky soil.
- Wheelbarrows and buckets for carrying and transporting the extracted clay.
- Pegs and fishing line, or tape - to mark the area.
From building materials you will need: remains of bricks, slate; gravel of different fractions and sand. Choice decorative materials depends only on the desire of the owner: you can buy gratings to protect ditches from pollution or simply fill the trenches with stones in the form of paths.

Drainage channel in the form of a rocky path
How to determine the correct trajectory and location of ditches without special tools? It is enough to observe the natural direction of flows after heavy rain or take a closer look at the tracks on the clay in the spring. Traces left by flowing water - perfect place for digging ditches. It is advisable to make preliminary markings on the diagram.

Scheme for planning the laying of drainage channels
Laying ditches: rules for performing excavation work
The most labor-intensive stage is excavation work. With open surface drainage, the depth of the ditches should be about half a meter. Width - from 40 to 80 cm, up to 1 m - at the drainage point. Before starting work, the selected trajectory is marked with pegs with a stretched fishing line.

Grooves are dug along the marking line
Dig trenches begin from the top point of the site. The excavated soil is stored on one side of the ditch. Cleaning up after finishing work will be greatly simplified by using ordinary polyethylene construction film laid on the edge of the trench. The extracted soil can be used to level and fill beds and flower beds.

The side walls must be formed at an angle. On an inclined surface, liquid flows faster to the bottom; in addition, there is no erosion of the bottom due to the impact of falling streams. The finished grooves must be compacted: the bottom and walls must be smooth and solid.

Dig the line to the junction with the receiving tank.
Construction of trenches and drainage
There are 3 options for arranging ditches:
- Soft - with laying a layer of soil on top of the backfill.

- Gutter - a concrete trench without a cover is placed in the prepared trench.

- Backfilling - backfilling is carried out to the surface level.
To extend the service life of the drainage system, it is necessary to strengthen the walls and install bulk cushions to facilitate the outflow of liquid. A perforated film or special geotextile fabric is placed in the trench. Water passes freely through the holes, partially absorbing into the soil.

Channels with installed protective film
A layer of gravel or crushed stone of different fractions must be poured onto the bottom: large fractions at the bottom, and fine fractions as you approach the surface. Between the layers of backfill, it is advisable to install flow accelerators from scrap materials, which will serve as a pipe. Use trimmed plastic bottles without a bottom, large pieces of brick laid with gaps, bundles of branches and brushwood up to 30 - 50 cm long.

Simple materials, which can be laid in grooves instead of perforated pipes
The finished trench can be left open or closed decorative grille. Mesh metal lids will protect the channel from clogging with branches and leaves. If the film is installed overlapping, then the layer of turf with lawn grass can hide the groove from prying eyes.

Main trench reinforced with mesh
Video: country drainage
Video lesson on how to plan and make drainage at your dacha with your own hands, without investing money in a complex system.
You can drain a moderate amount of water from the site yourself. But if at the dacha it is planned to build country house, a simple open system is not enough to drain a wetland, it is better to contact specialists. A system with a combination of deep and surface networks is difficult to plan and arrange, and an error in calculations can lead to water remaining on the ground surface.
An eternal problem is the sliding and crumbling of the walls of ditches, which leads to clogging, stagnation of water and, as a result, deformation and destruction of the structure of your entire ditch. To avoid this trouble, you need to take care of it in advance strengthening the walls of your wonderful ditch.
Choosing a method to strengthen the ditch
The method of strengthening depends on two factors: the steepness of the slope and the overall size of the ditch. Naturally, the greater the angle and height of the ditch wall, the more carefully and seriously it is necessary to approach measures to strengthen them.
If the angle of the slope is not large, then it is enough to simply plant the slopes with plants, the root system of which will create a reinforcing layer. For slopes of medium and high steepness, the use of geomaterials will be required. Such as biomats, geomats, geogrids, geogrids or gabions. Modern manufacturers offer huge selection materials, from expensive to relatively cheap. Let's briefly look at everything we might need.
Geomats are a product consisting of several layers of waterproof polymer material, similar to a lattice and reminiscent of a washcloth. This structure perfectly holds the soil and does not interfere with the growth of plants, the root system of which reliably fixes steep slopes.
Biomats are a type of geomats, the layers of which are filled with a nutrient mixture and seeds of perennial plants.
– mesh material made of synthetic or polymer threads with square cells. Designed for reinforcing medium slopes.
Geogrid (volume) is a honeycomb structure made of polymer or synthetic tapes, the cells of which are filled with crushed stone or pebbles. The geogrid is held on the slope using anchors.
Gabions are large structures made of galvanized metal gabion mesh with hexagonal cells. The entire structure is made in the form of a parallelepiped, which is filled with stone or crushed stone, larger in size than the cell. Thanks to the double torsion mesh, gabions can withstand heavy loads and are resistant to any corrosion. A type of gabions are Reno mattresses - flat designs with low height and large area surfaces.
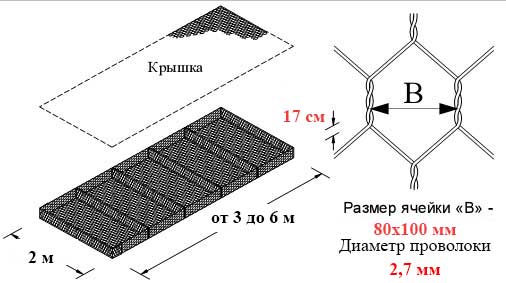
Industrial gabions are expensive and for our small ditches they will be cumbersome. We offer to use our new product developed by our company, the mini-mattress “European Road Technologies”. Which is designed to strengthen ditches, ponds, slopes and other coastal areas. In appearance, mattresses are similar and similar in application to mattress mesh structures, which are also widely used in bank protection; but have a relatively smaller size - 2x1x0.12m. This thickness of the mattresses (12cm) allows you to strengthen banks and ditches without disturbing the natural appearance or cluttering the bank.
A distinctive feature of the “European” mattresses Road Technologies" lies in their versatility: they can be used both in industrial quantities, strengthening entire coastlines and areas adjacent to water, and for individual construction reservoirs and ditches, landscaping.
At the same time, using this product is not difficult - from the necessary tool You will only need gloves to avoid scratches and pliers, which will make it more convenient to assemble the mattress into working condition.
Laying mattresses also does not require any special skills: first, geotextile flooring is done, then the mattress is laid along the coastal line, then stones are poured into it (they must be sized to fit the size of the cell, which is 6x8 cm), the final stage is “closing » mattress, which consists of tying the joining elements with wire.
Another advantage of European Road Technologies mattresses over their “big brothers” is the ability to fill stones with a shovel, while, for example, Reno mattresses require manual laying of stones. And with a smaller volume of the mattress itself, accordingly, up to 50% less volume of loaded stones is required.
Differences between European Road Technologies mini mattresses and Reno mattresses
DIMENSIONS. RENAULT MATTRESS:
 DIMENSIONS. MINI MATTRESS European Road Technologies:

To drain excess water from a summer cottage or garden plot, it is necessary to create a drainage system. With its help, you can protect the territory from waterlogging and buildings from destruction. One of the components of such a system are ditches. They can have different sizes (depth, width and length), but in any case their walls must be strengthened. Otherwise, the water will turn the ditches into real ravines, which will reduce the usable area of the site. How to strengthen a ditch at the dacha? This is exactly what the article will discuss.
Methods of strengthening
Drainage systems have existed for a long time and people have learned to strengthen their walls. There are several ways to do this. They can be divided into two types:
- using scrap materials and plants;
- using structures and devices made in the factory.
The walls of the ditch are strengthened using improvised means with slate, car tires, stones, and also by planting plants. This method is suitable for small ditches or low slope angles.

Various biomats, gabions, geogrids and geogrids are used for slope angles of more than 8-15 degrees. Also, such devices are used when arranging large-width ditches.
Each strengthening method has its pros and cons. This will be discussed later.
Available means

One of the simplest and most accessible ways to strengthen the walls of a drainage ditch is to use slate. In this case, you can also use used material. The main thing is that there are no large holes or cracks in it.
The technology using slate is quite simple. Sheets (whole or cut, depending on the size of the ditch) are laid on the slopes of the ditch close to each other. This can be done either strictly vertically or at a slight slope. Then pieces of reinforcement or thin pipes are driven in on both sides of the sheets, in a checkerboard pattern.
This method has both its advantages and disadvantages. The first include the following:
- low financial costs, and if used materials are used, then you can do without investments at all;
- ease of installation. All work can be done by one person.
The disadvantages of this design are its fragility. The appearance of the site itself may also suffer.

Strengthening slopes using old car tires looks more aesthetically pleasing. In addition, this method allows you to make a structure that will last much longer than the slate version (up to several decades).
Here you can resort to two methods, depending on the available space. One involves stacking tires along the edges of a ditch. Soil is poured inside, but sand or gravel is better. For greater reliability, you can drive in metal pipes.
If space allows, it is better to lay the tires offset. Each top row is laid halfway down the bottom row. The result is a kind of ladder. Soil is poured inside and plants can be planted. This creates a beautiful slope.

If the ditch is small and the slope angle is less than 8 degrees, then its walls can be strengthened with the help of plants. Small bushes or perennial herbs are planted along the edges. Their roots will reliably strengthen the walls and prevent water from washing them away and turning the ditch into a large ravine.
Special devices
For more reliable and durable strengthening of the walls of the drainage ditch, special structures and devices can be used. These include:
- geo- and biomats;
- geogrids;
- geogrids;
- gabions.

Geomats and biomats are made in the form of a polymer sponge. Using high temperature, several polymer meshes are soldered together. This structure is impermeable to water, but at the same time allows plant germination.

To install such structures, it is necessary to perform the following work:
- The slope is being prepared. All debris is removed from its surface and leveled. Then it is advisable to compact the surface. This is especially important if the site has sandy soil.
- The material is supplied in rolls, so installation begins from the top. The geomat (or biomat) is laid at the top of the slope, the edge is secured;
- Then the roll is rolled out to the base of the ditch and the excess is cut off.
- The next row is laid in the same way and overlaps with the one already laid. The tolerance can be up to 15 cm.
- Now the entire surface is covered with a small layer of soil and seeds of perennial grasses are added (if necessary or desired).

Another type of material for strengthening the slopes of ditches is geogrid. It is a mesh made of polymer material with a polyester base. The geogrid is cut into the required pieces and laid on a pre-prepared slope (the surface must be cleaned, level and compacted using a hand roller). The grids are laid close to each other and fastened with anchor brackets.

The mesh can be covered with a layer of soil on top and plants can be planted. Herbs such as mint, periwinkle and bryozoan work well for these purposes. These grasses will use their roots to firmly hold the coating in place.
Geogrids and gabions

More powerful structures for strengthening not only the slopes, but also the bottom of the ditch are geogrids. They are made from polypropylene and polyethylene. Such products are not afraid of corrosion, they are quite durable and can last for many decades.
Before installing them, it is necessary that the drainage ditch is dry. You also need to prepare anchor fasteners, a hammer, and fine gravel.

After draining the ditch, all debris (large branches, stones, etc.) and large vegetation are removed from the surface. In this case, small grass can be left in place. Then the geogrid is laid out. This must be done over the entire area of the canal; it is advisable to cut off the excess pieces immediately.

For long service life of the geogrid, it must be properly and securely fastened. This is done using anchor brackets or hooks. They can be purchased together with the grille or made with your own hands from reinforcing bars with a diameter of 15 mm and a length of 50 to 110 cm. The fasteners are placed in a checkerboard pattern at a distance of at least 30 cm from each other.
The next step will be backfilling the geogrid. You can place sand at the bottom of the ditch (if it will rarely fill with water) or crushed stone (if drains will constantly flow in the ditch). On slopes it is better to use soil sown with grass. This way the grille will stay in place more securely.
A more expensive, but also more reliable, way to strengthen the slopes of a drainage ditch is to install gabions. In addition, such designs will look more aesthetically pleasing and respectable.

A gabion is a factory product made in the form of a parallelepiped (box). The material used is double twisted metal wire. Large stones or pebbles are placed in such “boxes”.
When producing gabions, they use more than just wire. It has a polymer coating. This protection extends the service life of the product to 70 years. At the same time, the product is not afraid of aggressive environmental influences and can withstand heavy overloads.

Before installing the gabion, it is necessary to prepare the slope. Since the product is of considerable size, excess soil is removed. The gabion is placed in place and filled with large stones or crushed stone. For greater reliability, you can attach a chain-link mesh to the top; it is advisable to choose it also with a polymer coating. To improve the decorative appearance, stones or pebbles can be placed on top of the mesh.

If you have welding skills and the necessary equipment, then you can try making a gabion with your own hands. Pieces of reinforcement are suitable for this. They are welded together to make a lattice. For long service life, all parts can be coated with an anti-corrosion compound.
When strengthening the slopes of drainage ditches, do not forget about the base. Here you can use sand or crushed stone, depending on the frequency of filling with water. If the ditch is small and located in a visible place, then the bottom lined with natural stones will look beautiful. A particularly beautiful effect will be achieved in combination with gabions.
Video
Another interesting way to strengthen: