Chimneys for sauna stoves are the main type of work to protect premises from smoke and fires. If you decide to do the work yourself, it is important to know how to calculate the structure and step by step instructions installation of steel and masonry chimneys.
Collapse
Chimney device for a sauna stove
A chimney for a stove in a bathhouse will need to be made regardless of the type of fuel or the size of the steam room. The operating principle of any device is based on the ability of heated air to rise upward. Exhaust gases exiting the furnace exhaust channel enter the chimney. They can be laid inside the building or along the outer wall.
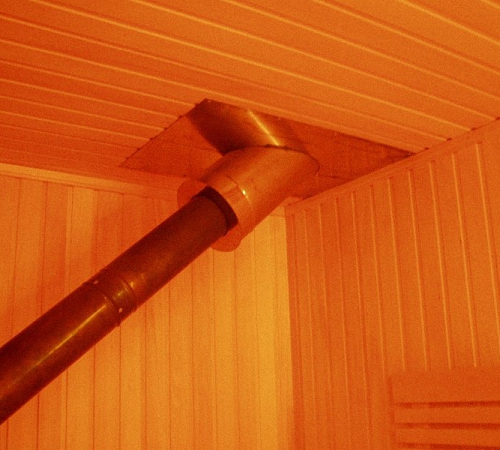
Each type has a number of advantages, but the most common method is to install pipes indoors. When passing through ceilings and access to the roof, it is recommended to equip such places with an additional layer of heat and waterproofing. It is recommended to use thermal insulation sleeves, or wrap parts mineral wool or other material.
Installation of a stove chimney in a bathhouse
Gases pass through the channels and exit into the atmosphere. The second job of the chimney is to provide reliable and sufficient draft for normal combustion of fuel. And if at first, when kindling firewood, additional draft can be provided by opening the ash pan and damper, then when the fill is burned, the ash pan must be closed. Ventilating the firebox is the concern of the chimney.
Chimney outlet diagrams
Installation of a chimney in a bathhouse for wood stove, depending on the materials and characteristics of the room, can be carried out according to several basic schemes:

Output through the roof

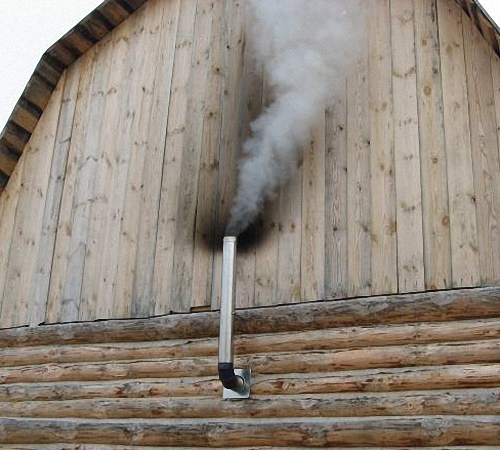
Through the wall
The choice of design and materials for installation depends on the capabilities of the bathhouse owners. The main thing is to do the calculations correctly optimal size chimney.
Chimney calculation
To simplify calculations, it is customary to determine the main size - the internal cross-section of the pipe, depending on the power of the furnaces. The main dimensions and capacities of furnaces for individual baths are shown in the table.
So in a simple way you can quickly calculate the amount of materials and dimensions of the future chimney. The protective canopy of the chimney should protrude 1000 mm above the roof ridge. When making calculations, it is important to take into account the need to equip the structure with a gate valve. Only after determining the cross-section and length of the pipeline is it possible to install a sauna stove with a chimney.

Roof pipe height
Types of chimneys
Let's look at some design features and advantages of each type of ventilation pipe.
Made of brick
There are 2 masonry methods used in the production of a brick chimney:
- Indigenous. Such structures are laid out next to the heater and connected to it using pipes. They are used in the construction of stoves made of cast iron parts and in the production of brick heaters. Such designs can serve several devices simultaneously.
- The mounted type is laid out during the construction of the heater. They can only serve one device.
A brick chimney requires experience and production skills. It is important to reliably seal the seams and lay each brick evenly on all planes. It is important to adhere to the layout of parts at all stages of pipe construction. The advantages of this design include:
- creates constant and sufficient traction, regardless of wind strength;
- brick is a durable material that can serve for a long time;
- the material is absolutely resistant to open fire;
- bricks are able to accumulate and gradually release heat;
- Such pipes for bathhouses are more attractive than steel ones.
Made of metal
They are easier and faster to install, and the price of such materials is more attractive than a brick chimney. And more modern sandwich pipes are made with a thin but sufficient layer of insulation sandwiched between layers of metal. But in terms of reliability and durability, steel pipes are inferior to brick ones.

Among the advantages are:
- installation speed;
- low material prices;
- the smooth internal surface prevents the rapid deposition of soot on the walls, but due to the temperature difference, a layer of condensation is deposited on the steel walls.

Other
Pipes are produced for sauna stoves made of stainless steel with an internal layer of thermal insulation. Such materials are safe for people. Using double-sided steel pipelines, external gas removal systems can be installed. It is recommended to use parts with a wall thickness of 8 mm or more, with a thermal insulation layer thickness of 5 mm or more.
They use stove pipes for saunas made of ceramics. Such products are imported into the country from Europe, so the price does not allow the use of such parts by a wide range of consumers. The inner surface of the ceramic chimney is absolutely smooth, so condensation does not stay on them and rolls into the firebox.
Which one is better to choose?
Regardless of which chimney is used in your steam room, a metal sauna stove with a brick chimney or chimneys for sauna stoves made of stainless steel main job remove exhaust gases from the premises. Steel pipes are not durable, but they are easy to replace and the price of such parts is much lower than brick ones.
Brick chimney occupies more space, a layer of soot is deposited on it faster, but the level of accumulation and gradual heat release is higher. Ceramic ones are expensive. Everyone chooses based on their needs and capabilities. The choice of methods is individual, each has advantages and disadvantages.
Making a chimney
Let us examine in detail the process of making the main structures of chimneys with our own hands.
Made of brick
The work is broken down into several basic steps. First of all, you will need to do some preparatory work.
Materials and tools
To work you will need to prepare:
- Master OK;
- trowel;
- building level;
- a solution of fireclay clay or simple clay with sand;
- a sufficient amount of refractory bricks;
The pipe for the stove in the brick bath will require work to be carried out in a certain sequence.
Step-by-step instruction
Depending on the type of chimney, you will need to perform different types works Let us examine in detail the laying of the chimney at the same time as the laying of the stove (mount-on type of ventilation pipe).

Installation of a brick chimney for a sauna stove
Manufacturing instructions:

The installation of a brick bath chimney is ready.
Made of metal
This pipe is installed quickly and easily.
Materials and tools
A pipe for a sauna stove made of steel pipes will require you to buy:
- blanks for a pipeline of the required diameter;
- clamps for fastening;
- protective visor;
- a ready-made sleeve for insulating the passage through the ceiling;
- mineral wool;
- roofing felt or rigid roofing parts.
Step-by-step instruction
The work is carried out in several stages;
- Before installation, we protect the walls with a layer of thermal insulation. To do this, you can use foam boards with a mirror-like outer surface with an inner layer of mineral wool.

Thermal insulation of the wall
- We install the first short section with a gate valve on the outlet pipe from the furnace. A covered damper makes the air mixture depleted of oxygen and the firewood gradually smolders. This design allows you to save wood.
- The pipes are connected into a socket; we use asbestos cord to seal the joints. Be sure to install joints in the direction of smoke exit. At the joints we secure the pipes with clamps and fasten them to the wall.
- We install a heat-insulating sleeve at the point of passage through the slabs, run a pipe and seal the hole with asbestos cord and trim.

Option 1

Option 2
- At the exit point through the roof, we make a hole along the diameter of the pipe, securely fasten the pipe with guy wires and clamps. You can put a seal on the pipe rubber ring or wrap it with asbestos cord. We insulate the passage, cover it with a sheet of metal, seal it with a layer of fireproof sealant, and lay the roof covering on top.


- We bring the pipe to the required height and, if necessary, secure it with guy wires.


- We install the protective visor.

- We tighten all joints with wide clamps.
The installation of the sauna stove chimney made of steel pipes is completed. Extends the service life of the chimney different materials timely and complete maintenance and repair.
Cleaning and care
The main job is to clean the internal surfaces from soot. When the draft level decreases for the first time, you will need to immediately clean the channels from adhering soot. Such preventative work is carried out at least once every 30 days.
The work is not difficult. To clean, we pass a cable or wire through the top. At the bottom we tie a metal pipe cleaner along the diameter of the pipe and stretch it along the entire length. You can tie a weight to a cable and clean the soot from above, lowering a heavy blank. After the work is completed you will need spring-cleaning steam room, so it’s better to cover the shelves with plastic and take out light items.
People use several other cleaning methods. In winter, rolling a snowball on internal size pipes, it is lowered into the pipe and, as it descends, it will clean the soot from the walls. The simplest and effective way- burn a stack of aspen firewood in the stove. Aspen releases moisture, which settles on the soot layer and causes it to collapse.
Can be installed powerful fan and direct the air flow into the pipe. Just don't forget to warn your neighbors about your operation. Otherwise, you are guaranteed to get into trouble and wash your neighbor's clothes.

Conclusion
Making chimneys for stoves yourself is a completely doable task for men. A brick pipe will require knowledge and hard work according to its manufacture, but will last a long time. Steel pipes are easy and quick to install. The main thing is to make a chimney of normal cross-section and the fragrant atmosphere in the steam room will not be overshadowed by clouds of smoke.
←Previous article Next article →Our bathhouse is associated with light steam and the pleasant crackling of wood in the stove, hot stones in the heater and the smell of a freshly brewed broom. But a live fire is associated with smoke, and if the chimney is not made correctly, you can get carbon monoxide poisoning in 20–30 minutes. The pipe in the bathhouse is planned before the construction of the bathhouse; it must be assembled efficiently and correctly. This is the only way the bathhouse will be safe and will not cause harm to its owners. We will tell our readers how to remove a pipe in a bathhouse with your own hands, what features and subtleties you need to know.
The pipe in the bathhouse is removed in two ways: inside and outside the structure.
Planning a chimney in a bathhouse is always associated with the choice of design. It is necessary to understand all types, know how to correctly calculate the size, display and install. Before drawing up the project, it is necessary to briefly study these aspects.
What pipes are used for baths?
The chimney in a bathhouse can have two devices: external and internal. Everyone has their positive and negative sides:
- External arrangement is less fire hazardous, do-it-yourself installation and fastening is also easier. The disadvantages are that the pipe goes outside and heat loss increases.
- Interior arrangement complicated, but all the heat gets into the bathhouse. The main disadvantage high degree fire hazard.
 The sandwich pipe is easy to install with your own hands.
 Design flaws can be prevented by using high-quality insulation. We advise you not to save on time and effort and install an internal chimney; although it is more difficult to install, it will reduce the cost of heating the steam room structure. For small bathhouse on summer cottage, it is easier to remove the external chimney. In any case, the choice is up to the user.
Various materials are used for the chimney: red brick, ceramics or metal. They withstand temperatures above +100 °C and are durable.
Easier to buy ready-made option sandwich smoke vent. It is easy to assemble and install, and the internal asbestos lining makes the device safe.
Design of external and internal chimneys
The design of the chimney is selected depending on the characteristics of the selected stove. The pipe package includes several units, each with its own functional features. For a bath with brick stove You can use brick, metal, ceramics, and for a metal stove - a ceramic or metal chimney. You can use brick, but laying the pipe yourself will be difficult. You will have to hire a bricklayer - a stove maker.
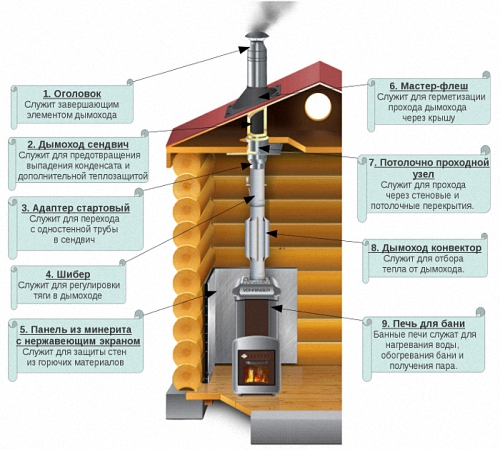
The main components of the chimney (design lists start from top to bottom):
- Head (probe) - prevents sparks from hitting the roof and neighboring buildings, as well as from flooding during rain.
- Master flush.
- PPU ( Ceiling assembly where it goes through).
- Chimney made of double sandwich or brick.
- Single iron pipe.
When choosing a brick structure, you need to be prepared for complex cleaning and maintenance. A massive foundation is needed for the stove, since a brick chimney weighs a lot, and the entire load will fall on the stove.
Simpler assembly that does not require special knowledge - finished design from sandwich pipes. It consists of double design between which asbestos is laid. More heat-saving and lighter. Made up of individual elements: elbow, deflectors, tees, rain protection, adapters and gate. Fastened using brackets that are mounted with clamps.
What to pay attention to during installation
It is necessary to remove a pipe in a bath taking into account a number of its features (material, design). The installation is influenced by sanitary and environmental standards, the material from which the bathhouse was built. Do not forget that traditionally this is a tree.
Compliance with certain rules and regulations will make the structure reliable and safe:
- Any one must be insulated with environmentally friendly and non-flammable material: expanded clay, asbestos, stone wool.
- Thermal insulation of the place where the chimney passes is necessary only with foil material. It is often confused with materials covered with Dacron foil, but it is highly flammable and melts at temperatures above 300 °C.
- The chimney is installed so that the structure does not touch any wooden elements: floor beams, roof, walls. To insulate the joints, they are sheathed with metal sheets. The outlet area can only be insulated with non-flammable mineral wool or expanded clay mound.
- Inside the ceilings you need to install a special iron box, into which the structure is placed and covered with expanded clay. There is no need to make a box for the sandwich.
- On top, to avoid contact with the roof, a casing of metal sheets is made around it.
- All joints and seams can be sealed with special iron foil tape or foil.
How to choose the size and shape of a chimney
Diagram of the pipe outlet in the bathhouse.When designing a chimney in a bathhouse, you need to adhere to the standard shape and size. The best option cylindrical shape. Related simple form Since any bend in the elbow will additionally create areas for the accumulation of ash and soot, the structure will have to be cleaned frequently. And cleaning a structure with numerous bends is more difficult.
The main dimensions that need to be determined are the diameter and height of the structure. They must be taken from SNiP.
Bath pipe diameter
The power and choice of stove are directly related to the choice of diameter and height of the chimney. Here are some values for a rectangular and square chimney in the form of a table:
| Furnace power, kW | Chimney diameter, mm |
| Up to 3.5 | 140x140 |
| 3,5–5,2 | 140x200 |
| 5,2–7,2 | 140x270 |
For a round stove, the diameter of the chimney is taken equal to or greater than the outlet of the stove. In order to calculate the diameter, you need to know the formula, which stipulates that for 1 kW of stove power, take at least 8 m2 of pipe. So, for a 20 kW stove, the chimney area will be at least 160 m2. It is at least 14 cm in diameter.
Bathhouse chimney height
The height is calculated depending on the type and height of the roof ridge. Neighboring buildings must also be taken into account, especially if the bathhouse is attached to the main house. According to SNiP, the height of the bath chimney must correspond to the indicators indicated in the table:
For flat roof The height of the smoke exhaust of the bathhouse must be at least 1 m. For a high pipe (more than 1.5 m), it is necessary to install special braces; they will strengthen the structure.
It is important to take into account the moment of the sloping and horizontal elements of the chimney. Length more than 1 m is unacceptable. Allowable size will not allow soot to accumulate on the walls of the bathhouse pipe and will not interfere with draft.
DIY chimney installation
Before work you need to buy everything necessary materials and components. All work takes place in stages: preparing holes for the pipe outlet, installing a protective box, assembling the pipe.
Preparing holes for pipe outlets
 Do not install a pipe with too much a large number bends.
 It is better to make holes in a new bathhouse under construction at the stage of assembling the floors and roof. In already assembled structure you'll have to do it from scratch. If installation is chosen inside the bathhouse, then holes are cut out in the ceiling and roof; the external one is provided in the wall near the bathhouse stove.
The holes must be sheathed on both sides with sheets of metal 0.5 mm thick. They will protect the surface from fire. The holes are made with a square section of 450x450 mm. Dimensions depend on the sandwich pipe adapter. For a brick chimney, the size of the hole must be equal to the specified width of the chimney masonry. More information about how to properly make a hole in the ceiling of a bathhouse is described in the video:
Manufacturing and installation of a protective box
 Factory-made protective box for a sandwich pipe.
 You can make an adapter for a metal and sandwich pipe with your own hands: Take 2 metal sheet 50x50 cm in size and an outlet for the pipe is cut out in the middle. A box is made from 4 sheets, which is connected by welding. The box is insulated with stone or basalt mineral wool and covered with metal foil. A pipe will be inserted into it, it will protect the ceilings from heating.
Next, attach a metal protective apron to the roof. You can buy it ready-made “Flash Master”. The box is installed in place between the ceiling transitions and screwed in place. For brick pipe There is no need to make a metal protective box. Next, a chimney is installed.
Installation of a chimney
 The assembly of the pipe in the bathhouse must be completed by installing an anti-rain fungus.
 To attach the pipe, you need to drill places for fastenings opposite the chimney outlet hole. The sandwich pipe is made in such a way that all parts are simply installed into each other.
First, the first link from the stove, 50 cm long, is mounted. It is fixed into the prepared holes using metal fasteners to the wall and the stove. Next, the second link is brought out into a metal box. If the diameter of the second link is smaller than the outlet of the first, then use a special adapter.
Having installed the second link, the box is filled with expanded clay into the adapter. If the stove is not located strictly under the hole in the ceiling, then use an elbow. You should not use more than three bends in one pipe design; soot and soot will accumulate in the bathhouse pipe.
A fungus is mounted on top of the pipe; you can make it yourself from a sheet of metal, an old tin can. It's easier to buy ready-made.
Outer pipe It is assembled with one difference: first the elbow is mounted to the wall and only then the main structure. A transition box, insulated and filled with expanded clay, is placed in the wall in the same way. The main pipe goes out from the box to the street. WITH outside baths, a tee is attached to the pipe, where an inspection with a window is located. They will help clean the building from soot. All parts of the pipe from the outside are attached to the wall in stages. On the façade of the bathhouse, you can only use a double sandwich structure, and only a single one on top of the roof. The wall under the pipe is insulated with metal or asbestos material.
There is no need to rush to assemble the pipe; it is better to carefully secure each link. How fireproof the bathhouse will be depends on how well the bathhouse pipe is installed. Safety is not only important wooden walls and transitions of the bathhouse, but also the people who will use the building. You should not skimp on insulation; it is better to make it high quality from expensive material. This is the only way the steam will be light and the sauna safe.
The chimney is an important part of the bathhouse, since it is it that transports the products of fuel combustion from the room. Each of the sauna stoves needs a chimney. Let's look at how to make a chimney in a bathhouse below.
Design features of a chimney for a bath
Exists great amount chimneys, each of which is compared with a specific classification parameter. Among them are single- and double-circuit chimneys made of brick, steel or ceramics, etc.
Before starting work on the manufacture of a chimney, you must first study its main components.
Perfect option chimney is strictly horizontal design, through which all combustion products are removed. Although, there are situations when the construction of such a chimney is not possible. Therefore, you have to install the chimney vertically, then horizontally and vertically again. For these purposes, you will need elbows, pipes, tees and other connecting elements, which are the main elements of the sauna chimney structure.
An elbow is a connector that ensures smooth installation of the chimney. For example, if it is not possible to arrange a strictly vertical chimney, its direction is changed by using an elbow. Exists huge selection knees, which differ in the ratio of angles. When the horizontal section departs from the stove in front of the chimney, an elbow or tee is also installed here.
Please note that cleaning the elbow is a rather complicated process, therefore, if possible, it is better not to use it in arranging a vertical chimney.
The use of a tee is versatile, as it allows you to easily clean ash and combustion products using special mechanisms. Inside the tee there is an element in the form of a glass, which is pulled out and cleaned if necessary.
The only condition for the correct installation of a tee is its perfect connection with the pipes. Otherwise, smoke and combustion products will enter the room, which will cause discomfort to the people in it.

If there is a wooden floor on the second floor, you will need a pipe that will protect the wood from the high temperature that is present in the chimney. To install it, you will need to make a hole, install a pipe, insulate it and connect it to the pipe. The same pipe will be needed to prevent contact of the chimney with the roof and attic.
In addition, during the installation of the chimney, you will need brackets that can hold the pipe and fix it in the desired position. The interval between their fastening is about 200 cm.
Last but very important element chimney is called a roof cut. It is with its help that the tightness of the connection between the pipe and the roof is ensured. The cover prevents weather conditions, dirt and dust from entering the attic. Please note that the roof groove is a mandatory element of the chimney and it should not be replaced by cheaper options in the form of sealants or homemade structures. During the shrinkage of the bath, the integrity of the bath will be compromised and all smoke, rain and snow will enter the room.

Advice: When purchasing a chimney, you should check for certificates that confirm its quality, as well as specifications, which describe the materials from which each of the elements of the system is made.
Chimney pipes for a bath: features of choice
In relation to the material from which the chimney is made, it can be:
1. Made of stainless steel - this material most suitable for making a chimney, as it is resistant to moisture, overheating and does not accumulate soot.
Tip: When choosing of this type chimney, you should clarify such a parameter as the resistance of steel to acids. Since during overheating, sulfur comes into contact with coal, and a gas of a rather aggressive type is released.
Among the advantages of using of stainless steel In the process of making a chimney, it should be noted:
- resistance to corrosion;
- high strength;
- affordable price;
- light weight;
- aesthetically attractive appearance.
2. Chimney made of concrete pipes - this option is characterized by low cost, durability, ability to be restored and good sealing. In addition, to manufacture such a chimney there is no need to involve specialists. During production monolithic structures soot will practically not accumulate in the chimney.
Among the disadvantages of a concrete chimney is the heaviness of its weight, which significantly loads the building structure. Although to eliminate this parameter in concrete mixture expanded clay additives are introduced.

3. Pipes made of asestocement - are reliable, low cost, and have good insulation. Such pipes are not environmentally friendly, are unstable against the formation of condensation masses, soot quickly accumulates in them, so they require constant maintenance.
4. Brick chimney - characterized by a rough surface on which a lot of soot accumulates. As a result, the draft decreases; only after cleaning the chimney is the system’s functionality restored. Among positive qualities this chimney is noted for its attractive appearance, high level fire safety, duration of operation.
5. A metal chimney is the simplest and affordable option, especially for the bath. This chimney is different high heat pipes, on which a special tank is often installed, due to which the water in it is heated. A fairly common option is to install a steel chimney using sandwich systems. In this case, the pipes are connected so that they are inserted into each other, and insulation is laid between them. The result is minimal heating of the outer surface and the absence of condensation.
There is an option for installing corrugated pipes for arranging a chimney. With their help, rotating elements of the system are created.
6. A ceramic chimney in the wall of a bathhouse is characterized by such qualities as high cost and practicality. The service life of such a chimney is the highest. It is resistant to intense heat, chemical influences, and corrosion. Besides, ceramic chimney quite smooth inside, so it does not retain either soot or ash on the walls.
The ceramic material absorbs heat well, so outer part the chimney does not heat up. Ideal for a bathhouse made of wood.
7. Vermiculite pipes - characterized by zero condensation formation, which means they are easy to maintain. Such a chimney is very light, is not able to absorb moisture, and is resistant to exposure high temperatures, mechanical damage.
In order for the chimney to serve its owner for many years, simple rules should be followed:
- ensuring tight fastening;
- adjustment of heating temperature and draft;
- arrangement of ventilation ducts;
- insulation;
- weather protection;
- ensuring the removal of condensate masses;
- correctly selected type of fuel;
- no overheating or hypothermia;
- regular cleaning.

How to make a chimney for a bath through the ceiling
Proper installation of a chimney requires serious attention to this process. A poorly installed chimney has a negative impact not only on the decoration of the room in which it is installed, but also on the health of the people staying in this room. Since gases and combustion products entering the room can cause serious poisoning.
There are two options for installing a chimney:
- smoke - during the work process, a tee is required to remove condensate;
- condensate - no need for a tee.
The initial stage of installing a chimney in a bathhouse involves preparatory work related to the selection of a project for a chimney. It is advisable at this stage to use the help of specialists who will calculate optimal length pipes that provide good traction.
Next, you should inspect the ceiling to determine the location of the chimney. It should not be directly above the beam. Choose a location for the chimney so that there are a minimum number of bends. Since soot accumulates well in horizontal areas, and as a result, traction decreases.
In the bathhouse, the chimney pipe must be assembled; if desired, this work is carried out directly at the installation site of the chimney. Clamps are used to secure all joint sections on the chimney, and support brackets will help secure the tee, if any.
The third stage is the arrangement of a chimney in the bathhouse through the ceiling. For its construction, a special cutting is required, the choice of which is carried out in accordance with the type of roof and its slope angle.
Next, the section of passage of the pipe is determined, work is done to mark it and cut out the opening from inside the room. The pipe is led outside, behind the roof. The roof sheet protects the inside of the chimney, and the cutting provides protection from the outside. To adjust the angle of inclination of the chimney, use a conical cutting section; its ends are placed directly under the roof.
On sections of the walls, at the locations of the pipe, work should be carried out to install insulation in the form of foil mats or basalt wool.
In the bathhouse, the installation of the chimney is completed by attaching the pipe to the surface of the apron and sealing it at the joint. This is how the chimney is built up to the right size. A steel umbrella will provide reliable protection chimney from weathering.
Areas of the chimney that are subject to corrosion should be treated with heat-resistant paint, and sealant should be used to strengthen the joints on the clamps.

1. No joints with various kinds pipes. The chimney should not be adjacent to various types of communication systems.
2. It is not allowed to install in the chimney horizontal sections whose length is more than 100 cm.
3. It is not allowed to install a chimney near gas or electrical communication systems.
4. Minimal amount chimney cleanings during one season is twice.
5. The minimum length of the chimney outlet above the roof surface is 50 cm.

Features of installing a chimney in a bathhouse
Before installing a chimney in a bathhouse, we suggest studying the instructions for its manufacture using sandwich pipes for upper and lower purposes:
1. First, the pipe should be cut into two sections, which are treated with insulation.
2. From a sheet of galvanized steel, you need to cut two parts from which pipes are constructed, the edges of which are connected by rolling.
3. This sheet will be needed to cut out a metal strip that will serve as a clamp.
4. In addition, parts in the form of four rings must be made from galvanized steel, which will help close the insulation at the end sections.
5. A metal strip 0.2 cm thick and 4 cm wide is welded to the bottom of the pipe. It will serve as a pipe.
To make a chimney in a bathhouse with your own hands, you should cut out two holes that will help chimney pass through a wall or ceiling. Please note that the chimney must pass through the central part of the hole.
Next, you will need a steel sheet, from which two sections will be made that will fix the ceiling on the roof and on the ceiling. Holes should be drilled in the corner areas of the workpiece in which the fasteners will be installed.
Chimney installation instructions:
1. A hole with a diameter the size of a chimney should be made in the center of the metal blank. A casing made of galvanized steel should be installed on the pipe.
3. Place the upper one on the lower pipe and connect them together. Be sure to ensure tight connections. For secure fixation, use a clamp.
4. Install the second metal piece on the roof. The resulting area should be filled with clay, asbestos or expanded clay.
The basis of any bath or sauna is the stove. If you cannot create the required temperature in the steam room, the entire structure will not give you the opportunity to get real pleasure.
Don't neglect your device either. stove chimney, since its quality and material depend on:
- fire safety of the premises;
- caring for him;
- microclimate in the steam room.
Therefore, when choosing chimneys for baths, approach this process responsibly.
You should have an idea of how to:
- install;
- isolate;
- clean.
General information about sauna stoves
The bathhouse or sauna room should be heated for a short time. The oven you purchase is compact, and its main function is to heat it up in a short time stones lying on it. They will serve as a kind of heat accumulators..
Flue gases have a very high temperature, approximately 800˚C. In addition, in the sauna and steam bath it is especially important to have good traction. Otherwise, a small amount carbon monoxide V small room could become fatal. Stoves and pipes for the bath must be fenced to prevent injury in the steam room.

- The pipe for the stove in the bathhouse and the stove itself do not need a massive foundation. It is better to isolate it well from wooden structures.
- Make the first one from thick metal without applying additional thermal insulation to it. After this, it is possible to install a sandwich chimney.
- Remember - the distance between the pipe and the structural elements of the bathhouse that are not protected from fire must be at least 350 mm.
- Cover with your own hands all gaps in the wall, ceiling or roof with galvanized sheet iron, having an asbestos backing.
- Be sure to install the asbestos sheet in a place where the pipe for the furnace to the bath with hot gases can come into contact with the wall and ceiling.
Material
The industry today offers pipes for bathhouse stoves in a wide range. Everyone will be able to choose exactly what they need for their steam room.
For example, use stove pipes for a bath:
- ceramic, the price of which is the most expensive;
- steel, the most versatile;
- thermoplastic;
- made of stainless, acid-resistant and fire-resistant steel (withstands temperatures up to 600˚C).
Installation of a stainless steel chimney
Below are instructions on how to make a chimney for. Usually ready-made kits can be purchased online.
Installation chimney the bath is not difficult, you can do it yourself, although an assistant will not hurt.
- Insert one pipe into the other by 5-7 cm. This will ensure complete tightness of the structure. Less soot and condensation will form. Cleaning such a pipe will not be difficult.
- Place the chimney 1 m above the ridge of the house to create the necessary draft.
- Secure the pipe to the ceiling of the steam room, protecting the wood from the metal with fire-resistant material.
- Install a protective cap against rain and snow at the end of the pipe.

The photo shows elements of a stainless steel chimney
Tip: use chimneys made of acid-resistant stainless steel with the addition of molybdenum where flue gases are highly acidic.
In other cases, brick does an excellent job.
Ceramics
A stove pipe for a ceramic bath is used extremely rarely, since it has a considerable weight, but its service life is quite long. Its weight can only be supported by a massive stationary stove, which will be used to heat the house.
Advantages of steel pipes
- Perfectly round cross-section that creates excellent traction;
- The pipe for a sauna stove is lightweight and easy to maintain;
- The “dew point” is quickly overcome, due to which condensation does not form, thereby minimizing the effect of acid on them.

Asbestos cement pipes
Reviews about such chimneys are the most negative. They should not be used in a bathhouse or sauna, as they may simply burst due to temperature and lead to a fire. It’s better not to save money and risk your own safety.
Insulation of pipes in the sauna
Today the best material Folgoizol is used for insulating bath pipes. It does not emit any harmful substances due to high temperatures.
It is also used to protect:
- pipelines;
- heating mains;
- air ducts.
If you do everything thoroughly, you need to create a “sandwich” from the pipe:
- first layer - stainless pipe sauna stove;
- second layer – basalt;
- the third layer is the outer contour.
Such a chimney will heat up much less than a traditional one. This will prevent possible condensation from forming.

More details
- The fact is that basalt-based insulation:
- withstands high temperatures;
- does not ignite when heated seriously;
- does not emit unpleasant odors.
Therefore, such chimneys are called “warm”, since the insulating layer does not allow metal pipes to quickly cool from the outside air. As a result, all the water vapor that is necessarily present in the smoke will not cool down and will not appear in the form of condensation along with soot on their inner walls. Because of this, flue gases easily escape without experiencing resistance.
- Due to the inner layer of insulation, the outer pipe remains cold, practically without heating, ensuring complete fire safety of the sauna.
- Such a chimney improves the operation of the stove, which quickly warms up and immediately returns to operating mode.
- Traction improves due to the absence of various obstacles and turbulences that brick pipes have.

Tip: If you want to check the temperature of the pipe, it is better to check it from the material surrounding the chimney.
To do this, you can touch the boards with your hand or spray water on the apron.
Additionally: wrap the pipe with a layer of flexible asbestos in the place where it comes into contact with flammable elements. Protect the chimney from moisture from above with a “fungus”.
Bath chimney cleaning
To clean a bath pipe from soot, many methods are used, using special brushes and aggressive chemicals. What if an adjustable chimney is installed?
The only option:
- Pour several liters of hot water directly into the pipe.
- Then heat the stove for a long time so that the pipe does not rust.
You will see how, after kindling, the compacted and long-caked soot will come out of the chimney in a thick cloud. But there will be no odors or residues; they will be destroyed by high temperature.

Should know
- Using a long and straight pipe allows you to create good traction. However, this will reduce the efficiency of the furnace, since the combustion products will not have time to give off all the heat.
- a deflector that will not only protect the chimney from snow and rain, but will also help create the necessary draft. It is made of galvanized steel, preferably titanium or stainless steel.
There may also be the opposite effect if the various “hoods” and “umbrellas” are of the wrong configuration. In this case, the smoke strong wind will begin to flow into the room. - Make sure that the furnace pipe does not take away all the heat from the furnace gases. Otherwise, when the temperature of the combustion products drops to 150˚C, condensation will begin to form in it.
- If you need to connect elements of sandwich pipes or ceramic pipe, use high temperature silicone sealant.
- Use the pipe valve carefully to prevent carbon monoxide from entering the room. It's better to dismantle it altogether.
Conclusion
Do not neglect pipes for sauna stoves. In fact, they make it possible to create the required temperature in the steam room and remove burnt gases to the outside. Their quality and correct installation allow you to regulate the climate in the steam room, save firewood and provide comfortable conditions in the sauna and bathhouse.
Each of the materials is interesting in its own way and can be used. But remember that you must protect hot elements from flammable elements, which are wooden steam rooms plenty. In the video presented in this article you will find Additional information on this topic.
Today it is not difficult to buy a chimney for a bathhouse, but before going to the store it would be useful to know what they are. Their types, materials from which chimneys are made and which one is right for you. Or maybe it’s worth making a chimney in the bathhouse with your own hands? We will try to answer which chimney is better for a bathhouse and what is the structure of a chimney in a bathhouse in this article.
Conventionally, the passage of the chimney from the steam room to the street can be divided into three options:

Chimney in the bathhouse ceiling
Chimney for a bathhouse made of stainless steel
Stainless steel chimneys are sold in stores in two versions: double-walled sandwich chimneys (insulated) and single-walled (not insulated). 

Single-wall, non-insulated pipes are used mainly for lining brick chimneys and for the first section of the chimney (you can use it to assess the wear of the entire chimney). They look like and are assembled according to the pipe-socket principle, where the upper pipe is inserted into the socket of the lower pipe. Such chimneys are made of mirror stainless steel or galvanized steel High Quality.
The insulation thickness on insulated chimneys ranges from 30 to 100 mm. As a rule, it is used as insulation basalt wool, having high fire-fighting properties.
The thickness of the stainless steel is from 0.5 to 1 mm, the design is light and does not require large amounts of effort, powerful fasteners or a foundation.
The socket system is a sealed connection. Big choice shaped products and fasteners, makes assembling the chimney a simple and, most importantly, quick task even for a person who has never done this.
Walkthrough wooden floors, roofs and walls of such chimneys occur with the use of special elements that isolate the chimney from the wood and prevent fire.
Also, such chimneys are easy to clean and have an aesthetic appearance. appearance. 

Chimney diameter from 80 to 300 mm. No corrosion, and also the ability to order (in many cities) custom production, makes a stainless steel sauna chimney the leader in this market.
Video of stainless steel chimney assembly
Ceramic chimney for a bath


The ceramic chimney package includes:
- Ceramic pipes and fittings
- Adhesive for ceramic pipes
- Insulation
- Outdoor units
The pipes are made from refractory ceramics of a special composition; they do not absorb moisture and are resistant to aggressive environments and temperature changes. The thickness of most manufacturers is around 15 mm for pipe diameters from 140 to 200 mm. The length of each pipe is from 330 to 500 mm. 

The ceramic chimney is built free-standing on a special ceramic base “condensate collector”. Next comes an inspection tee 660 mm long with large window for chimney cleaning and inspection. Then a tee is installed to connect the stove; they come at 45 and 90 degrees.
Glue for ceramic chimney pipes, the so-called “acid mass for gluing pipes” goes to plastic buckets 1.5 kg each and applied using glue gun. The glue creates a sealed monolithic joint with a coefficient of thermal expansion equal to the expansion of the ceramic pipes themselves.
High-density (110 kg/m3), molded insulation designed specifically for ceramic chimneys and their diameters. Segments with a locking connection fit tightly to the chimney. 

External high quality concrete blocks 400 by 400 mm, connected with block glue.
And the design is completed by the “top kit”, which consists of concrete slab and a metal cone.
Ceramic chimneys for saunas are very reliable in terms of fire safety and if your sauna is located in ground floor home, and the chimney will pass through the upper floors and a cluttered attic, then this is your option. Concrete blocks can be plastered and painted to match the color of the walls, which will visually hide the presence of the chimney in the room.
Video of ceramic chimney assembly
Chimney price
The price of a chimney is no less, and often much more expensive than the stove itself. 

Let's compare prices for stainless steel chimneys and ceramic chimneys with the following conditions:
- Chimney height 7 meters
- Internal chimney diameter 160 mm
- Chimney elements
- Base with condensate drainage
- Audit
- Tee for 90 degree connection
- Chimney
- Cone on the chimney head
Stainless steel chimney from 40 t.r. up to 60 tr. The chimney weight will be from 40 to 70 kg.
Ceramic chimney from 45 t.r. up to 120 tr. The chimney weight will be from 500 to 700 kg.
Do-it-yourself chimney for a bathhouse
If you are planning to build or assemble a chimney with your own hands, here are some tips and life hacks:

Results for choosing a chimney for a bath
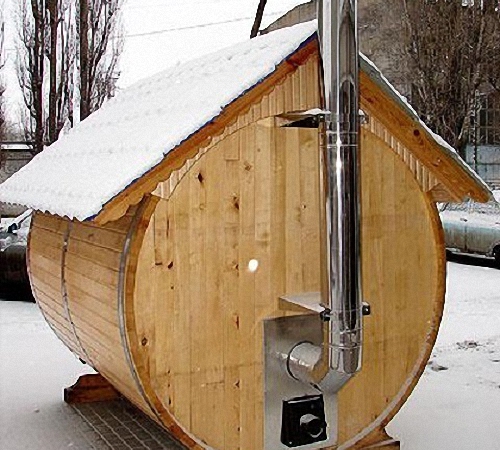
- If you have a small, one-story, free-standing bathhouse with an iron stove, then take a sandwich chimney made of stainless steel.
- If you have a large two-story bathhouse or a bathhouse in the basement of the house, buy a ceramic chimney or build a lined one steel pipes brick chimney.
- A brick chimney is only justified if you have a brick stove or fireplace.
Video on choosing a chimney