In private homes, floors are usually created directly on the ground; they are quite cheap and simple in design. Ground floors are installed on the first floors of private houses with strip foundations, and clay, cement or concrete can be used for their arrangement. The most popular is concrete flooring on the ground. There are several reasons for this: firstly, concrete is publicly available, secondly, it is cheap, thirdly, a concrete floor has the greatest strength and durability, and everything else, it is quite simple to make. Work on creating such floors can be done without any special skills, the main thing is to know what and how to do.
Conditions for arranging a concrete floor on the ground
The installation of a floor on the ground places certain requirements on the soil itself. The soil should be dry, level groundwater should be at a depth of at least 4-5 m, the soil should not be mobile. It makes sense to make a concrete floor on the ground when the house design includes a basement or ground floor. In addition, the house must be residential and in cold period be heated, since in winter the soil freezes, thereby increasing the load on the foundation and deforming the structure.
Installation of a concrete floor on the ground
Layout of a floor on the ground
We begin all work on installing the floor after the walls have been erected and the roof has been constructed. This will ensure high-quality performance of further work. The process of arranging the floor itself consists of the following stages:
- marking the concrete floor level;
- clearing and compacting soil;
- laying gravel, sand and crushed stone;
- hydro- and thermal insulation;
- reinforcement;
- installation of guides and formwork;
- pouring concrete, leveling and screeding the concrete floor.
Concrete floor level marking

We outline the “zero” floor level
We set the level of the concrete floor to “zero” with the bottom of the doorway and apply it along the entire perimeter of the room. To do this, you need to put marks on the wall at a level of 1 m from the bottom of the doorway. Then transfer the marks to the walls along the entire perimeter of the room and measure from them and mark back 1 m down. The resulting line will be the “zero” level to which concrete must be poured. To make it easier to navigate, you can hammer nails along this line in the corners of the room and pull a cord on them.
Clearing and compacting soil
Now we begin to clear and compact the soil. First of all, we remove all construction waste from the premises.
Then we begin to remove the top layer of soil.
The structure of the floor on the ground is a multi-layer “pie”, about 30-35 cm thick. Therefore, we remove the layer of soil until overall height from “zero” to the ground will not be equal to the thickness of the multilayer “pie” structure.
Then carefully compact the surface. This can be done using a special vibrating plate. But if it is not there, then we take an ordinary log, nail handles to it on top, and a board below and begin to compact the soil. The goal is to get a level and sufficiently dense base on which you can walk and not leave indentations from your feet.
There may be a situation when the ground level is below the stated 35 cm. In this case, it is necessary to remove most fertile layer, compact it tightly, add sand to the required level and compact it.
Important! To increase the waterproofing of a concrete floor, a layer of clay and then sand can be laid on top of the native soil. The clay can be watered a little and compacted; it will prevent the penetration of groundwater.
Once the base layer is compacted, you can begin to fill in the next one - this will be gravel. We fill a layer of gravel with a thickness of 5-10 cm. Water it with water and compact it thoroughly. To make it easier to control the thickness of the layer, we drive several rows of pegs of the required height into the base soil and set them according to the level. After backfilling and compaction, the pegs can be removed.

Fill the sand and tamp it down
After the gravel we add sand. We make the layer thickness about 10 cm and to simplify control we use the same pegs. We water the sand and compact it tightly. It should be noted that ravine sand with various impurities can be used for this layer.
On top of the sand we lay a layer of crushed stone of a fraction of 40-50 mm. We carry out the compaction procedure. Sprinkle the resulting crushed stone surface thin layer sand, level and compact. If there is crushed stone with sharp protruding edges on the surface, it should be removed or placed so that there are no sharp corners on the entire surface.
Important! The base base and all layers of the concrete floor “pie” must be leveled to the horizon. Therefore, at all stages of laying and compacting each layer, it is necessary to monitor the horizon using a level.
Waterproofing and thermal insulation of concrete floors

Waterproofing a concrete floor can be done with plastic film
To create, you can use a 200 micron thick polyethylene film or a waterproofing membrane. We spread the waterproofing layer over the entire area of the room, bring the edges a couple of centimeters above the “zero”, let the sheets themselves overlap and glue them with tape.
To improve the thermal insulation qualities of a concrete floor, you can use various materials, each of which is laid at a certain stage of the work:
- expanded clay;
- Styrofoam;
- stone basalt wool;
- mineral wool;
- expanded polystyrene;
- extruded polystyrene foam;
- perlite;
- thick moisture-resistant plywood;
- cork covering;
- rolled isolon.
Floor reinforcement

You can reinforce a concrete floor with a frame made of metal rods
To give concrete floor It must be reinforced for additional strength. For this purpose, metal or plastic mesh, reinforcing rods or metal wire are used. The reinforcing frame must be laid on stands 2-3 cm high. This way it will be inside the concrete floor and create a single whole with it.
Important! If we use a plastic mesh, we stretch it over pegs driven into the base. You can weld a reinforcing frame made of reinforcement and metal wire yourself, having certain skills.
Installation of guides and formwork
To make pouring concrete easier and maintaining the “zero” level, it is necessary to lay guides. We mark the room into equal sections up to two meters wide and divide them using guides. They are usually made from a board or block, the main thing is that the height of the guides is level with the “zero” mark. We fix the guides themselves using a thick mortar of cement, sand and clay.
We install the formwork for the concrete floor between the guides. It forms so-called “cards”, which are subsequently filled with concrete. This is done in order to simplify the filling process and maintain a “zero” level. For formwork we use moisture resistant plywood or boards.
Important! The guides and formwork must be brought to “zero” and leveled horizontally using a level in order to obtain a level floor when pouring. We treat the formwork and guides with special oil to easily remove the boards from the concrete solution.
Pouring concrete, leveling and screeding a concrete floor
We pour the concrete floor in one, or maximum two, passes. This is necessary to create a monolithic and robust construction. To do this, you can order concrete from the factory, and it will be delivered in large quantities, but if this is not possible, you will have to do everything yourself. Then you will need a concrete mixer and a shovel, M400 or M500 cement, river sand, crushed stone and a partner.
To prepare concrete, take 1 part cement, 2 parts sand, 4 parts crushed stone and 0.5 parts water. Mix in a concrete mixer and use the resulting mixture to fill the floor. We start pouring from the opposite corner from the door. It is necessary to pour several “cards” in one or two times, then level and stretch the mixture with a shovel. To ensure dense shrinkage of concrete, we use a special vibrator, which helps compact the concrete and fill all voids with it.

We set the rule on the guides and pull towards ourselves
After filling out several “cards” we begin the rough draft. To do this, we install a rule more than 2 m long on the guides and pull it towards us. With its help, we remove excess concrete that fills the still empty “cards”. In those “maps” where the alignment was carried out, we remove the formwork and guides and fill the voids with concrete. Once the entire floor area is filled with concrete and leveled, it is covered with film and allowed to sit for 3-4 weeks to harden. During this time, the surface is constantly moistened with water.

Fill the floor with self-leveling mixture
At the final stage, we screed the concrete floor with a self-leveling mixture. This will smooth out all the small flaws and create a perfectly smooth surface. We start from the opposite corner from the door. We apply a solution of a self-leveling mixture to the surface and stretch it using the rule. The resulting surface must stand for 3 days.
The crowning achievement in creating a concrete floor on the ground will be the laying of the floor covering, which, thanks to a carefully prepared base, will be strong and durable. The design of a concrete floor on the ground, due to its simplicity and reliability, can last for decades; the main thing when creating it is to follow the concrete pouring technology.
You can achieve your goals in construction different ways. Paul is no exception. One of the simple, effective and reliable methods is considered to be a concrete floor on the ground in a private house.
The technology for installing floors on the ground is available, but requires strict adherence to the rules, which will be discussed below. The choice in favor of this method is due to the following advantages:
- Floors on the ground in a private house can be made with your own hands, without using expensive lifting equipment to install reinforced concrete floors.
- Are used available materials, the acquisition and delivery of which is not difficult.
- Economic benefit. The cost of installing a floor on the ground using this method can cost the owner of a future home significantly less than using other methods.
- High quality. When designing, the desired characteristics of a concrete floor on the ground in a private house are laid down.
- There is no need to attract additional labor.
- Having skills civil works You can do all the work yourself.
When starting construction, one of the most important conditions for many homeowners is a reasonable estimated cost. For this reason, many try to do affordable operations in a private home with their own hands. Detailed step-by-step instruction will help you realize this desire. At the same time, the recommendations will allow you to avoid typical mistakes and achieve optimal results. performance characteristics.
Using a ready-made reinforced concrete floor, the labor intensity of the process is reduced, but its costs for purchase, transportation, and payment increase sharply lifting equipment. Many people try to avoid a significant increase in costs by working independently.
Necessary materials for a concrete floor on the ground
It is advisable to purchase everything needed for work at a time. Professional builders know that transportation costs can exceed 10% of the estimated cost of the project. Sometimes paying for delivery of missing materials can cost more than the materials themselves. Therefore, it is important to correctly determine the list of components and calculate them required amount everyone.
One of the key questions is how to insulate a concrete floor in a private house? The best solution today it is considered to be used polystyrene foam boards. Mineral wool is used much less frequently because it is too elastic and flexible. In exceptional cases, its use is allowed, but only when laid in the cells of a specially prepared sheathing or in the space between the joists. Then a subfloor is made from boards and sheet materials.
The work becomes more labor-intensive if you decide to use this material on floors. Insulation on a concrete floor that can withstand the planned load without additional operations is preferable.

In addition, the estimated cost increases significantly without a noticeable improvement in performance. The only indicator where it is observed clear advantage- sound insulation. But the ground is not a source of noise, so when choosing insulation for the floor, you shouldn’t think about it.
This advantage is completely devalued. In the vast majority of cases today, concrete floor insulation is done with foamed polystyrene. This is justified by the following characteristics:
- economic benefit;
- sufficient strength;
- reliability of the material;
- long service life;
- environmental Safety;
- resistance to rotting, corrosion, mold, moss and other microorganisms;
- Expanded polystyrene insulation for concrete floors is easy to process, which makes it convenient for independent work.
Such thermal insulation layer is not hygroscopic, but slight surface and capillary penetration is still observed. Floor insulation in this situation will lose its effectiveness over the years. Repeated seasonal freezing cycles can damage the material.
Thermal insulation of a concrete floor needs to be protected from moisture entering it, both ground and water from the solution when installing the screed. A wide selection of waterproofing materials will allow you to create a reliable barrier to liquid. Rolled and sheet products of this category on a polymer or bitumen basis are used. The quantity is calculated taking into account overlaps and waste during cutting.

Main consumables by mass is concrete mixture. You can accurately determine the number of required components in a simple way. Without delving into the essence of complex professional formulas, experienced craftsmen use the following technique - 1 m 3 of the following grades of concrete contains cement:
- M 150 - 260 kg (cement M 300);
- M 200 - 290 kg (cement M 300), 250 kg (cement M 400) and 220 kg (cement M 500);
- M 250 - 340 kg (cement M 300), 300 kg (cement M 400) and 250 kg (cement M 500);
- M 300 - 350 kg (cement M 400) and 300 kg (cement M 500);
- M 400 - 400 kg (cement M 400) and 330 kg (cement M 500);
However, in terms of volume, this value can reach a difference of 6-7 times. Depending on the brand of cement, as well as the desired quality of concrete, crushed stone is imported at the rate of 4 to 7 tons per 1 ton of binder.
Soil compaction
The most important stage of work, on which the final quality and long service life of the floor depend. In cases of high soil density and low groundwater levels, this operation can be ignored. Compacting the soil simply won't work. If the site was graded with the movement of layers of soil, trees were uprooted, and other vegetation was removed, then compaction must be done.
The manual process is extremely labor intensive. For high-quality execution operation, a special device is made - manual tamper. Weight and size are selected based on your own capabilities. It is advisable to use this method for small amounts of work or to use it in hard-to-reach places.
The optimal solution would be to use an electric or pneumatic rammer. The speed of work and its quality increase manifold. The next stage - insulating a concrete floor in a private house will be easier to do. A smooth, dense surface is an ideal basis for a thermal insulation layer, the integrity of which during operation will determine the comfort in the home and protection from the penetration of cold.

The quality of soil compaction will increase significantly if the area is watered abundantly between operations to physically compact the soil. The number of voids is minimized. Soil softened by moisture requires less physical effort when performing the operation.
If an underground floor is planned, then it is done first. In a private home this is always the desired room. It is convenient for storing food, storing tools, equipment for cultivating land, and items used seasonally.
Even if it is not possible to make a full-fledged basement under the entire house, a small volume of several cubic meters can be done without difficulty. Designed convenient entrance, Walls are made using masonry or monolithic pouring. As a base for further layers of coating, you can install a wooden ceiling, or make a concrete floor using the formwork.
Sand and gravel layer for concrete floor
It is not recommended to skip this step. Dense soil cannot be considered a guarantee of the final quality of work. A layer of sand and gravel compensates for the natural movement of the soil and relieves the internal stresses that arise. The scope of work largely depends on the quality of the soil. In some cases, on rocky soil, it is enough to add sand about 10 cm thick.
If the soil is clayey, then it is advisable to supplement the layer with gravel or crushed stone. Soil used for agricultural purposes or with developed natural vegetation requires a different approach.
For example, black soil must be completely cleared of roots. After compaction, gravel is laid. Then sand is poured onto it. After spilling water, tamp again. Another layer of crushed stone is laid. The final leveling is carried out using sand level. This multi-layer base completely eliminates possible problems when operating housing on soft soils.

The final stage of the work will be to check the entire area horizontally, inspect for the absence of sharp stones and other objects that could damage the waterproofing layer laid on the prepared sand and gravel base under load. The method of laying a rough screed on top of crushed stone, which is then waterproofed and insulated, looks more reliable and of higher quality.
It is recommended to carry out this and the next stage as carefully as possible. The mobility of the sand and gravel layer is high. The best way to protect its integrity will be the foresight of laid boards or sheets. The load is distributed evenly over a large area and will remain flat for subsequent installation of insulation.
Waterproofing layer
The main purpose of the operation is to protect the insulation from moisture. The layer is located above the soil freezing level. If water gets in, it will begin to deteriorate and reduce its performance.
The film is laid with the necessary overlap. Then the joints are sealed. Bitumen-based waterproofing insulators are generously treated with a ready-made adhesive solution or, in the case of using the fusing method, the material is liquefied with a burner to the required state. Good waterproofing will protect the layer floor insulation for concrete from unwanted exposure to moisture, and most importantly, it will allow you not to worry about the condition of the insulation under the concrete layer.

Laying insulation
A layer of 8-10 cm is considered sufficient for effective protection shelter from the cold. The main rule of this stage is the creation of a single area, without cracks and gaps. How to insulate a concrete floor in a private house, observing the recommended characteristics?
You should know that gaps of even a few millimeters increase heat loss by 10-30%. There are several effective ways to fix this problem:
- cut out parts as accurately as possible, achieving a tight fit;
- use special adhesives to create a sealed layer;
- lay insulation boards using polyurethane foam, which, having a porous structure similar to the base material, ensures maximum thermal protection efficiency.
Experienced craftsmen can easily eliminate large chips and cracks in the insulation coating with crushed polystyrene foam mixed with adhesive composition. With this method, the effectiveness of thermal protection is practically not reduced, since the mixture has characteristics identical to the base materials.

Waterproofing before pouring concrete
So that concrete floors in a private house provide reliable protection housing, have served for a long time, it is necessary to prevent moisture from getting into the insulation. To do this, a waterproofing layer is made on top of the polystyrene boards. The optimal material for this operation is special films. Their strength characteristics allow you to pour screed of the required thickness. The material is elastic and easily takes the desired shape.
The use of bitumen-based surfacing materials is highly discouraged at this stage. The temperature of such compositions is high and can damage polystyrene foam. Burner operation is completely eliminated.
The joints are carefully taped with a special tape or the recommended composition. Popular today waterproofing films with a layer of glue applied to them. Simply remove the protective paper or polymer material, lay the waterproofing, pressing it tightly to the surface, observing the overlap dimensions specified in the instructions.
Pouring screed and reinforcement
The last stage of work before finishing the floors. The solution is prepared according to traditional technology. Depending on the brand of cement and the desired characteristics of the screed, it may have a different composition. However, experimentation is not recommended to avoid loss of quality.
Too much cement will make the concrete too brittle and prone to cracking. If its percentage is less than the norm, then the screed will turn out to be too loose and fragile. When installing a heated floor, the design will be very efficient, since there will be virtually no energy loss.

There are several ways to reinforce a screed. The work can be done in two stages. First, the soil layer is laid. Reinforcing elements are mounted on it. Then the final pouring completes the process. It should be remembered that the metal must be located in the body of the screed.
If you lay reinforcement directly over the waterproofing layer, the strength of the layer decreases. Concreting can be carried out in one operation, when the metal is knitted on specially placed spacers that lift the layer above the base to the required height.

To reinforce the concrete layer, you can use existing ones on the farm. hardware. For example, angles, channels, other types of rolled products left over after the construction of utility structures, old water supply and heating pipes, etc.
Building a house is a long-term process and includes a huge number of works in various directions. This includes the construction of walls, the construction of roofs, and a host of other types of work. One of the required steps is pouring the rough screed. It is necessary to create a primary base, on which the finishing screed or finishing coating will then be laid. A rough screed does not require special qualifications of the builder, but, nevertheless, involves a large number of works associated with its creation.
Creating smooth floors in a new home is not the easiest thing. And it is the construction of a rough screed that is the main step on the way to a level base suitable for laying various types coatings It ensures the reliability of the base and its strength. This is a rather labor-intensive and time-consuming process, but at the same time it is financially quite economical.

As a rule, laying the rough screed on the first floors is done directly on the ground. And most often, ordinary concrete mixture made from sand and cement is used as the base material.


However, quite simple process creating a rough screed cannot be called. The fact is that it involves laying several layers various materials and several preparatory stages:
- soil preparation - it must be thoroughly compacted;
- laying sand and gravel mixture;
- flooring waterproofing material, insulation;
- installation of the rough screed itself;
- installation of finishing material.
Thus, the floor consists of several layers. And this design has its own name - floor pie. It may also contain . Reinforcement is necessary to increase the strength of the screed.

Important! A rough screed can only be installed on dry ground. It will not be possible to create a full-fledged one on a damp surface, as problems with waterproofing may arise. Also, a rough screed can only be installed if groundwater is at least 4 m below the surface.

Also, during the installation of the rough screed, a floor heating system and other communications can be installed inside, if necessary according to the house construction project.
In general, a concrete floor on the ground in private construction is probably the most acceptable option for creating a foundation. It is often installed inside garages, on terraces, verandas, in warehouse premises and others.

On a note! Most often, concrete floors on a soil base are installed where there is no severe cold in winter, that is, in the middle or southern zone of the Russian Federation. In cold regions, it is recommended to use wood to create the subfloor.

In the photo - crushed stone bedding
Main advantages
If we consider the main advantages of creating a floor on the ground, we can identify the following.
- Simplicity of all work. Overall, creating a floor cake with the right approach only takes a few hours.
- High strength and resistance to deformation will ensure a long service life of the floor finish.
- This base has good thermal, hydro and sound insulation properties. Such a floor will not freeze critically even in cold weather, which will keep the house warm and cozy.
- One of the factors is economy. Arranging a rough screed is not as expensive as it might seem at first glance.

Thanks to all these advantages, many future home owners choose it as a foundation rather than one made from any other materials.

Types of rough screed
Rough, like a regular screed, can be different types. It all depends on the installation technology and materials used. It can be performed using both dry and wet methods.
Dry floor screed- this is a kind of multi-layer cake, where the layers are vapor barrier material (or waterproofing), expanded clay or sand, acting as a dry “pillow”, as well as any leveling material such as chipboard, OSB, plywood or gypsum fiber, depending on the wishes of the owner of the future home. Often the material can be laid not in one, but in two layers, with individual sheets fastened with self-tapping screws.

Wet screed is made on the basis of a cement-sand mixture, which will be poured on top of previously laid other layers and carefully leveled. A waterproofing layer and insulation can be laid under it, and a sand cushion is mandatory.

On a note! There is also a semi-dry screed. If in the previous version the mixture during preparation and use will resemble the consistency of sour cream, then in the version with a semi-dry screed it will look like wet sand.

Schemes of the rough screed device
Depending on the level at which the groundwater lies, as well as depending on the ground level and the position of the screed relative to the foundation, several types are distinguished.
Table. Types of arrangement of rough screed.
| Type of screed | Description |
|---|---|
| Screed below ground level | This method is used if it is planned to arrange food storage rooms or warehouses under the floor. In this case, the screed is located below the ground level, adjacent to the foundation. |
| Screed at ground level | Can be used in both industrial construction and residential construction low-rise buildings. The screed is located at ground level and adjacent to the strip foundation. |
| Screed above ground level | In this case, the screed is mounted above the foundation level; it is most effective and advisable to use it in places where groundwater lies quite close to the surface, in areas where the risk of floods and streams is high. |

In general, there is no universal scheme for arranging a screed - depending on the design of the house, it can be carried out in any of the above options. However, it is important to accurately design the location and level before construction begins. doorways so that you don’t have to correct mistakes later.

Foundation preparation process
All work on arranging a rough screed begins with careful preparation of the soil base. To begin with, it is important to identify the highest and lowest points, taking into account the level of the soil and the evenness of its surface. It will help to determine their values laser level. This procedure is necessary in order to evaluate for yourself the entire scope of work, as well as determine how much building materials may be required.
It is also important to pay attention to thoroughly compacting the soil. To do this, you can use special construction equipment - for example, a roller or vibrator. The procedure is necessary so that in the future the soil does not sag significantly and this does not lead to cracking of the rough screed, which will undoubtedly negatively affect the finishing floor covering.

After the soil has been thoroughly compacted, a sand and gravel cushion is laid. It can also be made from clean, washed and river sand. The thickness of this layer should not be more than 60 cm. In the latter case, a layer of gravel or expanded clay is also poured on top, which will make it possible to create a more durable base.
Attention! Before the soil is compacted, it is important to cut off the entire fertile layer, if any. It can be found in a more worthy use than burial under the house. The soil layer is removed approximately 35 cm.
It is also recommended to fill the pillow not all at once, but in layers - for example, 20 cm each. In this case, each layer is well compacted separately. The procedure will make the base as dense as possible. Before compacting, the pillow is moistened with water. The thickness of the expanded clay layer can be at least 10 cm. This layer is also compacted separately.

Prices for popular models of electric vibratory rammers
electric vibrating rammer
Layer of rough screed and waterproofing
Another important step when creating a rough screed is its waterproofing. If it is neglected, then the moisture seeping from the soil will “undermine” the concrete screed and as a result the foundation will become unusable and collapse, or at least will last for a very short period of time.
For waterproofing rough screeds it is usually used rolled materials– others in this case will be ineffective. The ideal option is to use rolled bitumen material or waterproofing membrane. Less commonly, but still used, dense polyethylene. The material must be laid in one large piece. If it is necessary to form joints (in case large areas), then they are carefully sealed - soldered or glued with construction tape so that water has no chance of penetrating to the base.

Attention! The waterproofing material should not have defects - holes, otherwise it will not fulfill its role.
It is important to lay the waterproofing material in such a way that it extends 15-20 cm onto the walls. If necessary, after laying the finishing screed, the excess can be cut off. If the waterproofing material cannot be laid for some reason, then the final screed must be treated with coating materials that can resist moisture and retain it.


Thermal insulation
In order to make the floors as warm as possible, it is important not to skip the thermal insulation stage. Expanded clay, basalt wool, and extruded polystyrene foam are used as materials that help retain heat. Laying the material is simple - slabs or layers of any of them are mounted end-to-end, without gaps, on a surface insulated from water. In this way, it will be possible to obtain a base that maximally retains the heat that tends to leave the house.
Attention! After laying the insulation material, it is recommended to lay another layer of waterproofing. This will allow you to evenly fill the screed and protect the insulation as much as possible from getting wet in the event of flooding. Wet insulation often loses most of its properties.

The most convenient and simplest option, but not the cheapest, is polystyrene foam. In addition to its thermal insulation functions, it makes floors stronger. Polystyrene foam can also be used as insulation. In this case, PSB50 grade material is used for garages and warehouses, and PSB35 is used for residential premises.

It is important to protect foam plastic from contact with cement, which can destroy the material. To do this, the foam must be covered with plastic film. But at mineral wool there is one drawback that sometimes scares off builders - it tends to absorb moisture, which is why waterproofing measures must be carried out especially carefully.

Reinforcement
Reinforcement is an additional strengthening of the rough screed by laying a reinforcing mesh in it. This material, created from metal rods or plastic, can significantly strengthen the base and allow it to withstand maximum loads. The mesh is laid on top of the previously installed layers on small supports, so that when pouring the screed, it appears to be inside the cement-sand mixture, and not under it. If the mesh has not been raised, it will not perform its functions of strengthening the base. The approximate height of raising the mesh level is about 2-3 cm. It is recommended to use a mesh with a cell size of no more than 10x10 cm. smaller size cells, the stronger the base will be, this is especially true in relation to plastic mesh, which is also often used in construction.


Fiber fiber for concrete screed- replaces reinforcement with metal mesh
In this article we will analyze in detail the design and construction of a monolithic concrete floor on the ground. By “floor on the ground”, further in the article, we will mean a concrete floor made inside the contour of the foundation, directly on the ground. Let's consider FAQ associated with this floor, and the structure itself from the ground to the finishing surface.
For what types of foundations can a floor be made on the ground?
A concrete floor along the edge can be used with a strip foundation, and with a columnar foundation (or a foundation using TISE technology). Slab foundation itself (by its design) is also a floor on the ground. With a strip foundation, the floor structure is usually adjacent to the foundation wall.
Rice. 1. Connection of the floor along the ground to the strip foundation

Rice. 2. Connection of the floor along the ground to columnar foundation with a low grillage
With a columnar foundation or a foundation using TISE technology, the floor structure along the ground can be adjacent to the grillage (if the grillage is low), or located below the grillage (if the grillage is high).
In the case of a high grillage, the gap between the floor structure and the grillage is closed when the floor is filled, for example, with boards (can be unedged). These boards remain in the structure and are not removed, Figure 3.

Rice. 3. Connection of the floor along the ground to the columnar foundation in the case of a high grillage
The height of the floor on the ground relative to the strip foundation

Rice. 4. Floor on the ground on the expansion of the belt

Rice. 5. The floor is adjacent to the wall along the ground strip foundation

Rice. 6. The ground floor is located above the foundation strip

Rice. 7. The ground floor is adjacent to the top of the belt
There are no constructive mandatory recommendations regarding the mark (height) of the floor installation on the ground. It can be installed at any height shown in Figures 4-7 above. The only thing you need to pay attention to when choosing this option is where the height of the front door will be. It is advisable to attach to the mark of the bottom of the door so that there is no difference between the bottom of the door and the floor, as in Figure 8, or so that you do not then need to cut an opening in the tape for the door.

Rice. 8. Height difference between the ground floor and the doorway

Rice. 9. The floor is level with the doorway
Note: Opening under front door it is better (more correct) to provide for it at the stage of filling the tape. Just do not fill this place, insert boards or foam plastic there, so that there is an opening in the tape. If you forgot to leave the opening, then you will have to either make the entire floor higher (and this will increase the cost of bedding), or cut an opening in the finished strip, cut the reinforcement in it, weaken it, etc.
Thus, if the opening under the front door is made correctly (at the stage of filling the tape), then we arrange the floor on the ground so that the top of the floor is level with the opening under the door (taking into account the finishing coating). In order to correctly calculate the thickness of the floor structure, and determine at what point you need to start its construction, you need to understand what the thickness of all its layers will be, what this depends on. More on this later.
There are no such cases. Even when high level groundwater, then it is more correct to install a monolithic floor on the ground than a floor on joists, for example. The type of soil, seismicity, level of freezing - all this also does not affect the possibility of installing such a floor.
Note: We do not consider situations where the house is raised above the ground on stilts; it is clear that then such a floor is not suitable.
Options for floor construction on the ground

Rice. 10. Floor construction on the ground with a ground water level higher than 2 m (with waterproofing)

Rice. 11. Floor construction on the ground at low ground water level, below 2 m, with bedding

Rice. 12. Floor construction on the ground at low ground level, below 2 m, without bedding, with pouring instead of rough screed

Rice. 13. Floor construction on the ground at low ground level, below 2 m, without bedding, with a rough screed
Rice. 14. Construction of the floor on the ground in combination with a warm floor
Note: Figure 14 shows the underfloor heating pipes and the reinforcing mesh above them. Between the floor pipes and the reinforcing mesh, - no gap, just drawn for clarity.
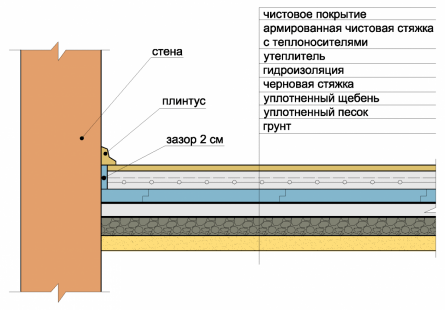
Description of the main floor layers based on the ground
Let's analyze the main layers (pie) of the floor according to the ground. Let's look at the structure from the bottom up. We will describe all the layers that may exist, without reference to a specific drawing.
- Compacted soil- the base for the floor must be well compacted;
- Bedding layers(sand 7-10 cm and crushed stone 7-10 cm). Bedding layers can be used to protect against capillary rise of water and can be used as a leveling layer. The crushed stone in the bedding layer should be of a fraction of 30-50 mm (large). The sand in the bedding layer can be of any kind, both river and quarry (gully). Whether the crushed stone can be replaced with expanded clay depends on the purpose for which the bedding is made; you can read about this in the paragraph Is it possible to replace crushed stone with expanded clay, in the same article, below. It is important that the bedding layers are well compacted. There are conditions when a bedding device is necessary and when it is not. You can read about this in the paragraph What determines the design of a floor on the ground, in the same article, below;
- Rough floor screed on the ground. This is a layer on top of bedding or compacted soil. It is carried out on a polyethylene film (it is spread on the ground or bedding), the thickness of the rough screed is 5-7 cm. It does not need to be reinforced. Sometimes rough screed replaced by pouring. About pouring - in the next paragraph, about when you can replace the rough screed with pouring - in the paragraph Is it possible to replace the rough screed with pouring, in the same article, below. The crushed stone in the construction of the rough screed should be of a fraction of 5-10 mm (fine). The sand in the construction of the rough screed must be river sand, not quarry (gully);
- Pouring (pouring) the floor over the ground. It is arranged by pouring a solution onto the bedding layer. The thickness of the pouring is equal to the thickness of the bedding layer. She gets comfortable without polyethylene film;
- Waterproofing. Constructed from roofing felt, 1-2 layers. You can take the most ordinary roofing material, without sprinkling. There are conditions when waterproofing is mandatory. You can read about this in the paragraph What determines the design of the floor on the ground below;
- . As insulation for floors on the ground, we recommend using EPS with a density of 28-35 kg/m 3, or polystyrene foam with a density of 30 kg/m 3 and higher. The thickness of the insulation is determined by calculation (depending on the climate zone);
- Finishing screed. The thickness of the finishing screed is 7-10 cm. The crushed stone in the construction of the finishing screed should be of a fraction of 5-10 mm (fine). The sand in the construction of the finishing screed must be river sand, not quarry (gully). The finishing screed (as opposed to the rough screed) must be reinforced. Reinforcement is performed with a mesh with a wire diameter of 3-4 mm. How to choose, 3 mm or 4 mm, is written in the paragraph What determines the design of the floor on the ground below;
- Finish coating. The final finish of the floor on the ground can be anything. Accordingly, the details of the device are different for each type of coating.
Presence and sequence of floor layers on the ground
What determines the design of the floor on the ground:
- From the groundwater level;
- It depends on whether these floors will be with heat transfer fluids (warm) or not;
- From operational loads on floors.
How exactly the construction of a floor on the ground depends on these factors will be discussed below.
1. By the presence of waterproofing. Our recommendations: install waterproofing from roofing felt (1-2 layers) if the groundwater level lies closer than 2 m from the bottom of the floor along the ground. In addition, if the groundwater is located closer than 2 m, we recommend making a backfill of sand and crushed stone, Figure 10. If the level is lower than 2 m, then the floor can be made without waterproofing. At a level lower than 2 m, backfilling with sand and crushed stone is not necessary, Figure 11, 12, 13.
Note: You need to focus on the highest groundwater level that can be in a particular construction site. That is, look at how high the water rises in the spring, during a flood, etc., and take this level into account.
2. If there are coolants in the floor structure on the ground, you need to make a gap between the walls and the floor, 2 cm. This requirement is the same for both water and electric heated floors. The gap is made at the level of the finishing screed (with coolant). All layers below the finishing screed are placed against the walls without a gap, Figure 14. You can read more about the installation of a water-heated floor in the article.
3. If it is planned that something heavy will be placed on the floor on the ground (heavier than 200 kg/m2), then we reinforce the finishing screed with a mesh with a wire diameter of 4 mm. If the load is up to 200 kg/m2, then it can be reinforced with a wire mesh with a diameter of 3 mm.
Important points when installing a floor on the ground
These important points I would like to analyze based on the questions that, as a rule, arise among readers of our portal when installing a floor on the ground.
Can interior walls be placed on this floor?
Yes, on a screed reinforced with 4 mm wire, you can install internal walls made of brick (in brick), from a partition block (100 mm), and walls half a block thick. By “block” we mean any block (expanded clay concrete, shell rock, aerated concrete, foam concrete, etc.)
Is it possible to replace crushed stone in the bedding layer with expanded clay?
Backfilling is usually done in order to interrupt the capillary rise of water. Expanded clay swells with water and is not suitable as a bedding material. That is, if the bedding was planned as additional protection from water - such a replacement cannot be made. If the backfill was not planned as protection, but simply as a leveling layer, and the water is far away (deeper than 2 m from the base), and the soil is constantly dry, then you can replace crushed stone with expanded clay to install a floor on the ground.
Is it possible to replace the crushed stone in the bedding layer with broken bricks and waste construction materials?
It is forbidden. If the bedding was planned as additional protection from water, then broken bricks and other waste will not fulfill their purpose in the bedding. If the bedding was not planned as protection, but simply as a leveling layer, then we also do not recommend such a replacement, since these materials have different fractions and will be difficult to compact well, and this is important for normal operation floor designs.
Is it possible to replace the crushed stone in the bedding layer with expanded clay, pour more of it, and then not put insulation?
To replace 50-100 mm of EPS (this is the average amount needed to insulate a floor on the ground), you will need 700-1000 mm of expanded clay. It is impossible to properly compact such a layer, so we do not recommend doing this.
Is it possible not to reinforce the screed?
You don't have to reinforce the rough screed. The finishing screed must be reinforced.
Is it possible to reinforce the screed with something other than mesh? Instead of reinforcing mesh, is it possible to simply put metal rods in the screed without tying them together, or other metal parts?
No, for reinforcement to work, it must be done with a mesh.
Is it possible to lay waterproofing directly on bedding layers?
No, waterproofing must be laid on a flat and solid base (in our case it is a rough screed), otherwise it will quickly become unusable due to uneven loads.
Is it possible not to make a rough screed and put waterproofing or insulation (if there is no waterproofing) directly on the bedding layers?
We discussed waterproofing in the paragraph above. The insulation also needs to be laid on a flat and solid base. This base is the rough screed. Otherwise, the insulation may move, and subsequent layers too, and this may lead to cracks in the floor.
Is it possible to do a wash instead of a rough screed?
Let's look at what we mean by “rough screed” and “shedding”. A rough screed is a layer on top of bedding or compacted soil. It is carried out over a plastic film (it is spread on the ground or bedding), the thickness of the rough screed is 5-7 cm. The pouring is done by pouring the solution onto the bedding layer. The thickness of the pouring is equal to the thickness of the bedding layer. It fits without plastic film. Now let’s talk about whether the rough screed can be replaced by pouring. If the water is closer than 2 m, and the backfill (sand and crushed stone) was used as a layer that prevents capillary rise, then watering cannot be done. Because spilled crushed stone will not interrupt the capillary rise of water. If the backfill was carried out for leveling purposes, and the water is deeper than 2 m, then you can use a backfill instead of a rough screed. If there is no bedding at all, and the screed is done directly on the compacted soil, then you can do both a rough screed and a pour. It just turns out that there is no point in doing the pouring, since for it you will still have to pour about 3 cm of sand and about 10 cm of crushed stone, and in this case the sand is river sand, and the crushed stone fraction is about 10 mm. In general, it is easier to do a regular rough screed.
Does polyethylene under the rough screed replace waterproofing?
The function of this layer is to prevent concrete milk from going into the bedding layers or into the ground. This layer is purely technological; it does NOT replace the main waterproofing (roofing felt on top of the rough screed). If the water is deeper than 2 m, then waterproofing (roofing felt) is not needed, but this does not mean that we “replaced” it with polyethylene. It’s just that these layers have different functions and do not replace one another. When installing a rough screed and water deeper than 2 m, a layer of polyethylene is still needed.
Where is the correct place to place the reinforcing mesh in the finishing screed?
Does it matter where exactly the reinforcing mesh is located in the finishing screed layer (at the bottom, at the top or in the center)? If the screed is without coolants, then the mesh should be located 3 cm from the top of the screed (that is, approximately in the middle). If the screed contains coolants, then the mesh must be on top of the pipes, plus 2-3 cm of a protective layer.

Rice. 15. Finish screed without coolants, reinforcement

Rice. 16. Reinforcement of finishing screed with coolants
The most rational solution for an individual developer is to concrete the floor on the ground in the form of a floating screed. When using other options (beam-based flooring, PC slab), harmful radon can accumulate inside the underground, and there is often a lack of normal ventilation. Excess moisture leads to corrosion of concrete and biological damage to wood.
Laying a floor on the ground in a private cottage is often confused with pouring a monolithic floor resting on a plinth or foundation elements, when the bottom permanent formwork is filled, but not compacted, soil inside the MZLF tape. These are different technologies, the differences of which will be discussed below.
The developer should understand that for specific conditions, the design of a concrete floor on the ground (PG) should be chosen correctly, based on the conditions:
- with floors on the ground, it is necessary to create a single base for laying the floor covering;
- the structure is a floating screed that does not come into contact with the walls of the building and does not go under them;

Confusion in the names of technologies occurs for the following reasons:
- the project includes a foundation whose width is greater than the thickness of the walls;
- the enclosing structures are shifted outward (the inner surface of the plinth, grillage or MZLF tape does not coincide with the plane of the internal walls).
In this case, the developer tries to avoid the resulting step, raises the floor level, pours the screed not only onto the ground, but also rests it on the protruding parts of the foundation. The MZLF backfill or grillage in this case serves as formwork, but is not compacted properly.
During operation, the soil under the slab or the foundation under the building itself may sag or rise due to heaving forces. Where the slab rests on the plinth, serious loads arise that are not taken into account in the calculations. The screed breaks and the floor covering becomes unusable.
It is important to understand that when you make a floating screed on the ground with your own hands, it rests on tightly compacted soil and cannot sag or swell. Therefore, mesh reinforcement in one layer in the lower third of the structure is sufficient. Slabs supported on foundation/basement elements are always reinforced in two levels. By filling the foundation/basement in this option, other problems are solved:
- the developer gets rid of the underground, inside of which it is necessary to provide natural ventilation, and the low base does not allow the creation of vents in it, since they will be covered with snow in winter;
- the accumulation of harmful radon gas inside the underground, freezing of the soil under the cottage is eliminated and heat loss in the floors is reduced;
- formwork costs are reduced, since the lower deck is earth, which does not need to be compacted with a vibrating plate.
There is an option for installing a floor on the ground with “support” on the foundation, but the support occurs through the foundation layer, and the soil must be well compacted, i.e. in fact, the floor does not rest on the foundation, because Due to local compression of the insulation at the point of support on the base, all movements are leveled out. That is why you should not use high-density insulation for such a design.

The floor is on the ground with “rest” on the plinth.
The concrete floor on the ground has the following design:

- backfilling - the topsoil layer must be completely removed; soil taken from the MZLF trenches can be used, but only with a minimum clay content, compacted layer by layer with a vibrating plate;
- underlying layer - necessary for additional leveling, recommended thickness 40 cm, created from sand (on dry soils) or crushed stone with geotextiles (in high groundwater level), compacted with a vibrating plate (every 10 - 15 cm);
- footing - a screed is necessary to protect the waterproofing material from punctures by the sharp edges of crushed stone; it can be filled with thin (B7.5) concrete mortar;
- waterproofing - EPDM films, two-layer polyethylene or fused bitumen roll material, which prevents concrete from getting wet and corrosion of the reinforcement inside it;
- insulation - just make a 5-10 cm layer of high-density polystyrene foam (XPS or EPS);
- reinforced concrete – mesh reinforced in the lower level there is a concrete screed B15 and higher (corresponding to M200).
- damper layer - along the perimeter the screed is separated from the walls, base or foundation by a special tape or insulation installed on the edge;
- expansion joint - necessary in openings between rooms, arranged by laying special elements (corners) when pouring the structure.

Layout of expansion joints.
This is the only thing correct design PG for a private cottage. However, individual developers often try to save money on installing a floor on the ground, so the following options exist:
- in the backfill, expanded clay is used instead of soil - the material is very difficult to compact, but it is lightweight and has thermal insulation properties(but nevertheless it cannot replace a layer of insulation), instead of a concrete base, the surface is covered with cement laitance, which binds the top layer and makes it suitable for laying waterproofing;
- exception of the footing - a layer of sand with a thickness equal to two sizes of the maximum crushed stone fraction is laid on top of the crushed stone, after which the non-metallic material is compacted so that no traces of workers’ shoes remain on it, waterproofing is laid on it, but is not glued, but is sealed in places where they overlap each other .
Private residential projects often contain partitions and free-standing structures that are heavy (from 400 kg) and exert concentrated point loads.
Important! A ground floor is not a load-bearing structure, so stoves/fireplaces, internal stairs and heavy partitions require an independent foundation, which can be built into a ground floor or take the form of piles, slabs, pillars.

Foundation options for stairs.
Manufacturing technology
Before making a PG with your own hands according to the above scheme, it is not enough to know its design. The nuances of construction at each stage, given below, should be taken into account. The main misconception is that PG is only suitable for strip foundations of a private house.
In fact, a floating screed can be poured into houses with a low grillage on screw and bored piles, classic and TISE pillars. In this case, the thickness of the structure and its structure remain the same, and the PG is adjacent to the walls on a grillage.

Backfill MZLF for floors on the ground.
Preparation
The floor structure on the ground must have a base with normal bearing capacity. The PG is made inside a grillage or MZLF, the beams of which rise above the ground, creating the base part of the foundation. That's why internal cavities It would be correct to fill it with soil taken from the trenches of the strip foundation, leaving 0.4 m for non-metallic material.
If there is a topsoil containing a large amount of organic matter, it must be removed. Even if you compact the chernozem with a vibrating plate, after 3–12 months the organic matter in it will rot and the soil will certainly sag, which is extremely dangerous for concrete, even if reinforced, but not connected to the foundation.
Important! At this stage you should process waterproofing materials(plastering, welding or coating) elements of the grillage, plinth or foundation, if this has not been done previously.
Communications
Unlike a floating foundation slab, the input nodes engineering systems install with your own hands before filling the underlying layer. The exact location of the walls is already known, since the grillage or MZLF has already been made. Therefore, it is impossible to make a mistake with the passage of risers in close proximity to the enclosing structures.
Even with minimum thickness screeds, the maintainability of communications inside the steam generator is practically zero. Therefore, the following technology is used:
- the water supply system is buried by 1 - 1.5 m, since the soil under the cottage cannot freeze (only for all-season housing), sewerage by 0.7 - 1 m, since the wastewater leaves the house warm;
- pipes run in sleeves or corrugated pipe larger diameter, so that if they fail, you can pull out part of the circuit from outside or inside the house and replace them with new ones;
- If necessary, you can run a power cable into the cottage at a depth of 0.5 m, laying red warning tape on top of it.

Communications inside the underlying layer.
You can maximize the quality and service life of engineering systems in a private house by installing an underlying layer:
- under water supply and sewer pipes trenches are torn off;
- geotextiles are laid, the edges of which are attached to the sides of the excavation;
- a 5–10 cm layer of sand/crushed stone is poured;
- communications are laid out;
- covered with the same non-metallic material on top and sides;
- covered with the remains of geotextiles and covered with soil.
This will compensate for possible heaving forces and maintain the integrity of engineering systems.
Substrate
Filling the top layer with nonmetallic material is a technology that eliminates heaving forces. Crushed stone and sand have drainage properties, serve as a damper layer of the floor on the ground, are normally compacted by a vibrating plate and do not sag over time.

Sand preparation of the floor on the ground.
However, these materials absorb cement laitance from concrete and do not allow the joints to be properly sealed roll waterproofing. Therefore, on top of the underlying layer you need to pour a footing - 3 - 5 cm of screed from a mixture of grade B 7.5.
Waterproofing and insulation
After the footing has gained strength, rolls are fused onto its surface. bituminous materials with overlapping strips of 10 - 15 cm. The edges are launched onto the vertical surfaces of the grillage or strip foundation of a private cottage to the height of the floor along the ground.

Waterproofing and insulation of PG.
The optimal insulation option for the SG design under consideration is high-density extruded polystyrene foam of the XPS or EPS grades. It does not sag, retains its properties in water and has high vapor barrier properties.
Important! With the specified “pie” of the floor along the ground, the insulation remains under the concrete, the structure has high thermal inertia (it accumulates heat, but also increases the energy consumption in the heating boiler during initial heating).
Reinforcement and heated floor
Due to the fact that a concrete floor on the ground absorbs exclusively compressive loads, its lower layer must be reinforced to compensate for destruction from tensile forces. For this purpose, a wire mesh made of rods with a diameter of 4 mm with a cell of 10 x 10 cm is used, in accordance with SP 63.13330 (reinforced concrete structures).

Reinforcement of the floor on the ground.
According to the regulations of the above joint ventures, concreting of the steam generator must be carried out in compliance with the following conditions:
- lower protective layer concrete 1.5 cm minimum;
- to ensure this, the mesh is laid on polymer or concrete bosses; the use of metals and crushed stone is prohibited;
- when extending the mesh, the overlap is 10 cm minimum (one cell).
If the project includes a heated floor (HF), its contours are laid on top reinforcing mesh, the thickness of the floating screed automatically increases.

Concreting
- the mesh must not be cut;
- to pass the rods through the partition, you will have to cut the required number of grooves in the shield;
- install the formwork in place and foam the remaining cracks;
- nail a beam on one side of the partition to create a ledge in the concrete for connection with the next piece of screed.
Before pouring, a damper layer must be installed. To do this, along the perimeter of the PG, pieces of thin (1 cm) polystyrene foam are installed vertically, close to the foundation of a private cottage, protruding beyond the design floor level, or the perimeter is covered with damper tape, which performs the same function.

Damping layer for floating screed.
The mixture is placed from the corner farthest to the concrete mixer with a ledge. Then it is compacted with a vibrating screed and leveled using the beacons.
Nuances of technology
The strength of floors on the ground is affected by the grade of concrete, the sequence of operations and the materials used. However, there are general features when concreting junction points, platforms for supporting heavy structures and light partitions.
Junction nodes
In order to minimize heat loss in the floors with your own hands, the insulation on the outer edge of the base and foundation must be connected to the heat-insulating material inside the walls or on their outer surface (ventilated facade or wet facade) without cold bridges.

Insulation of the wall and base to eliminate cold bridges.
Partitions and walls
Since floors on the ground are not a power structure, under load-bearing walls and heavy partitions need to be poured with a separate foundation. Another option is stiffening ribs along these walls, directed towards the ground, similar to the Swedish USHP slab.
A rather complicated case is gypsum plasterboard partitions on the floor on the ground:
- on the one hand, the PG needs to be separated from the partition by a damper layer, that is, a screed must be made after installing the partition;
- on the other hand, plasterboard systems should be erected after wet processes are completed, otherwise the material will absorb moisture and lose rigidity and strength.
Therefore, a combined technique is used:
- a profile frame is mounted on the foundation;
- a narrow strip of drywall is attached, the width of which is equal to the height of the floating screed;
- damper tape is glued to it or polystyrene foam is installed;
- The screed is poured, after which the partitions dry, they are completely sheathed with plasterboard.

Installation of the frame for the partition.
This avoids the drywall getting wet when the concrete dries and preserves the properties of structural materials.
Ladders and power equipment
Internal building structures can be significant and place concentrated loads on small areas. Therefore, for fireplaces, interfloor stairs, pumping equipment, furnaces and boilers, it is necessary to make a separate foundation or increase the thickness of the floor slab along the ground.
Thus, an individual developer can use ground floor technology for a low grillage and MZLF tape in order to reduce the construction budget and operating costs, and increase living comfort.
Advice! If you need repairmen, there is a very convenient service for selecting them. Just submit in the form below detailed description work that needs to be done and you will receive offers with prices from construction teams and companies by email. You can see reviews about each of them and photographs with examples of work. It's FREE and there's no obligation.