We will send the material to you by e-mail
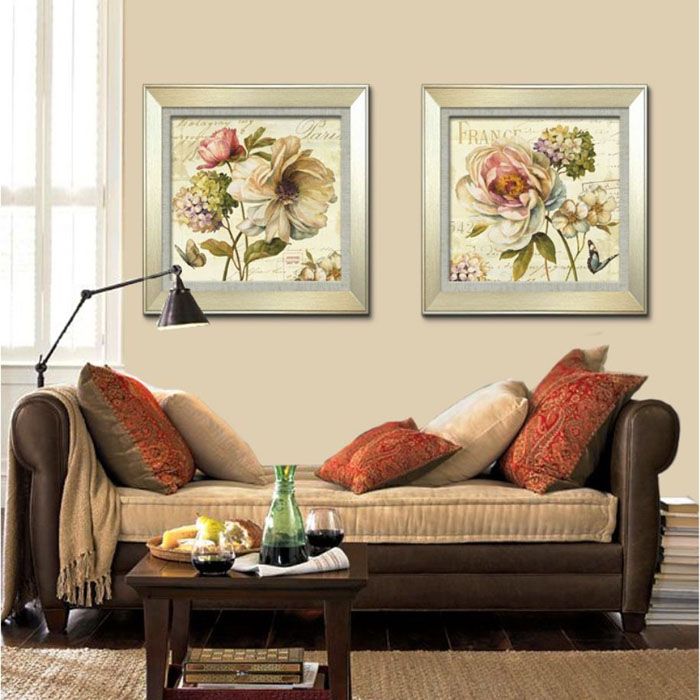
The picture looks complete and laconic only in the frame design. Whatever one may say, but an unformed piece of canvas or just art on a sheet will not make the proper impression without a frame. The editors of the online magazine site believe that it is not necessary to buy a baguette, since making a frame for a picture with your own hands is not only interesting, but also easy!
So it won't take long to become a master in making frames
What determines the design of a product? The surrounding interior. It is not enough to simply wish to see a blue artsy frame in a painting in a room with classic interior- therefore, we focus strictly on the style of the room.


How to make a baguette for a picture with your own hands
Painting on canvas or paper can be arranged in a beautiful wooden or polyurethane foam baguette, simple or carved - as your soul tells you.A baguette is made from a wooden or polyurethane foam profile with a jigsaw, a stapler and using a clamp.Let's show you how to make a frame for a picture from a baguette.
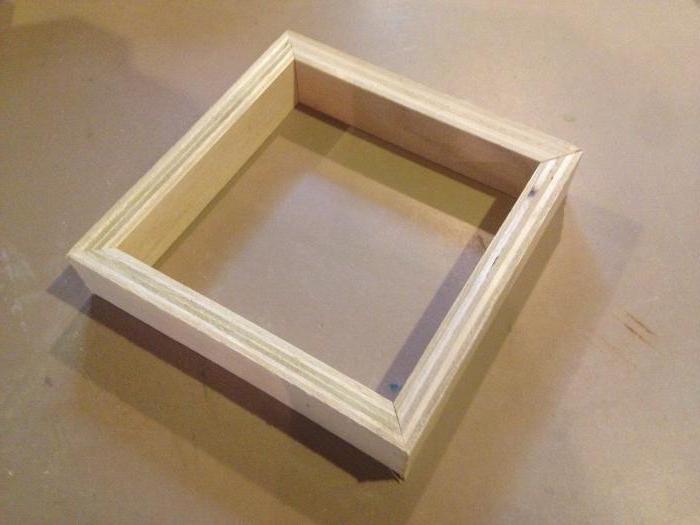
Making a frame for a picture of wood with your own hands
Wooden picture frames look sophisticated and fit into almost any style.


What you need to work
As already mentioned, we acquire a ready-made wooden profile, fine sandpaper, preparing a jigsaw, wood glue and tape measure.

If the profile is completely finished, then no additional actions are required, although, if desired, the baguette is decorated with gilding, craquelure varnish, and patina.
Instructions for making a picture frame from a wooden plinth
We measure the picture and correlate them on the profile. The task is to make cuts at an angle of 45 ° and ideally clean each one with sandpaper.

We apply glue to each saw cut and connect them together. This is where a clamp comes in handy, which will help make the bonding points very strong.

On the seamy side, the picture must be covered with a sheet of plywood or durable cardboard.
DIY painting frames from polyurethane ceiling plinth
If you want to see on the wall white frame for a picture, you can make a baguette from ceiling plinth.


What you need to work
Ceiling skirting boards are sold today in every hardware store, and the choice of products is great. For the first time, we suggest trying to make the simplest version from a medium-width profile without any special decorations.
For gluing we take Titan glue for ceiling tiles and baseboards, we also need a stationery knife, a ruler and a protractor to measure the angle. If you want to paint over the whiteness of the plinth, prepare the desired color of acrylic paints.

Instructions for making a picture frame made of polyurethane skirting boards
Having made measurements horizontally and vertically, we prepare the base of the picture from thick cardboard or ceiling tiles (if the size of the canvas allows). The base is either the same as the picture, or slightly surpasses it.
Let's start creating the frame:
- We measure all measurements made on the baseboards and mark them with a protractor (remember that we need an angle of 45 °).
- We make cuts with a clerical knife according to the markings made, or with the help of a miter box we immediately cut off the finished elements.
- Before starting the gluing process, all sides are aligned with each other to ensure that all edges match exactly.
- You can glue all the pieces together and leave them alone for a while.


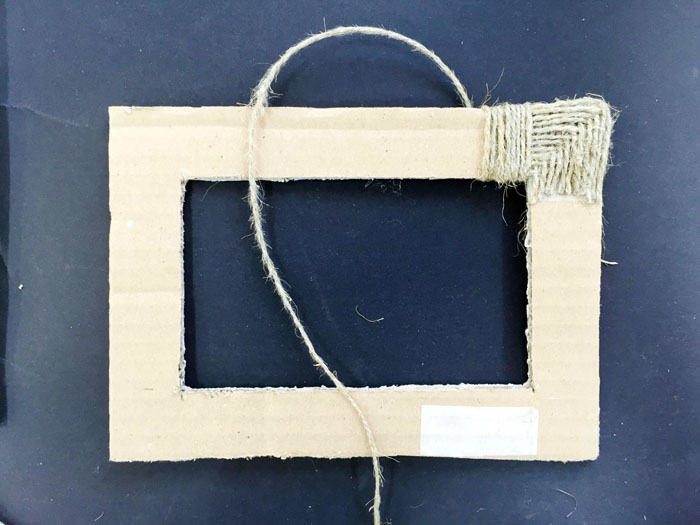
How to make a cardboard frame with your own hands
A do-it-yourself frame for a picture from cardboard can be made by people without experience in applied art: it is cheap, beautiful and not at all difficult. In order for everything to work out the first time, you need to immediately prepare all the elements necessary for creativity.


What you need to work
In the work, you will need thick cardboard for the base and for the frame itself. Both simple cardboard and corrugated cardboard are suitable here: it all depends on the desired thickness and strength of the product.

In addition to the main material, we prepare scissors, a stationery knife, a glue gun with glue sticks (or, in the absence of such, we purchase wood glue or Titan glue for ceiling tiles). It remains to pick up everything for the external decor.


Cardboard products allow you to widely apply your own imagination: there are no boundaries either for form or for decoration. You can decorate the product with textiles, beads, shells, and scrap paper.
Instructions for making a mat
Let's start with the instructions on how to make a cardboard frame for a picture.
| Illustration | Description of action |
|---|---|
 | Cut out a frame from cardboard, taking into account the size of the photo. We lay the scrap paper face side on the table and put a cardboard blank on it. We are not gluing anything yet. |
 | We cut off the outer corners with scissors, and inside we make diagonal cuts using a clerical knife. |
 | We bend the outer borders. |
 | Carefully cut off the excess inside the product and bend the inner borders. We are in no hurry: everything should be smooth. Now we glue the inner borders to the frame, and then the outer ones. |
 | This is what the frame will look like. You can leave it simple without any decoration, but a couple of decorations will not be superfluous. |
Video: DIY cardboard photo frame
How to make a frame for a picture from scrap materials with your own hands
Making frames for pictures with your own hands is your own fantasy, embodied in practical use. It has become fashionable to decorate walls or tables with your own products, because this is the most direct inclusion in the design of your beloved home. Why is it worth trying to make frames with your own hands if there are a great many of them on sale? Well, who knows your preferences better than yourself? Who cares more for the warmth of the hearth, besides the owner of the apartment?


If we describe all the ways of creating picture frames, all the pages of our magazine are not enough, so we will focus on the two most available materials: newspapers and buttons.
How to make a frame for a picture yourself from buttons
Beautiful picture frames are made from buttons! Many have button deposits from grandmothers and mothers, but not everyone knows what to do with them. For creativity, we do not need tons of new buttons, any will do!


What you need to work
Here we will use the previous paragraph of the content and start making a cardboard base: we cut out the desired frame shape from cardboard.
Advice! Don't limit your imagination! Let the form be unexpected, catchy, angular, streamlined.
We are preparing a framework, acrylic paints or spray paint, glue-moment or heat gun. If the buttons themselves are very beautiful, they are matched in harmonious combination with each other, you only need to paint the base.
Now turn on the appropriate music and get started!
Manufacturing instruction
We select the largest buttons and use glue to attach them one by one to the frame base. Do not rush to the next layer - let the first grab properly.
Then we begin to glue medium-sized buttons, trying to cover all the gaps. Small buttons cover the remaining gaps and are located over the entire surface of the frame.


The spray can will paint the entire frame at once, and you can create interesting color variations with acrylic paints.
Picture frame from old newspapers
As soon as the newspapers read and become unnecessary are not used in everyday life! If earlier they washed glasses and mirrors, today it is a fertile material for weaving baskets and different kinds decor. Lovers of making frames were also attracted by the newspaper as a decoration material.


What you need to work
We will not explain the basics of weaving here, but we will show you how to easily and quickly make a wonderful frame for a picture or photograph from.We take a heap of newspapers, PVA glue, a thermal gun, acrylic paints or gouache of the color in which you want to see the frame and the frame itself (you can use cardboard).
Nuance! Magazine pages are too bright for pictures in color, but perfect for black and white. It is better to either paint or simply varnish newspaper tubes.
Manufacturing instruction
We cut newspaper sheets in this way:

- Each strip is laid on a thin knitting needle (in its absence, an electrode, which must first be tapped, or a strong thin long wire equal in length to a knitting needle) will do at an angle of 45 ° and begin to wind almost to the end of the strip. The tip of the strip is greased with PVA glue and rolled to the end. The tube is removed from the needle and coated with PVA entirely. In this way, several dozen tubes are made (if the volume of the frame is large). As soon as the products are dry from the glue, you can paint them in any color.
- The dried tubes are laid out on a frame base and disassembled in accordance with their own wishes for the composition. You can lay them vertically, horizontally, obliquely.
- At this stage, we decide how long each tube should have: it is better to cut off the excess immediately.
- We put the tubes on a frame smeared with glue (or alternately with a heat gun) and tint the cut edges.
A stretcher is a structure assembled from wooden slats or planks. It can be of various sizes and uses. Making a stretcher for the canvas with your own hands will not be difficult. To do this, you need to know what type of construction is required in one case or another.
Varieties of stretchers
They are of two types: prefabricated and deaf. The first type is modular and wedge subframes. The second is characterized by a strong and reliable connection of all elements. It cannot be tightened or the spacing between the slats can be changed, unlike modular subframes.
Prefabs are sold in separate slats. Their cost is slightly higher than that of simple stretchers. They are popular because they can be used to stretch the canvas of a painting under a frame or without it.
Any stretcher must be endowed with the following characteristics:
- durability - all elements are securely fastened together;
- wear resistance - it is necessary to assemble the structure only from dry wood;
- match the size of the painting.
For this reason, it is necessary to choose quality material for the manufacture of structures.
Choosing raw materials for the product
To make a do-it-yourself canvas stretcher, you need wood. It can be pine, oak, birch, mahogany and other varieties. The material must be well dried, processed and prepared. Otherwise, the structure will begin to deform over time.
We make a deaf stretcher
This type of product is more popular due to its low cost. Everyone can make such a stretcher for the canvas with their own hands.
You will need the following tools and materials:
- wood slats or planks;
- ruler;
- hacksaw;
- joiner's glue;
- furniture stapler;
- sandpaper;
- hammer;
- furniture corners.
How to make a do-it-yourself canvas stretcher? It is necessary to start the manufacturing process by determining the dimensions of the future product. After that, you need to saw off two vertical and horizontal strips. This can be done at an angle of 45 degrees.
The resulting parts are processed. Their surface must be smooth and free of knots. The ends of the elements are coated on both sides and connected to each other. To make the structure durable, to inside mount furniture corners at the corners of the stretcher.
After that, the product is covered with several layers of varnish or paint. This will help protect the wood from moisture and other aggressive influences.
Modular designs
It is also easy to make such a stretcher for a canvas with your own hands. It has all the elements as in a standard blind type product. The main difference is the bolts and nuts, which are located at the corners of the product. With their help, the tension of the canvas is adjusted so that the canvas does not sag. For the manufacture of the structure, you will need the same materials and tools as for the previous product.
Stretching the canvas onto the finished stretcher

The process can take a long time for an inexperienced person. How to stretch the canvas onto a stretcher with your own hands? Initially, it is necessary to check the diagonals of the structure. Then a picture is placed on the product so that the drawing is in the very center. Secure the canvas on all sides of the stretcher with a stapler (one bracket - one side).
After that, similar actions are performed over the entire surface of the structure. The distance between the staples should be at least 2-3 cm. The excess canvas is cut off with scissors, and the raw edges are folded and glued to the inside of the stretcher. The picture is framed.
Any artwork without an original frame is considered unfinished. This design adds charm, sophistication, creates the unity of the entire composition. The editors of the site today will tell and show how to make a frame for a picture with your own hands, so that your artistic creations fit perfectly into the interior.
Read in the article
We decide on the design and size of the frame: which is better?
First of all, study the nuances of decorating and lighting your home. Where will the picture look most advantageous?

How to make a stretcher for a picture with your own hands
A stretcher is a necessary element of any painting. It serves to evenly tension the canvas with the image. The tighter the stretcher fits to the frame, the better. Those masters who have been making picture frames for a long time choose their own options for a stretcher.
Stretchers are deaf and.

 Modular - allows you to adjust the tension. Its elements are movable.
 A blind stretcher is the easiest to manufacture:
To make it, you need to choose wooden slats universal size. Reiki can be purchased at any carpentry store. You will need: wood glue, tape measure, sandpaper for processing, nails, corners.
We measure out the slats. Horizontal and perpendicular. The frame size should be slightly smaller canvas.
We make cuts at an angle of 45 ° and process sandpaper.

 We tap the staples with a hammer, drowning them into the frame. On the reverse side of the structure, metal fasteners must be screwed onto the corners.
 How to make a baguette for a picture with your own hands
A baguette is a modular structure made of wood or polyurethane foam. Usually cut with a jigsaw, fastened with a clamp or hot glue.
If you don't know how to make a frame for a baguette, watch this video:
Making a frame for a picture of wood with your own hands
Wooden picture frames are always in fashion and always look exquisite.
What is needed in order to make a frame out of wood with your own hands
There are many variations of wood frames from the simplest ones.
Up to more complex ones. For example, from carved wood or skirting boards.
Instructions for making a picture frame from a wooden plinth

We apply glue to each saw cut and connect them together. This is where a clamp comes in handy, which will help make the bonding points very strong.
DIY painting frames from polyurethane ceiling plinth
If you want to see a white picture frame on the wall, you can make a baguette from the ceiling plinth. The most important thing is to perfectly cut the joints off.
Advice! For gluing we use Titanium glue for ceiling tiles and skirting boards. From above, the product can be treated with acrylic paints.
How to make a cardboard frame with your own hands
Simple, fast, most cheap way make a frame for the picture using cardboard. You can decorate the creation with fabric, pebbles, interesting decorative elements.
1 of 4
Advice! For work, it is best to choose thick cardboard. The perfect way fastening elements will become a thermal gun.
An interesting video will tell you how to make a mat for a photo with your own hands.
The following photos and diagrams for creating a mat will help you create a layout correctly.
How to make a frame for a picture from scrap materials with your own hands
Making picture frames with your own hands is not easy, but fascinating activity... If you decide on such an exclusive product once, then for sure, you will never forget about your hobby.
Any picture is a story, a spectacular frame can emphasize this story and make it even more vivid.
The stretcher serves as the basis for stretching the canvas. The modular (prefabricated) subframe design has become the most suitable solution for these purposes, since the canvas reacts to chemical and temperature influences during operation and storage. With a prefabricated subframe, the curvature of the canvas can be corrected using wedges as much as required.
MODULAR SUB-FRAME AND BLIND SUB-FRAME - WHAT IS THE DIFFERENCE?

There are two types of subframes in total: modular and blind. The subframes are made of wood, usually pine.
Modular subframe- prefabricated, it is made up of individual strips, which are sold in two pieces of a certain size. The ends of the strips are chamfered and have grooves with which the strips are connected to each other. They can be used to compose a stretcher of any desired format by selecting and connecting the planks the right size... To increase the rigidity of the structure, middle strips are used.
Deaf (rigid) stretcher- one-piece subframe, fastened with staples. They are usually sold in small formats and are used for sketches, since the rigid fastening of the slats does not allow you to adjust the tension of the canvas if it sags under the influence of any factors.

Modular subframes have great advantage in front of the deaf, primarily due to the adjustable tension, which is achieved by tamping the wedges. The second plus is the ability to assemble a stretcher of any format necessary for an artistic design - square, rectangular, elongated.
However, one should check the quality of modular subframes. The stretcher will deform and damage the canvas if it:
- has fragile material and connections
- made of raw wood, which, when naturally dried, will give distortions
- made of wood with knots
- infected with mold or beetle
MODULAR SUB-FRAME PROFILES

The profile of the slats (planks) of the stretcher has a protrusion, the so-called "side", which ensures minimal contact of the canvas with the stretcher, which is very important for the safety of the canvas. The cross-section of the subframe rails has different thickness, which allows you to select them for the necessary tasks (for example, for large hard work need slats with a wide section). Among Russian manufacturers, as a rule, there are subframes with the following cross-section:

- Lightweight section 40x17 mm. This section is lightweight and has a limitation on maximum size finished stretcher: 70x70 cm. No middle planks required.
COMPONENTS OF THE MODULAR SUB-FRAME

Design modular subframe make up:

Side slats
The slats from which the subframe frame itself is composed. The side slats have 45 ° cuts along the edges with grooves, with which the slats are connected, forming a subframe. No glue or other fixing material is needed when assembling the modular subframe. Side slats in stores are presented in sizes from 18 cm to 200 cm.
Medium plank without slot / Medium plank with slot
Medium planks are used to reinforce the subframe structure, which is especially required for large formats. The strips are inserted into special holes in the side strips.
People who are fond of drawing or professional artists creating their masterpieces know about the need for stretchers. They keep the canvas taut, not allowing it to sag and keep the painting in the state it was created in. Standard subframes are available and can be purchased commercially or custom-made individual order... We offer you to order from our specialists.
Artists are creative people, their needs do not always correspond to the standard ones. Sometimes inspiration or customer order involves the use of a custom size stretcher. How to make a canvas stretcher that matches your needs creative personality- a question that can be solved if you resort to the services of an appropriate workshop.
What is a stretcher
The picture is painted on canvas. A stretcher is a base of four planks connected to each other, which give the canvas rigidity and make it possible to stretch the canvas onto this structure. The stretcher is wooden frame, on which the canvas is stretched, it, in turn, is primed with acrylic or oil emulsion, which is the basis for the future painting.
Poor-quality stretchers can ruin the picture by the fact that it is impossible to securely fix the canvas on them, they will not be able to protect it from sagging. This complicates the artist's work, there is a real risk of ruining the canvas. Considering the fact that for an artist every work is his brainchild, one can imagine how he relates to his creation and to every little thing that accompanies the creative process.
About the types of stretchers
There are 2 types of stretchers:
- Non-collapsible - they are also called deaf, glued right in the workshop to fit the canvas.
- Collapsible - they consist of separate slats with grooves, are connected to each other by a connecting method. Benefits of collapsible stretchers:
- Convenience of transportation of paintings. The canvas can be removed from the stretcher, in turn the stretcher itself is disassembled into modules. A blind structure cannot be disassembled, since it is static. It takes up a lot of space during transportation.
- It is possible, if necessary, to adjust the degree of tension on the canvas, as it can sag over time as a result of changes in temperature or humidity levels. In this case, the wedges in the corners of the subframe are carefully hammered down to help correct the tension.

Manufacturing features
Stretchers for individual sizes can only be created by contacting qualified and experienced craftsmen... In this case, all aspects are important, there are no trifles:
- Selection of material.
- Design agreed with the customer.
- Correctness and sequence of operations.
- Fulfillment of the customer's conditions.
- The presence of creative inspiration from the artist.
- The safety of the finished painting.
The outer corners of the stretcher should be rounded to avoid damaging the edges of the canvas. Along the outer perimeter, the structure is slightly raised, and the inner one goes deeper. In such a stretcher, the canvas is stretched along the outer edge.
About materials for making stretchers
The classic subframe is made of pine wood- the most durable and high quality natural material... Pine contains up to 10% moisture, does not crack, there are no resin streaks and knots on it.

The width of the rail depends on its dimensions - length and width, varies in the range of 5-6 cm. If the structure has large area, then it is equipped with a crossbar that protects the canvas from sagging. Pine is less susceptible to rotting and drying out than other types of wood, if stored under a certain temperature conditions... Planks of the required length and width are cut on special machines, fastened using special equipment, which makes the structure reliable and durable. The finished subframes must undergo a strength test prior to use to ensure that they are quality workmanship and lack of marriage.
Where to order a stretcher
The address of the workshop where you can make high-quality and inexpensive stretchers is known: the ART-BAGUET company. They make custom stretchers here: standard, any size, wholesale and piece. The company has been working in the baguette market for over 5 years, so our specialists know everything about how to make a stretcher quickly, efficiently and at an affordable price.
The company works without intermediaries, for own production craftsmen will make stretchers in classic style- rectangular or square, as well as triangular, oval, diamond-shaped, round. Non-standard subframes are manufactured according to special technology developed by the company's specialists. For this we use professional equipment and high quality materials.