If inside the house you can afford the most different variants interior design, the outside possibilities are significantly limited. Apart from the original color of the walls or the material that can be used to decorate it, it is difficult to come up with anything else. In the old days, this issue was solved with the help of window frames, which served as a real decoration for any home, showing the skill of the owner or the master creator. This tradition has survived to this day, although it has partially changed.
Peculiarities
Platbands were traditionally used in wooden houses. They helped decorate the windows and effectively complement the composition of the facade. With the help of such elements, you can visually increase the window opening or reduce it. Initially, great importance was given to the design of the house; each owner sought to show the individuality of his building.


With the help of platbands you can achieve different effects.
- Visual decoration of the house, giving it a special color and charm, the ability to distinguish it from a number of standard ones.
- Giving the window a different shape using platbands of different configurations, sizes and patterns. A small window can be made large if you use openwork designs.
- Creation of a holistic composition of all facade elements. Using the same trim on windows and doors allows you to complete the design of your home.

With the help of platbands you can protect window openings from the negative influence of environmental factors. The seam between the frame and the house may have small gaps, into which moisture gets in during rain, and with strong winds, dirt gets clogged. All this contributes to the development of harmful microorganisms that destroy wood. Therefore, the frame begins to let air through, which significantly reduces its thermal insulation qualities.


The platbands cover that very gap and do not allow moisture or dirt to reach it. In addition to the obvious advantages of platbands, there are also negative factors. It is also worth knowing about them when planning the installation of such parts on the windows of a wooden house. These include several factors.
- Active response of decorative elements to weather conditions, which contributes to material deterioration. To prevent this from happening, you need to treat the products with a special substance, which significantly increases the service life of the casing.
- Need for constant care. Platbands must be painted or varnished annually. If this is not done, the product will begin to crack. As a result, instead of decorating it, it will only spoil the appearance of the house.
- When planning the manufacture of platbands, you need to choose the right material for them. If this is not done, it is unlikely that the desired effect will be achieved. If it is difficult to cope with such a task alone, it is better to enlist the help of a professional.


Now there are products made from modern materials that can have a wide variety of appearances. At the same time, caring for them is much easier. They are not affected by the environment, they are not afraid of moisture and even cold. They do not crack over time and serve reliably for many years. For connoisseurs of aesthetics this is not the best option. But for those who want to decorate their home and diversify the appearance of the facade, this is what they need. It is this product that will create the necessary appearance, but will not require increased attention.
Kinds
The species diversity of platbands is enormous. It also lies in the patterns that are applied to the wood, and the shape of the product itself. In addition, modern technologies make it possible to create window decorative elements from a wide variety of materials.

If we talk about appearance and patterns, there are several types.
- Slotted, through which you can create elegant and beautiful images.
- Openwork, which are distinguished by bizarre shapes that can distinguish the master’s hand from other options. They look like a continuous canvas on which they create a pattern.
- carved, capable of creating a unique appearance and protecting the window opening.
- Invoices, which have a complex shape design, since the carved element is superimposed on the plate. Such products can be created separately or as decoration for existing platbands. In this way it is convenient to update existing decorative elements.
- Simple ones that have a smooth surface. There are no patterns on them. Such elements can be different in shape (with rounded edges, smooth, narrow and wide).


When choosing a material for the casing, it is important to understand that it should serve as protection for the window, and therefore you should not rush to purchase the material without knowing its features.
The most popular decorative trims are made of wood. They fit beautifully into the design of the facade of a wooden house, so they still do not lose their relevance. In order for such parts to serve as long as possible and correctly perform the tasks assigned to it, they must be processed correctly.

If you do this treatment, the wood will not rot, and moisture will not cause damage to it. In order for wooden trim to remain beautiful for a long time and decorate the house, it is best to open them with varnish. Today there is an alternative option that can replace varnish. This is a wax-based substance. Both options preserve the appearance of the wood, give it a more elegant appearance, significantly extending the service life of the platbands.
In addition to wooden ones, there are also decorative items on windows made of other materials.


MDF
The MDF panel has a laminated coating. Usually such platbands have the form of a plank with a pattern underneath natural wood. There can be quite a lot of colors and textures; you can easily choose a frame for the window opening of any wooden house.


Plastic panels
Products made from plastic panels are considered the most modern, because they are easy and convenient to care for. This option can be chosen by those people who do not have time to care for their own home, but want to see a beautiful structure that they can admire. Most often, plastic platbands are used for metal-plastic windows. However, recent trends have shown that they combine well with wooden structures and fully fulfill their purpose.


Polyurethane
Polyurethane trims can also be used on windows in wooden houses. They are lightweight and deformable, which makes it possible to bend them in the desired direction. Installing such elements is quite simple, and their service life will please anyone.


PVC
PVC products are considered the most common today. You can find varieties of such platbands in white and a wide variety of color variations. The product is installed on the street side; it can easily cope with any weather conditions. The advantages are the abundance of colors and shapes that can be given to such material.


Styrofoam
Polystyrene foam can also be used as a material for making platbands. For this purpose, a dense variation is suitable, which will not be as strong as a metal frame. This is the reason that this kind of product is not used in countries with high seismic activity, where even the slightest vibrations of the earth’s crust would cause cracks to appear on the windows. The color of such decorative elements is white, but with the help of paint you can change it by choosing one that suits your estate.


Metal
There are also metal trims, which are considered the highest quality of all in terms of protecting windows from environmental influences. Their production requires sheets of metal with a small thickness, which makes it possible to produce structures of various shapes. The advantage of this option over the same plastic is the material’s resistance to mechanical damage. This makes the service life longer.
To make it fresh and interesting appearance ironwork can be painted, and the appearance of the house will immediately change. The popularity of this type of product is also created by the price, which is quite low taking into account all positive qualities material.
To install metal products, it is extremely important to measure the window correctly in order to install them without much difficulty. If you want to install unusual metal trims, you can order carvings, which will look interesting on the facade of the house.


You can also provide something similar inside to create a holistic image of the building on each side. Typically, external and internal platbands are quite different from each other. This is due to their functions. Facade decorative elements must combine aesthetics and quality. Otherwise, they would hardly be used to decorate the room.
Sketches
The use of platbands on the windows of a wooden house should give the building a complete look and make it more beautiful. Therefore, simple glossy panels are unlikely to be able to fully cope with this task. It is best to choose carved elements or make them yourself.
If you have no skills in working with wood, it is better to choose the first option. But for lovers of handicraft and original products ideal solution There will be work based on the sketch.


The first step is to decide on the choice of pattern that will be on the platband. For this you can use books and the Internet. You can come up with a sketch yourself. As soon as perfect option will be found, you need to enlarge it to natural scale and print it out. All patterns must be cut out and accurately transferred to cardboard, with which the main work will be done. A piece of cardboard must match one piece of the casing.
You need to place it on a piece of wood and use a pencil to trace the design along which the cutting will go in the future. To choose the right design for the trim, it is worth making a drawing of the entire house using all the decorative elements. If ready-made option turned out beautiful, and all the parts are in harmony with each other, then the idea was chosen correctly, you can begin to implement it.
For some houses, simple options for platbands are suitable (for example, if the estate was designed in a minimalist style during construction).

If you want to create something grandiose and beautiful, you need to choose wide planks and start creating. To make good platbands, it is best to choose pine (especially those planks with practically no knots). As tools that will be useful in the process of work, you need to have a jigsaw with a soft start in order to manually cut out everything necessary details. In addition to this, the following will be useful:
- feather drill with a diameter of 12 mm;
- screwdriver;
- Sander.


The active process of working on window trims begins immediately after the entire drawing is transferred to the future product. First, they take on the inside of the drawing, making openwork details. To make the process more convenient, using a drill you need to make several holes in the board, which will be located on the contour of the picture. Cutting out the pattern itself is done using a jigsaw, which is inserted into the finished hole. Then they simply follow the contour, cutting out the necessary part.
Once the inside of the drawing is ready, you can start on the outside. You need to make two cuts (at the beginning and at the end of the product) to make it easier to navigate the work.
It is important to cut in one motion, without stopping, so that the finished casing turns out to be as shaped as possible. This sequence of actions is inherent in every detail in the overall design of the window casing.


The resulting product is still far from what it should be. Therefore, you need to use a grinding machine to clean out all the unevenness and roughness. Only after this stage is part of the structure treated with special solutions. After this, it can be ready to use or paint for a more original appearance.
How to do it yourself?
Making platbands for a wooden house with your own hands is much more interesting than simply buying such elements in a store, because you can choose the design that will correspond to the spirit of the owners themselves and emphasize the design of the facade desired by the residents of the house.


You can choose a wide variety of options.
- Flat cornice. In this case, the platbands symbolize the wealth and style of the house. They are used for beautiful and elegant buildings, made in a simple style.
- Arched top. Platbands, which are complemented with an arch on top, will be an ideal complement to window openings that do not have a standard rectangular shape, but a rounded upper part.
- Using patterns and carvings. Platbands of this type can give the house elegance, make it unusual and beautiful.
- Using hanging elements. These are the details that are added to the product after it is completed. In this way you can add something that you couldn’t do initially. The use of hinged parts makes the design three-dimensional and more interesting.


When planning to make platbands yourself, you need to choose the right material for the future product. It is important to choose a color based on the colors of each component of the house, to find the ideal option for decorating this product. You can take advantage of the offers that are available in construction stores and buy a ready-made version, which is much easier and faster. The installation of such a casing will be simpler, since it already contains all the necessary fasteners, and also ensures ease of installation.


If you have a strong intention to do everything yourself, there are several options for making beautiful platbands.
- Slotted option- a product that has an internal pattern and a beautiful border. Traditionally, such platband is white or light in color; it is attached to buildings with a contrasting shade of the walls.
- Overhead thread type created by cutting individual elements and gluing them or nailing them onto a solid piece of wood that will serve as a platband. This design option makes the drawing voluminous and at the same time airy. With the help of such overlays you can decorate any platband.


If the house already has carved frames, but they require repairs, you can remove all or part of the structure and restore it. If it is not possible to repair a part, you can remove it completely and replace it with a new one. If there is a need to make completely new designs for windows, you need to prepare all necessary equipment, which includes:
- jigsaw;
- plane;
- sander;
- cutter;
- sandpaper;
- strips with a section of 30x100 mm.

This is what you will need to create simple platbands. To begin work, it is necessary to process all future parts with a plane, and then use a cutter to give them a finished look. To ensure that the product has a presentable appearance, it is sanded with sandpaper. This is the simplest option for making platbands, which does not require much skill. If you want to make something original and beautiful, you should choose a carved type of product. For such work, you need to add figured chisels to the main equipment.
To make a platband, you can use two technologies (regular and overhead). In the first option, the pattern is cut out on the strip of the casing itself. In the second case, it is made on an additional bar, which is then attached on top of the main element.
For your first attempts at wood cutting, it is better to choose the simplest design options so that you can easily handle them.


If the platband is made as an overhead option, then the work process will proceed in the following sequence:
- processing planks using a plane;
- preparation of overlay strips with a thickness of at least 10 cm;
- forming a future design on cardboard and cutting it out;
- transferring the design from the stencil to the overhead strip;
- use a drill to make holes throughout the entire pattern;
- using a chisel you need to finish all the carved elements;
- polishing the finished lining;
- fastening the lining to the platband with glue or self-tapping screws;
- collection of every detail of the platband;
- installation of the finished structure on the window opening.


Installation of finished structures on a window can be done using nails, screws or glue. Most often, platbands are placed on the sides and top of the window, sometimes they are also placed on the lower parts of the structure. In order to correctly and aesthetically join the edges of each part, they need to be cut at an angle of 45 degrees using a hacksaw or miter box. If the wall is concrete, dowels and screws are needed for reliable fastening.


To decorate a window beautifully country house, you need to know not only basic information, but also some nuances, without which it may not be possible to create a truly wonderful example of handicraft. Several factors contribute to such moments.
- When choosing boards for making platbands, it is better to give preference to those options whose thickness will be 3-4 cm. Thicker materials are much more difficult to work with, especially to perform figured cutting.
- When starting to carve platbands for the first time, you should take a simple pattern and polish it, after which you can try something more complex and interesting.
- In addition to the thickness of the wood for the platbands, you should take care correct selection its width, because the main purpose of these elements is not so much decoration as to protect the window.
The platband must cover the opening between the wall and the window frame.


- When planning to cut out any drawings, it is worthwhile to position them correctly on the board so that they go along the grain of the wood, and not across it.
- When choosing a design for your first attempts at carving platbands, you should look at something large with convex shapes, which will not be difficult to make, and the result will delight you with its beauty. If you choose a small ornament, in case of an unsuccessful outcome, the platband will look sloppy. This will spoil the impression of the external facade of the house.
Making platbands for the facade of a house is a long process and requires perseverance. Therefore, it is worth clearly assessing your strengths before taking up work. Choice suitable material, the desired drawing, its successful implementation in life is only half the battle. Next comes the equally labor-intensive process of processing the platbands so that they serve for a long time, while performing their functions efficiently.
The final stage of work with these decorative elements is their installation. At each stage there is a specific choice, and the outcome of the entire work depends on the correctness of its adoption.


Beautiful examples
When planning the manufacture or purchase of platbands for a wooden house, you should choose the option that is best suited for a particular building.
Using the Internet and other sources of information, you can see sketches of drawings already finished works, which will give food for thought.


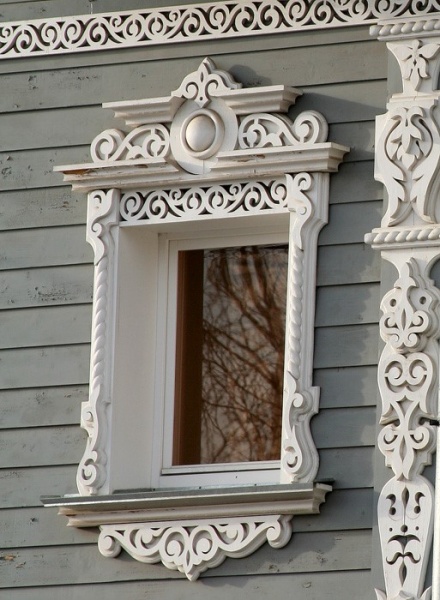
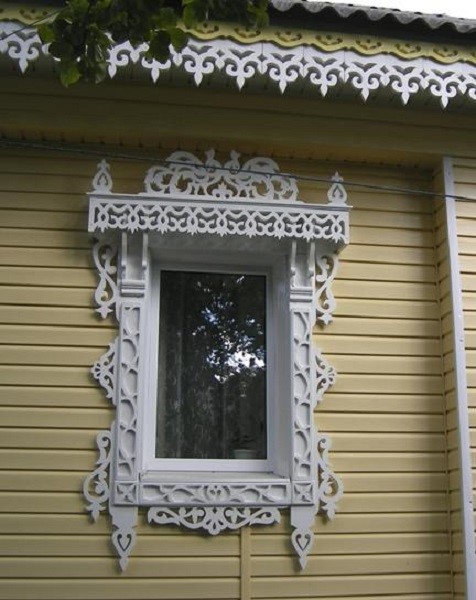
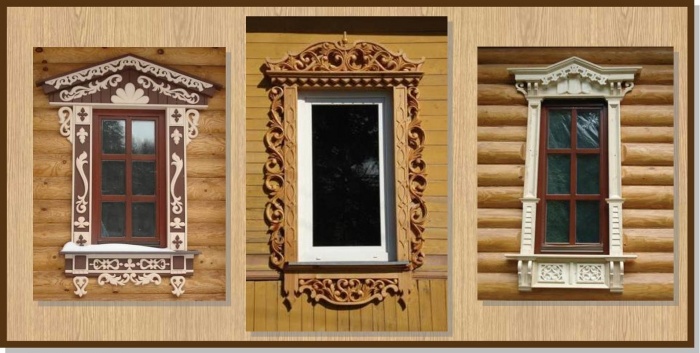
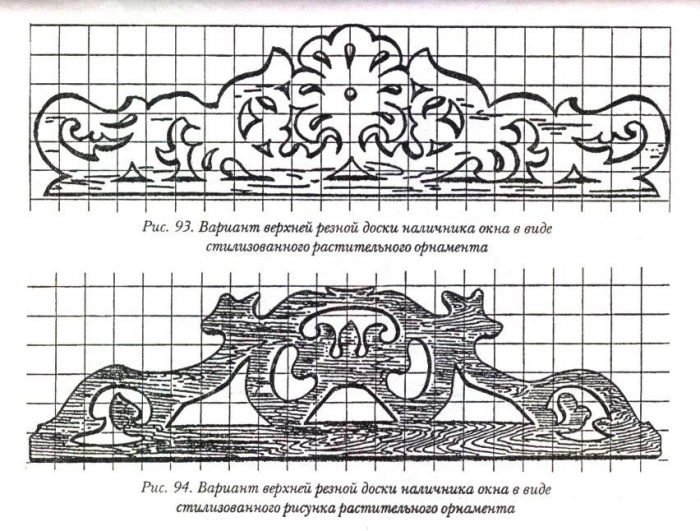
Since ancient times, the main decoration of wooden architecture was the decoration of the facade of the house with various patterns and entire drawings carved from wood. The central element of the home’s exterior decor has always been hand-made window frames folk craftsmen and masters.
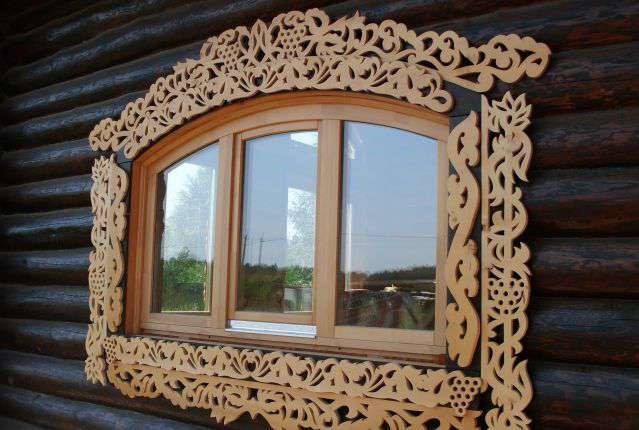
This is what homemade carved platbands look like
Anyone can try to revive the ancient practice of wood carving and make window frames with their own hands, if they are not afraid of carpentry. The joy of the creative process and contemplation of the result of one’s labors will undoubtedly bring satisfaction to the creator.
A window casing is a structural element designed to close the gap between the opening and the window frame.
Thanks to platbands we provide:
- uniqueness and originality of the facade;
- aesthetics and completeness of the exterior;
- noise level is reduced;
- protection from precipitation, cold and wind;
- safety of the insulation between the frame and the opening.
Ancient technology for making platbands
In the old days they believed that carved frames protected the house and its owners from the evil eye and evil spirits.
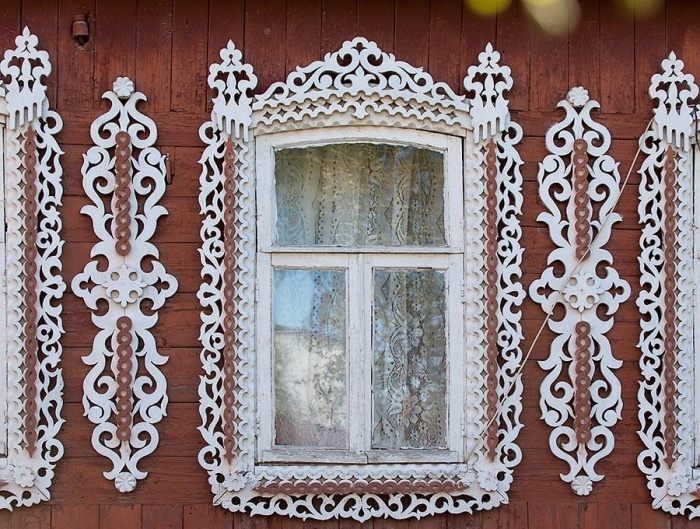
 Exterior and decoration of the house with carved platbands
 Each pattern and ornament was created not only as a decoration, but also as a talisman. At the top of the window there were most often symbols of the sun or a cross. Plant motifs show the desire for unity with nature. Carved curls and waves are signs of water, bestowing life and fertility. Snakes, birds and other animals also had their own symbolic meaning.
Significance was given not only to carved signs, but also to the properties of wood. The type of tree, place and conditions in which it grew were also taken into account by the craftsmen. For example, houses were never built from the trees that grew at the crossroads and no objects were made.
The ornaments and techniques for making carved frames in each region and even in each village were different and unique.
 The following types of wood carving are distinguished:
Option for a homemade window trim pattern
Type of wood for carved frames Used for carving different breeds
wood Their difference lies in density, hardness, fiber structure, color, pattern.
 The most pliable and convenient wood for carving is considered to be hardwood - linden, aspen and alder. The easiest way to make carved window frames with your own hands is from linden. It is very easy to cut, but you need to be careful not to spoil the workpiece with an awkward movement.
 Carved aspen frame
Linden wood is clean, light, with a uniform, almost imperceptible texture. Soft woods also have disadvantages: their loose structure absorbs moisture very well, although this problem can be solved by applying impregnation, varnish or paint.
Coniferous varieties used for carving include pine, cedar, fir, and spruce. These rocks are well processed and are perfect for creating street platbands with slotted and. Pine is the most common and affordable lumber, characterized by good operational properties
Due to its resin content, pine has good weather resistance. Beginners in carving can use birch - its wood is not as soft as linden, which allows you to get clearer and more accurate cuts. Birch lends itself perfectly to cutting both along and across the grain, and is easy to saw and drill. 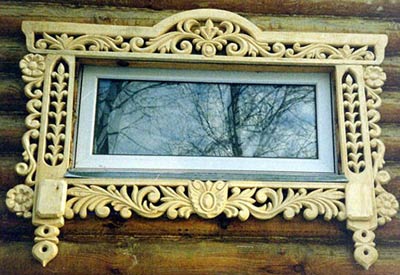
Platbands from hard rocks(oak, larch, beech, boxwood, walnut) are very durable, but they are expensive and require more effort and time when processing. The production of such platbands will be justified in the following cases:
- the region is characterized by strong temperature changes;
- in very dry air;
- for climates with high humidity.
For small elements made using the applied carving technique, you can use fruit tree varieties, such as cherry, apple, and pear.
Patterns for carved platbands - creating a template
To make it symmetrical and identical throughout the windows, it is necessary. Creating a template for a decorative frame is not difficult; it is more difficult to decide on the variety of designs and ornaments presented on specialized websites and stores.
 Pattern templates for carved trims
 For those who are carving for the first time, you should not choose complex patterns. A large ornament without too small or elaborate details is what a beginner needs. Ready-made templates you can copy it completely or come up with something new based on individual parts and their combination.
You can make your own templates in several ways:
- Processing with a graphic editor. You can create a finished image of the desired scale using Photoshop.
- Print or make a photocopy. The selected pattern is enlarged to the desired size and printed on a printer.
- Manual method. Manually transferring a drawing to a template using linear scaling.
It is best to do it on cardboard or thick paper.  For all elements of the ornament, our own life-size template is made.
You can transfer the pattern from the template to a wooden base as follows:
- Cut the stencil with scissors and, applying it to wooden board, trace the contours with a pencil.
- Draw the outline of the design using carbon paper.
- If you don’t have carbon paper, you can transfer the pattern imprint onto the wood by pressing firmly on the pen. A faint mark will remain, which is outlined with a pencil for clarity.
- The design on a wooden board should be placed across the grain, this will protect the carved elements from cracking.
- The slotted areas on the workpiece can be painted over with a pencil.
For many centuries, the windows of the house were framed by carved wooden frames. Their use is still relevant today, given modern technologies. But why do you need window frames in a wooden house and is it necessary to install them? What is needed to make protection and what types of wood are best to use? Is it possible to make wooden window frames with your own hands?
Why do we need trim on windows?
The construction of houses has always been improved throughout human history, and a wooden house has hundreds of small, but necessary elements. What functions do the platbands on the windows of a house perform?
Firstly, this is protection. They close the gap between the window and the opening to prevent drafts, dust and moisture, and also as additional thermal insulation. Today, when installing modern window systems, the gaps are filled with foam, which is already a good insulator and seal. The only drawback of this material is its rapid destruction under the influence of temperatures and moisture. In this case, the platband will act as a good protection and finishing of plastic windows outside in a wooden house from the action of these harmful factors.
The design protects the plastic from the effects of temperature and precipitation
Secondly, the aesthetic function. Only in second place is decorating the gaps between the window and the opening. Smooth and straight or elaborately carved, they will embellish the home design.
What types of platbands are there?
Structurally, all types of platbands are similar to each other. They can be classified according to the material used:
- Plastic.
- Wooden.
Plastic trims have a lot of positive points: they are durable, and the influence of temperature and moisture on them is reduced to zero. Also, these products can replicate the texture of wood. The only negative is the unnatural look wooden building.
 Plastic products are not affected by temperature changes and moisture
 MDF is a wooden board made from sawdust and glue. As a rule, such platbands are laminated, which provides excellent protection from external influences, and their service life is very long.
Wooden - natural and environmentally friendly. When properly processed, such platbands perfectly resist harmful environmental influences.. The use of wood allows you to create any shape and pattern, which will be a huge plus in the exterior decor of the building.
Depending on the installation method, platbands can be overhead or telescopic.
Invoices are mounted traditional way installations - on top of the facade and window frame .
 The overhead type is mounted in the traditional way
 Telescopic trims are shaped like the letter “L” and are installed in the window grooves. Their great advantage is that they do not require the use of additional fastening materials.
 The telescopic type is mounted without the use of additional fasteners
 A special type that can be distinguished is Finnish platbands for windows in wooden and other houses. Their main distinctive feature is a visor at the top and simple, laconic shapes.
Which type of trim to use depends on personal preference and the design plan, but wood trim is the most commonly used. They are easy to install and aesthetically match the material of the walls of the house.
Which wood species to choose
If the decision was made to make wooden platbands, then what species are best to use?
Typically, the window casing is made from the same wood that you built your home from. Ease of processing, texture or strength must also be considered.
To make your own trims with elaborate shapes, it is easier to choose soft woods: alder, linden, aspen. They are easy to cut and finish. However, such wood must be carefully treated to protect it from moisture.
Types of wood such as pine or birch have excellent properties. Their processing is somewhat more difficult, but they are more durable and resistant to weather changes.
Oak or beech has the strongest and most durable properties, but it is quite difficult to make carved frames of complex shapes without special equipment.
Also, to make additional decorative cashing elements that can be placed on top, fruit wood species are used - sweet cherry or cherry.
The main rule when using any of the listed types of material is the need for mandatory additional protection from moisture. Elementary paintwork will greatly extend the life of wooden platbands.
Templates for carved trims
Of course, you don’t have to bother and make a simple cash card without a pattern. A striking example would be the Finnish ones - smooth and without intricate patterns.
 Simple Finnish window frame finishing
 Carved platbands for windows in a wooden house will greatly embellish the overall appearance and create individual design. The easiest way to make them is to use templates. How to make platbands of non-standard shapes?


Initially, choose a pattern, and follow some rules:
- The designs are geometric and floral. They do not need to be mixed in one design.
- Need to pick up correct proportion. The geometry of the pattern should not be too wide or narrow.
- Use the optimal combination of colors in the design.
Ready-made patterns for the template can be found on the Internet and printed. Then use them to make stencils, with the help of which you can transfer the pattern to the surface of the material.
When marking wood for a template, the pattern is applied along the grain.
How to make wooden trims
As a rule, two technologies are used to frame window openings. The Finnish design is considered a simpler option. If the home owner prefers a more sophisticated window design, then a carved manufacturing technique is chosen. Let's consider each of the methods in more detail.
Making a simple Finnish window cashing
You can make window frames using Finnish technology using wood coniferous species, pine or larch are excellent. Less commonly, birch, beech or oak are chosen for this.
The design is simple and concise, consisting of the following elements:
- Four trim boards around the perimeter of the window.
- Visor.
- Two supports for the casting board (canopy).
The width of the trim is from 90 to 145 millimeters, the casting board is 175 mm, the thickness is 20-30 millimeters.
 Finnish cashing device
 The manufacturing algorithm is as follows:
- They cut out supports for low tide. Complex geometric shapes are not used for their manufacture. Cutting is done using a jigsaw.
- The harness is made like this. The side boards should be slightly longer than the window opening (approximately twice their width). Their lower part is beveled. The top board is made along the length of the ebb and also has figured edges (usually simple bevels).
- The visor is made beveled along the edges, and a chamfer is cut in front (to drain water).
- Installation of Finnish platbands is carried out on a casing board (for plastic windows) or on a window frame. In this case, they do not use self-tapping screws, but only wooden spikes in combination with an adhesive composition.
The glue itself installation work will not provide sufficient fastening.
Manufacturing of carved platbands
First, a stencil with a pattern is made. For a beginning carver, it is best to use a pattern with large elements - they are easier to implement. The main thing is to adhere to the same type of pattern, which will create a unified design of the entire facade.
The carving of the platbands can be of two types:
- Proreznaya. Has very original look, the pattern gives the impression of wood lace. It is made by cutting through the board and further fastening it around the perimeter of the opening.
- Invoice. In this case, all elements of the drawings are made separately and then fixed to a single board as a base.
When making it you will need a set of woodworking tools. Elementary carved platbands can be made using a manual and electric jigsaw, hacksaw, and drill.
More complex patterns are made using milling machines and sets of wood cutters. Sandpaper is needed for sanding.
The thickness of the board of the selected material is at least 30 millimeters for the slotted pattern and 10 mm for the manufacture of the invoice. The wood must be perfectly dried, otherwise in the future such platbands will crack and change shape.
- The window opening of the house is measured and blanks are prepared according to it.
- The required pattern is applied to the surface of the board under a stencil. It is imperative to take into account the mirror opposite of the left and right trims, as well as the top and bottom (that is, there must be at least four stencils).
- Internal cuts begin by drilling holes for the jigsaw blade.
- All the necessary drawings are cut along the lines.
- After cutting, all irregularities are carefully leveled and polished using sandpaper, rasps and even needle files.
- When the product is ready, it is finally finished using 600-grit sandpaper.
- Overlay elements are fixed to the base. Fasteners can be made using glue and nails without heads. Self-tapping screws can cause cracks.
Installation of platbands on openings
 Patterned window framing device
 Assembly
When all the elements are ready, they are assembled into a single structure. To do this, use tenon joints (dowels) or nails without heads; wood glue plays an additional role.
If an overhead thread is used, the base is assembled first. With this method, the ends of the base are connected with dowels on spikes.
Installation of platbands on windows in a wooden house is also carried out using studded fastenings.
Installation
Installation of platbands on a tenon can be of two types: blind and through.
- Deaf. The spikes are inserted into holes on the trim or frame, and similar sockets are made in accordance with them. The advantage is that the fastening points are not visible.
- Through. To do this, cash is applied to the opening and through holes are drilled into which dowels with glue are driven.
Installation of window casing on a blind tenon fastening is done according to the following principle.
- The location of the tenons is marked on the surface of the frame and trim.
- Holes are made for them.
- The spikes are made from a harder type of wood and are 0.5 mm larger than the required diameter.
- The pins are inserted into the holes on the frame and the trim is placed on them.
First, before installing the element, you need to lubricate the joints with wood glue.
The installation itself is quite simple, but requires great precision; the slightest distortions and violation of compliance will not allow for a good fastening.
 Installation of the structure must be carried out with maximum accuracy
 Final finishing of platbands
In order for products to last a long time, they need to be treated against the destructive effects of the environment: temperature changes and moisture.
Finishing and protective material may be varnish, paint or stain.
There are also various special impregnations or good old drying oil. They must be applied before final painting.
Stains perfectly highlight the texture of wood, but their use is preferable in combination with colorless wood varnishes. This finish can perfectly imitate valuable wood species.
Varnishes have excellent protective properties and, like stains, can create rich colors, for example, of oak or pine.
It is best to use waterproof paints. They are selected according to the general color scheme houses and windows.
 Selection of colors for roofing
 To extend the service life, it is necessary to inspect the appearance of the platbands and update the coating.
If there are places with mold or rot, they are carefully scraped off or cut off. Damaged areas are restored using wood putty followed by a paint coating.
Putting platbands on windows with your own hands is the easiest and cheapest way to give the outside appearance of a house individuality and express its character, which has survived from antiquity to the present day, see fig. In the old days, an illiterate stranger, guided by the platbands, could find the home of the desired craftsman, specialist, official, government office or hotspot. Nowadays, the functions of window frames are mainly decorative, but the patterns on them have not lost their meaning, see below.

Story
The platbands on the windows of the dwellings of peoples who practiced mass wooden architecture appeared simultaneously with windows “glazed” with fish bladder and mica. Initially, their purpose was purely functional: to cover the insulation and windproofing - to caulk - in the gap between the window and the frame.
Platbands with sacred patterns were first noted among the ancient Celts, but the true flowering of the art of creating carved platbands is associated with the unification of the resurgent Rus' under the leadership of Moscow and the overthrow of the Mongol yoke; Russian masters in wood carving had no equal. The Bolsheviks wrote down window frames as relics of philistinism and declared a war of extermination on them, but nowadays artistically designed window frames are experiencing a rebirth.
This article is intended to satisfy, as far as possible, reader demand on how to make beautiful trims on the windows with your own hands, how to give them artistic expression and install them in place.
Design
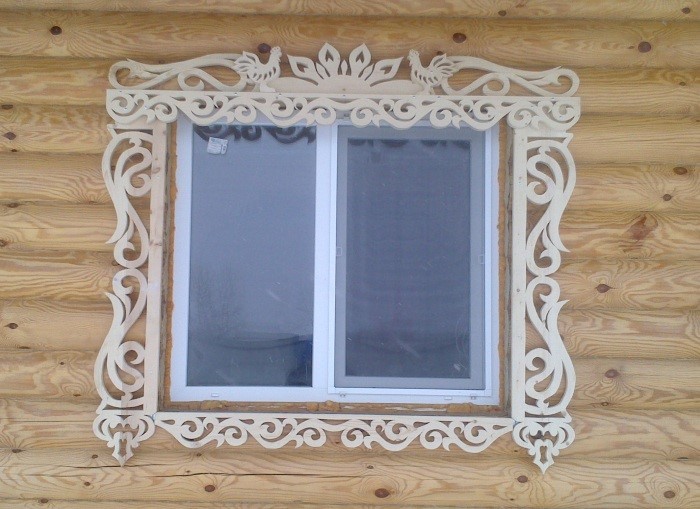
Kinds design window trims are shown in the photo. Overhead trims (item 1) are attached to the wall; plug-in or box-shaped (item 2) - to the slopes of the window opening (this is better) or in the window frame (worse). Overhead trims are placed on windows flush with the wall; insert - on windows in niches.

Based on the capabilities of insulation and protection of the window insulation, the platbands are divided into a frame (item 3) and a portal, item. 5. The portal frame is often complemented by a visor. The frame frame practically does not protect the window insulation/seal from getting wet and is placed on windows from the inside or on windows facing under a canopy, for example, onto a veranda.
Installation
Traditionally, the installation of platbands is carried out by fastening them to the wall or window slopes. Now for this it is best to use self-tapping screws (4.2-6)x(80x150), if the wall is not wooden, use propylene dowels. The attachment points are placed as evenly as possible at the rate of 1 point per 5-7 square meters. dm of the surface of the clypeus, outlined by its outer contour. When attaching to slopes, the attachment points are placed in a row with a pitch of 150-300 mm (depending on the mass of the platband, which, in turn, depends on its artistic execution, see below) along the center line of the part of the load-bearing (base) wall protruding outward. The holes with fastener heads are either hidden in the ligature of the upper levels (see below), or they are puttied and painted over with the main tone.
Platbands-"telescopes"
In modern houses, the outside of which is insulated and covered with siding/lining, windows are often placed flush with the base wall, otherwise the window will completely sink into the wall. In this case, there is nothing left to attach the platband except the window frame. For such a case, the so-called. telescopic frames, but they will remain quite securely only on windows in reinforced frames intended for regions with harsh climates; the frame material - reinforced PVC or modified wood (see below) does not matter much.

The entire “telescoping” nature of the platbands comes down to installing them on locally cut additional elements that are rigidly connected to the window frame. The most reliable platbands are on grooved extensions, on the left in Fig. Telescopic platband systems with a groove in the frame (e.g. on the right in the figure) are not intended for outdoor installation: a gust of wind can break the casing, breaking the frame at the same time.
If the window frame is modern, wooden or PVC with a groove for a key, telescopic platbands can be installed on such a window without removing it. If a PVC window on a wall with an inaccessible base surface is not intended for installing a platband, then there is no other option but to remove the window, place a box under the platband in the opening, attaching it to base wall, and install the window again. In this case, the platband box must have grooves that fit into the places where the window anchors are attached.
Wood for platbands
Painted, carved and slotted wooden platbands (see below) are made from high-quality straight-grain pine or larch without knots. The thickness of the boards is from 30 mm. A knotted spruce is not suitable: the outside knots will soon appear under any covering, and then they will begin to fall out.Carved frames require wood suitable for carving - fine-grained, viscous, fairly dense - and resistant to external conditions. The best species for this are oak and beech, but they are quite expensive. Linden, alder and aspen are suitable after 2-fold impregnation (the first impregnation is until it penetrates through) with a water-polymer emulsion; oil, silicone and mineral (borax solution) impregnation against rotting does not increase the viscosity and surface strength of wood. Birch is absolutely unsuitable: no amount of impregnation on the outside will save it from being damaged by fungi.
Note: fabulous carved frame It is very simply obtained from the cheapest plywood, twice impregnated with a water-polymer emulsion. For more information about plywood trims, see the end.
Shield for platband
Sometimes one board is not enough for the desired width of the platband, but fastening 2-3 boards into a shield with steel fasteners in this case is a gross mistake. Wooden shield on the outside of the steel it will soon crack, then the fasteners in the gap between the casing and the wall will rust and crumble. But it’s also impossible to assemble boards into a panel for a furniture frame without additional reinforcement, because a cabinet or table is not designed to withstand strong winds, rain and snow. Shields are made from boards for the casing. Thus, see also Fig. below:
- On a table or workbench, spread a plastic film with a 3-fold margin along the width of the future shield;
- The boards are placed in a bag on film and glued with PVA or waterproof wood glue;
- When the glue sets, the package of boards is wrapped in film;
- Plywood cheeks are placed under the bag in film and placed on it;
- The package with the cheeks is tightly wrapped with linen cord;
- Pairs of wooden wedges are placed under the turns of the cord so that the cord is stretched as tightly as possible;
- After 2-3 hours of complete drying of the glue, the cord, cheeks and film are removed;
- From the underside (back side) the shield is further reinforced by stuffing 40x20 bars, laid flat across the boards.

Note: the boards are assembled into a package, observing the rules for alternating the orientation of the layers of wood, just like furniture panels, see on the left in Fig.
Not a tree
Unpainted wooden trim does not look good on any non-wooden wall, even if its material imitates the color of wood well. In such cases, it is better to either install simple PVC trims complete with the window (on the left in the figure), or more expensive polyurethane trims, the rest pos. in Fig. Polyurethane trims can imitate external stucco molding and painted multi-level cut-out trims (on the right in the figure); the latter option can be assembled using glue from elements purchased separately.

Various arts
Artistically designed window frames can be made, firstly, framed (item 1 in the figure below) or in a frame, pos. 2; functionality, i.e. window seal protection, both are the same. Platbands in salaries are the most informative and sacredly significant, which we will discuss below. In addition to functionality, frame trims are mainly decorative.

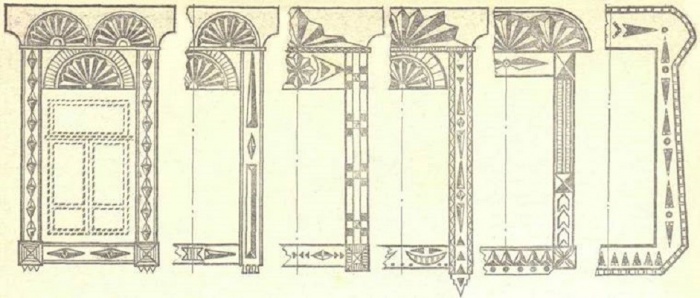
From the point of view of woodworking, frame trims, in order of increasing complexity, are divided into:
- Cut-out - boards or panels are cut along a figured contour, pos. 3.
- Slotted, pos. 4 – a pattern is cut into the boards/board. They are relatively rare, because fragile.
- Multi-level slotted, pos. 5, up to 5 or more levels - sawn patterned modules are attached to a durable simple or cut-out base. In addition to strength, multi-level platbands are good because powerful fasteners to the wall are hidden in the ligature of the upper levels, and the upper levels themselves can be fastened with small, inconspicuous fasteners.
- With applied relief details, pos. 6. Nowadays, technologically they may turn out to be simpler than cut-out ones, because looks quite appropriate on a tree, respectively. painted purchased polyurethane relief.
- With low convex thread, pos. 7 – they look great, but are very labor-intensive, you need to choose a lot of wood.
- With low pressed thread, pos. 8 – less labor intensity, but the work is more difficult, because It is very difficult to correct visible flaws.
Note: on pos. 8 shows a casing with the so-called. pillow carving - the corners of the protruding fragments are smoothed. Platbands with cushion carvings look almost as luxurious as those with convex carvings, but they are almost as labor-intensive.
As for the colorful decor, the platbands can be painted, pos. 3, unpainted varnished, pos. 4, or natural look, pos. 7, painted in different colors by levels, pos. 5, 6, and painted entirely, pos. 8. Painted frames are almost exclusively made from carved frames, while natural frames are made from particularly resistant wood species ( bog oak and so on.)
About the sculpture of platbands
In general, platbands with sculptural carvings, high (round, semicircular) and low, see Fig., could not be mentioned in an article with the tag “do-it-yourself”. Anyone who knows how to carve wood like that doesn’t need an explanation on how to make and install a frame on a window. But there is one point that is little known to experienced craftsmen.

MDF - have you heard? In fact, this is tracing paper with MDF, medium density fiberboard, medium density wood board. The well-known fiberboard is low density fiberboard, low-density wood board. And there is also HDF, high density fiberboard, fiberboard high density, little known among us due to its relative high cost. All these materials are completely environmentally friendly, because... obtained by hot pressing wood pulp without a synthetic binder, the only difference is the temperature and pressure of the press.
So, HDF, firstly, subject to 2-fold impregnation with a water-polymer emulsion, is resistant in outdoor conditions. And in terms of viscosity and density, it is suitable for fine wood carving, but is much cheaper than wood species for artistic carving and is produced in large, absolutely homogeneous slabs. HDF does not cut as well as walnut, but quite similar to oak and beech.
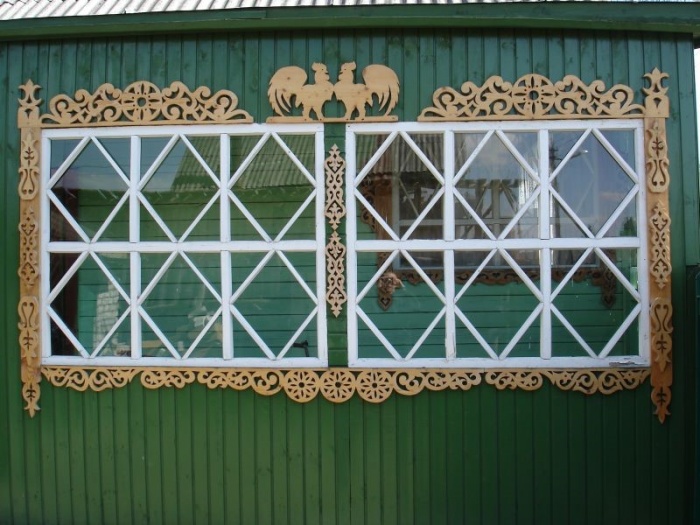
Salary
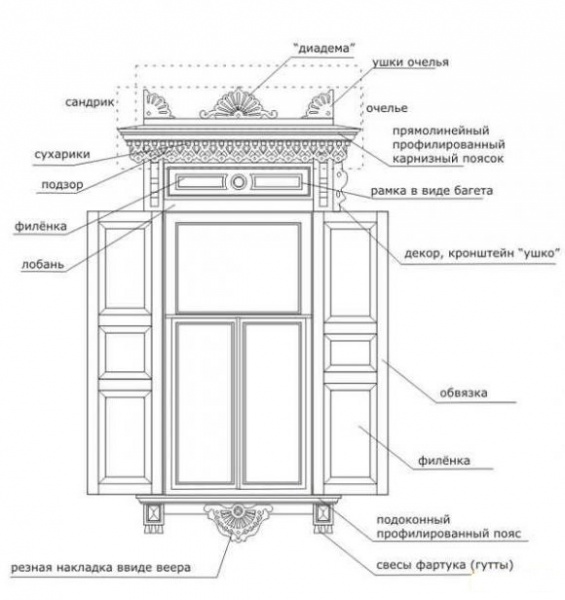
The full set of elements of the Russian frame frame is shown on the left in Fig. The names of its parts are also given there. Certain modules may be missing in specific products, because they duplicate each other in significance.
The main sacred significance is the teremets with a kokoshnik and an apron; As a rule, the heads and overhangs carry the informational and functional load. A tympanum with an apron is usually amulets against evil, and a kokoshnik with a frill, chasuble and a window sill are talismans that attract goodness. In old Rus' there were specific figures for both, not only in every village, but in almost every house. What is common to good is a circle with radii, rays or wings (the Sun), a bird (the firebird is the heir of either the phoenix or the simurgh), the horse is a symbol of prosperity and social status, and the fish is the original positive symbol of Christianity. Universal amulets against evil - a stylized floral ornament based on useful plants.

Note: the wing, as the part of the bird that carries it in the sky, has the same sacred meaning as the bird. The Winged Sun is a good messenger. The Christian six-winged seraph is nothing more than a pagan winged Sun with an angelic face.
In the European-Eastern tradition, universal symbols of goodness are the cartouche and the medallion. The medallion, of course, is the Sun, and the cartouche is either a stylized tree of life, or there is a phoenix bird on it. Both of these in no way contradict Christianity or ancient Slavic beliefs. In Rus' they even undertook to combine the cartouche with the medallion, for which the casing chamber was made split, on the right in Fig.
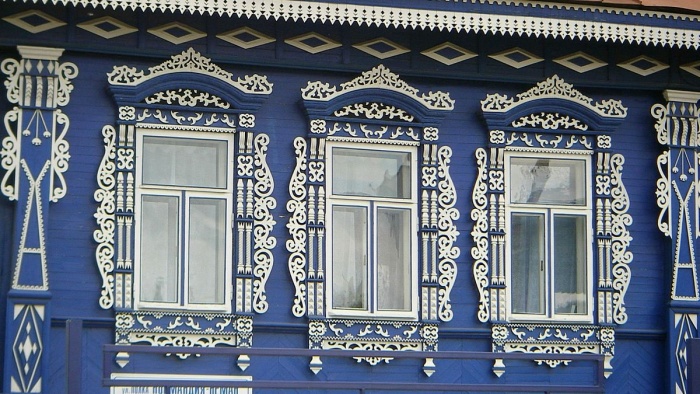
Charms
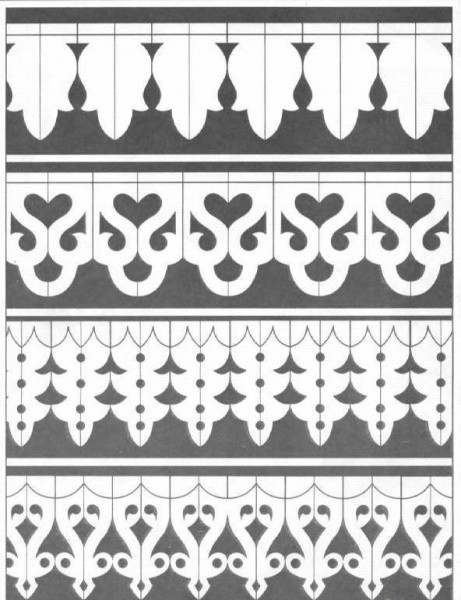
In the city highest value had a talisman on the tympanum and a kokoshnik, they protected against damage, the evil eye, etc. Templates for the upper amulets of the casing of a city house window are shown in Fig. The top one has a cartouche, stylized birds, fish (the tails are clearly visible) and no less than 12 other positive elements noticeable to a knowledgeable person.

The lower one is more for adherents of primordial beliefs. There, in a stylized solar circle, there is some ancient Slavic deity. Which one is not entirely clear, but it is definitely good. Good tramples evil in the form of a serpent: note that the lower elements of this board are asymmetrical.
In the countryside, and even more so in the forest, it was considered necessary to protect oneself equally from the upper (evil eye, slander, etc.) and lower evil: creeping reptiles and forest evil spirits. Platbands with a weighted or heavy apron, equal in height to or greater than the top amulet, were called upon to help with this. An example of the upper and lower boards of the platband-bereginya with a weighted apron of a village house is given in Fig. You can try to decipher it yourself.

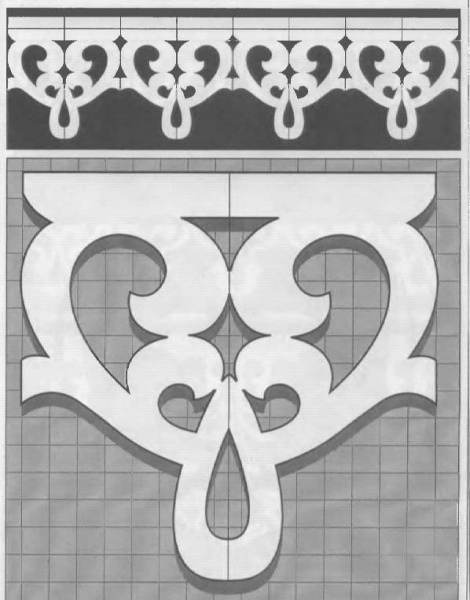
Ornament
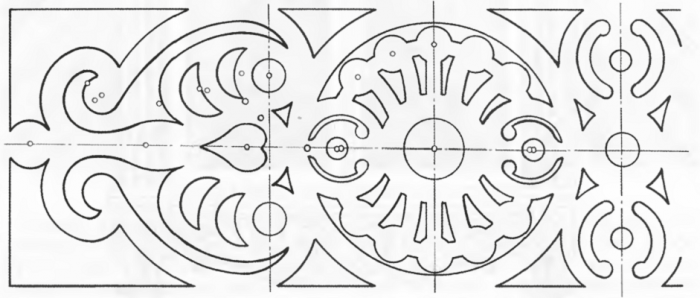
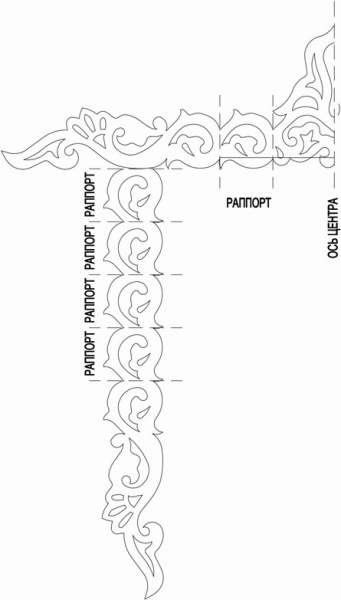
Window trim patterns are usually built on the basis of the so-called. repeats - elements self-conjugate in one direction, forming a linear seamless pattern, on the left in Fig. By changing the size and number of repeats, you can quickly develop a slotted casing for any window. By combining only 2-3 repeats, it is possible to obtain a wide variety of patterns; stencils of several types of fully conjugated repeats are given on the right in Fig.

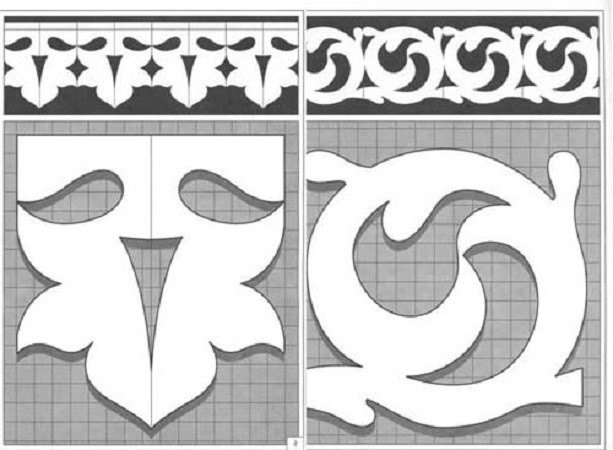
The repeats of the pattern do not have to completely match each other; this will make the pattern visually more complex and effective. For example, pattern top row on the trail. rice. is constructed by turning each subsequent fragment “upside down” relative to the previous one. Rapports of other ornaments in Fig. are conjugated either along broken or curved lines (marked in red).

Note 5: decorating the corners of frame trims with the usual end elements for rapport lines often turns out to be difficult, there is simply not enough space at the corner. In such a case, next. rice. Templates for isolateral ends of the ornament are given. By rotating them 45 degrees, you can also use them to create linear patterns. These parts are best cut out of plywood, see at the end.

Thread
If you want to make yourself unique carved platbands, then the main difficulty on this path is the selection of tools. In addition to flat chisels of 5, 10, 16/18 and 24 mm (pos. A in the figure), you will need oblique chisels of the same widths, but always in pairs - right and left, pos. B. Corner chisels will be sufficient 6, 12 and 18/24 mm at an angle of 90 degrees, pos. IN.
Much more semicircular chisels will be required, pos. G: for starters, 4, 8, 13 and 16 mm normal, with a gutter depth equal to its width. 4 and 8 mm chisels will also need deep, so-called. U-shapes, and 13 and 16 mm are also sloping.

For fine artistic carving you will also need curved chisels, normal, sloping and 60 degree angled, pos. D1, D2, D3. For cushion carving, you can’t do without reverse crimpers for smoothing corners, pos. D2a. The minimum required standard sizes are marked in pos. D red.
You need to look for chisels for wood carving in art stores, but buying everything initially needed randomly will be very expensive. It’s better to immediately take a set for wood carving, but not for a fine sculpture of 40-60 items (item E), it won’t cost any less, and at first you simply won’t understand what to do with most of these tools. You need to take a beginner's set of 12-15 items, pos. Well, for it you will only need to buy jamb knives at 90 and 60 degrees (shown by arrows in position E). With the tools from such a set it will be possible to refine cut-out overlay elements and perform rather thin geometric carving, see figure:

Note: if you have the opportunity to use manual milling machine on wood, then the carved or slotted platbands can be significantly improved visually by running a shaped chamfer - molding - along its edge with a shaped cutter, see fig. on right.

Plywood
The crappiest packaging plywood, after being impregnated 2 times with a water-polymer emulsion, becomes suitable for medium-level artistic carving, and when painted with water-dispersion paint and varnished with acrylic varnish, it turns out to be resistant on the outside, like oak. But what’s even more important is that the strength of plywood, unlike boards, is almost equal in all directions. The minimum thickness required for the platband is 30 mm, which means 5 layers of plywood and 5 levels of decoration of the platband. In this way, you can make plywood trims that are visually almost as good as the masterpieces of the masters of the past; compare left and center in fig.

Antique carved trims, modern plywood trim and a jigsaw for cutting out plywood
However, cutting so much plywood with a hand jigsaw will take a long time and be inaccurate, and a carpenter's jigsaw is unacceptably rough for such thin lace. You need a jigsaw machine, also known as a stationary jigsaw, on the right in Fig. Branded jigsaw machines are expensive, but they can be made with your own hands from a manual jigsaw (which does not deteriorate and remains suitable for basic work), an old sewing machine, and other methods, see for example. track. video.
Video: homemade jigsaw for wood carving
Note: Sewing machine machines are the safest and may not be electrified if the machine is foot driven. In this case, the frequency of the saw strokes is regulated simply without any electronics: you just need to jerk your legs more often or less often.
Old Russian architecture is invariably associated with carved window frames. This form of house design is distinguished by its diversity of species. Just a few decades ago, each region had craftsmen with their own style of creating decorative elements. Today's return to origins is accompanied by a revival of interest in window decoration using carved frames.
Purpose of framing
The word “platband” itself speaks of its location - “on the face”, that is, one of its functions is to decorate the facade of the building. Therefore, people tried to express their individuality through it and decorate their windows with carved frames. In addition to their decorative role, window casings primarily perform a constructive function, closing the gap between the frame and the opening. This prevents dust from entering the house, protects against precipitation, drafts and extraneous sounds.
In the old days, carved platbands were also attributed magical properties. It was believed that framing a window with a certain shape of a bar protects against the evil eye and serves as a kind of amulet. Therefore, in the bizarre patterns one could see various figures and plants carrying a specific meaning.
In modern architecture, the functional purpose of window frames is as follows:
- Properly selected carved design allows you to visually elongate a low building or expand a narrow wall.
- The opportunity to show individuality and decorate the building in accordance with the spirit of a certain era.
- Allows you to achieve a unified architectural ensemble between all buildings on the site.
- Protection of cracks from penetration of external negative factors (precipitation, noise, dust).
- It is one of the elements of thermal protection of the house.
Note! Sometimes platbands are the only option for framing a window. This mainly applies to wooden log houses, when the use of other materials is unacceptable due to the loss of a harmonious appearance.
Carved finishes, especially those made of wood, have a number of features that should be taken into account during operation:
- Dependence on the influence of atmospheric factors. Moisture and temperature changes invariably cause damage to decoration.
- When selecting a frame, you should take into account the properties of the rock from which the frames are made and take care of high-quality processing. Timely preventive measures extend the service life of window products.
- Difficulties often arise when combining wooden carved elements with modern plastic frames. With this combination, it is preferable to install windows that imitate wood texture.
The meaning of carved elements
The desire to conform to ancient traditions requires knowledge of the meaning various elements carved platbands:
- The sun is usually placed on a kokoshnik. It symbolizes life and energy.
- The personification of wisdom and fertility is contained in the image of a snake.
- A symbol of harmony between spiritual and material aspirations is a cross in a carved frame.
- The feeling of unity with nature is emphasized through vegetation.
- The earrings testify to the hospitality of the owners of the house.
- The connecting element of all times is the silhouette of a bird on the window.


Characteristics of materials and forms
For the production of window frames, natural and artificial materials. Traditionally, carved elements were made from weather-resistant wood. Characteristics of the properties of individual rocks will help determine the most suitable type:
- Larch is minimally susceptible to rotting processes, but is not suitable for the production of carved frames due to its fragility.
- Aspen, alder and linden are the most convenient species for creating openwork decor on windows. However, the pliable and soft wood of carved frames requires special treatment due to its ability to absorb moisture well.
- Window frames made of oak, ash or beech are characterized by resistance to negative atmospheric influences, but the processing of carved elements is burdened with difficulties, overcoming which you will get a durable decor.
- A good choice would be birch or pine wood, which allows you to create neat carved decor. At the same time, the platbands are strong enough for external use.
- Small carved window decorations that are fixed to the main elements can be made from cherry or apple trees.
Advice ! Regularly updating the coating of wooden frames with waterproof paint or varnish will ensure their long service life.

What other materials are used in the production of window trims and what their features are, we will consider below:
- Laminated MDF allows you to accurately imitate the color of any type of wood, but is intended exclusively for indoor use.
- Plastic windows are harmoniously combined with platbands made of similar material(PVC), which is not subject to rotting, has a wide color palette resistant to solar radiation. The color of the trim is selected taking into account the finishing of the house to match or contrast with the facade.
- For windows round shape Products made of polyurethane, characterized by ease and ease of care, are ideal.
- Metal strips are attached for protection assembly seam, connecting them into a single unit with a profile box.
There are two main ways to install platbands:
- The invoice is the most common method when decorating windows. For fixation, special glue or nails are used.
- The telescopic method involves an L-shaped form of manufacturing the platband, which allows you to secure the product by entering into the grooves of the box. Most often used for finishing doorways. Its characteristic difference is the absence of traces of fasteners.
Patterns and types of threads
The carved shapes of the platbands give the window individuality, but to make them, you will definitely need templates. Having wood carving skills allows you to choose a complex ornament. If the ability to work with wood is not enough, it is better to find a light pattern for window trim. We suggest studying:
- variants of single element templates and their general appearance;
- top, bottom and side decoration details.


You can copy them completely or add your own details to the pattern. The carved frame design you like or a fragment of it needs to be enlarged to a scale taking into account the size of your window. To make carved templates, fiberboard, thick cardboard or paper are used. It is advisable to decorate windows with platbands with the same carvings. Please note that making small carved elements is much more difficult, and they deteriorate faster than others. In this case, partial replacement of the frame will be required.
Warning ! Be sure to take into account the slope at the top of the carved platband. This will prevent snow accumulation and ensure timely drainage of water.
The upper part of the window casing is called a kokoshnik, the lower part is called a towel. The most widespread ornaments of carved frames are the contours of plants, images of animals and geometric shapes.
The key details of the drawing for any window casing are:
- bottom strip or window sill;
- vertical rail;
- top bar.
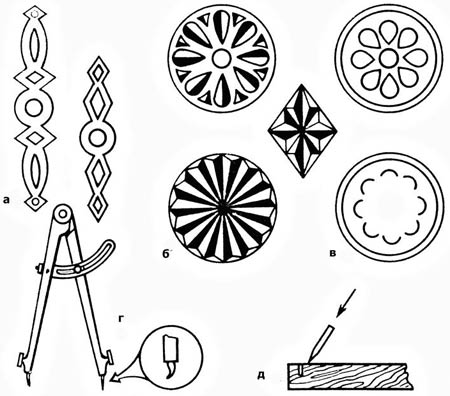
The pattern can also contain all kinds of hangers, flowerpots or a tiara. Detailed description The names of carved decorative elements are presented in the diagram below:
If your windows have different sizes, experts advise making a drawing with an intermediate repeat repeating the required number of times. For rapport, you can choose one or two elements that are repeated alternately. An example of such a scheme is shown in the photo below:
There are several ways to make carved wooden frames for windows:
- Carved platbands are characterized by the greatest decorativeness and delicacy. The product is made of light-colored wood or is subsequently coated with white paint. This window design on a darker wall looks sophisticated and elegant, vaguely reminiscent of Vologda lace.
- With overlay carving, separately cut parts are fixed to a continuous board by gluing or nailing. This technique allows you to design a window with a simple platband. Protruding elements are often coated with contrasting paint.
Sometimes both types of carving are combined.


Manufacturing process
Having decided on the pattern, material, type of carving and method of fastening the trim, you can proceed directly to the manufacture of carved frames for the windows.
Important ! The drawing on the workpiece needs correct placement. The placement of elements along the fibers of wooden blanks will prevent cracking of the thread.
It is better to mark the places in the pattern where slits need to be made with color. The work on making platbands consists of the following stages:
- Taking measurements from the window.
- For slotted carving, boards with minimum thickness 30 mm, the overhead method allows the use of wood with a thickness of 10 mm. All work is carried out with dry lumber.
- Blanks are cut out.
- To ensure a tight fit of the carved platband from the inside, the wood is selected to a shallow depth (1-2 mm).
- The pattern applied using the template is cut out. Drills of various diameters are used to form holes; a jigsaw will be needed to make the slots. To create a beautiful cut, the jigsaw insertion point is marked with a drilled hole.
- All carved elements of the window casing are cleaned with sanding paper. Wood dust is removed from non-through holes using a vacuum cleaner.


The applied thread provides for fastening finished elements to wide casing on nails with heads removed. The strength of the connection will be strengthened by applying glue to the underside of the casing. It is not recommended to use self-tapping screws due to the risk of damaging the carved section of the connection.
Carved platbands are installed on wooden windows using blind or through tenons. The first option is distinguished by a reliable connection and a complex installation process. The second method is simpler, but less reliable. Installation of carved elements on a plastic window is carried out using liquid nails.
Preliminary protective treatment carved trim and regular preventative maintenance will ensure long-term preservation of the attractive appearance of the window.