To install new window frames, many people are accustomed to doing the same as everyone else - to call craftsmen who dismantle old windows and insert new ones, most often made of plastic or aluminum. True, their significant drawback is the rather high price and the need to use special equipment.
That is why many are wondering: “How to make a window frame their hands? And what you need to do?".
Materials and tools for making a window frame
So, when choosing the necessary material, select boards with a section of 5 by 15 cm or a beam of 5 by 5 cm.
You will also need:
- wood glue;
- window squares (metal);
- glass.
You will also need a drawing and some carpentry tools:
- saw;
- hammer;
- chisels.
After the acquisition and preparation, we can get to work.
How to make a window wooden frame from bars with your own hands
For manufacturing, it will be enough to have 4 strips, which will need to be connected into a rectangle. In this case, it is important not to forget to set the angle to 90 °. To obtain the required profile, the frame is assembled from several similar rectangles with different widths.
Also, do not forget about accurate measurements, otherwise the weight may turn out to be lopsided. In such an extraordinary way, you can even make a curly profile.
This method is suitable for both blind and multi-leaf windows, where there can be from one to three rows of glass.
If there is only one glass, then 8 plywood strips will be enough for you, which you will connect into 2 rectangles. And in order to fix the glass sheets, your second layer should be slightly smaller than the first.
When all the details are ready, we fasten them with self-tapping screws.
Tools and materials you will need:

As you can see, anyone who knows how to work with a tool and has a desire to do something with their own hands can make a window frame with their own hands.
Down with laziness and forward to new achievements!
Joinery work on the manufacture of windows is considered to be one of the most difficult, it requires considerable skill and understanding of the window structure. Do not flatter yourself and think that a wooden window can be made on your knee, with a couple of simple carpentry tools. In the process of making a wooden window with your own hands, the carpenter has to spend a lot of time and effort preparing the material and making additional hanging elements, from glazing beads to awnings and fittings. Therefore, wooden windows simply cannot be cheap and at the same time of high quality if they were made by hand.
How to make a wooden window
In addition, you will need equipment for cutting grooves, cutting chamfers and internal transitions, otherwise it simply will not work to make a wooden window with high quality. To build a window you will need:
- A circular saw;
- Milling cutter for wood easel and manual;
- Grooving and slotting machine;
- Hand drill, tape measure, a set of carpentry clamps.
The window can be completely blank, for example, if you plan to make glazing in a barn, garage or utility room. For residential premises, as a rule, a ventilation system is used with the help of a window leaf and an opening sash. A general view of the window device is shown in the photo. You can make the main part of the window frame in the presence of tools, equipment and prepared material in a day, if you have a clear idea of \u200b\u200bhow to make a wooden window with your own hands, and drawings for the manufacture of the main parts.
For your information! In order to make a window with an opening sash, you must first prepare a set of canopies and two window locks.
It is clear that before making a window out of wood, it is necessary to take the dimensions of the window opening and the box into which the window block will be inserted. In this case, a window will be made with an opening sash-window window measuring 130x110 cm.

What is the best way to make a window
In order to make a wooden window quickly and efficiently, first of all, you need to choose high-quality material. Forget about oak, larch, Karelian pine, all kinds of options for making a window frame from glued laminated timber. In order to make a wooden window soundly the first time, you need to buy a well-dried pine blank without knots, without fiber defects and traces of wood damage by microflora or bark beetles.
To make a wooden window frame, we need:
- Three blanks 115 cm long and 40x140 mm in section for vertical window pillars;
- Two blanks 140 cm and a section of 40x140 mm for horizontal crossbars;
- Two blanks of 50 cm each and two blanks of 110 cm each, with a section of 40x50 mm, for the manufacture of an opening sash.
For your information! All workpieces must have an ideal geometry, without "propeller" and cracks.
If wooden blanks have been stored outside for a long time, before starting work, let the material mature and gain initial moisture. Wooden planks and beams should not be dried in the sun, in drafts or in a warm, dry room. It is clear that it is necessary to process wooden blanks with protective compounds in advance, after which they fold the material into operation and dry it thoroughly. If possible, it is better to make a supply of blanks for the first experiment, since often, due to errors, it is necessary to redo or restore joints or entire elements of the wooden window frame.

How to make a wooden window
If you have the necessary equipment at your disposal, then cutting the material for a wooden frame on a window is quite easy to do in 2-3 hours, you will need a circular saw and a groove cutter.
The order of work is as follows:
- Quarters are stretched on vertical and horizontal blanks;
- Wooden beams are trimmed and cut to size for assembly;
- At the ends of the blanks, an undercut is made for a corner connection into the frame;
- On the central crossbar and the left pillar, a selection is cut out for the arrangement of the opening sash.
It remains to assemble a wooden window box, make a window, install awnings and fittings. In order to install canopies and make locks, you will need to spend at least 4 hours. About as much as it took to make the main part of the frame.

Making a wooden window frame
The first operation for joiners involved in the manufacture of wooden windows is called the selection of quarters. In plain language, this means making rectangular cuts at the ends of the blanks, which, after assembling the frame, will be used to install glasses. Groove dimensions 10x12 mm.

On the side vertical racks, the selection must be made at the corners of the wide side of the beam, facing the inside of the frame. On the central vertical rack, quarters are selected along all four faces of the timber.

This can be done on a circular saw, a hand mill or any end mill. If the tree is very dry, then before cutting the corner grooves, it is necessary to remove a small chamfer from the edges. This will avoid chipping.
After milling the quarters, it is necessary to trim the vertical posts and horizontal crossbars to size. That is, the vertical posts are cut to fit 104 cm. The design height of the window is 110 cm. The thickness of the horizontal crossbars of a wooden window is 40 mm. In order to ensure that the vertical post is inserted into the upper corner of the horizontal beam, it is necessary to make a sample of 10 mm in it, the rest of the body is 30 mm. The same selection must be made for the lower corner and horizontal beam.
The vertical post must be installed in the upper and lower recesses on the crossbars. This means that the size of the rack is 1100-2x30 \u003d 1040 mm or 104 cm. In a similar way, you need to trim the second side and central pillar of a wooden window.

Let's make lateral selections in the horizontal beams of the window under the sidewalls.

With the side posts, everything is more or less clear, it remains to choose a place for the grooves in the upper and lower crossbars to install the central post, on which the opening sash of the wooden window will close.
For the opening sash, we selected four wooden bars, two of 110 cm and two of 50 cm. At the ends of the upper and lower horizontal beams, we have already made samples of 40 mm. Set aside the width of the future sash from the edge - 45 cm.

On each transverse beam, we make two cuts with a hand saw to a depth of 10 mm and cut a groove 40 mm wide.

We assemble a box of a wooden window using self-tapping screws.

We make an opening sash and install it on the frame
Unlike the box, we will assemble the wooden frame of the sash on tongue-and-groove joints. This connection option will provide high rigidity of the frames and guarantee the absence of deformation and sagging of the sash. If you try to make it on self-tapping screws or even on the corners, the sash will still deform and crack the glass.
First you need to cut grooves in horizontal segments with a cutter. An end mill or a groove cutter is best suited for these purposes, but in their absence, the grooves can be made manually with an ordinary chisel and mallet.

On the vertical racks of the sash, spikes 40 mm long are cut out. Before making spikes, it is necessary to make a selection of quarters under glass, as was done earlier for a large box.

We assemble the frame on spikes, after having smeared the joints with carpentry glue. After an hour and a half, the assembled sash frame is doweled and ground along the plane of the sash to the main wooden frame of the window.

The size of the sash frame is 50x1100 mm. In order for the sash to close into the window opening, it is necessary to cut a sample along the perimeter of the frame in the size of 1040 mm.

The sash frame of the wooden window is almost ready, now it easily fits into the main box. It remains to make canopies and install locks. Small window hinges can be used as awnings, but their installation is quite long and requires careful cutting of hidden grooves for awnings. In addition, the strength of a conventional canopy for a heavy sash is not enough, and sculpting three loops will already be ugly. Therefore, barrels with pinned fastening are used as canopies.

You can install the barrel in a couple of minutes, but only if there is an appropriate tool for drilling holes in the frame and sash. The problem of installing the barrel is how to perform perfectly precise drilling in the wooden beam of the frame at an angle of 45 o, the drill diameter is 6.8 mm, the thread on the barrel is M8. Trying to do this by eye does not make sense, it is better to spend an extra hour, but to achieve a high-quality result.
In order to make a fixture, you will need an oak bar with a section of 40x40 mm. We cut off one face of a wooden block along the entire length. The block is set on a drilling machine and drilled exactly diagonally.

On the reverse side of the bar, a quarter of 6x12 mm is selected along the edge. This is necessary so that the fixture fits tightly and rigidly on the edge of the sash and frame of the wooden window.
Before drilling the sash and frame, you need to make markings for installing the barrel. To do this, we apply the risk of installing a canopy on the frame, step back up the rack by 13 mm and transfer the risk to the sidewall of the sash, along which drilling will be performed for the counterpart of the barrel.

After drilling the holes, it remains to wrap the barrel screws into the frame and into the sash, after which you can hang the sash on the installed canopies.


Cut handles and finish
It remains to make handles and finish the wooden window. For convenience, it is best to use balcony handles with hidden locks of domestic production made of steel, aluminum ones will not work, they last for 2-3 months, no more.
We fix the sash on the frame with clamps. On the front part we mark the points for the output of the lock handles. From the points we transfer the line to the end plane of the sash. To install the lock, you need to make groove milling. It will be most convenient to cut the groove with a hand router with an 8 mm drill. The groove milling depth is 28 millimeters, it is impossible to drill less - the lock will not fit, more - too, can pierce a wooden beam through and through.

At the second stage, you need to mill a shelf to hide the mounting flange of the lock. Next, you need to drill holes for the installation of handles and fix the "ears" of the handles on the wooden plane of the sash.

To install the reciprocal part of the lock, you need to get the entry point of the lock tongue on the frame. To do this, simply turn with a little effort to make a dent in the surface of the B-pillar. We cut a groove along this dent and install the reciprocal metal bar of the lock.

Conclusion
Before assembling the window, it is necessary to carefully sand the entire surface of the frame and sash, especially the ends and quarters. After grinding, we process the wooden surface with impregnation, varnish and install glass. After the varnish or oil-paraffin impregnation has dried, we sew up the glass with a glazing bead and install locks and slats, and the wooden window is almost ready.
Today, plastic windows are in the greatest demand among consumers, but this does not mean that wooden models have lost their relevance. The main advantage of such structures is as follows: almost anyone can make wooden windows with their own hands.
Advantages
Today, wooden windows with double-glazed windows are considered an elite option that not every homeowner can afford. In terms of their technical and operational characteristics, they are in no way inferior to PVC structures, and in terms of environmental safety, they are in many ways superior.
The undoubted advantages of wood models include:
- naturalness;
- safety in use (they do not emit toxins during temperature changes, with high-quality installation they do not change their parameters);
- ease and convenience of installation, repair work;
- aesthetic appeal (dirt is almost invisible on wooden models);
- several opening options, mosquito net.
Of course, such designs are by no means cheap. But making them yourself is a way to save money.
Wooden windows made on special machines are distinguished by the accuracy of assembly. But compliance with all technological features of the process of connecting various structural elements will make it high-quality and reliable.

Tools
To make a similar window with your own hands, you will need the following tools:
- drill;
- hammer;
- screwdriver;
- milling machine;
- roulette;
- ruler;
- glazing bead;
- glue;
- sealant;
- fasteners.

box
The most popular among the materials for the manufacture of the box among middle-class consumers is pine. It is affordable and practical to use.
An oak window will be of better quality. But this material is quite expensive, so experts do not recommend making a window structure from it for the first time. Also, do not use soft woods.
Pine boards that will be used for the box must be properly dried.
When buying a board, choose material without knots, cracks, undeformed. The box experiences the greatest load, so it must be made of high-quality board.
If glued laminated timber was chosen, then, subject to high-quality installation, you are guaranteed to receive a high-strength window, it will not change its parameters during operation.
To avoid subsequent deformation, the window block should be a couple of centimeters smaller than the opening.
Depending on the thickness of the window, a bar of a certain size is selected. The minimum indicator is 6 * 4 cm.
Grooves in the timber can be made using a milling cutter or an electric planer. Before carrying out this stage of work, it is best to practice on a separate piece of the board.
First you need to make measurements, according to which it will be possible to make a box. In the blanks for it, to a depth of 1.5 cm, grooves should be made in the shape of the letter G. The ends of the bars are cut down at an angle of 45˚. After that, all the elements of the window box must be connected with carpentry glue, make holes in them, through which insert wooden rods 3 cm long.
Do not forget to grease the holes for the wooden rods with glue.
Thus, the resulting structure will become fixed and rigidly fixed at a right angle.
The opening in which the box will be mounted must first be prepared: cleaned of debris and dirt, leveled. Holes should be drilled in the walls (in increments of no more than 80 cm), into which dowels should be driven. The box is fixed with self-tapping screws.
After that, with the help of mounting foam, it is necessary to close up all the gaps between the walls and the box. The advantage of this fixation is as follows: the design does not depend on temperature changes.
It must be remembered that the geometry of the window must be strictly observed: corners - 90˚, diagonal difference - no more than 10 mm, deviations in evenness - no more than 1 mm per 1 m of the length of the window block.

Frame
Experts advise to invite professional craftsmen to measure the frame, since the slightest mistake in the calculations can lead to undesirable consequences. It is best to make a frame from a bar with a cross section of at least 6 * 4 cm. For euro-windows, a bar is needed, the humidity of which does not exceed 12%. Oak, hornbeam, beech are ideal for such structures.
It is worth using whole pieces of timber for the manufacture of frames, it is better to make it from several boards in several layers, connecting each of them with wood glue; make sure that the fibers of each layer are perpendicular to the fibers of the previous one.
The number and thickness of glass, the parameters of the glazing bead depend on the shape of the frame profile. The single glass model has a pair of rectangular slots. The double-glazed window has an additional groove for the second glass.
The profile is shaped using a milling cutter or an electric planer. In this case, glass with a thickness of 4 mm and a glazing bead with a thickness of 10 mm are used.
The prepared boards are sawn, the sawing angle along the edges should be 45˚. They are connected like a thorn-groove and fixed on self-tapping screws so that their hats are recessed into the tree (if desired, they can be “hidden” under a mixture of glue and sawdust).
Then the entire structure is assembled, the joints are carefully coated with carpentry glue. After the frame is dry, the joints are sanded.
Window models with a sash need to install fittings.
Do not forget to treat all wooden components with an antiseptic composition before installing both the box and the frame.
Glasses can be mounted only after the frames are installed.

Installation Features
In order for a wooden window to be installed strictly horizontally, it is necessary to use mounting blocks. The window is carefully adjusted beforehand, then fixed with wedges.
If your window is more than 1.5 m, then install an additional mounting plate in the middle of the structure.

glass
It is important to correctly calculate the size of the glass, this will avoid the formation of cold bridges. Measurements are taken with an accuracy of 1 mm. When cutting glass with a diamond self-tapping screw, you must take care of safety precautions (use gloves to protect your hands, goggles to protect your eyes).
Prepared pieces of glass are inserted into the frame for fitting, then they are removed. Sealant is applied to the grooves and the glass is inserted again. Then the whole structure is fixed with a glazing bead using small nails.

Finishing touches
A fully prepared do-it-yourself structure is installed in the grooves and fixed on self-tapping screws.
Self-tapping screws must go through the box, a mounting gun will help you do this.
At the last stage, it is necessary to close up all the cracks with mounting foam, let it dry and plaster the surface of the walls.
After that, you can mount the ebbs and the window sill.
As you can see, making wooden windows with your own hands is quite possible. Of course, for this it is necessary to adhere to a certain sequence of work and observe some technological subtleties.
If you doubt that you can make such designs yourself, seek help from professional craftsmen. They will manufacture and install wooden windows quickly and efficiently.
Four years ago, I published an article "Window block profile drawings (wooden double-glazed window)", where I attached a photo and drawings of wooden window profiles. Over the years, I have received several letters asking for gusset drawings or more detailed drawings. A week ago, I received another such letter, and today I will try to clarify the situation with this overview article.
Letter from a reader of ModelMen.ru
Written by: Daniel
Hello Dmitry. I am from Sevastopol (Crimea, Ukraine). I was very interested in the drawings of a wooden window with a double-glazed window. (). Now I am doing repairs in the house and did not want to put plastic windows, and very expensive wooden ones came to my mind to make them myself, I started looking for drawings on the Internet and many search engines indicate yours. You write that you developed the drawings yourself, so I wanted to ask you a question as a developer. How much the window should be smaller than the frame, i.e. if you assemble the frame, then how should the frame (height and width) be calculated so that they fit exactly to each other and do not create gaps when closing (or do not cling to each other). Is it possible to make such a window without a milling machine? How to connect the corners (butt or at 45 degrees)? Under what fittings was the window calculated? I promise that if I manage to make such a window, I will post photos of the step-by-step creation of such a window. Thanks in advance. Sincerely, Daniel.
= = = = = = = = = = = = = = = = = = = = = = = = = = = = = = = = = = = = = = = = = = =
So let's go!
Is it possible to make such a window without a milling machine?
Yes, it is possible! Moreover, such a window can be made with only a circular saw at hand. I have a modern saw blade for aluminum in my arsenal, although it was written at the time of sale that it saws wood, of course. My disk looks like this:
Specifications:
Disc diameter 255 mm.
Number of teeth 80 pcs.
Mounting hole diameter 30 mm.
Mine really has a 32 mm bore and a larger diameter, but that's not the point, it's the number of teeth! Thanks to the large number of teeth on the blade, it cuts wood exceptionally cleanly. I often asked friends to compare planed wood and sawn wood with this blade, sawn wood always won in quality. Home planers often do not give a high-quality planed surface, it turns out to be wavy, especially at the ends of the workpiece, and not everyone can afford industrial equipment.
Why am I doing all this, you can make a wooden window with a circular machine at hand and a good saw blade with a lot of teeth (soldering).
How to connect corners?
The most interesting question :) because most make a simple spike connection into one spike.

Such frames with one spike have already proven to be extremely short-lived. If you want the window to serve for a long time and withstand a large number of opening and closing cycles of the sashes, then make a spike connection in two spikes. You can of course make it in three spikes, if the thickness of the frame allows. 
The more spikes, the greater the bonding area of the parts and, accordingly, such a spike connection is several times stronger.
How to make a spike connection?
This is not as difficult as it seems at first glance, first you need to cut four blanks to size, two vertical and two horizontal. These can be just rectangular bars or already bars with a selected profile. The length of the blanks depends on the size of the box of the window block, it is better to calculate this, of course, on the drawing.
You can even saw off the blanks to length by eye, attaching them to the finished box, but given that the frame should overlap the box. Of course, in this case, a profile must already be selected in the blanks for the frame.
Spikes and eyes are usually cut on a milling machine, but we have circumstances, there is no machine, so the same can be done on a circular saw with the help of simple devices or without them at all.
It should be noted right away that the vertical parts of a wooden window or door are always eyes, and the horizontal parts should be spikes.
For example, I will show you a video of how an uncle makes spike joints on a circular using his device.
Here's a smarter one:
In both videos, box spikes are made, they are small and there are a lot of them and it is difficult to make them without devices. If you make one or two windows, then you can get by with a simple fixture as in the first video, but without a pin, then all the work will need to be done by marking with a pencil on the workpiece.
Under what fittings was the window calculated?
To be honest, I took the fittings and the profile of a plastic window as a basis. I don’t know if there are differences between fittings for a wooden and a plastic window, but I think that having any of them you can adapt.
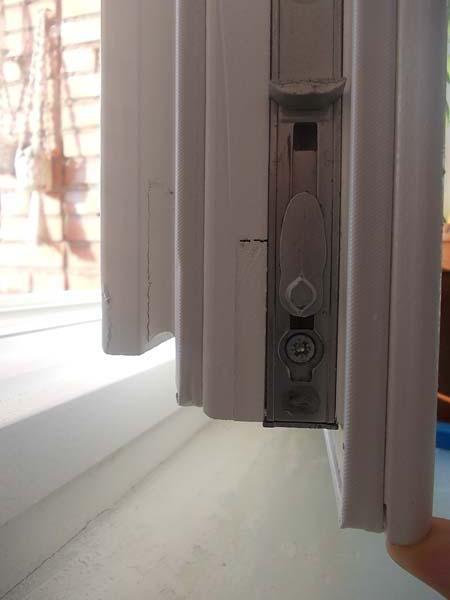
At the beginning of this winter, I installed a factory-made wooden window in my kitchen on my own. Below, see the photo of the window, which elements can be taken from there when developing a drawing.


Today, I would portray my profile a little differently than four years ago: 
As you can see, I increased the size of the bars to 80 mm., All the same, we have harsh winters, and I would like the heat to remain in the house, besides, a more massive frame will be stronger and look better.
In this article, I again do not give you ready-made drawings and sizes of windows, because in order to develop them, you need to have window fittings in your hands and understand how it is attached and works. Unfortunately, I have no experience with such fittings, so I cannot yet develop a finished drawing. Below I tried to visually depict how the corner stud connection should look like.


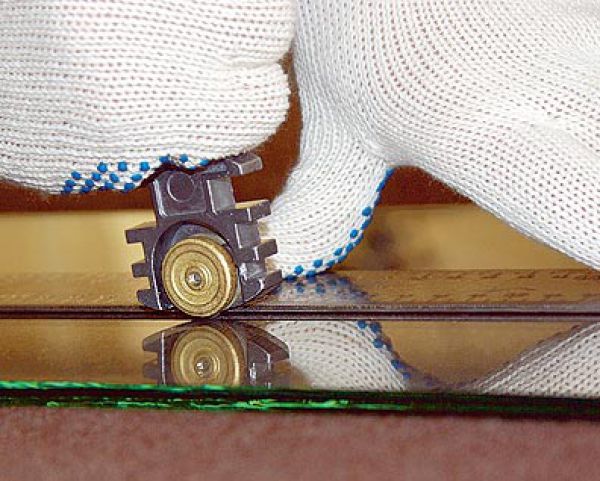
I found a few more photos on the Internet that show elements of the tenon joints of a wooden window. I hope the information I have provided will help you to independently develop a drawing of a wooden double-glazed window and bring it to life. Good luck!


In recent years, plastic double-glazed windows have been confidently replacing wooden counterparts. However, their reliability and technical performance are firmly entrenched, time-tested. In addition, this is a budget way to change the window, especially if you decide to make a new one yourself.
Wooden structures are an environmentally friendly and reliable construction item. Everyone knows about their advantages: firstly, wooden windows “breathe”, secondly, wood is an affordable material, and thirdly, they can be made by hand, without the use of sophisticated equipment.
Windows for summer cottages, outbuildings or verandas can be made independently, having studied the technology a little. When manufacturing, it is necessary to pay attention to the correct calculations of the dimensions of the window and its geometry. Not only the aesthetic factors of operation depend on this, but also the functionality of the structure.
How to make a wooden window with your own hands
The main point in assembling the details of a new wooden window is a jeweler's precision. If you are unsure of your abilities, then it is better to turn to a professional or order a ready-made window made in production.
Required tools:
- screwdriver;
- drill;
- glass cutter;
- electric planer;
- hammer;
- chisel.
Stage number 1. Preparatory work
In order to make a window, you need to create a sketch. To do this, you must clearly know the dimensions of the future window and its functionality, for example, whether it will open or not, the number of sashes and vents.
The sketch is drawn to scale. This is important in order to correctly calculate the amount of material, the location of the bolts and loops, handles and heck. The presented video contains examples of window drawings, maybe you will find here what you need:
In addition, the calculation of the material for this window is carried out. It is better to do the calculation with a margin, in case the part, due to lack of experience, can be spoiled
Important! Decide in advance on the type of window in order to purchase the necessary fittings.
Stage number 2. Making blanks for the window
An important point is the choice of the type of wood. The most popular windows are made of solid pine, in addition, oak can be an alternative.
The board must be prepared for processing, namely dried, not deformed or damaged.
According to the drawing, the necessary parts are cut out, which will later be interconnected.
In working with a milling machine, a skill is needed, so it would be more expedient to use an electric planer and an electric jigsaw.

In addition to the array, you can use glued laminated timber as a working material. It has a strong texture and is also resistant to deformation.
To work, you need a board 150x50 mm.
Stage number 3. Making a box or frame
A groove or groove is made in the blank boards, the depth of which is 15 mm, the groove is a recess in the shape of the letter G. We need to make four identical parts of this kind.
Connect the parts of the box together with wood glue or PVA glue. Holes are drilled in the corners in the finished rectangle and a 3-4 cm rod is driven in. This wedge provides a reliable connection of parts at right angles.
The box is ready. It is placed in a window opening and fixed with dowels. Gaps are filled around the perimeter with mounting foam.
Stage number 4. Making a window
The frame requires a beam of 6x4 cm. The shape and design depends on the number of compartments, glass and the size of the glazing beads.

There are two types of profile:
- single glass;
- double-glazed.
The single-pane design includes two grooves: one for installation in the box, and the other for glass installation.
A two-pane profile is a more complex design with three grooves for two panes and a box.
Usually glass with a section thickness of 4 mm is used, while the size of the bead will be 10 mm.
The base of the frame is assembled from blanks. To make the assembly convenient, the ends of the blanks are cut off at an angle of 45 degrees. And the pre-prepared profile is joined using the tenon-groove method, which ensures reliable adhesion of the parts and immobility of the structure.
You can also consider another reinforcement option - a metal corner. This part is sold at any hardware store. The corners are attached to each corner of the structure using self-tapping screws. Currently, builders have begun to abandon this method, believing that it is not aesthetically pleasing. However, if the window will subsequently be painted with paint, this option may be considered.
Stage number 5. Glass installation
The importance of the correct calculation of the size of the glass is due to the fact that this factor determines the tight fit of the glass to the frame, which is responsible for the thermal conductivity of the window. If gaps are formed during the installation process, then it will blow into such windows.
Important! Measurements of glasses before cutting are made with an accuracy of up to a millimeter.
Glass is cut with a glass cutter, after which the sharp edges are treated with sandpaper.
When carrying out this process, you must follow the safety rules:
- work must be carried out in gloves with a dense rubber coating to protect the palms of the hands from cuts;
- a mask is put on the face;
- the eyes are protected with goggles, as there is a threat of glass fragments and chips.
Working as a glass cutter also has its own subtleties. So, how to cut glass. The movements of the glass cutter on the glass surface should be smooth with a moderate degree of pressure. If you have not applied enough pressure, then the incision will be of poor quality and with further actions, you will get a jagged chip. On the contrary, excessive pressure can push through the glass, and you risk injuring yourself with glass fragments.
A ruler is used to cut glass. The material from which it will be made does not matter. If you don't have a ruler, you can use a straight line.
Important! The length of the ruler must exceed the size of the glass.
After processing with a glass cutter, the canvas is moved to the edge of the table, and lightly pressed by hand. If you have done everything correctly, the glass will break in place of the cutting line. Thus, we cut out all the glass for the window.
For final installation, we apply sealant to wooden parts. It is better to take a colorless tool so that the window looks aesthetically flawless. Next, apply the glass and let the sealant dry. From above the canvas is fixed with a glazing bead. The glazing bead is a triangular rail that simultaneously presses against the glass and the frame. His task is to fix the glass and hide the seam.
The rail is mounted using thin nails, less often with self-tapping screws if the glazing bead is wide.
Stage number 6. Window installation
The finished window is mounted in the box using self-tapping screws. The gaps between the frame and the box are sealed with mounting foam or sealant. Next, the window sill is mounted in place. You can learn more about the process of manufacturing a wooden window by watching the video:
Making a frame in two parts
When a window is required that will open, the technology changes a little and becomes more complicated. Such a window is made a little differently. In the center, a bar is mounted in a vertical position, which has grooves similar to the frame. The second half of the window is made separately, has a frame a few centimeters thinner. It is attached to the main structure and is a "door".
Making a wooden window is a fascinating and rewarding process. In addition, how nice it is to look out the window, created with your own hands, which keeps your warmth and a piece of your soul.