Clapboard cladding of surfaces is carried out in several interrelated stages, each of which requires a special approach. Careful implementation of all technological procedures is a guarantee that it will be possible to obtain a reliable coating that is distinguished by excellent properties and environmental friendliness. The material is ideal for all types of work.
Lining - is a board (of different thickness), which is made from various types of wood. The material gets its name from its original place of use. Namely - train carriages, the inner surfaces of which were sheathed with small wooden slats, which created an excellent microclimate. Nowadays, wood products are returning to their former popularity, which decreased slightly when plastic and MDF options began to appear.
 The modern construction market offers a wide range of lining types
 It must be borne in mind that clapboarding with clapboard with your own hands requires a balanced approach. Therefore, it is important to pay attention to the product at the stage of its acquisition. Pay attention to the following points:
- Correct storage of the purchased goods. Packages should be stored horizontally on a support.
- The moisture level of the warehouse must be within the normal range.
- It is not allowed to find products in an open space, under the rays of sunlight.
You should also pay attention to the expiration date on the label.
 All information about the storage and shelf life of the lining should be indicated on the packaging of the material
This precaution is necessary in order to neutralize possible risks. The fact is that work with the lining is carried out only after they are fully convinced that the material meets all standards.
On a note! The product should be purchased with the necessary margin, which is ten percent. To get the exact number of elements, preliminary calculations are carried out, and a diagram is drawn up. It is important to take into account that the size of the width of each fragment is measured by the internal depth. That is, it is necessary to subtract the groove depth (10-12 mm).
 It is necessary to buy material with a margin of 10%
 Material handling
After purchasing the required number of products and fasteners, the question immediately arises: how to properly sheathe the walls with clapboard? But this is not the first priority. You need to know that the material needs preliminary processing, because in production no actions, except for manufacturing, are performed. Therefore, the following manipulations are performed:
- Coniferous wood species need complete degreasing. All tar stains are removed. Boards are well washed with acetone (25% solution is required). Further, they are thoroughly wiped with rags previously soaked in water. After all actions, the products are dried.
- To obtain the same shade of the surface, each fragment is processed with a pre-prepared mixture. It consists of hydrogen peroxide and acid (oxalic). The solution is prepared based on the wood species.
- All damages, even minor ones, are repaired with putty. It is better to choose a mixture for wood. You can buy it at the store or prepare it yourself.
- If you want to change the shade, then apply a stain or other special impregnation that preserves the texture of the wood.
 Processing of the lining allows you to extend its service life and change the color of the material
 Of course, you can find products that will be pre-processed, but their cost will be substantially yours.
On a note! Pre-processing cannot be skipped. This will be a gross violation of the technology for clapboarding surfaces.
There are two main options for revealing the surface with clapboard: glue and frame. The first requires a perfectly flat plane. Therefore, the preferable is the method that involves the construction of the crate. In addition, it allows you to create additional space for room insulation.
 The construction of the frame gives additional opportunities for warming the room
 To fix the lining to the wall you will need:
- Tool. In this case, you need to prepare: a drill with various attachments, a level (plumb line), a hammer, pliers, an electric jigsaw or a hand saw.
- Slats for the frame. For this purpose, a solid wooden beam is excellent, the section of which is 30 * 60 mm. Substrates are prepared immediately. They are used to level the posts.
On a note! If the surface has a significant slope, then exposing a wooden beam will be a rather difficult procedure. In this case, a metal profile is used.
- Fasteners: self-tapping screws, dowels, nails, clamps; if required, additional elements for the frame (suspensions).
You should know that before sheathing with clapboard, even if the frame method is used, preliminary surface preparation is required. The procedure is simple, it consists in the fact that the old decorative layer is removed, and all defects are well covered. Additionally, priming is carried out.
Creating the lathing
The lathing is carefully attached to the wall. The order of placement of the slats is determined by the selected lining stacking scheme.
 Scheme for creating a lathing for a lining
- The timber is treated with refractory impregnation and mold protection. Wood cladding assumes that the wall will be dry.
- The slats should be perpendicular to the decorative boards.
- A single distance is established between the slats, the step of which is 40-50 cm.
- Be sure to leave a gap between the ceiling and floor. This is especially important for wooden houses that are subject to constant shrinkage.
- The evenness of the installation of the frame for cladding with wooden clapboard is carefully checked. For this, a building level and plumb lines are used.
- If an empty space forms between the wall and the rail, then it is filled with prepared dies.
 The empty space between the rail and the wall is filled with wooden dies
 On a note! The lathing makes it possible to finish the walls with an additional layer of insulation. It is fixed directly between the posts.
Choice of fixing option
Immediately determined with the method of fixation. After all, clapboard cladding can be performed by different methods:

 Mounting the lining on the clamps allows you to make the fasteners invisible
 The necessary fasteners are selected based on the specific situation. Nowadays, it is kleimers that are becoming more and more popular.
Fastening decorative material
Fastening the lining begins with the fact that the material is brought into the room and left for two days. This time is necessary for the product to fully acclimatize. If you carry out the installation immediately, then there is a high probability that warping of the elements will begin - the structure will be deformed. Work is carried out only at a positive temperature and humidity, which is at least 60%.
 Previously, the lining is brought into the room and left for two days
 The general technique is as follows:
- Often the boards are installed horizontally. Therefore, the first element is installed at the bottom so that the tenon points up.
- Fixation starts from a corner that is away from the main entrance to the room.
- The first board is well checked by level, taking into account the horizontal and vertical plane. Even small deviations, if allowed, will become very noticeable when the top panel is attached.
- The first fragment is fixed. The possibility of deviations is checked again.
- Further, the following elements are installed, which are first grooved and then fixed.
But how to sheathe a wall with clapboard vertically? The procedure does not differ from the previous version:
- Elements are placed from the far corner. The first fragment is exposed and secured.
- The following elements are inserted into the groove and locked. It is important to check that the joint is fully connected. To do this, lightly tap the rail along the edge.
- For this method, a wider rail is used. It creates a beautiful surface with fewer joints.
With experience, the walls can be finished in one day (even taking into account the frame). When the installation is completely completed, decorative elements are attached: corners and skirting boards. The surface is well impregnated with stain and varnished.
Finishing the house outside
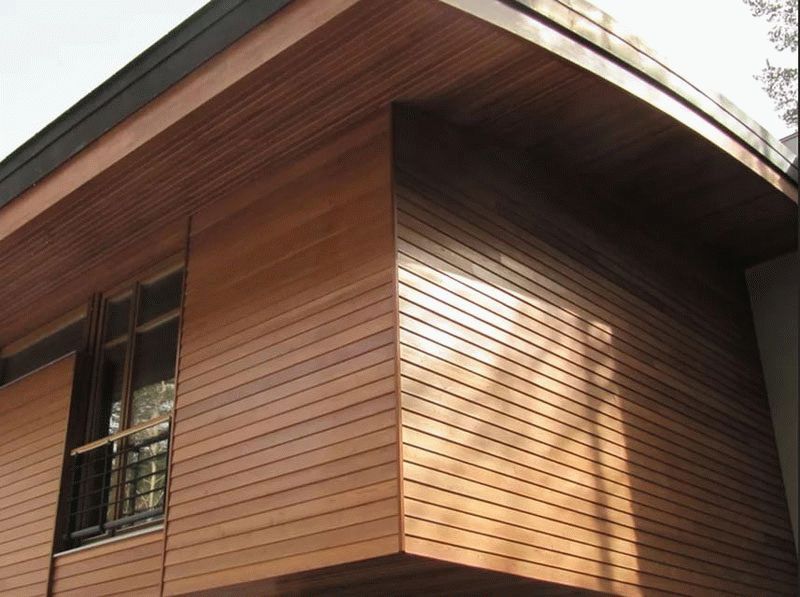 Decorating the house with clapboard outside
 Sheathing the house with clapboard outside - almost completely repeats the internal work. The procedure is divided into three stages: marking, installation of the battens and cladding. But there are some nuances:
- Two racks must be installed at each corner of the house.
- Window and door openings - framed by a profile (bar).
- For work, a high-quality board is used that does not have knots falling out.
- The fixation is performed through.
- The elements are fastened with the groove down. This prevents the accumulation of precipitation.
If you understand the basic rules and study the chosen fixation method well, then the work is done quite quickly. The result will be a surface that will bring comfort and warmth of natural wood to the interior and will delight with its beauty for many years.
The construction of any structure is being completed interior decoration... The main criterion for the interior decoration of a house is giving it a well-groomed appearance and efficient operation. One of the most popular types of today is eurolining.
The material is a thin board fixed around the perimeter of the room. Lining has been used for interior decoration for a long time. This type of interior decoration came to us from transport construction, when wood panels were used for covering carriages.
Material properties
The lining has a number positive characteristics:
- high environmental friendliness of the product;
- pleasant appearance;
- resistance to high and low temperature extremes;
- increased;
- lack of temperature coefficient.
The lining is actively used for wall sheathing:
- wooden houses, dachas, baths,
- terraces, balconies,
- as a decoration for rooms,
- for a bright accent in wooden buildings.
With the right choice of finishing material, the durability of such a finish can reach thirty years.
For craftsmen with experience in home wall cladding, fastening a wide lining is not difficult. The cost per square meter of cladding is extremely low, with the exception of special surface decoration.
The lining is monotonous in appearance, but experienced designers are always ready to give it a universal look and find original wall mounts.
Initially, only wood was used in the construction of houses, but modern trends and craftsmen come up with other materials for the lining. Today this type of decoration is widely used in modern construction and renovation.
This material has rightfully gained its popularity. thanks to its economy. Construction markets and shops are overflowing with a wide assortment of clapboard for interior decoration.
Kinds
The main types of lining differ in material,from which they are made. Every year there are new items presented by such materials as:
- Aluminum, it is categorically not recommended for interior decoration due to the lack of resistance to high temperatures and unpresentable appearance.
- PVC panels - will allow you to save on the purchase of material, but will lose in terms of durability.
- MDF - pretty nice material that easily fits into any interior. Wiring is easily hidden under the MDF, and cleaning work is performed.
Despite innovative technologies in construction, the traditional choice of many construction companies is still is a tree... Various types of wood are used, the most common are linden, cedar, ash, birch, alder.
Which one is better to choose?
For interior decoration of saunas it is recommended to purchase deciduous woodthat does not allow moisture to pass through and does not release heat outside the room. with softwood trim will be filled with a pleasant aroma. 
There is an opinion about the fragility of the tree and the influence of external factors on it. A few decades ago, one could agree with this opinion, but not today, when stores are overflowing with a huge selection of various wood care products.
When choosing the right wood, extremely her class is important:
- Extra - has no defects and chips, it is considered an ideal option for repair;
- AND - has no core, knots and resin pockets are allowed on it (no more than two);
- B - material with two knots, two pockets, one spot of contrasting paint and two cracks can be attributed;
- C- is already less suitable for finishing works, since it has a number of the above disadvantages.
Particularly popularuse 2 cladding options:
- horizontal sheathing - fasteners are made from the ceiling to the floor, which prevents the ingress of debris and moisture;
- vertical sheathing is made from the corner, and on the reverse side of the board the kleimer is placed in the groove, then attached to the crate.
How to sheathe a "block house" with decorative clapboard?
Special attention should be paid for home decoration - "block house"... This finish is suitable for the living room, kitchen, hallway, and will be a great solution for the attic.
An important advantage will be that the block-house technique lets the walls breathe and create a pleasant microclimate for the inhabitants of the home. This type of attachment will create improved sound insulation compared to the above methods.
Before performing the work, the calculation of the fittings and the amount of material is made. But an even more important process is to let the freshly purchased material lie down without packaging. about three days in the room where it will be installed.
Preparing the walls
The panels are installed on dry and even walls, so the surface must be free from defects. Walls should be waterproofed with a special film or deep impregnation.
Without this procedure, wood panels may not withstand the high moisture content, and the work will have to be redone.
Areas with fungal infections on the wall treated with an antiseptic.It is better to process all the walls with it. After thoroughly impregnating the walls, they will become resistant to the negative effects of fire and mold. Impregnation with a water-repellent composition is required before starting such work.
Learn how to level the walls with plaster from our article.
If you wish, you can install additional materials for thermal and noise-insulating construction. As sound insulation, polystyrene foam or mineral plates are installed.

Vapor barrier film can be purchased with the purchase of cladding material. The work begins with covering the walls with a film, which in the future will serve as a steam insulation.
Frame fabrication
The frame is manufactured in the following stages:

Wooden panels are heavy, so a reliable frame will need to be made for high-quality sheathing.
For the frame in the block house technique, a wooden base is suitable. The frame must be made of strips, the distance between which does not exceed 65 cm.
Before installing the frame, you need to outline the places where sockets, switches and other electronics will be located. These marks are needed in order to make cutouts in the cladding before installation.
The bars can be fixed to the wall, either with nails or with mounting strips. After completion of work on the manufacture of the frame, you can start decorating in the block house style with your own hands.
See the video clip for mounting the lathing:
Panel mounting
For accurate measurement, use plumb line, square and level. To calculate how much board will be spent, you need to make simple calculations: divide the total area of \u200b\u200bthe room by the area of \u200b\u200bone board.
Having calculated the area of \u200b\u200bone board, it is easy to find out how much of the total material will go to cover the entire surface. If there is a shortage of panels, additional clamps to fix the problem.
The fastening of the wood panels begins on the pre-installed battens. The starting bar is installed from below, with indented up to 1 cm, such a procedure is done to actively ventilate the walls and avoid further deformation of the material. A similar indent is made in the upper part of the wall.

The block house is set only in the horizontal direction. Sometimes craftsmen choose a vertical installation, but this method has a lot of disadvantages.
Fastening to the frame is carried out using self-tapping screws at an angle of 30-45 degrees. A hole is made on the surface of the panel with a thin drill, and then a self-tapping screw is screwed into it.
The screw head should not go deeper than 3 mm.
Further, the panels are gradually installed from bottom to top. When installing the panel, the spike must point up. The wood is interconnected by means of spikes and grooves. If desired, corner joints are held together with corners.
There are several ways to hide the screw heads:
- With the help of the material left over from work.
- You can use "wood paste" made from PVA glue and sawdust.
- Special plugs, which can be bought at a hardware store, will easily close irregularities.
Corks are formed from the scraps and fixed with PVA glue in the recesses. Uneven spots are smoothed out with sandpaper.
The thick composition is poured into the holes. The downside of this method is a possible discrepancy between the color of the composition and the wood.
Fastened with pVA glue.
For detailed installation of panels, see the video:
Corner decoration
Making corners using the block house technique causes difficulty when trimming yourself.
You can purchase in advance "boats" for finishing the inner corners and  elements specially designed for outer corners. The finished skirting boards will be in close contact with the block house only at the top point, as a result of which the cladding will have open cracks, and this is unacceptable.
It is much more convenient to use planed timber with dimensions 5x5... Its installation is carried out before the start of the sheathing. The block house is attached to the bars and the finish will look much smoother and more professional. This method is effective for interior and exterior corners.
The final stage is surface grinding, but such work should be done with caution. One awkward movement can disrupt the structure of the board.
How to neatly make the corners, see this video:
Which coating to choose: paint or varnish?
- alkyd;
- acrylic;
- linseed.
The impregnation will significantly extend the life of the Blockhouse, reduce the occurrence of surface cracks and, most importantly, impart fire-resistant and bio-protective properties to the wood.
In the event that naturalness is an important point, and you want to preserve the appearance of the tree, varnishing will be an alternative to painting. The surface for the varnish must be perfectly clean and free of extraneous irregularities. 
To work on the walls, you will need a roller or ordinary paint brush. Coating is done in several layers, except for the first tonic staining impregnation.
Which of the coverage methods to choose will depend on the desire of the owner of the premises. If he is an adherent of traditional design and wants to maintain the natural look of his walls, he will need a varnish solution.
If the room is planned as a youth room or the walls should become a bright accent, of course, preference should be given.
If the finishing is done at the highest level, the room will look noble and presentable.
The cost of installing the lining
The installation of wooden lining is a laborious process, consisting of many operations: preparing the walls, installing the battens, attaching the material to the walls and final impregnation.
The detailed cost of the work looks like this:
- Assembly and preparation of the lathing 180 rubles.
- Wind protection device 150 rubles.
- Covering structural elements with an antiseptic 30 rubles.
- Installation of 400 rubles.
- Impregnation with varnish or paint 70 rubles.
For a more accurate answer to the question about the cost of work, you should contact the representatives of the construction company.
The demand for finishing material generates the most sophisticated offer. Such material in the classical sense was and remains molded wood.
Natural natural material has again become popular with private developers, as it is versatile and is intended for both exterior and interior decoration of the house. In most cases, this is the so-called board "lining".
The specificity of its application is due to the special design and the decoration of the house with clapboard, in its appearance, is in no way inferior to siding, professional sheet, etc.
So, unlike similar material, such as folding, it has a groove and a ridge, as well as a different profile of the face.
Thanks to its design, it not only has an excellent view, but also reliably protects the building from being blown out from the outside. In terms of the cleanliness of the indoor climate of the room, it has no equal materials at all.
Types of clapboard cladding
Traditionally, it is customary to distinguish between two types of work: external and internal. For interior decoration purposes, it is very common to find proposals from manufacturers of euro distillation. This, of course, does not mean that it was produced in Europe.
It's just that recently, about two decades ago, our wood processors switched from the old Soviet standard to European standards. According to them, in the production of such a distillation, only fractions of millimeters of deviation from the initial dimensions are allowed, along the section and during operation.
Wall cladding with clapboard can be performed both vertically and horizontally... In both cases, a frame with guides is required. Wooden blocks of various sections can be used as guides, but as practice shows, it is best to use a section of 30 x 60 mm.

The guides themselves, depending on the technical requirements, are attached to the walls using pads or iron hangers for profiles under the gypsum board. For fastening the lining to the guides, any thin nails (hardware) or clamps are used.

Now that the basic concepts of lining are known, you can proceed to the features of sheathing walls inside and outside the building. By the way, it is customary to sheathe not only baths with clapboard, but also residential buildings, change houses, balconies, etc.
Clapboard decoration of building facades
For the purpose of outdoor decoration, you can use forcing of the second or first and highest grade (C, B and, respectively, A). If you plan to paint with a colorless varnish, then it is better to stop at the first or higher, since there are no knots falling out in them.
As in the case with other molded materials, the cladding of the house with wooden clapboard from the outside is carried out in three stages:
- Markup
- Installation of guides
- Lining board clapboard
Often, beginners are trying to make sure how to properly sheathe walls with clapboard. The vertical arrangement of the board is most often used, as it visually lengthens the walls and the building looks taller. But at the same time, nothing can prevent you from using a different location option.
It used to be fashionable to sew with herringbone clapboard. This allows you to significantly save on material and use any forcing edge with a length of 50 to 100 cm.
For a vertical arrangement, it is better to select a distillation with a width of more than 80 mm, so after processing with a paint and varnish material, it will seem to "frequent".
This type of work has its own characteristics, which are useful for any novice builder to finish. These are the rules for stitching, since a building usually contains, in addition to doors and windows, all sorts of ledges and niches. It is necessary to take into account their protrusion from the wall, and it is better to remove the cash-cases from the doors and windows before cladding.
At the first stage, by level or using a plumb line, corner posts-guides are installed on all sides of the building, so that there are two posts for each corner. Here it is better to use the lining of their bar or board, since it will be problematic to fix the suspensions at the corner of the walls. After aligning the vertical, fix the posts with nails or long (100-150 mm) self-tapping screws.

Vertical and horizontal bars are also placed near door and window openings. To ensure that the stitching is flat, pull the upholstery cord over the top and bottom of each side of the building. After installing all the necessary vertical bars, you can begin to set the guides themselves in increments of 50 - 70 cm, depending on the height of the sheathing.
For fixing the lining, you can use the method of external or internal installation. The first implies hidden fasteners using cleats or a thin nail driven into the groove of the lining. The second is directly through the boards, that is, when, like a nail, the screw is screwed into the lining directly. In this case, make sure your screws line up.
Wall cladding by the forces of a hired company can be expensive and can fluctuate in the price range from 350 to 500 rubles per m2, depending on the complexity of the sewing and the presence of an insulating layer.
Internal wall cladding
As in the previous example, rails and stands are required. The lining is fastened in a hidden way to clamps or thin hardware. Interior wall decoration with clapboard is carried out from a board of the highest or first grade.
This type of work differs from the external cladding bythat almost always, before sheathing, the room in which the work is carried out is subject to hydro and thermal insulation of the walls. For this purpose, foil and any insulation (roll or briquette type) are usually used, depending on the required frost penetration thickness.

A typical living room in a private house may have sloping walls. In this case, it is necessary to mount the frame taking into account the correct or sevenfold slope of the walls. For an indoor frame, a 30 x 50 mm bar is perfect.
The installation of the racks begins with marking for the corner posts using a laser or conventional rack level. Do not abuse the thickness of the walls from the lining, as the area of \u200b\u200bthe room may subsequently decrease significantly. In addition to the racks, it is necessary to immediately fix the horizontal ties. The resulting contour can be used as a guide to fill it with the desired guide frequency.

The only significant feature of the interior cladding can be considered the application in a specific type of building. So, if we are dealing with a log house, vertical racks-guides should not be brought to the floor and ceiling by 2 - 2.5 cm. This is done so that your wall does not "swell" later. All finishing elements of a wooden house, and even the walls themselves, are subject to constant deformation (subsidence or rise), depending on the humidity in the room and outdoors.

The price for indoor cladding work can reach 600-1000 rubles depending on the complexity of the frame.
Of course, entrusting the wall sewing to the professionals is more convenient and practical, but what if there is no free money? It is not difficult to sheathe a house with clapboard with your own hands, and as you could see no more expensive than siding.
Here is a short, but rather detailed video, by watching which you can apply your knowledge:
e504xoTKqrc
Your summer cottage or house will be transformed and will have a better effect on air purity and health.
Modern technologies in construction and repair are constantly being improved, many new materials appear. GKL, OSB, plastic are in demand and are widely used, but wood still does not give up its own positions. In particular, the clapboard is very popular and in demand; it is practiced for cladding ceilings, walls, window and door slopes. The material can be used for interior and exterior work.


Features and purpose
Lining is a natural and environmentally friendly material. Its positive features include the following characteristics.
- Nice appearance. The never-repeating original wood pattern makes it possible to create extremely interesting finishing materials. The variety of colors, shades and contrasts makes it possible for designers to actively use it in their own projects. Using this material, you can not only change the look of the interior of living quarters, but also make the facade of any house more attractive.
- Wear resistance. Lining boards are thoroughly impregnated with all kinds of protective equipment, the treated surface will serve for more than a dozen years. The boards are tightly docked with each other during installation, as a result of which an extremely strong surface is formed, excellently protecting the internal or external walls from the influence of negative factors.


- Ease of installation. Laying can be done even by those who know absolutely nothing about construction. The ease of installation greatly attracts consumers, since spending a minimum of time on mastering the most important rules for finishing, you can save significant money on wages for specialists.
- Good soundproofing.When installing the lining, a slight air layer is formed between it and the wall of the house, which counteracts the penetration of third-party sounds and ensures silence in the house.
- Affordable price.The cost of the material fluctuates in a relatively wide range, which makes it possible to choose the most cost-effective option. It should also be noted that installation does not require careful preparation of the base, which helps to reduce the cost of finishing work.

The lining is an almost universal productused for cladding a wide variety of surface types, from room walls to ceilings. It can be used for finishing a bathroom in an apartment, a bathhouse, a sauna, office premises, cladding a log house, timber, frame, brick houses or aerated concrete buildings. You can hem the roof with clapboard, since the tongue-and-groove connection used makes it possible to give the cladding the appearance of a monolithic coating.


Types and characteristics
The lining can be made of wood, MDF (wood waste), as well as PVC (plastic lining).
From wood
Wooden lining is the ancestor of all lining, which has not lost its popularity in our time. The lining of wood is widely used both in the external and internal cladding of structures. It looks especially respectable in hallways or saunas. Of course, in order for the service life of the lining to be long, even in places with high humidity, the basis for its manufacture should be the appropriate tree species, such as linden or alder. Other types of wood (pine, spruce) are suitable for use in more acceptable temperature conditions.


This material can also be of different shapes. There are several types of profiles.
- Standard Profile - front side with equal bevels both on the side of the groove and on the side of the tenon. In this case, the outer corners and edges of the profile are straight and look somewhat rough.

- Profile with the name "soft-line"gives the lined surface a smoother appearance, which is facilitated by rounded bevels. Lining of the “calm” brand looks the same smooth. But unlike the "soft-line", it has a shallower groove and a shorter spike, which significantly reduces the performance of the material, since the profile locks can part with fluctuations in temperature and humidity.

- If grooves are additionally made in the standard profile on its back side, then the so-called euro lining... Such grooves are made to prevent the accumulation of condensate behind the mounted profile, since air masses circulate between the base and the profile.

- Lining "American".By virtuously copying solid wood, it is the most successful replacement for solid wood. Its demand is facilitated by an acceptable cost, which is significantly lower than the cost of the array. It also owes its popularity to its peculiar design, which has managed to captivate the hearts of designers, and resistance to the effects of high humidity and precipitation, which makes it possible to use it for exterior decoration.

Made of MDF
This material can be attributed to wood, but relatively. The raw material for its production is finely chopped wood waste or wood dust. Thanks to the specialized heat treatment of raw materials, a fairly strong and relatively light material comes out, the environmental characteristics of which make it possible to use it even in children's and bedrooms.
The undoubted advantages of the MDF profile include an almost limitless color range. Due to the ability to externally reproduce not only the patterns of wood, but also the pattern of stone, marble and other materials, the profile has gained particular popularity among people with modest material wealth.
Walls lined with MDF look cozy and stylish.


Plastic
A profile made of plastic or PVC panels is a strong competitor to the first two types of lining. Often, the plastic version is chosen because of its relatively low cost, low weight, and the same ease of installation and reliability in operation.
It is successfully used in both external and internal decoration of the house.Although this material is environmentally friendly and can be used in almost any room, you must be aware that this material will not add a certain comfort to the interior of the room. The walls (or some of them), lined with plastic clapboard on the balcony or in the bathroom, look good. However, in a living room or bedroom, such a design can look somewhat awkward. Where PVC panels look especially attractive is on the ceiling, and then only in common areas such as kitchen, bathroom, corridor.

When deciding whether to mount PVC panels on the ceiling and walls, make sure that there is no open flame or just something hot nearby, since such material freely deforms from high temperatures, loses its color and after that cannot be restored, or repair.

Dimensions
It should be noted right away that the sizes of regular and euro lining are different. The length, thickness and width of a conventional profile is set by the manufacturer.
The greatest demand is for lining made of wood, which is characterized by typical sizes.
- The smallest board length is 0.2 meters, the greatest length is 6 meters. Such dimensions make it attractive for those who intend to cover a bath, balcony or living room.
- The profile width can be from 76 to 200 millimeters. This size makes it possible to perform high-quality cladding both inside and outside the house.
- The thickness of the board is from 12 to 40 mm, the size of the spike is from 4 to 5 mm.


If wooden profiles are analyzed in length, then they are divided into two classes: long ones are used for cladding, short ones - for sheathing eaves. Short planks are cheaper due to the fact that the blanks are produced from the leftover long plank production.

The dimensions of the lining can range from 1.5 meters to 6 meters in length. The thickness can be 13.16 and 19 millimeters. The width of the eurolining is 80, 100, 110 and 120 millimeters. This width is ideal for covering large spaces. The spike size is from 8 mm to 9 mm.
For Euro lining, the following size differences are allowed:
- along the length +/– 5 mm;
- thickness 0.7 mm;
- in width - one millimeter;
- the size of the spike can be +/– 0.5 mm.


Subtleties of installation
Usually, for cladding clapboard on the bases, wood frames are created with a distance between the bearing profiles from 40 to 60 cm.Likewise, the subsystem can be made of galvanized metal profiles, only in order to attach clamps instead of nails (for rooms with high humidity, anodized or copper ones are used), it is necessary to use self-tapping screws for metal or rivets with a small head, type LN 9 mm.
The slats can be directed both vertically and horizontally.In the horizontal direction, the expansion ducts on the rear side are excellent at removing moisture (very good for couples), and in the horizontal direction of the duct downward, moisture penetration into the lock is prevented (excellent for facade cladding).

I must say that lining made of wood, mounted horizontally, can be practiced for sheathing wooden and metal partitions. Sometimes the walls of frame buildings are sheathed with it directly on the racks. A good decorative effect can be obtained if the boards are installed diagonally, although there are difficulties with cutting and planning the economical use of the material.


Forcing boards to the enclosing structures are best installed with a compensating gap (up to 10 mm). After mounting, the outer and inner corners of the abutment are closed with wood extensions. Similarly, for these purposes, you can use a rope made of jute, hemp or flax, which is excellently combined with wood and reliably seals technological gaps, since it repeats all kinds of curved surfaces very accurately.


Facade
In order to finish the facade in a horizontal direction, it is recommended to work from the bottom up. The first plank is mounted with the spike down and attached to the crate. The second panel is installed so that its spike goes into the groove of the first, after which it should also be fixed to the crate. All subsequent panels are mounted in the same way.
Fixing the lining to the lathing can be done by means of self-tapping screws, nails, staples construction stapler, as well as specialized fasteners. It would not hurt for the fasteners to pass through the groove strip when mounting the board, then it will be invisible. When installing each panel, it is necessary to strictly control the accuracy of its position - it should be parallel to other boards. Skews and misalignments are not permitted. It is also important that the boards are located strictly in the same plane, that is, they should not be higher or lower relative to each other.

For door and window openings, wall joints, specialized skirting boards, profile angles and strips are used. The second option is the installation of lining strips perpendicular to the base of the facade. The boards are installed and fixed in a vertical position. For wall joints, two strips are used, which are set at the desired angle. The openings of doors and windows are made in a similar way (ode the plank covers the slope, the second one bases the platband).


In some cases, it is required to use a double frame for eurolining. For him, the bars are nailed in two layers, the upper one is made perpendicular to the lower one. Strengthening of the frame is required on large facades, where the own weight of the cladding is large, and the load on the supporting structure is increased.
It is better to varnish and paint the lining after installation is completed, and treatment with protective agents both from the inside and outside should be carried out before installation.
When cladding the facade, the lining can be used in conjunction with other materials. This will give the exterior of the house a more expressive look. You can also use lining of various colors.


Interior decoration
The lining, of course, can be nailed directly to the ceiling or wall, but only on condition that they are even and made of wood, which happens extremely rarely. As a rule, a frame is first built on the surface (the slats are fixed), and then the facing material is nailed. There is a small but very significant nuance here. If the lining will be mounted in a vertical position, then the slats should be filled horizontally on the wall with a step of approximately 0.5-1 meter. If the horizontal position is chosen for the sheathing, then the slats are positioned vertically.


This is done for a more reliable adhesion of the frame to the lining.Naturally, the wall should be flat, so all the slats in the frame should be at the same level. To do this, it is necessary to use a plumb line and a level when working. Upon completion of the preparatory work, you can proceed to the sheathing. Experts recommend starting at the corner and moving on to the rail after the rail.
In rooms that do not require impeccable beauty (in particular, outbuildings and utility rooms), nails can also be used for fixing. Of course, not ordinary nails, but special ones - with small caps.


You can just nail the planks in the center, but to form a decent appearance, it is better to hammer the nails in the grooves, then they will practically not be noticeable. But if you want the surface to have a pleasant aesthetic appearance, it is better to use special fixation brackets.


Mounting the lining is required to be done by adhering to the rules. At this stage, there should be no omissions or defects, otherwise the cladding may turn out to be fragile and will not last long.
Between planks and base (wall, facade, ceiling, etc.) there must be a ventilation gap of 1-2 centimeters. Often, during installation, it is overlooked, closing the space for ventilation with thermal insulation. For proper ventilation, an empty space must be left between the installed clapboard and the ventilation layer. If this is not done, then the material will start to wet, crack, bend.
If no ventilation space was left during the work, the casing must be dismantled. If there is insulation, there are 2 ways to create a ventilation gap: you can remove some of the insulation or "build up" the frame, thereby increasing the distance between the base and the skin.


In the process of assembling with your own hands, when aligning the strips of the euro lining, you must act extremely carefully. In order not to spoil the material when tapping their ends, it is necessary to correctly calculate the impact force. Actually, due to the fear of breaking off the groove, they often leave small distortions of the strips during installation. This should not be allowed - the material must fit perfectly evenly, exactly parallel to the starting bar. Otherwise, the skew will only increase, due to which the entire cladding will be curved.
If the boards are already mounted skewed, you need to find the one with which the discrepancy has gone. All cladding installed after it must be dismantled. Then the uneven plank is leveled and the lining is mounted first.


When heated, the tree expands and shrinks when it cools. To compensate for the transformation of its dimensions when laying the cladding along its contour, a space of several millimeters is retained. If the laying is done without a gap and the boards rest against the walls, the sheathing undergoes deformation over time. To correct such a mistake, you need to dismantle the skirting boards and cut the planks a little from the edges. So, when facing walls, the extreme strips should not reach the corners by 5-6 mm. The same is with the joints with the ceiling and floors.
Often, the lining is fixed to the frame by means of clamps (special configuration brackets). Meanwhile, ordinary staples can be used only when it is required to sheathe indoor and dry rooms. For external cladding, as well as for cladding rooms with high humidity, it is better to use nails or self-tapping screws. Standard staples in such episodes provide not very reliable fastening and the skin deforms as the wood becomes damp, as well as under the influence of sharp temperature fluctuations.

If the cladding of a room with high humidity or a facade is implemented using not very strong brackets, it is necessary to strengthen the fasteners. The easiest option is through fixing with nails or self-tapping screws. It should be noted that in this situation, their caps will be noticeable on the surface of the skin. If this is unacceptable, then the lining should be removed and laid down again using more reliable fasteners.
In accordance with the regulations, the lining after mounting must be covered with protective equipment. In fact, this is not always produced, as a rule, the material performs its functions without a special coating. The result of this is the appearance of fungal neoplasms on the surface. If the tree has not had time to deteriorate, it is necessary to apply a protective substance to it as soon as possible. If the fungus has already formed, the surface of the boards must be treated with a special agent against the fungus, and then applied protection. In some cases, before applying the protection, the surface is sanded to remove the damaged wood.


Cladding examples
- There is an opinion that the lining is more suitable for a bath or a summer residence than for an apartment and a cottage. Such a misconception is successfully refuted by designers who harmoniously fit wood cladding into a wide variety of trends and styles.
- Lining made of wood in the interior harmoniously combines with wallpaper, tiles, plaster. With a professional combination of textures, you can create a stylish and elegant interior.
- The lining can become an integral part of the interior in the Scandinavian style. In this design, it is in harmony with artificial or natural stone and large beams on the ceiling.


- For those who are in love with Provence, the execution of walls with material made of wood of natural tones will certainly suit. In this version, the combination of wood with plaster and rough plank floors looks nice and at ease.
- Another style that requires the use of natural wood cladding is Russian. The walls faced with a block house look like the walls of a log house.


- You can also use lining in high-tech style. In this version, materials painted with paint in neutral white or gray colors are used as a background for rich accessories.
- Fans of minimalism will most likely like the combination of lining with a strict ceramic and stone cladding.
Sheathing of a wooden house with clapboard inside seduces many with its naturalness, freshness, ability to "breathe" and fill the house with a special atmosphere, therefore finishing work is the main and important part of construction work. Outside, the house is most exposed to atmospheric influences, or rather, to their differences, so high-quality and timely finishing is required here.
The tree should be protected both outside and inside, then the structure can last for more than a dozen years. The photo shows an example of respect for the home and taking care of it.
Sheathing a house with clapboard wood is a way to turn a simple village hut into a prestigious cottage to the envy of neighbors, and the use of modern finishing materials helps to solve a number of related problems.
Tasks solved by finishing
How to sheathe a wooden house outside with clapboard in order to solve several problems at once:
- To increase and improve the performance of the home.
- Protect the facade from the destructive effects of the environment.
- To postpone significantly the period of overhaul of the outside finish.
- Simple care and maintenance of the lining.
- Aesthetic appearance and beauty.
- The possibility of using modern, high-tech materials such as glass, stone, metal, plastic, tiles in the decoration.
- Combine and combine synthetic and natural materials for the best result.
Internal cladding of a wooden house with clapboard is performed after finishing finishing work on the outside, but also for a reason. Undoubtedly, a wooden house has many advantages and advantages, but it is also not immune from disadvantages.
Fire, high humidity, rodents, insects, mold - a very small list of factors that negatively affect the general condition of the house from the inside. Pretreatment with fire retardants, antiseptics of walls and other wooden elements before finishing work will not be superfluous.
Attention: In the manufacture of building materials, there is information about the processing of a bar or log with the necessary impregnations. “Trust but verify”, so it's better to play it safe and do the processing yourself.
So:
- Clapboard cladding inside a wooden house may not be done, the main thing is to process them with the above compounds, and orient the interior to wood.
- There are many options for decorative, constructive finishes, where different materials are used. For example, the timber used in construction can be sheathed with plasterboard, clapboard, OSB panels.
- Not only does the decoration of the house differ in the materials, but also the choice of various styles, of which there are also a great many. Among all the proposals, two main ones can be distinguished - urban and rural style.
- The interior of the house depends on the choice of style. The video in this article allows you to catch the similarities and differences in the selected options.
- The rural version tends to preserve the natural color of the wood. The walls are cleaned with their own hands, impregnated with compounds and tinted.
- Urban is reminiscent of the decoration of modern apartments, when the walls are finished with plasterboard, and then decorated with tiles or wallpaper. Another method includes glass blocks used as inserts or walls, the main thing is to remember that the chosen style and material are tied directly to the size of the rooms, their features and functional purpose.
How to properly trim

How to sheathe a wooden house with clapboard, if this material belongs to universal products. Do I need to turn to specialists for help or can I do it on my own?
The worries of home owners who decided to sheathe the house outside and inside with clapboard are very understandable. Each work has its own "pitfalls" that can appear at the most inopportune moment.
So:
- For outdoor work, a material with the best characteristics is used, which includes the lining, decorated accordingly.
- Insulation of the house from the outside serves as the main obstacle to changeable weather and protects the building from atmospheric changes.
- Wood or metal, what to choose for the lathing? Wooden products are the most vulnerable and depend on the "whims" of nature. The tree will not stand for a long time without periodic processing, which cannot be completed on time.
- The instruction recommends choosing a metal profile for the crate.
- Vapor barrier in exterior finishes is sometimes neglected, relying on natural ventilation of the surface underneath. When deciding how to sheathe a wooden house with clapboard, then a vapor barrier must be present here.

- Insulation is selected with the optimal layer thickness suitable for a particular building, which is very important when working outside.
- The counter lattice is equipped when the supporting frame is made of wood. What caused this? A certain gap should remain under the cladding, ensuring that there is no condensation under it, and the wooden elements are made with solid bars. To raise the finish above the insulation, slats with a thickness of products about 3 to 5 cm are stuffed.
- The metal profile is distinguished by its grooves or windows, so working with it shortens this stage.
Attention: The size of the insulation in terms of thickness is selected from the calculation when its surface does not reach the upper cut of the frame.
- It happens that the thermal insulation has already been acquired and has a large thickness, then the crate is mounted with guides on special pedestals (substrates) previously fixed on the base.
- Eurolining of a wooden house starts both from the bottom and from the top
- For the outer cladding, a material of at least class 2 is used, and if a colorless varnish is planned for subsequent painting (see), then a class "A" or "Extra" lining is purchased. The purchased eurolining the house of the tree also has the proper quality, there are no knots falling out on its surface.
Plating location
Whatever one may say, the lining can be positioned horizontally, vertically, at an angle, and then a combination of options begins. Each chosen location has its own advantages and disadvantages.
- In places where there is heavy, slanting rain, horizontal siding is preferable to vertical placement. It is performed by a tongue-groove connection or with overlapping joints, which prevents moisture from penetrating into the gaps. Here it is important to make high-quality cladding with good sealing of joints in the corner and near openings. Another argument in favor of horizontal cladding lies on the surface. It is easier to replace when damage occurs at the base of the wall. Whether you like it or not, moisture collects along the perimeter at the base of the structure, which has a negative effect on the surface.
- With the vertical arrangement of the skin, water flows down it much faster, without having time to fill the cracks with moisture. However, with such an arrangement of the lining, it is more difficult to protect the ends of the boards from damage caused by increased moisture. Cracks, mold, fungus especially often affect wood in shaded areas of the facade.
- It should be noted that wooden buildings may be fundamentally different from each other, or this is an elite structure from a log house or a house made of old wood, handcrafted. In any case, the external finishing of a wooden structure prolongs its service life and radically transforms its appearance, if the basic rules and requirements are observed.
- The installation of the lining from the outside, both horizontally and vertically, should be carried out along the water level or plumb line.
- The visible heads of the nails or screws used for the fastening line up.
- The lower sheathing boards, which cover the joints between the wall and the foundation, go down by at least 20 mm.
- The bottom ends, as well as the longitudinal sides, are cut at an angle of 15º.
- The distance from the metal drips at the openings is 4-8 mm.
- The minimum number of joints, especially at the bottom of the walls. They should be evenly distributed over the wall. Boards in these places are guided by possible deformations, but in one direction.
- The vertical lining of the lining on the outside provides for joining at an angle of 15º with the support of the joint on the rail on both sides.
- Door and window frames should overlap the outer skin by 15 mm or less.
Internal work

So:
- Internal clapboard cladding of a wooden house gives people a sense of unity with nature, creates extraordinary comfort and coziness. Correctly performed work on the filing of finishing materials will help to preserve these feelings for a long time.
- All irregularities and imperfections in the surfaces of the walls and ceiling will be hidden by the lathing aligned to the level.
- Before performing work, it must be treated with special antiseptic compounds. This will extend its service life and protect it from mold and mildew.
- A wooden or metal frame is constructed. For it, you will need the same tools that were used for the outside cladding: a 20x40 mm timber, a drill, a screwdriver, a level, fasteners.
- The beam is attached depending on the location of the panels. The panels are along, the beam is across and vice versa, that is, they must be perpendicular to each other.
- The finished frame is leveled; if necessary, wedges are used for leveling.
- On a ready-made base, checked carefully by level, the lining in a wooden house is hemmed and a suitable mount is selected.
Attention: Fastening is carried out in a staggered manner in pieces of different lengths if the long side of the ceiling is more than 6 m in the direction of the lining.
- The first row begins with a whole panel, the second - with an incomplete one, so that later the joints do not focus on themselves.
- Fastening is carried out with clamps or self-tapping screws, and the groove-comb allows you to accurately and fairly quickly gain the desired surface. The main thing is that the lining boards are from the same batch, which has already been tested more than once in practice.
- The perimeter, for example, of the ceiling is beautifully sewn up with special strips, and wooden or plastic corners are an available option for decorating the corners. You can use a planed board, but it takes some experience to cut it at a 45º angle, so it's best not to risk it. The price of the services of an experienced professional will be fully justified by beautiful and correct angles.
Remained the last stage of work related to the treatment, impregnation of coatings. Metal and polymer products do not need it, and wood must be processed without fail.
What formulations to use - the owners choose, relying on their experience or listening to the advice of the masters. Summing up, it should be noted that a wooden house made of high-quality material does not always need to be finished with synthetic products.
Significant defects in the structure or giving an aesthetic appearance to the house push the owners to finishing work outside and inside.