What are the best ceilings in the kitchen - stretch, plastered or suspended? What materials are preferred? We will analyze in detail the 6 most popular finishing materials and talk about all their advantages and disadvantages.
When choosing which ceilings in the kitchen are better, it is necessary to carefully weigh all the advantages and disadvantages of materials.
Ceiling requirements
Before deciding which ceiling in the kitchen is best to make, it is important to understand what quality criteria it must meet. For your finish to serve you for many years, it must be:
- Moisture resistant... You can argue as much as you like which ceiling is best for the kitchen, but one cannot but agree. It must be moisture resistant, as the humidity level in the kitchen is always high.
- Easy to clean... So that you do not dream of periodic cleaning of the ceiling in a nightmare, the material with which it is trimmed should be unpretentious to maintain.

The ceiling covering should be not only moisture resistant, but also unpretentious in cleaning
- Wear-resistant... If you do not plan to change the ceiling finish every year, then make sure that it is durable.
- Eco-friendly... The range of modern materials makes it possible to choose a material that is harmless to human health and the environment.

Wear-resistant material can last for many years
- With a "masking" effect... The decoration should successfully hide some of the ceiling imperfections, as well as various kitchen communications.
- Decorative... When choosing which ceilings for the kitchen are better, in addition to their technical characteristics, it is necessary to pay attention to the decorative component. The material should organically fit into the interior created by your own hands and be in harmony with it.
- Inexpensive... Not every family budget involves spending on a ceiling, the price of which is equal to several monthly salaries. So it is very important to find a coating that offers the best value for money.

Ceiling finishing should be affordable and hide surface defects
We have considered the basic requirements for finishing materials, now is the time to talk about which ceiling is better for the kitchen.
Overview of the advantages and disadvantages of 6 finishing materials
In this section, we'll take a closer look at the pros and cons of the various finishes. After reviewing them, you can decide which ceiling for the kitchen is better to choose.
Whitewash
In Soviet times, whitewashing was considered almost the only option for decorating the top of the kitchen. Now she has a lot of competitors, but this cladding option is still somewhat popular.

Whitewashing is the cheapest finishing option
Advantages: The main advantage of whitewashing is its low cost. Among other things, thanks to its porous structure, a bleached ceiling can provide the best possible air exchange. In addition, whitewashing is one of the types of finishes that will not be difficult to carry out on your own.
disadvantages: On closer inspection, whitewashing can easily fall out of the competition for "which ceiling is best in the kitchen." It does not tolerate moisture and temperature changes, it needs regular updating and begins to crumble and crack quite quickly.

Whitewashing does not react well to moisture and temperature changes, and also needs constant updating
Drywall
Thinking about which ceiling is better to make, it is difficult not to remember the plasterboard coating. Due to it, it is possible to implement several interesting design solutions, be it combined or multi-level structures, which will become a decoration of the decor.

When choosing the best way to finish the ceiling, it should be remembered that high-quality drywall is moisture resistant and hides the unevenness of the ceiling
Advantages: Moisture-resistant drywall options will help hide minor defects at the base, they also have high strength and long service life. They are quite cheap, besides, they are subject to staining. And this will give you the opportunity, if you wish, to update the existing interior.
disadvantages: Despite the moisture resistance of the material, flooding of the neighbors from above will be disastrous for it. From constant temperature changes, which cannot be avoided in the kitchen, unsightly gaps will appear between the sheets. Among other things, do not forget that the painted drywall layer will need to be periodically renewed.

From high temperatures, noticeable gaps appear between sheets of drywall
Dye
Painting surfaces is as much a tradition as whitewashing. Therefore, in our review of popular options for finishing the ceiling, you cannot do without it. What is the best way to paint the surface? You can use water-based or acrylic paints, which have long been recognized by consumers.

The paint is able to quickly and budget enough to update the interior.
Advantages: Painted ceiling tolerates moisture well, so it is easy to damp clean. It is not difficult to paint the surface yourself, so you do not need to spend money on the services of specialists.
disadvantages: Paint, however, like whitewash, is not the most durable material, moreover, over time, the white color of the ceiling will become more and more faded. If the paint suddenly cracks in one place, then it will not be possible to restore the site quickly. You will have to remove the old finish, level the ceiling and only then move on to the new painting.

Like bleached, painted surfaces need regular renewal.
Plastic lining
If you are in the process of thinking about how best to make the ceiling, so that it is budgetary and durable, then you can opt for a plastic lining. In this case, you should pay attention to special panels and a sealant designed for processing seams.

Plastic tolerates moisture well and is easy to clean
Advantages: Plastic materials are considered a very budget and practical way to decorate the ceiling. Plastic tolerates moisture well, and if one panel is damaged, it will not be difficult to replace it. It is easy to clean, but it must be done regularly, since a thick layer of soot and grease will be much more problematic to remove.
disadvantages: Too budgetary PVC models can hardly be called environmentally friendly. In addition, plastic is susceptible to ultraviolet light and will lose its original color over time.

From exposure to the sun, plastic begins to fade
Wallpaper
Someone may get tired of thinking about what is better to make ceilings, and decide on a very unusual option - gluing wallpaper to the surface. This solution looks very unusual, it can also become a full-fledged highlight in the interior.

Wallpaper on the ceiling (example in the photo) will become the center of your decor
Advantages: A relatively budget design option that does not require much effort from you to install. In addition, high-quality wallpaper can be washed, and they are also able to hide minor defects on the surface.
disadvantages: Sticking thick wallpaper can cause some difficulties. From streams of hot air, the seams between the canvases will diverge and deform. In addition, this material will definitely not save you from being flooded by neighbors.

Hot air can cause the sheets to peel off.
Stretch ceiling
The stretch ceiling in the kitchen has long ceased to be a sign of luxury: prices have dropped to 500 rubles per square meter, which, combined with a small kitchen area, makes the final cost of the project more than feasible even with a modest budget.

Stretch ceilings are one of the best finishing options
Advantages: This coating creates a perfectly flat surface, it is also easy to maintain. It has a wide design variability, it is able to hide all the defects of the ceiling.
disadvantages: Instructions for installing tensioning structures are quite complicated, so you cannot cope without the help of specialists. It also subtracts a few centimeters from the ceiling height, which is bad for a small kitchen.
Repair of the ceiling in the kitchen, alas, is an inevitable process, since the service life of any coating is limited. If short-lived options are used - for example, whitewashing, one has to deal with repairs at least once a year. A more durable finish, for example, excludes the process for 10 years, but sooner or later the floor will have to be repaired.
Ceiling preparation for renovation
Do-it-yourself kitchen ceiling repair always starts with removing the old coating. Depending on its nature, this process can be very laborious, time-consuming and in any case includes dirty, mostly wet work.
The next step is the actual preparation of the ceiling for the installation of a new coating. There are more options here, but you still have to stock up on time and patience.
Tools and equipment
To repair the kitchen as quickly and efficiently as possible, you need to have the following tools on hand:
- a ladder or trestle of sufficient height and stability to reach the ceiling surface without risk;
- covering film - any kind;
- masking tape or at least ordinary tape - will be needed for fastening;
- respirator, gloves and goggles are a must. The dry method of cleaning the ceiling leads to the appearance of a huge amount of fine dust, which is highly irritating to the mucous membranes and respiratory organs. Wet ones are fraught with the formation of a large amount of dirt, so precautions are necessary;
- spray gun - ordinary, garden, for wetting the kitchen ceiling. You can replace it with a sponge and a container of water or a wide roller with a long handle, but the spray gun is still more convenient;
- staple - preferably wide to remove layers of coating as quickly as possible;
- iron brush, chisel with a hammer - required to remove a more durable old coating;
- perforator and grinder - they are needed if you want to remove the base overlap layer, when infected with fungi, for example. Also, old durable plaster can be removed with a grinder.

Removing the coating
Surface cleaning methods are determined by the nature of the coating. Most often in the kitchen, the ceilings are whitewashed, painted, plastered or pasted over with wallpaper. Often there is also a suspended structure with plastic panels or clapboard. But in this case, you first need to disassemble the system, and only then, if necessary, prepare the ceiling surface.
First of all, furniture is taken out of the room, if possible. Large objects and equipment are covered with foil and secured with tape. The floor, if it is not being repaired, is also covered with a film.
- Whitewashing - removed in two ways:
- wet method- using a sponge or a spray bottle, moisten a small area of the ceiling and wait about 10 minutes for the coating to absorb moisture. After that, a layer of chalk or lime is removed with a spatula. In difficult areas - joints, as a rule, you can use a puncher. Lime adheres better to the material, so it takes at least 20 minutes to “soak” it;
- dry involves the use of a metal brush or grinder with a disc, which quickly cleans the surface from whitewash. This produces a mass of dust. After removing the whitewash, the ceiling should still be washed.
 2. Paint is removed in the same way as whitewash. A water-based composition is used for the kitchen, since it is safe for humans. This coating also absorbs moisture and swells. The process takes a little longer. The paint can be removed both dry and wet.
3. Wallpaper is the easiest solution to repair. Even washable ones are easily soaked, since the glue that holds them together absorbs moisture. It is enough to moisten the area well with water, and then, picking up the edge of the strip, carefully remove it. Sometimes the use of a spatula is required.
4. Plaster usually has a higher degree of adhesion and is difficult to remove.
The options are as follows:
- the mechanical method involves the use of a hammer and chisel. If the plaster is old and peels off easily, a spatula is enough;
- electric - a punch or grinder with a disc is used. This method is much faster and more efficient.
If, after removing the plaster, mold is found on the base substrate, the infected areas should be removed rather than decontaminated.
In this case, the concrete is broken with a perforator until they reach the uninfected material. Then the entire ceiling is treated with any chlorine-based antiseptics or special antifungal compounds. For reliability, you can re-treat the area with copper sulfate.
 5. Any suspended structures are removed according to a single scheme: first, the finishing material is removed - sheets of drywall, lining, plastic panels, and then disassembles the frame. The finish cannot always be preserved: when fixing with nails, for example, the material is damaged, but the frame elements are quite suitable for reuse.
How to make one of the important stages of repairing the ceiling in the kitchen, in particular, removing whitewash, can be found in the following video.
Initial repair
The need for it does not always arise. The ceiling in the kitchen with your own hands, you can build a rack, plasterboard, even install a tension. In this case, the state of the base coat does not play a special role. If finishing coatings or a false ceiling are intended, plastering is required.
The procedure depends on the condition of the ceiling in the kitchen.
Pre-plastering
If there are deep rusts and cracks on the surface - more than 2 cm in depth and width, their embedding is carried out separately.

- Cracks are expanded with a spatula and cleaned of dust and dirt. It is best to use a vacuum cleaner.
- The grooves are treated with a primer for better adhesion to the material.
- After drying, the cracks are sealed with polyurethane foam.
- A day later, cut off excess foam and prime again.
- With a spatula, plaster is applied into the recess, very tightly and a reinforcing tape is applied on top - serpyanka.
- Then a thin layer of plaster is applied over the tape to finally level the surface.
 If the difference in height or depth of cracks is more than 4 cm, special metal meshes and a special kind of sand-cement compositions will be required. It is better to entrust such repairs to specialists.
Basic plastering
How to repair a ceiling without plastering? Only if you install a suspended structure. And even in this case, it is recommended to cover the surface with plaster, albeit without leveling and smoothing, at least in order to avoid the accumulation of dust and dirt.
Plastering is not the easiest process. It will require the appropriate composition, beacons, as a rule, a fiberglass stack and, of course, a spatula. You cannot use gypsum plaster for the kitchen, as it is hygroscopic and absorbs dyes.
 The sequence of actions is as follows.
- treated with an antiseptic.
- The base is primed. Preferred compositions for smooth ceilings, as they provide good adhesion. The primer should dry completely - this is about 12 hours.
- The lowest angle of the ceiling is determined by a laser level or conventional level. With the help of a paint cord, markings are made from this point.
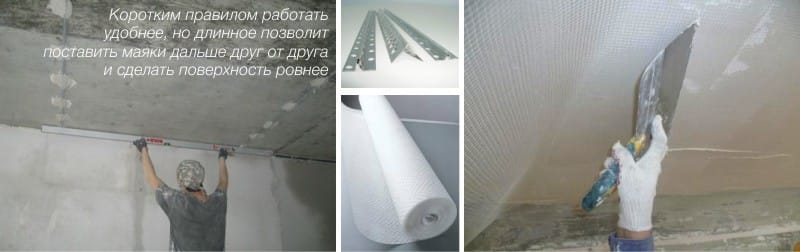
- Beacons are fixed along the ceiling - self-tapping screws located at the required height, that is, taking into account the irregularities of the base ceiling surface. Lighthouses are installed in parallel rows with a distance between them 15–20 cm less than the length of the rule.
- Using self-tapping screws, the beacon profile is fixed to plaster blotches. The correct placement is checked with a laser level.
- Plaster is applied between the profiles - with a spatula, literally thrown onto the surface. Then the rule is moved between the rows in zigzag movements: the excess mixture is removed and the surface is leveled.
- The plaster layer reaches 2 cm - no more. If the irregularities on the ceiling are too large, then re-plastering is allowed after the first layer has completely dried. In this case, reinforcement will be required: first, a fiberglass painting net is fixed to the surface, and then plaster is applied.
 If the ceiling is being prepared for painting or whitewashing, it is important to get not just a flat, but a smooth surface. For this, putty is applied to the dried plaster layer. This composition has a more liquid consistency and forms a smooth surface.
 The video demonstrates the plastering of the kitchen ceiling.
How to fix a ceiling in a kitchen
The finishing itself gives the final look to the new ceiling. The options are as follows.
- Whitewashing and do not cause difficulties. To work you need a brush and a roller, it is even more convenient to use a spray gun. It should be noted that the paint is more durable and tolerates moisture better.
- You can wallpaper the ceiling. Washable are preferable, since even the best hood does not save from soot and fat evaporation.
- You can stop your choice on decorative plaster. In this case, instead of putty, the surface is finished with mosaic, Venetian, stone plaster, as in the photo.
- Suspended structure - rack or with a sufficient height of the room, it will not only decorate the room, but also serve as a method of dividing into a working and dining area. In this case, you can also refuse the putty, and it is not necessary to level it.
- Hem version easier to execute. , clapboard, plasterboard sheets. This is where the creation of a flat surface is required.
Repairing the ceiling in the kitchen includes 2 mandatory stages and 1 is not always mandatory. The first is the removal of the old coating and the installation of a new one. Plastering is optional, since when constructing suspended structures, the state of the base surface does not really matter.
The kitchen in any apartment or country house is considered a special room. This is a favorite place for the whole family to eat and socialize. During the renovation, there are usually no questions about the decoration of the walls and floors. But how to decorate the ceiling in the kitchen so that the coating looks good and lasts further, many do not know. We will try to understand this difficult issue.
Requirements for materials for finishing the ceiling in the kitchen
The kitchen is a special place where food is constantly being prepared, windows are often opened. The conditions are different here, so it is important to choose the right finish for the ceiling in the kitchen. Temperature changes occur in the kitchen, there is always high humidity. During cooking, steam from the dishes rises to the surface of the room. All this should be taken into account when choosing a material for cladding.
The main parameters for choosing a coating include beauty and practicality.
When deciding from what you can make the ceiling in the kitchen, you must take into account the following requirements for the facing material:
- moisture resistance;
- wear resistance;
- how easy it is to clean. It is desirable to have the possibility of wet cleaning;
- operational safety;
- incombustibility;
- simple installation of the coating;
- smooth surface, aesthetic appearance.
Given the listed requirements, you can consider options for finishing the ceiling in the kitchen.
What is the best ceiling?
In construction markets, there is a large selection of materials for cladding the kitchen ceiling space. When choosing which ceiling is best done in the kitchen, you need to take into account not only the practicality and service life of the material, but also many other equally important characteristics.
There are several main options for finishing the ceiling in the kitchen, which are used most often:
- painting;
- whitewash;
- polystyrene tiles;
- drywall sheets;
- wallpaper;
- plastic panels;
- plaster;
- clapboard finishing;
- stretch fabrics.
The best way to finish the ceiling in the kitchen depends on taste, and on how much the material will be combined with the general design style of an apartment or a country house.

Before deciding which ceiling to do in the kitchen, you need to understand the advantages and disadvantages of each of the materials listed above.
How to cover?
To decide on the material and choose how to cover the ceiling in the kitchen, we will consider in detail the most common cladding options for kitchens. It is also necessary to separate the coverings for a country house, and apartments in a high-rise building. We'll talk about these differences after discussing materials for kitchen coverings.
Plaster
Despite the large selection of finishing materials for kitchens, plaster is still one of the most demanded options.
Using plaster to finish the ceiling and walls of the kitchen has the following advantages:
- budget option, especially when doing work on your own;
- environmentally friendly material;
- perfectly hides any defects and surface irregularities;
- if you finish the ceiling in the kitchen with plaster, then its height will not be affected, because the layer of material does not exceed 3 cm;
- you can apply plaster to the surface of any material;
- if you apply decorative plaster, the room will look unusual.

The disadvantages of using the material include the process itself, which is quite laborious. The volume of work is rather big and requires certain skills. If the surface gets dirty, all stains will remain visible. When the structure shrinks, cracks may form on the ceiling.
Whitewash
The most obvious advantage of whitewashing is the cheapness of the coating. And any owner of an apartment or house can whitewash the kitchen surface. The work will be especially simple if no preliminary leveling of the surface is required.

But, over time, the whitewash turns yellow, and the coating loses its original appearance. Whitewashing does not withstand prolonged exposure to moisture and vapors released during cooking. Choosing this option for finishing the kitchen covering, you should take into account the likelihood of an early repair.
Painting
Among the advantages of using paint, the following points are distinguished:
- economical, inexpensive option;
- the height of the room does not suffer;
- easy care;
- easy to apply.

The only drawback of staining is the uneven surface, which is not hidden by the best paint. It turns out that before painting it is necessary to prepare the ceiling. And this is a rather difficult process.
Tile
Expanded polystyrene tiles with a cellular structure have the following advantages:
- inexpensive;
- no surface preparation required;
- moisture resistant;
- easy care, you can do wet cleaning.

The disadvantages include:
- fast pollution;
- if the tiles are carved, they get dirty faster and are difficult to wash.
If you are at a loss how you can make the ceiling in the kitchen, then you can choose tiles from different materials, except for expanded polystyrene. These are tiles that are better protected from moisture, laminated with a film, or tiles made of plastic.
Plastic tiles have their advantages:
- a large selection of colors and structures;
- quick installation;
- good sound insulation;
- the ability to mount lighting fixtures in the ceiling.
But, plastic plates will make the room a few centimeters lower.
Plasterboard sheets
Plasterboard is considered one of the best options for finishing a kitchen ceiling, due to the following advantages:
- no preparation needed;
- lighting and ventilation can be mounted on the ceiling;
- the ability to create any kind of surface, from flat to wavy, or with transitions in height;
- inexpensive.

The disadvantages include time-consuming installation, reducing the height of the room.
Wallpaper
If wallpaper is glued to the kitchen ceiling, then it must be waterproof and washable. The best option would be fiberglass wallpaper.
Material pluses:
- inexpensive option;
- not difficult;
- height will not be affected;
- strength;
- long service life.

Of the nuances of such a finish, one can call the obligatory leveling of the work surface.
Lining
Separately, it must be said about finishing the ceiling in the kitchen with clapboard. Nowadays, different profiles are produced with different widths and structures. This option will be ideal for a country house or summer cottage.
If you sheathe the ceiling in the kitchen with clapboard, then you can leave the material unpainted. In this form, the material will look if the interior of the entire room is made in a rustic style. You can paint the lining if you choose a softer style, for example, Provence.

Lining for finishing kitchen ceilings is used both in country houses and in apartments. If the material is colored, white is usually used. So you can decorate a room in a Scandinavian style.
In the apartment
In order to competently decorate the ceiling in the kitchen in an apartment, it is necessary to take into account the area of the room, the height, and the combination with the interior.
The floor of the apartment is of no small importance. So, if the floor is the last, then you need to take care of the normal condition of the roof before deciding what is better to make the ceiling in the kitchen. If the roof leaks, then some finishing materials will not withstand the presence of moisture, and repairs will have to be done again.
Among the most popular ceiling coverings for apartment kitchens are materials such as:
- plastic panels;
- painting;
- stretch fabrics;
- rack structures.
Most often, in high-rise buildings, the ceilings are not very high. Therefore, you need to choose a coating that will not take the necessary centimeters of height.
In a private house
When choosing a ceiling finish for a kitchen in a private house, you need to adhere to such material requirements as practicality, durability and combination with the general style of the house.

Unlike ceilings in apartments, in a private house you can apply any, the most incredible solutions. It can be a loft or country style, high-tech, Provence, or the surface is simply sewn up with wooden beams.
There are many options. And besides the most common ones, in the form of painting, stretch canvases, clapboard cladding, or painting, you can build on any preferences. This is the advantage of a private house over an apartment.
When choosing a ceiling finish for the kitchen of a country house, one should also take into account such a moment as thermal insulation. For example, clapboard paneling will be a great option for a kitchen in a private house.
When choosing a finish, the peculiarity of the ceiling device is also taken into account. In private houses, to reduce heat loss, a rough ceiling is mounted. As a result, the main load is carried not by the walls, but by the ceilings.
Any renovation starts with planning. At this stage, they decide what the ceiling will be: painted, whitewashed, suspended or suspended. They choose the color scheme of the interior, they are determined with the lighting. After that, they begin a detailed study of each step to repair the ceiling in the kitchen - they choose materials and prepare tools.
Preparing the ceiling in the kitchen for painting
Preparing the ceiling for painting is one of the most time-consuming work that has to be done during a renovation. In addition, this is a rather lengthy process, so you need to be patient. The preparation of the base surface should be as thorough as possible, since after staining all the flaws will become noticeable.

There are two options to make the ceiling perfectly flat and smooth:
- level with gypsum mixtures;
- re-plaster with a cement-sand mortar.
In either case, in order to achieve an ideal result, skills in working with solutions and mixtures will be required. Professionals know many secrets that help them in their work. For a beginner in this business, there is only one way out: to gain experience and strictly follow step-by-step instructions, which reveal all the nuances of each action.
How to remove old whitewash, paint and plaster
It is impossible to make a new one without first destroying the old one. Therefore, before proceeding with the leveling of the ceiling in the kitchen, you need to remove the finishing coating that has served its life.

How to remove old whitewash
It is easiest if the surface has been whitewashed. To remove lime, you need a roller with a long handle and a container of water (warm or cold), a spatula with a short metal blade. For the convenience of working at height, use a stable stand or step-ladder.
To moisten a small section of the ceiling with water and wait until it is absorbed. This process is not fast: it takes at least 15-20 minutes. Then they take a spatula and begin to remove the lime. If dry spots are found, they are moistened with a roller. Old wallpaper is removed from the ceiling in the same way.


How to remove whitewash from the ceiling - tips

How to remove old paint
The paint adheres much more firmly to the base surface than lime, so it will be much more difficult to remove.
There are several options for accomplishing this task:
- mechanical;
- glue;
- thermal;
- chemical;
- electromechanical.
The first is the easiest to implement and not expensive from a financial point of view.
To complete the work you will need:
- personal protective equipment (gloves, mask and goggles);
- roller with foam rubber coat;
- container with warm water;
- spatula with a short and sharp blade.
Iodine is added to a container with water in such an amount that the liquid acquires a pale brown hue. Work begins by wetting the painted surface. When the paint absorbs water, it will begin to swell and flake off. At this point, it is removed with a sharp spatula.


There is a universal way to remove paint and varnish coatings. This method uses PVA glue, which is diluted with water to the consistency of thick sour cream. Cover the ceiling with this compound and paste any newspapers or pieces of wallpaper. It is important that the paper is completely saturated with glue. After a few hours, when the newspapers are dry, they are removed with a sharp spatula. Old paint will come off along with the paper. Even stubborn paints and varnishes can be removed with this method.
Spatula prices

Using old newspapers to remove paint and varnish (in this case, from the walls of the room)
The thermal method for removing old paint involves the use of a blowtorch or portable gas torch. This method is useful for cleaning surfaces with a thick layer of paint. Firing is carried out, as a result of which the old coating begins to flake off and crumble. This method is dangerous not only with the use of open fire, but also with a large amount of smoke. Therefore, in apartment buildings, its implementation is fraught with certain difficulties.


The electromechanical method involves the use of a grinder and a special attachment - a metal brush. This method of removing paint is simple and straightforward: they turn on the tool and begin to remove the old finish coating. During work, it is necessary to ensure protection of eyes and respiratory organs.

Using a grinder with a special attachment - a metal brush
The chemical method for removing old paint involves the use of washes. They apply the composition to the ceiling and then act in accordance with the manufacturer's instructions: they wait for the wash to be absorbed, and proceed to remove the paint and varnish layer.
- DOCKER S5;
- Denalt Paint Remover 5001;
- Bio-Decap'Peintures Guard;
- Set Boya Sokucu;
- Gunter Gut Umsetzer.


"Antikras-Universal", paint remover
How to remove old plaster
Apart from mechanical, there is no other way to remove old plaster. But this task can be accomplished in different ways. In any case, care must be taken to generate as little dust as possible during work. To do this, the old plaster is regularly moistened with hot water. Keeping the ceiling always damp will make it easier and easier to work.
Priority of actions:
- they tap the entire surface of the ceiling with a hammer, trying to determine by sound those places where the plaster holds the weakest;
- hammer blows knock down the plaster in these places;
- using a hammer and chisel, they knock down stronger layers of plaster;
- clean the ceiling with a spatula, the blade of which is regularly sharpened.

If there are places that cannot be handled, use a power tool - a hammer drill or a drill with a drill. Several holes are drilled in the plaster and try to knock it down with a hammer and chisel. Or they remove the old layer with a grinder equipped with a stone disc.

How to align the ceiling in the kitchen
To level the base surface, you will need the appropriate tools and materials:
- rule;
- wide blade spatula;
- plaster falcon;
- drill;
- mixer for stirring the mixture;
- container for mixing the leveling compound;
- roller and tray;
- brush with long stiff bristles;
- aluminum beacons;
- front spatula;
- foam sponge;
- deep container for solution preparation;
- universal primer ("Concrete-contact", "Patrice-s", "Tex universal");
- leveling mixture (Rotband, Fugenfuller, Giplan, Osnovit T22, any gypsum plaster).

Stages of work on leveling the ceiling
Step 1. Surface preparation.
- The old finishing layer is removed: with a spatula, remove everything that crumbles under mechanical stress.
- Jointing is performed.
- Sweep the ceiling with a brush with long stiff bristles.
- If fungus or mold is found under the old finishing layer, the surface is treated with special disinfecting compounds: Olympus Stop Mold, Abedis 06, Fongifluid Alpa, Biozid Sanierlösung, Dali, Prospectors.


Composition "Olympus Stop-Mold"
Step 2. Priming is an important stage of work that should not be ignored. The primer not only removes dust from the surface of the ceiling, but also fills in all small cracks, thereby providing some leveling and enhancing adhesion to the subsequent material.
Prices for gypsum plaster
gypsum plaster

The primer is applied with a roller, rolling it in a special tray or on a piece of plywood. It is necessary to thoroughly moisten all sections of the ceiling, paying special attention to the seams and chips of the old plaster. Corners and difficult areas are finalized with a brush. The ceiling is primed in two layers: in the longitudinal and transverse directions. Each next is applied after the previous one has completely dried.
Step 3. Installation of beacons. Lighthouses are necessary to bring the ceiling in one plane. It is rational to use aluminum beacons, as they do not rust and they can not be removed from the plaster layer. To fix these strips, use the same composition with which the ceiling will be leveled.
An important point! The distance between the beacons should be less than the length of the rule. This will allow you to perform high-quality plastering of the surface. Marks are made on the ceiling with a marker. Plaster is applied along the lines of installation of beacons. Beacons are built in, controlling the work with a rule and a bubble level.

Step 4. Ceiling alignment. This stage of work begins after the plaster that holds the beacons hardens.
- pour into a deep container the amount of water specified in the manufacturer's instructions;
- pour in a dry plaster mixture, observing the proportions indicated in the instructions;
- a metal mixer is installed on the drill;
- turn on the drill and stir the mixture, achieving a homogeneous thick consistency;
- wait 5 minutes and mix the solution again;
- put plaster over with a spatula, filling the space between the beacons;
- align the applied layer with the rule, pressing it to the beacons and moving it towards you.
In order for the alignment to be of better quality, the rule is moved by alternately shifting it to the right and left. It should be noted that the thickness of the plaster layer should not exceed the value recommended by the manufacturer. Different formulations have their own requirements. When using a standard cement-sand mixture, the plaster layer should not exceed 2 cm.Gypsum compositions allow you to apply a layer up to 8 cm.


Step 5. Smoothing. At this stage of the work, it is important not to miss the moment when the plaster has already begun to harden, but still has some plasticity. At this time, they begin to smooth the surface of the ceiling in the kitchen. For this purpose, a wide facade trowel is used with a blade width of 45-60 cm. With light pressure, it is moved along the areas between the beacons, trying to avoid the formation of waves.

Step 6. Finishing grout. After leveling, they are waiting for the moment when the drying plaster acquires a matte shade. Pour warm water into the container, take a foam rubber sponge and moisten a section of the ceiling. Finishing smoothing is performed with a front spatula, modifying all minor flaws with a damp sponge. Achieve ideal smoothness and evenness of the ceiling.


Decorative plastering
The ceiling in the kitchen can be finished with decorative plaster. This is an easier task than leveling the surface. In addition, the application of decorative plaster also solves the issue of finishing the ceiling.

The market of finishing materials offers a wide range of compounds for interior and exterior use. For the decoration of the ceiling, gypsum-based mixtures are optimal. They have a lot of advantages over cement ones: they harden quickly, are plastic, easy to apply and stir.
Any composition of decorative plaster includes three components:
- water;
- binder;
- filler.
Any of these ingredients are available, so you don't have to buy the mixture, but make it yourself. To do this, you need to know the exact proportions of the composition. You can familiarize yourself with them by studying the instructions on the packaging of any mixture you like for applying decorative plaster. Cement, gypsum or lime is used as a binder. The filler can be small pebbles, sand, marble chips. A pigment (dye) is added to the composition.
Prices for decorative plaster
decorative plaster

Features of the use of decorative plaster
Structural decorative plaster offers endless possibilities for creating surfaces with different types of relief, emphasizing the individual style of the room. With the help of these mixtures, you can implement any option for decorating the ceiling: from creating a smooth surface with uniform grain to rough textures with clear lines and deep gaps. The layer thickness can be up to 2 cm.
The following compositions are suitable for decorating the ceiling:
- Alpina Expert;
- Buntsteinputz LF;
- Struktum ФеLux;
- Bolars.

For applying decorative plaster, use both a standard painting tool and suitable tools at hand. To obtain the same type of relief, rolling with textured rollers is used.

The plastered surface can be tinted with any coloring compounds: dispersion paints, decorative glazes, tinting agents.
For finishing the ceilings in the kitchen, you can use decorative pebble plaster with grain granulation of 1-2 mm. These compositions are intended for thin-layer plastering, therefore it is necessary to perform the entire range of preparatory work, including leveling the surface.


Table. Average consumption of pebble decorative plaster.
The optimal choice is ANSERGLOB acrylic decorative plaster. You can use other mixtures - "Ceresit", "Bayramiks Gravol" and so on. All of these compounds are moisture-resistant, plastic, and crack-resistant.
Technique for applying pebble decorative plaster on the ceiling
To complete the work, you will need the following tools:
- drill;
- mixer nozzle;
- maklovitsa brush;
- Master OK;
- metal grater;
- plastic grater;
- gloves.
To enhance the adhesion of the plaster layer to the base surface, use adhesive emulsions ANSERGLOB EG 62 Quartz-grunt, Haftemulsion-Konzen, ANSERGLOB EG 62 SILICONE, Haftemulsion-Sopro HE 449.

Stages of work on the application of decorative pebble plaster.
Step 1. Padding. Apply a layer of adhesive emulsion to the ceiling with a brush. Leave to dry for 3-4 hours.
Step 2. Toning. If the mixture is not tinted, add pigment and mix the composition using a drill with a mixer.
Step 3. Application of the first layer of plaster.
- With a spatula, plaster is taken from the container and laid on a grater with a metal sole.
- Apply the plaster to the ceiling, holding the float at a 60 ° angle to the surface. Strive to obtain a layer of uniform thickness (2-3 mm).

Step 4. Smoothing. At this stage of work, a layer of the same thickness is formed over the entire surface of the ceiling. The work is performed with a grater with a metal sole.
Step 5. Formation of surface texture. This stage of work begins at the moment when the plaster mixture stops sticking to the tool. Take a plastic float and with light circular movements, holding the tool parallel to the ceiling surface, rub the previous layer. When there are no smooth areas on the ceiling, the work is completed. Leave to dry for 72 hours.
Stretch ceiling prices
stretch ceiling

Technique for applying textured decorative plaster to the ceiling
Step 1. A small amount of the mixture is applied to a spatula with a stainless steel blade.
Step 2. Apply plaster to the ceiling in an even layer up to 3 mm thick. Cover a section of 1.5x1.5 m.

Step 3. The surface can be structured within 15-20 minutes. After this time, the composition will begin to set. To form the relief, use the same or a different plaster mixture. You can use a cement-sand mortar. The mixture is applied in a layer up to 8 mm thick. There is no need for alignment.

Step 4. Moisten the plaster (spray with water) and give the surface texture with a float with a flat plastic sole. To do this, alternately press and tear the grater from the ceiling. Thus, a clear relief with randomly located peaked waves is obtained. Using stronger pressure and abrupt tears of the grater can make a coarser texture.
Step 5. With light touches, the float smooths out the relief of the decorative plaster. Achieve obtaining the same type of ceiling pattern. If the composition loses its elasticity, the plastered surface is sprayed with water.
Step 6. After 20-30 minutes, take a damp foam sponge and smooth the relief with light hand movements. Thus, a ceiling with Venetian plaster is obtained.
Venetian plaster prices
Venetian plaster


Since the kitchen is a room with a high level of humidity, the finishing layer can be coated with a moisture-resistant primer. But most often this is not necessary, since most decorative plaster mixtures have the necessary resistance to external influences.

Video - How to align the ceiling. Ceiling alignment
When deciding how to finish the ceiling in the kitchen, you can give preference to the following materials:
- Plastic panels;
- Plasterboard suspended ceiling;
- Stretch ceiling;
- Polystyrene boards;
- Rack ceiling;
- Painting and whitewashing.
In this article, we will look at the process of removing old coatings, which is almost always a must when repairing and installing any kind of ceiling. And then we will dwell in detail on the topic of basic, serious repairs and figure out how to do it with our own hands - to properly level the ceiling, repair cracks and rusticums, make high-quality primer, plaster and putty, and then paint / whitewash the kitchen.
Removing the old finish
Any do-it-yourself ceiling repair begins with the total removal of all old coatings. What do we need at this stage?
- Ladder;
- Covering film and masking tape to fix it;
- Respirator, glasses and gloves - there will be a lot of dirt;
- Ordinary or garden spray with a pump, if they are not there, we take a regular roller with a long nap (preferably with a long handle), a sponge, a cuvette or a bucket of water;
- A spatula (preferably, such as in the picture, especially for removing old paint), a chisel with a hammer and a metal brush for removing a layer of paint can also be useful for beating off plaster;
- For quick mechanical cleaning (observing safety precautions), you can use a punch or grinder.
The old coating is completely removed - paint, whitewash, peeling plaster.
Whitewash can be removed in two ways - wet (the chalk can be simply washed off) and dry. As a rule, these two methods are used as follows: first moisten a small area (not the entire area at once, since the wetted surface dries quickly) with water, wait 10-15 minutes until the water is absorbed into the old coating, and then begin to actively remove it with a spatula. in difficult places it is better to use a puncher. In the joints of the slabs (rustic), you also need to remove all unnecessary.


If mold spots are found under the plaster, the ceiling should be treated with a special antifungal primer or any chlorine-containing compound (for example, Whiteness, if the mold is small and not old). Of course, all work must also be carried out in a respirator.

More information about all the nuances of removing paint, whitewash and plaster can be seen in the following video:
We prime, plaster, putty, level, seal cracks and rusty
Prepare everything you need for work, namely:

Correctly painting the kitchen ceiling means adhering to the following sequence of actions:
- Before painting the ceiling, as we said above, you need to prime it. This will further strengthen the substrate and improve adhesion. Do not neglect this step, the unprimed ceiling will begin to crack very soon.

To make things go faster, use a spray gun, not a roller.
It is better to choose a deep penetration primer and, of course, with an antiseptic. After all, we make repairs in a special room - in the kitchen.
- After the primer is dry, you can proceed with the plaster and putty. But first you need to determine how even the ceiling is, whether you need plaster or you can immediately start to putty.
- Plaster is not needed if the ceiling drops are insignificant from 10 to 15 mm.
- Differences of more than 15 mm require preliminary plastering, which is leveled with beacons.


- And if the ceiling has differences from 20 to 30 mm, rusty and cracks, then how to make the ceiling in the kitchen even? We clean the bushes (or large cracks), expand them to 30-50 mm or more, prime them, after the primer has dried, we wipe and fill the hollow with polyurethane foam and let it dry for 24 hours, then cut off the excess foam and prime again. When the primer is dry, apply the plaster tightly to the seam with a spatula, then apply a whole tape of reinforcing serpyanka and plaster it.

- Differences in the ceiling-base of 3-5 cm require more serious measures - the use of a metal reinforcing mesh, fixed to the concrete with ceiling dowels and withstanding a large layer of plaster from a cement-sand mixture (Rotband). After the plaster is dry, you can start filling.
It is better not to do such a complex and responsible repair of the kitchen ceiling with your own hands, but entrust it to the master.

- But what if the irregularities exceed 5 cm? In this case, it is better to install a suspended ceiling - plasterboard, slatted, plastic or stretch ceiling. It is difficult, time-consuming, expensive, and most importantly unsafe to align such curvature.
- After that, a finishing plaster putty is used, which must be applied with a wide spatula in 1-2 layers, while the first layer must, of course, dry. The last layer should be thin - about 1 mm.

- 6 hours after filling, the surface can be wiped and sanded, it can be done manually, and better and faster - with a grinder. Then it should be primed again - with diluted paint or a penetrating primer. Let it dry and start painting. We look in detail about filling the ceiling with our own hands in this training video:
Painting the ceiling
- You can paint the ceiling only when the primed surface is dry. It is desirable to start painting from the window. In addition, if you paint the surface with a short-nap roller, you get a smooth finish. A rough texture can be created using a long-nap roller. One strip of paint should go slightly over the other.


- It is desirable to paint the surface in two layers, and the first must dry before applying the second. One coat of paint must be applied at a time, otherwise there will be a visible joint between the areas.
How to choose a coloring composition for a kitchen ceiling
Do-it-yourself ceiling repair by staining or whitewashing is the most common (largely due to its budget) method.
Before you paint the ceiling, you need to choose the right dye. The traditional way of painting involves the use of lime or chalk mortar.

This material was used a hundred years ago, but until now, among its advantages, the following stand out:
- Cheapness;
- Environmental friendliness (lime absorbs harmful substances);
- The ability to mask small surface defects.
The whitewash layer needs to be periodically renewed, but if you paint without washing off the previous layer, then very soon unaesthetic "sags" will form on the surface. In addition, in this case, you can forget about design delights.
It is better to paint the kitchen ceiling with water-based paint. Compared to lime, it forms a thinner and more attractive layer.

Compositions of this type almost do not smell during the work, they are economical, affordable and varied in shades. To create a durable and reliable coating, you can paint with a water emulsion in several layers - this will not interfere with the passage of air, which means that the room will not be stuffy. Among the most noticeable disadvantages of this type of paint is the impossibility of washing. The ceilings can be wiped with a dry cloth or slightly damp but without rubbing.
Experts call acrylic paint the best material for painting a kitchen ceiling. The resulting surface can be washed not only with water, but also with soap solutions - the only exceptions are abrasive substances.
The surface obtained with the help of such a dye is distinguished by aesthetics and decorativeness.
It is better to paint the surface in the kitchen with matte rather than glossy dye. Gloss is able to emphasize unevenness of the base, and the matte layer, on the contrary, will hide them.
