Artistic cutting with a jigsaw is one of the types of wood processing. For such creativity, it is necessary to have certain skills in working with the instrument, so for beginners this type may seem difficult. But despite this, woodcarving with a jigsaw (templates, photos are attached) is an extremely exciting activity. In addition to the usual tool, you can use an electric jigsaw or special tables for volumetric carving. This technique, as a rule, is used in workshops, and the result from working with it is really amazing, especially if there are high-quality sketches.


Varieties of carving
There are several types of woodcarving with a jigsaw, which templates and photos help to get to know better.

Flat-relief thread characterized by the fact that the pattern is on the same plane with the base.

Cutting thread- the ornament is cut out with a jigsaw or a twisting saw. The decorative effect is achieved using an openwork mesh. This type of thread is, as it were, a continuation of the flat-relief thread.


It is the sawing thread that is most often done with a jigsaw. This type of wood carving is most often used when decorating furniture, facades at home. The most common pattern is an S-shaped curl with curled ends. Flora and fauna motifs are also common.

Slotted carving is usually done with a flat pattern. All its elements are in contact with each other, smoothly flowing into one another. Large cuts of wood are made using this carving technique. An example can be seen in the pictures below.


Stages of work
To create threads with a jigsaw you will need the following materials and tools:
- jigsaw;
- set of files;
- awl and chisel;
- drill;
- pliers;
- base (wood);
- pattern (drawings are created with its help);
- stencils;
- brush, varnish (if necessary, cover the product with a topcoat).

The threading technology itself implies the following steps:
Step 1. Choosing the base material (thin wooden boards will work well).
Step 2. Choosing an ornament. Transferring it to the base using carbon paper and a simple pencil.
Step 3. Making the starting holes with a drill.
Step 4. Carving process.
Step 5. Working out small details with an awl or knife.
Step 6. Finishing the product.
There are several thread options. Above has already been described flat and sawed threads.
Making a flat-relief thread with an indication of the direction of movement of the tool:

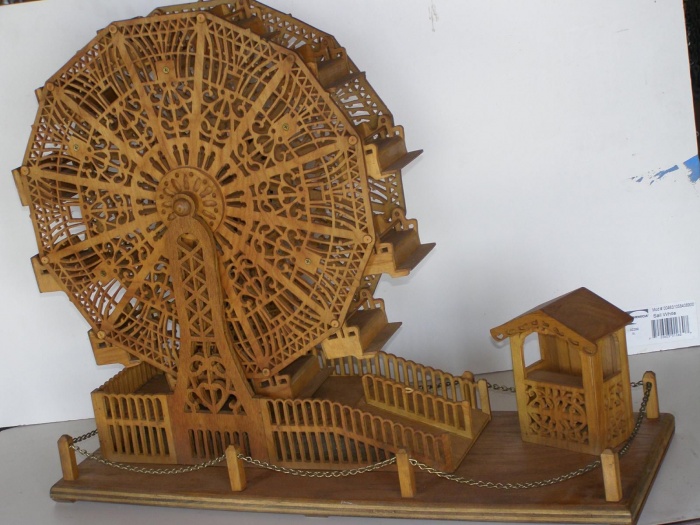
Large paintings made with a jigsaw using the saw-carving technique look especially interesting.


Pargori technique
Another carving technique that deserves special attention is the pargori technique.


It is performed on a smooth background with the creation of the so-called overlaid thread.
The resulting chiaroscuro plays a special role. It is she who gives the products, cut in this technique, a particularly mysterious and interesting look.
Wood carving is used to decorate various accessories and household items. In this case, the patterns for cutting are distinguished by a special grace. Very often, caskets are decorated with woodcarving with a jigsaw.
Wood and sheets (slabs) based on it are one of the cheapest and most flexible materials. For those who like to work with a jigsaw, plywood is of interest first of all.
It is her home craftsmen who most often choose for the manufacture of various crafts. If you organize the work correctly, you can create real masterpieces.
Crafts from this material are made for various purposes, but basically they can be divided into two groups - for decorating premises or territory (for example, fences from the inside, a garden area, and so on).
Variety of plywood
If you focus on the optimal combination of indicators such as quality and price, then FSF or FC products are selected. It is characterized by resistance to dampness and temperature fluctuations. This alone is enough to ensure the durability of a hand-made craft. But there is a fundamental difference between these types of plywood - in the component composition of the glue, which holds the veneer layers together.
In the first case, it is toxic, therefore FSF sheets are used only for outdoor work. But for crafts intended for indoor use, FC plywood is quite suitable. Its counterparts are much more expensive, therefore they are not considered as material for simple, easy-to-make crafts.

Type of sheet grinding
It's easy to figure it out: Ш1 and Ш2 - respectively, one- and two-sided; NSh - coarse plywood. That is, the craft still has to be "brought to mind", polished. The choice according to this parameter depends on how it is planned to be arranged and placed in the future. A sample fixed on the wall and, for example, a figurine (stand, vase, toy or other) that is viewed from all sides are different things.

Plywood texture
Much depends on personal preference. If it is planned to preserve the natural appearance of the tree when applying the protective coating of the craft, then it is better to purchase birch veneer plywood under the varnish. But for the subsequent painting, it is advisable to choose pine.
For various plywood crafts, it is advisable to focus on an oil or acrylic base. The explanation is simple - they are less susceptible to fading in the sun, therefore, you do not have to frequently update the outer coating; it will not change its original appearance for several years.
Plywood grade
When choosing a sheet for crafts, you must first of all inspect it for knotty and inclusions. Significant defects will not only complicate the cutting of the material, but also initiate the appearance of cracks or "holes" (as a result of falling out of the same knots). Next - inspection of the end surfaces. During the cutting process, plywood is subjected to dynamic loads (vibration). If at least signs of veneer peeling are noticeable on the side parts, such material should not be purchased, even if its price is too tempting.

In the future, in the process of making crafts, many problems will arise. As a result, the rejection of plywood and its increased consumption. In aggregate terms, this in terms of money will come out about the same in comparison with the purchase of high-grade material, and in terms of the time spent and the quality of work - a big minus.
Thickness of sheets
If the crafts are cut with an electric / tool, then it is limited to 30 mm. For a hand jigsaw, it is advisable to use relatively thin plywood; maximum three-layer. That is, no more than 9 mm thick.
What you need to work
Jigsaw
This is a priori, since we are talking about making crafts using such a tool. The question is, which one is the best to work with. Electric models are much more expensive than manual counterparts, but they have a lot of advantages. About V.

For example, high speed and accuracy of cutting, cleanliness of edges, the ability to change the parameters of the cut and a number of others. If a plywood craft is not a one-time, short-term hobby, then it is worth spending money on an e / jigsaw. It is versatile, and will come in handy on the farm more than once, because depending on the type of file it can “work” not only with wood, but also with non-ferrous metals, plastics, and plexiglass.
It is somewhat more difficult with a manual jigsaw. Its design is quite simple - a frame with screw clamps and a handle + file.

The nuance is that the cutting blades break quite easily (from excessive pressure, changing the position of the hand tool), and therefore it is advisable to purchase them with a margin; fortunately, they are cheap.
Hacksaw
It is needed only at one stage - when cutting the dimensional sheet into separate fragments. Doing it with a hand jigsaw is an unpromising and unprofitable occupation; time and files will be spent a lot.
Stand
Nobody will cut plywood by weight; It's clear. Cut out the details by laying the sheet on the countertop - there is a risk of damaging it. It is in order to ensure the "safety" of the latter that the stand is needed. You can make it with your own hands from trimming the board. How such a device looks like (one of the options) can be seen in the figure.

The fixation of the stand on the base is made with clamps (on a non-working table) or self-tapping screws (in case there is a joiner's workbench in the annex, shed, garage). Although these are not the only mounting options. How to proceed is easy to understand, taking into account local conditions.

Skin
The ideal tool for fine woodworking -. But for plywood crafts that do not differ in large areas, it is not suitable. Therefore, only sandpaper; medium fraction - for primary grinding of workpieces and with fine grain - for finishing.
Additionally
- Files and files.
- Awl.
- Simple pencil and carbon paper.
- Glue, if the craft is created as a composite or multi-level, that is, with the fixation of two or more figured fragments in separate areas.
- Varnishes, paints, stains.
Examples of drawings and sketches of plywood crafts


Copying "one to one" in this case is hardly advisable. Any work done with your own hands is a process with a creative component. That is why the dimensions should be determined independently, depending on where it is supposed to place (or how to use) the craft. For example, will it "look" in a specific place, will it organically fit into the interior of the room?
Even if you like the drawing, it is not difficult to change the geometry of the figure by applying the scaling rules. Moreover, when it comes to drawing a contour on plywood with a simple pencil; to correct any mistake, it is quite easy to correct something in some areas. It is not much more difficult to modify any sketch, adding something of your own, original to the sample.


There is another solution - you can download any picture you like from the Internet. Printing it at the right scale is not a problem. It remains only to transfer it to plywood using carbon paper and shade the areas that need to be cut. This is when it comes to curly crafts. It's even easier with an outline pattern; cut exactly along the line - and that's it, you're done. All that remains is to do the decoration of the product.


Basic rules for cutting with a jigsaw
- Laying under a rigid backing sheet. It is in order to ensure the hardness of the surface under the plywood that the stand is used. A sheet, even a small one, bends quite easily (under pressure), therefore, without this device, a high-quality cut, strictly along the line, will not work.
- The working body of the jigsaw (saw) must be strictly perpendicular to the end of the sheet. Moreover, constantly, throughout the entire process of cutting the material.
- The tool is fed along the line in a translational motion, but without effort. Otherwise, the file will break immediately. As well as when it deviates from the "vertical".
- Cutting holes "blind", that is, somewhere along a sheet of plywood, with an indent from its edge, is done as follows. At any point of the outlined contour, a "hole" is drilled with a slight offset to the center of the fragment. The diameter is chosen so that the file fits easily into it. After attaching it to the tool frame, you can cut in any convenient direction.
- A curly cut in plywood suggests sharp turns, smooth bends, and so on. First, at the point of changing direction with a jigsaw, without changing its position, it is necessary to make a small hole in the material. To do this, you need to continue the cut with a file, strictly maintaining the orientation of the tool, and at the same time turn the piece of plywood. As soon as the plane of the cutting part coincides with the required direction of further cutting, it can be carried out along the marked line.
Having mastered the manufacture of fairly simple plywood crafts, you can take on more complex options. As an example - self-assembly of furniture (shelves, bookcases, original hanging shelves). With a skillful approach to business, plywood makes excellent countertops, cutting boards, window frames and so on. It is easy to make a folding chair from this material, with various modifications. Who is interested in this,.
Plywood also makes great frames for paintings and photographs. For those who have a plot, it will be possible to do the decoration of outbuildings; the same gazebo, a house above a well, or something else. There are many options. The main thing is to want to learn.
In the process of preparing for cutting with a jigsaw, do not forget that all drawings and drawings are nothing more than the basis for developing your project. A little imagination, time, effort, and you can make a truly real masterpiece from plywood.
Crafts made by the craftsmen with a jigsaw look elegant and stylish. In skillful hands, an ordinary tool turns into a miracle jigsaw, with the help of which incredible masterpieces are created. Artistic sawing can be just a hobby or a professional activity because handicrafts are always appreciated. The features of the miracle of the jigsaw and the procedure for performing interesting crafts will be discussed further.
Characteristic features of the jigsaw
The miracle jigsaw provides convenient cutting of lines on a wooden base, this is facilitated by a narrow cutting blade. For woodworking, a band saw is more useful, but cutting out of plywood is better obtained as a miracle with a jigsaw. The main advantages of the tool are as follows:
- Accurate cutting of parts, the cut line comes out quite smooth, requiring no grinding.
- Due to the presence of a narrow blade in the miracle jigsaw, cutting of sharp corners and small parts is available.
- Internal grooving starts from the hole prepared with drill # 3.
Regarding the technical characteristics of the miracle of the jigsaw, the following features are noted:
- Easy tensioning and fixing of the blade.
- Sawing is much easier than using a band saw.
- Sawing out a miracle with a jigsaw practically does not pose a threat of injury.
- The tool does not require frequent adjustments.

There are several parameters that you should be guided by when choosing a miracle jigsaw for cutting:
- The main thing is the capacity, this indicator indicates the size between the back wall and the cutting blade. There are miracle jigsaws with sizes ranging from 12 to 26 inches.
- The thickness of the material that the tool is capable of processing.
- Number of moves in 1 minute.
- Saw stroke height.
To cut out complex elements from plywood in a miracle jigsaw, two types of saws made of steel are used.
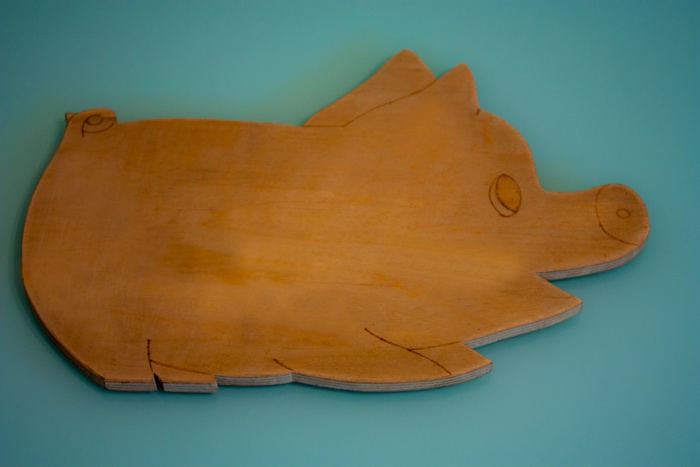
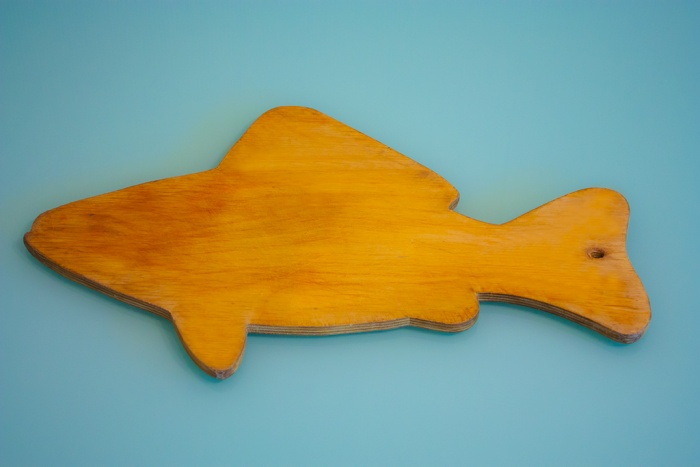
Advice! For beginners, it is best to train on a thick-toothed plywood blade. It is also used to make cutting boards. Small teeth on a thin file allow you to cut out filigree elements of crafts from thin plywood.
The result of the work of a top-class professional is shown in the photo:

Preparatory steps
Sawing a miracle with a jigsaw requires painstaking work from the master, develops perseverance and patience. Initially, you should take care of the organization of the workplace. Prerequisites for comfortable work are high-quality ventilation and lighting. A private house provides more options for choosing a utility room; a glazed balcony is suitable in a city apartment.
The second important step is the acquisition of material. High-quality plywood reduces the risk of delamination of the part or the appearance of cracks when cutting a miracle with a jigsaw. The second reason for the violation of the integrity of the material is an incorrectly selected canvas or unprofessional actions. For cutting out crafts, plywood with a thickness of 3-4 mm is intended. The following steps can help prevent delamination:
- Depending on the area of the surface to be treated, dilute the required volume of the mixture of water and PVA glue. For small areas, 2 tablespoons of water and a few drops of glue are sufficient.
- After thorough mixing, the solution is applied with a brush to the back wall of the plywood blank in 2-3 layers.
- The material is left to dry completely.
Comment! The glue solution will successfully replace furniture or parquet varnish.

Before cutting the miracle with a jigsaw, you need to clean the plywood. Chips, microscopic cracks, dark traces of knots are removed with sandpaper of various grain sizes. To give the surface the maximum smoothness is facilitated by stripping the plywood against the fibers. First, work with medium-grain paper, the final touches are applied with fine-grained sandpaper. The complete absence of burrs allows you to go to the main stages of work.
A simple example of a craft for beginners is presented below:

Craft making process
Preparing a drawing, sawing a miracle with a jigsaw, assembling parts and decorative finishing are key steps in creating original crafts.
Drawing translation
A well-executed drawing will provide a quick assembly of ready-made elements into a single figure. Otherwise, after painstaking work, a miracle with a jigsaw is at risk of encountering the problem of mismatching grooves and the need to rework individual parts. Drawings of crafts can be taken from this article or try to create a unique pattern for cutting. After printing or drawing on paper, the drawing is transferred to plywood in one of the most convenient ways. In the first case, the drawing is fixed with buttons on the plywood and copied using a pen and a ruler.


For cutting out crafts a miracle with a jigsaw, the technology of thermal transfer of toner from paper to plywood can be useful:
- Selects media with a low toner retention rate (such as glossy paper).
- In the printer settings, high-quality printing is selected to get more toner. The procedure for cutting out a miracle with a jigsaw in this case is facilitated.
- The printed image is applied face-down to plywood and ironed. For A4 format, one minute is enough. Instead of an iron, a construction hair dryer is suitable.
- After the paper has cooled, remove it. If there are gaps in the outline of the sketch for cutting out a miracle with a jigsaw, they are completed with a pencil.

Making holes and sawing
Cutting out the inner grooves with a jigsaw is preceded by the design of the holes. The process includes the following steps:
- Prepare a drill with a drill diameter of 3 mm or an awl of appropriate dimensions.
- The tool is placed in the middle of the groove and a hole is made.
- It is recommended to pre-protect the desktop with a board.
- The presence of an assistant is only welcome.
To decorate the internal grooves with a jigsaw, the nail file is inserted into the hole and fixed at the top of the tool. After processing a small area of about 2 cm, check the evenness of the sawing. In case of a poor-quality cut, it is better to replace the canvas with a more suitable specimen. If the cut is not straight enough, try correcting the imperfections with a flat file.
Important! Observe safety regulations, do not get your fingers under the file.

Cleaning of parts
Upon completion of cutting, a miracle with a jigsaw, small chips on the back of the parts are cleaned with sandpaper. Also, the prepared items of the craft need polishing. The ribs and the back of the parts are first processed with medium-grain paper, at the final stage, fine-grained sandpaper is used. Internal grooves cut with a miracle jigsaw can be easily cleaned with a rounded file. Strive to be completely free of bumps and burrs at the end of the cut.
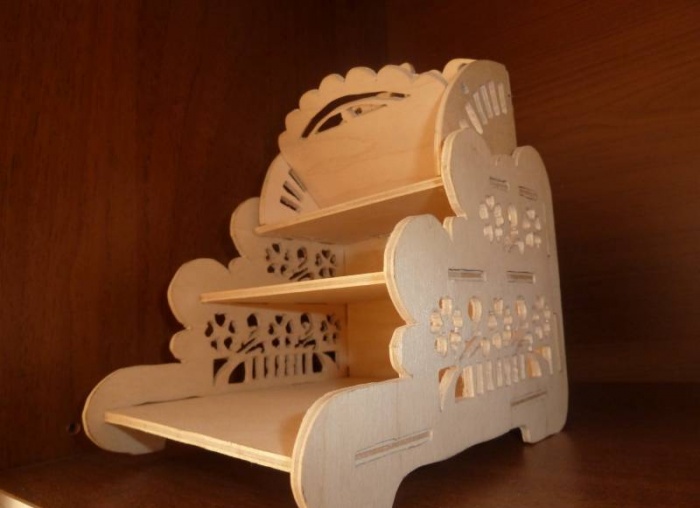
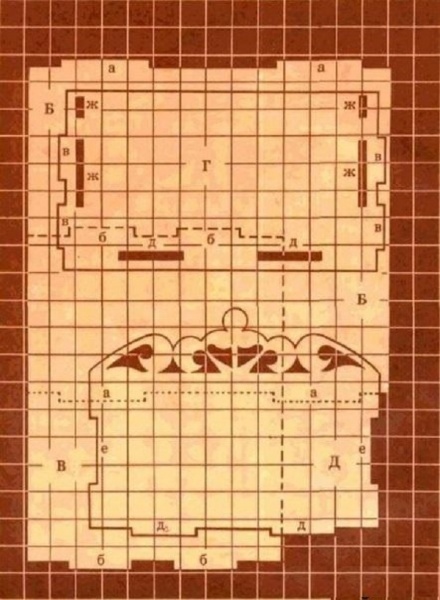
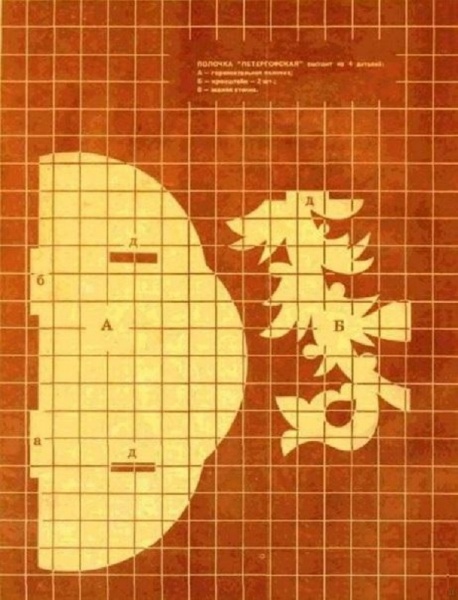
Having achieved the desired result, they proceed to assembling the parts of the craft, prepared by a miracle with a jigsaw. An interesting drawing for cutting and a photo of the shelf are presented below:

The final stage
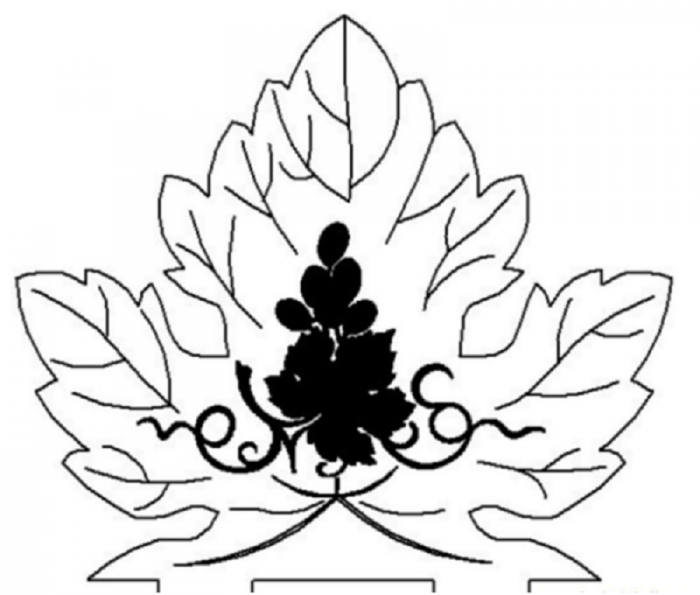
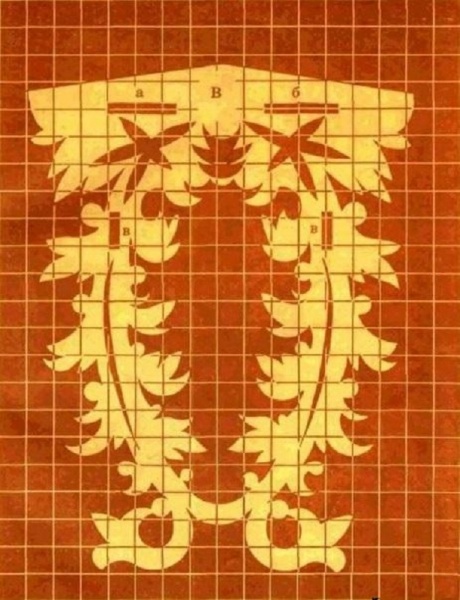
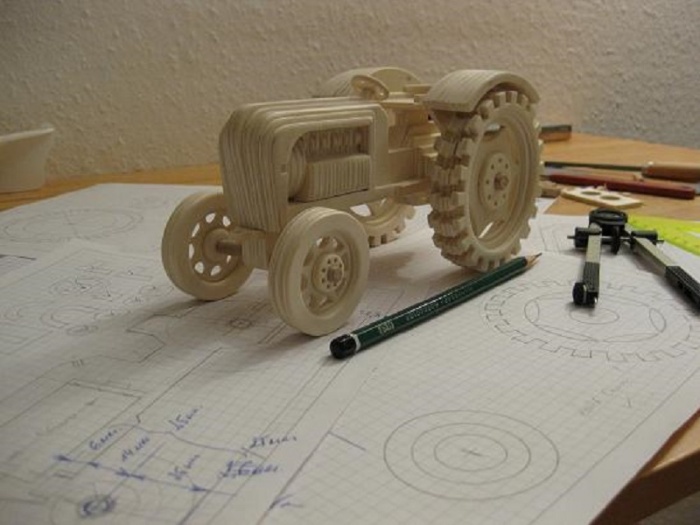
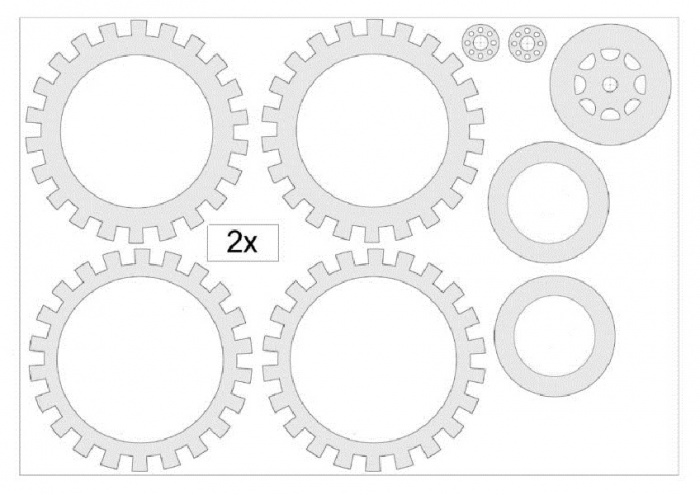
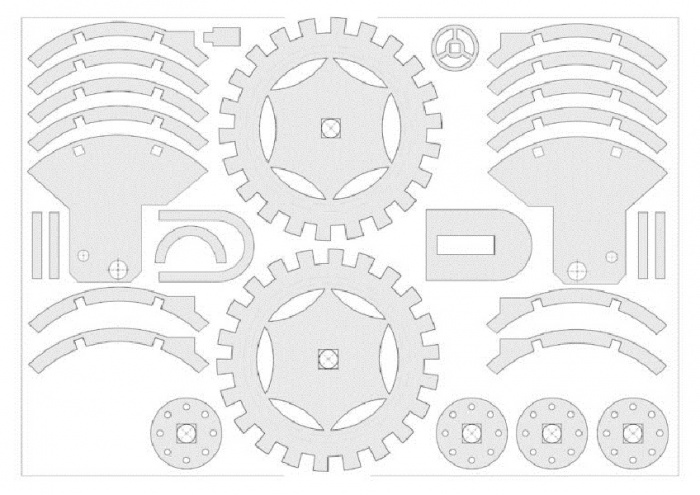
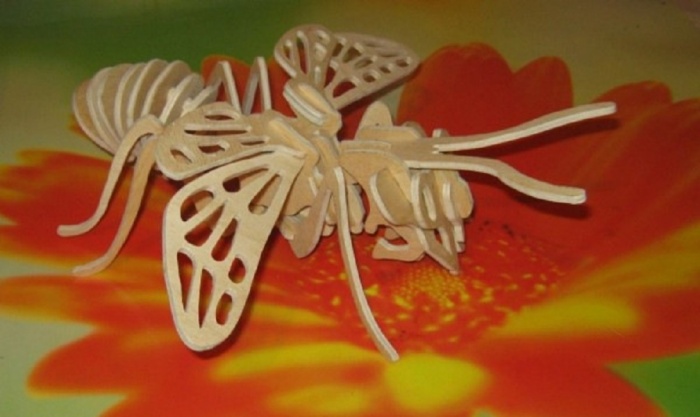
After assembling and adjusting all the parts, the crafts proceed to gluing using PVA or Titan glue. Depending on the design, it is recommended to tie the multilayer elements tightly with a strong thread and leave to dry. The process lasts no more than 15 minutes. An example of a product that is difficult to cut out with a jigsaw is shown below in the photo and drawings:

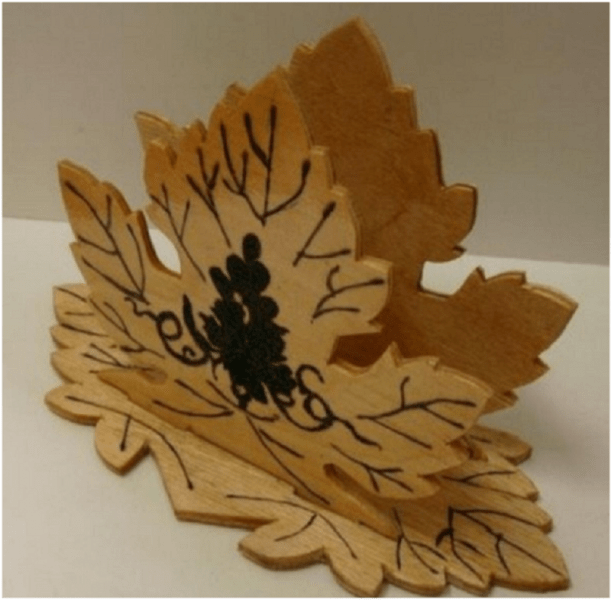
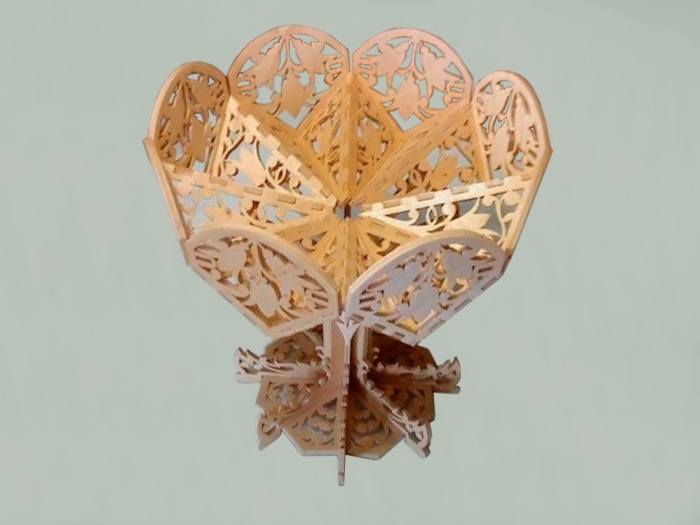
Burning patterns on individual elements of the craft allows you to add decorativeness. Previously, the drawing is applied with a pencil, after which they work with an electric burner. An openwork vase for sweets will become a worthy table decoration:


Sawing a miracle with a jigsaw is a painstaking task. In order for the product to serve for a long time, it needs decorative processing. The preservation of the pristine beauty of natural materials is facilitated by varnishing on wood. For work, you need a high-quality varnish composition and a convenient glue brush. Aim to avoid scratches or visible streaks on your craft. When cutting out figures of animals or models of mechanisms with a miracle jigsaw, sometimes they resort to fragmentary coating of the product with paints. This technique brings the craft closer to the original.
To start cutting with a jigsaw, diagrams and drawings are prepared in advance. When creating furniture, interior elements (shelves, doors) and finishing work, the skill of cutting with a jigsaw may be required. This process requires care, precision of movement and accuracy.
Sawing with a jigsaw may be required for finishing work, but most often in the process of making furniture with your own hands, shelves and other things.
Preparatory work
Previously, the wizard transfers the drawing to a sheet of plywood. During cutting, it is necessary to hold the tool correctly, observing safety measures.
The quality of the product depends on how accurately the master will perform the work at each stage.
To cut out parts with a jigsaw, you will need:

Usually, with experience, the craftsmen immediately apply drawings to the surface, but for beginners, you will need special adhesive paper, tracing paper.
- tracing paper and adhesive paper (required for accurate drawing on wood);
- plywood sheet (moisture resistant or ordinary, depending on what product is required);
- a manual or electric jigsaw (the first is used to cut out carved elements, patterns, small parts, the second is used if you have to work with a large amount of wood, large parts);
- an awl or a drill (with their help, holes are made for cuts, the diameter of the hole should allow you to insert a file into it; the choice depends on which tool is more convenient for the master to work with);
- files (special kits are sold in stores, with the help of which, if necessary, they clean the ends and edges of the product);
- a persistent board (necessary for fixing plywood and tools);
- pliers;
- compass;
- hammer;
- pencil;
- knife with sharp replaceable blades.
When assembling furniture and creating large parts, straight cuts are made without artistic wood cutting. In this case, experts recommend using an electric jigsaw. When cutting out small parts and curly elements, a hand tool is used.

When choosing a tool, attention must be paid to ensure that it is appropriate for the work being performed.
To cut a high-quality part with your own hands, use high-quality raw materials. The electric jigsaw must be held vertically, without tilting or loosening, making smooth up and down movements during operation.
At the same time, the plywood moves towards the tool. The craftsman must ensure that the jigsaw does not vibrate. Otherwise, the wood will split. Improper use of the tool can cause it to get stuck in the wood or break the saw blade.
In the first case, the product will be damaged, and in the second, the master may be injured. Before sawing out the inner contours, it is necessary to make holes with an awl or drill. Then the tool is inserted into the holes and sawing begins. Experts recommend keeping an eye on the position of the saw teeth and making turns without stopping the cut. The blade must be sharp, well tensioned, correctly positioned and firmly fixed to avoid injury.

A pattern carefully applied to the surface of plywood is half the success in creating a quality part.
A pattern carefully applied to the surface of plywood is half the success in creating a quality part. For this, pre-prepared sketches and tracing paper are used. The cost of tracing paper is not high, but the process of transferring the image onto plywood will require high concentration and precision of movements.
Transferring patterns to wood using tracing paper can be replaced by projecting an image. The required pattern is displayed on the plywood sheet using the projector. The working surface must be firmly fixed so that the pattern does not move. The disadvantages of the method are the need to purchase a projector, the cost of which is an order of magnitude higher than tracing paper. This technique is used for transferring small images. The third way to transfer the design to the work surface is self-adhesive paper. The sheet with the image is glued to the plywood. With this technique, you can get accurate lines.
Carving simple shapes

Cutting simple shapes from plywood is quite simple, you just need to clearly adhere to the drawn lines.
To cut simple shapes from plywood, it is recommended to correctly transfer the drawing to the surface, observing the rules for working with a hand tool (taking into account the lines drawn on the wood).
Arcs and smooth lines are cut out without turning the tool, but directing the teeth strictly along the line. You can make neat obtuse and sharp corners if you know a few nuances. Obtuse corners are cut using a turn-in-place technique (the foreman makes a straight cut and then unfolds the plywood sheet).
Loop formation is suitable for creating sharp corners. To do this, you need to cut out one side of the corner, and then a loop is cut along the outer contour, which allows you to immediately create the 2nd side of the acute outer corner. The sequence of actions helps to make neat internal cuts:
- make holes for sawing;
- cut the sheet along the pattern to the top of the corner;
- return the plywood to its original position;
- cut out the 2nd side of the corner.
To create decorative elements with a jigsaw, the master will need plywood, tools, good lighting, and an eye. The work is done slowly and accurately. Rushing can lead to uneven corners and oblique cuts.
Beginners will be helped by step-by-step instructions, professional advice (to create artistic elements, you need to know special techniques for working with a jigsaw) and regular practice. Sawing with a jigsaw takes patience and dedication. Do-it-yourself decorative wooden products can be used to decorate the interior of your home and office.
Any building materials are cut to the required dimensions. And plywood is no exception. Sawing plywood can be done manually or using special tools. Sawing plywood involves not only its use in construction, but also as an element of decor. Lace bars, boxes, stands and other variety of decor items are created using artistic cutting of plywood sheet.
Construction cut of plywood
How to cut plywood at a construction site and how to do it without chipping? Most often, in a domestic environment, a knife, jigsaw, or circular saw is used for this.
Some rules for working with plywood sheet:
- a thin sheet, the thickness of which does not exceed 2 mm, can be cut with an assembly knife
- sheets from 3 to 6 mm can be cut with a jigsaw
- with a sheet thickness of more than 6 mm, a circular saw will be needed
- remember that coniferous timber has a viscous structure due to the presence of resins, so this material blunts the cutting edge of the tool
- you need to work with plywood along the grain. If it is necessary to cut across the fibers of the outer layer, you must first make weakening cuts with a knife, and then work with a jigsaw
- if your work involves screwing in self-tapping screws, then before that you need to drill a hole of the appropriate size.
Shaped cutting from plywood
Figured cutting of plywood is a fairly popular activity among decorators and furniture makers. With the help of a plywood sheet and special tools, you can make not just a craft, but a real work of art.
The choice of tool for this procedure depends on the complexity of the pattern, the thickness of the plywood sheet. In the event that the bending radius does not exceed 1 cm, then you can use a hand jigsaw. A round hole is made with a drill. When the bend radius exceeds 3 cm, use an electric jigsaw. Which plywood file is suitable? Remember that the finer the saw teeth, the smoother and more complete the cut edges will be. For this purpose, for very small and complex figures, it is better to buy a canvas for metal.
It is better to apply the sketch to the back of the sheet. In this case, if the chips rise, then it will be imperceptible. At the same time, you should not rush, because the quality of the future product depends on the drawing. Drawings for cutting out of plywood are found in a huge number on the Internet. Here you can find everything: from children's crafts to the most complex patterns.
You can create a plywood craft using the following tools:
- hand jigsaw
- laser machine
- electric jigsaw
- CNC - milling machine.
Sawing with a hand jigsaw
For this work, you will need the following tools:
- saw for plywood. Several files of different sizes may be needed
- pencil and ruler.
Start with a simple drawing. If you have 5 for drawing, you can apply the pattern to the sheet with a simple pencil. If your drawing is not very good, use carbon paper to transfer the pattern. For the first time, animal figurines, flowers and other light drawings are perfect.
Before starting sawing, it is necessary to fix the plywood sheet with a special machine to prevent defects from occurring, for example, in the event of sheet movement. However, if such a machine is not available, try to hold the sheet as tightly as possible. Only the jigsaw moves while cutting.
If you need to create through elements, you should use an awl. The file must be kept strictly perpendicular to the sheet. At the end of cutting, it is necessary to wipe the edges of the product with sandpaper.
Laser cutting of plywood
A laser system burns out a pattern on the surface of a plywood sheet with a beam.
The main advantages include:
- the quality of the cut is the highest, the thickness is the smallest. Such indicators are quite difficult to achieve on other types of equipment.
- saving time and effort. No need to handle defects that arise when working with a hand or electric jigsaw
- high accuracy. All parts will be the same size, and the drawing may be the most complex.
 Of the negative qualities, we single out:
- Excessive power can result in carbonization of the material and fire. Experienced craftsmen should work with such machines.
- each type of timber and type of adhesive requires its own processing mode
- in the absence of experience from the operator of the machine, the beam can hit a knot, which with a high degree of probability will fall out, and, therefore, there will be a marriage in the work.
If you do not take into account the human factor, then we can say that laser equipment provides tremendous opportunities for the implementation of design ideas.
Using the milling machine
The main advantages of this method:
- high speed
- no carbonized elements are generated, as is the case with a laser machine. This machine is best used by novice craftsmen.
- high precision, just like when working with a laser machine
- no need for processing and sanding the edges.
Using a jigsaw
It is worth noting that jigsaw files are fragile, they can only be moved in a strictly vertical plane. Any misalignment will cause the canvas to break. The saw functions when moving down, and the saws are positioned in the same way, with the teeth down. When working with complex areas, it is the workpiece that scrolls, and the canvas should remain in one place. In the event that the outer perimeter does not contain difficult patterns that can be damaged while working according to the internal scheme, then you can start working from the outer perimeter. Thus, you will lighten the weight of the workpiece.
 It is imperative to control the temperature of the web. The file tends to heat up quickly, and overheating becomes the cause of breakage. For this reason, it is worthwhile to let the nail file cool down from time to time or change it to another.
In this article, we tried to answer the question: how to cut plywood? Cutting plywood is more time consuming than cutting wood. This is mainly due to the multidirectional fibers and viscous adhesive mixtures. However, with the right equipment, these problems can be dealt with with ease.