Hanging bed - perfect solution not only for a garden or veranda, but also for an ordinary city bedroom. Moreover, this design of a sleeping place corresponds to many modern styles interior. Today we will look at the popular types of hanging beds.
To achieve the effect of weightlessness, the bed is fixed to the wall. The absence of legs and other visible fixtures creates the illusion of "floating" furniture. This sensation can be intensified under the bed.

Such a bed can be of any shape, the main condition is absolutely flat. Otherwise, the structure will not fit snugly against the wall, which will reduce its reliability and safety. Such a hanging bed will perfectly fit into the interior in style, and will also be suitable for high-tech and modern style.
Advantages
1. Unlike other types of hanging beds, the bed "hanging" on the wall does not wobble or wobble.
2. The bed looks quite original and modern, but at the same time it is versatile - it is suitable both for a teenager's room and for a spouse's bedroom. A hanging double bed is the most common occurrence.
3. The embodiment of non-standard design ideas, for example, creating an asymmetric "floating" bed.

disadvantages
1. The inability to arrange a warehouse of things under the berth. After all, the space between the bed and the floor is clearly visible.

2. Installing a "floating" hanging bed with your own hands in compliance with all safety measures is a rather difficult task. You will have to resort to the help of specialists, which entails additional waste.
Bed on four bindings
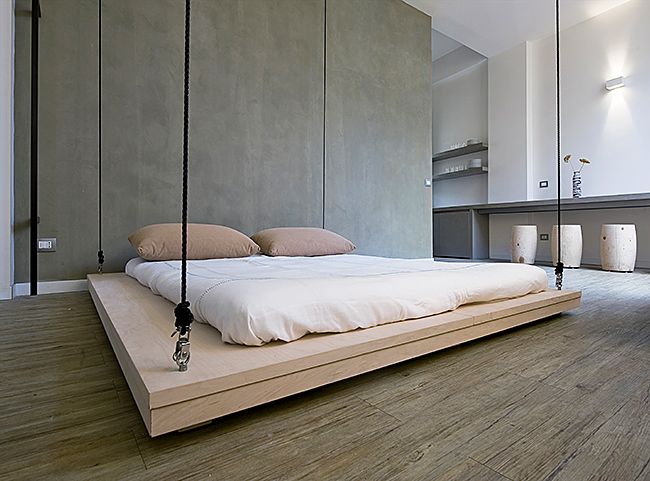
As the name implies, ropes, metal cables, chains or special pipes with fastening holes are attached to the sleeping place in four places. This bed is usually rectangular in shape. If you decide to make a hanging bed yourself, do not forget to attach to wooden frame steel strips at the points of connection of the ropes. Each plank should be supported by several screws, this will increase the reliability of the structure. The hanging bed is attached to the ceiling using dowel-nails with rings or hooks at the ends. Such mounts do not always look aesthetically pleasing, but they can be successfully hidden under the ceiling trim, for example, under drywall. In the following interior, you can see an example of hanging beds on ropes (round mounts are used).

Rope beds are successfully used in country, tropical, nautical and romantic styles. The bed on the chains will be an impressive element of the Gothic interior.

Hanging beds on four mounts are often equipped with bumpers on three sides, this practically eliminates the possibility of an accidental fall of a sleeping person when rocking the bed. There are also bunk hanging beds, this technique will be appropriate in
What to do when there is a desire to change the interior in the house, but at the same time there is not enough useful area? it frequent question residents of small sizes. You have to go to the tricks, look for options to save space. But few people come up with the idea to install a hanging bed. And such a solution solves several issues at once without any problems.
How does this desire arise?
When it is impossible to create interesting interior indoors, many immediately rush to extremes - they buy an ordinary sofa instead of a bed. But what if there is another way to decorate the room? Make a hanging structure with your own hands! This decision will save the owners of apartments with a small area. With such a bed, the lack of space will recede into the background.

A similar construction - perfect way optimize the free space in the room. Of course, you can only make a bed if the ceiling in the room is high. Another option is to place it above the work area, where to stand in full height nobody will. This solution is often practiced by designers when it is required to create an atypical interior. In this case, the product is placed against the walls.

Such furniture is stylized for a specific apartment. In this case, both the dimensions of the room and the dimensions of the bed itself are taken into account. So, the lack of free space is more than compensated for by a hanging bed. Placement against walls - promising direction in design. Wherein sleeping place is in a static position or moves on suspensions or hinges.
Wall mount (photo below) is used when the landlord is not satisfied with the chains in the middle of the room. Then one part of the berth is placed against the wall. But for this it is necessary to calculate the loads and think over the fasteners.

Advantages and disadvantages
You can talk about the system for hours, but what is it in reality? Let's consider its advantages and disadvantages. Advantages of the bed for the interior:
- saving space;
- placement at any point of housing;
- creation interesting design interior;
- ease of maintenance, folding and unfolding of furniture.

Now let's approach from the other side. There are also many disadvantages:
- the high price of such furniture;
- minimum comfort, especially when using a rope or chain;
- the complexity of dismantling and installation;
- long-term calculations.
Important! The interior of the room is guaranteed to suffer due to visual reduction ceiling height.

What follows from this? Of course, this way the placement of the bed remains interesting, but it also has significant drawbacks. Not every contemporary will allow himself such a pleasure. If, however, under the berth you organize working area, then you can significantly save free space, but again the interior will suffer. When installing, it is important to monitor compliance with the technology, otherwise you can pay dearly for negligence.
Suspension options
Ceiling mounts are carefully selected. Otherwise, the structure will be fragile. It is recommended to use anchor bolts that will support both the weight of the bed and the load when a person is on it. After that, the installation continues by threading a rope, cable or chain through special holes. They are found in the corners of the furniture. Do-it-yourself assembly provides for other fastening methods, but almost always it all comes down to these holes.

Important! Keep in mind that this method of fastening will not exclude the rocking of the berth. And this does not add comfort if you use hanging furniture as a permanent resting place.

If you want to make such a bed with your own hands, but do not use technological holes, you can consider the option of installing it against the walls. This method provides for a rigid attachment.

Hangers for such a bed are of the following types:
- bed;
- rigid ligament;
- floating bundle;
- combined.

In the first version, a support is used. This is done in cases where it is not possible to fix the bed to the ceiling. At the same time, the interior does not suffer at all. The combined ligament provides for the use of a rigid connection and a floating suspension. Rigid fixation of the bed is possible provided that it is fastened by metal profiles... The floating bundle (photo below) is nothing more than a rope.

Bed shape
Rectangle and circle are the most popular bed shapes. But there are also extraordinary solutions that can impress with their quirkiness. Of course it is designer things that are used to tailor the system to a specific interior. Such a bed does not outwardly differ from an ordinary one. It can be double or single, for children or adults. There are models that are massive and lightweight.
If the conversation is about a full-fledged place to sleep, then it is preferable to choose a massive option with mounts designed for heavy loads. As a rule, these beds are rectangular, with edging around the edges. There are also models with a free perimeter. But children's variations will dilute the interior of any room with an unusual look (see photo below). There are beds in the form of cars, boats, houses, and so on.

Round beds are presented in the form of a hoop with a canvas stretched inside it. The pendants are masked or left in plain sight. Such a bed is created in the form of a wicker basket with a peculiar back. There is a mattress inside the structure. More often the bed on the ceiling is used for temporary rest, but sometimes they take people into their possession for the night.

There are also hanging sofas. You can do this with your own hands, if you try. If desired, they are decorated with backs, sides, sidewalls. Therefore, they not only lie on them, but also sit comfortably. Such models are designed for one person lying or two or three sitting people. They have found application on verandas and gazebos, therefore, they resemble a hammock in their functionality.
Outcomes
Since hanging beds are part of the interior, take the choice of design as seriously as possible. It is possible to build such a bed with your own hands, but it is not always worth doing. These solutions are not meant for hobbyists. classic style premises. They will fit into an extraordinary interior, complement it. In addition, not everyone likes the rocking of the structure.

Choose a mattress that matches the size of your hanging bed. If it is less, then you can always borrow usable space other little things. The suspended bed is suitable for those who like to experiment, connoisseurs of originality who want to diversify both the ceiling and the room itself.

In the warm season, when it is very difficult to fall asleep in the house, you want to move somewhere closer to nature. Sleep on fresh air very useful, so you can consider the process of building a hanging bed, which can be placed, for example, on the back porch country house on your garden plot.
In this case, your costs will be approximately $ 350 and only one day of work.
How to make a hanging bed with your own hands?
First of all, you need to decide where exactly the bed will be located. It should not interfere with anyone, so it will be correct to place it on a spacious terrace, and take into account that the bed can swing from side to side, so there should be no walls or furniture nearby.

Measure the beam to which the bed will be attached. Drill the beam in the center. Cut the blocks into quarters and brace them to the ceiling. Each bracket must be fixed at an even distance from each other, which is 75 cm. If there are open rafters, the brackets can be mounted even higher. If you plan to finish the ceiling, place the fasteners at the same level as the lower part of the beam.

Drill holes for suspension bolts in all brackets. The holes should be centered on the width or length of the staple in a rectangle.

Rembolts need to be inserted into drilled holes, put washers on them and tighten with a wrench so that they do not rotate.
The next step is to create the bed frame.

Reinforce two planks and place the other two in the middle of the supporting elements. Attach the quadrangular brackets to the end of the timber. They need to be reinforced at the beginning and end of the boards at the same level with their inside.

Attach four hangers to the beam, positioning them on the inside of the boards 25 cm from the edge.

Place the bars in the fasteners, and glue them together for strength.

To connect the main bars of the bed frame, glue the ends of the bars with glue and fasten the staples with nails. Repeat the procedure on the other side.

Cut out the plywood for the mattress.

To attach the plywood to the bed, apply glue to the planks along the top of the stretcher and to the support.

Additionally, we fasten the plywood with nails. The stretcher must be the same size as the mattress.

Make bumpers around the perimeter of the bed, for this you need a 16 mm board. We will fix it with glue and additionally with nails to the frame.

To allow the bed to hang, drill four holes through the planks and frame.

After that, the finished bed must be covered with paint and allowed to dry.

Install the re-bolts through the drilled holes, which should be strictly vertical.

Attach S-shaped hooks to each re-bolt, on the ends of which put a metal chain.
Raise the bed with the hooks on the metal chain to the ceiling.

Place a mattress inside the frame, make the bed and you can rest in peace.
Hanging bed - modern solution registration of a sleeping bed. She is very much loved in Asian countries because of the originality of the design. Our people associate such a bed with something sublime and unusual, sometimes with a comfortable hammock. Spending time in such a sleeping place, you will feel like on a luxurious terrace overlooking the ocean or in a rainforest with waterfalls and birdsong, if you add a little fantasy. A do-it-yourself hanging bed is a completely feasible task. To create and install it, you only need consumable, patience and some free time. Believe me, your efforts will exceed your expectations, because such suspended structure will make the interior in your bedroom more original, and your sleep will bring you pure pleasure.
Hanging bed shape
The hanging bed is suitable for the most daring and creative people. It is quite difficult for individuals of conservative views to abandon their habitual, firmly standing bed... But don't put aside this interesting option, because he is able to add the very bright colors that you lacked in your bedroom.
Before making a hanging bed, let's talk about the possible forms of this design. So, let's look at what shapes hanging beds are:
- Rectangular. This is the most traditional, familiar and widespread option. It is very easy to find a mattress and bed linen for such a bed. In addition, it will fit well into absolutely any interior.
- Square. This model can only be considered if there is large room or premises with sufficient area - Vacation home, spacious studio. Most often, such a structure is used not as a sleeping place, but for temporary pastime. It is a square bed floating in the air that can be found on beautiful terraces and summer cottages.
- Round. Undoubtedly, this form looks incredibly original and stylish. But before you buy such a bed, think about the fact that it needs special care and it takes a lot more space, in contrast to the standard rectangular model. Yes, and it is difficult to choose bedding for a round structure, which, for sure, will have to be sewn to order.
Suspended structure fastening methods
So, let's figure out a little how to attach a hanging bed with your own hands.
Important! The installation method of this structure directly depends on its shape and design features ceiling. For example, a bed on wooden attic can be fixed to ceiling beams.
There are three main ways of attaching a hanging bed.
Ceiling
Attaching a floating structure to the ceiling is a rather complicated and time-consuming process that requires a large number knowledge and time. When designing a ceiling-mounted bed, you will need to correctly calculate the potential static load given the load on the bed in motion.
That is why the hooks and all the others are mounted ceiling mounts must be made of durable high quality alloy.
Important! The sleeping place will hang from the ropes, metal ropes or chains - this will depend on your interior design and bed model.
Fastening the structure to the wall
This is not the most popular mounting method, but it is still used. Mounts are installed in the central part of the bed at the headboard or on one side - as you like. By attaching the bed to the wall with special fasteners, you will get a bed floating in free space, which will look very impressive.
Combined
This mounting method is considered the safest and most reliable among all possible. By choosing hanging mount, you will be able to ensure the complete immobility of the hanging bed.
Important! This method should be chosen for fixing a children's hanging bed. Here you can give free rein to your imagination: fix the ropes in the corners of the room or install the mount in the center of the berth - choose any option you like.
How to make a hanging bed with your own hands?
If you are planning to create something hanging, uncomplicated and light, then a hammock is exactly what you need.
You need to prepare the following tools and materials:
- 2 cuts of bright, very durable fabric measuring 1.5 x 3.5 cm.
- Soft rug.
- Strong cord (you can take nylon).
- 4 metal hooks for fixing the structure.
- Threads for basting and sewing.
- Needle.
- Scissors.
- Sewing machine.
Step-by-step algorithm of actions:
- We put one sheet of fabric on top of the second.
- We cut off the edges of two segments with pins, sweep them off, sew on two long sides on a typewriter. We leave a hole for inserting the rug.
- We turn two short sides once (where the head and feet will be located) so that in the end we get space for the cord.
- We insert the cord and fix the previously tucked upper part machine stitching.
- We tighten the cord so that our fabric gathers well.
- We put the rug inside our future hammock and close the hole with a blind seam.
- We form large loops on the cords on both sides.
- We attach metal hooks to the hinges.
That's it, a simple DIY hammock is ready to use! All that remains is to attach it to a tree or posts for maximum relaxation.
Do-it-yourself hanging bed of a classic rectangular shape
This method is perfect for those people who like to relax together. You can make such a bed with your own hands quickly enough.
To do this, you need to prepare the following materials and tools:
- Large, very durable wooden plank(a table top will do).
- Drill.
- Choice of paint.
- Steel rope or very thick rope (rope can be used).
- Hooks for hanging the structure.
- Varnish or glue.
Important! We do not recommend taking fiberboard material, as it can break under heavy load. If you do not have a large board for the base of the bed in stock, then in this case you can assemble it from ordinary boards for the floor, placing them in two rows, perpendicular to each other.

Progress:
- First, we give the bed base an attractive look. We sand it, prime it, paint or varnish it.
- Using a drill, we make holes for the cable. It is best to place the holes 15-20 cm from the edge of the board.
- We pass the ropes into the holes, securing them from below with a tight knot. We process the knots with varnish or glue so that they do not come loose during the operation of the suspended bed.
Important! It is advisable to pass the two ends of the rope into the hole, so the fastening will be stronger, and it will be easier to install the hooks for hanging into the formed loop.
- We fix the previously fixed ceiling hooks on rope loops on both sides of the structure, adhering to the sequence: we work first with one, and then with the second side. It is better to do this work with an assistant who will hedge the structure.
- Place the mattress on the base of the bed.
Important! If desired, a transparent canopy can be thrown onto the hanging bed, fixing it on the side hinges.
The work is done. Hanging romantic bed is ready!
How to make a round hanging bed?
Such a fluttering bed will perfectly fit into a garden veranda or a nursery. The main thing is to stick to one important rule: position the structure away from the walls. When rocking, it should not touch the wall or other surfaces.
List of materials and tools for round hanging bed:
- Boards of good strength.
- Ropes or nylon cords.
- Metal hooks.
Step-by-step instruction:
- Determine the diameter of the hanging bed.
- We cut out an even circle from a wooden canvas.
- Using coarse and then fine-grained sandpaper, we grind the edges of the round canvas.
- We drill holes for the ropes in 4 places, stepping back from the edge 20 cm.
- We take 4 ropes in our hands one by one, fix them to the ceiling metal hooks.
- We put the mattress on the base.
Suspended round bed ready!
- Types of hanging beds
- Round hanging bed
- Little subtleties
The hanging bed is a favorite Asian bed. Russians, hearing such a phrase, imagine either a luxurious terrace overlooking the ocean, or a garden with a hammock suspended in it. In any case, such a bed is relaxation, pleasure, a light sound of the wind, a whisper of gentle waves.
The hanging bed combines style and comfort. It makes the interior original, and it is a pleasure to sleep on it.
But who bothers to decorate the interior of their home by hanging a light, graceful bed in the room, swaying from the slightest movement?
Types of hanging beds
Creative pendants are becoming more and more popular in our latitudes. So far, most often, parents are trying to make a hanging bed in the children's room. Boys like the rocking bed in the shape of a ship; girls prefer a sleeping place in the shape of a fairy-tale flower. Resourceful parents with many children build hanging bunk beds for children. One side of such structures is usually attached to the wall, the other is suspended from steel cables or strong ropes.

Round hanging beds in combination with a light cape look good on the terrace.
On a terrace or in a girl's bedroom, round hanging beds are quite appropriate. Decorated with canopies and correctly selected lighting, they become the center of the interior, demonstrating either the creativity of the owner or the sophistication of the hostess.
Rectangular hanging models can be light, airy. Even beginners can do these. More complex structures with a back and sides require some carpentry skills, but with hard work, patience, you can even make such models yourself.
Today it is considered fashionable to decorate the interior of a country house with hammocks. Hammock in Mexican, Brazilian or Mediterranean style Is both a fashionable interior solution and a comfortable bed.
Back to the table of contents
The simplest do-it-yourself hanging bed
The most simple construction- a hammock made of a strip of bright fabric. You will need 2 cuts of a very strong fabric of about 1.5x3.5 m. The fabrics are laid on top of each other and sewn along the long side. So that you can put a rug that supports the shape of a hammock inside the panels, you can not completely overwrite it. The narrow side is folded over and sewn to form a tunnel for the cord. The cord must be very strong. Better to weave it from nylon ropes. The cord is tightened to collect the fabric, the place of assembly is wrapped several times with the same cord. The fashionable hammock is ready, it remains to securely attach it to a tree or special racks. A bright hammock will help create a light resort atmosphere of Asia or the Mediterranean.
Hammocks have one drawback: it is not very comfortable for two people. Therefore, for those who like to relax together, a rectangular hanging bed is suitable. It is very simple to make it with your own hands. Would need:

A very thick rope is required to hold the hanging bed.
- Solid and very durable board. You can use a table top. It is not worth taking fiberboard: the material may break. If there is no large board, you can assemble a bed of floorboards by fastening them in 2 layers, perpendicular to each other.
- Dye.
- Drill.
- Extra thick rope or steel cable.
- Hanging hooks.
First, they give a presentation to the base board. It is sanded, primed, painted or varnished. With a drill with a crown, holes are made in the corners into which the edging or cable will pass. It is good if they are located 15-20 cm from the edge. Ropes are passed through the holes, they are fixed with a knot from below. To prevent the knots from coming loose, they can be treated with varnish or glue. It is better if both ends of the rope are lowered into the hole: the fastening will be more reliable, and the resulting loop is easier to place the hooks for hanging. Hooks are hooked onto the rope, each side of the bed is alternately attached to the hinges previously fixed on the ceiling. It remains to put the mattress, if desired, fix the canopy. The romantic bed is ready.
Back to the table of contents
Round hanging bed
It looks great on a garden veranda or in a children's room. The main thing is to hang it away from the walls. While swinging, it should not touch the walls.

Diagram of a round hanging bed.
Very durable boards are selected for the base. If the bed will be constructed from fiberboard, then 2 sheets should be fastened together: this will be more reliable. Calculate the required diameter of the future bed, from the assembled wooden board or fiberboard cut out a circle. Holes are drilled at a distance of about 20-25 cm from the edge. They must be located at the same distance, and their diameter must correspond to the ropes, ropes or chains on which the structure will be suspended. Chains are passed through the holes, which are securely fixed from below. These are the most reliable, but not the most aesthetic mounts. Nylon cords look more aesthetically pleasing, but they are less reliable. When choosing what the structure will be suspended on, one should take into account the weight of the guests and the load that will fall on the base and fastenings. If children are jumping on the bed, you should choose the most durable materials... Chains or ropes are passed through the holes, collected in a bundle, which is fixed to the ceiling. It turns out to be a beautiful cone. It is very important to correctly calculate the length of the cords: the base should hang straight. The most powerful anchor bolts are required for fastening.