Among the many options for planting potatoes, the most popular is the shovel planting. This method can be called classic. It is used in small areas with predominantly loose soil. On clayey areas such a potato planting scheme is impractical due to the complexity further processing seedlings. Let's talk in more detail about how to plant potatoes under a shovel.
Preparation of planting material
Potato tubers for planting are prepared in the fall. At the same time, rotten and damaged roots are excluded. At this stage, you should remember: strong, healthy potatoes will bring big harvest... In turn, rotten tubers can infect the soil and provoke rotting of roots in adjacent holes.
To increase the resistance of tubers to diseases in the fall, they are kept in the sun for 20 days. In this case, the tubers acquire green tint and already become unfit for human consumption. Planting potatoes are harvested in a dark, cool place until spring.
 In the spring, the potatoes are taken out and transferred to a bright room for germination. Immediately before planting, all tubers are examined for rot. Sick root crops are disposed of.
Potatoes are considered ready to plant when sprouted. They should be strong, but not long. Otherwise, the shoots can be damaged during planting.
Potatoes for planting should be medium in size. Large tubers can be cut in half. Moreover, there should be a sprout on each half of the potato. Sections must be well dried to avoid rotting. planting material... After that, the slices are processed wood ash... This method allows you to reduce the consumption of potatoes and is quite popular with experienced farmers.
Soil preparation
In the fall, the potato beds are plowed up and humus is introduced. In the spring, before planting potatoes, the soil is plowed again, disinfected and fertilized. Ash, compost, urea or saltpeter are used as fertilizers. Top dressing of the soil allows you to increase the yield.
If the soil on your site is clayey, but you plan to plant potatoes under a shovel, take care of high-quality and abundant feeding soil. Fertilization not only increases the yield, but also directly affects the quality characteristics of the soil, making it lighter and friable.

Potatoes have good performance seedlings and yield, if it is planted in beds previously sown with sunflowers, beets or pumpkins. Also you can plant potatoes after cucumbers and corn... The area chosen for planting potatoes should be well lit and accessible for irrigation.
Planting potatoes under a shovel
It is necessary to start planting potatoes when night air temperature will be set at around 10 degrees... There is no point in planting earlier - the first shoots will appear after the soil warms up well.
There are two ways to plant potatoes under a shovel:
- Linear fit - the holes are in one line;
- Staggered landing.
The distance between the holes should be at least 30 cm. When planting linearly, it is necessary to observe an interval between rows equal to 60 cm. The soil in the aisles will be required for hilling potato seedlings. In late-ripening potato varieties, the tops are thicker, so the distance in the aisles must be at least 70 cm.
The hole in which the seed potatoes are placed, shouldn't be too deep... In the lower soil layers, the soil is much colder, so deep planting increases the time to germination. The optimum depth is 10 cm.
If you decide to plant potatoes at a later period, when the weather is warm and dry enough, reduce the depth of the hole to 4 cm. The same depth is required when planting tubers in clay soil... Its dense structure is poorly permeable to heat and moisture and increases the time of emergence of the first shoots.
 After we have decided on the landing pattern and distance, we proceed directly to the planting work. We dig a hole and place the potatoes in it in such a way, so that the sprout looks up... We fall asleep with earth. We plant the rest of the potato tubers in the same way.
If you are using a linear fit, you can use a board to facilitate the work process. To do this, measure the width of the garden bed and select a board of the appropriate length plus 10 cm. The width of the board can be arbitrary, but it is necessary to take into account: a board that is too narrow can break from the weight of your weight, and a board that is too wide is inconvenient to work with. We place a suitable board on the ridge in the same way as the line for the location of the holes. Once on the board, start digging holes. After digging one row of holes and placing potatoes in them, move the board to a distance equal to the row spacing, and cover the holes with earth. Take the next row and repeat.
Using a board when planting potatoes in a linear manner has its advantages. The earth is not trampled down in the process of work, the holes are located on the same line. As a result, you will get straight potato rows.
After the potatoes are planted, it is necessary to level the surface of the ridge. This is done using a rake. This will give your garden a more well-groomed look and eliminate excessive evaporation of moisture from the soil.
Care of potato seedlings
After the appearance of the first shoots, it is necessary to carry out after them proper care... In addition to watering and systematic weeding, it includes hilling.
Hilling potatoes is carried out every two weeks. With the help of a hoe or a large flat cutter, the soil from the aisles is raked to the potato tops, forming heaps around it. Hilling has a beneficial effect on the formation of potato tubers, and also protects seedlings from late frost.
 After the potato tops have grown and become strong enough, hilling can be skipped and limited to watering. Watering must be done once or twice a week. Watering should be stopped two weeks before harvesting. If you plant potatoes according to the rules, following the advice of experienced farmers, then the harvest will delight you with an abundance and large healthy root crops.
We plant potatoes along the rope. The distance from one tuber to another is of the order of 35-45 cm. And between the rows they did not specifically measure, but it turns out like this: we plant a row of potatoes, dig up the next row, pouring in the potatoes and dig in the second row blank;. And in the third row we plant the tubers again. Well, in fact, it comes out about 60 cm.
There are two methods of planting potatoes that most people use on small areas... This is a lean and compact fit. In the first case, if space permits, potatoes are planted in rows, and the distance between the rows is greater than the distance between bushes in a row. The first is 25-35 centimeters, the second is from 50 centimeters. This makes it possible later to easily process potatoes - weed and huddle, creating the very hills in which most of the tubers will form. The second method of planting in confined spaces in piles. On a small area, 6-8 potatoes are planted almost closely, then a meter recedes and a pile is again created. The space is used more economically, although the yield is probably slightly lower. But this method is ideal for summer cottages, when potatoes are grown not for storage, but for cooking immediately after digging.
We plant like this : if the potatoes are of an early variety, then the distance between the tubers is 25 cm, the first row is measured with a centimeter and then we plant equal to the first row, and the distance between the rows is 60 cm, but if we plant potatoes late varieties, then the distance between the tubers is 35 cm, we also measure it with a centimeter and equal to the first measured row, and the distance between the rows is 70 cm.
The planting depth of tubers is 8-10 cm.
In general, the distance can be different. It all depends on the required planting density and the availability of space for planting. We usually use a distance between rows equal to 1-1.5 times the length of the metal part of the shovel. And between the bushes 0.5-1 length.
I plant early potatoes in the ridges in the country. The distance between the ridges is 70-80 centimeters, between the plants 30-40 centimeters. I plant later varieties simply in a continuous line on the field. Between rows 60-70 centimeters, between plants 40-50. With dense plantings, the potatoes must be watered so that the plants have enough moisture, be sure to loosen and huddle. If the care and the soil are good, those potatoes will grow with denser plantings, only it will be more difficult to process them.
When we planted potatoes, as a rule, we made a small distance between the tubers, about the order of thirty centimeters. Here, between the rows of potatoes, we retreated more. About seventy centimeters, well, about twice as much as between tubers
25 centimeters between tubers is too little. The roots and tubers of potatoes will not have enough nutrition with such a close planting and the yield will be appropriate - small potatoes.
At least 30 - 35 centimeters should be the distance between the tubers, and between the rows - 1 step (70 - 80 cm).


The distance between the rows of potatoes and individual tubers depends on the method of planting this beloved crop. For example, with this not the traditional way planting, like a "slide", the distance between the tubers is only 20-25 centimeters. When planting in the barrel the distance between tubers is at least half a meter, and between rows - up to one meter.

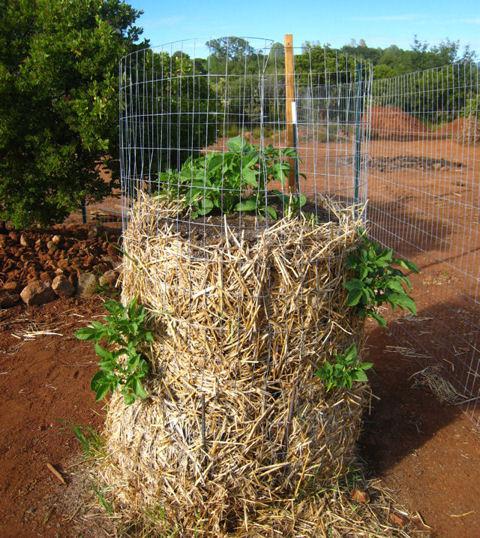
The photo shows a method of growing potatoes in straw. The distance between tubers is 30-50 centimeters, and between rows - up to seventy centimeters.
When planting in a tape manner, a distance of 110 centimeters is left between the tapes, and at least thirty centimeters between the two rows in the tape.
We often use the traditional method of growing potatoes, in which the distance between the tubers is up to seventy centimeters, and between the rows - at least a meter, so that there is a possibility of good hilling of the bushes.
And another point: early potatoes are planted more often than mid-season and late varieties.
We follow in the country following rule: the rows are located at a distance of seventy to eighty centimeters (usually seventy) from each other, the distance between tubers in a row when planting under a plow is about forty to forty five centimeters. When planting under a shovel, pits are dug to the width of the shovel, the distance between the pits is end-to-end (the distance between the tubers is approximately the same: 40-45 cm).
Usually, when we plant potatoes on a site, we measure the distance from hole to hole in steps, usually we measure two steps from one hole to another, we also do it with rows, we also separate the distance from one row to another in two steps. The most important thing is that the holes and rows are not cramped.
Gardeners already have a trained eye, and of course, before planting potatoes, they mark their site and for this they make grooves, along which they subsequently plant potatoes.
And to increase the yield, after planting, sprinkle the holes with potatoes with a small layer of peat a couple of centimeters.
The correct row spacing with potatoes is seventy-five centimeters for early potatoes and ninety centimeters for late potatoes.
But the planting density will directly depend on the size of the potato tubers. Small tubers need to be planted after twenty centimeters, and large ones after thirty centimeters.
The depth depends on the soil, and can be from six to ten centimeters.

Well sprouted tubers to get early potatoes, you can plant a little earlier - at a soil temperature of 5-6 degrees. Experience shows that such early landing in insufficiently warmed soil gives a greater yield than late in warmed up.
Potatoes are planted on flat surface, and on waterlogged and heavy soils - in the ridges. With this planting, the ground warms up better and more air flows to the tubers.
The distance between the rows of potatoes when planting
Before boarding in order to evenly place the plants in the area, the area should be marked out. To do this, using a marker, shallow grooves are made, along which landing is carried out. For the first pass of the marker, a cord is pulled along which its extreme tooth is led. You can plant the tubers directly under the cord, but this is less convenient, and it takes more time. To increase yields after planting, the soil can be mulch(sprinkle with a layer of peat 2-3 cm).
The optimal distance between the rows of potatoes for early-ripening varieties is 70-75 cm, for late-ripening ones - 80-90 cm.
Planting density depends on the size of the potato tubers. Small ones are planted after 18-20 cm, medium and large ones after 26-28 cm.
Tubers are planted in heavy soils to a depth 6-8 cm, on the lungs - 8-10 cm, counting the distance from the soil surface to the tuber. With such a planting, about 350 large tubers, 450 medium tubers, 500 and smaller ones will be required per hundred square meters.
Caring for potatoes after planting
Potato care basically comes down to keeping the soil loose and killing weeds.Harrowing of potatoes. The first harrowing is carried out 4-5 days after planting. Then two or three more before germination and one or two after the emergence of plants on the surface. Usually 16-28 days pass from planting to germination.
Loosening and hilling of potatoes. After the rows are well marked and the plants have sprouted so that it is impossible to harrow, they begin to loosen the row spacings. The first time the soil is loosened deeply - by 12-14 cm, and the second and third times are shallower - by 6-8 cm.When the plants reach a height of 12-15 cm, the first hilling is carried out, with a ridge height of 15-20 cm. The second time the potatoes are hilled before closing the tops.
Top dressing of potatoes after planting. Before loosening the row spacings and hilling the plants, it is advisable to feed them. This is especially important for mid-season and late varieties of potatoes. It is enough to carry out two dressings.
First time you can add two handfuls of humus under each bush with the addition of two teaspoons of ammonium nitrate, or add two handfuls of ash mixed with the same amount of soil, or add 15 g of chicken droppings.
For the second feeding in 10 liters of water, dilute 2 tbsp. tablespoons of superphosphate and 1 tbsp. spoon of nitrophoska. The plants are watered with this solution at the root, and then they are watered with clean water.
Keep in mind, that feeding is given only at the initial development of plants. After flowering, they lead to late maturation of tubers and the accumulation of nitrates in them.
With a lack of moisture potatoes are watered along the furrows or by sprinkling. Drought 2-3 weeks after germination, during bud emergence and early August when tubers are growing, can significantly reduce yield. After watering, the soil must be loosened so that a crust does not form.
Advice. To avoid damaging the potatoes, keep in mind that in hot and dry weather, do not deep loosening around bushes or hilling plants. This leads to dehydration and overheating of the soil, stops the growth of tubers and contributes to the appearance of diseases. In drought conditions, shallow loosening of the row spacings is sufficient.
Hello. Many are convinced that growing potatoes is very easy. Indeed, it is worth bury it in the ground, by the fall there will be a harvest. But which one? That is the question. To justify the hopes for good harvest, it is necessary to take into account the peculiarities of the culture: what seed material is needed, at what distance to plant potatoes, how to care and much more.
You can plant any potatoes, the harvest will still be there. But you are interested in having a rich harvest, so approach the selection seed material responsibly. The best tubers for planting are the size of egg... The harvest will be worse from the smaller ones, the large ones are not to be used economically, and you will not get a good harvest from them.
It is sometimes asked if the tubers can be cut into pieces to get more seed. You can do this, but if after planting heavy rains begin, a lot will rot before sprouting. Therefore, if you only have large tubers and you have to cut them, be sure to prepare them for planting: dry in the sun and sprinkle with ash.

If you want to have a good harvest delicious potatoes, buy an elite seed at a trade show or specialty store. It is enough to purchase one kilogram, and in two years you will have enough seed tubers, and you will have left for food. It is not cheap, but you can choose the desired variety that is not infected with diseases, a high yield is guaranteed.
Preparing for landing
About a month before planting potatoes, you need to wake him up. The procedure is simple, but very effective for harvesting large and healthy tubers. It is performed in the following sequence:
- the tubers are disinfected with a weak solution of potassium permanganate;
- laid out in one layer in boxes;
- a week is kept at a temperature of at least 20 °;
- placed in a bright place with a temperature of about 10 °;
- periodically moisten the tubers with water and turn over.
Add an ash extract to the water for humidification and mineral fertilizers... Before planting, treat potatoes with preparations containing copper to prevent early late blight. The best tubers for planting are with dark green shoots one centimeter long.
Preparing the soil
Potatoes like light soil, grows worse on heavy soil. The introduction of manure in the fall, humus, peat will help to improve the structure and nutritional value: 3-4 kg per m 2. The culture does not like acidic soil, liming is good. It is advisable to plant in one place after three years so that pathogens and pests do not accumulate.
In the fall, the fertilized area is dug deeply, without leveling, so that the earth does not compact. In the spring, a complex of fertilizers is applied: nitrogen, phosphorus, potash, the soil is loosened. Keep in mind that potatoes do not like excess moisture in the garden: they can get wet.

Time landing
The timing depends on the variety and local conditions. The condition of the soil also plays an important role: it should not be wet, but it should not be allowed to dry out either. It is necessary to choose a middle ground. A few tips will help you decide when to plant:
- most early date coincides with the appearance of leaves on a birch;
- cherry blossoms suggest that you can plant potatoes without any risk;
- the daily air temperature does not drop below 10 °, the soil warmed up to the same rate;
- potatoes with strong sprouts can be planted at a soil temperature of 6 °.
Landing technology
You can plant different ways, which depend on your capabilities and preferences. Choice is an important issue correct distance between rows and bushes of potatoes. A thickened planting harms plants, a rare planting reduces yields. The choice of planting density depends on the variety, land, technology. Early varieties can be planted slightly thicker.
Shovel landing is most common on small summer cottages, but not everyone knows how to get the maximum yield with this method. It has several options:
- solid fit;
- landing in the ridges.
Each method has its own characteristics. With the continuous method, it becomes difficult to care for the plants: the bushes, growing, close up. It is better to plant under a shovel together: one person digs shallow holes, no more than half a bayonet, the other places seeds in them. Then they move on to the second row. The holes with potatoes in the first row are covered with dug earth, the second person again lays out the potatoes in the holes. The distance between the holes is kept 40 cm.

Potatoes are planted in the ridges if the soil is waterlogged or heavy. Elevated beds one meter wide are formed to accommodate two rows with a distance of 60 cm between them. The rows on the bed are separated from the other ridge by a groove with sloping walls. The width between the ridges is 20 cm.The potatoes are planted in a row at a distance of 25 cm.
Landing under walk-behind tractor saves time and energy. Potatoes are planted using a hiller, ideally with an adjustable working width. Good in work and disc, which makes high ridges, additionally loosens the ground. If you have a potato planter, the work will go even faster: in one pass, you can plant the tubers and cover them with soil. Regardless of the unit, the distance between rows should be 60-80 cm, between tubers - 20-30 cm, depth - 10 cm.
The furrows are carried out by the hiller, the seed material is placed in them. The width between the wheels for this operation is minimized as much as possible. Then they pass with a walk-behind tractor with a hiller between the furrows, sprinkling them with earth. For sprinkling potatoes, the base of the wheels is expanded so that they go between the rows.
It remains to provide correct and timely care to dig up big tasty tubers in the fall. This, perhaps, is all. How to care for potatoes is a topic for a separate article. If the material seemed useful to you, share a link to it with your friends from social networks.
Goodbye.
It is very important to plant potatoes on time. The size largely depends on this. harvested... The distance between bushes, rows and planting depth matters. The latter is defined as the distance from the top of the tuber to the surface of the ground and depends on many reasons:
- landing method;
- the size of the tubers;
- soil quality;
- water regime.
Ridge landing
it old way planting potatoes on heavy soils. In the treated area, furrows are dug along a stretched cord at a distance of 70 cm. The depth of planting potatoes in the ridges is from 5 to 10 centimeters. If fertilizer was not applied on the site, then humus and ash (respectively, half a shovel and a tablespoon) are added to the furrows, spreading them out after 30 centimeters. Potatoes are laid on top and covered with earth, forming a ridge 10 cm high.Its width is 20 cm.
As a result, the ground is at a height of 10 cm from the potatoes. This method is good because the tubers can be planted earlier, the beds quickly warm up, and the potatoes will sprout soon.
It is also used in areas with close occurrence groundwater... The height of the ridge there can reach 15 cm, while the planting depth of potatoes is 6-8 cm.
After hilling, the height of the ridge approaches 30 cm. In this case, the soil is removed from the rows, and the water after the rain runs into the border.
The yield increases by a quarter. Harvesting with this growing method is easy and convenient. But planting is more difficult, because you have to shovel a lot of land even at the planting stage.
Under the shovel
This is the easiest way. On the plowed field, they dig holes 8-10 cm deep. Then put the potatoes and cover them with earth taken from the hole in the next row. The distance between the bushes is 30 cm, between the rows - 70 cm. If you reduce it, then there will be nothing to spud the plants with.
The disadvantage of this method is the later planting and the short time interval between when the ground is still cold and when it is already dry. In rainy weather, such plants are more likely to be damaged. various diseases due to the fact that the tuber is in wet soil.
In ditches
An even more laborious process than on the ridges. In autumn, they dig trenches, place the remains of plants and weeds (without seeds), sawdust in them, and cover them with earth. In winter, they get wet, and in spring, when the temperature rises, they begin to overheat. This generates heat, which heats up the earth. Tubers are removed and a ridge is formed. The potato is at ground level, and it is covered by 8-10 cm. The yield when grown in this way increases by 45% compared to planting "under a shovel". The potatoes are harvested clean, not contaminated. It has good keeping quality.
In containers
A very interesting, but at the same time laborious way. Used in small areas. From building materials build the walls of the future container. Width - up to a meter, height - from 30 to 50 cm. Their length should be from north to south. The passages between the beds are wide, about 80 cm. Composting from waste will take place right in these boxes. The remains of grass, leaves, straw, sawdust are placed on the bottom. There will be a layer of manure, compost or humus on top. All this is sprinkled with earth taken from the aisle or elsewhere. The garden bed is ready to use. With just one work, you can use it for many years. It is only necessary to renew the compost components.

The tubers are planted in two rows in a checkerboard pattern. This makes it possible to uniformly illuminate the plants, which increases their productivity. It is two or even three times more than with the traditional method of cultivation. And how much pride you will feel when showing your friends your wonderful garden!
It is easy and convenient to take care of potatoes in such a mini-vegetable garden. The soil does not need to be dug up. It is enough to loosen to a depth of 7 cm. This will be the planting depth of potatoes. You can plant very early. No need to spud. You don't have to bend low to get away. Tubers are not infected, clean, well kept.
It is used in areas with a high peat content.
Under the black agrofibre
In this way, the early ones are usually grown. Prepare the garden. Cover it with agrofibre. Cut holes 10 cm long in it crosswise. The potato planting depth is about 8 cm. In order to place it in the ground, soil is selected from the holes with a narrow scoop. Place the tubers, cover them with earth. They do not huddle, because the moisture from under the bush does not evaporate due to the film. When it comes time to harvest, the stems are cut, then the film is removed and the tubers are taken out.
This method speeds up the ripening of potatoes by a month.
Landing under a walk-behind tractor
Motoblocks are increasingly being used by gardeners. They greatly facilitate the main labor-intensive work in the garden. With their help, they plow, loosen, cultivate the soil. The walk-behind tractor will also help in planting potatoes. For this, metal wheels with bushings and a bipod are installed. Set it up for a middle spread. It is advisable to pass the first furrow as evenly as possible.

Putting the wheel of the walk-behind tractor near the edge of the resulting furrow, pass the second one. The distance will be about 70 cm. If you get less or more - adjust the width of the wings. Tubers are laid in the furrows at a distance of 30 cm.The depth of planting potatoes with a walk-behind tractor is 10-12 cm.
You can sprinkle the tubers with earth with the same walk-behind tractor. To do this, change the wheels to rubber and spread the wings of the bipod to the maximum distance. The wheel of the walk-behind tractor will go over the potatoes, but the rubber will not damage it (if the sprouts are small), and the wings will fill the furrow.
You can lay potatoes after two passes of the walk-behind tractor. Then the row spacing will be slightly smaller - from 55 to 60 cm.
Dutch technology for growing potatoes
Dutch varieties are by far the most productive. Therefore, they are trying to grow in various regions where potatoes can generally grow. Gardeners began to pay attention to what the Dutch use, what depth of planting potatoes are maintained at the same time. The whole process is strictly scheduled, and you cannot move away from it in any direction, as this will negatively affect the harvest.
It turns out that they focus on aerating plant roots, that is, improving air access to them.
For this, special milling units are used. They very efficiently produce loosening of the soil. When planting, a high ridge is immediately poured, in which there is a potato tuber. As a result, the depth turns out to be slightly deeper, about 15 cm.

In this way, the potatoes are arranged in two rows, the distance between which is up to 30 cm. Then there is a row spacing of 1 m 20 cm. A technician walks along it, which takes care of the plants.
Dependence on soil composition
If the soil is clayey, and even wet, not warmed up, then it makes no sense to bury the tubers deeply. It will be difficult for the sprouts to get out of there. That's why optimal depth planting potatoes for such soils should be 4-5 cm.This is how they planted early varieties for sale, which are often covered with black agrofibre.
When the soil dries up, the planting depth of potatoes increases to 6-8 centimeters during planting.
If the ground has warmed up to a sufficient depth, it is well supplied with air, the tubers are deepened by 8-10 cm.
In a light culture, they are planted 10-12 cm from the surface of the earth.
The placement depth increases after hilling. It is carried out so that the soil becomes looser, improved aeration, and increased the formation and growth of fruits.

Hilling is shown on heavy clay soils, where the landing was carried out early, which means shallow. As a result, the layer of earth increases to a height of 4 to 6 centimeters.
If the climate is dry, there is little rainfall, or droughts are frequent, hilling is advised not to be carried out. In such conditions, it can lead to a loss of moisture residues and a decrease in yield. But then the tubers can come to the surface and turn green. Therefore, you can loosen the soil and huddle the plants a few centimeters.
The depth of planting potatoes in the Black Earth Region depends on the readiness of the soil. The seedlings are deepened into the warmed earth by 12-15 cm.
The lighter the soil, the warmer and drier the climate, the deeper the tubers are laid and the less they are spud.
V middle lane first, they are planted under a shovel or walk-behind tractor, and then they are spud and get, in fact, a ridge landing.
Tubers big size they are planted deeper than small ones.
There are many more different interesting ways growing potatoes. You can cover it with straw. In this case, the potato planting depth is 7 cm.

The straw is laid two times: the first - after planting, in a layer 10 cm high. Then, when the stems grow, add more. In general protective layer reaches at least 25 cm. If it is less, then the straw will not overheat, and the weeds will be able to break through it.
Growing in a barrel
This method is useful for those who practically do not have personal plot, and eat potatoes grown with my own hands, I want to.
A 15 cm layer of soil is poured into a barrel made of any material or a tall box on the bottom. Tubers with sprouts are placed on top. When they rise 5 cm, sprinkle them with another layer of earth and again wait for the shoots to appear. Having filled in this way part of the barrel so that only a third of the height remains, they stop filling up the soil. Watering, feeding. The crop is harvested gradually, starting from the top layer. You can get up to four buckets of potatoes from one barrel.