Electronic combination lock - circuit diagram
This scheme exists in different variations, and on different counters ( K561IE8, K561IE9, K176IE8, CD4022 and the like). I modified the circuit based on CD4017 (decimal divider counter with 10 decoded QO...Q9 outputs). Microchip analog CD4017(Johnson counter) is K561IE8, K176IE8. I found a chip with the designation EL4017AE, which was applied in this device. When repeating the device, do not be lazy, determine the marking - they differ in characteristics (operating voltage). All required project files are .


So, the operation of the electronic combination lock circuit is very simple. When you enter the correct four-digit serial code, a logical unit appears at the output of the microcircuit (Q4), which leads to the opening of the lock. When an incorrect number is dialed (buttons S5-S10), which is not part of the code, the circuit returns to its original state, that is, it is reset to zero through the 15th output of the microcircuit ( RESET). When S1 is pressed, a single state at the third pin Q0 of the microcircuit is fed to the input of the field-effect transistor VT1, opening it energizes pin 14 ( CLOCK) which switches the single state to the second output Q1, then when the buttons S2, S3, S4 are pressed in succession, the signal goes to Q2, Q3, and finally, when the correct code is entered from the output Q4, the signal opens the transistor VT2 to a short time, determined by the capacitance of the capacitor C1, including relay K1 which, with its contacts, supplies voltage to the actuator (electric lock, latch, or car "activator" (actuator)).


There is one thing, but the code cannot consist of the same number. For example: 2244, the values must be different, like: 0294, etc. One way or another, there are a lot of possible code options, about one tens of thousands, which is quite enough to use this combination lock in everyday life.
About the details of the combination lock
All radio components are cheap and can be replaced with other analogues. For example: VT2 can be replaced with the same npn transistor: 2N2222, BD679, KT815, KT603. To bypass the relay, it is better to use a Schottky diode. VD7 may not be installed, although it is better that it be in order to avoid polarity reversal (the voltage drop across it is not critical, since the circuit also works at 9V). Any relay, with a lower actuation current, for 12V, with contacts rated for the current of the lock drive. Now about the design of the castle
The scheme is the simplest, tested, it has been working for a year and a half without problems, in conditions of heat and cold. And most importantly, easy to repeat! You buy radio components, you can use the mounting board.

As a drive for the lock, I used a simple automobile electric drive (actuator). The kit also includes fasteners - metal strips that need to be redone, as seen in the photographs. It all depends on which lock is used for the alteration. You can install a ready-made electric latch of the company FASS LOCK Itemno:2369 (8-12V,12W). In this case, the capacitance of the capacitor C1 changes, so as to obtain a time delay of the timer of 0.5-1s.

In my case, I fixed the metal strip on the plastic handle of the lock, attaching it directly with self-tapping screws. From it to the drive, a knitting needle is put on (it comes with an activator), and then the electric drive itself is also fastened with self-tapping screws to the base of the door. The relay board is installed on the door and wired from the keypad and power. As a case, I used a plastic coffee lid, drilling two holes for fastening.

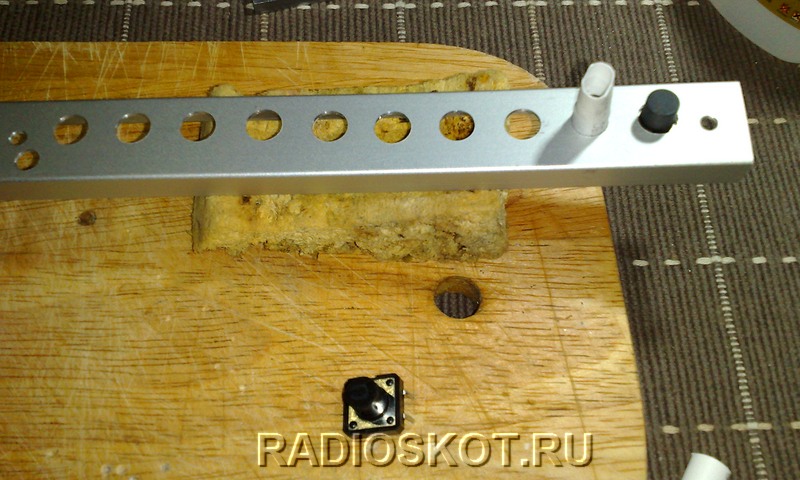

The keypad for dialing the code is made from the rest of the U-shaped aluminum profile, for furniture facades, bought at any furniture fittings store. The profile is cut based on the number of buttons (10 pieces). After that, you need to drill holes for the buttons, slightly larger in diameter than the diameter of the button, so that the button with the cambric (tube) dressed on it passes into the hole. Thus, it will be centered, and as a result, move freely when pressed, without jamming. This is done so that there is no mixing when filling the buttons with glue, but more on that later.
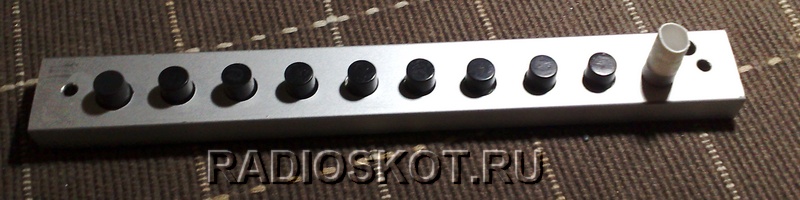
Fill buttons
Now it's time to fasten the buttons into place in the pre-drilled holes. We insert the cambric into the buttons and put them in their place, as can be seen in the photo. After, you need to fasten them with drops of glue or hot glue. But this must be done carefully, so that there are no gaps left, in the event that you fill in the buttons epoxy resin! Because for me, the first panel, filled with epoxy, remained as a museum exhibit. Epoxy, very runny, and it seeped into the buttons and stuck them together. Like this. I had to do everything in a new way and this time, I filled the panel with hot glue. The buttons can be pre-glued, so that they are fixed in place, with a two-component, instant glue used by furniture makers for gluing MDF, sold in the same place as aluminum profiles - in furniture fittings stores.

Of course, before pouring, you need to solder all the wires to the buttons and LEDs, as you can see in the photographs. All this provides a reliable, waterproof and non-detachable keyboard, as well as Beautiful design, which is applicable to any front doors, safes or garage doors. Also, the device can be used for security systems.

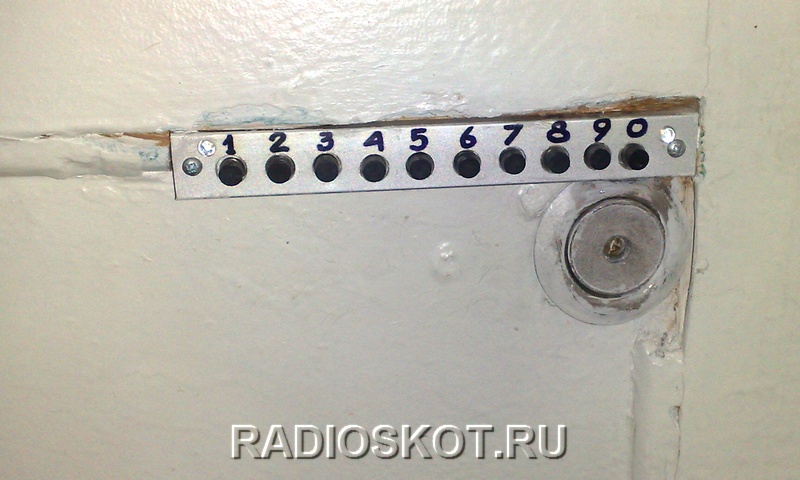
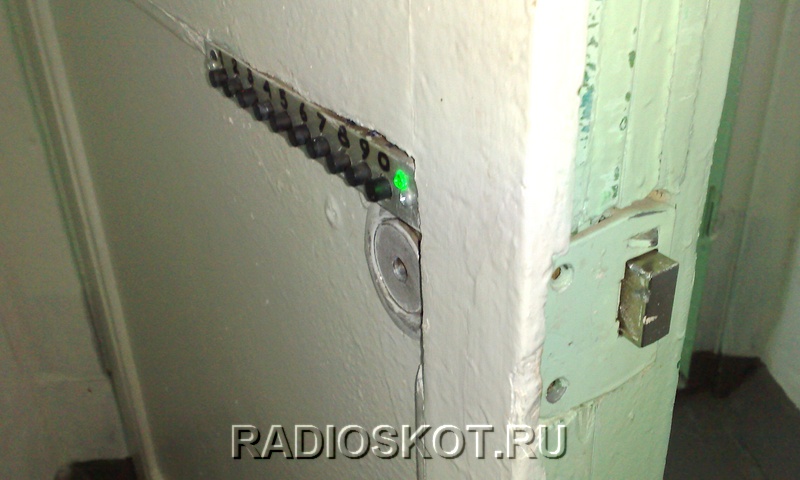
Now we drill two holes for the screws for attaching the panel. Also, one or two holes for LEDs (d=3mm). One of them (green glow) on the right to indicate the opening of the lock. The other did not work, it can be connected to the power supply for a constant glow or through an additional button in order to illuminate the keyboard when it is pressed. Accordingly, the LED should be white (ultra bright), fixing it so that the luminous flux is directed to the buttons. You can cut another piece of the profile and attach it to the keypad on top, or even use a ready-made keyboard from a calculator or other devices. And if you make the front panel from plexiglass, then you will have a solution for lighting the entire keyboard!

And the last, the numbers can be applied ready-made, or you can draw them yourself with a felt-tip pen, and then cover aluminum profile simple tape. This is done immediately after drilling the holes for the buttons. Of course, there are a lot of wires, regarding devices on microcontrollers, but not everyone has the opportunity to make such devices. The essence of this castle is that even a person who does not have special skills in radio electronics can assemble it. I bought the parts, assembled over the weekend, hung and connected. All. This circuit does not need any adjustments. And yet, the code can be changed at any time. All wires from the keyboard are connected inside the combination lock case. Don't forget to label each wire. I used stickers for price tags.
I want to note that over the past time, there are no obvious traces of abrasion on the buttons! Most likely due to black plastic. They are used daily. But, wipe and change the code, from time to time, does not interfere.
Device power supply
The device is powered by an uninterruptible power supply from the company Dantom
. It has a built-in 12V/7A gel battery. You can assemble the same, the circuit is very simple, it gives out a constant small charging current (a few milliamps - with a fully charged battery, and 70 - 100 with a discharged one). This is enough to power several electric locks and electric strikes. Or make a smaller block if you have only one door with a combination lock. Let's say to: L7812CV, LM317, KR142EN8B. Also, the system can be powered from switching power supplies. 
Schematic diagram of BP RIP


PCB BP RIP
In the proposed backup power supply (RPS) scheme, a moisture-proof transformer is used, but you can use any other 20-40 watt transformer with an output voltage of 15-18 volts. If under load there is only one automobile actuator, then a less powerful transformer will do. For several electric locks, the electrolytic capacitor C1 must be with a larger capacity than that indicated in the diagram - for a larger supply of energy when triggered and, accordingly, a lower voltage drop across the load. Capacitor C2 - 0.1-0.33mF, C3 - 0.1-0.15mF. The radiator for IC1 is larger, by about 100-150cm2, since in a case with a battery, extra heating is not needed! The output load current for the L7815CV is 1.5A. Especially if a plastic box is used as a case, it is unforgetable about the ventilation holes. Diode D8 and fuse FS2 serve as short circuit protection.


In security RIPs there is a button ( tamper) against unauthorized hacking of the device - we will not need it. On the board, to connect wires, it is better to use soldering instead of terminals, as the most reliable method of fastening. Also, it is appropriate to insure and bring spare power wiring outdoors, in case of an unforeseen event (different things happen in life).
Video of the work of a homemade castle
That's all, I hope it was useful to you. ).
Discuss the article HOW TO MAKE AN ELECTRONIC CODE LOCK
Every owner of a residential or office space dreams of reliable protection of their property. The best way to deal with this problem is an electronic lock on front door, in which there is no well for the key, which means that it is almost impossible to pick up a hacking tool.
Standard equipment of the electronic lock
Electronically controlled locks consist of several elements, as a rule, included in the package of the device when it is purchased. The main elements include:
- locking device. Can be installed inside door leaf (mortise lock) or on the surface of the door (surface lock). The locking mechanism consists of a body, inside of which there are bolts that hold the door in the closed position and an electric motor, with which the bolts are set in motion. The lock case may provide for the possibility of installing a door handle;

- a strike plate mounted on the door jamb and necessary to hold the crossbars in the closed position;

- Control block. The block consists of a device that processes signals for opening and closing the locking mechanism and a controller that serves to control the lock, independently encode keys and combine the constituent parts of the mechanism into single system. Batteries are built into the control unit, which ensure the operation of the lock in the event of a power outage;

- the unit is connected to a constant current source (electrical socket) network adapter.

- device for reading information from the key. Electronic locks can be biometric or built-in stealth locks. Electronic code lock opens when typing the code on the panel. The biometric lock is set in motion by recognizing a fingerprint or retina. The stealth lock can be opened by a signal transmitted by a key fob, card, cell phone, and so on.

- a set of keys (key fobs, cards).

- fixing bolts of different sizes.

Additionally, an electronic lock can be equipped with a door closer that allows the door to open and close smoothly, which increases the life of the locking mechanism and is connected to an intercom that allows you to open the door remotely.
Installing an electronic lock
According to the installation method, electronic locks are divided into two types:
- overhead devices;
- mortise devices.
Overhead locks are installed on the surface of the door leaf, and mortise - inside the door.
Installing an overhead electronic lock
Rim locks are mainly installed on metal doors, on the gate or .
To install an overhead electronic lock, you will need:
- marker, pencil, tape measure, corner. This set of tools is necessary for marking the plane of the door at the installation site of the main mechanism;
- electric drill with a set of various drills;
- screwdriver
The first stage of installation begins with the installation of the locking mechanism. To do this, a number of actions are performed:
- in the chosen place (most often locks are installed at a distance of 90 - 110 cm from the floor level), markings are applied to the door leaf. At the same time, the location of the body of the locking mechanism and the attachment points are indicated on the door;
Marking on the door can be done by attaching the lock body to the door leaf or by first drawing the layout of the device.
- the marked holes for the fasteners are drilled. In this case, the diameter of the drills used must correspond to the diameter of the fixing bolts;

- a through hole is drilled in the door to connect the device case and the reading mechanism;
- in the marked area, the lock body is installed and fixed.

The second stage of installation is the installation of a striker plate, that is, a device for which the locking bolts will hold. The installation of the striker plate is carried out in the same way as the installation of the housing according to the plan:
- markings are made on the door jamb. When determining the location of the area of the bar, it is necessary to take into account the location of the lock. It is best to close the main mechanism and mark the location of the crossbars. It is also required to designate the attachment points of the device;
- holes for mounting bolts are drilled;
- the back plate is fixed.

Rigel should smoothly enter the reciprocal bar. Tight entry and excessive friction are not acceptable.
The third stage of installing a lock with your own hands is to install a reader and other necessary equipment. In doing so, you must follow the following rules:
- the reader is installed on the outside of the door, and as close as possible to the lock, since in the case of a contact opening, this mechanism must be connected by wires to the locking device;
- the control unit, which is connected to the network adapter, is located near a permanent power source indoors;
- connecting wires should preferably be placed in specialized boxes or corrugated hoses. This will help protect the appliances from moisture and give the door an aesthetic appearance.
An example of installing an overhead electronic lock is discussed in detail in the video.
Installation of a mortise electronic lock
Installing an electronic lock by cutting into the door is somewhat more difficult, since special niches must be drilled in the door leaf and jamb for the body and striker, respectively. For the formation of niches, the following scheme is provided:
- door leaf . This contributes to increased convenience during work;
- the dimensions of the niche are noted, which should be 2–3 mm larger than the dimensions of the lock;
- using a drill, chisel, hammer or other equipment, a part of the door leaf and jamb is excavated;
- Irregularities after work are cleaned.

How to connect an electronic lock
After the lock body and all the necessary equipment is installed on the door, you can start connecting it. In most cases, the connection diagram of the device is included in the lock package. If there is no diagram, then you can follow the instructions below:
- in the control unit there is a controller, to which it is necessary to connect all the equipment: a locking mechanism, a reader, and so on. For this, they are used electrical cables supplied with a lock;
- locking device connects to the opening code reader;
- then all system components are connected to the corresponding terminals of the controller;

- the power adapter is connected;
- checking the functionality of the mechanism.
If you cannot connect the electronic lock yourself, then it is more advisable to seek help from specialists.
Electronic locks are among the most reliable locking mechanisms. A significant drawback of the devices is the impossibility of the correct operation of the lock without the impact electric current. For this reason, it is recommended to install two locks on the front door, one of which is electronic and the other is mechanical.
Any good owner takes care of his property, ensuring its independent protection from various criminal encroachments. Today, "with the development of technology" of committing crimes, an ordinary mechanical lock has ceased to be a reliable barrier between your home and an intruder.
Such locks are opened in an “intelligent” way in a few minutes, but, thank God, progress does not stand still and today the market offers us a wide selection of fairly reliable electromechanical locks. Such locking devices are good for everyone, except for the price, so craftsmen have long been wondering how to make a home-made electromechanical lock? In this article, we will try to answer this question, along the way, analyzing the motivation self-manufacturing similar locking device.
Why make an electromechanical lock yourself?
Reading this article, many may ask the question, why bother at all and try to make an electromechanical locking device with your own hands, when you can easily buy it in a store? Even if the price for it is not low, but you can always save up, put it off or take it in installments, it's still better than, in the end, failing trying to "rivet" something more or less working.
First of all, one should not discount the inquisitive mind of our Russian handicraftsmen, who may not really need the castle itself, it’s just interesting to figure it out and make it. The second point is the security we have already mentioned, any factory locking device has its drawbacks, which an attacker may be aware of. Using this knowledge, the offender will quickly deal with the sophisticated electromechanical lock bought in the store and take everything of value out of the house. 
And imagine if you manage to assemble a stable working electromechanical device. Its main advantage will be that no one except you will know the features of its design, which means that an attacker simply will not take risks trying to open the lock. But even if you run into a super-professional thief who cannot be held by any lock, even such a thief will still lose more time fiddling with the opening of a "homemade" than if he were opening a factory device. In general, there are some advantages to homemade locks.
True, here it is necessary to make a reservation, a device made by oneself must be made on the basis of a workable circuit and repeatedly tested.
What approach to choose when making a castle
The appearance of your electromechanical lock will be largely influenced by the approach that was chosen during its manufacture. There are two main approaches that craftsmen use when creating locks and their control systems.
- The first approach involves the handicraft production of all elements protective system including electromechanical locking device.
- The second approach involves a combination of factory and handicraft elements of the system, including the lock.
Experienced craftsmen advise using the second approach, since it is very difficult to make absolutely all the parts on your own, and there is no need. It is much easier and more efficient to “improve” factory samples of locking devices by introducing their own “handicraft lotions”.
It is extremely difficult to make an electromechanical lock from scratch, because in its design it has elements, the manufacture of which requires specialized equipment. However, no one forbids taking parts and accessories from other locking devices and making a hybrid unknown to any professional burglar.
Required tools and accessories
 The composition of the necessary components and parts will largely depend on the complexity of the design of your electromechanical lock. Within the framework of this paragraph, we will describe the most typical parts and tools that may be required for the manufacture of an electromechanical locking device and its control system. Let's start with the details.
- Circuit board and radio components according to the diagram. We will need them to make the lock control unit, although no one bothers you to adapt the finished factory unit.
- Details of the secrecy mechanism of the mechanical part of the lock (bolt, levers, springs).
- Ready-made case for the lock or materials for its manufacture. Naturally, the better the materials, the better.
- A specialized electric drive for electromechanical locks or a standard drive for the central locking of a car.
- Small electric motor.
- Gear wheels and crowns.
- Drive spoke.
- A small metal rod with a handle that will be attached to the lock body and will become part of the electric strike, if you need it, of course.
- Relay, designed for a certain load, fasteners for the lock.
- 12 volt power supply and electrical wiring of the required length and section. Masters recommend using multi-colored wiring in order to avoid mistakes when connecting all elements of the protective system.
- Control elements for an electromechanical lock, call panel, handset or monitor for a video intercom.
 It is not in vain that we consider not only the details of the locking device itself, but also its controls. Since putting only one electromechanical lock without connecting it to the network and auxiliary devices means doing all the work in vain. In addition to parts and accessories, we also need tools. It is also quite difficult to designate their complete list, so we will focus on typical ones.
- Soldering iron, solder, side cutters, pliers.
- A set of various screwdrivers.
- A set of needle files and files.
- Drill with drills for metal with a diameter of 1.5 to 15 mm. If you're working with a printed circuit board and parts, you will need thinner drills.
- Instruments for measuring voltage.
The process of self-manufacturing an electromechanical lock
 To make an electromechanical lock, we start with a control unit. In this case, you need to either purchase a ready-made board for the control unit with the necessary parameters, or make it yourself according to the attached diagram (Fig. 1).
We solder the necessary radio components to a specially prepared printed circuit board and remove it for now to the side. Now let's start making the lock case. We note right away that it is better to make the case in such a way that both the control unit and the mechanical part of the lock fit in it, with the exception of cases when the locking device is planned to be used on the street.
The case is best made of metal, at least 3 mm thick. The shape and size of the body will depend on the size of the components. Now you can proceed to the installation of elements in the housing according to the diagram (Fig. 2). Let us briefly describe the procedure for the production of works.

Summing up, we note that it is quite possible to make an electromechanical lock yourself. However, this requires a certain skill, desire and ability to handle tools. It is best to use ready-made components for electromechanical locking devices that are supplied by their manufacturers. In this case your homemade device it will turn out a little more expensive, but there are more chances that it will be reliable and stable. Master with pleasure!
Any owner of a private house wants to protect his yard from intruders. And the decisive moment in this matter is right choice gate lock. They are different - from the good old padlocks and mortise locks to complex security systems. The most popular option today is the electric gate lock. This article will tell you about the features of the selection and operation of such devices.
Advantages and disadvantages of an electric lock
First of all, let's understand the principles of operation of an electrically controlled lock. From the outside, the device is opened with a key (magnetic or conventional), and from the inside - either by a button located on the inside of the door, or remotely, using an intercom.
Important details in the device of the electric lock are two crossbars - cocking and working. When the door closes, the first cocks the spring, and the second enters the part of the lock, called the reciprocal. At the same time, the door is locked, and it becomes impossible to open it by simply pulling the handle. When we need to unlock the gate, with the help of a button, the solenoid of the electromagnet in the lock is supplied with electrical signal, the spring retainer is reset, and the working bolt is pulled back into the lock under its action.
A modern electric gate lock has the following "pluses":
- to open the door, there is no need to go outside (if you have an electric lock installed on the gate with an intercom);
- magnetic keys are difficult to fake;
- resistance to environmental influences allows you to extend the life of the lock;
- electric locks provide high level the security of your home.
The disadvantages of the electric lock on the gate include, first of all, the complexity of installation (the installation of such a lock should be carried out only by an experienced specialist), as well as the dependence on the power supply and the high cost of the device itself.
However, there are several types of electrically controlled locks:

We also note that for the correct operation of the device, it is required that the control voltage is within 12 V, and the current strength is from 1.2 to 3 A, depending on the model of the lock.
Related articles:
|
Inflatable double mattress
Most of us have come across a situation where we urgently need to organize an extra bed. And they do it best air mattress- easy to use and store. The article will talk about inflatable double mattresses. |
Straight razor with replaceable blades
Shaving accessories are one of the traditional gift options for men. But we do not advise you to give shaving foam for the hundredth time, pay attention to something more original. For example, in last years The popularity of straight razors with replaceable blades has skyrocketed. |
|
Construction knife with replaceable blades
In the process of construction or repair, we often resort to the help of a knife. And of course, I want to always have a convenient, reliable and sharp tool at hand. All these requirements are fully met by construction knives with a retractable blade. Read more about them in the article. |
Intercoms for a private house
There is hardly a person who is absolutely indifferent to the security of his home. Therefore, various castles, security systems and intercoms are popular among residents apartment buildings, and among the owners of estates. In the article we will talk about intercoms for a private house. |


The company for the production of door fittings is a reliable and proven manufacturer quality fittings for doors. With the help of the experience gained while working with manufacturers of door fittings of foreign and domestic samples, METTEM Coded Locks has the opportunity to create fittings of perfect quality.
METTEM code locks Product categories: Products are produced simultaneously in several price categories This gives customers the opportunity to choose the best product for them. 1. Economic - inexpensive option with beautiful decoration.
2. Standard - products excellent quality with an attractive design. 3. Premium - elegant and flawless products with high-quality protective mechanisms and exclusive design.
Company Combination locks METTEM
provides huge selection door fittings, with a huge number of products of excellent quality and several product groups. Combination locks METTEM Advantages of products from the company Combination locks METTEM over products from other manufacturers: Fittings from the company Combination locks METTEM is primarily quality and reliability - the main characteristics that ensure long-term use of goods.
In the manufacture of door fittings, the best modern technologies, years of experience and materials of exceptional quality. The company manufactures fittings in accordance with European quality standards, which allows us to fully satisfy the requirements of modern customers, namely in such requests as: 1. Affordable price - branded products go on sale without % extra charge and commission.
2. A good assortment - the product catalog consists of a wide variety of products: from simple, concise fittings to exclusive design elements. 3. Perfect quality material - metals are used in the production best quality: brass, steel best brands, as well as copper and other alloys. Our
It is intended for installation on metal and wooden doors where high security properties are not required, and locking is needed more for show, from loafers passing by.
Therefore, the locking device in question is popular in places such as driveways, public toilet doors, gazebos, utility rooms, etc.
Please note that with all the advantages of this castle, its security properties are frankly low. Therefore, it is not necessary to put it on unguarded critical premises with a single lock.
Another important point: the lock is assembled under the doors of internal opening and cannot be installed on the door of external opening.
The factory in the passport declares that there is a modification that can be installed on external opening doors. But to be honest, we haven't seen anything like it.
The cocking of the latch into the working position occurs when the door slams shut.
At the same time, it is extremely important to install the counter part of the ZKP, with which it is completed, on the door.
The locking latch of the lock consists, as it were, of two parts: a platoon and a lock. When the door snaps into place, the platoon part of the latch, with the correct installation of the lock, abuts against the reciprocal plate and sinks into the body. At this moment, the locking part of the latch is loaded by the force of the spring, which also drags this part into the housing.
But the locking plates, which actually provide the code, prevent her from entering.
To open the RFP, you must simultaneously hold down the numbers of the set code. By default, the RFP is assembled from the factory with code 38.
From the inside, the mattem combination lock is operated by simply moving the handle, like a latch.
The latch is fastened both to the front mounting holes and to the end holes.
In addition, it is important to fix the counterpart, exactly the one that comes with the kit.
We emphasize that the correct installation of the code lock in question is a frankly difficult task. It is important not only to place everything at the same horizontal level, but also to correctly calculate the distance between the movable lock on the canvas and the fixed answer.
It happens that at the door the gap between the canvas and the box is huge initially.
And after installing this locking device, the latch simply does not reach the intended hole, that is, it does not fix the door. In the instruction manual, the manufacturer writes that the gap between the housing and the counter should not exceed 3 mm.
And there are situations exactly the opposite, when there is a very small distance between the box and the canvas.
And having fixed the answer with the lock, the door stops closing, because the end of the lock simply rests on the answer.
It is not uncommon to find a ZKP installed on the street gate of a private house.
Open to all rain, wind and adversity. You can hear negative feedback from the owners of these locks, such as the lock is bad and often breaks.
We repeat from time to time: there are no airtight locks that will work well in cold weather. Pieces of ice will prevent it from working properly and will drastically reduce its service life. Eliminate direct moisture on the case, and everything will be fine.
And so, the quality of the RFP is excellent.
At correct installation and compliance with operating conditions, these latches work for many, many years.
By the way, one more important note. A mettem combination lock is one of the few locking devices that can and should be periodically lubricated.
Because there are no small code elements in the castle. All parts are rather bulky plates. And at the same time, each of them is loaded with the force of powerful springs.
Therefore, lubrication in this case will reduce the friction forces between the mating parts and increase the life of the latch.
Instructions for changing the code
The mettem combination lock is assembled from the factory under the number 38.
That is, in order to open such a lock now, you need to cock it and simultaneously press the two middle keys.
Let's learn how to change the code of this lock.
To do this, we need to unscrew the four screws on the back cover.
So, the code combination of the lock is given by ten plates of the same shape.
Each plate is located under one of ten keys, each of which corresponds to a specific number relative to the overlay with numbers.
Each plate can be installed in two positions. In one position, she will include the number below her in the code combination, in the other position she will exclude it.
What does it mean?
Now the lock has a combination of two numbers 3 and 8
These numbers are in the middle of each horizontal.
And if you now carefully look at the code plates, you can see that they all have a bevel. But only two numbers have this bevel looking inside the lock. As you may have guessed, these plates correspond to the numbers 3 and 8.
For all other plates, the bevel looks from the lock.
Therefore, to change the code, we need to swap these plates.
In order to ensure advanced level security, according to the manufacturer's recommendations, you need to include at least three digits in the code.
Today I will describe and take apart the code lock of the Russian company METTEM, the model of the lock ZKP-1 (aka ZKP-30).
The lock is push-button (it is also called a latch), mechanical. In a modernized form, it repeats those locks that were made back in the USSR (the METTEM company was founded in 1992 on the basis of the Molot plant, Moscow).
Balashikha).


So, the castle body, thoroughly made of strong steel, is covered with… outside only ten steel buttons and a 2 mm thick plate protrude from the door, on which the manufacturer's logo and numbers are embossed.
Opening is made by simultaneous pressing of three buttons. The code can be changed.
On the reverse side there is a ledge and a handle for opening the lock from the inside.
The tongue of the lock is a double external square section, inside there is another movable round section.


Let's start dismantling METTEM ZKP-1.
We remove the plate with embossed numbers.


We turn the lock over and unscrew the four screws of the protective cover and remove it together with the manual opening lever.
This block has flat springs that press on the code plates, which in turn press on the buttons.


Under this plate we see slots of coding plates - these are the so-called tsugali or levers.
We take them out. The code is changed by changing the combination of these plates (shuffling).


We turn the lock over and unscrew the two button blocks.
Their bodies are made of aluminum, or some kind of aluminum alloy. Buttons - steel cylinders with hats.
In the cover of the lock under the push-button blocks there are also slots for the tsugali.


Now nothing holds the lid, remove it and look inside.
Inside we see a crossbar and two U-shaped guides.


The crossbar consists of a latch finger, it is located inside the clip (tongue), the crossbar slider - the latch shank moves in it.
In the center of the crossbar there is a stud - a stud with a nut, it moves in the slot of the slider of the crossbar. Further photos of the subsequent phased dismantling of the ZKP-1 lock ...


Drawing of locks ZKP-1 and ZKP-2
This completes the disassembly of the METTEM ZKP-1 code lock.
You can lubricate the whole thing and assemble it back - but I took it apart one way ...
The product, in my opinion, is of high quality, reliable, has preserved good Soviet traditions, as it is “made for centuries” ...
Electromechanical, coded, autonomous lock Cisa-Nimeo
The Cisa-Nimeo electromechanical lock is designed for use in public areas such as offices, factories, educational institutions and wherever a multi-level access control system is required.
The basis of the lock lies in the micro controller latest generation, which allows not only to control the lock using a code, card and radio remote control, but also to create separate user groups with personal codes and electronic cards. With this function, if necessary, you can erase a specific card or code from the lock's memory, as well as replace them with new ones.
This is not available in conventional electronic locks, and if you need to remove one card, you have to remove everything.
Gate lock - a selection of the best modern models and options for their competent installation (85 photos)
Cisa-Nimeo is of particular interest where there is no possibility of supplying electricity to operate a conventional electronic lock. Autonomous power is provided by 4 AA batteries with a service life of up to 12 months.

Castle characteristics:
- Lock type: electronic
- Installation type: mortise
- Opening methods: by code, by card, radio remote control, mech.
- Number of digits in the code: from 6 to 12
- Number of registered cards: up to 50
- Card type: Em marine 125 kHz
- Opening by code: yes
- Remote opening: yes (additional charge)
- Mechanical key opening: yes
- Card opening: yes
- Display backlight: yes
- Permissible door thickness: 40 to 70 mm
- Permissible humidity: from 40% to 80%
- Working temperature: -15°С to +50°С
- Power: DC 6V (AA alkaline batteries x 4)
- Battery life: 1 year (10 openings per day)
- Dimensions of the inside of the lock (WxHxT): 69.5x161.5x80.3 mm
- Dimensions of the outer part of the lock (WxHxT): 69.5x161.5x91.9 mm
- Available colors: antique bronze, nickel
- Production material: steel, zinc, ABS plastic
- Country of manufacture: Italy


Mortise part of the lock
Housing with split latch and retractable bolt.
The main area of application is installation in metal and wooden doors instead of an old lock with similar dimensions.
Latch housing "Compact"
The main area of application is installation in interior doors in a new place or instead of an old one with similar dimensions.
The price of the lock with installation is 24,000 rubles.
Controller with 1 radio remote control - 7000 rubles.
Additional remote control - 1500 rubles.
Card - 100 rubles.

How to install a combination lock on a gate?
After the completion of the construction of the fence, each owner has a question how to secure their own territory adjacent to the house.
In this regard, many are beginning to think about installing a good and sufficiently high-quality lock on the gate. This issue must be taken seriously, because it is very important for the safety of everyone living in this house.
Initially, it should be understood that a reliable lock will necessarily have a rather high cost.
Code locks. Peculiarities
Such protective devices are quite popular today among most buyers. There are several types of combination locks.
✔ mechanical lock .
In this option, attackers will not be able to pick the lock, because it does not have a keyhole. However, if the owner of the house forgets the code, then it will not work to open such a device. A mechanical combination lock is installed on the gate. This device has the ability to snap into place automatically.


✔ Electromechanical lock This is a combined version of the protective device.
This type of lock is considered complicated, since it is equipped with mechanical drives powered by electricity. This type is more reliable.
There are mortise and overhead locks. The overhead version is a simple overhead device with only a button, when pressed, the lock will open. It is possible to put a lock on such a lock and then the gate will be open all the time.
In addition to all this, in such devices there is a mechanism by which you can open the gate with a simple key.
✔ Electronic version of the lock programmed for a specific set of numbers. If you enter the code correctly, the door will open.
Installation of a code lock
Can be installed by yourself coded lock on gate . The most important thing is to have instructions for protective device. Thus, the work will be easier.
It is also important to prepare the required tools for installing the lock in advance.
Procedure
✔ First, the main part of the lock is applied, and then its complementary part to the leaf of the gate.
✔ The reverse part is attached to the gate with a screwdriver.
✔ A locking bolt is inserted into the opposite side of the lock.
Selection and installation of an electric lock on the gate, intercom and gate
Holes are drilled for the keyboard and crossbar.
✔ The lock and handle are fixed with screws. In the end, you should definitely attach the lid to the lock and check how it does its job.
How to rearrange the code on the combination lock. How to set a code lock?
Combination locks provide a high level of security for the premises, since they are quite difficult to crack and even more so open with a found key or a special master key.
Thanks to the development of new technologies, such devices every year become not only more reliable, but also more affordable.. To date, most of the entrance doors of apartment buildings are equipped with a combination lock. Owners of office buildings also appreciated the convenience of mechanisms with the ability to open the door with a unique code.
It was possible to ensure a high level of secrecy due to the possibility of changing the code combination. Changing the password on the lock may be required in various situations.
For example, after the repair work it is worth changing the code to restrict access to workers who knew the previous combination. Also it is recommended to periodically change the code every 3-5 months, since characteristic scuffs may remain on the lock buttons, which will allow an attacker to choose the correct combination of numbers.
Types of code locks and how to change the code
To date, there are several types of combination locks, which differ in the degree of secrecy and the principle of operation.
Consider how the code is changed on each type of lock.
Mechanical combination locks. This type of device is considered obsolete, but, nevertheless, it can still be often found. To change the code on a lock with mechanical buttons, you will need to partially disassemble the case in order to gain access to special plates.
Each of the plates corresponds to a button on the dial pad and has a slight bevel on one side. By removing the plate and setting it with a bevel to the center of the lock, the corresponding button becomes part of the code.
Electromechanical andelectronic combination locks. Such devices are more practical and are very popular due to the possibility of integration into a common access control system.
Electromagnetic combination locks can be found in almost all apartment buildings, and in recent years they have become in demand among owners of country cottages, where they are installed on the entrance gate.
Changing the code to electromechanical or electronic locks can be done in two ways, it depends on the chosen model:
- Open the suitcase and make sure that you have the factory code - three zeros
- At the bottom of the combination lock (or on the inside, depending on the model) is a plate (or metal lever), which must be moved from position A to position B (usually from bottom to top)
- While holding the plate/lever, set the desired combination, for example 234, and return the plate/lever to its original position.
Code set!
- Press the big PUSH button to pop the runners out of the lock
- Check that the combination of numbers matches three zeros (000)
- Find a small code lock button on the side of the lock, it is almost invisible and is usually located on the side on which the sliders are located
- Take a pencil or pen and press the lock button inward.
Keep it pressed
- Dial the desired combination of numbers
- Remove the pencil from the lock button and press the large PUSH button. Ready!
- Remove the lock from the suitcase and set the initial combination of three zeros - 000
- Turn the lock shackle 90 or 180 degrees, then you will see that there is a recess in which you need to press this shackle and hold it pressed
- Dial your unique code by turning the wheels starting from the top number
- Release the bow and return it to its original position.
Nothing complicated!
With Code, which puts the device into programming mode.
A special code allows you to put the lock into the code combination change mode, after which you must enter a new code. Having returned the lock to the standard mode of operation, you need to make sure that it works with a new numerical combination.
With a special key.
Such models are equipped with a special key, it allows you to put the lock into a mode in which it is possible to set a new code. It remains only to enter another combination of numbers, remove the key and check the operation of the device.
Regardless of the type of code lock, changing the secret combination of numbers is carried out within 5-7 minutes and does not require special skills, but if this procedure seemed complicated, it is better to seek help from specialists.
Currently, almost all luggage manufacturers install combination locks on their products: padlocks, built-in, and any, the main thing is that your things are safe.
Do-it-yourself electric lock installation
And very often the traveler is faced with a problem: how to set the code on the suitcase? It’s good if there is an instruction in the suitcase, but what if it isn’t? What to do in this case? In fact, this is not at all a complicated and fast procedure.
For any model, the initial factory code is 000 (three zeros).
You can leave this combination, or you can set your own. It remains only to determine the type of lock.
How to set the code on the suitcase: built-in lock
You plastic polypropylene suitcase with latches?
Then in most cases the lock is installed like this:
Polycarbonate or fabric suitcases are usually equipped with a padlock or built-in combination lock. For them, the instructions are quite similar.
Built-in code lock:

How to set a code on a suitcase: padlock
Well, the last modification of the castle is padlock combination lock.
And yet, try not to forget the code you set. Let the combination of numbers be associated with something important, then you will definitely avoid unnecessary trouble! In extreme cases, you can write down the lock code and hide it in a safe place.
Have a good trip!
Today, as part of this material, you will learn how to change the code on the code lock of the front door in the entrance. The topic will be supported by a specialist in opening doors without a key, Alexey. This is the only first-person report so far, but there will be others soon if the topic is relevant.
To whom it seems that this topic, How to change the code on a combination lock, is not fully disclosed or someone, something is not clear, leave your questions and suggestions in the comments.
Alex will definitely answer.
And so hello dear visitors construction site umnyestroiteli.ru. My name is Aleksey and today, within the framework of this article, I will try to explain how to change the code on the combination lock set at the very beginning by the door installer.
We will change the code on a push-button mechanical lock. Well, for starters, let's figure out why to change it.
Why change the code on the code lock?
Typically, a combination lock is released with standard settings.
The lock code consists of only two digits and at the first stage, it can be 38 or 78. But, good company, which provides services for installing the front door in the entrances, changes this code to a more complex one. Which will have a three-digit digital code, which will later be harder to pick up!
In the second case, the code of the code lock is changed after some time, since the buttons of the code lock are oxidized from constant touch and it becomes clear which buttons to press.
Well, an example of oxidized buttons of a combination lock, in the photo below.
This photo shows that the code on the front door code lock, it's time to change! But when installing a combination lock, on the back of the front door, in order to safely dismantle the core of the lock, literally all specialists solder it with a metal sheet.
As in the photo below.

So, my dears, we will have to cut off this damper in order to change the notorious code.
How to change the code on a combination lock.
Let's break it down first. On the back of the lock, there are four screws that need to be removed.

Having unscrewed these screws, the cover will automatically be removed, behind it there will be the parts we need, which are called levers.
These levers, when the lock is pressed, go back and forth and there are limiters on them, in the first case these are cut sides of the levers, in the second case these are pits at the top of the levers. They are highlighted in the photo below. orange.

These levers can be taken out of the lock and inserted back, turning the mirror.
Well, a little more detail.
In the first case, the levers have a notch, which are turned away from the lock, and in the second case, the levers have cuts on their upper part, which, in turn, are also turned away from the lock. The first photo shows and highlighted in orange, those levers that are on this moment set the code for the code lock.
They need to be taken out and put in a normal position. After taking out those levers that we need in the code and turning it in a mirror so that they look inside the lock, install it back.
In order to change the code, we just need the levers we need, turn inside the castle, and turn the old ones so that they look out!
Thanks everyone and good luck!
What is not clear on the material, ask in the comments form.
Well, in the end, interesting.
http://www.umnyestroiteli.ru
Instructions for use
Have you bought a new suitcase with a combination lock and do not know how to set your combination correctly? Do not worry, this question arises for every second traveler after the purchase.
Let us immediately reassure that there is nothing complicated in this procedure. A couple of minutes is enough, and your suitcase will become an impregnable fortress for everyone except its rightful owner.
For any model, the factory code for opening the lock is initially set to three zeros - “000”.
For fixed combination lock:
Important– do not release the button / do not change the position of the lever before you have finished dialing the numbers.
This may result in incorrect code being installed.
For combination padlock:

Well, your personal code is set! Now the most important thing is to remember the saved combination of numbers!
Pick a number that you won't forget for sure. It could be your birthday, zip code, or just your lucky number.
If you forget the set code, then opening the suitcase can be a big problem.
You will either have to go through all the possible numerical combinations for a long time and hard, or carry the suitcase to the warranty workshop and ask for help from specialists.
It's not so scary if you're just going on a trip. What if you are in another country and all your belongings are locked inside? It is better to play it safe and write down the digital code, hiding it in a safe place.
“If you have one key in your pocket, then your key to the apartment, and you are a big boss! If you have two keys on a bunch, then you have an office, and you - office worker! If you have three keys or more, then you are the head of the warehouse! Folk wisdom.
 Carrying a large bunch of keys to locks in your pocket is a great inconvenience. This is especially evident not in winter, but in summer. In the season when a person has fewer clothes, which means fewer pockets. And if a bunch of keys is large, then under its weight it is able to wipe pockets to holes. To prevent pockets from being wiped, various key holders are used, but the key holders increase the dimensions of the keychain, which is not only inconvenient.
The bulging of pockets looks ugly. Women in this regard are more fortunate than men, because they have "dimensionless" handbags. What can't you find there? To unload their pockets, men use purses.
But the purse also presents some inconvenience - one hand is constantly busy carrying.
 But what if the number of people working in office space lot?
Go to the key keeper and do a large number of duplicates! There is another way: Install a combination lock on the front door.
A large number of mechanical combination locks are sold in stores, but they have drawbacks. Push-button locks have a weak degree of protection - the code is easily selected.
Locks with wheels are inconvenient to use - first you need to set all the wheels to the required numbers, open the lock, and then turn the wheels again to “knock down” the code combination.
The most convenient to use is an electronic combination lock.
 There are many different combination lock schemes on the Internet, but after digging into global network, I found that all combination lock schemes made on one or two microcircuits have poor burglary protection, which, provided that the keypad is easily opened, can be opened using an ordinary circuit, a multimeter, or a logic probe.
Of course you can collect the simplest circuit, but it must come with a "cast iron" keypad so that it is impossible to get to the wires. I offer you a scheme for an electronic combination lock, which does not need a keypad "hacked only by a grinder". If they break anything, it's only the panel. But a cast-iron panel can also be hit once with a heavy object, putting it out of action. During five years of operation, the proposed combination lock has shown high reliability - it has never broken and high security against hacking.
You can see the view of the code lock from the outside of the door in the photo - this is only a light keypad. The view of the code lock from the inside of the door is shown below.
The proposed electronic code lock is made on two CMOS chips 561LA7 and one 561LE5, has low power consumption from the network - about 2 milliamps on the secondary winding of the transformer in standby mode.
When powered by battery, current consumption is measured in units of microamperes. Thus, the combination lock is powered by industrial network, and when it disappears - from a 12 volt battery. In the presence of an industrial network of 220 volts, the battery is recharged, and in the absence of an industrial network, it is a power source for the lock.
A schematic diagram of an electronic combination lock is shown in the figure.

In the initial state, the entire circuit, except for the power sources, is de-energized. The node, assembled on transistors VT1-VT3, is designed to supply power to the electronic code dialing unit, for a limited time required for dialing the code (about 10 ... 15 seconds).
Power is supplied by pressing the "," button. This button is not a code button. The power supply time limit is designed to ensure that the lock electronics do not consume power when in standby mode. Therefore, if you keep this button pressed, then the power supply will be constantly present on the circuit, and will disappear 15 seconds after the “,” button is released.
The SA1 code dialer is a keypad that extends outside the lock and is connected to the lock circuit using twelve thin stranded conductors.
 The SR1 code setting panel is designed to set the lock code. As a panel, the panel for setting fixed frequencies of the R-140 radio station, or the R-155 radio receiver, where special plugs are used, is used. Perhaps, instead of a dial pad, use other switching methods.
After setting a certain code, the SR1 code setting panel is closed with a special cover and sealed with a mastic seal.
Thus, when leaving the premises, you can check that no one has spied on your code. Otherwise, by opening the lid, you can quickly change it and reseal the lid.
The circuit diagram shows the setting of the lock code "3052". In the photo of the panel - "5491".
As you understand, the dialing code is four-digit, (not counting the power button ","). The dialing of the code is carried out by successive pressing of the buttons. If the buttons are pressed in the wrong order, the lock will not open.
It is allowed to simultaneously press all four buttons of the code, but in any case, the actuator will operate for a time limited by the charge time of the capacitor C7, equal to 1 second. Capacitors C5-C6 limit the time required to dial the code.
If within 10 seconds the code is not dialed, then the actuator will not work and the code set must be repeated from the beginning.
The circuit assembled on the elements of the D3 chip is designed to prevent unauthorized selection of the lock code. When any of the six “wrong” buttons is pressed, the D3.2-D3.3 single vibrator blocks the code set and the actuator for 15 seconds. This time is determined by the values of the elements C9 and R17 and the time of power supply from the power supply unit.
After that, in order to open the lock, you must wait at least 15 seconds and enter the code correctly. If the “wrong” button is pressed again, the lock will lock again for 15 seconds. If, during blocking, without waiting 15 seconds, the attacker energizes the lock with the "," button, then the blocking will last for another 15 seconds. The self-locking node greatly complicates attempts to select a code.
In our case, on the typesetting field SR1 circuit diagram the “wrong” buttons are set - 1, 4, 6, 7, 8 and 9.
In the case of a self-locking lock, there are no audible or visible signs, so the attacker does not know about it, which does not allow him to determine the "wrong" buttons. It is also impossible to determine that the code lock has become self-locking by the presence or absence of voltage on the contacts of the opened dial-in panel by any electronic devices.
When the correct code is entered, the executive contact group of relay P1 supplies power to the lock actuator (electromagnet or motor).
The power supply time is determined by the capacitance of C7 and is approximately 1 second. To adjust the power supply time to the executive relay manually (by the duration of pressing the last button of the set code), but not more than 2 seconds, it is necessary to disconnect the resistor R12 from terminal 4 of element D2.4, and connect it to the common wire of the circuit.
Electromechanical lock for the gate: a guarantee of safety and comfort
Chips 561LA7 are interchangeable with 176LA7, or an imported analogue of CD4011. Chip 561LE5 is interchangeable with 176LE5, or an imported analogue of CD4001. Transistors VT1-VT3 - type KT361, or KT3107 with any letter. Transistor VT4 - type KT315, or KT3105 with any letter. Transistor VT5 - type KT815 with any letter.
The secondary winding of the transformer T1 is designed for 12 volts. Transformer T1 is selected with sufficient power to ensure actuation of the actuator, any rectifier diodes VD3-VD7 must also provide sufficient load current for the actuator.
Diodes VD8-VD20 - any low-power pulse. As a rechargeable battery, it is optimal to use a small-sized alkaline battery used in uninterruptible power supplies. The entire circuit, except for the dialer, actuator, battery and power transformer, is placed in a plastic case measuring 10x14 cm.
 The combination lock can also be used without a battery if it is used as part of a lock that can also be opened with a key. I did just that. The key to one of our workrooms is kept by the janitor in a tube. I have no key on the link and my colleagues.
We open this room with a code, but if the light disappears, then we take the key from the tube. In order not to run to the watchman in the absence of light after opening the premises, there is an additional backup key in the safe.
As an actuator, I used the drive for unlocking and locking car door locks, picking it up on a chain to the flag of an ordinary overhead lock, which “can” slam shut.
This lock, or one similar to it, is sold at any hardware store, and the drive can be bought at any automotive store. The housing of the electronic circuit of the lock is located on the inside of the door, directly next to the actuator.
The SA1 code dialer is made from the keys of an old domestic calculator, decoratively placed in a case made from a soap dish.
It is brought out of the lock on the outside of the door and connected to electronic circuit in a way that eliminates the possibility of code selection by "electronic scanning", or hacking using measuring equipment. This is due to the fact that no matter what state the lock is in, all its contacts have the same potential. No attempts to dial, or close contacts in search of a code also lead to nothing.
The scheme of the presented combination lock, like any other electronic locks, can be damaged by applying high voltage to the contacts of the opened keypad, but the lock will still not open.
Unfortunately, I cannot offer you a printed circuit board, because I made the lock ten years ago.
A rim lock, used in conjunction with an electronic combination lock, can be easily opened with a flat object inserted between the door and the jamb - a knife or a metal ruler.
Therefore, when installing such a lock, ensure the conditions under which this will not be possible - the door frame and the door itself must be strong, and the gap is closed with a recess that prevents access to the lock tongue.
Protection of a private house from unwanted penetration provides reliable fence and a good quality lock. This device comes in various designs and degrees of reliability.
Types of locks for gates
Locks are of the following types:
- hinged;
- invoices;
- internal (mortise);
- electromechanical;
- electromagnetic;
- radio wave.
The very first to come into use padlocks, today overhead and mortise devices are most in demand.
padlocks
 Models of locks are universal during installation, as they are suitable for gates of any design. Reliable in operation, have convenient prices and always in stock a wide range. To increase protection against burglary in modern modifications, the arms are made of high-strength cable.
Overhead
 The overhead lock on the gate made of corrugated board is convenient for installation, the locking structure has a sufficient level of reliability. The keyhole is on both sides of the gate or only on the outside, and inside there is a handle. From a practical point of view, the first option is more protective than the second.
By design, overhead locks are lever (with an internal secret) and cylinder (another name: English).
The lever lock on the gate has a sufficiently strong working mechanism in the form of plates with various cuts that reliably protects against burglary. The presence of a key on both sides can be considered more of an advantage than a disadvantage, as it increases the protection of the territory. Great for outdoor use.
Cylinder locks are neat in size and weight, rational in design: it is enough to change the core of the device (larva), leaving the lock the same. These locking devices do not tolerate the costs of the weather (frost, moisture, dust, litter), so they require separate care: a special niche from specks and regular treatment with a special lubricant during the cold period.
Overhead locks are in high demand. By affordable price you can purchase the necessary high-quality device.
Code
 The combination lock on the gate is very popular at the present time, which cannot be broken or opened with a master key. The device opens with the correct cipher set, which can be changed as many times as you like. There is no need for keys and duplicates.
Rack
 They consist of a bolt that moves along the hinges when opening and closing the lock. Strong and durable, but due to the simplicity of the design, the key can be easily faked. In addition, the keys to the rack lock are very bulky and inconvenient to carry around.
Mortise locks
 It is installed inside the end of the gate, has small dimensions, a huge selection of designs and models. The lock itself is convenient and reliable in operation, but it will not provide absolute protection against hacking.
Electromechanical
 There are overhead and mortise options. Powered by electricity or autonomous power supply. An excellent system both in operation and in terms of the level of protection against hacking. When closing, the electromechanical lock on the gate pushes out powerful rods that reliably block the entrance to the territory from uninvited penetration.
The remote control of this modification allows you to let visitors in with a button. You can open the lock with an electromagnetic key (such as an intercom), dialing a code or mechanically in the event of a prolonged power outage.
A solid price is not a disadvantage, as it fully corresponds functionality devices.
electromagnetic
 The working part of the electromagnetic street lock for the gate, unlike the previous type, are magnets. Operates with electricity or offline source nutrition.
To open the device, the attacker will need to overcome the force of gravity of more than half a ton. There are especially powerful designs in which the magnetic thrust is twice as much. The device is opened with a special contact key, which is triggered by the magnetic field of the working mechanism.
The set-kit of the electromagnetic lock on the gate contains:
- lock with fasteners and slats;
- power supply to ensure uninterrupted power supply;
- button for remote opening of the gate from the inside;
- keys (card, key rings);
- lock controller;
- invoice information reader (recognizes a key or a card from the kit).
So that the protective assembly does not wear out, and its parts do not move from sharp blows, during installation it is required to additionally install a closer.
radio wave
 They work with the help of radio waves by analogy with car alarms, they have a control panel at a distance of up to 100 meters. Design options are different: with and without a key (only with a remote control). The scheme of the device of the electronic lock on the gate has a high degree of reliability against hacking.
How to choose the right model
Regardless of the design, a successful locking device should have:
- tightness to maintain the working capacity of the mechanism (tightly closed case without wide slots and slots);
- resistance to subzero temperatures;
- a sufficient degree of protection;
- possibility to close the gate with a key on both sides.
If reliable and at the same time inexpensive locks are needed, then you can choose hinged and overhead options. Not everyone can afford electric locks of mechanical or magnetic design, but having spent money once, the owner of the house will not worry about protecting his home.
Lock installation
 It is easy to install the lock on the gate with your own hands. For example, to install a padlock, you will need:
- welding machine;
- Bulgarian ( universal tool for cutting and grinding metal in this case);
In addition to tools, you should have at hand: a metal crossbar (if it is not welded during the manufacture of the wicket frame), a 3 mm steel plate (for a striker), a triangle, a marker.
Installation of the locking device depends on the design and material of the gate. How to install a lock on a corrugated gate? For an overhead locking mechanism, you first need to weld the transverse bar (if it was not there initially) at a height of 1 m from the ground. It will serve as a place for fastening the castle.
One of the mounting holes must be marked at the level of the cross member. The device itself can be located under the bar or above it. Having attached the lock to the inside of the gate, mark the places for the remaining holes with a marker. Next drill required holes for lock, handle, locking rod (bolt).
For mounting the counterpart on the support, holes for the crossbar are marked. must be closed, and locking mechanism open. Then the bar is welded and the necessary grooves are drilled on it.
To install a mortise locking device, you must first make a box (niche) from metal profile or a corner that will protect the castle from rain, snow, dirt and dust. The prepared box is welded to the wicket frame.
The next step is to mark the future groove for inserting the lock and mounting holes. A groove cut by a grinder and drilled holes clean up.
Place the street lock for the gate in the finished niche, fasten it with self-tapping screws and check its operation in action. If the lock does not stick, then insert the handles with the connecting rod and tighten with bolts. For safety, the operation of the lock is again checked for the absence of skew. The final action is the treatment of the locking device with a special lubricant, closing the box.
The right choice of a lock for a gate made of corrugated board, its competent and accurate installation will reliably protect residents, providing them with peace of mind and moral comfort.
How to choose an electric lock for a gate - video